Sony Reader Touch Wi-Fi (PRS-T1) Handout with Hands-On Exercises
•
0 j'aime•1,040 vues

Sony Reader Touch Wi-Fi handout used in hands-on portion of Introduction to eBooks & eReaders workshop.This material was created as part of the 2010 Institute of Museum and Library Services 21st Century Librarian program grant to the Nebraska Library Commission.

Recommandé
Recommandé
Contenu connexe
Plus de Nebraska Library Commission
Plus de Nebraska Library Commission (20)
Dernier
Dernier (20)
Sony Reader Touch Wi-Fi (PRS-T1) Handout with Hands-On Exercises
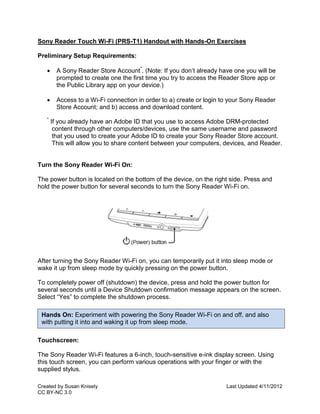
- 1. Sony Reader Touch Wi-Fi (PRS-T1) Handout with Hands-On Exercises Preliminary Setup Requirements: A Sony Reader Store Account*. (Note: If you don’t already have one you will be prompted to create one the first time you try to access the Reader Store app or the Public Library app on your device.) Access to a Wi-Fi connection in order to a) create or login to your Sony Reader Store Account; and b) access and download content. * If you already have an Adobe ID that you use to access Adobe DRM-protected content through other computers/devices, use the same username and password that you used to create your Adobe ID to create your Sony Reader Store account. This will allow you to share content between your computers, devices, and Reader. Turn the Sony Reader Wi-Fi On: The power button is located on the bottom of the device, on the right side. Press and hold the power button for several seconds to turn the Sony Reader Wi-Fi on. After turning the Sony Reader Wi-Fi on, you can temporarily put it into sleep mode or wake it up from sleep mode by quickly pressing on the power button. To completely power off (shutdown) the device, press and hold the power button for several seconds until a Device Shutdown confirmation message appears on the screen. Select “Yes” to complete the shutdown process. Hands On: Experiment with powering the Sony Reader Wi-Fi on and off, and also with putting it into and waking it up from sleep mode. Touchscreen: The Sony Reader Wi-Fi features a 6-inch, touch-sensitive e-ink display screen. Using this touch screen, you can perform various operations with your finger or with the supplied stylus. Created by Susan Knisely Last Updated 4/11/2012 CC BY-NC 3.0
- 2. Buttons: There are five silver buttons below the touch screen. From left to right you will find: < > Two Page Turn buttons – When reading a book or periodical press the < button once to turn back one page; press the > button once to turn forward one page. Press and hold either button to turn pages continuously. These buttons can also be used to scroll up and down through a list or, when using the Web browser, to scroll up or down a page. Home button – Press at any time to return to the first page of the Home screen. Back button – Press to return to the previous screen. Also closes the on- screen keyboard or a dialog box/navigation bar/tool bar. Menu button – Displays available menu options. Menu options vary from screen to screen. Home Screen: The Home screen is two pages long and provides access to the following features: 1. Status bar – Check this horizontal black bar at the very top of the screen for icons indicating Wi-Fi status, battery level, file download status, and more. Tapping on the status bar will display a notification window which contains related information and links. Created by Susan Knisely Last Updated 4/11/2012 CC BY-NC 3.0
- 3. 2. Continue Reading – The top section of the Home screen displays information about the most recently-opened book/periodical. Tap anywhere in this section to continue reading from where you left off. 3. Recently Added – The middle section of the Home screen lists the three most recent books that have been added to the Reader. Tap one to begin reading. 4. Applications – The remainder of the Home screen (i.e. the bottom section of page one and all of page two) is devoted to the various tools, services, and content available via the Reader. Collectively, these tools, services, and content are referred to as “Applications” 5. Page Navigation -- Touch the in the lower-right corner of the screen (or press the > button) to go to page two of the Home screen. Applications: Choose from the following Applications to access the various tools, services, and content available via the Reader: Books – Lists books that have been downloaded or transferred to the Reader, as well as books saved on an inserted microSD card. Reader Store – Takes you to the Reader Store where you can search/browse for titles to purchase. Periodicals – Lists periodicals that have been downloaded or transferred to the Reader, as well as periodicals saved on an inserted microSD card. Collections – Lists preset and user-created collections. Public Library – Helps you find public libraries from which you can borrow books for the Reader. Google Books – No longer supported. Currently takes you to the Reader Store where there is a free books option. Browser – Launches the Web browser. Purchased Content – Takes you to your account at the Reader Store for downloading your purchased books and periodicals. All Notes – Lists any bookmarks/annotations that you’ve added to your books and periodicals. Dictionary – Allows you to look up a word in the dictionary. Created by Susan Knisely Last Updated 4/11/2012 CC BY-NC 3.0
- 4. Handwriting – Allows you to use a drawing pad for drawing. Text Memo – Allows you to use a notepad for typing memos. Pictures – Shows pictures saved to the Reader and, if inserted, the microSD card. Audio – Lists and plays the albums and songs that you have saved to the Reader. Settings – Allows you to access and control a variety of settings associated with the Reader, including Wireless Network Settings, Date and Time Settings, and Browser Settings. View Books: To view a list of books that are currently saved on the Reader, select the Books application. Display options -- Books can be displayed in thumbnail or list mode. tap on the thumbnail and list icons in the upper-right corner of the screen to toggle between these display modes. Sort options -- Books can also be sorted in a variety of ways. To view and select a sort option tap on the sort icon in the upper-right corner of the screen. Search – Tap on the search icon to search for a book by title or author. Hands On: Open the Books application and experiment with available display and sort options. Turn on Wi-Fi and connect to a Wireless Network: While in the Books application, press the silver Menu button to see what menu options are available. (Be sure to note grayed-out menu options, as well as active menu options.) Experiment with available menu options to see how they work! Open a Book: To open a book from within the Books app, tap once on the book’s title or thumbnail. Alternatively, tap and hold your finger on a book title or thumbnail to open a pop-up menu which gives you the following options: Open, Delete, Protect, Info, and, in the case of a currently checked out library book, Return Book. Select Open. Created by Susan Knisely Last Updated 4/11/2012 CC BY-NC 3.0
- 5. Navigate within a Book: Once you’ve opened a book there are several ways to navigate within it: Use the < and > Page Turn buttons. Press once to move one page forward or backward. Press and hold to quickly flip forward or backward through multiple pages. Swipe your finger or the stylus horizontally from left-to-right or from right-to-left across the middle of the screen to turn forward or backward one page. Swipe and hold to quickly flip forward or backward through multiple pages. Tap once on the page number display at the bottom of the page to open the page navigation panel. From here you can navigate through the book by entering a page number, using a scroll bar, accessing a table of contents, or jumping to a previous view. Hands On: Open a book and practice paging through it using several of the available methods, including page turn buttons, finger swipes, and the page navigation panel. Tools to Enhance the Reading Experience: Tools to Enhance the Reading Experience: While reading an eBook on the Sony Reader Wi-Fi, the following bonus features are available to enhance your reading experience. A few of these features mimic functionality available when reading a print book, but others are unique to the eBook experience. Bookmark: Tap once in the upper-right corner of a page to add a bookmark. Tap again to remove it. Select a word: Tap and hold your finger on a word to select it. When a word is selected a pop-up menu appears giving you the option to highlight the word, add a note to it, search for other occurrences of it within the book, or look it up on Wikipedia or Google. A dictionary definition of the word also appears at the bottom of the screen. Select a passage: To select an entire passage, begin by selecting the first word in the passage. Next, use your finger or the stylus to drag the vertical bar that appears at the end of the selected word to the end of the passage. You may then Created by Susan Knisely Last Updated 4/11/2012 CC BY-NC 3.0
- 6. choose the “Highlight” or “Add Note” option. Zoom: The zoom function allows you to temporarily zoom in on part of a page. Using your thumb and index finger on the touchscreen, pinch out to zoom in and pinch in to zoom out. Adjust font: While viewing a book, press the silver Menu button. Select the Font menu option to adjust the font type and size. Orientation: While viewing a book, press the silver Menu button. Tap on More. Select the Orientation menu option to toggle between portrait and landscape orientation. Hands On: Experiment with the reading enhancement tools outlined above: Bookmark a page. Select a word to look it up in the dictionary. Highlight a passage and add a note to it. Zoom in and out. Change the font type/size. Change the screen orientation. Wi-Fi: In order to access the Sony Reader Store, your public library’s OverDrive service, Project Gutenberg, and other sites from which you can download eBooks, your Reader needs to be connected to a wireless network. To check on the Wi-Fi status of your Reader, go to page two of the Home screen. Select Settings. Select Wireless Network Settings. (Alternatively, tap on the status bar at the top of the screen to open the notification window.) Make sure there is a check in the box to the right of the Wi-Fi option. A check in the box means Wi-Fi is turned on. Created by Susan Knisely Last Updated 4/11/2012 CC BY-NC 3.0
- 7. Next, select Wi-Fi Settings. Tap Scan. The Reader will scan for and list detected networks. Select a network from the list to connect to. If the network is secured you will be prompted to enter a password. Once you get confirmation that your Reader is connected to a network, you are ready to go out in search of books! Getting free content from Project Gutenberg: Project Gutenberg is one of many sites online where you can download free eBooks in multiple formats. To access the Project Gutenberg Web site go to page two of the Reader Home screen, and select the Browser application. Tap in the URL box and type in the Project Gutenberg URL (http://www.gutenberg.org/) using the on-screen keyboard. Tap Go. Alternatively, tap the icon to the right of the URL box to access the Bookmarks screen. Tap the Project Gutenberg bookmark. Once you arrive at the Project Gutenberg Web site, you can search or browse for content. Navigating the screen may be easier if you pinch out to zoom in. If you find a book you’d like to download, be sure to select the EPUB format. As soon as you select the EPUB format it should start downloading. You should see a download status indicator in the status bar. Tap on the status bar to check on the download status. Getting books from OverDrive: One of the unique features of the Sony Reader Wi-Fi is its built-in access to OverDrive via the Public Library application! This eliminates the multi-step process of first downloading an OverDrive eBook to your computer, then connecting your eBook reader to your computer with its USB cable, and finally transferring the eBook from your computer to your reader using Adobe Digital Editions software. Hands On: For your final hand-on exercise you will download an eBook from the Nebraska OverDrive Libraries site directly to the Sony Reader Wi-Fi. Go to page two of the Home screen and select the Public Library application. This will open the Web browser and take you to http://sonysearch.overdrive.com. Search for a library by typing the library’s name, state, or zip code in the search box or, if you’d prefer, you can use the “Browse for Libraries” option. (For this exercise pretend you are a patron of Chadron Public Library, zip code 69337.) Created by Susan Knisely Last Updated 4/11/2012 CC BY-NC 3.0
- 8. Hands On: (cont.) Once you find your library, tap on its name. This will bring up a page that lists your library’s address, as well as a link to its OverDrive collection (Nebraska OverDrive Libraries, in the case of Chadron Public Library.) Click on the OverDrive link to go to the library’s OverDrive site. Search or Browse for an EPUB eBook to check out. (Don’t worry about finding a title you actually want to read.) Check out the book using your temporary patron information (library and library card number.) Tap on the Download button. Watch the status bar for confirmation that your download is complete. Press the silver Home button to return to Home screen. Find your book (under “Recently Added” on the Home screen or within the Books application.) Tap on it to open it. To Return a Book: From within the Books application find the book you want to return. Tap and hold your finger on the book’s title/thumbnail to open an Options menu. Tap the “Return Book” option. Tap “Yes” to confirm. Alternate Method: Press the silver Menu button while in the Books application. Tap the “Return Books” menu option. This will cause check boxes to appear next to currently checked out titles. Tap the check boxes next to titles you want to return. Tap “Done.” Tap “Yes” to confirm. The books will be returned and deleted from your Reader. This material was created as part of the 2010 Institute of Museum and Library Services 21 st Century Librarian program grant to the Nebraska Library Commission . Created by Susan Knisely Last Updated 4/11/2012 CC BY-NC 3.0