SlideShare une entreprise Scribd logo
1  sur  10
mStep 1: Step 1 of this method is entirely intuitive. I don't want to burden you with algorithms for this
step. All you want to do is go from an entirely scrambled cube to selecting a top face, and solving the 4
edges of the chosen top face (the edge pieces of a cube have two colors on them). Play around with the
cube until you can do this without any problems from any start point. Notice that each edge piece is
aligned such that the top face is of the chosen top face color, and the color on the side corresponds to
the color of the center tile on that face. This is called solving the top cross.


                                             Step 1 Before


                                              Step 1 After

Step 2: The second step is also intuitive, and just involves solving the 4 corners of the top face.
The corner pieces of a cube are the pieces with 3 colors on them. In this second step, you are
going to intuitively get the corner pieces involving blue into the correct corners (make sure the
colors on these pieces apart from blue line up with the center pieces of the same colors). This
solves the top face, and forms short T's down the four sides of the cube. I refer to the
combination of steps 1 and 2 as solving one face to a T. With practice, you should be able to do
this in about a minute or so starting from scratch (don't worry if it initially takes you several
minutes. The important thing is to get familiar with how different cubes move in relation to each
other).
Step 2 After

Step 3: At this point, turn the cube over, so that your solved side is on the bottom. Thus, blue
becomes the down side of the cube (D). Your aim in this step is to complete solving the second
layer of the cube by getting the edgepieces of the colors around blue in their right places and
orientations. Thus, after the end of step 3, you will have two layers of yellow, orange, white and
red (your colors may be different depending on how your cube is colored. I am referring to the
color scheme on my cube in which green is the color opposite the solved blue side).

Now, if any of the second layer edge pieces are already in the correct position and orientation,
you don't have to worry about them. But many times, you will find edge pieces that are supposed
to go into the second layer in the third layer.

In one configuration (option 1), you will find second layer edge pieces that need to be rotated
from the right face to the corner of the front and right faces. That is, the piece needs to be rotated
into place anticlockwise.


                                      Step 3 Before, Option 1

Notice how, in the picture above, the white and red piece in the middle top of the right face
needs to be moved anticlockwise to the middle of the edge between the front and right faces. In
this case, the following sequence of steps will accomplish this: U' F' U F U R U' R'.
Step 3 After, Option 1

Notice how the white and red face has been moved anticlockwise to its correct location and
orientation.

In the other configuration (option 2), the edge piece needs to be moved from the top of the front
face to the corner of the front and right faces (so, it requires a clockwise rotation). Notice the red
and yellow corner piece in the picture below.


                                       Step 3 Before, Option 2

Notice how, in the picture above, the yellow and red piece in the middle top of the front face
needs to be moved clockwise to the middle of the edge between the front and right faces. In this
case, the following sequence of steps will accomplish this: U R U' R' U' F' U F. If you are
astute, you will realize that this is essentially the same set of moves as in option 1, just that you
start from move 5 of option 1, and cycle around to move 4 after the end. So, you only have to
actually memorize one algorithm for step 3.
Step 3 After, Option 2

Notice how the yellow and red face has been moved clockwise to its correct location and
orientation.

Now, one complication that you might encounter when you are solving this second layer is that
the edge piece you want in a particular position may be in that position, but may be in the wrong
orientation. In other words, for example, the yellow and red edge piece may be at the corner of
the yellow and red faces, but may be placed such that the yellow side of that edge piece is on the
red face and the red side of it is on the yellow face. In that case, there is no simple algorithm to
reorient the piece in place. You have to push some other edge piece into its position using one of
the algorithms above, and this will pop that edge piece to the upper layer, from where it can be
moved down to its correct position and orientation using one of the algorithms above.

At the end of step 3, you will have a cube that has one side fully solved (blue in my case), and 4
sides solved two-thirds of the way (two layers each of red, yellow, orange and white in my case).
Your cube will look like the picture below, assuming you have the same color scheme as me.
You don't see the orange and yellow sides, but they are also solved two-thirds of the way just
like the white and red sides in the picture below. The green side is still a mess while the blue side
(which is at the bottom) is fully solved (make sure you have not made any mistakes in applying
the step 3 algorithms by turning the cube over and making sure that the blue side is indeed
solved. If it is not, re-solve it, and then apply the step 3 algorithms more carefully).


                                             Step 3 After
Step 4: In this step, your aim is to solve the upper face (the green face in my case) to a cross.
That is, I want to align the edges that involve green such that the green side is on the upper face
of the cube. At the end of this step, you may not have those edge pieces placed correctly, but at
least all their green faces will be on the green side of the cube. If you already have the 4 edge
pieces involving green placed in such a way that their green sides are on the upper face, skip step
4 and proceed directly to step 5.

At the end of step 3, you may find yourself in one of three situations as far as the upper face is
concerned.


                                      Step 4 Before, Option 1


                                      Step 4 Before Option 2


                                      Step 4 Before Option 3

Ignore the corner pieces and concentrate only on the edge pieces involving green. You might
find that none of the green sides are on the top face (option 1), or you might find two of them on
the top face on adjacent sides of the cube (option 2), or you might find two of them on the top on
opposite sides of the cube (option 3).

If you find yourself facing option 1, it does not matter how you hold the cube. If you face option
2, make sure that the two adjacent sides on which the green edges are on the top face are on the
back and left. If you face option 3, make sure the green pieces form a bar parallel to the front
face of the cube.

From all three options, you can execute the following algorithm to get to the point where all the
edge pieces are placed such that their green sides are on the upper face: F R U R' U' F'. When
you do this, you will notice that if you start from option 1, you will end up in either option 2 or
option 3 when you execute this algorithm once. If you start from option 2, you will end up in
option 3 after one execution of this algorithm. If you start from option 3, after one execution, you
will be ready to move to step 5. If you want to cut down on one application of the algorithm, you
can apply a modified algorithm from option 2 to skip option 3 and end up with a green cross on
top. That modified algorithm is F U R U' R' F'.

Either way, you should now have the following configuration in front of you at the end of step 4
(ignore the green corners. You may or may not have them as shown below. All you need is a
green cross on the upper face).


                                            Step 4 After

The edge pieces involving green may or may not be in the correct positions. We will deal with
that in step 5. If you have blue solved fully, four sides solved two-thirds of the way, and the
edges involving green positioned with the green sides on the green face, you are done with step
4.

Step 5: In step 5, we are going to align the edges of the green face so that they line up with the
colors on the sides of the faces. You may have 1, 2 or 4 of the top edges aligned correctly with
colors on the sides (if you look at the picture above, you can rotate the upper face clockwise by
90 degrees to align the green and yellow face). If all 4 edge pieces are aligned correctly, skip step
5 and go directly to step 6.

If you find only one top edge aligned correctly, make that part of the front face, as shown in the
picture below. You are now going to apply the algorithm below that will move the edge piece
from the left face to the right face, the one on the right face to the back face, and the one on the
back face to the left face. The piece on the front face does not move. So, it is an anticlockwise
rotation ofthe edge pieces skipping the edge on the front face.


                                            Step 5 Before

The algorithm is: R U R' U R U U R'.


                                            Step 5 After

Since three of the edge pieces move when this algorithm is applied, if your cube already has two
top edges aligned correctly, you may have to apply the algorithm multiple times to get all the
edges aligned correctly. In the first application, you will end up destroying one or both of the
original alignments, and then you can rebuild all of them by applying the algorithms a couple
more times. Make sure you understand what changes the algorithm makes (anticlockwise
rotation of the edges, skipping the front face), and you will have no trouble figuring out how best
to use it.

Step 6: Step 6 is used to position the top corner pieces correctly. At this point, you only have 4
unsolved pieces in the cube (at most). These 4 pieces could be at the correct places, but wrongly
oriented (in which case, skip to step 7). None of them may be in the right place (note that at this
stage, you can not rotate the upper face because that will causethe edge pieces to get out of
position), or 1 of them could be in the right place, but the other three are in the wrong corners.

If none of them are in their correct corners, you can apply the algorithm holding the cube with
any of the sides (that is the faces other than blue and green in my case) as the front face. If one of
the corner pieces is in the correct corner (don't worry about its orientation), make sure you hold
the cube such that you place that piece in the front upper right corner of the cube (this is the only
corner that is not going to move when youapply this algorithm).

The algorithm below causes the front upper left corner piece to move to the back upper right
corner, the back upper right corner piece to move to the back upper left corner and the back
upper left corner piece to move to the front upper left corner. It is an anticlockwise rotation of
the corner pieces skipping the front upper right corner. You might haveto apply it more than
once to position all the corners correctly. Once again, understand what the algorithm does, and
you will have no problem figuring out how to use it.

The algorithm is: U R U' L' U R' U' L.

Step 7: Now you have a cube in which all the top corners are positioned correctly, but one or
more of them may be oriented wrongly. If you find that the cube is fully solved at the end of step
6 (that is, all the corners oriented themselves correctly while being placed in their correct spots),
you are done. Congratulations! Otherwise, you will have to orient the corner pieces.

Now, step 7 is a little confusing. Not because the algorithm for it is complicated. Quite on the
contrary: it is a very short algorithm. But throughout step 7, your front face is never changed. So,
pick a front face right now. I have picked red in the pictures below. You can pick any, but it is
not going to change as you progress through step 7.

Once you have picked a front face, bring a mis-oriented corner piece to the upper front right
position by rotating the upper face of the cube. The mis-orientation may look like the picture
below, in which the top color (green) is on the right face.


                                      Step 7 Before, Option 1

In this case, apply the algorithm below twice to get the green side on the upper face: R' D' R D.
After you do this, you may notice that your cube may look very scrambled. You may find blue
pieces floating around, away from the bottom face where they belong. DO NOT PANIC.
Between when you begin step 7 and when you complete step 7, you will find all kinds of weird
changes in the cube that you just have to ignore.

Just make sure you get the green side of the corner cube to the upper face, and then rotate the
upper face (only the upper face) of the cube to get the next mis-oriented corner piece in the front
upper right corner of the cube. Make sure you continue to keep red (or whatever face you chose
at the beginning of step 7) as the front face. You may then be faced with the following situation
pictured below where the green is on the front face.


                                        Step 7 Before, Option 2

Notice how the cube looks very scrambled. That is because we are in the middle of step 7. Don't worry.
Just apply the same algorithm as before (R' D' R D), but 4 times to get the green side on the upper face.
Continue turning the upper face and orienting each top corner piece so that the green is on the upper
face. Do not worry about how bad the cube looks in the interim.

Once you are done with all four corners, and all of them are oriented properly, you may find that your
cube looks as below:


                                             Almost done!

Now, all you have to do is rotate the upper and down faces of the cube a couple of times to line
up all the colors, and you will have yourself a fully solved cube, as shown below:
Fully done!

That is all there is to it! Two algorithms in step 3 (one of which is actually a variation of the
other), and one algorithm each in steps 4 (two if you want to use a shortcut), 5, 6 and 7. A total
of 6 or 7 algorithms, none of which are longer than 8 steps. That is all it takes to solve the cube! I
told you it was easy. Try it and let me know how it works out. Good luck!

Contenu connexe

Tendances

Constructing triangles
Constructing trianglesConstructing triangles
Constructing trianglesCnavarrovargas
 
Slopes in real life
Slopes  in  real  lifeSlopes  in  real  life
Slopes in real lifecmorales96
 
Clase v capeco
Clase v capecoClase v capeco
Clase v capecoivan232011
 
triangles-geometry
triangles-geometrytriangles-geometry
triangles-geometryelizer14
 
Plain scale Engineering Graphics
Plain scale Engineering GraphicsPlain scale Engineering Graphics
Plain scale Engineering GraphicsR A Shah
 
3D Figures- volume and surface area
3D Figures- volume and surface area3D Figures- volume and surface area
3D Figures- volume and surface areaRenegarmath
 
Geometrical Transformations
Geometrical TransformationsGeometrical Transformations
Geometrical TransformationsAndrea Leone
 
Intersection
IntersectionIntersection
Intersectionankit2313
 
REDES DE NIVELACIÓN(CLASE 01).pdf
REDES DE NIVELACIÓN(CLASE 01).pdfREDES DE NIVELACIÓN(CLASE 01).pdf
REDES DE NIVELACIÓN(CLASE 01).pdfHakunaMatata215995
 
Math unit12 solids
Math unit12 solidsMath unit12 solids
Math unit12 solidseLearningJa
 
Y10 m27012015numbarith1
Y10 m27012015numbarith1Y10 m27012015numbarith1
Y10 m27012015numbarith13SNEducation
 
Manual de topografia
Manual de topografiaManual de topografia
Manual de topografiacrismaker
 
Y9 algebra 1 Change of Subject
Y9 algebra 1 Change of SubjectY9 algebra 1 Change of Subject
Y9 algebra 1 Change of Subjectestelav
 

Tendances (16)

Rubik’s cube
Rubik’s cubeRubik’s cube
Rubik’s cube
 
Constructing triangles
Constructing trianglesConstructing triangles
Constructing triangles
 
Slopes in real life
Slopes  in  real  lifeSlopes  in  real  life
Slopes in real life
 
Clase v capeco
Clase v capecoClase v capeco
Clase v capeco
 
triangles-geometry
triangles-geometrytriangles-geometry
triangles-geometry
 
Quadrilaterals
QuadrilateralsQuadrilaterals
Quadrilaterals
 
Plain scale Engineering Graphics
Plain scale Engineering GraphicsPlain scale Engineering Graphics
Plain scale Engineering Graphics
 
3D Figures- volume and surface area
3D Figures- volume and surface area3D Figures- volume and surface area
3D Figures- volume and surface area
 
Geometrical Transformations
Geometrical TransformationsGeometrical Transformations
Geometrical Transformations
 
Intersection
IntersectionIntersection
Intersection
 
REDES DE NIVELACIÓN(CLASE 01).pdf
REDES DE NIVELACIÓN(CLASE 01).pdfREDES DE NIVELACIÓN(CLASE 01).pdf
REDES DE NIVELACIÓN(CLASE 01).pdf
 
Math unit12 solids
Math unit12 solidsMath unit12 solids
Math unit12 solids
 
Y10 m27012015numbarith1
Y10 m27012015numbarith1Y10 m27012015numbarith1
Y10 m27012015numbarith1
 
8datasufficiency
8datasufficiency8datasufficiency
8datasufficiency
 
Manual de topografia
Manual de topografiaManual de topografia
Manual de topografia
 
Y9 algebra 1 Change of Subject
Y9 algebra 1 Change of SubjectY9 algebra 1 Change of Subject
Y9 algebra 1 Change of Subject
 

En vedette

Rubiks cubes powerpoint presentation slides ppt templates
Rubiks cubes powerpoint presentation slides ppt templatesRubiks cubes powerpoint presentation slides ppt templates
Rubiks cubes powerpoint presentation slides ppt templatesSlideTeam.net
 
Basic concepts of scale of measurement
Basic concepts of scale of measurementBasic concepts of scale of measurement
Basic concepts of scale of measurementShreyas Patel
 
Probability distribution 2
Probability distribution 2Probability distribution 2
Probability distribution 2Nilanjan Bhaumik
 
10 lessons to become a successful entrepreneur
10 lessons to become a successful entrepreneur10 lessons to become a successful entrepreneur
10 lessons to become a successful entrepreneurCoolirisSlides
 
Respect powerpoint 26 slides
Respect powerpoint  26 slidesRespect powerpoint  26 slides
Respect powerpoint 26 slidesdustinbustin
 

En vedette (8)

Rubiks cubes powerpoint presentation slides ppt templates
Rubiks cubes powerpoint presentation slides ppt templatesRubiks cubes powerpoint presentation slides ppt templates
Rubiks cubes powerpoint presentation slides ppt templates
 
The Rubiks Cube And Your Money
The Rubiks Cube And Your MoneyThe Rubiks Cube And Your Money
The Rubiks Cube And Your Money
 
Rubik's Cube
Rubik's CubeRubik's Cube
Rubik's Cube
 
Basic concepts of scale of measurement
Basic concepts of scale of measurementBasic concepts of scale of measurement
Basic concepts of scale of measurement
 
Probability distribution 2
Probability distribution 2Probability distribution 2
Probability distribution 2
 
10 lessons to become a successful entrepreneur
10 lessons to become a successful entrepreneur10 lessons to become a successful entrepreneur
10 lessons to become a successful entrepreneur
 
Hair loss
Hair lossHair loss
Hair loss
 
Respect powerpoint 26 slides
Respect powerpoint  26 slidesRespect powerpoint  26 slides
Respect powerpoint 26 slides
 

Similaire à Rubik cube solution guide

Abstract-Reasoning-20QnA-with-explanation.docx
Abstract-Reasoning-20QnA-with-explanation.docxAbstract-Reasoning-20QnA-with-explanation.docx
Abstract-Reasoning-20QnA-with-explanation.docxNoraima2
 
Solving It - Part 2 of The Mathematics of Professor Alan's Puzzle Square
Solving It - Part 2 of The Mathematics of Professor Alan's Puzzle SquareSolving It - Part 2 of The Mathematics of Professor Alan's Puzzle Square
Solving It - Part 2 of The Mathematics of Professor Alan's Puzzle SquareAlan Dix
 
Tetrahedron compound angles example
Tetrahedron compound angles exampleTetrahedron compound angles example
Tetrahedron compound angles exampleQuinnMorley
 
maths-7-rubiks-cube-200518201412.pdf
maths-7-rubiks-cube-200518201412.pdfmaths-7-rubiks-cube-200518201412.pdf
maths-7-rubiks-cube-200518201412.pdfSuhasMagar1
 
Rubiks Cube - Part 7 of The Mathematics of Professor Alan's Puzzle Square
Rubiks Cube - Part 7 of The Mathematics of Professor Alan's Puzzle SquareRubiks Cube - Part 7 of The Mathematics of Professor Alan's Puzzle Square
Rubiks Cube - Part 7 of The Mathematics of Professor Alan's Puzzle SquareAlan Dix
 
Learn How To Do The Rubik's Cube In 3 Mins Or Less Using 7 Easy Steps With Sh...
Learn How To Do The Rubik's Cube In 3 Mins Or Less Using 7 Easy Steps With Sh...Learn How To Do The Rubik's Cube In 3 Mins Or Less Using 7 Easy Steps With Sh...
Learn How To Do The Rubik's Cube In 3 Mins Or Less Using 7 Easy Steps With Sh...J. Skyler Fernandes
 
Math 7 lesson 5 subtraction of integers
Math 7 lesson 5 subtraction of integersMath 7 lesson 5 subtraction of integers
Math 7 lesson 5 subtraction of integersAriel Gilbuena
 
DAT Ready Canadian DAT PAT Questions
DAT Ready Canadian DAT PAT QuestionsDAT Ready Canadian DAT PAT Questions
DAT Ready Canadian DAT PAT Questionsdatready
 
Gauss jordan elimination through pivoting
Gauss jordan elimination through pivotingGauss jordan elimination through pivoting
Gauss jordan elimination through pivotinguis
 
Summerlin Map Reading
Summerlin Map ReadingSummerlin Map Reading
Summerlin Map Readingsbeck46
 
How to do the six colored cube
How to do the six colored cubeHow to do the six colored cube
How to do the six colored cubeWolverine41
 
How to do the six colored cube
How to do the six colored cubeHow to do the six colored cube
How to do the six colored cubeWolverine41
 
Plane table surveying
Plane table surveyingPlane table surveying
Plane table surveyingNikMankar26
 

Similaire à Rubik cube solution guide (20)

Blindfold
BlindfoldBlindfold
Blindfold
 
Abstract-Reasoning-20QnA-with-explanation.docx
Abstract-Reasoning-20QnA-with-explanation.docxAbstract-Reasoning-20QnA-with-explanation.docx
Abstract-Reasoning-20QnA-with-explanation.docx
 
Solving It - Part 2 of The Mathematics of Professor Alan's Puzzle Square
Solving It - Part 2 of The Mathematics of Professor Alan's Puzzle SquareSolving It - Part 2 of The Mathematics of Professor Alan's Puzzle Square
Solving It - Part 2 of The Mathematics of Professor Alan's Puzzle Square
 
Isometric projection 3 eso
Isometric projection 3 esoIsometric projection 3 eso
Isometric projection 3 eso
 
Tetrahedron compound angles example
Tetrahedron compound angles exampleTetrahedron compound angles example
Tetrahedron compound angles example
 
maths-7-rubiks-cube-200518201412.pdf
maths-7-rubiks-cube-200518201412.pdfmaths-7-rubiks-cube-200518201412.pdf
maths-7-rubiks-cube-200518201412.pdf
 
Rubiks Cube - Part 7 of The Mathematics of Professor Alan's Puzzle Square
Rubiks Cube - Part 7 of The Mathematics of Professor Alan's Puzzle SquareRubiks Cube - Part 7 of The Mathematics of Professor Alan's Puzzle Square
Rubiks Cube - Part 7 of The Mathematics of Professor Alan's Puzzle Square
 
Learn How To Do The Rubik's Cube In 3 Mins Or Less Using 7 Easy Steps With Sh...
Learn How To Do The Rubik's Cube In 3 Mins Or Less Using 7 Easy Steps With Sh...Learn How To Do The Rubik's Cube In 3 Mins Or Less Using 7 Easy Steps With Sh...
Learn How To Do The Rubik's Cube In 3 Mins Or Less Using 7 Easy Steps With Sh...
 
Math 7 lesson 5 subtraction of integers
Math 7 lesson 5 subtraction of integersMath 7 lesson 5 subtraction of integers
Math 7 lesson 5 subtraction of integers
 
DAT Ready Canadian DAT PAT Questions
DAT Ready Canadian DAT PAT QuestionsDAT Ready Canadian DAT PAT Questions
DAT Ready Canadian DAT PAT Questions
 
Gauss jordan elimination through pivoting
Gauss jordan elimination through pivotingGauss jordan elimination through pivoting
Gauss jordan elimination through pivoting
 
.
..
.
 
Actividad1
Actividad1Actividad1
Actividad1
 
Summerlin Map Reading
Summerlin Map ReadingSummerlin Map Reading
Summerlin Map Reading
 
Logo paper
Logo paperLogo paper
Logo paper
 
How to do the six colored cube
How to do the six colored cubeHow to do the six colored cube
How to do the six colored cube
 
Solving the rubicks cube
Solving the rubicks cubeSolving the rubicks cube
Solving the rubicks cube
 
How to do the six colored cube
How to do the six colored cubeHow to do the six colored cube
How to do the six colored cube
 
Look up! v3.1
Look up! v3.1Look up! v3.1
Look up! v3.1
 
Plane table surveying
Plane table surveyingPlane table surveying
Plane table surveying
 

Dernier

Amil Baba In Rawalpindi Kala Jadu Expert Rawalpindi amil baba in rawalpindi j...
Amil Baba In Rawalpindi Kala Jadu Expert Rawalpindi amil baba in rawalpindi j...Amil Baba In Rawalpindi Kala Jadu Expert Rawalpindi amil baba in rawalpindi j...
Amil Baba In Rawalpindi Kala Jadu Expert Rawalpindi amil baba in rawalpindi j...Amil Baba Company
 
Call Girls In Moti Bagh (8377877756 )-Genuine Rate Girls Service
Call Girls In Moti Bagh (8377877756 )-Genuine Rate Girls ServiceCall Girls In Moti Bagh (8377877756 )-Genuine Rate Girls Service
Call Girls In Moti Bagh (8377877756 )-Genuine Rate Girls Servicedollysharma2066
 
NO1 Certified Black magic specialist,Expert in Pakistan Amil Baba kala ilam E...
NO1 Certified Black magic specialist,Expert in Pakistan Amil Baba kala ilam E...NO1 Certified Black magic specialist,Expert in Pakistan Amil Baba kala ilam E...
NO1 Certified Black magic specialist,Expert in Pakistan Amil Baba kala ilam E...Amil Baba Dawood bangali
 
Call Girls Near Taurus Sarovar Portico Hotel New Delhi 9873777170
Call Girls Near Taurus Sarovar Portico Hotel New Delhi 9873777170Call Girls Near Taurus Sarovar Portico Hotel New Delhi 9873777170
Call Girls Near Taurus Sarovar Portico Hotel New Delhi 9873777170Sonam Pathan
 
Call Girl Price Andheri WhatsApp:+91-9833363713
Call Girl Price Andheri WhatsApp:+91-9833363713Call Girl Price Andheri WhatsApp:+91-9833363713
Call Girl Price Andheri WhatsApp:+91-9833363713Sonam Pathan
 
Real NO1 Amil baba in Faisalabad Kala jadu in faisalabad Aamil baba Faisalaba...
Real NO1 Amil baba in Faisalabad Kala jadu in faisalabad Aamil baba Faisalaba...Real NO1 Amil baba in Faisalabad Kala jadu in faisalabad Aamil baba Faisalaba...
Real NO1 Amil baba in Faisalabad Kala jadu in faisalabad Aamil baba Faisalaba...Amil Baba Company
 
Zoom In Game for ice breaking in a training
Zoom In Game for ice breaking in a trainingZoom In Game for ice breaking in a training
Zoom In Game for ice breaking in a trainingRafik ABDI
 
Authentic No 1 Amil Baba In Pakistan Authentic No 1 Amil Baba In Karachi No 1...
Authentic No 1 Amil Baba In Pakistan Authentic No 1 Amil Baba In Karachi No 1...Authentic No 1 Amil Baba In Pakistan Authentic No 1 Amil Baba In Karachi No 1...
Authentic No 1 Amil Baba In Pakistan Authentic No 1 Amil Baba In Karachi No 1...First NO1 World Amil baba in Faisalabad
 
(伦敦大学毕业证学位证成绩单-PDF版)
(伦敦大学毕业证学位证成绩单-PDF版)(伦敦大学毕业证学位证成绩单-PDF版)
(伦敦大学毕业证学位证成绩单-PDF版)twfkn8xj
 
在线办理曼大毕业证曼尼托巴大学毕业证成绩单留信学历认证
在线办理曼大毕业证曼尼托巴大学毕业证成绩单留信学历认证在线办理曼大毕业证曼尼托巴大学毕业证成绩单留信学历认证
在线办理曼大毕业证曼尼托巴大学毕业证成绩单留信学历认证nhjeo1gg
 
办理滑铁卢大学毕业证成绩单|购买加拿大文凭证书
办理滑铁卢大学毕业证成绩单|购买加拿大文凭证书办理滑铁卢大学毕业证成绩单|购买加拿大文凭证书
办理滑铁卢大学毕业证成绩单|购买加拿大文凭证书zdzoqco
 
North Avenue Call Girls Services, Hire Now for Full Fun
North Avenue Call Girls Services, Hire Now for Full FunNorth Avenue Call Girls Services, Hire Now for Full Fun
North Avenue Call Girls Services, Hire Now for Full FunKomal Khan
 
Call Girls Ellis Bridge 7397865700 Independent Call Girls
Call Girls Ellis Bridge 7397865700 Independent Call GirlsCall Girls Ellis Bridge 7397865700 Independent Call Girls
Call Girls Ellis Bridge 7397865700 Independent Call Girlsssuser7cb4ff
 
The Fine Line Between Honest and Evil Comics by Salty Vixen
The Fine Line Between Honest and Evil Comics by Salty VixenThe Fine Line Between Honest and Evil Comics by Salty Vixen
The Fine Line Between Honest and Evil Comics by Salty VixenSalty Vixen Stories & More
 
Gripping Adult Web Series You Can't Afford to Miss
Gripping Adult Web Series You Can't Afford to MissGripping Adult Web Series You Can't Afford to Miss
Gripping Adult Web Series You Can't Afford to Missget joys
 
No,1 Amil baba Islamabad Astrologer in Karachi amil baba in pakistan amil bab...
No,1 Amil baba Islamabad Astrologer in Karachi amil baba in pakistan amil bab...No,1 Amil baba Islamabad Astrologer in Karachi amil baba in pakistan amil bab...
No,1 Amil baba Islamabad Astrologer in Karachi amil baba in pakistan amil bab...Amil Baba Company
 
Vip Delhi Ncr Call Girls Best Services Available
Vip Delhi Ncr Call Girls Best Services AvailableVip Delhi Ncr Call Girls Best Services Available
Vip Delhi Ncr Call Girls Best Services AvailableKomal Khan
 
Deconstruction theory ppt easy ppt for ms
Deconstruction theory ppt easy ppt for msDeconstruction theory ppt easy ppt for ms
Deconstruction theory ppt easy ppt for mshudamushtaq259
 
NO1 Certified kala ilam Expert In Peshwar Kala Jadu Specialist In Peshwar Kal...
NO1 Certified kala ilam Expert In Peshwar Kala Jadu Specialist In Peshwar Kal...NO1 Certified kala ilam Expert In Peshwar Kala Jadu Specialist In Peshwar Kal...
NO1 Certified kala ilam Expert In Peshwar Kala Jadu Specialist In Peshwar Kal...Amil Baba Dawood bangali
 

Dernier (20)

Amil Baba In Rawalpindi Kala Jadu Expert Rawalpindi amil baba in rawalpindi j...
Amil Baba In Rawalpindi Kala Jadu Expert Rawalpindi amil baba in rawalpindi j...Amil Baba In Rawalpindi Kala Jadu Expert Rawalpindi amil baba in rawalpindi j...
Amil Baba In Rawalpindi Kala Jadu Expert Rawalpindi amil baba in rawalpindi j...
 
Call Girls In Moti Bagh (8377877756 )-Genuine Rate Girls Service
Call Girls In Moti Bagh (8377877756 )-Genuine Rate Girls ServiceCall Girls In Moti Bagh (8377877756 )-Genuine Rate Girls Service
Call Girls In Moti Bagh (8377877756 )-Genuine Rate Girls Service
 
NO1 Certified Black magic specialist,Expert in Pakistan Amil Baba kala ilam E...
NO1 Certified Black magic specialist,Expert in Pakistan Amil Baba kala ilam E...NO1 Certified Black magic specialist,Expert in Pakistan Amil Baba kala ilam E...
NO1 Certified Black magic specialist,Expert in Pakistan Amil Baba kala ilam E...
 
Call Girls Near Taurus Sarovar Portico Hotel New Delhi 9873777170
Call Girls Near Taurus Sarovar Portico Hotel New Delhi 9873777170Call Girls Near Taurus Sarovar Portico Hotel New Delhi 9873777170
Call Girls Near Taurus Sarovar Portico Hotel New Delhi 9873777170
 
Call Girl Price Andheri WhatsApp:+91-9833363713
Call Girl Price Andheri WhatsApp:+91-9833363713Call Girl Price Andheri WhatsApp:+91-9833363713
Call Girl Price Andheri WhatsApp:+91-9833363713
 
Real NO1 Amil baba in Faisalabad Kala jadu in faisalabad Aamil baba Faisalaba...
Real NO1 Amil baba in Faisalabad Kala jadu in faisalabad Aamil baba Faisalaba...Real NO1 Amil baba in Faisalabad Kala jadu in faisalabad Aamil baba Faisalaba...
Real NO1 Amil baba in Faisalabad Kala jadu in faisalabad Aamil baba Faisalaba...
 
Environment Handling Presentation by Likhon Ahmed.pptx
Environment Handling Presentation by Likhon Ahmed.pptxEnvironment Handling Presentation by Likhon Ahmed.pptx
Environment Handling Presentation by Likhon Ahmed.pptx
 
Zoom In Game for ice breaking in a training
Zoom In Game for ice breaking in a trainingZoom In Game for ice breaking in a training
Zoom In Game for ice breaking in a training
 
Authentic No 1 Amil Baba In Pakistan Authentic No 1 Amil Baba In Karachi No 1...
Authentic No 1 Amil Baba In Pakistan Authentic No 1 Amil Baba In Karachi No 1...Authentic No 1 Amil Baba In Pakistan Authentic No 1 Amil Baba In Karachi No 1...
Authentic No 1 Amil Baba In Pakistan Authentic No 1 Amil Baba In Karachi No 1...
 
(伦敦大学毕业证学位证成绩单-PDF版)
(伦敦大学毕业证学位证成绩单-PDF版)(伦敦大学毕业证学位证成绩单-PDF版)
(伦敦大学毕业证学位证成绩单-PDF版)
 
在线办理曼大毕业证曼尼托巴大学毕业证成绩单留信学历认证
在线办理曼大毕业证曼尼托巴大学毕业证成绩单留信学历认证在线办理曼大毕业证曼尼托巴大学毕业证成绩单留信学历认证
在线办理曼大毕业证曼尼托巴大学毕业证成绩单留信学历认证
 
办理滑铁卢大学毕业证成绩单|购买加拿大文凭证书
办理滑铁卢大学毕业证成绩单|购买加拿大文凭证书办理滑铁卢大学毕业证成绩单|购买加拿大文凭证书
办理滑铁卢大学毕业证成绩单|购买加拿大文凭证书
 
North Avenue Call Girls Services, Hire Now for Full Fun
North Avenue Call Girls Services, Hire Now for Full FunNorth Avenue Call Girls Services, Hire Now for Full Fun
North Avenue Call Girls Services, Hire Now for Full Fun
 
Call Girls Ellis Bridge 7397865700 Independent Call Girls
Call Girls Ellis Bridge 7397865700 Independent Call GirlsCall Girls Ellis Bridge 7397865700 Independent Call Girls
Call Girls Ellis Bridge 7397865700 Independent Call Girls
 
The Fine Line Between Honest and Evil Comics by Salty Vixen
The Fine Line Between Honest and Evil Comics by Salty VixenThe Fine Line Between Honest and Evil Comics by Salty Vixen
The Fine Line Between Honest and Evil Comics by Salty Vixen
 
Gripping Adult Web Series You Can't Afford to Miss
Gripping Adult Web Series You Can't Afford to MissGripping Adult Web Series You Can't Afford to Miss
Gripping Adult Web Series You Can't Afford to Miss
 
No,1 Amil baba Islamabad Astrologer in Karachi amil baba in pakistan amil bab...
No,1 Amil baba Islamabad Astrologer in Karachi amil baba in pakistan amil bab...No,1 Amil baba Islamabad Astrologer in Karachi amil baba in pakistan amil bab...
No,1 Amil baba Islamabad Astrologer in Karachi amil baba in pakistan amil bab...
 
Vip Delhi Ncr Call Girls Best Services Available
Vip Delhi Ncr Call Girls Best Services AvailableVip Delhi Ncr Call Girls Best Services Available
Vip Delhi Ncr Call Girls Best Services Available
 
Deconstruction theory ppt easy ppt for ms
Deconstruction theory ppt easy ppt for msDeconstruction theory ppt easy ppt for ms
Deconstruction theory ppt easy ppt for ms
 
NO1 Certified kala ilam Expert In Peshwar Kala Jadu Specialist In Peshwar Kal...
NO1 Certified kala ilam Expert In Peshwar Kala Jadu Specialist In Peshwar Kal...NO1 Certified kala ilam Expert In Peshwar Kala Jadu Specialist In Peshwar Kal...
NO1 Certified kala ilam Expert In Peshwar Kala Jadu Specialist In Peshwar Kal...
 

Rubik cube solution guide

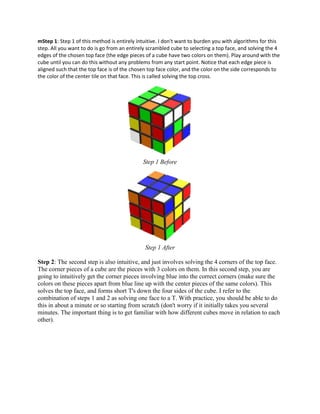
  • 1. mStep 1: Step 1 of this method is entirely intuitive. I don't want to burden you with algorithms for this step. All you want to do is go from an entirely scrambled cube to selecting a top face, and solving the 4 edges of the chosen top face (the edge pieces of a cube have two colors on them). Play around with the cube until you can do this without any problems from any start point. Notice that each edge piece is aligned such that the top face is of the chosen top face color, and the color on the side corresponds to the color of the center tile on that face. This is called solving the top cross. Step 1 Before Step 1 After Step 2: The second step is also intuitive, and just involves solving the 4 corners of the top face. The corner pieces of a cube are the pieces with 3 colors on them. In this second step, you are going to intuitively get the corner pieces involving blue into the correct corners (make sure the colors on these pieces apart from blue line up with the center pieces of the same colors). This solves the top face, and forms short T's down the four sides of the cube. I refer to the combination of steps 1 and 2 as solving one face to a T. With practice, you should be able to do this in about a minute or so starting from scratch (don't worry if it initially takes you several minutes. The important thing is to get familiar with how different cubes move in relation to each other).
  • 2. Step 2 After Step 3: At this point, turn the cube over, so that your solved side is on the bottom. Thus, blue becomes the down side of the cube (D). Your aim in this step is to complete solving the second layer of the cube by getting the edgepieces of the colors around blue in their right places and orientations. Thus, after the end of step 3, you will have two layers of yellow, orange, white and red (your colors may be different depending on how your cube is colored. I am referring to the color scheme on my cube in which green is the color opposite the solved blue side). Now, if any of the second layer edge pieces are already in the correct position and orientation, you don't have to worry about them. But many times, you will find edge pieces that are supposed to go into the second layer in the third layer. In one configuration (option 1), you will find second layer edge pieces that need to be rotated from the right face to the corner of the front and right faces. That is, the piece needs to be rotated into place anticlockwise. Step 3 Before, Option 1 Notice how, in the picture above, the white and red piece in the middle top of the right face needs to be moved anticlockwise to the middle of the edge between the front and right faces. In this case, the following sequence of steps will accomplish this: U' F' U F U R U' R'.
  • 3. Step 3 After, Option 1 Notice how the white and red face has been moved anticlockwise to its correct location and orientation. In the other configuration (option 2), the edge piece needs to be moved from the top of the front face to the corner of the front and right faces (so, it requires a clockwise rotation). Notice the red and yellow corner piece in the picture below. Step 3 Before, Option 2 Notice how, in the picture above, the yellow and red piece in the middle top of the front face needs to be moved clockwise to the middle of the edge between the front and right faces. In this case, the following sequence of steps will accomplish this: U R U' R' U' F' U F. If you are astute, you will realize that this is essentially the same set of moves as in option 1, just that you start from move 5 of option 1, and cycle around to move 4 after the end. So, you only have to actually memorize one algorithm for step 3.
  • 4. Step 3 After, Option 2 Notice how the yellow and red face has been moved clockwise to its correct location and orientation. Now, one complication that you might encounter when you are solving this second layer is that the edge piece you want in a particular position may be in that position, but may be in the wrong orientation. In other words, for example, the yellow and red edge piece may be at the corner of the yellow and red faces, but may be placed such that the yellow side of that edge piece is on the red face and the red side of it is on the yellow face. In that case, there is no simple algorithm to reorient the piece in place. You have to push some other edge piece into its position using one of the algorithms above, and this will pop that edge piece to the upper layer, from where it can be moved down to its correct position and orientation using one of the algorithms above. At the end of step 3, you will have a cube that has one side fully solved (blue in my case), and 4 sides solved two-thirds of the way (two layers each of red, yellow, orange and white in my case). Your cube will look like the picture below, assuming you have the same color scheme as me. You don't see the orange and yellow sides, but they are also solved two-thirds of the way just like the white and red sides in the picture below. The green side is still a mess while the blue side (which is at the bottom) is fully solved (make sure you have not made any mistakes in applying the step 3 algorithms by turning the cube over and making sure that the blue side is indeed solved. If it is not, re-solve it, and then apply the step 3 algorithms more carefully). Step 3 After Step 4: In this step, your aim is to solve the upper face (the green face in my case) to a cross. That is, I want to align the edges that involve green such that the green side is on the upper face
  • 5. of the cube. At the end of this step, you may not have those edge pieces placed correctly, but at least all their green faces will be on the green side of the cube. If you already have the 4 edge pieces involving green placed in such a way that their green sides are on the upper face, skip step 4 and proceed directly to step 5. At the end of step 3, you may find yourself in one of three situations as far as the upper face is concerned. Step 4 Before, Option 1 Step 4 Before Option 2 Step 4 Before Option 3 Ignore the corner pieces and concentrate only on the edge pieces involving green. You might find that none of the green sides are on the top face (option 1), or you might find two of them on the top face on adjacent sides of the cube (option 2), or you might find two of them on the top on
  • 6. opposite sides of the cube (option 3). If you find yourself facing option 1, it does not matter how you hold the cube. If you face option 2, make sure that the two adjacent sides on which the green edges are on the top face are on the back and left. If you face option 3, make sure the green pieces form a bar parallel to the front face of the cube. From all three options, you can execute the following algorithm to get to the point where all the edge pieces are placed such that their green sides are on the upper face: F R U R' U' F'. When you do this, you will notice that if you start from option 1, you will end up in either option 2 or option 3 when you execute this algorithm once. If you start from option 2, you will end up in option 3 after one execution of this algorithm. If you start from option 3, after one execution, you will be ready to move to step 5. If you want to cut down on one application of the algorithm, you can apply a modified algorithm from option 2 to skip option 3 and end up with a green cross on top. That modified algorithm is F U R U' R' F'. Either way, you should now have the following configuration in front of you at the end of step 4 (ignore the green corners. You may or may not have them as shown below. All you need is a green cross on the upper face). Step 4 After The edge pieces involving green may or may not be in the correct positions. We will deal with that in step 5. If you have blue solved fully, four sides solved two-thirds of the way, and the edges involving green positioned with the green sides on the green face, you are done with step 4. Step 5: In step 5, we are going to align the edges of the green face so that they line up with the colors on the sides of the faces. You may have 1, 2 or 4 of the top edges aligned correctly with colors on the sides (if you look at the picture above, you can rotate the upper face clockwise by 90 degrees to align the green and yellow face). If all 4 edge pieces are aligned correctly, skip step 5 and go directly to step 6. If you find only one top edge aligned correctly, make that part of the front face, as shown in the picture below. You are now going to apply the algorithm below that will move the edge piece from the left face to the right face, the one on the right face to the back face, and the one on the
  • 7. back face to the left face. The piece on the front face does not move. So, it is an anticlockwise rotation ofthe edge pieces skipping the edge on the front face. Step 5 Before The algorithm is: R U R' U R U U R'. Step 5 After Since three of the edge pieces move when this algorithm is applied, if your cube already has two top edges aligned correctly, you may have to apply the algorithm multiple times to get all the edges aligned correctly. In the first application, you will end up destroying one or both of the original alignments, and then you can rebuild all of them by applying the algorithms a couple more times. Make sure you understand what changes the algorithm makes (anticlockwise rotation of the edges, skipping the front face), and you will have no trouble figuring out how best to use it. Step 6: Step 6 is used to position the top corner pieces correctly. At this point, you only have 4 unsolved pieces in the cube (at most). These 4 pieces could be at the correct places, but wrongly oriented (in which case, skip to step 7). None of them may be in the right place (note that at this stage, you can not rotate the upper face because that will causethe edge pieces to get out of position), or 1 of them could be in the right place, but the other three are in the wrong corners. If none of them are in their correct corners, you can apply the algorithm holding the cube with any of the sides (that is the faces other than blue and green in my case) as the front face. If one of the corner pieces is in the correct corner (don't worry about its orientation), make sure you hold the cube such that you place that piece in the front upper right corner of the cube (this is the only
  • 8. corner that is not going to move when youapply this algorithm). The algorithm below causes the front upper left corner piece to move to the back upper right corner, the back upper right corner piece to move to the back upper left corner and the back upper left corner piece to move to the front upper left corner. It is an anticlockwise rotation of the corner pieces skipping the front upper right corner. You might haveto apply it more than once to position all the corners correctly. Once again, understand what the algorithm does, and you will have no problem figuring out how to use it. The algorithm is: U R U' L' U R' U' L. Step 7: Now you have a cube in which all the top corners are positioned correctly, but one or more of them may be oriented wrongly. If you find that the cube is fully solved at the end of step 6 (that is, all the corners oriented themselves correctly while being placed in their correct spots), you are done. Congratulations! Otherwise, you will have to orient the corner pieces. Now, step 7 is a little confusing. Not because the algorithm for it is complicated. Quite on the contrary: it is a very short algorithm. But throughout step 7, your front face is never changed. So, pick a front face right now. I have picked red in the pictures below. You can pick any, but it is not going to change as you progress through step 7. Once you have picked a front face, bring a mis-oriented corner piece to the upper front right position by rotating the upper face of the cube. The mis-orientation may look like the picture below, in which the top color (green) is on the right face. Step 7 Before, Option 1 In this case, apply the algorithm below twice to get the green side on the upper face: R' D' R D. After you do this, you may notice that your cube may look very scrambled. You may find blue pieces floating around, away from the bottom face where they belong. DO NOT PANIC. Between when you begin step 7 and when you complete step 7, you will find all kinds of weird changes in the cube that you just have to ignore. Just make sure you get the green side of the corner cube to the upper face, and then rotate the upper face (only the upper face) of the cube to get the next mis-oriented corner piece in the front upper right corner of the cube. Make sure you continue to keep red (or whatever face you chose
  • 9. at the beginning of step 7) as the front face. You may then be faced with the following situation pictured below where the green is on the front face. Step 7 Before, Option 2 Notice how the cube looks very scrambled. That is because we are in the middle of step 7. Don't worry. Just apply the same algorithm as before (R' D' R D), but 4 times to get the green side on the upper face. Continue turning the upper face and orienting each top corner piece so that the green is on the upper face. Do not worry about how bad the cube looks in the interim. Once you are done with all four corners, and all of them are oriented properly, you may find that your cube looks as below: Almost done! Now, all you have to do is rotate the upper and down faces of the cube a couple of times to line up all the colors, and you will have yourself a fully solved cube, as shown below:
  • 10. Fully done! That is all there is to it! Two algorithms in step 3 (one of which is actually a variation of the other), and one algorithm each in steps 4 (two if you want to use a shortcut), 5, 6 and 7. A total of 6 or 7 algorithms, none of which are longer than 8 steps. That is all it takes to solve the cube! I told you it was easy. Try it and let me know how it works out. Good luck!