Nell’iperspazio con Rocket: il Framework Web di Rust!
Win scp
1. Pankaj Naik
WinSCP
WinSCP is a freeware windows client for the SCP (secure
copy protocol), a way to transfer files across the network using
the ssh (secure shell) encrypted protocol. It replaces other FTP
programs on windows clients in cases where SSH is needed to
connect to the server. These instructions written in this
document are for WinSCP 4.3.2. If we choose a different
version some steps may vary.
This document demonstrates, how we will use WinSCP to
copy securely the Oracle Apps software folder (StagedR1211)
from windows machine to linux machine. Here we go.
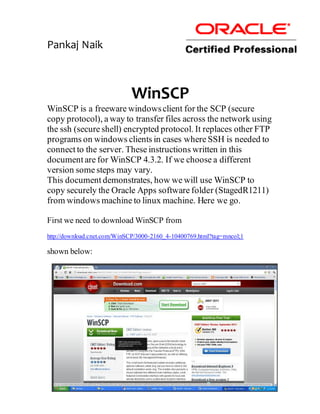
First we need to download WinSCP from
http://download.cnet.com/WinSCP/3000-2160_4-10400769.html?tag=mncol;1
shown below:
2. If we select the Installation Package a Set-up wizard starts after
we download and run WinSCP. Click the appropriate button to
proceed through the process. We will be asked to accept the
license agreement, select the typical installation, and the Norton
Commander Interface before confirming that we are ready to
install. Be sure the Launch WinSCP option is checked before
clicking the Finish button. Once the software is installed on your
computer, we are ready to configure WinSCP to connect to the
server.
Step 1
To connect to Server (r12.dekatc.com), we need to enter some
basic information. Once this information is saved on our
computer, it wont be needed to go through the initial steps
again when we use the WinSCP software next time. Fill in the
text fields on the Session screen shown below.
Host Name: r12.dekatc.com
Port Number: 22 (default)
Username: root
3. Step 2 :
Now click Directories under Environment in the left panel
as shown above.Remote directory is the directory of the
server ‘r12.dekatc.com as shown in below. Type directory
path into the box. Our directory path will be similar to the
following: /home/OracleR12 (replace directory name as per
your location). Local directory is our computer. We can
enter the location on our computer where our working files
are stored. By clicking the ellipsis button (the box with the
3 periods), we can browse to the location as well. We
should keep a backup of our on our own computer.
4. Step 3 :
Now click save on the lower right side of this window shown
as above. WinSCP automatically assigns a name to our
session, as shown below ,click OK. If we want to maintain
several sites with our server, we may follow these step by
step instructions to create a stored session for each
organization.
5. Step 4 :
When we wish to connect to the server (ebs.com),
highlight the session we just created and press login.
Enter password when prompted.
Enter the correct password,as shown in below screenshot.
6. Step 5 :
The first time we log into a server, we may get a dialog
box as shown below which tells that the server's host key
isn't cached in the registry.
Click Yes.
Step6 :
Before we start moving files, first we need to sure that we
are where we want to be. As you can see, the panel on the
left as shown below, displays the contents of our C: drive
(or where you specified in the local directory setup step),
this is referred to as the local side. The right panel
displays the contents of our server (r12.dekatc.com)
directory, also referred to as the remote side. Now we can
use the mouse to click, select and then drag and drop files
to and from your directory on the server.
7. Using WinSCP
WinSCP is an extremely feature rich program. This
document only covers the basics.
Remember, the list of our Local files, the ones on
the hard drive of the machine at which we're sitting,
is on the Left. The list of files on the ebs.com
server, or the remote host, is on the right. The
actions taken depend on which files we have
selected. So if we want to move a file from our local
machine to the server, click once on that file on the
left hand side to select it, and hit the F5 key to copy
it to the remote server. To select multiple files or
folders, which are next to each other, hold down the
shift key, and to multi-select individual files or
folders, hold down the ctrl key while clicking.
Navigation:
Use the arrow keys to move the cursor up and down
within a panel. The Enter key will open the folder
the cursor is currently on, if we move the cursor to
the top of the list and then press Enter we will go up
one level in the directory structure.