1. with the AgGPS® EZ-Steer® Assisted Steering System Quick Reference Card
CONNECTING THE SYSTEM
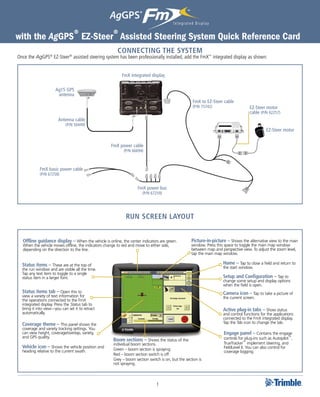
Once the AgGPS® EZ-Steer® assisted steering system has been professionally installed, add the FmX™ integrated display as shown:
FmX integrated display
Ag15 GPS
antenna
FmX to EZ-Steer cable
(P/N 75742) EZ-Steer motor
cable (P/N 62257)
Antenna cable
(P/N 50449)
EZ-Steer motor
FmX power cable
(P/N 66694)
FmX basic power cable
(P/N 67258)
FmX power bus
(P/N 67259)
Run Screen layout
Offline guidance display – When the vehicle is online, the center indicators are green. Picture-in-picture – Shows the alternative view to the main
When the vehicle moves offline, the indicators change to red and move to either side, window. Press this space to toggle the main map window
depending on the direction to the line. between map and perspective view. To adjust the zoom level,
tap the main map window.
Status items – These are at the top of Home – Tap to close a field and return to
the run window and are visible all the time. the start window.
Tap any text item to toggle to a single
status item in a larger font. Setup and Configuration – Tap to
change some setup and display options
when the field is open.
Status items tab – Open this to Camera icon – Tap to take a picture of
view a variety of text information for the current screen.
the operations connected to the FmX
integrated display. Press the Status tab to
bring it into view—you can set it to retract Active plug-in tabs – Show status
automatically. and control functions for the applications
connected to the FmX integrated display.
Coverage theme – This panel shows the Tap the Tab icon to change the tab.
coverage and variety tracking settings. You
can view height, coverage/overlap, variety, Engage panel – Contains the engage
and GPS quality. controls for plug-ins such as Autopilot™,
Boom sections – Shows the status of the
individual boom sections. TrueTracker™ implement steering, and
Vehicle icon – Shows the vehicle position and Green – boom section is spraying. FieldLevel II. You can also control for
heading relative to the current swath. coverage logging.
Red – boom section switch is off.
Grey – boom section switch is on, but the section is
not spraying.
1
2. calibrating the EZ-Steer system with the FmX integrated display
Note: For more information on system calibration and settings, see the EZ-Steer documentation.
Calibrating the EZ-Steer system with the FmX Entering the vehicle settings
integrated display 1. In the Configuration screen, select EZ-Steer and then tap
EZ-Steer Calibration configures the T2™ roll calibration and the Setup:
EZ-Steer system Angle per Turn, Aggressiveness, and Freeplay
settings:
The EZ-Steer Settings screen appears:
Before calibrating the vehicle, do the following:
• Ensure that the vehicle’s hydraulic oil is up to operating
temperature before beginning. Refer to the vehicle
documentation.
• Ensure that the tire pressure is correct.
• Perform initial calibration without an implement or with the
booms folded in on a high-clearance sprayer. After initial
calibration is completed, the settings can be fine-tuned with
the implement or booms folded out.
• Choose a field with the smoothest possible surface and
perform calibration at the normal operating speed for the
vehicle.
The EZ-Steer Calibration requires a straight A-B line. If you do not
create an A-B line before you begin the calibration, the system 2. Enter the following information in the Vehicle Settings tab:
prompts you to open a field and create one.
a. Select a vehicle type from the drop-down list that closely
resembles the machine being calibrated.
EZ-Steer calibration process
b. Measure the horizontal distance between the front and
1. Enter the vehicle settings. rear axles (the “wheelbase”) and then enter it.
2. Perform T2 roll calibration. c. Measure the antenna height from the ground and then
3. Calibrate the EZ-Steer system settings: enter it.
a. Calibrate Angle per Turn. d. Measure the horizontal distance from the fixed axle,
b. Calibrate Aggressiveness. identified in the image, to the antenna and then enter it.
c. Calibrate Freeplay Offset. Note: The Engage Options, Steering Settings, and Advanced tabs
on this screen are populated automatically with starting values,
4. Confirm the calibration settings. based on the vehicle type selected.
Note: You may need to run the EZ-Steer Calibration more than 5. Tap OK. The Configuration screen appears.
once to achieve optimal results.
2
3. Performing T2 role calibration 7. Turn the vehicle around and ensure that the wheels are over
The EZ-Steer system contains sensors that use T2 terrain the positions marked in Step 5.
compensation technology to provide roll compensation when the 8. Tap Next. The display records the roll offset in the second
vehicle is on a slope or drives over a bump. For roll compensation direction. This takes approximately 20 seconds. Do not move
to work correctly, the controller must be calibrated: the vehicle while the offset is being read:
1. Select Controller Orientation to calibrate the Steering
Control Module (SCM) and perform a Terrain Compensation
(T2) calibration.
2. Select the EZ-Steer plugin and then tap Calibrate. The EZ-Steer
Steering Calibration screen appears.
3. Select Controller Orientation. The EZ-Steer Roll Calibration
screen appears:
The T2 calibration results appear. The Roll Offset value should
be between 0° and 4°.
9. Tap OK to accept the settings.
Steering Performance calibration
1. Select Steering Performance. The EZ-Steer Steering
Performance screen appears:
4. Select the direction that the connectors of the EZ-Steer
controller face from the drop-down list and then tap Next.
Note: For the best accuracy roll compensation, install the EZ-Steer
controller on the floor at the front of the cab with the controller
parallel to the vehicle center-line. Installing on the back window is
not recommended, because the vibrations may reduce the accuracy
of the terrain compensation.
5. Park the vehicle and mark the inside position of both sets of
wheels.
6. Tap Next. The display records the roll offset in the first
direction. This takes approximately 20 seconds. Do not move
the vehicle while the offset is being read:
2. Complete each of the Step tabs in turn to set the steering
parameters.
Step 1: Angle Per Turn. The Angle per Turn value is the angle
that the wheels turn through during one full rotation of the
steering wheel. This is a course aggressiveness adjustment.
If the setting is too low, the system may require several
attempts to reach the line.
a. Nudge the vehicle left or right, 1 m (3 ft) from the
guidance line.
b. Engage the EZ-Steer system.
3
4. c. Adjust the Angle per Turn value so that when the system is
engaged, the vehicle moves close to the guidance line: To make ... Do the following...
More aggressive turns Increase the Aggresiveness value.
To make ... Do the following...
Less aggressive turns Decrease the Aggresiveness value.
More aggressive turns Decrease the Angle per Turn value.
Less aggressive turns Increase tthe Angle per Turn value. Step 3: Freeplay offset. Add a freeplay offset if the steering
has greater freeplay in one direction than the other, causing it
Note: Use the Cross track error history plot on the top right of
to drive consistently to one side of the guidance line.
the page and the Average Offline distance to optimize EZ-Steer
performance for each step in the calibration. Engage the system on the guidance line.
Step 2: Aggressiveness. The Aggressiveness setting fine-tunes Vehicle is offline ... Do the following...
how aggressively the system holds the line: To the left Increase the freeplay offset to the right.
–– If the Aggressiveness setting is too low, the vehicle will not
To the right Increase the freeplay offset to the left.
hold the line.
–– If the Aggressiveness setting is too high, the vehicle may Note: If you are calibrating a 4WD articulated vehicle, you may
over-correct and make S-turns. need to set the Motor Speed setting to Auto Low.
Note: The Advanced Calibration tab is currently greyed out.
Adjust the Aggressiveness setting to get the vehicle as close To access these options, select Diagnostics from the main
to the line as possible without going into S-turns. Configuration screen.
4. When all the parameters have been entered, tap OK. The
EZ-Steer Steering Calibration screen re-appears.
5. Tap OK. The Configuration screen appears.
OPERating the EZ-Steer system with the FmX integrated display
Engaging the system • The Minimum Fix Quality setting is set to a high accuracy
To engage the EZ-Steer system, you must have an A-B line correction method and the system receives low accuracy
defined, and the vehicle must be within the engage limits positions (for example, no corrections).
configured in EZ-Steer / Engage Options. • To manually disengage the system, do one of the following:
To manually engage the EZ-Steer system, do one of the following: –– Press the engage button on the main guidance screen or
• Press the engage button on the main guidance screen or on on the optional remote control.
the optional remote control. –– Turn the steering wheel to override the electric motor.
• Press the optional remote engage foot pedal. –– Press the optional remote engage foot pedal.
When the system is not in use, hinge the motor away from the
Disengaging the system
steering wheel and secure it with the lock pin.
Turning the steering wheel manually disengages the EZ-Steer
system. Trimble recommends that you check this setting before Engage status indicators
you start using the system in a new installation by engaging on
a line and then turning the wheel until EZ-Steer disengages. To Engage status Button color Vehicle icon color
adjust the amount of force required to disengage the system,
Ready to engage
change the Override Sensitivity in the EZ-Steer Setup screen. The
EZ-Steer system automatically disengages when:
Engaged
• The vehicle is outside the engage limits configured in the
Engage Options screen. Cannot engage
• The system is paused.
• GPS positions are lost.
4
5. EZ-Steer system Advanced Settings for FmX integrated display
Engage options
The Engage Options screen enables you to control the system’s engage / disengage behavior. Select EZ−Steer Setup / Engage Options.
Option Description
Minimum Speed Minimum speed at which the system can engage. If the system is engaged and the
speed drops below this limit, the system disengages.
Maximum Speed Maximum speed at which the system can engage. If the system is engaged and the
speed increases above this limit, the system disengages.
Maximum Angle Maximum angle at which the system can engage. If the vehicle approaches the swath
at an angle greater than this limit, it cannot be engaged.
Engage Offline Maximum distance from the swath at which the system can engage. If the vehicle
approaches the swath at a distance greater than this limit, it cannot be engaged.
Disengage Offline Maximum distance from the swath at which the system can remain engaged. If the
vehicle drives offline greater than this limit, the system disengages.
Engage on AB Configure whether the system can be engaged on the master AB line.
Override Sensitivity Amount the steering wheel must be turned manually before the system disengages.
EZ−Steer External Switch Configure the behaviour of a seat/foot switch.
Vehicle-specific performance hints
Vehicle type Performance hints
2WD tractor Install the EZ−Steer system on tractors that have SuperSteer (for example, New Holland TG). If the tractor has a SuperSteer front axle, for best
performance:
• Reduce the Online Aggressiveness value.
• Line up close to the swath and make certain the front wheels are straight before engaging the EZ−Steer system.
• To get smoother performance when the vehicle is pulling an implement over tilled ground, enable the Diff−Lock. This prevents the machine
from pulling sharply to the left or right. Turn off Diff−Lock if you are calibrating on a hard surface.
4WD tractor The EZ−Steer system can be installed on Case IH STX tractors with Accusteer. For optimal performance, disable Accusteer using the switch in the
cab (if possible).
Sprayer • It is common for these vehicles to have slow steering. To compensate for this, use high aggressiveness.
• If you experience large, slow oscillations, increase the aggressiveness.
• When you configure the system on a sprayer, the Sprayer steering delay setting is available on the Vehicle Setup screen. Some sprayers
have steering that is slow to react after the steering wheel is turned.
• The system uses the steering delay setting to compensate for this slowness and ensure that steering corrections occur at the correct point.
Swather When you configure the system on a swather, the Swather steering delay setting is available on the Vehicle Setup screen. Some swathers
have steering that is slow to react after the steering wheel is turned.
The system uses the steering delay setting to compensate for this slowness and ensure that steering corrections occur at the correct point.
To improve the performance of your swather, only adjust the Swather steering delay setting by a small amount (0.1 seconds) at a time. Test the
result between each adjustment.
5
6. EZ-Steer plugin diagnostics
The EZ-Steer Diagnostics displays the SCM statistics and inertial
information.
1. In the Configuration screen, select the EZ-Steer plugin and
then tap Diagnostics. The EZ-Steer Diagnostics screen appears.
This screen displays the roll and heading of the vehicle as well
as the temperature of the steering control module:
2. Tap Steering Perf. The EZ-Steer Steering Performance screen
appears. This screen is designed for advanced users that
understand how to adjust EZ-Steer performance. If you do not
know where to start, Trimble recommends that you adjust the
steering parameters in order, stepping through the numbered
tabs in sequence.
3. To adjust steering settings, tap the Advanced calibration tab
and then make the required changes.
4. Tap OK.
6
7. Faults
Fault code Fault message Possible cause Solution
01 Excessive manual overrides There have been a large number of manual overrides Decrease the Override Sensitivity value in
on one swath. the Engage Options screen.
02 Hardware fault There has been a general hardware fault. Check all equipment and cables for damage.
03 Controller reset There was a power brownout (a momentary loss of Ensure that power cables are not damaged and
power). that all connectors are tight.
Connect power directly to the battery.
The EZ-Steer controller has reset unexpectedly. Download the error log.
04 Communication error The EZ-Steer controller failed to receive CAN messages Check that the cable is not damaged and that
from the EZ-Guide® lightbar. connectors are tight.
05 Bridge fault The manual override sensitivity is too low. Increase the Override Sensitivity value in
the Engage Options screen.
The controller is faulty. Contact your local EZ-Steer system reseller for a
repair or replacement.
07 Broken motor cable The motor cable is broken. Contact your local EZ-Steer system reseller for a
repair or replacement.
08 EEPROM fault There was a memory error in the EZ-Steer system Contact your local EZ-Steer system reseller for a
controller. repair or replacement.
09 No motor connection The motor or motor cable is not connected to the 1. Check that the motor cable is connected to the
EZ‑Steer system controller. EZ-Steer system motor.
2. Check that the motor cable is connected to the
EZ-Steer system controller.
3. Check that all cable connections are secure and
that the cables are not damaged.
10 Unknown fault There was an unknown fault in the EZ-Steer system. Contact your local EZ-Steer system reseller for a
repair or replacement.
11 System fault The lightbar failed to receive messages from the 1. Check that none of the cables are damaged.
controller. 2. Check that the connectors are tight.
12 Temperature too high The controller temperature has exceeded the maximum 1. Move the controller out of direct sunlight.
internal operating temperature. 2. Ensure that the controller is well ventilated.
3. Turn on the air conditioning and direct the cool
air to the controller.
7