
Recommandé
Recommandé
Contenu connexe
Dernier
Dernier (20)
En vedette
En vedette (20)
07dcmotor 101020153810-phpapp01
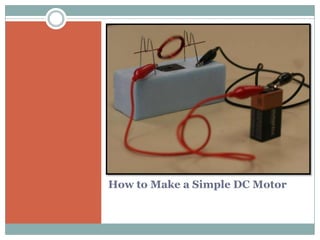
- 1. How to Make a Simple DC Motor
- 2. You will need: Magnet wire A Magnet Styrofoam base 9-volt battery 2 paperclips 2 test leads (w/ alligator clips) “C” size battery Sandpaper or razor blade
- 3. Some Basic “Need to Know’s” A motor converts electrical energy into mechanical energy. When current is flowing through a coil of wire in a magnetic field, a force (torque) is induced. The strength of this force depends on three things: Amount of current Length of wire Strength of the magnet You can determine the direction of the force by using the three-finger rule.
- 4. The Three-Finger Rule Shape your right hand as shown at the right: index finger is pointing straight forward thumb is pointing up at a right angle to your index finger middle finger is pointing straight out from the plane of your palm. With your hand in this shape, you are ready to use it!
- 5. The Three-Finger Rule (cont.) Point index finger in the direction of the magnetic field (the direction of the arrows, for this example). Point your thumb in the direction the current is flowing. Your middle finger will then be pointing in the direction of the force. Using the 3-finger rule, figure out the direction of the force at the top of the coil, the (Notice that the direction of the force will bottom of the coil, and which be different at the top of the coil than at the direction the coil will spin. bottom of the coil.)
- 6. The Three-Finger Rule (cont.) Top of coil: Force is directed toward us (away from the screen). Bottom of coil: Force is directed away from us (into the plane of the screen). Coil will spin with the top moving toward us. In other words, if it were a wheel, it would roll out from the screen.
- 7. But wait… Once the coil has spun 180 degrees, the direction of the current at the top of the coil will be flowing the opposite direction than at the beginning, as shown below, because the bottom is at the top. •Assuming that the magnetic field still points up, which way will the coil spin now? •How might this cause the motor to be ineffective?
- 8. Understanding the Problem In order to solve this problem, we need to understand what causes the problem: Current can only flow through a wire if there is a connection. This means that we need to remove the enamel coating so that the copper wire can make a direct connection with the paperclips. If we completely remove the enamel coating from both ends, the current will flow continuously. This will result in a coil of wire that wobbles back and forth, rather than a motor that spins as it should.
- 9. Solving the Problem By removing only part of the Cross-section enamel on each side of the coil, we of magnet wire can control when the current flows and when it doesn’t. If the current is not flowing, there Copper will be no force to make it spin. Wire In order to make the motor work properly, we need to remove the Enamel coating enamel coating from only half of the wire, as shown at the right. The current only flows for one half Each time the coil reaches a of a revolution. The other half of the connection point, current flows revolution receives no current (and through the wire. The coil, then, therefore, no force) but continues experiences a force in the same spinning because of momentum. direction each time. This allows the This is repeated so the motor will motor to spin properly. spin until disconnected.
- 10. Let’s test it! Coil the magnet wire around a “C-size” battery 12-15 times. Leave about 2 inches on each side of the coil. Next, we need to remove the enamel from the wire so that current can flow. WAIT—not all of it!
- 11. Removing the Enamel To remove only half of one side, hold the wire on a table so that the coil is oriented vertically. Use a file, blade or sandpaper to rub off the TOP SIDE of the wire only. To ensure a good connection, completely remove the enamel on the top half of the wire from the base of the windings (near the coil) through the end. Now turn the coil around and remove the enamel completely from the other end (top, sides, and bottom). Again, make sure it is clean for a good connection.
- 12. Preparing the Paperclips Bend your paperclips in the succession to the left. They should end up looking something like the ones below. It’s easiest to use pliers if available, but not necessary.
- 13. Preparing Your Base Put your magnet in the center of your Styrofoam. Trace around the magnet with a blade or knife. Remove the inner portion of Styrofoam. Replace Styrofoam with the magnet. Try to get the magnet as flush with the top of the Styrofoam as possible for a flat base. Put your paperclips in place, as shown in the picture.
- 14. On Your Mark, Get Set… Place your coil in the center of the paperclip holders, making sure the ends are parallel to the base. If possible, use a voltmeter to test the 9- volt battery to make sure it is good. (If not possible, we’ll find out in a second.)
- 15. Give It a Whirl! Connect one end of each alligator clip lead to the battery terminals of the 9-volt battery (one to negative, one to positive). Connect the other ends of the leads to one side of each paperclip, as shown. If your coil does not spin at first, give it a little push start.
- 16. Doesn’t work? Some possible problems: Was the enamel removed correctly? (The copper should be exposed completely on one end but only on the top of the other end of the coil.) Is the enamel removed enough to make a clean connection? (The copper should be shiny and without spots of enamel still attached.) Is your battery providing power? (Use a voltmeter to test it.) Is the circuit complete? (Current should flow from the negative terminal of the battery one side of a paperclip through the coil through the other paperclip through the other test lead into the positive terminal of the battery.) Is the coil close to and directly above the magnet?
Notes de l'éditeur
- The motor will spin one way for half of a revolution (toward us), then will switch and spin the other way for the other half of the revolution (away from us). Therefore, it will simply wobble instead of spinning as a motor should. This problem is overcome by only stripping part of the enamel from the wire. We will discuss this in the following slides.