

Recommandé
Contenu connexe
Tendances
Tendances (20)
En vedette
Similaire à Using Mail Merge
Similaire à Using Mail Merge (20)
Dernier
Dernier (20)
Using Mail Merge
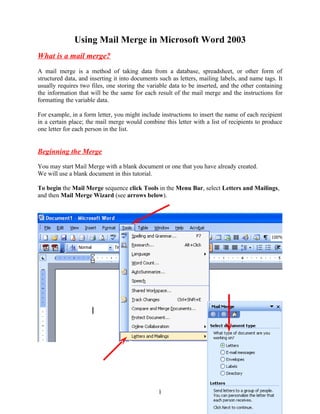
- 1. Using Mail Merge in Microsoft Word 2003 What is a mail merge? A mail merge is a method of taking data from a database, spreadsheet, or other form of structured data, and inserting it into documents such as letters, mailing labels, and name tags. It usually requires two files, one storing the variable data to be inserted, and the other containing the information that will be the same for each result of the mail merge and the instructions for formatting the variable data. For example, in a form letter, you might include instructions to insert the name of each recipient in a certain place; the mail merge would combine this letter with a list of recipients to produce one letter for each person in the list. Beginning the Merge You may start Mail Merge with a blank document or one that you have already created. We will use a blank document in this tutorial. To begin the Mail Merge sequence click Tools in the Menu Bar, select Letters and Mailings, and then Mail Merge Wizard (see arrows below). 1
- 2. You will now see a Microsoft Mail Merge Task Pane appear on the right side of your screen – similar to the image at the right. We will begin this tutorial by creating a mail merge letter. When we have completed the letter we’ll discuss Envelopes, Labels, and E-mail messages. Notice that the small circle to the left of Letters has a dot in it. This is the default selection. We’ll use letters to begin. You’ll notice, at the bottom of the Task Pane that it looks like the image on the right. Now that we’ve selected Letters, we can proceed to the next step in the Wizard. Click Next: Starting document. We are leaving Step 1 of the Mail Merge Wizard and moving to Step 2. The top of the Step 2 Task Pane looks like the image on the right. We indicated earlier that we are going to use a blank document for this tutorial. So, we’ll remain with the default selection – Use the current document. At the bottom of the Step 2 of 6 Task Pane, click Next: Select recipients. Notice, in the image on the right that, as you proceed through the Mail Merge Task Panes, you can go back and forth at any time you desire. This is logical and handy. 2
- 3. Selecting your merge file (Access, Excel, Word, Outlook) You are now in Task Pane 3. In this task pane you will select the source list for your mail merge. We’ll be using an Access database for this tutorial. You can use an Excel spreadsheet, Outlook Mail Contacts, or several other sources. The Access database file we will be using was created with our Access 2003 tutorial. If you’d like a copy of this tutorial and database file, please e-mail the address found at the end of the tutorial, or download them from our website, which is also found on the last page. Click the Browse button in Task Pane 3. We, as indicated, are going to select an Access Database. It is located on our C: drive in the Folder Mail Merge Word XP. 3
- 4. After we select our database we’ll click the Open button. You may choose several other file types, as previously indicated. If you click the small down arrow to the right of the Files of type: area in the Select Data Source menu screen (image at bottom of last page and on right), you will see many other file types from which you can merge. When we selected the Person 2003 database, the following Select Table menu appeared. This database contains three Tables – we are going to choose the Personnel Table. After we selected Personnel, we clicked the OK button. The Mail Merge Recipients menu screen appears. 4
- 5. Spend a few moments viewing Mail Merge Recipients screen (at the bottom of the last page). Use the elevator bars at the bottom and on the right of the screen to view your data. Click the OK button when you have viewed the screen to your satisfaction. Look at the middle of Task Pane 3 again. Notice that the Browse selection has been replaced by the image to the right. This Task Pane now indicates the database (or other source) you selected and allows you to edit the list which appeared when you made this selection (bottom of last page). You are now ready to begin inserting fields into your mail merge document. However it would be prudent to save your mail merge letter at this time. Once you’ve accessed your database, the save feature will not only save your document, but preserve the link to your data source (database, spreadsheet, etc.) Saving your Mail Merge document You will want to save your mail merge documents periodically. Use your favorite Save method. We’ll click File in the Menu Bar and select Save (as shown in the image on the right. The Save As menu screen will appear (image at the top of the next page). 5
- 6. We will save our document as Mail Merge Letter in the Mail Merge Word 2003 Folder on our C: drive. Creating the Mail Merge Document Having selected our data source, we are now ready to create our mail merge document. Look at the bottom of the Step 3 of 6 Task Pane and click Next: Write your letter. You will now be taken to the Mail Merge Step 4 of 6 Task Pane. The top of this Task Pane looks like the image on the left. We’ll cover two of the selections you see at the left – More items. 6
- 7. Click the More items… selection. The Insert Merge Field Menu Screen at the right will appear. In the Insert Merge Field Menu screen, click the First Name selection, then click the Insert button at the bottom of the screen (see image and arrows on the right), then click the Close button. When you do, the <<First_Name>> text will appear below the <<AddressBlock>> text. Click the More items… button in the Mail Merge Task Pan on the right again. When the Insert Merge Field Menu Screen appears, click the following: (when you click a field name, click the Insert button after each selection): Last Name (Insert), Street Address (Insert), City (Insert), State (Insert), Zip (Insert) – and now click the Close button. Your screen should now look like the text at the top of the next page. 7
- 8. Don’t worry about this. Since you are already an accomplished Word user, we’ll now arrange this text to look like a normal mailing address. Move your cursor between the First_Name>> and <<Last_Name arrows and click the left mouse button. When you click, your text should look like the image below. Tap the Space Bar to place a space between these two fields. Your text should now show a space like the image below. Now, move your cursor between the Last Name and Street Address arrows (>> <<) and click the left mouse button. Then tap the Enter Key. Your text should now look like the image below. We’ll continue this process to create a logical mailing label. Click between the arrows between Street Address and City and tap the Enter Key. Your text should now look like the image on the right. Click between the arrows between City and State and tap a comma (,) and then tap the Space Bar. Then click between the arrows between State and Zip and tap the Space Bar. Click to the right of the arrow at the end of Zip and tap the Enter Key twice. Your text should look like the image on the left. 8
- 9. Now, we’ll insert a greeting. Tap the Enter Key two more times – just to create some space – and type in Dear and then tap the Space Bar. Click the More Items button in the Task Pane on the right and insert the field First Name. Type a comma after the First Name field and tap the Enter Key twice. Your document should now look like the one on the right. Previewing your documents We are now ready to preview our efforts. Click the Next: Preview your letters choice at the bottom of the Mail Merge Task Pane on the right of your screen. You will now move to the Mail Merge Task Pane screen 5 of 6. It will look similar to the image on the right. Your document should look similar to the one on the left. You can browse your addresses and greeting by clicking the arrows on the right and left of Recipient. Notice two things – On purpose, we created our State field in Access with a lower case state designation (e.g. va). This happens frequently and we’ll show you how to correct this. As you browse through your documents, if you see one you wish to remove, you can click the Exclude this recipient button. We’ll explain this more on Page 14. 9
- 10. Printing your merged documents Let’s move on to printing our letters. In the Step 5 of 6 selection, at the bottom of the Mail Merge Task Pane, select Next: Complete the merge. The Mail Merge Step 6 of 6 Task Pane – like the one on the right will appear. First, before we print our merged documents, there is a really IMPORTANT choice – Edit individual letters…. Remember, in the Step 5 Task Pane, that if you did not desire to include a specific letter – because of some minor editing requirement – you could click the Exclude this recipient button. That would have removed that letter from the printing group. You would then have had to return to that letter and work on it individually. However, if you desire to make minor changes to a letter, you do not have to exclude it. You can proceed to this screen and print that letter individually. To do this you would click the Edit individual letters... selection. The menu screen at the top of the next page would appear. Notice you have several choices. We find most users make a note of the Recipient number(s) - (e.g. Recipient 6) and then enter them in the From: area in the Merge to New Document menu on the right. When you click OK, a Word document – of that letter – will open. You would make your changes and then only print the revised letter(s) by selecting Print current page. After printing, when you close the revised letter, you would return to your Mail Merge screen and Task Pane. Now we’re ready to print the letters (that did not need editing). Click the Print… selection in the Task Pane as shown in the image on the right. You will be taken to the Merge to New Document menu screen. Since you are now printing all of the letters that were not excluded, make sure that All is selected. Then click the OK button. The Print menu screen (below) will appear. 10
- 11. Once the Print menu screen appears, choose the printer on which you desire to print your merged documents. Then, make sure the All Page range (above) is selected and click the OK button. Note: If you are using letterhead paper – don’t forget to leave room at the top of your document for this. 11