Best VIP Call Girls Noida Sector 40 Call Me: 8448380779
A guide to building outdoor stairs
1. A Guide to Building Outdoor Stairs
Building a stairway can be one of the most intimidating tasks any builder–amateur or professional–tackles. But an
outdoor stairway is generally not a difficult project, as long as it is planned and executed carefully. This document
covers building procedures for a straight-run utility stairway, typically used on porches and decks.
Local building codes regulate the width and slope of a staircase, as well as how the assembly is supported and
braced, how the landing is built and whether railings are required. ALWAYS CHECK WITH YOUR LOCAL
BUILDING DEPARTMENT BEFORE DESIGNING A STAIRWAY, AND FOLLOW ALL LOCAL CODES.
The following instructions are intended as general guidelines only, and local requirements should be your primary
guide.
In this document you will find information about:
• Stair-Building Terms
• Designing Your Stairs
• Building Your Stairs
TOOLS AND MATERIALS
2x10 Stringers Hex Bolts Hammer
1x8 Risers 16d Galvanized Nails Carpenter's Square
5/4" or 2" Tread Material 8d Galvanized Nails Measuring Tape
2x6 Pressure-Treated Cleat 4x4 Posts Adjustable Wrench
Angle Iron 2" Railing Material Joist Hangers
Anchor Bolts Baluster Material
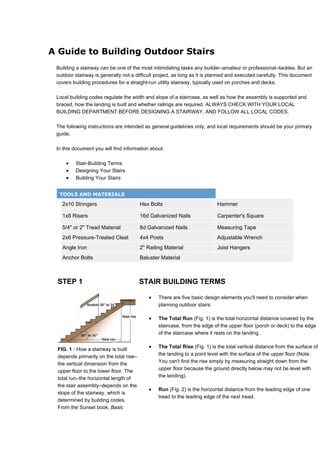
STEP 1 STAIR BUILDING TERMS
• There are five basic design elements you'll need to consider when
planning outdoor stairs:
• The Total Run (Fig. 1) is the total horizontal distance covered by the
staircase, from the edge of the upper floor (porch or deck) to the edge
of the staircase where it rests on the landing.
FIG. 1 - How a stairway is built
• The Total Rise (Fig. 1) is the total vertical distance from the surface of
the landing to a point level with the surface of the upper floor (Note:
depends primarily on the total rise–
You can't find the rise simply by measuring straight down from the
the vertical dimension from the
upper floor because the ground directly below may not be level with
upper floor to the lower floor. The
the landing).
total run–the horizontal length of
the stair assembly–depends on the
• Run (Fig. 2) is the horizontal distance from the leading edge of one
slope of the stairway, which is
tread to the leading edge of the next tread.
determined by building codes.
From the Sunset book, Basic
5. temporarily and lay out the location of the pad. Pour the pad and set
anchor bolts for the angle iron or 2x6 base. Instructions for pouring
concrete are in another brochure in this series.
• Once the landing pad is cured, secure the stringers at the top and
bottom. Rip the risers to the same width as the height of the riser cut in
the stringers. Then cut them to length and nail them to the stringers
with 8d galvanized nails.
• Measure the distance from the face of the riser to the edge of the
notch cut, then rip the treads to width so they extend 1" to 1-1/8"
beyond the edge of the notch. If you're using two boards side by side
as treads, rip half the dimension from each board so both will be the
same width. Cut the treads to length and nail them to the stringer with
16d galvanized nails.
• To build the railing, first secure 4x4 posts at the top and bottom of the
stringer. Notch the posts 1-1/2" deep and bolt them to the sides of the
stringers with 1/2x4-1/2 hex bolts, using a level to keep them plumb.
Use decay-resistant lumber for the posts. They should be at least long
enough to extend 36" above the surface of the treads. Leave them a
few inches too long at the top so you can cut them after they are in
place.
• Measure from the bottom of the stringer up the posts to the location of
the top and bottom rails. The top surface of the upper rail should be
30" to 34" above the tread; the rail should be about 6" above the tread.
Lay the railing material against the posts and lay out angled cuts for
any rails that will be fastened between the posts.
• Cut the railings to length and toenail them with four 8d galvanized
nails. If you'll be using balusters, cut them to length and nail them to
the rails. Check local codes for spacing requirements on balusters.