TELE-satellite-1203
•
0 j'aime•3,159 vues

The World’s Largest Digital TV Trade Magazine

Recommandé
Contenu connexe
En vedette
En vedette (18)
Similaire à TELE-satellite-1203
Similaire à TELE-satellite-1203 (20)
Plus de TELE-audiovision eng
Dernier
Dernier (20)
TELE-satellite-1203
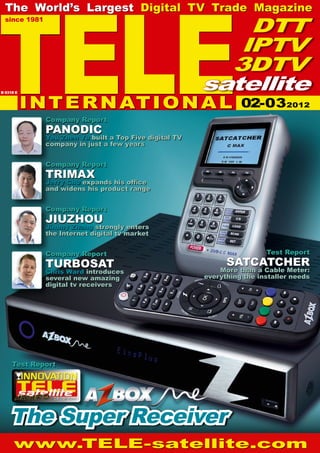
- 1. 02-03/2012 TELE since 1981 The World’s Largest Digital TV Trade Magazine www.TELE-satellite.com Company Report TURBOSAT Chris Ward introduces several new amazing digital tv receivers Company Report TRIMAX Jerry Chu expands his office and widens his product range Company Report PANODIC You Zhen Yu built a Top Five digital TV company in just a few years The Super Receiver Test Report SATCATCHER More than a Cable Meter: everything the installer needs Test Report INTERNATIONAL DTT IPTV 3DTV satellite B 9318 E Company Report JIUZHOU Jimmy Zhang strongly enters the Internet digital tv market 02-032012
- 3. TELE satellite Address TELE-satellite International, PO Box 1234, 85766 Munich-Ufg, GERMANY/EUROPE Editor-in-Chief Alexander Wiese, alex@TELE-satellite.com Published by TELE-satellite Medien GmbH, Aschheimer Weg 19, 85774 Unterfoehring, GERMANY/EUROPE Design Németi Barna Attila Advertising www.TELE-satellite.com/ads/ Hardcopy Subscriptions www.TELE-satellite.com/secure/eng/ Printer Blackprint Nyomdaipari Kft, Tenkefürdő utca 3, 1044 Budapest, HUNGARY/EUROPE Copyright © 2012 by TELE-satellite ISSN 1435-7003 TELE-satellite was established in 1981 and today is the oldest, largest and most-read digital tv trade magazine in the world. TELE-satellite is seen by more than 350,000 digital tv professionals around the world and is available both in printed form and online. www.TELE-satellite.com Redaktion TELE-satellite, Postfach 1234, D-85766 München-Ufg Chefredakteur Alexander Wiese (verantwortlich) Anschrift wie Verlag, Verlag TELE-satellite Medien GmbH, Aschheimer Weg 19, D-85774 Unterföhring, Inhaber: Alexander Wiese, Verleger, Unterföhring Anzeigen Alexander Wiese (verantwortlich), Anschrift wie Verlag TELE-satellite International The World’s Largest Digital TV Trade Magazine since 1981 Alexander Wiese Publisher alex@TELE-satellite.com HQ in Munich, Germany Dear Readers, It was only a few issues ago when TELE-satellite introduced to you the first receiver with the Linux operating system that could be started with two different user interfaces. The user could opt to work with one interface on one day and try the other interface the next day; it was entirely up to them. In this issue of TELE- satellite we are introducing a Linux receiver that can actually be started with three different user interfaces. In this way the hardware (the receiver) is distancing itself more and more from the software (the user interface). You can look at it like this: if you have a laptop, you could start it first with Windows and then later on you could start it with Apple’s operating system. Both operating systems are sophisticated and equivalent but there are some users that swear by one operating system and others that simply can’t do without the other operating system. It’s the same with the user interfaces in digital TV receivers. Every receiver that we present in TELE- satellite operates with a sophisticated user interface but there are those that would prefer to use a specific software. An additional argument here is the ever increasing choice of applications. If you record TV programs on a regular basis, you might place more value in the presentation of an EPG and thus prefer to work with a user interface that is especially comfortable in this area. Then there are those viewers that watch TV channels from broadcasters that don’t even provide an EPG. For this group a comfortable EPG means nothing to them; instead for them other criteria would be much more important, such as for example, a comfortable channel scan. If you, as a viewer, want the opportunity to be able to select a user interface for a digital TV receiver that is best suited to your needs, then you would need a receiver that offers precisely this kind of option. The software that a manufacturer factory-installs in its receivers is becoming more and more a selling point to the user and not a feature of a receiver that the user must live with. Whether or not receiver buyers use the original software or supplement the box with additional applications - in the end it’s another freedom for the user: he can choose to utilize what the manufacturer has to offer or he can load software that he likes better. Freedom of choice is now even more in the hands of the customer. And this seems to be a sign of the times; no one wants to be told what to do anymore, especially when it has to do with how to use a receiver. The customer is king; he even has a say in the user software. Sincerely, Alexander Wiese Editor-in-Chief TELE-satellite International
- 8. 8 ...126 TELE-satellite International — The World‘s Largest Digital TV Trade Magazine — 02-03/2012 — www.TELE-satellite.com ...144 ...154 ...172 ...178 ...200 CONTENT AZBox ME Linux Receiver with Multimedia Features with 3 Boot Images........ 16 SatCatcher Digipro C Max Professional Digital and Analog Cable TV Meter............ 34 Huber+Suhner CLIK! Optic Splitter Box................................ 48 Elgato Tivizen DVB-T Reception via WiFi... 58 logitech Revue Multimedia Box Multimedia Box with Google TV............. 70 Feature: The Wonderful World of Spark Part 1: YouTube................................... 80 Vitor’s Workshop: Waterfall Diagram for the SPAROS 609 Satellite Meters................. 88 AWARD Winning: Digital Receivers of 21st Century........... 96 AWARD Winning: HDTV PC Cards of 21st Century........... 106 AWARD Winning: Signal Analyzers of 21st Century......... 112 AWARD Winning: IPTV Receivers of 21st Century......... 122 Company Report: Receiver Manufacturer Panodic, China.................................. 126 Company Report: Wholesaler and Manufacturer Turbosat, Great Britain ...................... 144 Company Report: Digital TV Manufacturer Jiuzhou, China.................................. 154 Country Report: Digital TV Shopping in São Paulo, Brazil............................... 162 Company Report: Satellite Meter and Receiver Manufacturer Trimax, China................................... 172 Company Report: Wholesaler and Installer Sortec, Slovakia................................ 178 Company Overview: Best Digital TV Companies of the World................................... 188 Company Report: Satellite Uplink Station Castor, Netherlands........................... 200 DXer Report: Saul Spinetti in São Paulo, Brazil......... 212 DXer Report: Satellite Enthusiast in Budapest, Hungary............................ 218 Satellite DXer Overview: Hall of Fame of Satellite Enthusiasts of the World..................... 228 Technical Service: Digital TV Transponder Streams around the World............................... 236 DTT of the World............................ 262 Global Readership of TELE-satellite Magazine.................. 272
- 10. ADVERTISER‘S INDEX 8DTEK....................................... China........................ 51 ALUOSAT................................... China................105, 111 AMIKO....................................... Hungary..................... 9 APPLIED INSTRUMENTS........... USA........................ 209 AZBOX....................................... Portugal..................275 AZURESHINE............................. Taiwan..................... 67 B2C-ELECTRONIC...................... Germany..............32-33 BEIJINGTOPREAL...................... China.......................125 BOIINGSAT............................... China.......................131 BOMARE.................................... Algeria.................. 205y BSD........................................... Brazil......................253 BT............................................. UK.......................... 239 BYAELECTRONIC....................... Algeria....................225 CABSAT2012............................. UAE.......................... 91 CARDATTACK............................. Germany.................211 CASTOR..................................... Netherlands............241 CCBN2012................................. China.......................129 CHINABROADCASTING............. China.......................253 CNBROADCASTING................... China.......................255 COMMUNICASIA2012................ Singapore........165, 175 CONVERGENCEINDIA2012........ India.......................187 DEVISER................................... China........................ 65 DEKTEC..................................... Netherlands............137 DIGITALTELEMEDIA.................. China.......................276 DISHPOINTER........................... UK...........................243 DOEBIS..................................... Germany..............14-15 DOEBIS-JAEGER........................ Germany.................. 83 DVBCN...................................... China.......................247 DVBWORLD............................... UK.......................... 209 FULANELECTRONICS................. China.......................... 5 GECEN....................................... China...................55, 85 GLOBALINVACOM...................... UK............................ 61 GOLDENMEDIA.......................... Germany.................. 75 HANGZHOUPREVAIL................. China................... 46-47 HORIZON.................................. UK............................ 43 IBC2012.................................... UK....................161, 181 ICECRYPT.................................. UK.............................. 4 ICLASS...................................... Korea....................... 11 JAEGER..................................... Germany.................. 83 JIUZHOU................................... China.......................276 JONSA....................................... Taiwan....................211 KARMACOM............................... Hungary..................... 9 LEXIUM..................................... USA.........................227 MEGASAT.................................. Germany..............32-33 MFC........................................... USA.........................221 MICO......................................... China.......................... 2 MOTECK.................................... Taiwan....................227 NABSHOW2012......................... USA.... 147, 169, 177, 185 NETUP....................................... Russia.....................215 OIPF.......................................... Sweden...................257 OPENSAT................................... Portugal..................275 PANODIC................................... China.......................... 2 PREVAIL.................................... China................... 46-47 SAPRO....................................... Czech......................215 SATBEAMS................................. Belgium...................251 SATCATCHER............................. UK............................ 77 SATELLITEGUYS........................ USA.........................245 SBTVD....................................... Brazil......................249 SCATINDIA2012........................ India.......................167 SEN5......................................... China........................ 51 SICHUANJIUZHOU.................... China.......................276 SICHUANVIDEOELECTRONIC.... China........................ 37 SKYWORTH............................... China........................ 21 SMARTWI.................................. Denmark.................151 SOWELL.................................... China........................ 27 SPAUN....................................... Germany.................. 23 STREAM..................................... Algeria....................207 SVEC......................................... China........................ 37 TEHNICB................................... Romania..................221 TENOW...................................... China........................ 95 TEVII........................................ Taiwan....................225 TOPREAL................................... China.......................125 TRIMAX..................................... China.......................143 TURBOSAT................................. UK.............................. 4 WSINTERNATIONAL.................. USA........................ 229 10 TELE-satellite International — The World‘s Largest Digital TV Trade Magazine — 02-03/2012 — www.TELE-satellite.com
- 12. 02-03/2012 AZBox ME Today‘s absolute best Linux Receiver 04-05/201 1 Fulan ST7111 Excellently designed operating software with built-in customer service 12 TELE-satellite International — The World‘s Largest Digital TV Trade Magazine — 02-03/2012 — www.TELE-satellite.com
- 13. 08-09/2009 Global Invacom Optical LNB The first worldwide production-ready optical satellite reception and transmission system with excellent results – an investment that already makes sense today MAGAZINE 10-1 1/201 1 Tenow TBS6984 Made for TV addicts who can never watch and record enough channels. 13 www.TELE-satellite.com — 02-03/2012 — TELE-satellite International — The World‘s Largest Digital TV Trade Magazine
- 16. 16 TELE-satellite International — The World‘s Largest Digital TV Trade Magazine — 02-03/2012 — www.TELE-satellite.com The New Super Receiver • Can be started in three different user interfaces • Comes with an extremely sensitive tuner • Already a fully functional multimedia box • Very low heat generation guarantees long hardware life • Includes learning remote control and reset button in case of unsuitable images TEST REPORT Linux HD Receiver
- 17. 17 www.TELE-satellite.com — 02-03/2012 — TELE-satellite International — The World‘s Largest Digital TV Trade Magazine TELE-satellite Magazine Business Voucher www.TELE-satellite.info/12/03/azbox-me Direct Contact to Sales Manager
- 18. 02-03/2012 0.51 18 TELE-satellite International — The World‘s Largest Digital TV Trade Magazine — 02-03/2012 — www.TELE-satellite.com What‘s the difference be- tween a super receiver and a normal receiver? If it‘s a Linux receiver you‘re talking about, then the answer is clear: it‘s when it can boot in more than just one Linux image. For the Linux operating system there are a number of very sophisticated user interfaces that each have there own special highlights. TELE-satellite has already reported on Linux receivers that can boot in two different images. But the brand new AZBox ME can actually start with three different images and that for us makes it a super receiver. Naturally the AZBox ME can do a lot more than just start with three dif- ferent user interfaces. This surprising receiver makes quite an impression. The housing is made of black metal while the front visor is a mix of brushed aluminum and a black acrylic visor be- hind which can be found a VFD display. The shape of the receiver is easy to de- scribe: it is perfectly square all around (25cm x 24 cm x 4 cm). The simple design of the receiver was also carried over to the front visor which is just as minimalistic in de- sign. You can only see a sin- gle button surrounded by an LED ring the color of which indicates the operational status of the receiver, as well as a VFD display that can show alphanumeric charac- ters in blue and a USB port. It was nice to see that the AXBox designers installed the USB port in the proper orientation so that a USB stick won‘t face down when it‘s inserted. It‘s a minor detail but, nevertheless, we can‘t quite understand TEST REPORT Linux HD Receiver why some manufacturers don‘t install the USB port the proper way. A stylish „Z“ made out of brushed alumi- num, the logo of the AZBox family, rounds out the front panel of the receiver. We ap- AZBox ME Today's absolute best Linux Receiver
- 19. 19 www.TELE-satellite.com — 02-03/2012 — TELE-satellite International — The World‘s Largest Digital TV Trade Magazine preciated the simple design; it doesn‘t always have to be a complex geometric shape. Sometimes less is more. Since the housing isn‘t coat- ed in a glossy paint, you can handle the receiver as much as you want without having to worry about getting fin- gerprints on the surface. It was at this point that a question came to mind: shouldn‘t this receiver have a card reader? We checked the back of the box and didn‘t find one there. Only when we looked at the right side did we find a slit in the hous- ing. Yep, that must be it. The card reader supports Conax SmartCards. If you want to use this card reader, keep in mind that the SmartCard will stick out about 2cm so you have to make sure there is enough room on the side of the receiver. When we took a closer look at the receiver‘s rear panel, we instantly noticed an inconspicuous switch: BOOT Normal/Recovery. If a problem ever occurs during a firmware flash, there‘s no need to panic! Simply move the switch over to Recovery and load new firmware via the network. For the user this means no more worry- ing about accidentally up- loading the wrong firmware or having the power go out during a flash process. And while we‘re talking about flashing, the AZBox ME has the largest capac- ity memory that we know of. A fat 512MB lets us in- stall three firmware images in parallel. During the boot process, Bank 0, 1 or 2 can be selected. These banks can be flashed however the user likes so that there‘s re- ally no excuse not to try ev- ery available image! The receiver comes shipped with two different Linux images (Bank 0 and 1). Actually, Android should also be part of this but at the last moment chip manufacturer Sigma backed out of the OpenMIPS project. That‘s too bad. Although it‘s not that big a tragedy; it would still have been a MIPS pro- cessor based Android which means it couldn‘t have been used to access the Google Market not to mention the thousands of apps that can be found there - these are all laid out for ARM proces- sors. But since AZBox manu- facturer OpenSAT makes the source codes available to any interested developer, there‘s still hope that something will happen with Android. The rear panel also sports an HDMI port and RCA jacks for component outputs (YUV) as well as composite video and audio (L+R). In addition there‘s e-SATA, USB 2.0 and an optical audio out- put. We also liked the main power switch that can be used to turn the receiver completely off. Many manu- facturers omit this switch even though it does make sense to be able to turn the receiver completely off if it won‘t be used for a while. Pulling the plug out is not the best way to kill power to the receiver especially if the cables are all nicely placed behind a cabinet. The available YUV jacks are perfect for those who have, for example, a video projector, that still don‘t have their own digital inputs. The component outputs pro- vide a way to enjoy HDTV using an analog pathway. The AZBox ME only comes with one tuner but it has a looped-through output so that additional receivers can be connected. In addition to instructions for program- ming the three flash posi- tions and a pocket guide, there‘s also a remote control and a SATA cable as well as a set of screws. Since a Linux receiver can only reach its full poten- tial with a hard drive, we acquired a 2.5“ SATA hard drive. You could, of course, also use an external hard drive via the USB port or e-SATA interface, but this would disturb the harmony in the living room by add- ing more visible components and cables. Installing the hard drive is easy. A total of seven screws need to be removed from the receiver housing in order to get the top cover off. The designers of the AZBox ME came through once again: a sheet metal box is mount-
- 20. 20 TELE-satellite International — The World‘s Largest Digital TV Trade Magazine — 02-03/2012 — www.TELE-satellite.com ed to the housing with four screws; it can hold a 2.5“ as well as 3.5“ hard drive. We never expected that this little receiver would also be able to hold a 3.5“ hard drive! Another plus point! Once everything was screwed back together, the hard drive was automatically recognized. It was format- ted through the Hard Drive menu. Included were all of the typical PVR functions such as Timeshift and timer recordings. The AZBox ME remote con- trol is ideal. Even though it‘s rather unremarkable and not all that luxurious, it does sit nicely in your hands with all of the buttons easily reach- able with your thumb. The arrow buttons are surrounded by a ring of six additional buttons. This ar- rangement might take a little getting used to in that, for example, you could acciden- tally press the EPG button instead of the down-arrow button. But it won‘t take long before you get used to the setup and are able to keep the buttons separate from one another. The highlight of the remote control can actually be found inside the battery compart- ment: there you‘ll find a but- ton that activates the learn- ing function. This makes it possible to reprogram the right button in the first row to, say, turn your TV on and off. But, of course, you can reprogram this button to handle every other possible function. The AZBox ME is delivered with two pre-installed Linux images; the user is immedi- ately given a choice between the two images. Even though both of them are Linux imag- es, they both use completely different user interfaces. We selected „Boot (0)“ to start with. An assistant recog- nized the first-time use and guided us through the vari- ous steps. First on the list was selecting the language. It‘s interesting to note that you can also choose „Bavar- ian“ as one of the languages. Next come the video set- tings. Lastly comes the tuner configuration and the start of a channel scan. We tested the firmware with our DiS- EqC 1.0 antenna system that consists of four antennas pointed to ASTRA 28.2E, AS- TRA 19.2E, HOTBIRD 13.0E and HISPASAT 30W. The channel scan revealed the expected number of chan- nels and did so in a speedy fashion. With a freshly generat- ed and therefore unsorted channel list it might not be much fun channel surfing; it would probably take quite a few button pushes to wade through the thousands of channels before you‘d find a channel you like. This Linux operating sys- tem functions in a beautifully different way: the up/down buttons as expected switch between one channel at a time forwards or backwards while the left/right buttons switch between providers. They are automatically ar- ranged by satellite. Once you get used to this simple logic, you can switch amazingly fast between channels. Naturally you can use a variety of settings editors to modify the settings. We recommend the excellent freeware „DreamSet“ (www. dreamset-editor.com) since it‘s compatible with the dif- ferent firmware versions of the AZBox ME so that you only need one editor for both images. Operating the Boot (0) im- age is for the most part logi- cal and self-explanatory. The Boot (0) firmware left us with an overall good impression. It‘s easy to see that we‘re dealing with a mature oper- ating system in which every function has been perfectly
- 22. 22 TELE-satellite International — The World‘s Largest Digital TV Trade Magazine — 02-03/2012 — www.TELE-satellite.com integrated. We quickly be- came acclimated to the EPG and the Videotext feature also functioned lightning fast with its unlimited page memory. It‘s curious though: while watching a channel, a push of the red button dis- plays a small „Event List“ menu from which EPG infor- mation can be accessed. A fourth menu point is labeled „Technical Information“ and makes it possible to display a variety of relevant informa- tion on the currently running program. All the PIDs are shown as is information on resolution and reception plus there‘s a black box on the right side that is supposed to display a graphic with BER, SNR, signal and bitrate. Al- though these values are also shown numerically, the graphic was not displayed. Hopefully this will be cor- rected in a future version of the firmware; a satellite DX- ers heart beats faster with this kind of information and if it‘s displayed graphically, it then makes it possible to observe this data over time. We entered the IP address of the AZBox ME into the PCs Mozilla Firefox browser to test if it would be presented in the web frontend. And sure enough, a page was opened with an abundance of functions. You can access the EPG information for all channels, switch between channels and stream them into the browser and display them using the browser‘s VLC plug-in. You don‘t have to sit in front of the TV; you can ac- cess the receiver through the network. You can also completely configure the AZBox ME through the web frontend, set up timer re- cordings - you can even call up a virtual remote control. It‘s unbelievable how far the integration between the re- ceiver and browser has gone. After spending some time with this image, our curiosity got the better of us and we couldn‘t wait any longer; we had to try the image at „Boot (1)“. To accomplish this we had to perform a reset and then while restarting the re- ceiver we had to hold down the „1“ button on the remote control until the receiver confirmed our selection. The receiver‘s boot loader recog- nizes the last selected image and boots it automatically so that when switching images the user simply needs to se- lect 0, 1 or 2 during the boot process. A totally different greet- ing image appeared and after only a short loading time we could clearly see that a completely different user interface was loaded. Even though the skin of the interface was adapted to the AZBox ME, we instantly recognized one of the most popular operating systems of Linux satellite receivers. As before, an assistant once again guided us through the initial setup. In the first step the video output and resolution are selected. Next the user selects from a list of many different lan- guages whereby a small flag is shown next to the lan- guage name. It‘s a small but useful element if you can‘t read the English spelling of each language. After a short introduc- tion to navigating with the remote control, the next step was the configura- tion of the tuner. You can choose between a simplified automatic configuration or an expanded configuration for more complex satel- lite systems. We opted with the simple configuration for DiSEqC 1.0 with four inputs (A, B, C and D). The last step was starting an automatic channel scan. After just a few minutes it was complete and we could
- 23. Compact Headend 8 / 16 x DVB-S(2) into QAM BluBox 8 and BluBox 16 • 8 / 16 x DVB-S(2) (QPSK/8PSK) into DVB-C (QAM) • For the reception of 60/120 TV programs SD/HD and 30/60 Radio programs • Compact dimensions and high energy efficiency • LNB control with 14/18 V + 22 kHz or DiSEqC • Configuration via LAN/IP • Complete processing of the transport streams possible • All 8 / 16 output channels can be placed individually in the spectrum • Two individual input ports SAT-HD-ANALYZER SPAROS SAT HD • High quality and bright display (4.3 inch) • MPEG4-display and measuring • SCR single cable switching commands according to EN 50494 • DiSEqC control • Spectrum analysis • Robust, impact-resistant housing • Splash-resistant keypad Optical Transmitter SOTx 1310607 NF • Frequency range of 47 ... 2200 MHz • Laser output power: +6 dBm • Quattro- and QUAD-LNB support Optical Receiver SORx 1310607 NF and SORx 1310607/1 NF • 4-way / 1-way receiver in a compact housing • Remote powerable through one coaxial output
- 24. 24 TELE-satellite International — The World‘s Largest Digital TV Trade Magazine — 02-03/2012 — www.TELE-satellite.com check out the functions. Channel surfing was clocked at 2-3 seconds between FTA HD channels and 1-2 seconds for FTA SD channels. The EPG information was dis- played very nicely; you can select from different display modes and even lengthier program descriptions are to- tally readable. The PVR func- tions are also available with this image as they were with the Boot (0) image. The Timeshift function can be activated at any time - all you have to do is push the Pause button. Oddly enough, the real Pause function was programmed into the yellow button. Recordings are not started with the Record button (this switched the receiver over to radio mode) but rather with the red button. We‘re deal- ing here with a contradiction in the keyboard layout that is due to the OpenSource Linux operating system. Neverthe- less, it didn‘t take long to get used to this arrangement. Recordings can be started at any time, although we were much more interested in how easy it would be to program a recording and if the receiver could correctly handle this programmed re- cording coming out of stand- by mode. We came up with the following situations: • Recording from Standby with the antenna already pointed at the correct satel- lite. Result: the recording was handled without any problems. • Recording while watch- ing another channel in which the antenna was pointed at a different satellite. Result: no problems here either. The AZBox ME promptly displayed a message on the screen that because of a timer recording the satellite has to be changed. It then switched to the programmed channel. Outstanding! • Attempt to timer record two overlapping programs on two different transpon- ders. Result: in this case the receiver displayed a mes- sage that involved two over- lapping programs. The user needs to select recordings in
- 25. 25 www.TELE-satellite.com — 02-03/2012 — TELE-satellite International — The World‘s Largest Digital TV Trade Magazine such a way that there is no conflict between them. • Attempt to timer record two overlapping programs on the same transponder. Result: the receiver didn‘t have any problems here; it can handle multiple record- ings on the same transpon- der. At this point we wanted to test how well suited the AZ- Box ME would be for satellite DXers. Somewhat different criteria are important here. Satellite DXers want to be able to receive rare or weak signals. Most of the time this involves feeds, that is, brief transmissions such as with live broadcasts. In many cases these transmissions are unedited, something that can be very entertaining especially if you happen to catch a blooper or some other mishap that would normally not make it to the regular transmission. Many feeds are encrypted, but luckily not all of them. But often enough the MPEG 4:2:2 format is used which can handle a larger color
- 26. 26 TELE-satellite International — The World‘s Largest Digital TV Trade Magazine — 02-03/2012 — www.TELE-satellite.com this type of transmission. But this makes the AZBox ME amazing in that it can play back this format without any lag! This fact alone would be a great selling point in feed hunter circles. To test it we found sev- eral transponders with MPEG 4:2:2 feeds. We had luck with the first transponder and were able to watch a live broadcast. To verify that this was indeed a transmis- sion with MPEG compres- sion in 4:2:2, we recorded the transponder stream (TS) and copied it to our PC us- ing FTP. The Open Source tool „Mediainfo“ (mediainfo. sourceforge.net/en) offers the necessary assistance in that in addition to the Codec, the Chrome Profile is also shown. Feedhunters love to use a function called BlindScan in which the entire frequency range of an LNB is scanned in a very short time for ac- tive transponders without having to enter in additional parameters such as symbol rate or FEC. Although the AZBox ME currently doesn‘t have a BlindScan feature, the addi- tion of this function has been promised for one of the next firmware versions. The most critical component is already in place: a BlindScan-com- patible tuner! To see how well the AZ- Box ME works with motor- ized antennas, we hooked up the receiver to our 1.0-me- ter offset antenna with DiS- EqC 1.2 motor. We asked the receiver to perform an automatic channel scan on 14 different satellites. Since this task would take some time, we let the receiver run overnight. We woke up the next morning anxious to see if the receiver was successfully able to handle the job or if it crashed, something that happens all too often with other receivers. To our relief we found that the receiver was still running and that it had found a total of 6136 services (TV, radio and data). This was impres- sive especially because a storm passed through dur- ing the test that knocked our antenna slightly out of align- ment and therefore was no longer optimally aligned. Instead of trying to per- fectly realign the antenna, which was not possible be- cause of the ongoing storm, we turned the antenna to space so that an acceptable picture can be displayed even after it has been edited several times over. Standard receivers can‘t do anything with this format and therefore can‘t display ASTRA 2D to see if we could receive BBC HD. Well, how about that! The tuner, de- spite a small antenna, a misaligned motor and bad weather was able to receive the problem transponder 50 (10847 V 23000, 8/9) on AS- TRA 2D and display it with- out any interference. Additional traits of a good tuner include the ability to receive small symbol rates and also to display a pic- ture even if the signal is weak. With that in mind we turned our dish to TELSTAR 12 at 15W and called up the 11566H transponder. This uses a symbol rate/FEC of 5625 ½. BYU TV was dis- played without any hesita- tion worth mentioning. We also attempted the Russian INTER+ channel on the same satellite that was broadcasting on 10988H with a symbol rate/FEC of 2180 ¾. This transponder had already been found dur- ing our overnight channel scan. Thus far we‘ve been very impressed with the capabili- ties of this receiver but we still hadn‘t checked out the multimedia side of this box. So, we decided to copy a number of movies from the AVI container via FTP onto the receiver‘s hard drive and in a second test we connect- ed an external USB 2.0 hard drive that contained multi- media content. All of the movies were played back without any problems; even DivX coded movies were handled without any difficulties. We weren‘t, however, able to display sub- titles in SRT format; but this is normal: we don‘t know of any receiver that can do this. The AZBox ME surprised us once again when we inadver- tently tried to open an AVI file that originated from our Fuji S9000 camera. These videos normally can only be opened under Windows and quite often a Codec from the camera manufacturer would also have to be installed. Be- fore we realized what we had done, the receiver played the video back without any difficulties at all.
- 28. 28 TELE-satellite International — The World‘s Largest Digital TV Trade Magazine — 02-03/2012 — www.TELE-satellite.com Playing movies back from a hard drive is all by itself a beautiful thing, but it would be far better to be able to have direct access to our multimedia server on which can be found a nicely or- ganized library of music, pictures and movies. The server allows via SAMBA free access to this data. We spent a few moments with the AZBox‘s network settings and were able to es- tablish a connection rather quickly. Instantly a new hard drive appeared in the mul- timedia player from which we could access our server through the network. We tested a variety of media types and confirmed to our satisfaction that it was no bother for the AZBox ME to play back DivX data via the network. Another great feature is the integrated YouTube cli- ent. This lets you watch YouTube videos through the AZBox ME on your TV. The text entry in the search field with the keyboard was actu- ally quite fast and it was fun playing with this application. The incredible assortment of features in this receiver can be even limitlessly ex- panded with the installation of Plugins. There are already a number of Plugins avail- able that can be directly downloaded into the receiver and, of course, Plugins can be manually copied via FTP to the AZBox ME and then installed. And just like with the first image, we also opened the Mozilla Firefox browser on our PC in the Boot (1) image. And just like before we were able to access nearly all of the AZBox ME‘s functions via the web frontend although it was a completely differ- ent web frontend; one that was suitable to the Boot (1) image. There are so many functions that you could use that you‘ll always discover something new. We were able, for example, to take a movie, that we earlier copied to the receiver‘s hard drive via FTP, and stream it to the PC via VLC through the web frontend. Throughout the entire test, during which the AZ- Box ME was thoroughly put through its paces, the re- ceiver remained remarkably cool even though there was no cooling fan. Every other Linux receiver that we know of gets quite hot and even puts out more heat in stand- by mode than the AZBox ME does in normal operational mode. This guarantees that the internal hard drive and the electronics will have a long and healthy life.
- 29. DATA TECHNICAL Manufacturer OpenSAT Ltd, Lagoa, 4950-283 Mazedo, Portugal Website www.azbox.com E-Mail info@azbox.com Model AZBox ME Function Digital HDTV / Linux Receiver with Multimedia Features and large Flashmemory for 3 Boot Images Processor (CPU) SIGMA SMP 8655 AD RAM Memory DDR 256 MB Video Memory DDR 256 MB Flash Memory 512MB Tuner Availink AVL2108 Single Tuner, Blindscan capable DiSEqC 1.0, 1.1, 1.2, USALS Harddrives eSATA and internal SATA (2.5“ or 3.5“) Video Out HDMI, YUV and Composite-Video Video Containers MPEG1/2/4 (M1V, M2V, M4V); MPEG1/2 PS (M2P, MPG); MPEG2 Transport Stream (TS, TP, TRP, M2T, M2TS, MTS), VOB, AVI, ASF, WMV, IFO, ISO; Matroska (MKV), MOV (H.264), MP4, RMP4 Video Codecs XVID SD/HD; MPEG-1; MPEG-2: MP@HL; MPEG-4.2: ASP@L5, 720p, 1-point GMC; WMV9: MP@HL; H.264: BP@L3; H.264: MP@L4.0; H.264: HP@L4.0; H.264: HP@L4.1; VC-1: MP@HL; VC-1: AP@L3 Audio Containers AAC, M4A, MPEG Audio (MP1, MP2, MP3, MPA), WAV, WMA, FLAC, OGG Audio Codecs: AAC, AAC+, Dolby Digital, DTS, WMA, WMA Pro, MP1, MP2, MP3, LPCM, FLAC, Vorbis, DTS (Audio Passthrough); Dolby Digital (Audio Passthrough) Picture Formats JPEG, BMP, GIF Resolutions 576i (480i), 576p, (480p), 720p, 1080i, 1080p Ethernet 10/100 Base-T Ethernet Card Reader 1x (Conax Licence) Vitor Martins Augusto TELE-satellite Test Center Portugal + – DIAGRAM ENERGY Active Power Apparent Power Mode Apparent Active Factor Deep Standby 8.5 W 2.5 W 0.29 PVR 26 W 14 W 0.53 Reception 21.5 W 11 W 0.51 Standby 21 W 10 W 0.47 29 www.TELE-satellite.com — 02-03/2012 — TELE-satellite International — The World‘s Largest Digital TV Trade Magazine Best Linux receiver with outstanding hard- ware Factory-equipped with two Linux images Large flash memory can administer three images Emergency image can be activated through a switch Low heat dissipation No cooling fan BlindScan function not yet available (coming soon) Expert Opinion We could have tested this receiver for days on end; we were always discovering new and fascinating features or capabilities in this little pow- erhouse. The AZBox ME is truly a super receiver. Normal, everyday users will be satisfied with every aspect of this box: it comes with a fast processor and the modern firmware permits in- tuitive operation. Three dif- ferent firmware images can be installed at the same time so that it‘s easy to try out a different image. Even the most daring at- tempts at flashing the mem- ory no longer pose any risk since the little switch on the back of the receiver guaran- tees that you can reflash the receiver should something ever go wrong. This receiv- er lets you enjoy the high- est levels of multimedia - it can easily take the place of other multimedia devices. The vast array of functions in this receiver will blow away even the most experienced enthusiasts and they‘d have the ability to always try out new functions, Plugins and images. Even for the most sophis- ticated satellite DXer, this receiver would be an incred- ibly fascinating machine - it comes with a highly modern tuner that also happens to be extremely sensitive plus it can handle professional MPEG 4:2:2 transmissions. The AZBox ME manufacturer OpenSAT has already said that they will shortly be add- ing BlindScan as well. All of this is packaged in a small, attractive housing. We are very enthusiastic about this box and want to congratulate OpenSAT for the success of this super re- ceiver.
- 30. TEST REPORT on the Internet 30 TELE-satellite International — The World‘s Largest Digital TV Trade Magazine — 02-03/2012 — www.TELE-satellite.com Linux HD Receiver Was unterscheidet ei- nen Super Receiver gegen einen normalen Receiver. Wenn es sich um einen Li- nux-Receiver handelt, dann lautet eine klare Antwort darauf: wenn er in mehr als nur eines der Linux-Images booten kann. Denn für das Betriebssystem Linux gibt es eine Vielzahl sehr aus- gereifter Benutzeroberflä- chen, die jede für sich über ihre eigenen Highlights ver- fügen. Über Linux-Receiver, die in zwei Linux Images booten können, berichtete TELE-satellite bereits. Aber die nagelneue AZBox ME kann sogar in drei Images starten und das macht sie für uns zu einem Super Re- ceiver. Aber die AZBox ME kann natürlich noch weitaus mehr, als in verschiedenen Benutzerprogrammen zu starten. Der überraschend kleine Receiver macht einen sehr wertigen Eindruck. Das Ge- häuse besteht aus schwar- zem Metall, die Frontblende aus einer Mischung zwi- schen gebürstetem Alumi- nium und schwarzer Ac- rylblende, hinter welcher sich ein VFD-Display ver- birgt. Die Form des Recei- vers lässt sich sehr einfach beschreiben: sie ist qua- dratisch (25cm x 24 cm x 4 cm), ohne jede Spiele- rei. Das minimalistische Design kommt jedoch gut zur Geltung, da auch die Frontblende entsprechend entworfen wurde. Nur ein einziger Knopf, umgeben von einem LED-Ring, des- sen Farbe Hinweis auf den Zustand des Receivers gibt, das schon angesproche- ne VFD-Display, welches 8 alphanumerische Zeichen in blauer Farbe darstellen kann, und ein USB-Port sind hier sichtbar. Schön ist, dass die AZBox Entwickler den USB-Port richtig herum eingebaut haben, so dass ein eingesteckter USB-Spei- cher nicht nach unten zeigt. Dies ist zwar nur eine Klei- nigkeit, trotzdem verstehen wir es nicht, warum manche Hersteller es nicht schaffen, die USB Ports richtig herum einzubauen. Ein stilisier- tes „Z“ aus gebürstetem Aluminium, Markenzeichen der AZbox Familie, runden das vordere Erscheinungs- bild ab. Uns hat das Design sehr gut gefallen. Es muss nicht immer eine komplexe Geometrie sein, manchmal ist weniger definitiv mehr. Da das Gehäuse nicht mit Klavierlack gefärbt ist, kann man den Receiver nach Lust und Laune berühren und Download this report in German www.TELE-satellite.com/TELE-satellite-1203/deu/azbox.pdf anfassen, ohne dass gleich störende Fingerabdrücke entstehen. An dieser Stelle kam uns eine Frage auf: sollte das Gerät nicht einen Kartenle- ser haben? Auf der Rücksei- te fanden wir auch keinen… Doch dann sahen wir auf der rechten Seite einen Schlitz im Gehäuse. Ja, das muss er sein. Standardmäßig un- terstützt der Kartenleser Conax Smartcards. Möchte man diesen Kartenleser be- nutzen, gilt es zu bedenken, dass die Karte ungefähr 2 cm absteht und somit etwas Freiraum zur Seite benötigt wird.
- 31. 31 www.TELE-satellite.com — 02-03/2012 — TELE-satellite International — The World‘s Largest Digital TV Trade Magazine Als wir uns die Rücksei- te des Receivers näher an- schauten, fiel uns sofort ein unscheinbarer Schalter auf: BOOT Normal/Reco- very. Wenn beim Flashen einer Firmware etwas doch nicht klappt, dann hat man bei diesem Receiver keinen Grund zur Panik! Einfach den Schalter auf Recovery schieben und über das Netz- werk eine neue Firmware aufspielen. Für den Anwen- der heißt es: endlich keine Sorge mehr, dass man aus Versehen die falsche Firm- ware aufspielt, oder dass mitten im Flashvorgang der Strom ausfällt. Und wo wir schon über das Flashen sprechen: die AZbox ME hat den größten uns bekannten Flashspei- cher. Großzügige 512MB erlauben es, parallel 3 Firmware-Images zu instal- lieren. Beim Bootvorgang kann zwischen Bank 0, 1 und 2 gewählt werden. Die- se können je nach Belieben des Anwenders geflasht werden, so dass man wirk- lich keine Ausrede hat, alle verfügbaren Images aus- zuprobieren! Der Receiver wird mit zwei verschiedenen Linux-Images ausgeliefert (Bank 0 und 1). Eigentlich sollte sich noch Android hin- zugesellen, doch da machte der Chip-Hersteller Sigma im letzten Moment einen Strich durch die Rechnung und zog sich aus dem Open- MIPS Projekt zurück. Scha- de. Aber eigentlich auch kein echter Verlust, denn es handelte sich eben doch um ein auf MIPS Prozesso- ren angepasstes Android, mit welchem man sowie- so nicht auf Google Market geschweige denn auf die tausende Apps zugreifen könnte, da diese für ARM Prozessoren ausgelegt sind. Da der AZBox Hersteller OpenSAT aber die Source- codes jedem interessierten Entwickler zukommen lässt, bleibt doch die Hoffnung, dass es noch was werden könnte mit Android. Auf der Rückseite finden wir weiterhin einen HDMI- Anschluss, Chinch-Buchsen für den Komponenten-Aus- gang (YUV), Composite-Vi- deo und Audio (L+R). Dazu noch e-SATA, USB-2.0 und einen optischen Audio-Aus- gang. Sehr positiv bewer- ten wir das Vorhandensein eines Einschaltknopfes, der den Receiver komplett ab- schaltet. Diesen sparen vie- le Hersteller ein, obwohl es doch Sinn macht dass man den Receiver auch komplett abschalten kann, wenn man ihn über einen längeren Zeitraum nicht nutzt. Den Stecker zu ziehen ist selten eine sinnvolle Alternative, besonders wenn die Kabel schön aufgeräumt hinter dem Schrank liegen. Die vorhandenen YUV Chinch-Buchsen sind ein echter Mehrwert für all diejenigen, die z.B. einen Videoprojektor besitzen, der noch nicht über digi- tale Eingänge verfügt. Ein Componenten-Anschluss über YUV bietet in diesem Fall die Möglichkeit, HDTV über dem analogen Weg zu genießen. Die AZbox ME bietet nur einen Tuner, doch dieser hat einen durchge- schleiften Ausgang, so dass man weitere Receiver an- schließen kann. In der Verpackung wird neben einer Anleitung zum Programmieren der drei Flashpositionen und einer Kurzanleitung noch eine Fernbedienung und ein SATA-Kabel sowie ein Satz Schrauben mitgeliefert. Da ein Linux-Receiver sein volles Potential nur mit einer Festplatte ausspielen kann, haben wir uns eine 2.5“ SATA Festplatte be- sorgt. Natürlich kann man eine solche auch extern über USB-2.0 oder e-SATA betreiben, doch dies stört die Harmonie im Wohnzim- mer, denn es sind wieder erneute Gehäuse und Ka- bel sichtbar. Der Einbau der Festplatte ist leicht zu bewerkstelligen. Insgesamt müssen am Gehäuse 7 Schrauben entfernt werden, Download this report in English www.TELE-satellite.com/ TELE-satellite-1203/ eng/azbox.pdf um den Deckel abheben zu können. Wieder haben die AZBox Entwickler mitge- dacht, denn im Inneren ist eine Blechhalterung mit 4 Schrauben am Gehäuse be- festigt, die sowohl 2.5“ als auch 3.5“ Festplatten tra- gen kann. Wir hatten gar nicht erwartet dass dieser kleine Receiver auch 3.5“ Festplatten unterbringen kann; noch ein Pluspunkt! Nachdem alles wieder zu- geschraubt war, wurde die Festplatte automatisch er- kannt. Diese haben wir im Festplatten-Menü forma- tieren lassen. Es standen nun auch die typischen PVR Funktionen wie Timeshift oder Timer-Aufnahmen zur Verfügung. Die Fernbedienung der AZBox ME ist genial. Ob- wohl etwas unscheinbar und nicht besonders luxu- riös gestaltet, liegt sie sehr gut in der Hand und ermög- licht es, mit dem Daumen alle Tasten zu erreichen. Etwas gewöhnungsbedürf- tig ist der Umstand, dass um die Richtungstasten weitere 6 Tasten ringför- mig angeordnet sind, was in der Einarbeitungsperiode dazu führte, dass man statt auf die Unten-Taste auf die EPG-Taste drückt. Haptisch sind diese jedoch nach kur- zer Zeit sehr wohl auseinan- der zu halten. Der absolute Höhepunkt der Fernbedie- nung verbirgt sich jedoch im Batteriefach: dort ist ein kleiner Knopf, der die Lern- funktion aktiviert. Diese er- möglicht es, die rechte Tas- te in der ersten Zeile neu zu programmieren. Sie dient dazu, das Fernsehgerät ein und auszuschalten. Man kann aber natürlich jede andere Funktion auf diese Taste programmieren. Die AZBox ME wird mit zwei vorinstallierten Linux- Images ausgeliefert, der Anwender kann also sofort zwischen den Images wäh- len. Obwohl es sich in bei- den Fällen um Linux-Images handelt, verwenden diese komplett unterschiedliche Benutzeroberflächen. Wir wählten erst mal „Boot (0)“. Ein Assistent erkannte die Erstbenutzung und führte uns durch die verschiede- nen Schritte. Als erstes galt es, die Sprache zu wählen. Kurios ist hier, dass auch „bay- risch“ als Sprache gewählt werden kann. Weiter geht es mit den Video-Einstel- lungen.
- 34. 34 TELE-satellite International — The World‘s Largest Digital TV Trade Magazine — 02-03/2012 — www.TELE-satellite.com SatCatcher Digipro C Max Professional • compares favorable to professional meters • comes with many useful accessories for the installer • easy to read screen even in direct sunlight • includes Tilt measurement for professional installations TEST REPORT Digital Cable Meter
- 35. 35 www.TELE-satellite.com — 02-03/2012 — TELE-satellite International — The World‘s Largest Digital TV Trade Magazine TELE-satellite Magazine Business Voucher www.TELE-satellite.info/12/03/satcatcher Direct Contact to Sales Manager
- 36. 02-03/2012 36 TELE-satellite International — The World‘s Largest Digital TV Trade Magazine — 02-03/2012 — www.TELE-satellite.com Satcatcher Digipro C Max More than a cable meter: includes everything a professional installer needs An Accurate Instrument With Many Accessories Accuracy is something that every installer will value with a signal meter but apart from that true professional users have further demands on a me- ter: the instrument should have a bright and readable display, and its keyboard should be easy to oper- TEST REPORT Digital Cable Meter ate. It should also offer a wide choice of accessories making the work simpler and more efficient. To our delight, the new Digipro C Max by Satcatcher fulfills all those requirements. Its display is exceptionally bright and clear, you can operate its keyboard even with gloves on your hands, and the number of accesso- ries they offer to the pro- fessional user is really sur- prising. The meter can be sup- plied packaged in two ways. In a metal box like other Satcatcher meters or in a premium package with lots of extras included. For our test we opted for the latter and were delighted at the many useful accessories. The most unusual and most useful for an installer is a fully adjustable vest with a lot of pockets and straps. It allows you not only to transport and use the me- ter in a convenient way but also to keep handy all sorts of other tools an installer must have. Apart for the vest, you get a plug type power supply, a car lighter DC charger, a neck strap with a piece of sheep skin fur to avoid skin irritation, and a bad weather cover for the meter along with an attachable sun shade. Everything is neatly packed in a carrying bag so you do not need to worry that your meter accessories will disappear somewhere over time. The workmanship of the Digipro C Max is very good. The enclosure is robust but quite elegant at the same time. Buttons are large and clearly labeled. The POWER button has an edg- ing around it what guar- antees that the meter will not switch on accidentally when pressed against a solid surface. The keyboard consists of a numeric key- pad, quick access buttons, navigational arrows and 4 function keys F1 - F4. The function of these F1 – F4 buttons depends on the particular menu or screen you arrived at and is always explained at the bottom of the display window. Speak- ing of the display, it is one of the strongest points of this meter. This TFT LCD It is very bright and clear. You will be able to read it even outside in a very sunny day. There is also a loudspeaker embedded in the Digipro C Max Professional, giving off a significant sound volume. The Digipro C-Max Pro- fessional lets you either use a pre-programmed chan- nel band plan or you may choose to blindscan the whole bandwidth. The effort you put into the initial chan- nel band plan programming will pay off in much quicker measurements. To create a band plan, you enter the Meter Config menu and se- lect Edit Channel item. In this screen, you edit the channel name (most of the installers would probably use the standard chan- nel designators like: S02, S28, K32), its kind (analog or digital), and a number of parameters as: frequen- cies, modulation, symbol rate, bandwidth. Of course there is a different set of
- 38. ■ 38 TELE-satellite International — The World‘s Largest Digital TV Trade Magazine — 02-03/2012 — www.TELE-satellite.com parameters for analog and for digital channel. In this way, you edit channel by channel and save them in the meter’s memory. Such a list of the channels that are present in a given ca- ble network is called a band plan of this network. Once you have created a cor- rect band plan for the ca- ble systems you are about to install and measure, you can enter the Auto Meas- ure menu item and make the meter measure every channel form the list one by one. However, it is also pos- sible to scan an unknown network. In such case, the Digipro C-Max does a smart thing: it recognizes fully automatically all analog channels as well as the QAM modes and symbolrates for the digital DVB-C channels. For analog TV channels it shows the video and audio frequencies along with their signal levels and S/N ratio. The measurement results screen for a DVB-C signal is naturally more complex. You get not only signal fre- quency, QAM order, sym- bol rate, channel power, modulation error ratio (MER) and carrier-to-noise (C/N) readings but also a graphic representation of the constellation diagram. By pressing a button you can enlarge the diagram. This is perfect to asses the signal quality visually: the tighter the green dots’ con- centration in the center of the squares, the less noisy the signal is. Of course, visual assessment is rather subjective and not very ac- curate, therefore there are MER and C/N readings that correspond to the quality of the digital signal. Furthermore, the Digipro C-Max offers a spectrum view. It produces a clean picture of the frequency spectrum with adjustable span and amplitude. You can set the following fre- quency spans: FULL, 500, 200, 100, 50, 32, 16, and 8 MHz. Maximum amplitude can be set from 60 to 120 dBµV in 10 dBµV steps. Di- gipro C-Max creates a very readable spectrum picture. It does not take long to scan the whole bandwidth. Even the best looking meter, and Digipro C-Max looks great indeed, would not be worth its price if its measurement results were improbable. Therefore, we compared the results pro- duced by the Digipro C-Max with another high class ref- erence meter. We are de- lighted to announce that the results were in perfect agreement. Please exam- ine Table 1 and Table 2. Both for digital and analog TV signals, the channel power results were prac- tically identical. Also the MER measurements were matching one another very well indeed. The only differ- ences we noted in the S/N measurements, this, how- ever, is common between different meter brands. That’s because S/N meas- urements depend on the particular frequency a me- ter takes as a noise refer- ence level. As a result, S/N and C/N can be compared only if measured with the same meter model but not when measured with dif- ferent models and makes. MER is a much better sig- nal quality indicator as this value can be measured with different meters and you can expect similar results with any product. Our gen- eral conclusion: Digipro C- Max is a very accurate me- ter and you can fully rely on its signal strength and MER measurements. A great highlight is an- other positive feature: the Digipro C-Max not only takes measurements but it can also play back digital channel video and audio. Once it locks to the signal, it searches the NIT table inside the transport stream and based on the informa- tions found there, the me- ter displays a list of TV and radio channels. The last re- maining step is to select the channel you want to watch and press a button. Of course, this works only for FTA channels as the meter does not have any CI slot or smart card reader and can not descramble PayTV channels. The Digipro C- Max does not display analog TV channels either but tak- ing into account how fast the technology advances, analog channels will disap- pear from CATV networks anyway quite soon. So this is not something to care about. Finally we come to a truel- TELE-satellite expert Jacek Pawlowski wears the installer's vest from Satcatcher. The vest offers multiple pockets for the installer - and even matches the Digipro C-Max protective case' color! Table 1. Digital TV signal measurement results Power [dBµV] MER [dB] Signal C-Max Ref C-Max Ref 256QAM 474 MHz 87,1 87,7 38,8 36,7 64QAM 474 MHz 87,1 87,7 37,9 36,8 256QAM 674 MHz 82,5 83 39,4 35,6 64QAM 674 MHz 82,6 82,8 38,7 35,4 Table 2. Analog TV signal measurement results Power [dBµV] S/N [dB] Signal C-Max Ref C-Max Ref Video 471,25 MHz 61,3 64,4 23,7 48,6 Audio 477,75 MHz 50,4 52 Video 576,25 MHz 64 63,7 26,1 17,7 Audio 581,75 MHz 50,3 49,8
- 39. 39 www.TELE-satellite.com — 02-03/2012 — TELE-satellite International — The World‘s Largest Digital TV Trade Magazine
- 40. 1 2 3 40 TELE-satellite International — The World‘s Largest Digital TV Trade Magazine — 02-03/2012 — www.TELE-satellite.com
- 41. 4 5 6 7 8 9 10 11 12 13 14 15 16 17 18 19 41 www.TELE-satellite.com — 02-03/2012 — TELE-satellite International — The World‘s Largest Digital TV Trade Magazine 1. Main menu 2. Channel measure 3. Tilt measurement screen 4. DVB-C signal shown in spectrum view 5. Configuration menu 6. Band plans 7. One of the preprogrammed and plans 8. Editing a channel in a band plan 9. Options menu 10. Identifying digital TV signal chosen in the spectrum view 11. 256QAM constellation and signal measurement results 12. Closer examination of the constellation allows you to visually asses signal quality 13. Meter searches NIT in DVB-C signal to create a channel list 14. Channel list of the selected DVB-C carrier 15. Meter displays channel video like a small TV-set 16. A mix of analog and digital TV signal in a real cable network 17. Analog TV signals 18. Digital TV signals 19. Detecting the parameters of digital carrier
- 42. DATA TECHNICAL Manufacturer SatCatcher Ltd, Unit 7, Salvesen Way, Hull, East Yorkshire, HU3 4UQ, UNITED KINGDOM Webpage www.satcatcher.com E-mail sales@satcatcher.com Tel +44-1652-408191 Model Digipro C Max Function Digital and analog cable TV meter Input frequency range 46 MHz - 862 MHz for digital TV 46 MHz – 870 MHz for analog TV Input signal level range 40dBuV - 110dBuV for digital TV 25dBuV – 120dBuV for analog TV Accuracy of level measurement 2 dB for digital TV 1.5 dB for analog TV DVB-C symbol rates 1 – 7 Ms/sec Modulation 16/32 /64/128/256QAM Digital TV standard DVB-C/ITU-T J.83-ANNEX A/B/C Channel bandwidth 4, 8, 20, 40 MHz, USA version: 6 instead of 8 MHz Working time when fully charged 4 – 5 hours Jacek Pawlowski TELE-satellite Test Center Poland + – 42 TELE-satellite International — The World‘s Largest Digital TV Trade Magazine — 02-03/2012 — www.TELE-satellite.com Exceptionally accurate Very bright and clear display A lot of useful accessories USB application available for editing band plan none Expert Opinion ly valuable function of the meter, which is so useful for the professional install- er: the tilt measurement. Up to ten channels can be selected for this. Usually, you would select channels evenly distributed over the whole frequency range. Of course, the selected chan- nels must carry a TV signal. You first measure those channels in the TILT Meas- ure submenu somewhere in the beginning of the cable network, where all the sig- nals are strong and rela- tively equal in amplitude. then you press the REF but- ton to store those channels’ levels as reference. Then you move to various other points of the network and repeat this measurement. You will see the difference expressed in decibels be- tween the reference level and the current level for every channel. The tilt measurement al- lows you to quickly iden- tify signal level differences over a specified frequency range. Then all you do is insert an attenuator or an equalizar in order to smoothen the differenc- es according to the cable system’s specifications. Thanks to this, you can easily find out if the cabling along with the distribution equipment does not intro- duce excessive attenuation in particular parts of the cable TV frequency range. We found the Digipro C- Max to be a very mature meter, offering to the in- staller all the features he needs to properly align a cable system. The accu- racy of the meter matches our professional reference meters and the accesso- ries made available by Sat- cacther are an additional value to the installer.
- 44. TEST REPORT on the Internet 44 TELE-satellite International — The World‘s Largest Digital TV Trade Magazine — 02-03/2012 — www.TELE-satellite.com Digitales Messgerät für Kabelsignale Präzise Messergebnisse sind eine Eigenschaft, die wohl jeder Monteur an ei- nem Signalmessgerät zu schätzen weiß. Doch pro- fessionelle Anwender haben darüberhinaus noch weitere Ansprüche, die sie an ein solches Gerät stellen: Das Display sollte hell und gut lesbar sein, die Tastatur sollte einfach zu bedienen sein und es sollte ein breit- gefächertes Sortiment an Zubehör beinhalten, so dass die tägliche Arbeit einfacher und effizienter von der Hand geht. Zu unserer großen Freude erfüllt das neue Digipro C Max von SatCatcher alle die- se Voraussetzungen. Sein Display ist auffallend hell und klar, die Tasten lassen sich auch mit Handschuhen bedienen und die Menge an Zubehör, die dem Anwender zur Verfügung gestellt wird, ist überraschend groß. Lieferbar ist das Mess- gerät in zwei verschiede- nen Ausführungen: Einmal in der von SatCatcher ge- wohnten Metallbox, oder in der Premium Verpackung mit vielen Extras. Wir haben uns für die letztere Variante entschieden und waren in Anbetracht des praktischen Zubehörs hoch erfreut. Das ungewöhnlichste aber auch gleichzeitig praktischste Accessoire war dabei eine Weste mit jeder Menge Ta- schen und Gurten. Sie er- laubt nicht nur, das Mess- gerät auf bequeme Weise zu transportieren und zu verwenden, sondern bietet auch jede Menge Platz für all das notwendige Zubehör und die Werkezuge, die ein Monteur tagtäglich bei sich haben muss. Außer der Weste liegen dem Paket auch noch ein Steckernetzteil, ein DC La- degerät für den Zigaret- tenanzünder im Auto, ein Tragegurt mit einem Stück Schafwollbezug (um Hau- tirritationen zu vermeiden) sowie ein Schlechtwetter- überzug und eine Sonnen- blende für das Messgerät bei. All das ist ordentlich in einer Tragetasche unterge- bracht, so dass der Anwen- der nicht befürchten muss, die Einzelteile mit der Zeit zu verlieren. Die Verarbeitungsqualität des Digipro C Max ist sehr gut. Das Gehäuse ist robust aber gleichzeitig elegant, und die Tasten sind ange- nehm groß und übersichtlich beschriftet. Die Power-Taste verfügt zusätzlich über eine Umrahmung, so dass sich das Messgerät nicht uner- Download this report in German www.TELE-satellite.com/TELE-satellite-1203/deu/satcatcher.pdf wünscht einschaltet, wenn der Knopf versehentlich ge- gen eine harte Oberfläche gedrückt wird. Die Tastatur besteht aus einem Ziffernblock, Schnell- zugriffstasten, einem Tas- tenkreuz und vier Funkti- onstasten F1 bis F4. Die genaue Belegung dieser Tasten ist abhängig vom je- weiligen Menü in dem man sich gerade befindet und wird stets in der untersten Zeile des Displays ange- zeigt. Apropos Display: Es ist ei- nes der herausragendsten Merkmale dieses Messge- räts, denn das LCD TFT ist
- 45. 45 www.TELE-satellite.com — 02-03/2012 — TELE-satellite International — The World‘s Largest Digital TV Trade Magazine äußert hell und klar, so dass es im Freien selbst an einem sehr sonnigen Tag gut abge- lesen werden kann. Auch an einen Lautsprecher mit aus- reichend Volumen hat der Hersteller gedacht. Das Digipro C Max Profes- sional kann entweder mit einem vorprogrammierten Kanalbandplan verwendet werden oder man verlässt sich auf einen Blindscan der gesamten Empfangs- bandbreite. Allerdings ist zu beachten, dass jene Mühe, die in die Erstellung eines grundlegenden Kanalband- plans gesteckt wird, sich später in Form von deutlich schnelleren Messungen viel- fach bezahlt macht. Um einen Bandplan zu er- stellen wird das Menü des Messgerät aufgerufen und dort der Eintrag „Edit Chan- nel Item“ gewählt. Hier gibt man nun den Namen des gewünschten Kanals (die meisten Anwender werden wohl Standardkanalbezeich- nungen wie z.B. S02, S28, K32) verwenden), die Art des Bandes (analog oder di- gital) sowie eine Reihe von Parametern wie z.B. Fre- quenz, Modulation, Symbol- rate oder Bandbreite an. Selbstverständlich gibt es unterschiedliche Parameter für analoge und digitale Ka- näle und so wird nun Kanal für Kanal eingegeben und im Speicher des Messgeräts abgelegt. Diese Liste an Ka- nälen, die im Netzwerk ei- nes Anbieters vorhanden sind, wird schlussendlich als Bandplan bezeichnet. Sobald der Bandplan kor- rekt erstellt und eingegeben wurde, kann das Menü mit der automatischen Messung aufgerufen werden. So- gleich beginnt das Digipro C Max mit dem Einlesen der Frequenzen, eine nach der anderen. Selbstverständlich ist es aber auch möglich, ein völ- lig unbekanntes Netzwerk zu scannen. In diesem Fall macht das SatCatcher Mess- gerät etwas sehr cleveres: Es erkennt automatisch alle analogen Kanäle sowie die QAM Modi und Symbolra- ten der DVB-C Frequenzen. Bei Analogfrequenzen zeigt es die Audio- und Videofre- quenz zusammen mit deren Signalpegel und S/N Verhält- nis, während die Messergeb- nisanzeige eines digitalen Signals natürlich komplexer ausfällt. Nicht nur werden Signalfrequenz, QAM, Sym- bolrate, Signalstärke, Modu- lation Error Ratio (MER) und Carrier to Noise Wert (C/N) angezeigt, sondern auch eine grafische Aufbereitung der Werte – das Konstellati- onsdiagramm. Diese ist per- fekt geeignet, um die Sig- nalqualität optisch auf einen Blick beurteilen zu können. Je dichter die Konzentration der grünen Punkte im Zen- trum der Quadrate, desto weniger verrauscht ist das Signal. Natürlich ist so eine optische Beurteilung eher subjektiv und nicht beson- ders genau, deshalb werden auch Zahlenwerte zu MER und C/N dargestellt, die der Qualität des Eingangssignals entsprechen. Außerdem bietet das Di- gipro C Max eine Spektru- manzeige. Sie glänzt durch deutliche Anzeige des Fre- quenzbandes mit variabler Darstellung von Bandbreite und Amplitude. Folgende Bandbreiten sind einstell- bar: Full, 500, 200, 100, 50, 32 ,16 und 8 MHz. Die maximale Amplitude kann zwischen 60 und 120 dbµV in 10 dbµV Schritten fest- gelegt werden. Generell erzeugt das Messgerät ein sehr gut und deutlich lesba- res Spektralbild und es dau- ert nicht lange, die gesamte Bandbreite einzulesen. Selbst das optisch schöns- te Messgerät, und das Digi- pro C Max sieht wirklich gut aus, wäre sein Geld nicht wert, würde es ungenaue Messergebnisse liefern. Deshalb haben wir die mit ihm ermittelten Werte mit denen eines anderen high- end Profi-Messgeräts vergli- chen. Dabei hat es uns sehr gefreut feststellen zu kön- Download this report in English www.TELE-satellite.com/ TELE-satellite-1203/ eng/satcatcher.pdf nen, dass die Messergebnis- se perfekt übereinstimmen. Die Details dazu finden Sie in Tabelle 1 und Tabelle 2. Sowohl für analoge als auch digitale Signale waren die Pegelmessungen prak- tisch identisch und auch die MER Werte stimmten na- hezu überein. Die einzigen Unterschiede zeigten sich bei der S/N Messung, was jedoch bei unterschiedli- chen Messgeräteherstel- lern durchaus normal ist. Der technische Hintergrund hierfür liegt darin, dass die S/N Messung von der ge- nauen Frequenz abhängt, die ein Messgerät als Refe- renzwert für das Rauschen annimmt. Daher können S/N und C/N Werte nur zwischen Messgeräten desselben Typs, aber nicht hersteller- oder produktübergreifend verglichen werden. Ein viel zuverlässigerer Parameter für die Signal- qualität ist die MER, sie kann mit unterschiedlichs- ten Messgeräten ermittelt werden und es können im- mer dieselben Resultate erwartet werden. Unsere generelle Zusammenfas- sung: Das Digipro C Max ist ein sehr präzises Messgerät, auf dessen Mess-ergebnisse man sich im Bereich MER und Signalpegel absolut verlassen kann. Ein besonderes Highlight ist noch ein zusätzliches Features des neuen SatCat- cher Messgeräts: Das Digi- pro C-Max kann nicht nur Signalpegel und Parameter messen, sondern auch digi- tales Audio und Video eines Kanals wiedergeben. Hat es erstmal ein Signal gefun- den, so liest es die NIT des Transportstreams aus und stellt die gefundenen TV- und Radioprogramme dar. Nun muss der Anwender den gewünschten Sender nur noch auswählen und auf eine Taste drücken. Selbstverständlich funk- tioniert die Darstellung nur mit FTA Sendern, da das Messgerät über keinen CI Slot oder Kartenleser ver- fügt und daher verschlüssel- te Programme nicht sichtbar machen kann. Analoge Sig- nale können ebenfalls nicht angezeigt werden, bedenkt man aber wie rasch sich die Technik weiterentwickelt, so werden analoge Programme demnächst sowieso voll- ständig aus den Kabelnet- zen verschwunden sein, so dass dieser Punkt vernach- lässigt werden kann.
- 48. 48 TELE-satellite International — The World‘s Largest Digital TV Trade Magazine — 02-03/2012 — www.TELE-satellite.com Huber+Suhner CLIK! Splitter Boxes 1x2 and 1x4 TEST REPORT Fiber Optic Distribution System
- 49. 49 www.TELE-satellite.com — 02-03/2012 — TELE-satellite International — The World‘s Largest Digital TV Trade Magazine • distributes the full satellite signal • easy configuration of taps and splitters • the most easiest part is the "click" of the cable into the taps and splitters • gives all connected receivers a perfect signal TELE-satellite Magazine Business Voucher www.TELE-satellite.info/12/03/hubersuhner-clik Direct Contact to Sales Manager
- 50. 02-03/2012 50 TELE-satellite International — The World‘s Largest Digital TV Trade Magazine — 02-03/2012 — www.TELE-satellite.com Huber+Suhner CLICK! Perfect solution to distribute the full satellite signal to a multitude of receivers Even Simpler to Use Than Regular RF Splitters Digital TV signal distribu- tion is more and more often based on fiber optics. Among the most important advan- tages of such solutions are: extremely low signal losses in fiber optic cables and wide frequency bandwidth. The latter feature makes it pos- sible to distribute the whole Ku-Band in one band without the need to select polariza- tion or low/high sub-band. There are already LNBs with optical output available on the market, as well as com- plementary optic to RF con- verters (re-modulators) - see the many reports on this subject in previous TELE- satellite issues. Fiber optic cables have been in use for many years now. The last components you must use to build a fiber optic satellite TV signal distribution net- work are optical splitter. And this test report is just about them. The function of an optical fiber splitter is analogous to a familiar RF splitter. Most of them direct part of the incoming signal to the “tap” output where the terminal device is connected and the other part to the “trunk” output to which the remain- ing part of the cable network is connected. There are also splitters that divide evenly the input into two, four or more outputs. Depending on the network structure and the splitter position in the network, we need splitters with different split ratios. Huber+Suhner have vari- ous models in their portfolio. For this report, we have re- ceived optical splitters with the following split ratios: a four output model (1x4) with 25%-25%-25%-25% ratio, and a number of two output models (1x2) with the follow- ing ratios: 50%-50%, 30%- 70%, 20%-80% and 10%- 90%. Apart from the splitters, Huber+Suhner offered us a selection of their excellent fiber optic cables and connec- tors, so that we were able to build a small network using only their components. All components were perfectly finished off and the splitters were clearly labeled. You will not have any doubt how to hook them up. In contrast to the RF stuff with F type connectors, you do not have to hurt your fingertips when connecting everything to- gether in fiber optic instal- lations. Just a delicate push, you hear a click and a fiber optic cable is connected to a splitter. Now you may guess why Huber+Suhner branded their new system CLIK! TELE-satellite readers more familiar with insertion losses expressed in decibels rather than the signal power percentage description of the splitter outputs may at first feel slightly uncomfort- able. But take it easy. One corresponds precisely to the other. We can easily convert original percentage values to familiar “tap loss” and trunk “loss figures” in decibels - see the table. We spent some time won- dering what to measure to make our test results as practical for our readers as possible. We decided to measure rather the RF sig- nal that will be fed to the receiver IF input than opti- cal signal before and after a fiber optic splitter. In this way, you have a good idea what you can expect from TEST REPORT Fiber Optic Distribution System
- 52. 52 TELE-satellite International — The World‘s Largest Digital TV Trade Magazine — 02-03/2012 — www.TELE-satellite.com the whole system in which Huber+Suhner CLIK! Splitter Box is used. Our test system included: 90cm dish aimed at HOTBIRD satellite on 13° E, an optical LNB, optic fib- er cable, optic splitter and optic-to-RF signal converter (re-modulator) that was de- livering the IF signal suitable for a satellite receiver. The optical LNB generated light in the 1310 nm band. The light carrier was modulated with 0.95-5.45 GHz RF signal which was Ku-Band low and high sub bands of both po- larizations stacked one over the other. We tested 5 CLIK! Splitter Box models. The table below presents the insertion losses specified in manufacturer data. You can see the results in the attached graphs. Please mind that on top of the op- tic splitter losses, there are losses caused by nonlinear transfer function of the op- tic-to-RF signal converter. Because of that, the losses for 10, 20 and 30% outputs may appear slightly higher than specified for certain frequencies. This is due to Splitting ratio % 2 x 50 30/70 20/80 10/90 4 x 25 Maximum Insertion loss dB 3.8 each 6.3/2.1 8.4/1.4 12.0/0.8 7.7 each
- 53. 53 www.TELE-satellite.com — 02-03/2012 — TELE-satellite International — The World‘s Largest Digital TV Trade Magazine non ideal optic-to-RF con- version - not because of op- tic splitters imperfections. We also measured the noise performance and we are happy to inform you that in line with theory, optic fib- er cable and optic splitters practically do not add any noise. No matter what out- put we tested: 90% or 10% MER or C/N readings were at maximum (MER was above 14 dB). This means that your receiver connected to such network would also show very high quality readings (close to 100%). Using a proper combina- tion of Huber+Suhner CLIK! Splitter Boxes, you can eas- ily build a distribution net- work with even 36 optic outputs provided that your optic LNB generates about 7 dBm of output power what is a quite typical value. Such configuration consists of one 1x4 splitter which splits the LNB output to four optic fiber cables. On every fiber optic cable, eight 1x2 splitters are installed: four 10/90, two 20/80, one 30/70 and one 50/50. In such configura- tion, you get the output lev- els from -10.7 dBm through -13.2 dBm. This is quite a sufficient level for an optic- to-RF converter. Now, if your optic-to-RF converters are of quad types, you will be able to connect not 36 but 144 regular satellite receivers!
- 54. HUBER+SUHNER Fiber Optic Cables and Distribution, Switzerland www.hubersuhner.com www.TELE-satellite.com/TELE-satellite-1111/eng/huber+suhner.pdf More on This Manufacturer Read TELE-satellite’s Company Report: DATA TECHNICAL Manufacturer HUBER+SUHNER AG, Fiber Optics Division Degersheimerstrasse 14, 9100 Herisau/Switzerland Telephone +41 71 353 4111 Fax +41 71 353 4647 Email info@hubersuhner.com Web www.hubersuhner.com Model CLIK! Splitter Box Description Optic splitter Operating wavelength 1310 nm and 1550 nm Operating bandwidth +/- 40 nm Power handling 500 mW for 1x2 and 300 mW for 1x4 models Operating temperature – 40 to +85° C Fiber type Corning SMF-28e XB Jacek Pawlowski TELE-satellite Test Center Poland + – ■ ■ 54 TELE-satellite International — The World‘s Largest Digital TV Trade Magazine — 02-03/2012 — www.TELE-satellite.com After taking our meas- urements, we can honestly confirm that this is not just theoretical possibility but something that can be real- ized in real world. Time has indeed come to focus and switch to the fiber optical world. Very good workmanship – everything fits per- fectly Very easy installation Loss insertion agrees well with manufacturer specification None Expert Opinion A small selection of many accesories available from Huber Suhner After removing a protecting plug, you can connect a fiber optic cable
- 56. TEST REPORT on the Internet 56 TELE-satellite International — The World‘s Largest Digital TV Trade Magazine — 02-03/2012 — www.TELE-satellite.com Optisches Verteilungssystem Zur Verteilung digita- ler TV-Signale setzt man heute immer mehr auf optische Übertragungs- wege. Die zwei wich- tigsten Vorteile dieser Technik sind der äußerst geringe Signalverlust und die hohe Frequenzband- breite. Letztere ermög- licht es z.B. das gesamte KU-Band über eine Lei- tung zu übertragen, ohne auf Hilfsmittel wie Polari- sation oder low/high Un- terbänder zurückgreifen zu müssen. Mittlerweile sind be- reits optische LNBs am Markt erhältlich, ebenso aber auch entsprechende Konverter, die das opti- sche Signale wieder in ein RF-Signal umwandeln – lesen Sie dazu bitte die verschiedenen Test- berichte in vergangenen Ausgaben der TELE-sa- tellite. Die Funktion eines op- tischen Verteilers ent- spricht im Prinzip der eines gewöhnlichen RF- Verteilers. Die meisten von ihnen leiten einen Teil des Eingangssignals zum Abzweig-Ausgang weiter, mit dem dann ein abschließendes Ge- rät verbunden wird, der Rest geht zum Stammlei- tungs-Ausgang, mit dem das weiterführende Ka- belnetzwerk verbunden wird. Weiters gibt es Vertei- ler, die das Eingangssig- nal gleichmäßig in zwei, vier oder mehr Ausgänge aufteilen. Abhängig von der Verkabelungsstruk- tur und der Position des Verteilers innerhalb die- ser Verkabelung benöti- gen wir also Verteiler mit unterschiedlichen Vertei- lungsmustern. Aus genau diesem Grund bietet die Firma Huber + Suhner verschie- dene Modelle in deren Produktportfolio an. Zum Erstellen dieses Testbe- richts wurden uns zur Verfügung gestellt: Ein Modell mit 4 Ausgängen und einem Verteilungs- muster von 25%-25%- 25%-25% sowie eine Rei- he von Abzweigern mit 2 Ausgängen und folgen- den Verteilungsmustern: 50%-50%, 30%-70%, 20%-80% sowie 10%- 90%. Download this report in German www.TELE-satellite.com/TELE-satellite-1203/deu/huber+suhner.pdf Zusätzlich hat uns Hu- ber + Suhner eine Aus- wahl von deren exzel- lenten optischen Kabeln und Steckverbindern be- reitgestellt, so dass wir ein kleines Netzwerk, nur bestehend aus deren Komponenten, aufbauen konnten. Die Verarbeitungsqua- lität aller Bauteile war hervorragend, ebenso wie sich uns die Vertei- ler vorbildlich beschriftet präsentierten. So kamen keine Zweifel auf, wie die Komponenten miteinan-
- 57. 57 www.TELE-satellite.com — 02-03/2012 — TELE-satellite International — The World‘s Largest Digital TV Trade Magazine der zu verbinden sind. Im Gegensatz zu ei- ner RF-Verkabelung mit F-Steckern besteht bei einem optischen System keine Gefahr, sich die Fingerkuppen zu verlet- zen. Ein kurzer Druck, danach ein sattes Klick und schon ist das opti- sche Kabel mit dem Ver- teiler verbunden. Dreimal dürfen Sie jetzt raten welchen Markennamen Huber + Suhner ihrem optischen Verteilsystem gegeben hat – Richtig: CLIK! Denjenigen von Ihnen, die eher gewohnt sind mit Signalverlustangaben in Dezibel als mit Pro- zentangaben des Signal- pegels an den jeweiligen Ausgängen umzugehen, wird das Ganze auf den ersten Blick vielleicht nicht behaglich sein, aber nehmen Sie es locker: Das eine entspricht exakt dem anderen! Problemlos können wir die Prozen- tangaben in die bekann- ten Anschlußverluste und Abzweigverluste (ausge- drückt in dB) umrechnen (siehe Tabelle). Einige Zeit haben wir überlegt, welche Werte wir für diesen Testbericht einer genauen Messung unterziehen sollten, da- mit die Ergebnisse für Sie, unsere Leser, mög- lichst praxisnahe sind. Schlussendlich einigten wir uns auf eine Mes- sung des RF-Signals, das am Tuner des Receivers ankommt, anstatt das optische Signal vor und nach dem Verteiler unter die Lupe zu nehmen. So haben Sie nämlich eine gute Vorstellung davon, was Sie von einem Ver- teilungssystem erwarten können, in dem die Ver- teilerboxen von Huber + Suhner zum Einsatz kom- men. Unser Testsystem be- inhaltete eine auf den HOTBIRD 13° Ost ausge- richtete 90cm Antenne, ein optisches LNB, eine Lichtleiterverkabelung, optische Verteiler und Abzweiger sowie einen Optisch/RF-Konver ter (Re-Modulator), der das passende ZF-Signal für unseren Satellitenrecei- ver bereitstellte. Das optische LNB er- zeugte einen Lichtstrahl im 1310 nm Band, der auf ein RF-Signal im Be- reich 0.95 – 5.45 GHz moduliert wurde, so dass das gesamte KU-Band (low&high Band) sowie beide Polarisationen in Form mehrerer Blöcke gestapelt, einer über dem anderen, übertra- gen werden konnten. Insgesamt haben wir 5 Verteiler-Boxen getestet, die untenstehende Tabel- le gibt die Durchgangs- dämpfung laut Daten des Herstellers an. Die Detailergebnisse unserer Messungen kön- nen Sie den jeweiligen Diagrammen entneh- men, bedenken Sie aber bitte, dass neben dem Signalverlust durch den optischen Verteiler auch noch ein anderer Stör- faktor in Form von Sig- nalverlusten durch die nonlineare Transferfunk- tion des Optisch/RF-Kon- verters hinzukommt. Aus diesem Grund erscheinen die Signalverluste für die 10, 20 und 30% Ausgän- ge etwas höher als für die jeweilige Frequenz vor- gegeben. Diese Verluste haben ihre Ursache aber in einer nicht idealen Op- tisch/RF-Umwandlung und sind nicht bedingt durch die optischen Split- ter. Selbstverständlich ha- ben wir auch das Rausch- maß gemessen und freu- Download this report in English www.TELE-satellite.com/ TELE-satellite-1203/ eng/huber+suhner.pdf en uns Ihnen mitteilen zu können, dass optische Verteiler und Lichtleiter- kabel, so wie es die Theo- rie vorgibt, praktisch kein Rauschen hinzufügen. Egal welchen Ausgang wir getestet haben, ob 90% oder 10%, die MER oder C/N Werte waren stets am Maximum (die MER war über 14 dB). Dies be- deutet, dass ein Receiver, der mit einem solchen Signalverteilungsnetz- werk verbunden ist, auch hervorragende Qualitäts- werte anzeigen würde (nahe 100%). Bringt man eine pas- sende Kombination von Splittern aus dem Hau- se Huber + Suhner zum Einsatz, so lässt sich mü- helos ein optisches Netz- werk mit 36 optischen Ausgängen realisieren. Vorausgesetzt ist aller- dings, dass das optische LNB ein Ausgangssignal mit einer Leistung von 7 dBm (ein durchaus ty- pischer Wert) generiert. Eine solche Kombinati- on würde aus einem 1x4 Verter bestehen, der das Ausgangssignal des LNB auf vier Lichtleiter ver- teilt. An jede dieser Lei- tungen kämen nun acht 1x2 Abzweiger: 4 Stück zu 10/90, zwei zu 20/80, einer zu 30/70 und einer zu 50/50. Auf diese Weise würden Sie Ausgangspe- gel im Bereich zwischen -10.7 dBm und -13.2 dBm erhalten, was einem wirklich ausreichenden Wert für einen Optisch/ RF-Konverter entspricht. Wären Ihre Optisch/ RF- Konverter jetzt auch noch Quad Modelle, so könnten Sie nicht bloß 36 sondern 144 gewöhnliche Satellitenreceiver daran anschließen! Nachdem wir die Werte aller Kom- ponenten eingehend ge- messen und untersucht haben, können wir mit gutem Gewissen bestäti- gen, dass dies nicht nur eine theoretische Mög- lichkeit ist, sondern auch in der Praxis umgesetzt werden kann. Die Zeit ist nun wohl endgültig reif, um die optische Signal- übertragung ins Auge zu fassen und auf ein sol- ches System umzustei- gen.
- 58. 58 TELE-satellite International — The World‘s Largest Digital TV Trade Magazine — 02-03/2012 — www.TELE-satellite.com Elgato Tivizen Mobile DVB-T At Home • Transmits DVB-T via WiFi • Quick installation • Exceptional reception capabilities • PVR function possible TEST REPORT DVB-T via WiFi TELE-satellite Magazine Business Voucher www.TELE-satellite.info/12/03/elgato-tivizen Direct Contact to Sales Manager
- 59. 59 www.TELE-satellite.com — 02-03/2012 — TELE-satellite International — The World‘s Largest Digital TV Trade Magazine
- 60. 60 TELE-satellite International — The World‘s Largest Digital TV Trade Magazine — 02-03/2012 — www.TELE-satellite.com DVB-T via WiFi Wireless terrestrial reception at home on your mobile phone, tablet or desktop PC Thomas Haring MAC TV Modern SmartPhones are actually portable pocket mini computers that have become incredibly power- ful. And this is the perfect reason for the designers at the company Elgato to take the products from Apple and put their power to use in such a way that users can watch TV on their Smart- Phones: the Elgato Tivizen makes it possible to receive DVB-T on the Apple iPhone, iPad or the iPod Touch. But the question is how do the DVB-T signals get to the SmartPhone? Blue- tooth? Unfortunately, it’s way to slow. A USB 2.0 con- nection? Yes, it would be fast enough but who wants to deal with a tangled web of cables? There’s only one other way: WiFi, and that’s exactly what Elgato decided to use. The Elgato box is roughly twice the size of a cigarette lighter (92 x 52 x 12mm) and weighs just about 68g including the rechargeable battery. The elegant front and back reflective covers are in perfect harmony with the silver stripe that runs around the outside of the Tivizen. It’s easy to recog- nize the similarities to the Apple iPhone, but then, why not? On the underside of the Tivizen can be found a mini USB port hidden behind a small cap which can be used to recharge the inter- nal battery. This also means that you can use any PC or MAC to power the Tivizen through this port. You can even power it in a car or RV using a USB car charger. Unlike the mini USB ca- ble which is included in the package, a USB power supply is not included. Dur- ing our tests we were able to determine that a fully TEST REPORT
- 62. ■ 1 62 TELE-satellite International — The World‘s Largest Digital TV Trade Magazine — 02-03/2012 — www.TELE-satellite.com a little concerned that the telescopic antenna is thin- nest at the bottom where it connects to the Tivizen box and fattest at the top of the antenna unlike a typical antenna where it would be thickest at the bottom and gets thinner towards the top. The only thing still miss- ing is the software. For the iPhone, iPad or the iPod Touch, the correct software can be downloaded free of charge from the iTunes App Store. But Elgato didn’t for- get the owners of PCs or MACs; the necessary down- load information is included with the Tivizen as well as the required license codes for EyeTV (Mac) and Ter- raTec Home Cinema (MS Windows). We appreciated the fact that after starting the App precise information was given on how a connec- tion between the Tivizen and the iPhone, iPad or iPod Touch is created. The manufacturer also provided short but detailed notes on the operation of the DVB-T receiver. This information can also be found on the packaging. To create a connection the settings menu in the iPhone, iPad or iPod Touch needs to be accessed and a search for new WiFi net- works started. As long as the Tivizen is turned on the network will appear as its own entry and therefore can easily be selected. To clarify once again: the com- munication between the iPhone, iPad or iPod Touch and the Tivizen is made possible through the set up of a WiFi network that is operated by the Tivizen. It comes delivered from the factory without the need to enter a keyword. By double-pushing the Home button, the iPhone, iPad or iPod Touch displays a list of currently running Apps at the bottom of the charged battery could pro- vide up to 210 minutes of uninterrupted TV enjoy- ment and since the battery can easily be swapped out, TV-aholics can simply carry a spare with them. On the right side is a sin- gle button that turns the Tivizen on and off. Right next to this button is a small hole inside which is a recessed reset button; sticking a paperclip into this hole will reset the Tivi- zen to factory settings. Momentarily pressing the button on the right side lights up two of the three LEDs (TV operation and charging status/battery capacity) on the top of the Tivizen. The third LED in- dicates the existence of a WiFi network. It doesn’t matter how strong the DVB-T signals are, the hidden telescopic antenna in the top left side of the Tivizen should be pulled out. When it is fully extended it is 16cm long. The hinge at the bottom of the antenna lets you ad- just it 360° for best pos- sible reception. We were Contents of the package: Tivizen DVB-T receiver, USB cable, software download card and instructions
- 63. 2 3 4 5 6 63 www.TELE-satellite.com — 02-03/2012 — TELE-satellite International — The World‘s Largest Digital TV Trade Magazine 1. The Tivizen App Start Screen 2. The Tivizen App’s Main Menu with the channel list entries on the right side. 3. Multiple settings can be easily handled through the App. 4. Sorting the available channels 5. The time shift buffer memory size can be increase or decreased as needed. 6. Thanks to its multitasking capabilities, the App can play the current channel along with its audio in the background while another app is active. screen; this allows the user to quickly access the Tivi- zen App to set up a WiFi connection. This is sup- ported by the iPhone 4, the iPhone 3GS, the iPad as well as the iPad 2 and also the third and fourth gener- ations of the iPod Touch. On the software side, the iOS version 4.2 or newer must be installed. If the Tivizen App is be- ing started for the first time, it will ask the user to select a location. The user can choose from Australia, Austria, Belgium, China, Croatia, The Czech Re- public, Denmark, Finland, France, Germany, Greece, Great Britain, Hong Kong, Hungary, Iceland, India, In- donesia, Ireland, Italy, Lux- embourg, Macau, Malaysia, New Zeeland, The Nether- lands, Norway, Portugal, The Russian Federation, San Marino, Singapore, Slovakia, Slovenia, Spain, South Africa, Sweden, Switzerland, Thailand, Tur- key, Ukraine as well as the United Arab Emirates. After pushing the Chan- nel Scan button, the Tivi- zen will perform a search across the entire frequency spectrum for any receiv- able signals. In our tests this scan was completed in about 80 seconds on an iPad 2 or iPhone 4 whereby it found every useable DVB- T frequency and stored them completely and cor- rectly. The ability to per- form a manual scan of in- dividual frequencies was unfortunately not included in the App by the manufac- turer. Immediately after the scan is completed, the Tivi- zen App switches over to the channel list and dis- plays all of the channels that were found. We es- pecially liked the display
- 64. 7 8 9 64 TELE-satellite International — The World‘s Largest Digital TV Trade Magazine — 02-03/2012 — www.TELE-satellite.com 7. Channel Scan 8. The Tivizen App can be used with the iPad in either horizontal or vertical modes. 9. DVB-T playback of the current and upcom- ing programs for each of the channels; of course, this would only be possible if this information is made available by the provider. After briefly pressing the desired channel the App begins playing it back after a short delay of about four seconds. A detailed Info bar is blended in at the bottom of the screen that contains current EPG information for the current and upcoming programs as well as a pair of bar graphs that show the signal strength of the cur- rent DVB-T channel as well as the battery level of the Tivizen. If you tap your fin- ger anywhere in the vicinity of the TV signal, a control screen is displayed that can be used to either stop or re- cord the current channel. If you’re scratching your head right now, let us ex- plain: the Tivizen App can store the currently running program in the internal memory of the iPhone, iPad or iPod Touch. There’s even a Time Shift function avail- able as well as fast-forward and rewind functions. It makes sense now why the App’s Main Menu included a Recordings button in addi- tion to Live TV and Settings buttons. The Recordings button let’s you play back previously stored content. Since the Tivizen App uses the widely distributed MPEG format for recordings, there is nearly an unlimited num- ber of editing tools available for you to use. As you can see, the Tivizen in connec- tion with an iPhone, iPad or iPod Touch gives you a complete DVB-T receiver in- cluding PVR which you can just carry around in your pocket! The manufacturer even included the ability to con- tinue to play the audio of the current channel in the background if the user should start another App in the foreground. This is one way to pass the time dur- ing those long commercial breaks. Once the interrup- tion is over, the user simply needs to double-push the Home button to jump right back in to watching DVB-T TV. The Tivizen ran effort- lessly throughout our entire testing process; there were no crashes or other errors to be seen. TV playback flowed smoothly without any pixilation or other inter- ference in the picture and that’s not surprising at all considering that the Tivizen uses a powerful ARM 9 RISC processor. We were a little disappointed to find out that the Tivizen in connec- tion with the iPhone, iPad or iPod Touch does not sup- port HD content in MPEG-4 or H.264 via DVB-T; even DVB-T2 is not supported. On the reception side of things, the Tivizen covers the entire VHF and UHF fre- quency ranges, that is, from 177.5 to 226.5 MHz (VHF) and 474 to 858 MHz (UHF). The COFDM demodulator supports 16 QAM, 64 QAM and QPSK with bandwidths of 6, 7 and 8 MHz. The in- tegrated telescopic antenna works quite well and eas- ily measures up to active DVB-T room antennas. To test its capabilities, we at- tempted to latch onto the DVB-T channels from The Czech Republic. We were located about 40km from the border and as you can see by the screenshots that accompany this test report, we managed to accomplish this without any problems at all. Since we are dealing with a universal App for the iPhone, iPad and iPod Touch, it needs to be down- loaded only once; it can then be used on all three of these devices. We also
- 66. 10 11 12 13 66 TELE-satellite International — The World‘s Largest Digital TV Trade Magazine — 02-03/2012 — www.TELE-satellite.com liked that Elgato matched the App perfectly to all the different display sizes. The huge advantage of the iPad for a better overview was cleverly put to use. If it’s a MacBook that you have, it would be practical to be able to also use this device with the Tivizen. For this purpose Elgato has made version 3.0 of their own EyeTV software suite for Mac available to down- load for free. On the hard- ware side, EyeTV requires a minimum of a Mac with In- tel CPU as well as Mac OS X 10.5.8. The software itself can be installed with just a few mouse clicks and the necessary activation code is included with the Tivizen. To create a connection with the Tivizen, the WiFi func- tion of the MacBook needs to be used; the necessary settings can be found in the Mac OS X System Settings under the Network icon. And just like the iPhone, iPad and iPod Touch, the MacBook also recognizes the Tivizen as a WiFi hotspot and builds a connection us- ing this transmission path. Unfortunately, if your MacBook is connected to the Internet via WiFi, you have to make a choice: it’s either a WiFi connection to the router for Internet ac- cess or a WiFi connection to the Tivizen for DVB-T re- ception; it cannot be both at the same time. Here it would have been nice if the USB port on the Tivizen could also have been used for data instead of just for recharging the battery. So, what’s the story with Windows? Just like with the Mac, if you’re using a PC, you also have to set up a WiFi connection to the Tivi- zen. If you take a look at the available networks, you’ll see that the Tivizen is rec- ognized as a WiFi hotspot. After just a few mouse clicks the wireless connec- tion is established. Unfor- tunately, the same situa- tion exists here in that the Tivizen takes over the WiFi interface and that a simul- taneous wireless Internet connection is not possible. After the TerraTec Home Cinema Software has been downloaded from the El- gato website and then in- stalled and activated using the included product key, it automatically switches over to scan mode and asks the user for a valid chan- nel list. It should be men- tioned at this point that in order to use TerraTec Home Cinema, you’d need an MS Windows 7 PC (32 or 64 bit) with at least a 2.0 GHz Intel or AMD processor or Intel Atom CPU (for HD content an Intel Core2Duo CPU) as well as a minimum of 1GB of RAM. The scan process was completed in just about 64 seconds after which the names of all the available DVB-T channels at our loca- tion appeared in the chan- nel list. We were quite surprised to see during our tests that the time the TerraTec Home Cinema needed to switch between channels was around 2-3 seconds; this was nearly twice as fast compared to Elgato’s own EyeTV Mac software. We’re not sure why there was such a large difference in times but we were nevertheless satisfied to see that a 2-3 second hardware-based channel switching time was possible. Elgato will almost certainly offer an update for EyeTV in the near future in which this difference will be addressed. 10. Changing channels during TV playback. 11. Even the desired audio track can be selected. 12. Recorded programs that include the programs description can be played back at any time. 13. The Czech TV channel CT2 was received effortlessly at a distance of over 40km from the Czech border.
- 68. 1 5 68 TELE-satellite International — The World‘s Largest Digital TV Trade Magazine — 02-03/2012 — www.TELE-satellite.com
- 69. 2 3 4 6 69 www.TELE-satellite.com — 02-03/2012 — TELE-satellite International — The World‘s Largest Digital TV Trade Magazine 1. The EyeTV software’s detailed EPG. It is used by the Tivizen when connected to a MacBook. 2. The Tivizen appears as a separate entry in the list of available WiFi networks. 3. Thanks to the virtual remote control, all of the software’s functions can be controlled. 4. The TerraTec Home Cinema software is used with the Tivizen when connected to a Windows PC. 5. The control center for the TerraTec Home Cinema software. 6. The TerraTec Home Cinema software has its own editor so that commercial breaks can be snipped out.
- 70. 70 TELE-satellite International — The World‘s Largest Digital TV Trade Magazine — 02-03/2012 — www.TELE-satellite.com Logitech Revue TEST REPORT Multimedia Box