Merck Moving Beyond Passwords: FIDO Paris Seminar.pptx
CSS_tutorial_1
1. Beginner CSS Tutorial: Text Selectors 1
I. SAVING YOUR HTML FILE AND GETTING ACQUAINTED WITH TEXT SELECTORS
1. Make a folder on your desktop. Call it “CSS_tutorial_1”
2. Create a new file in Dreamweaver. Select:
- blank page
- Page type: html
- Layout: <none>
- click “create”
We do not want to use a template for this because we are building the CSS from scratch.
3. Go to “File” > “Save as” and name your Dreamweaver document “text_selectors_1.html”. Save it in
your “CSS_tutorial_1” folder on your desktop.
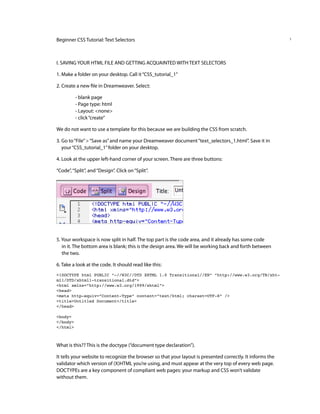
4. Look at the upper left-hand corner of your screen. There are three buttons:
“Code”, “Split”, and “Design”. Click on “Split”.
5. Your workspace is now split in half. The top part is the code area, and it already has some code
in it. The bottom area is blank; this is the design area. We will be working back and forth between
the two.
6. Take a look at the code. It should read like this:
<!DOCTYPE html PUBLIC “-//W3C//DTD XHTML 1.0 Transitional//EN” “http://www.w3.org/TR/xht-
ml1/DTD/xhtml1-transitional.dtd”>
<html xmlns=”http://www.w3.org/1999/xhtml”>
<head>
<meta http-equiv=”Content-Type” content=”text/html; charset=UTF-8” />
<title>Untitled Document</title>
</head>
<body>
</body>
</html>
What is this?? This is the doctype (“document type declaration”).
It tells your website to recognize the browser so that your layout is presented correctly. It informs the
validator which version of (X)HTML you’re using, and must appear at the very top of every web page.
DOCTYPEs are a key component of compliant web pages: your markup and CSS won’t validate
without them.
2. There are different types of doctypes; however we won’t get too deep into this right now. If you’re inter- 2
ested in learning more about them go to:
http://www.alistapart.com/articles/doctype/
The most important thing to know is that you absolutely need this code—do not delete it!
7. Look at line 5 of the code:
<title>Untitled Document</title>
This is where you name your document. This has nothing to do with the name you save it with—what
you type in here is what shows up at the top of the browser window. For now, type in:
<title>Font Tags 1 :: GD4</title>
You can also name your file here:
Notice the title shows up at the top of the window next to “Title” and is also reflected in the code.
I want you to be comfortable going back and forth between your layout mode and code mode. The
more you understand what is happening the code, the more likely you will be able to think in terms of
your markup for layout.
8. Look at line 8 in your code:
<body>
Type in the following so that after the body tag your code looks like this:
<body>
<h1> this is a headline 1 tag </h1>
<h2> this is a headline 2 tag </h2>
<h3> this is a headline 3 tag </h3>
<p> this is a paragraph tag </p>
<a href=”#”> this is a link </a>
</body>
</html>
3. 9. Click “refresh” in the CSS Styles panel (top right of the Dreamweaver interface). Now look below 3
your code in the design window. It should look like this:
You just wrote your first lines of code! Dreamweaver automatically defaults these “styles” if you define
your text as an h1, h2, p... and so on. Lets define some rules for these tags so we’re not limited to this
font choice and color.
II. SAVING A CSS FILE AND DEFINING RULES
1. Look at your screen. In the upper right-hand corner, there should be a panel called “CSS Styles”. It
looks like this:
In the upper right-most corner of that panel, click
and hold on this icon.
And drag down to “new”. Now, you should get a
window that looks like this:
4. 2. You are adding a new CSS rule to your document. Do the following: 4
- Selector Type: select “Tag” (don’t worry about “classes” or “IDs”—we’ll cover these later).
- Tag: click and hold the two arrows to the right of the field. Drag down to select “h1”.
You are defining the “h1” (headline 1) tag.
- Define in: select “(New Style Sheet File)”
- click “OK”
3. Dreamweaver is going to ask you to save your styles before defining any rules. Think of it this way:
CSS is a separate file from your html file. Your html file only holds the specific content for
your web page (such as text and images), whereas the CSS file defines all the RULES for all
your site’s pages (the font sizes, color, and layout).
Your CSS file needs to be saved in the same folder as your html file in order for your html
file to know where to get it’s “rules” from.
Here’s another way to think of CSS: if you have a seven page website, you only need one
CSS file to govern all the pages. It’s like using style sheets in InDesign: one set of rules govern
all the pages of a book. Get it?
Now, let’s save your CSS file before defining any rules. Name your CSS file: “text_selectors_1.css” and
save it in your “CSS_tutorial_1” folder. You will only have to do this once. The next time you want to
add a rule, it will be much easier.
4. Once your “text_selectors_1.css” is saved, a window should automatically pop up that looks like this:
5. Dreamweaver hasn’t forgotten that you originally wanted to define your <h1> tag. The window 5
automatically opens up in the “Type” category. Do the following:
- Font: select “Arial, Helvetica, sans-serif”
- Size: select 24 pixels
- Decoration: select “none” (this is so that if you decide to make it a link later on it won’t put an
ugly underline under your headline)
- Color: key in: ff7d00
Now look at what happened to your text! Notice that the code above has stayed exactly the same... but
your html files recognizes the rule you just made for your <h1> tag.
8. Let’s edit the <h1> tag a little bit more so you can get more comfortable with the CSS interface.
Make sure that your <h1> tag is selected (highlighted) at the top of your CSS panel. If it isn’t, just
click on it once. Below, look for “Properties for h1”. It looks like this:
6. In the properties window, there are three icons in the lower right-hand corner: 6
If you rollover each one and hover for a while, you’ll see each represents the following:
= “attach style sheet”
= “new CSS rule”
= “edit style”
= “delete CSS rule”
Click on the pencil icon (“edit style”). The window for “CSS Rule Definition for h1” will pop-up. You
used this window before when we initially set up the rules for h1.
9. Look at the list to the left, under “Category”. These are all the different rules you can set for your
font tags. Let’s modify our headline a little: (you can click “apply” in the lower right to preview the
changes...)
Category: Type
- Size: 20
- Case: uppercase
- Color: #333333
Category: Background
- Background Color: #99CC00
Category: Block
- Letter Spacing: 1 pixel
- Text Align: center
Category: Box
- Width: Auto
- Height: 30
- Padding: Top: 8 pixels
Category: Border
- Top: dotted, 1 pixel, Color #333333
- Right: dotted, 1 pixel, Color #333333
- Bottom: dotted, 1 pixel, Color #333333
- Left: dotted, 1 pixel, Color #333333
7. Click “OK”. Your <h1> should now look like this: 7
10. Now, let’s look at your CSS document to see how these rules translate to code. At the top of your
Dreamweaver file, there should be two tabs; “text_selectors_1.html” and “text_selectors_1.css”. Click
on “text_selectors_1.css” to see your CSS document. Your rules should look something like this:
@charset “UTF-8”;
h1 {
font-family: Arial, Helvetica, sans-serif;
font-size: 20px;
color: #333333;
text-align: center;
letter-spacing: 1px;
text-transform: uppercase;
background-color: #99CC00;
height: 30px;
width: auto;
padding-top: 8px;
border-bottom-width: 1px;
border-bottom-style: dotted;
border-bottom-color: #333333;
border-top-width: 1px;
border-top-style: dotted;
border-top-color: #333333;
border-right-width: 1px;
border-left-width: 1px;
border-right-style: dotted;
border-left-style: dotted;
border-right-color: #333333;
border-left-color: #333333;
}
Take a closer look at all the “rules”. If you read them carefully, they make sense.
Important things to note:
- there is a “;” after each line
- colors are always preceded by the “#” sign
- “width: auto;” (line 11) means that the box behind the title will scale and shrink to the
browser size (we will test this).
8. III. DEFINING RULES FOR ALL YOUR TEXT 8
1. In the CSS panel, select “text_selectors_1.css” and in the properties window click “New CSS Rule”
(page with “+” icon)
2. In “New CSS Rule” pop-up window select the following:
- Selector Type: select “Tag”
- Tag: h2
- Define in: “text_selectors_1.css”
- click “ok”
3. Set up the following categories:
Category: Type
- Font: Arial, Helvetica, sans-serif
- Size: 18
- Decoration: none
- Color: #666666
Category: Block
- Text align: center
Click “ok”
4. Repeat step 1, and for “New CSS Rule” pop-up window select the following:
- Selector Type: select “Tag”
- Tag: h3
- Define in: “text_selectors_1.css”
- click “ok”
5. Set up the following categories for h3:
Category: Type
- Font: Georgia, Times New Roman, Times, serif
- Size: 12
- Decoration: none
- Case: Uppercase
- Color: #333333
Category: Block
- Letter spacing: 2 pixels
- Text align: left
9. 6. Now set up the following categories for p: (repeating steps 1 + 2) 9
Category: Type
- Font: Verdana, Arial, Helvetica, sans-serif
- Size: 12
- Decoration: none
- Color: #666666
Category: Block
- Text align: left
7. Now set up the following categories for your link (the tag is “a”): (repeating steps 1 + 2)
Category: Type
- Font: Verdana, Arial, Helvetica, sans-serif
- Size: 12
- Decoration: none
- Color: #003366
Category: Block
- Text align: left
8. Your page should look like this:
Notice the following:
- None of your html has changed at all!
- click on the “text_selectors_1.html” tab. Now look at your CSS code. It should look like this:
11. IV. TESTING YOUR WORK 11
1. Click on the tab “text_selectors_1.html” to go back to your html file.
2. Now let’s look at your work in a browser. Look for the globe icon at the top of your Dreamweaver
window:
Click and hold on the globe icon, select “Preview in Firefox”. Dreamweaver might ask if you want to
save your file, save it if you haven’t already.
Your site should preview in Firefox. Notice how your h1 box scales and contracts if you play with your
browser window size. Also notice that your cursor changes over the link—however, the color of the
link does not. Next, we will define different states for hyperlinks.
V. DEFINING DIFFERENT STATES FOR HYPERLINKS USING THE PROPERTIES WINDOW
There’s two ways to define the different “states” of your links in Dreamweaver. I will show you both.
1. Look at the properties window at the bottom of your screen. It looks like this:
Click on the button that says “Page Properties.” It will open up a window that looks like this:
Look at the left-hand side of the window, under the word “category.” Click on the word “Links.”
12. 2. Clicking on the word “Links” will bring you to this screen: 12
Notice in the center of the screen you can select link color, visited, rollover, active.You can select
different colors for the active and inactive “states” for your links. You can also define if your links have
an underline or not.
This is one of the few times you will ever need to
use the property window, and in terms of CSS, this
is technically considered “cheating” as you have not
built in CSS rules for the different states of your
hyperlinks. Let’s look at what this did to your html
code:
Yuck! What is this? Dreamweaver hardcoded your
links into the html, messing up your nice clean
markup. Let’s move on to create those rules in CSS
in order to keep your html document as clean as
possible.
VI. DEFINING DIFFERENT STATES FOR HYPERLINKS IN YOUR CSS DOCUMENT
1. In Dreamweaver, look at the top of your window. Click over to the
CSS tab. Your workspace should now look like this:
Notice the highlighted section that reads as the following:
a {
font-family: Verdana, Arial, Helvetica, sans-serif;
font-size: 12px;
color: #003366;
text-decoration: none;
}
This defines how a link is displayed on your site. However, it DOES
NOT define the different states of your link (hover, active, visited) like
you can define in the properties window.
13. Underneath your “a” style, key in the following in the CSS document: 13
a:link {
color: #003366;
text-decoration: none;
}
a:hover {
color: #0955ef;
text-decoration: none;
}
a:visited {
color: #9bef09;
text-decoration: none;
}
Notice that the above rules don’t include fonts, sizes, etc. This is because your “a” tag already defines
this... this is the beauty of Cascading Style sheets. It follows a hierarchy of rules.
Now, switch over to your Dreamweaver site “text_selectors_1.html”. Go into your code and manually
delete the following: (all the “stuff” that Dreamweaver added when you defined your rollover in the
properties window.) Be careful—only delete the code in between the gray arrows.
Test your site. You should now have the colors
you selected for the different states of your links.
If it doesn’t work, clear your cache and try it
again. If that doesn’t work, check to make sure
your code (in CSS) in keyed in correctly.
In the next tutorial, we will work with Class and
ID selectors.
Quick reference: Basic HTML Tags
Tag Description
<html> Defines an HTML document
<body> Defines the document’s body
<h1> to <h6> Defines headers 1 through 6
<p> Defines a paragraph
<br> Inserts a single line break
<hr> Defines a horizontal rule
<a:link>
<a:hover>
<a:visited> Defines link states
<!--> Defines a comment