Neo4j - How KGs are shaping the future of Generative AI at AWS Summit London ...
d_ltr_print
1. ®
Welcome to CorelDRAW 10, a co mprehensive ve ctor-based drawing program that lets yo u to
create professional graphics.
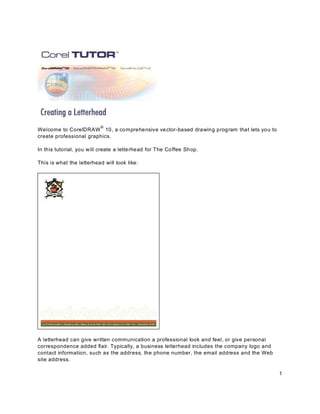
In this tutorial, you w ill create a lette rhead for The Co ffee Shop.
This is what the letterhead will look like:
A letterhead can give written communication a professional look and feel, or give personal
correspondence added flair. Typically, a business letterhead includes the company logo and
contact information, such as the address, the phone number, the email address and the Web
site address.
1
2. CorelDRAW 10 includes many powerful creative tools that can help you create a letterhead. By
experimenting with these tools, you can produce a w ide variety of designs and creative
graphics.
What you will learn
Du ring th is tutorial, you w ill learn h ow to
! import images from another file
! draw lines and shapes
! apply pre-set effects
! add co lor to o bjects
! create Artistic Text
Before you start
Before you start, you will need to dow nloa d the sa mple file u sed in this tu torial, or sub stitute with
your own graphics.
The sa mple file th at yo u w ill use to crea te the lette rhead is saved as a Co relDRA W form at (.cdr)
file. Click the link found on the first page of the online tutorial to download the sample file. When
prompted, choose to save the imag e to your working folder on your hard disk.
Set up a letterhead
The first step toward the creation of The Coffee Shop letterhead is to create a new blank
docum ent that is the size of a stand ard N orth A me rican letter.
To set the paper size
1. Click File menu New.
2. Click Lay out menu Page setup.
3. Display Size options from the directory .
4. Enable the Po rtrait option.
5. Choose Letter from the Pap er list box.
2
3. Importing a Logo
The next step toward the creation of the letterhead is to import The Coffee Shop logo. If you
completed the tutorial "Create a Logo," you can use the logo you created during that tutorial
instead of the file indicated below.
To import The Coffee Shop Logo
1. Click File menu Import.
2. From the Files of type list box, choose CDR - CorelDRAW.
3. Navigate to your working folder (the folder where you saved the files at the beginning of
the tutorial).
4. Click the filename coffee_logo.cdr, and click the Import button.
5. Position the Import placement start cursor near the top left corner of the drawing
page, then click to place The Coffee Shop logo.
Creating the thick strip
The letterhead has tw o stripe s across the bottom , one thick a nd one thin. These stripes help
give visual balance to the letterhead. You will create the stripes by creating two colored
rectangular objects about the same width as the letterhead and move them to the bottom of the
page. The thin rectangle is approximately half the height of the thick rectangle.
1. Click the Re ctangle tool .
2. Drag to crea te a rectangle that extends across the w idth of th e letterhead and is
approximately one quarter (1/4) of an inch in he ight.
3. Use the Pick tool to select the rectangle.
4. Type 8 in in the Object size width box on the pro perty b ar.
5. Type 0.28 in in the Object size height box on the prope rty bar and press ENTER.
6. Type 4.25 in in the Object position "x" box on the pro perty b ar.
7. Type 0.35 in in the Object position "y" box on the prope rty bar and press ENTER.
3
4. Coloring the thick stripe
Color may be added to an object using one of several methods. If you want to use the color
from an existing object, you can use the Eyedropper tool to adjust the color component
values in the Color Docker window automatically. You will use the Eyedropper tool to
duplicate a color from The Coffee Shop logo.
1. To open the Color Docker w indow, click Window menu Dockers Color.
2. Select the rectangle using the Pick tool.
3. Open the Eyedrop per too l flyout and click on the Eyedrop per too l .
4. Click on the Eyedropper 1 x 1 button on the pro perty b ar.
5. Click once on the dark green section at the top of The Coffee Shop logo.
6. Open the Eyedrop per too l flyout and click on the Paintbu cke t tool . Position the
tool over the edge of the rectangle; the square beneath the paint bucket image of the
tool will cha nge to a sq uare w ithin a squ are. Click once o n the outline of the rectan gle.
7. Position the tool over the fill area of the rectangle; the square beneath the the
paint bu cket image of the tool will change to a solid color. Click once o n the inside o f
the rectangle.
Creating the thin stripe
1. Click the Rectangle tool.
2. Drag to crea te a rectangle that extends across the w idth of th e letterhead and is
approximately one eighth (1/8) of an inch in h eigh t.
3. Use the Pick tool to select the rectangle.
4
5. 4. Type 8 in in the Object size width box on the pro perty b ar.
5. Type 0.14 in in the Object size height box on the prope rty bar and press ENTER.
6. Type 4.25 in in the Object position "x" box on the pro perty b ar.
7. Type 0.55 in in the Object position "y" box on the prope rty bar and press ENTER.
8. Drag to crea te a rectangle that extends across the w idth of th e letterhead and is
approximately one eighth (1/8) of an inch in h eigh t.
9. Use the Pick tool to select the rectangle.
10. Type 8 in in the Object size width box on the pro perty b ar.
11. Type 0.14 in in the Object size height box on the prope rty bar and press ENTER.
12. Type 4.25 in in the Object position "x" box on the pro perty b ar.
13. Type 0.55 in in the Object position "y" box on the prope rty bar and press ENTER.
Coloring the thin stripe
1. Use the Pick tool to select the thin rectangle.
2. Open the Eye drop per flyout and click on the Eye drop per tool.
3. Click on the large orange section of the coffee cup in The Coffee Shop logo.
4. Open the Eye drop per flyout and click on the Paintbu cke t tool.
5. Click on the outline of the thin rectangle.
6. Click on the fill area of the thin rectangle.
Creating spirals
You will create spirals and add them to the rectangles at the
bottom of the lette rhead. You w ill stylize these spirals to create
curls of steam similar to those found coming from the cup on The
Coffee Shop logo. Grouping the reshaped spirals lets you
cha nge them as a single un it.
5
6. 1. Open the Object flyout , and click the Spiral tool.
2. In the Spiral revolutions box on the property bar, type 2.
3. Click the Symmetrical spirals button on the property
bar.
4. Drag diagonally in the document window until the spiral is about one half (1/2) of an
inch in d iameter.
5. Repeat the above procedure, dragging diagonally to both the left and right, until you
have seven spirals of varying sizes, opening in both directions.
Manipulating the shape of the spirals
You can manipulate the shape of the spiral by using the Shape tool to re-position nodes and
adjust con trol po ints.
1. Open the Sh ape tool flyout and click the
Shape tool .
2. Select one of the spirals using the Shape tool. A number
of nodes will appear along the length of the spiral's Bezier
line.
3. Click the node at the open end of the sp iral and drag this segment of the Bezier line to
a new position so that it fo rms a "tail" for the spiral.
4. Click and dra g the control p oint to a djust the curve of the tail.
5. Click a node and drag the line to a new p osition that is asym metrical.
6. Click and drag the control point to adjust the curve of individual segments of the Bezier
line. M anipulate as many or a s few nodes an d co ntrol points of th e sp iral as you wa nt.
Positioning the spirals
You can group multiple objects to enact sweeping changes to portions of your work. First, you
will position the spirals relative to each o ther; then, yo u w ill group them .
6
7. 1. Rotate the spirals, if necessary, so that
the tail of the spiral is pointing down.
Using the Pick tool to click once on an
already selected object will make the
rotation han dles appe ar.
2. Click and drag a rotation handle to
re-orient.
3. Line the stylized spirals across the width of the page.
4. Marquee-select the row of spirals: first select the Pick tool. Position it to the left of and
just above the row of spirals. Click and drag diagonally until a rectangle surrounds the
spirals, without selecting other objects.
5. Click Arrange menu Group, from the property bar. To complete the grouping
process, deselect the group of spirals by clicking once on a blank part of the page.
Clicking once on any part of the group will now select the entire contents of the group.
Applying an artistic media effect to spirals
1. Click Effects menu Artistic media.
2. Using the Pick tool, select the group of spirals.
3. Choose bulletdoubleout from the Artistic media Docker window.
4. Set the Artistic media tool width on the property bar to 0.03 in to change
the width of the stroke.
Coloring and positioning the spirals
1. Click the Pick tool and select the group of spirals.
2. Click the Eye drop per tool from the Eye drop per flyout.
7
8. 3. Click the Eye drop per tool on the light green background of the coffee cup on the logo.
4. Click the Fill button in the Color Docker window.
5. Click the Outline button in the Color Docker window.
6. Click the Pick tool and select the group of spirals.
7. Re-position the group of stylized spirals so that the thin stripe h ides the tail of every
spiral. At the same time, ensure the curl of the each spiral is clear of the thin stripe.
Send curls to back.
Adding text
You will now add one continuous line of text to the large green rectangle at the bottom of the
page. First you will use the Tex t tool to add the addre ss a nd the phone num ber; then, you w ill
change the color of the text and increase the space b etween the letters.
Create the Contact Information
1. Click the Tex t tool .
2. Position the cursor on a white area of the page and click once.
3. Choose Times New Rom an from the Font list on the prop erty ba r.
4. Choose 12 from the Font size list on the pro perty b ar.
5. Type or copy from here 12–434 Sunset Boulevard, Any City, Anywhere, Canada
A5 A 5 A5 Tel: (800) 123-4567 Fax: (800) 123-6789.
Changing the color and spacing of text
1. Drag the Tex t tool cursor over the text to select it.
2. Click the Format text button on the pro perty b ar.
3. Type 20 in the Range kerning % of space box.
4. Select the text object using the Pick tool and center it in the large rectangle.
5. Click the White color swatch on the color palette.
8
9. Saving your work
Now that you have finished creating the letterhead, you can save the file for future use.
To save the file
1. Click File menu Save.
2. From the Save in list box, choose the drive and folder where you want to save the file.
3. In the File name box, type a filename.
4. Click Save.
From here . . .
Congra tulations! You have no w co mp leted a letterhead u sing C orelDRA W 10. Y ou can e xplore
CorelDR AW on your o wn, or you can becom e pro ductive quickly by follow ing oth er tutorials.
You can find out more about the tools and procedures you used in this tutorial in CorelDRAW
online Help.
For more information on: In the Help Index type:
importing objects importing files
changing outline color attributes outline color
drawing rectangles rectangles
copying colors eyedropper tool
stylized lines artistic m edia
filling objects with color paintbucket tool
working with objects in groups grouping o bjects
using the color docker color docker
spacing ind ividual letters kerning
formatting text formatting paragraph text
dra win g spirals spirals
objects with curves wo rking with curve objects
9