1. Creating a layout
Welcome to CorelDRAW®, a comprehensive vector-based drawing and graphic-design program for the graphics
professional.
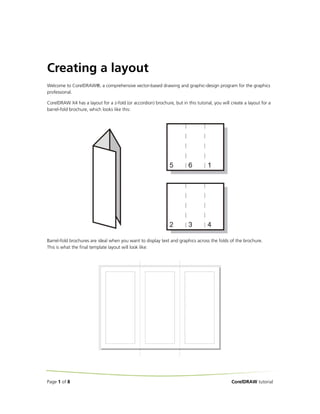
CorelDRAW X4 has a layout for a z-fold (or accordion) brochure, but in this tutorial, you will create a layout for a
barrel-fold brochure, which looks like this:
Barrel-fold brochures are ideal when you want to display text and graphics across the folds of the brochure.
This is what the final template layout will look like:
Page 1 of 8 CorelDRAW tutorial
2. What you will learn
In this tutorial, you will learn
• to change page orientation
• to change the paper type
• to add master layers
• to set up bleeds
• to set up print margins
• to save a drawing as a template
To begin the tutorial, you will create a new document and set the page properties. You will then add guidelines
to set up the brochure pages.
You will add a master layer. You can use master layers when you have content that you want to apply to all pages
in a document. On the master layer, you will set up a bleed that ensures that no white space appears between the
edges of the drawing and the edges of the paper after the document is printed.
You will also set up a printing margin that will inset the brochure text from the edge of the page by creating
rectangles to represent the printing margin. You will put the rectangles on a nonprinting layer so that you will be
able to see and snap to them, without making them part of the final design.
You will finish the tutorial by saving the drawing as a tri-fold barrel brochure layout.
Throughout the tutorial, you will use rectangles to help you set up elements of the brochure. You will also use
time-saving mathematical operators to quickly and precisely resize the rectangles.
To set up the drawing
1 Click File New to create a new document.
2 On the property bar, choose A4 from the Paper Type/Size list box to change the paper size.
3 Click the Landscape button to change the page orientation.
4 In the toolbox, double-click the Rectangle tool to create a rectangle that is the same size as the page.
You will use this rectangle to help you set up guidelines to divide the drawing into brochure pages.
5 On the property bar type /3 after the number in the width section of the Object(s) sizes box to reduce the
rectangle to one third of its original width .
6 Press Enter.
The rectangle is centred on the drawing page, dividing it into equal thirds .
7 Click the vertical ruler and drag two guidelines, aligning them to both vertical edges of the rectangle.
Page 2 of 8 CorelDRAW tutorial
3. If the rulers are not visible, click View Rulers. A check mark next to Rulers indicates that the rulers are
enabled.
8 Now that the guidelines are in place, you will delete the rectangle. In the toolbox, click the Pick tool ,
select the rectangle, and press Delete.
To add a Master layer
1 At the bottom of the Object manager docker, click the New master layer button .
2 Name the master layer Bleed Area.
3 Click the Printing and Exporting icon on the Bleed Area layer to make it a nonprinting layer .
To set up the bleed
1 In the toolbox, double-click the Rectangle tool to create a rectangle that is the same size as the page.
2 On the property bar, type +6 after the number in the width and height sections of the Object(s) sizes box to
add 6 mm to the width and height of the rectangle .
3 Press Enter.
Page 3 of 8 CorelDRAW tutorial
4. The top, bottom, left, and right edges of the rectangle expand by 3 mm. The page content will extend 3mm
over the edge of the page, setting up a full bleed .
To set up the printing margins
1 At the bottom of the Object manager docker, click the New master layer button.
2 Name the master layer Printing Margin.
When you use this brochure layout, text will be contained within the printing margins.
3 Click the Printing and Exporting icon on the Printing Margin layer to make it a nonprinting layer.
4 In the toolbox, click the Rectangle tool, and draw a rectangle that begins at the top-left corner of the page
and ends where fold left guideline intersects with the bottom of the page.
Page 4 of 8 CorelDRAW tutorial
5. 5 On the property bar, type -24 after the number in the width and height sections of the Object(s) sizes box to
create a 12 mm print margin .
6 Press Enter.
7 With the rectangle selected, press Ctrl + D to duplicate the rectangle.
8 In the Duplicate offset dialog box, type 0 in the Horizontal offset and Vertical offset boxes.
A duplicate rectangle is created directly over the original. The duplicate rectangle will serve as the print
margin for the middle panel of the brochure.
9 In the toolbox, click the Pick tool , and click the center of the rectangle.
10 Hold down Ctrl to constrain the rectangle to an axis, and drag the rectangle to the right until it snaps to the
center of the page.
11 Press Ctrl + D to duplicate the rectangle again.
A third rectangle is automatically offset by the same distance used when you offset the second rectangle from
the first, placing the third rectangle precisely where you need it on the right panel of the brochure.
Page 5 of 8 CorelDRAW tutorial
6. To save the drawing as a template
1 Click File Save as template.
2 In the Save drawing dialog box, locate the folder where you want to save the layout.
3 Click Save.
4 In the Template properties dialog box, type Barrel Tri-fold Brochure in the Name box.
5 From the Sided list box, choose Double.
6 From the Folds list box, choose 3-fold.
7 From the Type list box, choose Brochures.
8 In the Designer notes box, type 12 mm printing margin, 3 mm full bleed.
When you open the layout, the designer notes appear in the Open drawing dialog box.
9 Click OK.
Page 6 of 8 CorelDRAW tutorial
7. To see an example of a brochure created with this layout
1 Click File Open.
2 Choose the folder Program filesCorelCorelDRAW Graphics X4Tutorial files.
3 Double-click the filename barrel fold.cdr.
To access the z-fold brochure layout
1 Click Tools Options.
2 In the list of categories, click Document, click Page, and click Layout.
3 From the Layout list box, choose Tri-Fold Brochure.
Page 7 of 8 CorelDRAW tutorial