Oracle forms and reports 11g installation on linux
•
7 j'aime•8,032 vues

The document provides steps to install Oracle Forms and Reports 11g on Linux 5.4. It includes instructions on modifying OS configuration files, installing prerequisite RPM packages, setting up the user oracle and groups, installing Java JDK, unzipping the Forms and Reports software, running the installer, configuring the domain, and starting the servers. It also provides URLs to access the Forms and Reports applications and tips on deploying and running forms.

Recommandé
Recommandé
Contenu connexe
Tendances
Tendances (20)
Similaire à Oracle forms and reports 11g installation on linux
Similaire à Oracle forms and reports 11g installation on linux (20)
Dernier
Dernier (20)
Oracle forms and reports 11g installation on linux
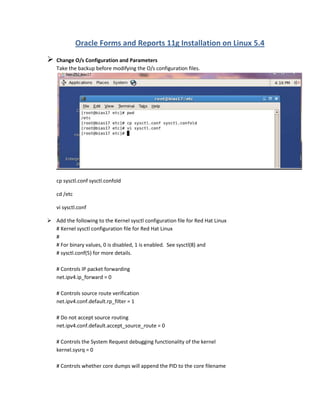
- 1. Oracle Forms and Reports 11g Installation on Linux 5.4 Change O/s Configuration and Parameters Take the backup before modifying the O/s configuration files. cp sysctl.conf sysctl.confold cd /etc vi sysctl.conf Add the following to the Kernel sysctl configuration file for Red Hat Linux # Kernel sysctl configuration file for Red Hat Linux # # For binary values, 0 is disabled, 1 is enabled. See sysctl(8) and # sysctl.conf(5) for more details. # Controls IP packet forwarding net.ipv4.ip_forward = 0 # Controls source route verification net.ipv4.conf.default.rp_filter = 1 # Do not accept source routing net.ipv4.conf.default.accept_source_route = 0 # Controls the System Request debugging functionality of the kernel kernel.sysrq = 0 # Controls whether core dumps will append the PID to the core filename
- 2. # Useful for debugging multi-threaded applications kernel.core_uses_pid = 1 # Controls the use of TCP syncookies net.ipv4.tcp_syncookies = 1 # Controls the maximum size of a message, in bytes kernel.msgmnb = 65536 # Controls the default maxmimum size of a mesage queue kernel.msgmax = 65536 # Controls the maximum shared segment size, in bytes kernel.shmmax = 68719476736 # Controls the maximum number of shared memory segments, in pages kernel.shmall = 4294967296 Press Esc +Shift :wq to save the changes Press Esc +Shift :q! to quit without saving the changes Change the Hosts File Entry Take the backup before modifying the hosts file entry cd /etc cp hosts hostsold vi hosts Press Esc +Shift :wq to save the changes Press Esc +Shift :q! to quit without saving the changes
- 3. Go to /etc/security (cd /etc/security) and Add or change /etc/security/limits.conf file: vi limits.conf # End of file oracle hard nofile 4096 oracle soft nofile 4096 oracle hard nproc 16384 oracle soft nproc 2047 Go to /etc/pam.d (cd /etc/pam.d) and Add or change line to the /etc/pam.d/login file vi login add the below lines in the file session required pam_limits.so session required /lib/security/pam_limits.so Press Esc +Shift :wq to save the changes
- 4. Press Esc +Shift :q! to quit without saving the changes The following packages(rpm) are required for Enterprise Linux: checking rpm: rpm –q rpmname rpm –q elfutils-libelf-devel-0.125-3.el5.i386 rpm –q gcc-4.1.2-46.el5.x86_64 rpm –q gcc-c++-4.1.2-46.el5.x86_64 rpm –q glibc-devel-2.5-42.i386 rpm –q libaio-0.3.106-3.2.i386 rpm –q libaio-0.3.106-3.2.x86_64 rpm –q libaio-devel-0.3.106-3.2.i386 rpm –q libaio-devel-0.3.106-3.2.x86_64 rpm –q libstdc++-4.1.2-46.el5.i386 rpm –q libstdc++-4.1.2-46.el5.x86_64 rpm –q libstdc++-devel-4.1.2-46.el5.i386 rpm –q libstdc++-devel-4.1.2-46.el5.x86_64 rpm –q libXp-1.0.0-8.1.el5.x86_64 rpm –q libxp6-1.0.1-2.mga2.i586 rpm –q libxp6-1.0.1-3-mdv2012.0.i586
- 5. rpm -q openmotif-2.2.3-6.RHEL4.2.i386 rpm -q openmotif-2.2.3-9.RHEL4.1.src rpm -q openmotif22-2.2.3-20.x86_64 rpm -q sysstat-7.0.2-3.el5.x86_64 rpm -q XFree86-libs-3.3.2.3-25.i386 Attached the downloaded rpm here Create User and Groups by using below commands: groupadd oinstall useradd -g oinstall oracle passwd oracle Unzip the software from the path where it is saved and use the below command to unzip the file unzip ofm_frmrpts_linux_11.1.2.0.0_64_disk1_1of1.zip Download and install Java JDK1.6 version from the path where it is saved before installing web logic server ./jrockit - jdk1.6.0_22-R28.1.1-4.0.1-linux-x64.bin
- 6. Click Next to install the JDK
- 7. Click Next with the default Product Installation Directory Click Next without selecting Optional Components
- 8. You will get the below confirmation message once the JDK has been installed successfully.
- 9. Click on Done to exit from JDK installation. Set JAVA_HOME and path by editing the bash_profile by using below command. vi .bash_profile PATH=$PATH:$HOME/bin export JAVA_HOME=/home/oracle/Oracle/jrockit - jdk1.6.0_22-R28.1.1-4.0.1
- 10. export PATH==/home/oracle/Oracle/jrockit - jdk1.6.0_22-R28.1.1-4.0.1/bin:$PATH To save the changes Esc+Shift+: wq To quit with out saving the changes Esc+Shift+: q! To effect the changes to the server execute the below command. . .bash_profile Download the web logic server software to the location /tmp/StageApps and install the web logic server by using the below command.
- 11. java -jar wls1035_generic.jar Click Next to continue installation
- 12. Create a new Middleware Home and give the location to be installed Click Next and uncheck the "I Wish to" and click Yes to continue
- 13. Check the "I Wish to..." and click on Continue to proceed further Continue with default install Type "Typical" and click on Next
- 14. Select the installed JDK path and click on Next
- 15. Choose default web logic server location and click next to continue WLS installation Click Next
- 16. You will get the above screen after installation got success. Uncheck the check box and click on Done. Check the Middleware location in the installed path Go to the Stage directory where the software is downloaded and staged and run the below command to start the installation ./runIstaller Select default values for Inventory Directory and Operating System Group Name
- 17. Click Ok to continue installation Click Next
- 18. Select "Skip Software Updates" and click Next to continue installation
- 19. Select "Install and Configure" and click Next to continue installation
- 20. Click next to continue and ignore the warning for operating system prerequisite checks
- 21. Select the Oracle Middleware Home Location, Web logic server location and Oracle Instance Location and click Next to continue installation
- 22. Select "Configure For Deployment" and click Next to continue installation
- 23. Select "Create Domain" and give the credentials for web logic server em console and click Next to continue installation
- 24. Select at least one developer tools and click Next to continue installation
- 26. Select "Auto Port Configuration" and click Next to continue installation
- 27. Select "Do Not Use Proxy Settings" and click Next to continue installation
- 28. Uncheck "Use Application Identity Store" and click Next to continue installation
- 29. Click on "Install" to start the installation You will get the below confirmation dialog once the installation reached 100% and connect to Linux as root and execute the below command
- 30. #/home/oracle/Oracle/Middleware/Oracle_FRHome1/oracleRoot.sh Click OK once the script is executed and you will get the below error while configuring and the solution to fix this issue is provided below
- 31. As we faced above error while configuring the domain .. modifications done on this issue: 1) Make sure that your Hostname and Gateway has properly configured. 2) Make sure that below RPM packages are installed or not. libXp-1.0.0-8.1.el5.x86 64.rpm openmotif22-2.2.3-20.x86 64.rpm 3) Make sure that Firewall and Selinux has been Disabled. Root] # service iptables status. Root] # service iptables stop. Refer below links for more information:
- 32. http://dirknachbar.blogspot.in/2011_02_01_archive.html http://dirknachbar.blogspot.in/2011/02/oracle-reports-1111-reports.html Click Next once the configuration reached 100% Click "Finish" once the installation is completed.
- 34. Change/add user environment variables log in as oracle Go to /home/oracle Vi .bash_profile Add the following: .bash_profile # .bash_profile # Get the aliases and functions if [ -f ~/.bashrc ]; then . ~/.bashrc fi # User specific environment and startup programs PATH=$PATH:$HOME/bin export JAVA_HOME=/home/oracle/jrockit-jdk1.6.0_22-R28.1.1-4.0.1 export PATH=/home/oracle/jrockit-jdk1.6.0_22-R28.1.1- 4.0.1/bin:$PATH:/home/oracle/Oracle/Middleware/Oracle_FRHome1/bin:$PATH export ORACLE_MIDDLEWARE=/home/oracle/Oracle/Middleware export ORACLE_HOME=/home/oracle/Oracle/Middleware/Oracle_FRHome1 export ORACLE_INSTANCE=/home/oracle/Oracle/Middleware/asinst_1 export LD_LIBRARY_PATH=/home/oracle/Oracle/Middleware/Oracle_FRHome1/lib:/home/oracle/Orac le/Middleware/Oracle_FRHome1/jdk/jre/lib/amd64/native_threads export FORMS_BUILDER_CLASSPATH=/home/oracle/Oracle/Middleware/Oracle_FRHome1/jlib export FORMS_PATH=/home/oracle/Oracle/data/myforms
- 35. Some Tips to start the servers from Linux: To find any file name use the below command find . -name *.DAT find . -name *.lok To remove any file execute the below command rm -rf <File name with path> start Admin Server **************** cd /home/oracle/Oracle/Middleware/user_projects/domains/ClassicDomain/bin ./ startWebLogic.sh start nodeManager ****************** cd /home/oracle/Oracle/Middleware/wlserver_10.3/server/bin
- 36. ./ startNodeManager.sh start reports engine ****************** cd /home/oracle/Oracle/Middleware/asinst_1/bin ./opmnctl startall To find out the status ./opmnctl status To stop the Engine ./opmnctl stopall If WLS_FORMS and WLS_REPORTS are down, then we need start from Web logic Administrator console http://bias17.bias.com:7001/console Administrator Console: http://bias17.bias.com:7001/console EM Console: http://bias17.bias.com:7001/em EMAgent URL: http://bias17.bias.com:5155/emd/main Reports URL: http://bias17.bias.com:8888/reports/rwservlet Forms URL: http://bias17.bias.com:8888/forms/frmservlet After successful installation, we need to verify the above links by opening in the web browser and you will get the below screens.
- 38. Configuration Information for reports Name of the File Directory structure on Unix rwbuilder.sh $ORACLE_INSTANCE/config/reports/bin/ rwbuilder (executable) $ORACLE_HOME/bin/
- 39. Name of the File Directory structure on Unix reports.sh $ORACLE_INSTANCE/config/reports/bin/ rwserver.sh $ORACLE_INSTANCE/config/reports/bin/ rwclient.sh $ORACLE_INSTANCE/config/reports/bin/ rwrun.sh $ORACLE_INSTANCE/config/reports/bin/ rwconverter.sh $ORACLE_INSTANCE/config/reports/bin/ rwservlet.properties ** $DOMAIN_HOME/servers/WLS_REPORTS/stage/reports/ reports/configuration/ cgicmd.dat ** $DOMAIN_HOME/servers/WLS_REPORTS/stage/reports/ reports/configuration/ rwserver.conf (standalone) $ORACLE_INSTANCE/config/ReportsServerComponent/ report_server_name/ rwnetwork.conf (standalone) $ORACLE_INSTANCE/config/ReportsServerComponent/ report_server_name/ rwnetwork.conf $ORACLE_INSTANCE/config/ReportsToolsComponent/ReportsTools/ rwserver.conf (in-process)** $DOMAIN_HOME/servers/WLS_REPORTS/stage/reports/ reports/configuration/ rwnetwork.conf ** $DOMAIN_HOME/servers/WLS_REPORTS/stage/reports/ reports/configuration/ targets.xml $DOMAIN_HOME/sysman/state/ opmnctl (executable) $ORACLE_INSTANCE/bin/ opmn.xml $ORACLE_INSTANCE/config/OPMN/opmn/ uifont.ali $ORACLE_INSTANCE/config/FRComponent/frcommon/ guicommon/tk/admin/ uiprint.txt $ORACLE_INSTANCE/config/FRComponent/frcommon/ guicommon/tk/admin/ Tk2motif.rgb $ORACLE_INSTANCE/config/FRComponent/frcommon/ guicommon/tk/admin/ portlist.ini $ORACLE_HOME/install/ httpd.conf $ORACLE_INSTANCE/config/OHS/ohs1/ tnsnames.ora $ORACLE_INSTANCE/config/ We need to add the TNS entries in the tnsnames.ora file which is located in the below path /home/oracle/Oracle/Middleware/asinst_1/config DEV = (DESCRIPTION = (ADDRESS = (PROTOCOL = TCP)(HOST = 172.16.12.43)(PORT = 1521)) (CONNECT_DATA = (SERVER = DEDICATED) (SERVICE_NAME = dev.bias.com) ) )
- 40. If we are facing any issue while opening form builder in Linux, just execute the below command as root user ]# xhost + To open the form builder in Linux execute below command from the path /home/oracle/Oracle/Middleware/asinst_1/bin ./frmbld.sh Move the attached form HR.fmb to the path /home/oracle/Oracle/data/myforms Compile the form HR.fmb by opening it in form builder and it will generate HR.fmx in the same directory. Open the deployed form in web browser by using the link below and you will get error as FRM- 40010: Cannot read form HR. http://bias17.bias.com:8888/forms/frmservlet?config=hr8&form=HR
- 41. If we get this error, then we need to log in into web logic em and need to give the FORMS_PATH for environment configuration as /home/oracle/Oracle/data/myforms After the path provided then click on "Apply" button then will get confirmation message as "Changes have been applied"
- 42. Try again by opening the link in web browser you will get the below screen http://bias17.bias.com:8888/forms/frmservlet?config=hr8&form=HR Username:hr8 password:hr8 Database:DEV Enter the credentials for the database then the form will open
- 43. If you do not want to enter the data base credentials at runtime, you need to configure them in web logic server em under web configuration. userid= hr8/hr8@DEV
- 44. Click on "Apply" button you will get the confirmation "Applying Changes - Completed Successfully" and then click on Close. Try again by opening the link in web browser you will get the below screen and this time it will not ask for database credentials http://bias17.bias.com:8888/forms/frmservlet?config=hr8&form=HR
- 45. Starting the In-process Server (Windows and UNIX) for Reports: If you are using Reports Server as an in-process server (the default configuration), sending a run report request starts the in-process server; however, if you are sending a request through a command line, the servlet must be invoked first using either the run report URL or the Web command URL. When you have successfully started the servlet, this also means you have successfully started the in-process server. To directly start the in-process server from a URL, enter the following from your Web browser: http://bias17.bais.com:8888/reports/rwservlet/startserver