SlideShare a Scribd company logo
1 of 31
1
Contents
Lab1: Migration using SCT/DMS ...................................................................................................................2
Lab2: Walkthrough of Aurora Console and Read replicas, DB Parameter groups.....................................23
LAB3 : Performance Insights.......................................................................................................................27
Load Scenario-1 : High volume insert via pgbench ..........................................................................27
Load Scenario-2: High volume update via pgbench.........................................................................28
Load Scenario-3: Connection Load Balancing across replicas..........................................................30
Clean up CloudFormation stack:.................................................................................................................31
2
Workshop Outline
Abstract:
Description: This workshop will focus on hands-on journey for existing Oracle DBA to Aurora PostgreSQL.
Attendees will deploy an instance of Aurora PostgreSQL, migrate or generate a test workload on
PostgreSQL, and manually monitor the database to understand the workload. They will review a few
ways to track queries and their execution plans, and what can be done to optimize the queries.
Attendees will also learn how to do the same on Aurora PostgreSQL using Performance Insights for
query analysis and tuning.
Lab1: Migration using SCT/DMS
Oracle RDS to Aurora PostgreSQL migration lab using DMS and SCT:
The following instructions help you launch a CloudFormation stack which sets up the following resources
and migrate a sample database from Oracle to Aurora PostgreSQL using DMS and SCT –
1. Oracle RDS source within a VPC with all networking resources configured with a sample “HR”
schema installed from Sample HR Schema installation
2. Aurora PostgreSQL target within same VPC as #1 with all networking resources configured
3. EC2 Bastion instance with preinstalled PSQL and PGBENCH utilities
4. The CloudFormation will provision the necessary security groups with access based on the IP
range provided in the template for port 1521 and 5432 respectively for Oracle and PostgreSQL
instances.
Pre-requisites:
1. Active AWS account with Admin privileges. (IAM user should have administrator access). Please
refer the link on how to create IAM administrator user here
2. Existing EC2 key pair created in the AWS region you are launching the CloudFormation template
in. Please refer below on how to first create a new Key pair as shown here
3
Please follow the instructions below for connecting to EC2 Bastion instance.
Your computer How to connect
Linux Connecting to Your Linux Instance Using SSH
Window Connecting to Your Linux Instance from Windows Using PuTTY
All Connecting to Your Linux Instance Using MindTerm
3. Pre-installed AWS Schema Conversion Tool software on your machine. Details on how to
download and install AWS Schema Conversion Tool shown below
a) Install and launch SCT on your local machine from
http://docs.aws.amazon.com/SchemaConversionTool/latest/userguide/CHAP_SchemaC
onversionTool.Installing.html
b) Download required drivers from links in the “Installing the Required Database Drivers”
section from the above link. You will need to download Oracle and PostgreSQL drivers
for this workshop. Alternatively, you can download the required drivers for this lab from
–
http://bit.ly/2phVpPk -> Oracle JDBC driver
http://bit.ly/2pt04ZT -> PostgreSQL JDBC driver
On the Mac, please make sure the file permission for the drivers is set to 755
You can update the path to drivers in Settings -> Global settings -> Drivers
High level steps:
c) Log into your AWS account
d) Launch CloudFormation stack
e) Click on create a new stack and “Choose Specify an Amazon S3 template URL” and specify the
S3 location for the cloud formation template
f) Provide user defined Stack name
g) Under Parameters section, for the parameter key name, select the preexisting key for your
account in this region
h) Click create and wait for the stack to be completed, once it is completed look under the tab
“outputs” to get the connection details for Oracle and Aurora PostgreSQL and EC2 instance.
i) Navigate to the DMS service (under Migration)
j) Launch a replication instance on the same VPC as source and target
4
k) Use SCT to convert source Oracle schema objects to target PostgreSQL
l) Create a source endpoint (Source is launched using the CloudFormation stack)
m) Create a target endpoint (Target is launched using CloudFormation stack)
n) Create a task to migrate the data from the source database to the target database
o) Execute some transactions on the source database (using a script we’ve provided)
Lab Instructions:
1. Login in to your AWS console and go to the CloudFormation service
2. Click “Create stack” from the top left
Please execute this LAB using the us-east-1 (N. Virginia) or us-west-2 (Oregon) region.
5
Click create stack, select ‘Specify an Amazon S3 template URL’ and specify the S3 template URL as
https://s3-us-west-2.amazonaws.com/nyc-loft/PostgreSQL_Migration_CloudFormation_template.json
3. Hit next and give a friendly name such as ora2pg for the stack and accept all defaults.
6
In the Other Parameters section choose the key for the EC2 instance as shown below Hit next in
the next page and click on create. Wait for the entire stack to launch and become available.
7
*Leave everything else default. Once the CloudFormation stack launch is complete, you should see 2
RDS instances in your account in the region you created the stack. Approximately, it will take 15 to
20 minutes for creating the Stack.
4. Note down RDS Endpoint details of source and target instances from stack output section as
shown below
5. Note down the resources created by the stack from the “Resources” tab, specially note down the
VPC created by the stack as shown below
8
6. Once stack is available, go to the DMS console and launch a replication instance by selecting
“Replication Instance” on the left side menu. Choose the same VPC as your stack name (this VPC
was created by the CloudFormation Stack).
Also, please check the “Replication engine version” to the latest version, this screenshot shows
the version 2.3.0, but the users should choose the latest 2.4.0 version.
Please leave the rest of the values/advanced settings to the default values.
Here is a screenshot of the create replication instance page –
9
Schema Conversion:
1. Launch the AWS Schema Conversion Tool installed on your machine.
2. Make the path to drivers in Settings -> Global settings -> Drivers point to the actual path where
you have kept the drivers as show below
10
3. Create a New Project using File-> New Project
11
4. Connect to your assigned Oracle source and PostgreSQL target endpoints. Endpoints can be
found under the “Resources” tab on the CloudFormation page or from the RDS Console under
instances
Oracle instance –
 Type: SID
 Engine: Oracle
 Server Name: RDS Oracle Source endpoint from your account
 Server Port: 1521
 SID: orasrcdb
 User name: oraadmin
 Password: oraadmin123 (Please note that if you changed the default settings when creating the
CloudFormation stack, then you need to enter the password that you have provided)
12
If the defaults were accepted in CloudFormation, the password is oraadmin123. Substitute the
server name with the RDS Oracle Database Endpoint launched in your VPC.
NOTE: If you’re not able to connect, please add the IP address from which you’re trying to connect
to the instances from to the inbound security group rules for the security groups attached to the
Oracle RDS and Aurora PostgreSQL instances.
PostgreSQL instance:
 Server name: Cluster endpoint of Aurora PostgreSQL target instance
 Serve Port: 5432
 Database name: auroradb
 Username: auradmin
 Password: auradmin123 (Please note that if you changed the default settings when creating the
CloudFormation stack, then you need to enter the password that you have provided)
13
If the defaults were accepted in CloudFormation, the password is auradmin123. Substitute
the server name with the RDS Aurora PostgreSQL (cluster endpoint) launched in your VPC.
NOTE: If you’re not able to connect, please add the IP address from which you’re trying to connect
to the instances from to the inbound security group rules for the security groups attached to the
Oracle RDS and Aurora PostgreSQL instances.
Please refer troubleshoot connectivity - EC2 security groups here
5. Uncheck all schemas on the left except for the “HR” schema.
6. Now, right click and click “Create Report”. Review the conversion report – click on the view tab
and click assessment report view. Look through what Oracle objects could be automatically
converted and what could not be
7. Now, right click and click “Convert schema”. The schema will be converted and shown on the
PostgreSQL instance (it has not been applied yet).
14
8. Right click on the created schema on the right and click “Apply to database”. This will apply all
those converted objects in the PostgreSQL target.
The above steps will convert all your Oracle objects into PostgreSQL objects.
9. Objects which could not be converted automatically must be taken care of manually after
migration at a later time.
NOTE: At this point, all the database objects from the source HR Oracle schema must be converted and
created in PostgreSQL in the HR schema in the Aurora postgres database.
15
Data Migration:
Create a source endpoint:
 Select Endpoints from the menu on the left and “click the "create endpoint" button at the top.
 Endpoint identifier: orasource
 Endpoint Type: source
 Engine: Oracle
 Server Name: RDS Oracle Source endpoint from your account
 Port: 1521
 SSL Mode: none
 User name: oraadmin
 Password: oraadmin123 (Please note that if you changed the default settings when creating the
CloudFormation stack, then you need to enter the password that you have provided)
 SID: orasrcdb
 VPC: VPC launched by the CloudFormation template
 Replication Instance: choose the instance you created
 Refresh schemas: Yes - check this box
Test the connection and save it if the test is successful.
16
Create a target endpoint:
 Click the "create endpoint" button at the top
 Endpoint identifier: aurtarget
 Endpoint Type: Target
 Engine: postgres
 Server name: Cluster endpoint of Aurora PostgreSQL target instance
 Port: 5432
 SSL Mode: none
 Username: auradmin
 Password: auradmin123 (Please note that if you changed the default settings when creating the
CloudFormation stack, then you need to enter the password that you have provided)
 Database name: auroradb
17
 VPC: VPC launched by the CloudFormation template
 Replication Instance: choose the instance you created
 Refresh schemas: check this box
Test the connection and save it if the test is successful
CREATE A MIGRATION TASK:
 Name: Replication Instance: choose the one you created
18
 Source Endpoint: choose the source endpoint you just created
 Target Endpoint: choose the target endpoint you just created
 Migration Type: Migrate existing data and replicate ongoing changes
 Start task on create: check this (or don't, up to you). If you don’t, you’ll need to start your task
Separately.
** Target table preparation mode: Do Nothing
Why a do-nothing task?
The initial load in DMS is done table by table which means that the target tables cannot have active
foreign key constraints. As we are using SCT to convert Oracle source objects into PostgreSQL target
objects, all secondary objects were created as part of the process. This means that we would need to
disable all foreign key constraints on the target for the initial full load to be successful. Foreign keys or
referential integrity constraints in PostgreSQL are implemented using triggers. One way to disable
foreign keys is to disable all triggers temporarily from the instance and do the loads.
One of the ways to do this is to use the session_replication_role parameter in PostgreSQL. Triggers also
have a state in PostgreSQL (Origin, replica, always or disabled). When the session_replication_role
19
parameter is set to replica, only triggers of the state replica will be active and are fired when called. If
not, the triggers remain inactive. We have already setup the parameter group on the target to set this
role to replica which means all foreign key constraints (innately triggers in the origin state) will not be
active. However, PostgreSQL has a failsafe mechanism of not letting a table truncate even with this role
set. As we are using prepopulated tables on the target and cannot truncate the table, we are using
do_nothing for the target table prep mode.
Stop task after full load completes: don't stop
Include LOB columns in replication: Accept the default
Enable logging: YES! (Check this box)
Table Mappings – Selection rules:
1. Select HR from the drop-down box Click the "Add selection rule" button.
2. Click on “add transformation rule” -> Choose schema for target dropdown -> Schema name is HR ->
Choose “make lower case” for action & click add transformation rule.
3. Click on “add transformation rule” -> Choose table for target dropdown -> Schema name is HR and
table name is % -> Choose “make lower case” for action & click add transformation rule.
4. Click on “add transformation rule” -> Choose column for target dropdown -> schema name is HR,
table name is % -> column name is % -> Choose “make lower case” for action & click add transformation
rule.
20
Note – We are doing 2, 3 and 4 above as the schema has been pre-created on the target with lowercase
(PostgreSQL convention). Your task json should look like this –
 Click create task now and let the task run.
Executing transactions on the source to mimic CDC transactions:
Once your task is running you might want to execute a few transactions on the source. So, connect to
your source database as oraadmin using your favorite tool on your local machine: SQLDeveloper,
DBeaver or even SQL*Plus!
21
You can also choose to use the EC2 instance created as a part of the CloudFormation stack, this EC2
Instance is being created with SQLPLUS pre-installed.
Login to EC2 instance (Refer the EC2 Bastion Instance Public DNS from the Output or Resource tab from
the CloudFormation stack) as shown here
1) ssh –i <keypair.pem> ec2-user@<ec2 host name public DNS>
(please note if you are using Putty to connect to EC2 Instance, then please use “.ppk” file
instead)
2) Switch to root user (sudo su -)
3) $cd /instantclient/instantclient_12_1/
4) $ . setup_sqlplus.sh
5)sqlplus 'oraadmin@(DESCRIPTION=(ADDRESS=(PROTOCOL=TCP)(HOST=<RDS Oracle
Endpoint>)(PORT=1521))(CONNECT_DATA=(SID=orasrcdb)))'
6) exec hr.add_employees(10000);
22
Steps to connect to Aurora PostgreSQL Database using psql:
Login to EC2 instance (grab the instance details from the Output or Resource tab from the
CloudFormation stack) as shown here
1) ssh –i <keypair.pem> ec2-user@<ec2 host name public DNS>
2) Switch to root user (sudo su -)
3) $ cd /scripts
4) psql -h <replace cluster endpoint of your Aurora DB instance> -p 5432 -U auradmin -d auroradb
provide the password for auradmin user (auradmin123)
23
Lab2: Walkthrough of Aurora Console and Read replicas, DB Parameter
groups.
In this exercise, we will walk through the important DBA tasks such as creating read replicas, making
changes in DB Parameter groups, enabling performance insights for monitoring.
Note: We recommend to use the psql installed in the EC2 instance to execute all the commands used in
the Labs. However, if you are comfortable with other PostgreSQL client tools such as pgadmin, feel free
to run the postgreSQL commands.
Set search_path to ‘hr’; ( similar to alter session set current_schema in oracle))
Add :- Enable Performance insight and Enhanced monitoring
1. Go to RDS Dashboard and click Clusters and then instances.
24
2. Select the Aurora writer instance (check the column replication role in the console which should
display writer) and create the read replica by clicking the option as displayed below:
Go to Aurora Instance, click Instance Actions and select Create Aurora Replica.
Use the below parameters in the Create Aurora Replica console:
Instance specifications
DB Instance Class – db.r4.large
Settings
Aurora Replica source - choose the Aurora Cluster instance launched by
CloudFormation stack
DB instance identifier – replica1
Network and Security
Publicly Accessible – Yes
Availability Zone – No preference
Failover
Priority - Tier0
Database Port
Database ports – 5432
Monitoring
Enable Enhanced Monitoring - No
Enable Performance Insights - Yes
Maintenance
Auto-minor version upgrade - Yes
Repeat the above steps mentioned in 3) and create another replica with DB instance identifier
as replica2 and failover priority as Tier1.
Note: replicas may take around 5 to 10 minutes to launch. proceed to the
next step.
25
3. Go to Parameter groups in RDS Dashboard. Search for the DB Parameter group associated with
the Aurora writer instance used in this lab (for example. parameter group name will start with
the stack name followed by aurorapgxxx).
4. Click Edit Parameters
5. Search for the parameter shared_preloaded_libraries
6. Choose and edit the values as auto_explain,pg_stat_statements under
shared_preloaded_libraries ( This will enable you to use those extensions)
7. Save changes
8. Again, Search for auto_explain. log_ and only modify the below parameters as defined below.
The first parameter helps to log the SQL statements with execution time > 5s. The second
parameter helps you to log the explain plan for the nested SQLs used in the plpgsql function.
9. Save changes
10. Go to instances under RDS Dashboard and select the Aurora writer instance, click Instance
Actions and then Modify.
11. Choose Yes for Enable performance insights section. Don’t make any other changes.
26
12. Apply the changes immediately by clicking the below option and continue , Click Modify DB
Instance.
13. You can also check if modification is completed, by looking at the Events tab.
14. Go to Instances and reboot the Aurora writer instance to complete the parameter changes as
you have modified the static parameters. (Go to intance -> instance actions -> reboot)
15. Check if the read replicas are launched. Understand the concepts behind Cluster Endpoint and
Reader Endpoint and failover priorities.
Note: replica instances are launched using default.aurora-postgresql9.6 db
parameter group. You can have different DB parameter groups for the writer
and reader instance.
16. Now, lets verify if the extensions are available in your database. Login to to the EC2 instance
launched via CloudFormation as mentioned in earlier section.
17. Login as a root (sudo su -) and then issue the below command and provide password for
auradmin use
psql -h <Cluster End point> -n -p5432 -U auradmin -d auroradb
psql –h ra54dqmy5gadq9.coojkqgdpomo.us-west-2.rds.amazonaws.com -n -p5432 -U auradmin
-d auroradb
27
18. After logging into database via psql, run the below SQL commands.
show shared_preload_libraries; (/* this is to verify the extensions are loaded */)
create extension pg_stat_statements; (/* create the extension for pg_stat_statements
*/)
SELECT * FROM pg_available_extensions WHERE name = 'pg_stat_statements';
show auto_explain.log_nested_statements; /* it should be on */
show auto_explain.log_min_duration; /* it should be 5s*/
LAB3 : Performance Insights
In this exercise, we will learn how to use Performance Insights and PostgreSQL extensions to analyze the
top wait events and performance issues. We will run the following load test cases using pgbench utility
on employees table in the HR schema that is migrated via AWS DMS.
1. Go to Performance insights in RDS Dashbaord
2. Select the Aurora Writer instance and open the PI dashboard in your console and keep it ready
for view
3. Login to the EC2 instance and login as a root (sudo su -) and run the below command.
psql -h <Cluster End point> -n -p5432 -U auradmin -d auroradb -f /scripts/hr-
postgres.sql
The hr-postgres.sql ceates the necessary plpgsql functions required for the load test, reset
the employee_seq and analyze the hr schema.
Now, we are ready to run some load on the Aurora Instance to understand the capabilities of
Perormance Insights.
Load Scenario-1 : High volume insert via pgbench
1. Login to EC2 instance and run pgbench workload using the below command.
pgbench -h <Cluster_Endpoint> -n -U auradmin -d auroradb -c 10 -T 300 -f /scripts/hrload1.sql >
/scripts/pgload1-run1.log
The hrload1.sql will ingest employee records using plpgsql function add_employee_data. This function
uses employee_seq to generate the next employee_id, randomly generate data including first_name,
salary with department_id from departments table. Each function call will insert 5 records. This test will
be executed for 5 minutes with 10 clients.
2. Review the PI dashboard and check the top wait events, AAS (Average Active Sessions) for the
duration.
28
3. Note down the key metrics in the pgbench output such as number of transactions, statement
latency.
4. Now, lets login to the database and check the top queries.
psql -h <Cluster End point> -p5432 -U auradmin -d auroradb
a. Run the below SQL query to understand the load caused by the above run using
pg_stat_statments extension (Top 5 SQLs by execute time and CPU Consumption)
SELECT substring(query, 1, 50) AS short_query, round(total_time::numeric, 2) AS
total_time, calls, round(mean_time::numeric, 2) AS mean, round((100 * total_time /
sum(total_time::numeric) OVER ())::numeric, 2) AS percentage_cpu FROM
pg_stat_statements ORDER BY total_time DESC LIMIT 5;
5. Lets rerun the same function with 50 inserts per execution and check the impact on wait events.
Use hrload2.sql for this run.
pgbench -h <Cluster_Endpoint> -n -U auradmin -d auroradb -c 10 -T 300 -f
/scripts/hrload2.sql > /scripts/pgload1-run2.log
6. Go to PI dashboard and check the top wait events now and see if there are any changes.
7. Login using psql and check the rerun the pg_stat_statements query and resource consumption
now (optional).
8. Verify which wait event reduced when compared to the previous run?
9. Can you verify whether the overall throughput has increased meaning you were able to insert
more employee records by comparing the throughput and latencies reported by pgbench
between the runs?
Load Scenario-2: High volume update via pgbench
In this exercise, we will run updates on the employee table using update_employee_data_fname and
update_employee_data_empid functions.
1. Login to EC2 instance and run pgbench workload using the below command.
pgbench -h <Cluster_Endpoint> -n -U auradmin -d auroradb -c 10 -T 180 -f
/scripts/hrupdname.sql > /scripts/pgload2-run1.log
The hrupdname.sql will update employee salary details of employees using plpgsql function
update_employee_data_fname. This function randomly selects the employee records and check if
their salary is within range (min and max salary of their job), if not update their salary using their
first_name. Each function call will execute 5 records randomly. This test will be executed for 3
minutes with 10 clients.
29
2. Go to PI dashboard and check the top wait events and AAS for the run duration. Check the CPU
utilization.
3. Let’s look at the performance stats using pg_stat_extensions. Connect to Aurora instance using
psql -h <Cluster End point> -n -p5432 -U auradmin –d auroradb
a) Run the below SQL query
SELECT substring(query, 1, 50) AS short_query, round(total_time::numeric, 2) AS total_time,
calls, round(mean_time::numeric, 2) AS mean, round((100 * total_time /
sum(total_time::numeric) OVER ())::numeric, 2) AS percentage_cpu FROM
pg_stat_statements ORDER BY total_time DESC LIMIT 5;
Let’s look at what is the explain plan used in the plpgsql function. In order to capture the
explain plan in the logs, set the below DB parameter at your session level.
b) set auto_explain.log_min_duration=10; /* This will enable to log any SQLs which is taking
more than 10ms to be logged in /error/postgres.log */
c) show auto_explain.log_min_duration; /* Verify the setting */
Run the explain analyze to capture the explain plan as well as execute the query and capture the
statistics.
d) explain analyze select hr.update_employee_data_fname(10);
4. Go to RDS Dashboard -> Aurora Writer instance -> Instance Actions ->See Details and then click
Recent Events & Logs
5. Scroll Down to Logs section and identify the latest log and click Watch
6. Review the explain plan used by the pgplsql function in the logs ( you can watch in the console
or download the log and review at your desktop).
30
7. Check the explain plan for the update statement used in the pgplsql function. Is there an issue
with the explain plan?
8. Now, lets run the procedure to use the employee_id and rerun the load. This time, lets use the
procedure hrupdempid.sql which updates the table by indexed column.
9. Login to EC2 instance and run pgbench workload using the below command.
pgbench -h <Cluster_Endpoint> -n -U auradmin -d auroradb -c 10 -T 180 -f
/scripts/hrupdid.sql > /scripts/pgload2-run2.log
The hrupdempid.sql will update employee salary details of employees using pg/plsql function
update_employee_data_empid. This function randomly selects the employee records and check if
their salary is within range (min and max salary of their job), if not update their salary using their
employee_id. Each function call will execute 5 records randomly. This test will be executed for 3
minutes with 10 clients.
10. Review the PI dashboard and check the top wait events again. Do you see any change in the top
wait events? What are the key observations?
11. Compare the execution results using pg_stat_statements query.
12. Compare the throughput and latencies reported by pgbench between the runs.
Load Scenario-3: Connection Load Balancing across replicas
This scenario will help you to understand how the connections are load balanced across multiple read
replicas. Remember to use Aurora Cluster reader endpoint for this exercise.
1. Login to linux instance and run pgbench workload using the below command.
pgbench -h <Cluster Reader Endpoint> -n -U auradmin -d auroradb -C -c 8 -T 180 -f
/scripts/hrread.sql > /scripts/pgload3.log
The hrread.sql randomly selects the employee records using emp_details_view using the belw
SQL query.
WITH empid AS (select max(employee_id) AS max_id, min(employee_id) AS min_id from
hr.employees) select * from hr.emp_details_view where employee_id = (SELECT
floor(random()*(max_id-min_id+
1))+min_id FROM empid);
2. Check the load distribution across multiple read replicas using performance insights dashboard.
Note down the key observations.
31
Clean up CloudFormation stack:
1. After testing, stop the task and delete the task.
2. Delete the source/target endpoints.
3. Delete the replication instance.
4. Delete the subnet group created for DMS.
5. Delete the Aurora Read Replicas (replica 1 and replica2)
6. Delete CloudFormation stack from the CloudFormation console.

More Related Content

More from Amazon Web Services

Microsoft Active Directory su AWS per supportare i tuoi Windows Workloads
Microsoft Active Directory su AWS per supportare i tuoi Windows WorkloadsMicrosoft Active Directory su AWS per supportare i tuoi Windows Workloads
Microsoft Active Directory su AWS per supportare i tuoi Windows WorkloadsAmazon Web Services
 
Database Oracle e VMware Cloud on AWS i miti da sfatare
Database Oracle e VMware Cloud on AWS i miti da sfatareDatabase Oracle e VMware Cloud on AWS i miti da sfatare
Database Oracle e VMware Cloud on AWS i miti da sfatareAmazon Web Services
 
Crea la tua prima serverless ledger-based app con QLDB e NodeJS
Crea la tua prima serverless ledger-based app con QLDB e NodeJSCrea la tua prima serverless ledger-based app con QLDB e NodeJS
Crea la tua prima serverless ledger-based app con QLDB e NodeJSAmazon Web Services
 
API moderne real-time per applicazioni mobili e web
API moderne real-time per applicazioni mobili e webAPI moderne real-time per applicazioni mobili e web
API moderne real-time per applicazioni mobili e webAmazon Web Services
 
Database Oracle e VMware Cloud™ on AWS: i miti da sfatare
Database Oracle e VMware Cloud™ on AWS: i miti da sfatareDatabase Oracle e VMware Cloud™ on AWS: i miti da sfatare
Database Oracle e VMware Cloud™ on AWS: i miti da sfatareAmazon Web Services
 
Tools for building your MVP on AWS
Tools for building your MVP on AWSTools for building your MVP on AWS
Tools for building your MVP on AWSAmazon Web Services
 
How to Build a Winning Pitch Deck
How to Build a Winning Pitch DeckHow to Build a Winning Pitch Deck
How to Build a Winning Pitch DeckAmazon Web Services
 
Building a web application without servers
Building a web application without serversBuilding a web application without servers
Building a web application without serversAmazon Web Services
 
AWS_HK_StartupDay_Building Interactive websites while automating for efficien...
AWS_HK_StartupDay_Building Interactive websites while automating for efficien...AWS_HK_StartupDay_Building Interactive websites while automating for efficien...
AWS_HK_StartupDay_Building Interactive websites while automating for efficien...Amazon Web Services
 
Introduzione a Amazon Elastic Container Service
Introduzione a Amazon Elastic Container ServiceIntroduzione a Amazon Elastic Container Service
Introduzione a Amazon Elastic Container ServiceAmazon Web Services
 
Come costruire un'architettura Serverless nel Cloud AWS
Come costruire un'architettura Serverless nel Cloud AWSCome costruire un'architettura Serverless nel Cloud AWS
Come costruire un'architettura Serverless nel Cloud AWSAmazon Web Services
 
AWS Serverless per startup: come innovare senza preoccuparsi dei server
AWS Serverless per startup: come innovare senza preoccuparsi dei serverAWS Serverless per startup: come innovare senza preoccuparsi dei server
AWS Serverless per startup: come innovare senza preoccuparsi dei serverAmazon Web Services
 
Crea dashboard interattive con Amazon QuickSight
Crea dashboard interattive con Amazon QuickSightCrea dashboard interattive con Amazon QuickSight
Crea dashboard interattive con Amazon QuickSightAmazon Web Services
 
Costruisci modelli di Machine Learning con Amazon SageMaker Autopilot
Costruisci modelli di Machine Learning con Amazon SageMaker AutopilotCostruisci modelli di Machine Learning con Amazon SageMaker Autopilot
Costruisci modelli di Machine Learning con Amazon SageMaker AutopilotAmazon Web Services
 
Migra le tue file shares in cloud con FSx for Windows
Migra le tue file shares in cloud con FSx for Windows Migra le tue file shares in cloud con FSx for Windows
Migra le tue file shares in cloud con FSx for Windows Amazon Web Services
 
La tua organizzazione è pronta per adottare una strategia di cloud ibrido?
La tua organizzazione è pronta per adottare una strategia di cloud ibrido?La tua organizzazione è pronta per adottare una strategia di cloud ibrido?
La tua organizzazione è pronta per adottare una strategia di cloud ibrido?Amazon Web Services
 
Protect your applications from DDoS/BOT & Advanced Attacks
Protect your applications from DDoS/BOT & Advanced AttacksProtect your applications from DDoS/BOT & Advanced Attacks
Protect your applications from DDoS/BOT & Advanced AttacksAmazon Web Services
 
Track 6 Session 6_ 透過 AWS AI 服務模擬、部署機器人於產業之應用
Track 6 Session 6_ 透過 AWS AI 服務模擬、部署機器人於產業之應用Track 6 Session 6_ 透過 AWS AI 服務模擬、部署機器人於產業之應用
Track 6 Session 6_ 透過 AWS AI 服務模擬、部署機器人於產業之應用Amazon Web Services
 

More from Amazon Web Services (20)

Microsoft Active Directory su AWS per supportare i tuoi Windows Workloads
Microsoft Active Directory su AWS per supportare i tuoi Windows WorkloadsMicrosoft Active Directory su AWS per supportare i tuoi Windows Workloads
Microsoft Active Directory su AWS per supportare i tuoi Windows Workloads
 
Computer Vision con AWS
Computer Vision con AWSComputer Vision con AWS
Computer Vision con AWS
 
Database Oracle e VMware Cloud on AWS i miti da sfatare
Database Oracle e VMware Cloud on AWS i miti da sfatareDatabase Oracle e VMware Cloud on AWS i miti da sfatare
Database Oracle e VMware Cloud on AWS i miti da sfatare
 
Crea la tua prima serverless ledger-based app con QLDB e NodeJS
Crea la tua prima serverless ledger-based app con QLDB e NodeJSCrea la tua prima serverless ledger-based app con QLDB e NodeJS
Crea la tua prima serverless ledger-based app con QLDB e NodeJS
 
API moderne real-time per applicazioni mobili e web
API moderne real-time per applicazioni mobili e webAPI moderne real-time per applicazioni mobili e web
API moderne real-time per applicazioni mobili e web
 
Database Oracle e VMware Cloud™ on AWS: i miti da sfatare
Database Oracle e VMware Cloud™ on AWS: i miti da sfatareDatabase Oracle e VMware Cloud™ on AWS: i miti da sfatare
Database Oracle e VMware Cloud™ on AWS: i miti da sfatare
 
Tools for building your MVP on AWS
Tools for building your MVP on AWSTools for building your MVP on AWS
Tools for building your MVP on AWS
 
How to Build a Winning Pitch Deck
How to Build a Winning Pitch DeckHow to Build a Winning Pitch Deck
How to Build a Winning Pitch Deck
 
Building a web application without servers
Building a web application without serversBuilding a web application without servers
Building a web application without servers
 
Fundraising Essentials
Fundraising EssentialsFundraising Essentials
Fundraising Essentials
 
AWS_HK_StartupDay_Building Interactive websites while automating for efficien...
AWS_HK_StartupDay_Building Interactive websites while automating for efficien...AWS_HK_StartupDay_Building Interactive websites while automating for efficien...
AWS_HK_StartupDay_Building Interactive websites while automating for efficien...
 
Introduzione a Amazon Elastic Container Service
Introduzione a Amazon Elastic Container ServiceIntroduzione a Amazon Elastic Container Service
Introduzione a Amazon Elastic Container Service
 
Come costruire un'architettura Serverless nel Cloud AWS
Come costruire un'architettura Serverless nel Cloud AWSCome costruire un'architettura Serverless nel Cloud AWS
Come costruire un'architettura Serverless nel Cloud AWS
 
AWS Serverless per startup: come innovare senza preoccuparsi dei server
AWS Serverless per startup: come innovare senza preoccuparsi dei serverAWS Serverless per startup: come innovare senza preoccuparsi dei server
AWS Serverless per startup: come innovare senza preoccuparsi dei server
 
Crea dashboard interattive con Amazon QuickSight
Crea dashboard interattive con Amazon QuickSightCrea dashboard interattive con Amazon QuickSight
Crea dashboard interattive con Amazon QuickSight
 
Costruisci modelli di Machine Learning con Amazon SageMaker Autopilot
Costruisci modelli di Machine Learning con Amazon SageMaker AutopilotCostruisci modelli di Machine Learning con Amazon SageMaker Autopilot
Costruisci modelli di Machine Learning con Amazon SageMaker Autopilot
 
Migra le tue file shares in cloud con FSx for Windows
Migra le tue file shares in cloud con FSx for Windows Migra le tue file shares in cloud con FSx for Windows
Migra le tue file shares in cloud con FSx for Windows
 
La tua organizzazione è pronta per adottare una strategia di cloud ibrido?
La tua organizzazione è pronta per adottare una strategia di cloud ibrido?La tua organizzazione è pronta per adottare una strategia di cloud ibrido?
La tua organizzazione è pronta per adottare una strategia di cloud ibrido?
 
Protect your applications from DDoS/BOT & Advanced Attacks
Protect your applications from DDoS/BOT & Advanced AttacksProtect your applications from DDoS/BOT & Advanced Attacks
Protect your applications from DDoS/BOT & Advanced Attacks
 
Track 6 Session 6_ 透過 AWS AI 服務模擬、部署機器人於產業之應用
Track 6 Session 6_ 透過 AWS AI 服務模擬、部署機器人於產業之應用Track 6 Session 6_ 透過 AWS AI 服務模擬、部署機器人於產業之應用
Track 6 Session 6_ 透過 AWS AI 服務模擬、部署機器人於產業之應用
 

Migrating Oracle to PostgreSQL

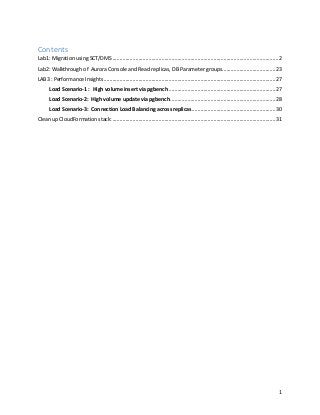
  • 1. 1 Contents Lab1: Migration using SCT/DMS ...................................................................................................................2 Lab2: Walkthrough of Aurora Console and Read replicas, DB Parameter groups.....................................23 LAB3 : Performance Insights.......................................................................................................................27 Load Scenario-1 : High volume insert via pgbench ..........................................................................27 Load Scenario-2: High volume update via pgbench.........................................................................28 Load Scenario-3: Connection Load Balancing across replicas..........................................................30 Clean up CloudFormation stack:.................................................................................................................31
  • 2. 2 Workshop Outline Abstract: Description: This workshop will focus on hands-on journey for existing Oracle DBA to Aurora PostgreSQL. Attendees will deploy an instance of Aurora PostgreSQL, migrate or generate a test workload on PostgreSQL, and manually monitor the database to understand the workload. They will review a few ways to track queries and their execution plans, and what can be done to optimize the queries. Attendees will also learn how to do the same on Aurora PostgreSQL using Performance Insights for query analysis and tuning. Lab1: Migration using SCT/DMS Oracle RDS to Aurora PostgreSQL migration lab using DMS and SCT: The following instructions help you launch a CloudFormation stack which sets up the following resources and migrate a sample database from Oracle to Aurora PostgreSQL using DMS and SCT – 1. Oracle RDS source within a VPC with all networking resources configured with a sample “HR” schema installed from Sample HR Schema installation 2. Aurora PostgreSQL target within same VPC as #1 with all networking resources configured 3. EC2 Bastion instance with preinstalled PSQL and PGBENCH utilities 4. The CloudFormation will provision the necessary security groups with access based on the IP range provided in the template for port 1521 and 5432 respectively for Oracle and PostgreSQL instances. Pre-requisites: 1. Active AWS account with Admin privileges. (IAM user should have administrator access). Please refer the link on how to create IAM administrator user here 2. Existing EC2 key pair created in the AWS region you are launching the CloudFormation template in. Please refer below on how to first create a new Key pair as shown here
  • 3. 3 Please follow the instructions below for connecting to EC2 Bastion instance. Your computer How to connect Linux Connecting to Your Linux Instance Using SSH Window Connecting to Your Linux Instance from Windows Using PuTTY All Connecting to Your Linux Instance Using MindTerm 3. Pre-installed AWS Schema Conversion Tool software on your machine. Details on how to download and install AWS Schema Conversion Tool shown below a) Install and launch SCT on your local machine from http://docs.aws.amazon.com/SchemaConversionTool/latest/userguide/CHAP_SchemaC onversionTool.Installing.html b) Download required drivers from links in the “Installing the Required Database Drivers” section from the above link. You will need to download Oracle and PostgreSQL drivers for this workshop. Alternatively, you can download the required drivers for this lab from – http://bit.ly/2phVpPk -> Oracle JDBC driver http://bit.ly/2pt04ZT -> PostgreSQL JDBC driver On the Mac, please make sure the file permission for the drivers is set to 755 You can update the path to drivers in Settings -> Global settings -> Drivers High level steps: c) Log into your AWS account d) Launch CloudFormation stack e) Click on create a new stack and “Choose Specify an Amazon S3 template URL” and specify the S3 location for the cloud formation template f) Provide user defined Stack name g) Under Parameters section, for the parameter key name, select the preexisting key for your account in this region h) Click create and wait for the stack to be completed, once it is completed look under the tab “outputs” to get the connection details for Oracle and Aurora PostgreSQL and EC2 instance. i) Navigate to the DMS service (under Migration) j) Launch a replication instance on the same VPC as source and target
  • 4. 4 k) Use SCT to convert source Oracle schema objects to target PostgreSQL l) Create a source endpoint (Source is launched using the CloudFormation stack) m) Create a target endpoint (Target is launched using CloudFormation stack) n) Create a task to migrate the data from the source database to the target database o) Execute some transactions on the source database (using a script we’ve provided) Lab Instructions: 1. Login in to your AWS console and go to the CloudFormation service 2. Click “Create stack” from the top left Please execute this LAB using the us-east-1 (N. Virginia) or us-west-2 (Oregon) region.
  • 5. 5 Click create stack, select ‘Specify an Amazon S3 template URL’ and specify the S3 template URL as https://s3-us-west-2.amazonaws.com/nyc-loft/PostgreSQL_Migration_CloudFormation_template.json 3. Hit next and give a friendly name such as ora2pg for the stack and accept all defaults.
  • 6. 6 In the Other Parameters section choose the key for the EC2 instance as shown below Hit next in the next page and click on create. Wait for the entire stack to launch and become available.
  • 7. 7 *Leave everything else default. Once the CloudFormation stack launch is complete, you should see 2 RDS instances in your account in the region you created the stack. Approximately, it will take 15 to 20 minutes for creating the Stack. 4. Note down RDS Endpoint details of source and target instances from stack output section as shown below 5. Note down the resources created by the stack from the “Resources” tab, specially note down the VPC created by the stack as shown below
  • 8. 8 6. Once stack is available, go to the DMS console and launch a replication instance by selecting “Replication Instance” on the left side menu. Choose the same VPC as your stack name (this VPC was created by the CloudFormation Stack). Also, please check the “Replication engine version” to the latest version, this screenshot shows the version 2.3.0, but the users should choose the latest 2.4.0 version. Please leave the rest of the values/advanced settings to the default values. Here is a screenshot of the create replication instance page –
  • 9. 9 Schema Conversion: 1. Launch the AWS Schema Conversion Tool installed on your machine. 2. Make the path to drivers in Settings -> Global settings -> Drivers point to the actual path where you have kept the drivers as show below
  • 10. 10 3. Create a New Project using File-> New Project
  • 11. 11 4. Connect to your assigned Oracle source and PostgreSQL target endpoints. Endpoints can be found under the “Resources” tab on the CloudFormation page or from the RDS Console under instances Oracle instance –  Type: SID  Engine: Oracle  Server Name: RDS Oracle Source endpoint from your account  Server Port: 1521  SID: orasrcdb  User name: oraadmin  Password: oraadmin123 (Please note that if you changed the default settings when creating the CloudFormation stack, then you need to enter the password that you have provided)
  • 12. 12 If the defaults were accepted in CloudFormation, the password is oraadmin123. Substitute the server name with the RDS Oracle Database Endpoint launched in your VPC. NOTE: If you’re not able to connect, please add the IP address from which you’re trying to connect to the instances from to the inbound security group rules for the security groups attached to the Oracle RDS and Aurora PostgreSQL instances. PostgreSQL instance:  Server name: Cluster endpoint of Aurora PostgreSQL target instance  Serve Port: 5432  Database name: auroradb  Username: auradmin  Password: auradmin123 (Please note that if you changed the default settings when creating the CloudFormation stack, then you need to enter the password that you have provided)
  • 13. 13 If the defaults were accepted in CloudFormation, the password is auradmin123. Substitute the server name with the RDS Aurora PostgreSQL (cluster endpoint) launched in your VPC. NOTE: If you’re not able to connect, please add the IP address from which you’re trying to connect to the instances from to the inbound security group rules for the security groups attached to the Oracle RDS and Aurora PostgreSQL instances. Please refer troubleshoot connectivity - EC2 security groups here 5. Uncheck all schemas on the left except for the “HR” schema. 6. Now, right click and click “Create Report”. Review the conversion report – click on the view tab and click assessment report view. Look through what Oracle objects could be automatically converted and what could not be 7. Now, right click and click “Convert schema”. The schema will be converted and shown on the PostgreSQL instance (it has not been applied yet).
  • 14. 14 8. Right click on the created schema on the right and click “Apply to database”. This will apply all those converted objects in the PostgreSQL target. The above steps will convert all your Oracle objects into PostgreSQL objects. 9. Objects which could not be converted automatically must be taken care of manually after migration at a later time. NOTE: At this point, all the database objects from the source HR Oracle schema must be converted and created in PostgreSQL in the HR schema in the Aurora postgres database.
  • 15. 15 Data Migration: Create a source endpoint:  Select Endpoints from the menu on the left and “click the "create endpoint" button at the top.  Endpoint identifier: orasource  Endpoint Type: source  Engine: Oracle  Server Name: RDS Oracle Source endpoint from your account  Port: 1521  SSL Mode: none  User name: oraadmin  Password: oraadmin123 (Please note that if you changed the default settings when creating the CloudFormation stack, then you need to enter the password that you have provided)  SID: orasrcdb  VPC: VPC launched by the CloudFormation template  Replication Instance: choose the instance you created  Refresh schemas: Yes - check this box Test the connection and save it if the test is successful.
  • 16. 16 Create a target endpoint:  Click the "create endpoint" button at the top  Endpoint identifier: aurtarget  Endpoint Type: Target  Engine: postgres  Server name: Cluster endpoint of Aurora PostgreSQL target instance  Port: 5432  SSL Mode: none  Username: auradmin  Password: auradmin123 (Please note that if you changed the default settings when creating the CloudFormation stack, then you need to enter the password that you have provided)  Database name: auroradb
  • 17. 17  VPC: VPC launched by the CloudFormation template  Replication Instance: choose the instance you created  Refresh schemas: check this box Test the connection and save it if the test is successful CREATE A MIGRATION TASK:  Name: Replication Instance: choose the one you created
  • 18. 18  Source Endpoint: choose the source endpoint you just created  Target Endpoint: choose the target endpoint you just created  Migration Type: Migrate existing data and replicate ongoing changes  Start task on create: check this (or don't, up to you). If you don’t, you’ll need to start your task Separately. ** Target table preparation mode: Do Nothing Why a do-nothing task? The initial load in DMS is done table by table which means that the target tables cannot have active foreign key constraints. As we are using SCT to convert Oracle source objects into PostgreSQL target objects, all secondary objects were created as part of the process. This means that we would need to disable all foreign key constraints on the target for the initial full load to be successful. Foreign keys or referential integrity constraints in PostgreSQL are implemented using triggers. One way to disable foreign keys is to disable all triggers temporarily from the instance and do the loads. One of the ways to do this is to use the session_replication_role parameter in PostgreSQL. Triggers also have a state in PostgreSQL (Origin, replica, always or disabled). When the session_replication_role
  • 19. 19 parameter is set to replica, only triggers of the state replica will be active and are fired when called. If not, the triggers remain inactive. We have already setup the parameter group on the target to set this role to replica which means all foreign key constraints (innately triggers in the origin state) will not be active. However, PostgreSQL has a failsafe mechanism of not letting a table truncate even with this role set. As we are using prepopulated tables on the target and cannot truncate the table, we are using do_nothing for the target table prep mode. Stop task after full load completes: don't stop Include LOB columns in replication: Accept the default Enable logging: YES! (Check this box) Table Mappings – Selection rules: 1. Select HR from the drop-down box Click the "Add selection rule" button. 2. Click on “add transformation rule” -> Choose schema for target dropdown -> Schema name is HR -> Choose “make lower case” for action & click add transformation rule. 3. Click on “add transformation rule” -> Choose table for target dropdown -> Schema name is HR and table name is % -> Choose “make lower case” for action & click add transformation rule. 4. Click on “add transformation rule” -> Choose column for target dropdown -> schema name is HR, table name is % -> column name is % -> Choose “make lower case” for action & click add transformation rule.
  • 20. 20 Note – We are doing 2, 3 and 4 above as the schema has been pre-created on the target with lowercase (PostgreSQL convention). Your task json should look like this –  Click create task now and let the task run. Executing transactions on the source to mimic CDC transactions: Once your task is running you might want to execute a few transactions on the source. So, connect to your source database as oraadmin using your favorite tool on your local machine: SQLDeveloper, DBeaver or even SQL*Plus!
  • 21. 21 You can also choose to use the EC2 instance created as a part of the CloudFormation stack, this EC2 Instance is being created with SQLPLUS pre-installed. Login to EC2 instance (Refer the EC2 Bastion Instance Public DNS from the Output or Resource tab from the CloudFormation stack) as shown here 1) ssh –i <keypair.pem> ec2-user@<ec2 host name public DNS> (please note if you are using Putty to connect to EC2 Instance, then please use “.ppk” file instead) 2) Switch to root user (sudo su -) 3) $cd /instantclient/instantclient_12_1/ 4) $ . setup_sqlplus.sh 5)sqlplus 'oraadmin@(DESCRIPTION=(ADDRESS=(PROTOCOL=TCP)(HOST=<RDS Oracle Endpoint>)(PORT=1521))(CONNECT_DATA=(SID=orasrcdb)))' 6) exec hr.add_employees(10000);
  • 22. 22 Steps to connect to Aurora PostgreSQL Database using psql: Login to EC2 instance (grab the instance details from the Output or Resource tab from the CloudFormation stack) as shown here 1) ssh –i <keypair.pem> ec2-user@<ec2 host name public DNS> 2) Switch to root user (sudo su -) 3) $ cd /scripts 4) psql -h <replace cluster endpoint of your Aurora DB instance> -p 5432 -U auradmin -d auroradb provide the password for auradmin user (auradmin123)
  • 23. 23 Lab2: Walkthrough of Aurora Console and Read replicas, DB Parameter groups. In this exercise, we will walk through the important DBA tasks such as creating read replicas, making changes in DB Parameter groups, enabling performance insights for monitoring. Note: We recommend to use the psql installed in the EC2 instance to execute all the commands used in the Labs. However, if you are comfortable with other PostgreSQL client tools such as pgadmin, feel free to run the postgreSQL commands. Set search_path to ‘hr’; ( similar to alter session set current_schema in oracle)) Add :- Enable Performance insight and Enhanced monitoring 1. Go to RDS Dashboard and click Clusters and then instances.
  • 24. 24 2. Select the Aurora writer instance (check the column replication role in the console which should display writer) and create the read replica by clicking the option as displayed below: Go to Aurora Instance, click Instance Actions and select Create Aurora Replica. Use the below parameters in the Create Aurora Replica console: Instance specifications DB Instance Class – db.r4.large Settings Aurora Replica source - choose the Aurora Cluster instance launched by CloudFormation stack DB instance identifier – replica1 Network and Security Publicly Accessible – Yes Availability Zone – No preference Failover Priority - Tier0 Database Port Database ports – 5432 Monitoring Enable Enhanced Monitoring - No Enable Performance Insights - Yes Maintenance Auto-minor version upgrade - Yes Repeat the above steps mentioned in 3) and create another replica with DB instance identifier as replica2 and failover priority as Tier1. Note: replicas may take around 5 to 10 minutes to launch. proceed to the next step.
  • 25. 25 3. Go to Parameter groups in RDS Dashboard. Search for the DB Parameter group associated with the Aurora writer instance used in this lab (for example. parameter group name will start with the stack name followed by aurorapgxxx). 4. Click Edit Parameters 5. Search for the parameter shared_preloaded_libraries 6. Choose and edit the values as auto_explain,pg_stat_statements under shared_preloaded_libraries ( This will enable you to use those extensions) 7. Save changes 8. Again, Search for auto_explain. log_ and only modify the below parameters as defined below. The first parameter helps to log the SQL statements with execution time > 5s. The second parameter helps you to log the explain plan for the nested SQLs used in the plpgsql function. 9. Save changes 10. Go to instances under RDS Dashboard and select the Aurora writer instance, click Instance Actions and then Modify. 11. Choose Yes for Enable performance insights section. Don’t make any other changes.
  • 26. 26 12. Apply the changes immediately by clicking the below option and continue , Click Modify DB Instance. 13. You can also check if modification is completed, by looking at the Events tab. 14. Go to Instances and reboot the Aurora writer instance to complete the parameter changes as you have modified the static parameters. (Go to intance -> instance actions -> reboot) 15. Check if the read replicas are launched. Understand the concepts behind Cluster Endpoint and Reader Endpoint and failover priorities. Note: replica instances are launched using default.aurora-postgresql9.6 db parameter group. You can have different DB parameter groups for the writer and reader instance. 16. Now, lets verify if the extensions are available in your database. Login to to the EC2 instance launched via CloudFormation as mentioned in earlier section. 17. Login as a root (sudo su -) and then issue the below command and provide password for auradmin use psql -h <Cluster End point> -n -p5432 -U auradmin -d auroradb psql –h ra54dqmy5gadq9.coojkqgdpomo.us-west-2.rds.amazonaws.com -n -p5432 -U auradmin -d auroradb
  • 27. 27 18. After logging into database via psql, run the below SQL commands. show shared_preload_libraries; (/* this is to verify the extensions are loaded */) create extension pg_stat_statements; (/* create the extension for pg_stat_statements */) SELECT * FROM pg_available_extensions WHERE name = 'pg_stat_statements'; show auto_explain.log_nested_statements; /* it should be on */ show auto_explain.log_min_duration; /* it should be 5s*/ LAB3 : Performance Insights In this exercise, we will learn how to use Performance Insights and PostgreSQL extensions to analyze the top wait events and performance issues. We will run the following load test cases using pgbench utility on employees table in the HR schema that is migrated via AWS DMS. 1. Go to Performance insights in RDS Dashbaord 2. Select the Aurora Writer instance and open the PI dashboard in your console and keep it ready for view 3. Login to the EC2 instance and login as a root (sudo su -) and run the below command. psql -h <Cluster End point> -n -p5432 -U auradmin -d auroradb -f /scripts/hr- postgres.sql The hr-postgres.sql ceates the necessary plpgsql functions required for the load test, reset the employee_seq and analyze the hr schema. Now, we are ready to run some load on the Aurora Instance to understand the capabilities of Perormance Insights. Load Scenario-1 : High volume insert via pgbench 1. Login to EC2 instance and run pgbench workload using the below command. pgbench -h <Cluster_Endpoint> -n -U auradmin -d auroradb -c 10 -T 300 -f /scripts/hrload1.sql > /scripts/pgload1-run1.log The hrload1.sql will ingest employee records using plpgsql function add_employee_data. This function uses employee_seq to generate the next employee_id, randomly generate data including first_name, salary with department_id from departments table. Each function call will insert 5 records. This test will be executed for 5 minutes with 10 clients. 2. Review the PI dashboard and check the top wait events, AAS (Average Active Sessions) for the duration.
  • 28. 28 3. Note down the key metrics in the pgbench output such as number of transactions, statement latency. 4. Now, lets login to the database and check the top queries. psql -h <Cluster End point> -p5432 -U auradmin -d auroradb a. Run the below SQL query to understand the load caused by the above run using pg_stat_statments extension (Top 5 SQLs by execute time and CPU Consumption) SELECT substring(query, 1, 50) AS short_query, round(total_time::numeric, 2) AS total_time, calls, round(mean_time::numeric, 2) AS mean, round((100 * total_time / sum(total_time::numeric) OVER ())::numeric, 2) AS percentage_cpu FROM pg_stat_statements ORDER BY total_time DESC LIMIT 5; 5. Lets rerun the same function with 50 inserts per execution and check the impact on wait events. Use hrload2.sql for this run. pgbench -h <Cluster_Endpoint> -n -U auradmin -d auroradb -c 10 -T 300 -f /scripts/hrload2.sql > /scripts/pgload1-run2.log 6. Go to PI dashboard and check the top wait events now and see if there are any changes. 7. Login using psql and check the rerun the pg_stat_statements query and resource consumption now (optional). 8. Verify which wait event reduced when compared to the previous run? 9. Can you verify whether the overall throughput has increased meaning you were able to insert more employee records by comparing the throughput and latencies reported by pgbench between the runs? Load Scenario-2: High volume update via pgbench In this exercise, we will run updates on the employee table using update_employee_data_fname and update_employee_data_empid functions. 1. Login to EC2 instance and run pgbench workload using the below command. pgbench -h <Cluster_Endpoint> -n -U auradmin -d auroradb -c 10 -T 180 -f /scripts/hrupdname.sql > /scripts/pgload2-run1.log The hrupdname.sql will update employee salary details of employees using plpgsql function update_employee_data_fname. This function randomly selects the employee records and check if their salary is within range (min and max salary of their job), if not update their salary using their first_name. Each function call will execute 5 records randomly. This test will be executed for 3 minutes with 10 clients.
  • 29. 29 2. Go to PI dashboard and check the top wait events and AAS for the run duration. Check the CPU utilization. 3. Let’s look at the performance stats using pg_stat_extensions. Connect to Aurora instance using psql -h <Cluster End point> -n -p5432 -U auradmin –d auroradb a) Run the below SQL query SELECT substring(query, 1, 50) AS short_query, round(total_time::numeric, 2) AS total_time, calls, round(mean_time::numeric, 2) AS mean, round((100 * total_time / sum(total_time::numeric) OVER ())::numeric, 2) AS percentage_cpu FROM pg_stat_statements ORDER BY total_time DESC LIMIT 5; Let’s look at what is the explain plan used in the plpgsql function. In order to capture the explain plan in the logs, set the below DB parameter at your session level. b) set auto_explain.log_min_duration=10; /* This will enable to log any SQLs which is taking more than 10ms to be logged in /error/postgres.log */ c) show auto_explain.log_min_duration; /* Verify the setting */ Run the explain analyze to capture the explain plan as well as execute the query and capture the statistics. d) explain analyze select hr.update_employee_data_fname(10); 4. Go to RDS Dashboard -> Aurora Writer instance -> Instance Actions ->See Details and then click Recent Events & Logs 5. Scroll Down to Logs section and identify the latest log and click Watch 6. Review the explain plan used by the pgplsql function in the logs ( you can watch in the console or download the log and review at your desktop).
  • 30. 30 7. Check the explain plan for the update statement used in the pgplsql function. Is there an issue with the explain plan? 8. Now, lets run the procedure to use the employee_id and rerun the load. This time, lets use the procedure hrupdempid.sql which updates the table by indexed column. 9. Login to EC2 instance and run pgbench workload using the below command. pgbench -h <Cluster_Endpoint> -n -U auradmin -d auroradb -c 10 -T 180 -f /scripts/hrupdid.sql > /scripts/pgload2-run2.log The hrupdempid.sql will update employee salary details of employees using pg/plsql function update_employee_data_empid. This function randomly selects the employee records and check if their salary is within range (min and max salary of their job), if not update their salary using their employee_id. Each function call will execute 5 records randomly. This test will be executed for 3 minutes with 10 clients. 10. Review the PI dashboard and check the top wait events again. Do you see any change in the top wait events? What are the key observations? 11. Compare the execution results using pg_stat_statements query. 12. Compare the throughput and latencies reported by pgbench between the runs. Load Scenario-3: Connection Load Balancing across replicas This scenario will help you to understand how the connections are load balanced across multiple read replicas. Remember to use Aurora Cluster reader endpoint for this exercise. 1. Login to linux instance and run pgbench workload using the below command. pgbench -h <Cluster Reader Endpoint> -n -U auradmin -d auroradb -C -c 8 -T 180 -f /scripts/hrread.sql > /scripts/pgload3.log The hrread.sql randomly selects the employee records using emp_details_view using the belw SQL query. WITH empid AS (select max(employee_id) AS max_id, min(employee_id) AS min_id from hr.employees) select * from hr.emp_details_view where employee_id = (SELECT floor(random()*(max_id-min_id+ 1))+min_id FROM empid); 2. Check the load distribution across multiple read replicas using performance insights dashboard. Note down the key observations.
  • 31. 31 Clean up CloudFormation stack: 1. After testing, stop the task and delete the task. 2. Delete the source/target endpoints. 3. Delete the replication instance. 4. Delete the subnet group created for DMS. 5. Delete the Aurora Read Replicas (replica 1 and replica2) 6. Delete CloudFormation stack from the CloudFormation console.