SlideShare a Scribd company logo
1 of 30
What is Android?
Android provides a rich application framework that allows you to build you own app for mobile
devices such as smartphones and tablet computers.
It is a: -
 Softwareplatform and a Linux based Operating System formobile
 Open source (freely available in market)
 Owned by Google since August ,2005
Categories of Android applications
There are many android applications in the market. The top categories are:
 Entertainment
 Communication
 Personalization
 Music and Audio
 Social
 Media and Video, etc.
Android Versions and Releases:
Version Codename API
1.5 Cupcake 3
1.6 Donut 4
2.0
2.1
Eclair 5-7
2.2 Froyo 8
2.3.3 -
2.3.7
Gingerbread 10
4.0.3 -
4.0.4
Ice Cream Sandwich 15
4.1.x Jelly Bean 16
4.2.x 17
4.3 18
4.4 KitKat 19
5.0 Lollipop 21
5.1 22
6.0 Marshmallow 23
Android Architecture:
Android Architecture is categoerised into fiveparts whichincludes:
1) Applications:
Located at the top of the Android software stack are the applications. These comprise
both the native applications provided with the particular Android implementation (for
example web browser and email applications) and the third party applications
installed by the user after purchasing the device.
2) Application Framework:
The Application Framework is a set of services that collectively form the environment
in which Android applications run and are managed. This framework implements the
concept that Android applications are constructed from reusable, interchangeable
and replaceable components. This concept is taken a step further in that an
application is also able to publish its capabilities along with any corresponding data
so that they can be found and reused by other applications.
3) Android Libraries:
On the top of Linux kernel, there are Libraries such as WebKit, OpenGL, FreeType,
SQLite, Media, C runtime library (libc) etc.
The WebKit library is responsible for browser support, SQLite is for database,
FreeType for font support, Media for playing and recording audio and video formats.
4) Android Runtime:
Android application simply runs as a process directly on the Linux kernel. In fact, each
application running on an Android device does so within its own instance of the Dalvik virtual
machine (VM).
Dalvik Virtual Machine:
 Providing environment on which every Android application runs
 Each Android application runs in its own process, with its own instance
of the Dalvik VM.
 Dalvik has been written such that a device can run multiple VMs
efficiently.
 Register-based virtual machine
 Executing the Dalvik Executable (.dex) format
5) Linux Kernel:
It is the heart of android architecture that exists at the root of android
architecture. Linux kernel is responsible for device drivers, power management,
memory management, device management and resource access.
Android Project Structure:
build/
Contains build outputs.
libs/
Contains private libraries.
src/
Contains all code and resource files for the module in the following subdirectories:
androidTest/
Contains code for instrumentation tests that run on an Android device. For more information,
see the Android Test documentation.
main/
Contains the "main" sourceset files: Android code and resources shared by all build variants
(files for other build variants reside in sibling directories, such as src/debug/ for the debug
build type).
AndroidManifest.xml
Describes the nature of the application and each of its components Every application must
have an AndroidManifest.xml file (with precisely that name) in its root directory. The
manifest file presents essential information about your app to the Android system,
information the system must have before it can run any of the app's code
java/
Contains Java code sources.
jni/
Contains native code using the Java Native Interface (JNI). For more information, see
the Android NDK documentation.
gen/
Contains the Java files generated by Android Studio, such as your R.java file and interfaces
created from AIDL files.
res/
Contains application resources, such as drawable files, layout files, and UI string.
See Application Resources for more information.
assets/
Contains file that should be compiled into an .apk file as-is. You can navigate this directory
in the same way as a typical file system using URIs and read files as a stream of bytes using
the AssetManager . For example, this is a good location for textures and game data.
test/
Contains code for local tests that run on your host JVM.
build.gradle (module)
This defines the module-specific build configurations.
build.gradle (project)
This defines your build configuration that apply to all modules. This file is integral to the
project, so you should maintain them in revision control with all other source code.
Android Main Components:
1) Activity
2) Services
3) Broadcast Receiver
4) Content Provider
Activity and its life cycle:
An Activity is an application component that provides a screen with which users can
interact in order to do something, such as dial the phone, take a photo, send an email, or
view a map. Each activity is given a window in which to draw its user interface.
public class ExampleActivity extends Activity {
@Override
public void onCreate(Bundle savedInstanceState) {
super.onCreate(savedInstanceState);
// The activity is being created.
}
@Override
protected void onStart() {
super.onStart();
// The activity is about to become visible.
}
@Override
protected void onResume() {
super.onResume();
// The activity has become visible (it is now "resumed").
}
@Override
protected void onPause() {
super.onPause();
// Another activity is taking focus (this activity is about to be
"paused").
}
@Override
protected void onStop() {
super.onStop();
// The activity is no longer visible (it is now "stopped")
}
@Override
protected void onDestroy() {
super.onDestroy();
// The activity is about to be destroyed.
}
}
You can shut down an activity by calling its finish() method. You can also shut down a
separate activity that you previously started by calling finishActivity().
Managing the lifecycle of your activities by implementing callback methods is crucial to
developing a strong and flexible application. The lifecycle of an activity is directly affected by
its association with other activities, its task and back stack.
Diagram below shows the lifecycle:
User Interface Design
Android provides in built UI components which we can use for designing our screen.
We have multiple layout types and View which we can use. For example, Linear Layout
Relative Layout, Buttons, Checkboxes, Spinner, TextView, EditText, Radio Buttons.
View and ViewGroup in Android
View
 View is the basic building blocks of User Interface(UI) elements in android.
 View is a simple rectangle box which responses to user action.
 Examples are EditText, Button, CheckBox etc.
 View Refer to the android. view. View class, which is the base class of all UI
classes.
ViewGroup
 View Group is the invisible container. it holds View and View Group
 Example LineraLayout is the ViewGroup it contains Button(View), Other
Layouts also.
 ViewGroup is the base class for Layouts.
Layouts:
1) Linear
2) Relative
Linear Layout is a layout which aligns the widgets or elements in a linear (Straight)
fashion. Linear Layout consists of two types of orientation:
 Vertical Orientation,
 Horizontal Orientation.
<LinearLayout
android:orientation="horizontal"
android:layout_width="fill_parent"
android:layout_height="wrap_content">
<TextView
android:text="1"
android:layout_width="wrap_content"
android:layout_height="wrap_content" />
< TextView
android:width="100px"
android:layout_width="wrap_content"
android:layout_height="wrap_content"
android:text="2"
/>
< TextView
android:width="100px"
android:layout_width="wrap_content"
android:layout_height="wrap_content"
android:text="3"
/>
</LinearLayout>
Relative Layout:
Relative Layout is a layout where the widgets (such as Text Views, Buttons, etc.) are
represented with respect to previous widget or parent View.
User Interface Components:
 TextView: A TextView displays text to the user and optionally allows them to
edit it. A TextView is a complete text editor, however the basic class is configured
to not allow editing.
 Button: A button consists of text or an icon (or both text and an icon) that
communicates what action occurs when the user touches it
 Spinner: Spinners provide a quick way to select one value from a set. In the
default state, a spinner shows its currently selected value. Touching the spinner
displays a dropdown menu with all other available values, from which the user
can select a new one.
 EditText: It allows the user to type text into your app. It can be either single
line or multi-line. Touching a text field places, the cursor and automatically
displays the keyboard.
 RadioButton: Radio buttons allow the user to select one option from a set.
You should use radio buttons for optional sets that are mutually exclusive if you
think that the user needs to see all available options side-by-side.
 CheckBox: Checkboxes allow the user to select one or more options from a
set. Typically, you should present each checkbox option in a vertical list.
Event Handling:
Events are a useful way to collect data about a user's interaction with interactive
components of Applications. Like button presses or screen touch etc.
So in order to handle events we need different listener’s types based on the view which
we are opting to interact with. For example,
onClick(): We need View.OnClickListener() .This is called when the user either clicks
or touches or focuses upon any widget like button, text, image etc. You will use
onClick() event handler to handle such event.
onLongClick(): We need OnLongClickListener() for this. This is called when the user
either clicks or touches or focuses upon any widget like button, text, image etc. for one
or more seconds. You will use onLongClick() event handler to handle such event.
How to add a listener to Button:
Step 1: Add a button
Step 2: Register Event Handler
 Separate class to handle events or,
 Have the activity containing the button to do event handling?
Step 3: Implement respective Event Handler.
For E.g. if we are handling event for button then we need to implements
View.OnClickListener.
Advance UI Components
AdapterView: Whenever we have to populate dynamic data then there is a need of
AdapterView. It helps in displaying data at runtime.
See ListView, GridView, Spinner and Gallery for commonly used subclasses of
AdapterView.
“When the content for your layout is dynamic or not pre-determined, you can use a layout
that subclasses AdapterView to populate the layout with views at runtime. A subclass of
the AdapterView class uses an Adapter to bind data to its layout. The Adapter behaves as a
middleman between the data source and the AdapterView layout—the Adapter retrieves the
data (from a source such as an array or a database query) and converts each entry into a
view that can be added into the AdapterView layout.”
ListView: A view that shows items in a vertically scrolling list.
GridView: A view that shows items in two-dimensional scrolling grid.
Implementing ListView
Android provides several subclasses of Adapter that are useful for retrieving different kinds
of data and building views for an AdapterView.
ArrayAdapter:
Use this adapter when your data source is an array. By default, ArrayAdapter creates a view
for each array item by calling toString() on each item and placing the contents in a TextView.
For example, if you have an array of strings you want to display in a ListView, initialize a
new ArrayAdapter using a constructor to specify the layout for each string and the string
array:
ArrayAdapter<String> adapter = new ArrayAdapter<String>(this,
android.R.layout.simple_list_item_1, myStringArray);
simply call setAdapter() on your ListView:
ListView listView = (ListView) findViewById(R.id.listview);
listView.setAdapter(adapter);
Custom ListView:
Extend BaseAdapter and use all abstract methods to provide definition.
getView () Method: Called each time for data size (ArrayList size).
EXAMPLE: if data size is 11 then get view method called 11 times to produce
each row.
LayoutInflater: Inflate (Add) view/xml file for ListView Row.
Holder: Contain Inflated / added xml Elements.
Intents in Android
An Intent is a messaging object you can use to request an action from another app component.
An Android Intent can be used to perform following 3 tasks:
To start an activity
To start a service
To deliver a broadcast
Intent can be broadly classified into 2 categories:
 Explicit Intent
 Implicit Intent
Explicit Intent: You'll use an explicit intent to start a component in your own app, because you
know the class name of the activity or service you want to start. For example, start a new activity in
response to a user action or start a service to download a file in the background.
Syntax:
Intent openNewActivity = new Intent(getApplicationContext(), SecondActivity.class);
Implicit Intents: Implicit intent do not name a specific component, but instead declare a general
action to perform, which allows a component from another app to handle it. For example, if you want
to show the user a location on a map, you can use an implicit intent to request that another capable
app show a specified location on a map.
Syntax:
Intent sendIntent = new Intent();
sendIntent.setAction(Intent.ACTION_SEND);
List of standard actions that Intents can use for launching activities (usually through
startActivity(Intent).
•ACTION_MAIN
•ACTION_VIEWACTION_EDIT
•ACTION_PICK
•ACTION_CHOOSER
•ACTION_DIAL
•ACTION_CALL
•ACTION_SEND
•ACTION_SENDTO
•ACTION_ANSWER
•ACTION_SEARCH
•ACTION_WEB_SEARCH
Data Passing - There are multiple ways to store data in an Intent.
•You can use an explicit bundle and set bundle using putExtra, or
•You can directly use putExtra
Bundle object is used to pass data between activities. You can still use putExtra method to associate
a bundle with an Intent.
Lets see the example code
Bundle dataBundle = new Bundle();
dataBundle.putString( "BundleUserName", "Pranay"); openNewActivity.putExtra("data",dataBundle);
Let's see this example:
openNewActivity.putExtra("UserName", "Pranay");
openNewActivity.putExtra("isRegistered", true);
The code below describes as to how we collect data into the Intent object
Intent intentObject = getIntent();
String userName = intentObject.getStringExtra ("UserName","");
boolean isRegistered = intentObject.getBooleanExtra ("isRegistered", true);
Pending Intent: A Pending Intent specifies an action to take in the future. It lets you pass a future
Intent to another application and allow that application to execute that Intent as if it had the same
permissions as your application, whether or not your application is still around when the Intent is
eventually invoked. It is a token that you give to a foreign application which allows the foreign
application to use your application’s permissions to execute a predefined piece of code.
By giving a Pending Intent to another application, you are granting it the right to perform the
operation you have specified as if the other application was yourself (with the same permissions and
identity). As such, you should be careful about how you build the Pending Intent: often, for example,
the base Intent you supply will have the component name explicitly set to one of your own
components, to ensure it is ultimately sent there and nowhere else.
It is an Intent action that you want to perform, but at a later time. Think of it a putting an Intent on ice.
The reason it’s needed is because an Intent must be created and launched from a valid Context in
your application, but there are certain cases where one is not available at the time you want to run
the action because you are technically outside the application’s context (the two common examples
are launching an Activity from a Notification or a Broadcast Receiver. By creating a Pending
Intent you want to use to launch, say, an Activity while you have the Context to do so (from inside
another Activity or Service)
Menus in Android
Menus are a common user interface component in many types of applications. To provide a familiar
and consistent user experience, you should use the Menu APIs to present user actions and other
options in your activities. They can be used for settings, search, delete item etc.
Types of Menus:
1. Options Menu – The options menu is the primary collection of menu items for an activity. It's
where you should place actions that have a global impact on the app, such as "Search," "Compose
email," and "Settings."
2. Context Menu – A context menu is a floating menu that appears when the user performs a long-
click on an element. It provides actions that affect the selected content or context frame.
The contextual action mode displays action items that affect the selected content in a bar at the top
of the screen and allows the user to select multiple items.
3. Popup Menu – A popup menu displays a list of items in a vertical list that's anchored to the view
that invoked the menu. It's good for providing an overflow of actions that relate to specific content or
to provide options for a second part of a command. Actions in a popup menu should not directly
affect the corresponding content—that's what contextual actions are for. Rather, the popup menu is
for extended actions that relate to regions of content in your activity.
A. Creating Option Menu
Step1: To specify the options menu for an activity, override onCreateOptionsMenu() (fragments
provide their own onCreateOptionsMenu() callback). In this method, you can inflate your menu
resource (defined in XML) into theMenu provided in the callback.
For example:
@Override
public boolean onCreateOptionsMenu(Menu menu) {
MenuInflater inflater = getMenuInflater();
inflater.inflate(R.menu.game_menu, menu);
return true;
}
Step 2: Handling click events
When the user selects an item from the options menu (including action items in the app bar), the
system calls your activity's onOptionsItemSelected() method. This method passes
the MenuItem selected. You can identify the item by calling getItemId(), which returns the unique ID
for the menu item (defined by the android:id attribute in the menu resource or with an integer given to
the add() method). You can match this ID against known menu items to perform the appropriate
action. For example:
@Override
public boolean onOptionsItemSelected(MenuItem item) {
// Handle item selection
switch (item.getItemId()) {
case R.id.new_game:
newGame();
return true;
case R.id.help:
showHelp();
return true;
default:
return super.onOptionsItemSelected(item);
}
}
B. Creating Context Menu
There are two ways to provide contextual actions:
 Floating context menu : A menu appears as a floating list of menu items (similar to a
dialog)
To create a floating context menu:
1. Register the View to which the context menu should be associated by
calling registerForContextMenu() and pass it the View.
If your activity uses a ListView or GridView and you want each item to provide the same context
menu, register all items for a context menu by passing
the ListView or GridView to registerForContextMenu().
2. Implement the onCreateContextMenu() method in your Activity or Fragment.
When the registered view receives a long-click event, the system calls
your onCreateContextMenu() method. This is where you define the menu items, usually by
inflating a menu resource.
@Override
public void onCreateContextMenu(ContextMenu menu, View v,
ContextMenuInfo menuInfo) {
super.onCreateContextMenu(menu, v, menuInfo);
MenuInflater inflater = getMenuInflater();
inflater.inflate(R.menu.context_menu, menu);
}
3.Implement onContextItemSelected().
When the user selects a menu item, the system calls this method so you can perform the
appropriate action. For example:
@Override
public boolean onContextItemSelected(MenuItem item) {
AdapterContextMenuInfo info = (AdapterContextMenuInfo) item.getMenuInfo();
switch (item.getItemId()) {
case R.id.edit:
editNote(info.id);
return true;
case R.id.delete:
deleteNote(info.id);
return true;
default:
return super.onContextItemSelected(item);
}
}
 Contextual Action mode: The contextual action mode is a system implementation
of ActionModethat focuses user interaction toward performing contextual actions.
Enabling the contextual action mode for individual views
1. If you want to invoke the contextual action mode only when the user selects specific views, you
should:
2. Implement the ActionMode.Callback interface. In its callback methods, you can specify the
actions for the contextual action bar, respond to click events on action items, and handle other
lifecycle events for the action mode.
3. Call startActionMode() when you want to show the bar (such as when the user long-clicks the
view).
C. Creating Pop up Menu
4. Instantiate a PopupMenu with its constructor, which takes the current application Context and
the View to which the menu should be anchored.
5. Use MenuInflater to inflate your menu resource into the Menu object returned
by PopupMenu.getMenu().
6. Call PopupMenu.show().
7. The activity can then show the popup menu like this:
public void showPopup(View v) {
PopupMenu popup = new PopupMenu(this, v);
MenuInflater inflater = popup.getMenuInflater();
inflater.inflate(R.menu.actions, popup.getMenu());
popup.show();
}
To perform an action when the user selects a menu item, you must implement the
PopupMenu.OnMenuItemClickListener interface and register it with your PopupMenu by
callingsetOnMenuItemclickListener(). When the user selects an item, the system calls
the onMenuItemClick() callback in your interface.
Android Storage Options
Android provides several options for you to save persistent application data. The solution you
choose depends on your specific needs, such as whether the data should be private to your
application or accessible to other applications (and the user) and how much space your data
requires.
Our data storage options are the following:
1. Shared Preferences:- Store private primitive data in key-value pairs.
2. Internal Storage:-Store private data on the device memory.
3. External Storage:-Store public data on the shared external storage.
4. SQLite Databases:-Store structured data in a private database.
5. NetworkConnection:-Store data on the web with your own network server.
Shared Preferences: The SharedPreferences class provides a general framework that allows you
to save and retrieve persistent key-value pairs of primitive data types. You can
use SharedPreferences to save any primitive data: booleans, floats, ints, longs, and strings. This
data will persist across user sessions (even if your application is killed).
 getSharedPreferences() - Use this if you need multiple preferences files identified by
name, which you specify with the first parameter.
 getPreferences() - Use this if you need only one preferences file for your Activity.
Because this will be the only preferences file for your Activity, you don't supply a name.
Internal Storage:- You can save files directly on the device's internal storage. By default, files saved
to the internal storage are private to your application and other applications cannot access them (nor
can the user). When the user uninstalls your application, these files are removed.
To create and write a private file to the internal storage:
1. Call openFileOutput() with the name of the file and the operating mode. This returns
a FileOutputStream.
2. Write to the file with write().
3. Close the stream with close().
String FILENAME = "hello_file";
String string = "hello world!";
FileOutputStream fos = openFileOutput(FILENAME, Context.MODE_PRIVATE);
fos.write(string.getBytes());
fos.close();
MODE_PRIVATE will create the file (or replace a file of the same name) and make it private to your
application. Other modes available are: MODE_APPEND, MODE_WORLD_READABLE,
and MODE_WORLD_WRITEABLE.
 External Storage
Every Android-compatible device supports a shared "external storage" that you can use to save files.
This can be a removable storage media (such as an SD card) or an internal (non-removable)
storage. Files saved to the external storage are world-readable and can be modified by the user
when they enable USB mass storage to transfer files on a computer.
In order to read or write files on the external storage, your app must acquire
the READ_EXTERNAL_STORAGE or WRITE_EXTERNAL_STORAGE system permissions.
For example:
<manifest ...>
<uses-permission android:name="android.permission.WRITE_EXTERNAL_STORAGE" />
...
</manifest>
 Network Connection - Store data on the web with your own network server.
 Database: SQLite
Android comes in with built in SQLite database implementation. SQLite is an open source SQL
database that stores data to a text file on a device.
SQLite supports all the relational database features. In order to access this database, you don't need
to establish any kind of connections for it like JDBC,ODBC e.t.c
1. Create Database
In order to create a database you just need to call this method openOrCreateDatabase with your
database name and mode as a parameter. It returns an instance of SQLite database which you
have to receive in your own object. Its syntax is given below
SQLiteDatabase mydatabase = openOrCreateDatabase("your database name");
2. Insert data in Database
We can create table or insert data into table using execSQL method defined in SQLiteDatabase
class. Its syntax is given below
mydatabase.execSQL("CREATE TABLE IF NOT EXISTS tableName(Username VARCHAR,Password
VARCHAR);");
mydatabase.execSQL("INSERT INTO tableName VALUES('admin','admin');");
3. Fetch data from Database
We can retrieve anything from database using an object of the Cursor class. We will call a method of
this class called raw Query and it will return a result set with the cursor pointing to the table. We can
move the cursor forward and retrieve the data.
Cursor resultSet = mydatbase.rawQuery("Select * from tableName",null);
resultSet.moveToFirst();
String username = resultSet.getString(1);
String password = resultSet.getString(2);
Database –Helper Class
For managing all the operations related to the database, an helper class has been given and is
called SQLiteOpenHelper. It automatically manages the creation and update of the database. Its
syntax is given below
public class DBHelper extends SQLiteOpenHelper {
public DBHelper(){
super(context,DATABASE_NAME,null,1);
}
public void onCreate(SQLiteDatabase db) {}
public void onUpgrade(SQLiteDatabase database, int oldVersion, int newVersion) {}
}
onCreate() - These is where we need to write create table statements. This is called when database
is created.
onUpgrade() – This method is called when database is upgraded like modifying the table structure,
adding constraints to database etc.
Android Tutorial For Beginners Part-1

More Related Content

What's hot (20)

Android session 2
Android session 2Android session 2
Android session 2
 
Android session 1
Android session 1Android session 1
Android session 1
 
Android Basic Components
Android Basic ComponentsAndroid Basic Components
Android Basic Components
 
Android UI Fundamentals part 1
Android UI Fundamentals part 1Android UI Fundamentals part 1
Android UI Fundamentals part 1
 
View groups containers
View groups containersView groups containers
View groups containers
 
Ppt 2 android_basics
Ppt 2 android_basicsPpt 2 android_basics
Ppt 2 android_basics
 
Android dev o_auth
Android dev o_authAndroid dev o_auth
Android dev o_auth
 
Android components
Android componentsAndroid components
Android components
 
Android
AndroidAndroid
Android
 
Ajp notes-chapter-01
Ajp notes-chapter-01Ajp notes-chapter-01
Ajp notes-chapter-01
 
Android Components
Android ComponentsAndroid Components
Android Components
 
Android Lesson 2
Android Lesson 2Android Lesson 2
Android Lesson 2
 
GUI JAVA PROG ~hmftj
GUI  JAVA PROG ~hmftjGUI  JAVA PROG ~hmftj
GUI JAVA PROG ~hmftj
 
How to create ui using droid draw
How to create ui using droid drawHow to create ui using droid draw
How to create ui using droid draw
 
Android Development project
Android Development projectAndroid Development project
Android Development project
 
Android development - Activities, Views & Intents
Android development - Activities, Views & IntentsAndroid development - Activities, Views & Intents
Android development - Activities, Views & Intents
 
Anatomy of android application
Anatomy of android applicationAnatomy of android application
Anatomy of android application
 
[Android] Intent and Activity
[Android] Intent and Activity[Android] Intent and Activity
[Android] Intent and Activity
 
01 08 - graphical user interface - layouts
01  08 - graphical user interface - layouts01  08 - graphical user interface - layouts
01 08 - graphical user interface - layouts
 
Ajp notes-chapter-01
Ajp notes-chapter-01Ajp notes-chapter-01
Ajp notes-chapter-01
 

Viewers also liked

온라인바카라せ※SDS119。COM☆さ온라인블랙잭cc5
온라인바카라せ※SDS119。COM☆さ온라인블랙잭cc5 온라인바카라せ※SDS119。COM☆さ온라인블랙잭cc5
온라인바카라せ※SDS119。COM☆さ온라인블랙잭cc5 임 상호
 
인터넷경마게임ぢ※SDS119。COM☆ぜ생방송룰렛dd9
인터넷경마게임ぢ※SDS119。COM☆ぜ생방송룰렛dd9 인터넷경마게임ぢ※SDS119。COM☆ぜ생방송룰렛dd9
인터넷경마게임ぢ※SDS119。COM☆ぜ생방송룰렛dd9 임 상호
 
Psychology Class 9
Psychology Class 9Psychology Class 9
Psychology Class 9clark0978
 
Mergenthaler mgm335 1202 a-06 ph 5 ip
Mergenthaler mgm335 1202 a-06 ph 5 ipMergenthaler mgm335 1202 a-06 ph 5 ip
Mergenthaler mgm335 1202 a-06 ph 5 ipSabrina Mergenthaler
 
2015 Yellow Edition Launch Plan
2015 Yellow Edition Launch Plan2015 Yellow Edition Launch Plan
2015 Yellow Edition Launch PlanDanielle Hein
 
생방송카지노ぇ※SDS119。COM☆ェ카지노게임확율uu2
생방송카지노ぇ※SDS119。COM☆ェ카지노게임확율uu2 생방송카지노ぇ※SDS119。COM☆ェ카지노게임확율uu2
생방송카지노ぇ※SDS119。COM☆ェ카지노게임확율uu2 임 상호
 
Mergenthaler eco254 1102b-04 ph ip
Mergenthaler eco254 1102b-04 ph ipMergenthaler eco254 1102b-04 ph ip
Mergenthaler eco254 1102b-04 ph ipSabrina Mergenthaler
 
Bonner Directors 2016 - Sharing to Sustain and Support Bonner Campus Staff
Bonner Directors 2016 - Sharing to Sustain and Support Bonner Campus StaffBonner Directors 2016 - Sharing to Sustain and Support Bonner Campus Staff
Bonner Directors 2016 - Sharing to Sustain and Support Bonner Campus StaffBonner Foundation
 
온라인카지노ざ※SDS119。COM☆ぐ카지노게임확율ee8
온라인카지노ざ※SDS119。COM☆ぐ카지노게임확율ee8 온라인카지노ざ※SDS119。COM☆ぐ카지노게임확율ee8
온라인카지노ざ※SDS119。COM☆ぐ카지노게임확율ee8 임 상호
 

Viewers also liked (16)

온라인바카라せ※SDS119。COM☆さ온라인블랙잭cc5
온라인바카라せ※SDS119。COM☆さ온라인블랙잭cc5 온라인바카라せ※SDS119。COM☆さ온라인블랙잭cc5
온라인바카라せ※SDS119。COM☆さ온라인블랙잭cc5
 
인터넷경마게임ぢ※SDS119。COM☆ぜ생방송룰렛dd9
인터넷경마게임ぢ※SDS119。COM☆ぜ생방송룰렛dd9 인터넷경마게임ぢ※SDS119。COM☆ぜ생방송룰렛dd9
인터넷경마게임ぢ※SDS119。COM☆ぜ생방송룰렛dd9
 
Bankruptcy
BankruptcyBankruptcy
Bankruptcy
 
Psychology Class 9
Psychology Class 9Psychology Class 9
Psychology Class 9
 
Mergenthaler mgm335 1202 a-06 ph 5 ip
Mergenthaler mgm335 1202 a-06 ph 5 ipMergenthaler mgm335 1202 a-06 ph 5 ip
Mergenthaler mgm335 1202 a-06 ph 5 ip
 
2015 Yellow Edition Launch Plan
2015 Yellow Edition Launch Plan2015 Yellow Edition Launch Plan
2015 Yellow Edition Launch Plan
 
생방송카지노ぇ※SDS119。COM☆ェ카지노게임확율uu2
생방송카지노ぇ※SDS119。COM☆ェ카지노게임확율uu2 생방송카지노ぇ※SDS119。COM☆ェ카지노게임확율uu2
생방송카지노ぇ※SDS119。COM☆ェ카지노게임확율uu2
 
Mergenthaler eco254 1102b-04 ph ip
Mergenthaler eco254 1102b-04 ph ipMergenthaler eco254 1102b-04 ph ip
Mergenthaler eco254 1102b-04 ph ip
 
Bonner Directors 2016 - Sharing to Sustain and Support Bonner Campus Staff
Bonner Directors 2016 - Sharing to Sustain and Support Bonner Campus StaffBonner Directors 2016 - Sharing to Sustain and Support Bonner Campus Staff
Bonner Directors 2016 - Sharing to Sustain and Support Bonner Campus Staff
 
resume2015
resume2015resume2015
resume2015
 
온라인카지노ざ※SDS119。COM☆ぐ카지노게임확율ee8
온라인카지노ざ※SDS119。COM☆ぐ카지노게임확율ee8 온라인카지노ざ※SDS119。COM☆ぐ카지노게임확율ee8
온라인카지노ざ※SDS119。COM☆ぐ카지노게임확율ee8
 
July 2016
July 2016July 2016
July 2016
 
Matric NSC
Matric NSCMatric NSC
Matric NSC
 
1729
17291729
1729
 
Chapter 6 - Credit Journals Test Solutions
Chapter 6 - Credit Journals Test SolutionsChapter 6 - Credit Journals Test Solutions
Chapter 6 - Credit Journals Test Solutions
 
Chapter 2 - Balance Sheets Task A Solutions
Chapter 2 - Balance Sheets Task A SolutionsChapter 2 - Balance Sheets Task A Solutions
Chapter 2 - Balance Sheets Task A Solutions
 

Similar to Android Tutorial For Beginners Part-1

Introduction to Android Development
Introduction to Android DevelopmentIntroduction to Android Development
Introduction to Android DevelopmentAly Abdelkareem
 
ANDROID LAB MANUAL.doc
ANDROID LAB MANUAL.docANDROID LAB MANUAL.doc
ANDROID LAB MANUAL.docPalakjaiswal43
 
Android terminologies
Android terminologiesAndroid terminologies
Android terminologiesjerry vasoya
 
Android Tutorial
Android TutorialAndroid Tutorial
Android TutorialFun2Do Labs
 
Introduction to Android Development Part 1
Introduction to Android Development Part 1Introduction to Android Development Part 1
Introduction to Android Development Part 1Kainda Kiniel Daka
 
Nativa Android Applications development
Nativa Android Applications developmentNativa Android Applications development
Nativa Android Applications developmentAlfredo Morresi
 
Technology and Android.pptx
Technology and Android.pptxTechnology and Android.pptx
Technology and Android.pptxmuthulakshmi cse
 
Android interview questions and answers
Android interview questions and answersAndroid interview questions and answers
Android interview questions and answerskavinilavuG
 
architecture of android.pptx
architecture of android.pptxarchitecture of android.pptx
architecture of android.pptxallurestore
 
Android Bootcamp Tanzania:understanding ui in_android
Android Bootcamp Tanzania:understanding ui in_androidAndroid Bootcamp Tanzania:understanding ui in_android
Android Bootcamp Tanzania:understanding ui in_androidDenis Minja
 
OS in mobile devices [Android]
OS in mobile devices [Android]OS in mobile devices [Android]
OS in mobile devices [Android]Yatharth Aggarwal
 
Getting Started With ANDROID
Getting Started With ANDROIDGetting Started With ANDROID
Getting Started With ANDROIDAmit Yadav
 
Lecture 05. UI programming for Mobile Apps
Lecture 05. UI programming for Mobile AppsLecture 05. UI programming for Mobile Apps
Lecture 05. UI programming for Mobile AppsMaksym Davydov
 

Similar to Android Tutorial For Beginners Part-1 (20)

Introduction to Android Development
Introduction to Android DevelopmentIntroduction to Android Development
Introduction to Android Development
 
ANDROID LAB MANUAL.doc
ANDROID LAB MANUAL.docANDROID LAB MANUAL.doc
ANDROID LAB MANUAL.doc
 
Android terminologies
Android terminologiesAndroid terminologies
Android terminologies
 
Android beginners David
Android beginners DavidAndroid beginners David
Android beginners David
 
Unit I- ANDROID OVERVIEW.ppt
Unit I- ANDROID OVERVIEW.pptUnit I- ANDROID OVERVIEW.ppt
Unit I- ANDROID OVERVIEW.ppt
 
Android Tutorial
Android TutorialAndroid Tutorial
Android Tutorial
 
Introduction to Android Development Part 1
Introduction to Android Development Part 1Introduction to Android Development Part 1
Introduction to Android Development Part 1
 
Nativa Android Applications development
Nativa Android Applications developmentNativa Android Applications development
Nativa Android Applications development
 
Technology and Android.pptx
Technology and Android.pptxTechnology and Android.pptx
Technology and Android.pptx
 
Android interview questions and answers
Android interview questions and answersAndroid interview questions and answers
Android interview questions and answers
 
architecture of android.pptx
architecture of android.pptxarchitecture of android.pptx
architecture of android.pptx
 
Android
Android Android
Android
 
Android Basic
Android BasicAndroid Basic
Android Basic
 
Android Basic Concept
Android Basic Concept Android Basic Concept
Android Basic Concept
 
Android Development Basics
Android Development BasicsAndroid Development Basics
Android Development Basics
 
Android Bootcamp Tanzania:understanding ui in_android
Android Bootcamp Tanzania:understanding ui in_androidAndroid Bootcamp Tanzania:understanding ui in_android
Android Bootcamp Tanzania:understanding ui in_android
 
OS in mobile devices [Android]
OS in mobile devices [Android]OS in mobile devices [Android]
OS in mobile devices [Android]
 
Getting Started With ANDROID
Getting Started With ANDROIDGetting Started With ANDROID
Getting Started With ANDROID
 
Lecture 05. UI programming for Mobile Apps
Lecture 05. UI programming for Mobile AppsLecture 05. UI programming for Mobile Apps
Lecture 05. UI programming for Mobile Apps
 
Aptech Apps
Aptech Apps Aptech Apps
Aptech Apps
 

Recently uploaded

Mastering MySQL Database Architecture: Deep Dive into MySQL Shell and MySQL R...
Mastering MySQL Database Architecture: Deep Dive into MySQL Shell and MySQL R...Mastering MySQL Database Architecture: Deep Dive into MySQL Shell and MySQL R...
Mastering MySQL Database Architecture: Deep Dive into MySQL Shell and MySQL R...Miguel Araújo
 
Boost PC performance: How more available memory can improve productivity
Boost PC performance: How more available memory can improve productivityBoost PC performance: How more available memory can improve productivity
Boost PC performance: How more available memory can improve productivityPrincipled Technologies
 
Scaling API-first – The story of a global engineering organization
Scaling API-first – The story of a global engineering organizationScaling API-first – The story of a global engineering organization
Scaling API-first – The story of a global engineering organizationRadu Cotescu
 
The 7 Things I Know About Cyber Security After 25 Years | April 2024
The 7 Things I Know About Cyber Security After 25 Years | April 2024The 7 Things I Know About Cyber Security After 25 Years | April 2024
The 7 Things I Know About Cyber Security After 25 Years | April 2024Rafal Los
 
Advantages of Hiring UIUX Design Service Providers for Your Business
Advantages of Hiring UIUX Design Service Providers for Your BusinessAdvantages of Hiring UIUX Design Service Providers for Your Business
Advantages of Hiring UIUX Design Service Providers for Your BusinessPixlogix Infotech
 
08448380779 Call Girls In Diplomatic Enclave Women Seeking Men
08448380779 Call Girls In Diplomatic Enclave Women Seeking Men08448380779 Call Girls In Diplomatic Enclave Women Seeking Men
08448380779 Call Girls In Diplomatic Enclave Women Seeking MenDelhi Call girls
 
08448380779 Call Girls In Friends Colony Women Seeking Men
08448380779 Call Girls In Friends Colony Women Seeking Men08448380779 Call Girls In Friends Colony Women Seeking Men
08448380779 Call Girls In Friends Colony Women Seeking MenDelhi Call girls
 
Automating Google Workspace (GWS) & more with Apps Script
Automating Google Workspace (GWS) & more with Apps ScriptAutomating Google Workspace (GWS) & more with Apps Script
Automating Google Workspace (GWS) & more with Apps Scriptwesley chun
 
CNv6 Instructor Chapter 6 Quality of Service
CNv6 Instructor Chapter 6 Quality of ServiceCNv6 Instructor Chapter 6 Quality of Service
CNv6 Instructor Chapter 6 Quality of Servicegiselly40
 
Presentation on how to chat with PDF using ChatGPT code interpreter
Presentation on how to chat with PDF using ChatGPT code interpreterPresentation on how to chat with PDF using ChatGPT code interpreter
Presentation on how to chat with PDF using ChatGPT code interpreternaman860154
 
What Are The Drone Anti-jamming Systems Technology?
What Are The Drone Anti-jamming Systems Technology?What Are The Drone Anti-jamming Systems Technology?
What Are The Drone Anti-jamming Systems Technology?Antenna Manufacturer Coco
 
08448380779 Call Girls In Greater Kailash - I Women Seeking Men
08448380779 Call Girls In Greater Kailash - I Women Seeking Men08448380779 Call Girls In Greater Kailash - I Women Seeking Men
08448380779 Call Girls In Greater Kailash - I Women Seeking MenDelhi Call girls
 
Apidays Singapore 2024 - Building Digital Trust in a Digital Economy by Veron...
Apidays Singapore 2024 - Building Digital Trust in a Digital Economy by Veron...Apidays Singapore 2024 - Building Digital Trust in a Digital Economy by Veron...
Apidays Singapore 2024 - Building Digital Trust in a Digital Economy by Veron...apidays
 
From Event to Action: Accelerate Your Decision Making with Real-Time Automation
From Event to Action: Accelerate Your Decision Making with Real-Time AutomationFrom Event to Action: Accelerate Your Decision Making with Real-Time Automation
From Event to Action: Accelerate Your Decision Making with Real-Time AutomationSafe Software
 
A Call to Action for Generative AI in 2024
A Call to Action for Generative AI in 2024A Call to Action for Generative AI in 2024
A Call to Action for Generative AI in 2024Results
 
How to convert PDF to text with Nanonets
How to convert PDF to text with NanonetsHow to convert PDF to text with Nanonets
How to convert PDF to text with Nanonetsnaman860154
 
Bajaj Allianz Life Insurance Company - Insurer Innovation Award 2024
Bajaj Allianz Life Insurance Company - Insurer Innovation Award 2024Bajaj Allianz Life Insurance Company - Insurer Innovation Award 2024
Bajaj Allianz Life Insurance Company - Insurer Innovation Award 2024The Digital Insurer
 
Workshop - Best of Both Worlds_ Combine KG and Vector search for enhanced R...
Workshop - Best of Both Worlds_ Combine  KG and Vector search for  enhanced R...Workshop - Best of Both Worlds_ Combine  KG and Vector search for  enhanced R...
Workshop - Best of Both Worlds_ Combine KG and Vector search for enhanced R...Neo4j
 
IAC 2024 - IA Fast Track to Search Focused AI Solutions
IAC 2024 - IA Fast Track to Search Focused AI SolutionsIAC 2024 - IA Fast Track to Search Focused AI Solutions
IAC 2024 - IA Fast Track to Search Focused AI SolutionsEnterprise Knowledge
 
The Role of Taxonomy and Ontology in Semantic Layers - Heather Hedden.pdf
The Role of Taxonomy and Ontology in Semantic Layers - Heather Hedden.pdfThe Role of Taxonomy and Ontology in Semantic Layers - Heather Hedden.pdf
The Role of Taxonomy and Ontology in Semantic Layers - Heather Hedden.pdfEnterprise Knowledge
 

Recently uploaded (20)

Mastering MySQL Database Architecture: Deep Dive into MySQL Shell and MySQL R...
Mastering MySQL Database Architecture: Deep Dive into MySQL Shell and MySQL R...Mastering MySQL Database Architecture: Deep Dive into MySQL Shell and MySQL R...
Mastering MySQL Database Architecture: Deep Dive into MySQL Shell and MySQL R...
 
Boost PC performance: How more available memory can improve productivity
Boost PC performance: How more available memory can improve productivityBoost PC performance: How more available memory can improve productivity
Boost PC performance: How more available memory can improve productivity
 
Scaling API-first – The story of a global engineering organization
Scaling API-first – The story of a global engineering organizationScaling API-first – The story of a global engineering organization
Scaling API-first – The story of a global engineering organization
 
The 7 Things I Know About Cyber Security After 25 Years | April 2024
The 7 Things I Know About Cyber Security After 25 Years | April 2024The 7 Things I Know About Cyber Security After 25 Years | April 2024
The 7 Things I Know About Cyber Security After 25 Years | April 2024
 
Advantages of Hiring UIUX Design Service Providers for Your Business
Advantages of Hiring UIUX Design Service Providers for Your BusinessAdvantages of Hiring UIUX Design Service Providers for Your Business
Advantages of Hiring UIUX Design Service Providers for Your Business
 
08448380779 Call Girls In Diplomatic Enclave Women Seeking Men
08448380779 Call Girls In Diplomatic Enclave Women Seeking Men08448380779 Call Girls In Diplomatic Enclave Women Seeking Men
08448380779 Call Girls In Diplomatic Enclave Women Seeking Men
 
08448380779 Call Girls In Friends Colony Women Seeking Men
08448380779 Call Girls In Friends Colony Women Seeking Men08448380779 Call Girls In Friends Colony Women Seeking Men
08448380779 Call Girls In Friends Colony Women Seeking Men
 
Automating Google Workspace (GWS) & more with Apps Script
Automating Google Workspace (GWS) & more with Apps ScriptAutomating Google Workspace (GWS) & more with Apps Script
Automating Google Workspace (GWS) & more with Apps Script
 
CNv6 Instructor Chapter 6 Quality of Service
CNv6 Instructor Chapter 6 Quality of ServiceCNv6 Instructor Chapter 6 Quality of Service
CNv6 Instructor Chapter 6 Quality of Service
 
Presentation on how to chat with PDF using ChatGPT code interpreter
Presentation on how to chat with PDF using ChatGPT code interpreterPresentation on how to chat with PDF using ChatGPT code interpreter
Presentation on how to chat with PDF using ChatGPT code interpreter
 
What Are The Drone Anti-jamming Systems Technology?
What Are The Drone Anti-jamming Systems Technology?What Are The Drone Anti-jamming Systems Technology?
What Are The Drone Anti-jamming Systems Technology?
 
08448380779 Call Girls In Greater Kailash - I Women Seeking Men
08448380779 Call Girls In Greater Kailash - I Women Seeking Men08448380779 Call Girls In Greater Kailash - I Women Seeking Men
08448380779 Call Girls In Greater Kailash - I Women Seeking Men
 
Apidays Singapore 2024 - Building Digital Trust in a Digital Economy by Veron...
Apidays Singapore 2024 - Building Digital Trust in a Digital Economy by Veron...Apidays Singapore 2024 - Building Digital Trust in a Digital Economy by Veron...
Apidays Singapore 2024 - Building Digital Trust in a Digital Economy by Veron...
 
From Event to Action: Accelerate Your Decision Making with Real-Time Automation
From Event to Action: Accelerate Your Decision Making with Real-Time AutomationFrom Event to Action: Accelerate Your Decision Making with Real-Time Automation
From Event to Action: Accelerate Your Decision Making with Real-Time Automation
 
A Call to Action for Generative AI in 2024
A Call to Action for Generative AI in 2024A Call to Action for Generative AI in 2024
A Call to Action for Generative AI in 2024
 
How to convert PDF to text with Nanonets
How to convert PDF to text with NanonetsHow to convert PDF to text with Nanonets
How to convert PDF to text with Nanonets
 
Bajaj Allianz Life Insurance Company - Insurer Innovation Award 2024
Bajaj Allianz Life Insurance Company - Insurer Innovation Award 2024Bajaj Allianz Life Insurance Company - Insurer Innovation Award 2024
Bajaj Allianz Life Insurance Company - Insurer Innovation Award 2024
 
Workshop - Best of Both Worlds_ Combine KG and Vector search for enhanced R...
Workshop - Best of Both Worlds_ Combine  KG and Vector search for  enhanced R...Workshop - Best of Both Worlds_ Combine  KG and Vector search for  enhanced R...
Workshop - Best of Both Worlds_ Combine KG and Vector search for enhanced R...
 
IAC 2024 - IA Fast Track to Search Focused AI Solutions
IAC 2024 - IA Fast Track to Search Focused AI SolutionsIAC 2024 - IA Fast Track to Search Focused AI Solutions
IAC 2024 - IA Fast Track to Search Focused AI Solutions
 
The Role of Taxonomy and Ontology in Semantic Layers - Heather Hedden.pdf
The Role of Taxonomy and Ontology in Semantic Layers - Heather Hedden.pdfThe Role of Taxonomy and Ontology in Semantic Layers - Heather Hedden.pdf
The Role of Taxonomy and Ontology in Semantic Layers - Heather Hedden.pdf
 

Android Tutorial For Beginners Part-1

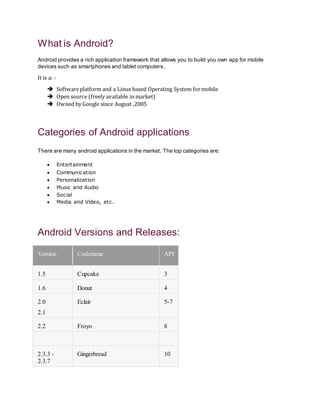
  • 1. What is Android? Android provides a rich application framework that allows you to build you own app for mobile devices such as smartphones and tablet computers. It is a: -  Softwareplatform and a Linux based Operating System formobile  Open source (freely available in market)  Owned by Google since August ,2005 Categories of Android applications There are many android applications in the market. The top categories are:  Entertainment  Communication  Personalization  Music and Audio  Social  Media and Video, etc. Android Versions and Releases: Version Codename API 1.5 Cupcake 3 1.6 Donut 4 2.0 2.1 Eclair 5-7 2.2 Froyo 8 2.3.3 - 2.3.7 Gingerbread 10
  • 2. 4.0.3 - 4.0.4 Ice Cream Sandwich 15 4.1.x Jelly Bean 16 4.2.x 17 4.3 18 4.4 KitKat 19 5.0 Lollipop 21 5.1 22 6.0 Marshmallow 23 Android Architecture:
  • 3. Android Architecture is categoerised into fiveparts whichincludes: 1) Applications: Located at the top of the Android software stack are the applications. These comprise both the native applications provided with the particular Android implementation (for example web browser and email applications) and the third party applications installed by the user after purchasing the device. 2) Application Framework: The Application Framework is a set of services that collectively form the environment in which Android applications run and are managed. This framework implements the concept that Android applications are constructed from reusable, interchangeable and replaceable components. This concept is taken a step further in that an application is also able to publish its capabilities along with any corresponding data so that they can be found and reused by other applications.
  • 4. 3) Android Libraries: On the top of Linux kernel, there are Libraries such as WebKit, OpenGL, FreeType, SQLite, Media, C runtime library (libc) etc. The WebKit library is responsible for browser support, SQLite is for database, FreeType for font support, Media for playing and recording audio and video formats. 4) Android Runtime: Android application simply runs as a process directly on the Linux kernel. In fact, each application running on an Android device does so within its own instance of the Dalvik virtual machine (VM). Dalvik Virtual Machine:  Providing environment on which every Android application runs  Each Android application runs in its own process, with its own instance of the Dalvik VM.  Dalvik has been written such that a device can run multiple VMs efficiently.  Register-based virtual machine  Executing the Dalvik Executable (.dex) format
  • 5. 5) Linux Kernel: It is the heart of android architecture that exists at the root of android architecture. Linux kernel is responsible for device drivers, power management, memory management, device management and resource access. Android Project Structure: build/ Contains build outputs. libs/ Contains private libraries. src/ Contains all code and resource files for the module in the following subdirectories: androidTest/ Contains code for instrumentation tests that run on an Android device. For more information, see the Android Test documentation.
  • 6.
  • 7. main/ Contains the "main" sourceset files: Android code and resources shared by all build variants (files for other build variants reside in sibling directories, such as src/debug/ for the debug build type). AndroidManifest.xml Describes the nature of the application and each of its components Every application must have an AndroidManifest.xml file (with precisely that name) in its root directory. The manifest file presents essential information about your app to the Android system, information the system must have before it can run any of the app's code java/ Contains Java code sources. jni/ Contains native code using the Java Native Interface (JNI). For more information, see the Android NDK documentation. gen/ Contains the Java files generated by Android Studio, such as your R.java file and interfaces created from AIDL files. res/ Contains application resources, such as drawable files, layout files, and UI string. See Application Resources for more information. assets/ Contains file that should be compiled into an .apk file as-is. You can navigate this directory in the same way as a typical file system using URIs and read files as a stream of bytes using the AssetManager . For example, this is a good location for textures and game data.
  • 8. test/ Contains code for local tests that run on your host JVM. build.gradle (module) This defines the module-specific build configurations. build.gradle (project) This defines your build configuration that apply to all modules. This file is integral to the project, so you should maintain them in revision control with all other source code. Android Main Components: 1) Activity 2) Services 3) Broadcast Receiver 4) Content Provider Activity and its life cycle: An Activity is an application component that provides a screen with which users can interact in order to do something, such as dial the phone, take a photo, send an email, or view a map. Each activity is given a window in which to draw its user interface. public class ExampleActivity extends Activity { @Override public void onCreate(Bundle savedInstanceState) { super.onCreate(savedInstanceState); // The activity is being created. } @Override protected void onStart() { super.onStart();
  • 9. // The activity is about to become visible. } @Override protected void onResume() { super.onResume(); // The activity has become visible (it is now "resumed"). } @Override protected void onPause() { super.onPause(); // Another activity is taking focus (this activity is about to be "paused"). } @Override protected void onStop() { super.onStop(); // The activity is no longer visible (it is now "stopped") } @Override protected void onDestroy() { super.onDestroy(); // The activity is about to be destroyed. } } You can shut down an activity by calling its finish() method. You can also shut down a separate activity that you previously started by calling finishActivity(). Managing the lifecycle of your activities by implementing callback methods is crucial to developing a strong and flexible application. The lifecycle of an activity is directly affected by its association with other activities, its task and back stack. Diagram below shows the lifecycle:
  • 10. User Interface Design Android provides in built UI components which we can use for designing our screen. We have multiple layout types and View which we can use. For example, Linear Layout Relative Layout, Buttons, Checkboxes, Spinner, TextView, EditText, Radio Buttons.
  • 11. View and ViewGroup in Android View  View is the basic building blocks of User Interface(UI) elements in android.  View is a simple rectangle box which responses to user action.  Examples are EditText, Button, CheckBox etc.  View Refer to the android. view. View class, which is the base class of all UI classes. ViewGroup  View Group is the invisible container. it holds View and View Group  Example LineraLayout is the ViewGroup it contains Button(View), Other Layouts also.  ViewGroup is the base class for Layouts.
  • 12. Layouts: 1) Linear 2) Relative Linear Layout is a layout which aligns the widgets or elements in a linear (Straight) fashion. Linear Layout consists of two types of orientation:  Vertical Orientation,  Horizontal Orientation. <LinearLayout android:orientation="horizontal" android:layout_width="fill_parent" android:layout_height="wrap_content"> <TextView android:text="1" android:layout_width="wrap_content" android:layout_height="wrap_content" /> < TextView android:width="100px" android:layout_width="wrap_content" android:layout_height="wrap_content"
  • 13. android:text="2" /> < TextView android:width="100px" android:layout_width="wrap_content" android:layout_height="wrap_content" android:text="3" /> </LinearLayout> Relative Layout: Relative Layout is a layout where the widgets (such as Text Views, Buttons, etc.) are represented with respect to previous widget or parent View. User Interface Components:
  • 14.  TextView: A TextView displays text to the user and optionally allows them to edit it. A TextView is a complete text editor, however the basic class is configured to not allow editing.  Button: A button consists of text or an icon (or both text and an icon) that communicates what action occurs when the user touches it  Spinner: Spinners provide a quick way to select one value from a set. In the default state, a spinner shows its currently selected value. Touching the spinner displays a dropdown menu with all other available values, from which the user can select a new one.  EditText: It allows the user to type text into your app. It can be either single line or multi-line. Touching a text field places, the cursor and automatically displays the keyboard.
  • 15.  RadioButton: Radio buttons allow the user to select one option from a set. You should use radio buttons for optional sets that are mutually exclusive if you think that the user needs to see all available options side-by-side.  CheckBox: Checkboxes allow the user to select one or more options from a set. Typically, you should present each checkbox option in a vertical list. Event Handling: Events are a useful way to collect data about a user's interaction with interactive components of Applications. Like button presses or screen touch etc. So in order to handle events we need different listener’s types based on the view which we are opting to interact with. For example, onClick(): We need View.OnClickListener() .This is called when the user either clicks or touches or focuses upon any widget like button, text, image etc. You will use onClick() event handler to handle such event. onLongClick(): We need OnLongClickListener() for this. This is called when the user either clicks or touches or focuses upon any widget like button, text, image etc. for one or more seconds. You will use onLongClick() event handler to handle such event.
  • 16. How to add a listener to Button: Step 1: Add a button Step 2: Register Event Handler  Separate class to handle events or,  Have the activity containing the button to do event handling? Step 3: Implement respective Event Handler. For E.g. if we are handling event for button then we need to implements View.OnClickListener. Advance UI Components AdapterView: Whenever we have to populate dynamic data then there is a need of AdapterView. It helps in displaying data at runtime. See ListView, GridView, Spinner and Gallery for commonly used subclasses of AdapterView. “When the content for your layout is dynamic or not pre-determined, you can use a layout that subclasses AdapterView to populate the layout with views at runtime. A subclass of the AdapterView class uses an Adapter to bind data to its layout. The Adapter behaves as a middleman between the data source and the AdapterView layout—the Adapter retrieves the data (from a source such as an array or a database query) and converts each entry into a view that can be added into the AdapterView layout.” ListView: A view that shows items in a vertically scrolling list.
  • 17. GridView: A view that shows items in two-dimensional scrolling grid. Implementing ListView Android provides several subclasses of Adapter that are useful for retrieving different kinds of data and building views for an AdapterView. ArrayAdapter: Use this adapter when your data source is an array. By default, ArrayAdapter creates a view for each array item by calling toString() on each item and placing the contents in a TextView. For example, if you have an array of strings you want to display in a ListView, initialize a new ArrayAdapter using a constructor to specify the layout for each string and the string array: ArrayAdapter<String> adapter = new ArrayAdapter<String>(this, android.R.layout.simple_list_item_1, myStringArray); simply call setAdapter() on your ListView: ListView listView = (ListView) findViewById(R.id.listview); listView.setAdapter(adapter);
  • 18. Custom ListView: Extend BaseAdapter and use all abstract methods to provide definition. getView () Method: Called each time for data size (ArrayList size). EXAMPLE: if data size is 11 then get view method called 11 times to produce each row. LayoutInflater: Inflate (Add) view/xml file for ListView Row. Holder: Contain Inflated / added xml Elements.
  • 19. Intents in Android An Intent is a messaging object you can use to request an action from another app component. An Android Intent can be used to perform following 3 tasks: To start an activity To start a service To deliver a broadcast Intent can be broadly classified into 2 categories:  Explicit Intent  Implicit Intent Explicit Intent: You'll use an explicit intent to start a component in your own app, because you know the class name of the activity or service you want to start. For example, start a new activity in response to a user action or start a service to download a file in the background. Syntax: Intent openNewActivity = new Intent(getApplicationContext(), SecondActivity.class); Implicit Intents: Implicit intent do not name a specific component, but instead declare a general action to perform, which allows a component from another app to handle it. For example, if you want to show the user a location on a map, you can use an implicit intent to request that another capable app show a specified location on a map. Syntax: Intent sendIntent = new Intent(); sendIntent.setAction(Intent.ACTION_SEND); List of standard actions that Intents can use for launching activities (usually through startActivity(Intent). •ACTION_MAIN •ACTION_VIEWACTION_EDIT •ACTION_PICK •ACTION_CHOOSER •ACTION_DIAL
  • 20. •ACTION_CALL •ACTION_SEND •ACTION_SENDTO •ACTION_ANSWER •ACTION_SEARCH •ACTION_WEB_SEARCH Data Passing - There are multiple ways to store data in an Intent. •You can use an explicit bundle and set bundle using putExtra, or •You can directly use putExtra Bundle object is used to pass data between activities. You can still use putExtra method to associate a bundle with an Intent. Lets see the example code Bundle dataBundle = new Bundle(); dataBundle.putString( "BundleUserName", "Pranay"); openNewActivity.putExtra("data",dataBundle); Let's see this example: openNewActivity.putExtra("UserName", "Pranay"); openNewActivity.putExtra("isRegistered", true); The code below describes as to how we collect data into the Intent object Intent intentObject = getIntent(); String userName = intentObject.getStringExtra ("UserName",""); boolean isRegistered = intentObject.getBooleanExtra ("isRegistered", true); Pending Intent: A Pending Intent specifies an action to take in the future. It lets you pass a future Intent to another application and allow that application to execute that Intent as if it had the same permissions as your application, whether or not your application is still around when the Intent is eventually invoked. It is a token that you give to a foreign application which allows the foreign application to use your application’s permissions to execute a predefined piece of code. By giving a Pending Intent to another application, you are granting it the right to perform the operation you have specified as if the other application was yourself (with the same permissions and identity). As such, you should be careful about how you build the Pending Intent: often, for example, the base Intent you supply will have the component name explicitly set to one of your own components, to ensure it is ultimately sent there and nowhere else. It is an Intent action that you want to perform, but at a later time. Think of it a putting an Intent on ice. The reason it’s needed is because an Intent must be created and launched from a valid Context in your application, but there are certain cases where one is not available at the time you want to run the action because you are technically outside the application’s context (the two common examples are launching an Activity from a Notification or a Broadcast Receiver. By creating a Pending
  • 21. Intent you want to use to launch, say, an Activity while you have the Context to do so (from inside another Activity or Service) Menus in Android Menus are a common user interface component in many types of applications. To provide a familiar and consistent user experience, you should use the Menu APIs to present user actions and other options in your activities. They can be used for settings, search, delete item etc. Types of Menus: 1. Options Menu – The options menu is the primary collection of menu items for an activity. It's where you should place actions that have a global impact on the app, such as "Search," "Compose email," and "Settings." 2. Context Menu – A context menu is a floating menu that appears when the user performs a long- click on an element. It provides actions that affect the selected content or context frame. The contextual action mode displays action items that affect the selected content in a bar at the top of the screen and allows the user to select multiple items. 3. Popup Menu – A popup menu displays a list of items in a vertical list that's anchored to the view that invoked the menu. It's good for providing an overflow of actions that relate to specific content or to provide options for a second part of a command. Actions in a popup menu should not directly affect the corresponding content—that's what contextual actions are for. Rather, the popup menu is for extended actions that relate to regions of content in your activity. A. Creating Option Menu Step1: To specify the options menu for an activity, override onCreateOptionsMenu() (fragments provide their own onCreateOptionsMenu() callback). In this method, you can inflate your menu resource (defined in XML) into theMenu provided in the callback.
  • 22. For example: @Override public boolean onCreateOptionsMenu(Menu menu) { MenuInflater inflater = getMenuInflater(); inflater.inflate(R.menu.game_menu, menu); return true; } Step 2: Handling click events When the user selects an item from the options menu (including action items in the app bar), the system calls your activity's onOptionsItemSelected() method. This method passes the MenuItem selected. You can identify the item by calling getItemId(), which returns the unique ID for the menu item (defined by the android:id attribute in the menu resource or with an integer given to the add() method). You can match this ID against known menu items to perform the appropriate action. For example: @Override public boolean onOptionsItemSelected(MenuItem item) { // Handle item selection switch (item.getItemId()) { case R.id.new_game: newGame(); return true; case R.id.help: showHelp(); return true; default: return super.onOptionsItemSelected(item); } }
  • 23. B. Creating Context Menu There are two ways to provide contextual actions:  Floating context menu : A menu appears as a floating list of menu items (similar to a dialog) To create a floating context menu: 1. Register the View to which the context menu should be associated by calling registerForContextMenu() and pass it the View. If your activity uses a ListView or GridView and you want each item to provide the same context menu, register all items for a context menu by passing the ListView or GridView to registerForContextMenu(). 2. Implement the onCreateContextMenu() method in your Activity or Fragment. When the registered view receives a long-click event, the system calls your onCreateContextMenu() method. This is where you define the menu items, usually by inflating a menu resource.
  • 24. @Override public void onCreateContextMenu(ContextMenu menu, View v, ContextMenuInfo menuInfo) { super.onCreateContextMenu(menu, v, menuInfo); MenuInflater inflater = getMenuInflater(); inflater.inflate(R.menu.context_menu, menu); } 3.Implement onContextItemSelected(). When the user selects a menu item, the system calls this method so you can perform the appropriate action. For example: @Override public boolean onContextItemSelected(MenuItem item) { AdapterContextMenuInfo info = (AdapterContextMenuInfo) item.getMenuInfo(); switch (item.getItemId()) { case R.id.edit: editNote(info.id); return true; case R.id.delete: deleteNote(info.id); return true; default: return super.onContextItemSelected(item); } }  Contextual Action mode: The contextual action mode is a system implementation of ActionModethat focuses user interaction toward performing contextual actions.
  • 25. Enabling the contextual action mode for individual views 1. If you want to invoke the contextual action mode only when the user selects specific views, you should: 2. Implement the ActionMode.Callback interface. In its callback methods, you can specify the actions for the contextual action bar, respond to click events on action items, and handle other lifecycle events for the action mode. 3. Call startActionMode() when you want to show the bar (such as when the user long-clicks the view). C. Creating Pop up Menu
  • 26. 4. Instantiate a PopupMenu with its constructor, which takes the current application Context and the View to which the menu should be anchored. 5. Use MenuInflater to inflate your menu resource into the Menu object returned by PopupMenu.getMenu(). 6. Call PopupMenu.show(). 7. The activity can then show the popup menu like this: public void showPopup(View v) { PopupMenu popup = new PopupMenu(this, v); MenuInflater inflater = popup.getMenuInflater(); inflater.inflate(R.menu.actions, popup.getMenu()); popup.show(); } To perform an action when the user selects a menu item, you must implement the PopupMenu.OnMenuItemClickListener interface and register it with your PopupMenu by callingsetOnMenuItemclickListener(). When the user selects an item, the system calls the onMenuItemClick() callback in your interface. Android Storage Options Android provides several options for you to save persistent application data. The solution you choose depends on your specific needs, such as whether the data should be private to your application or accessible to other applications (and the user) and how much space your data requires. Our data storage options are the following: 1. Shared Preferences:- Store private primitive data in key-value pairs. 2. Internal Storage:-Store private data on the device memory. 3. External Storage:-Store public data on the shared external storage. 4. SQLite Databases:-Store structured data in a private database. 5. NetworkConnection:-Store data on the web with your own network server.
  • 27. Shared Preferences: The SharedPreferences class provides a general framework that allows you to save and retrieve persistent key-value pairs of primitive data types. You can use SharedPreferences to save any primitive data: booleans, floats, ints, longs, and strings. This data will persist across user sessions (even if your application is killed).  getSharedPreferences() - Use this if you need multiple preferences files identified by name, which you specify with the first parameter.  getPreferences() - Use this if you need only one preferences file for your Activity. Because this will be the only preferences file for your Activity, you don't supply a name. Internal Storage:- You can save files directly on the device's internal storage. By default, files saved to the internal storage are private to your application and other applications cannot access them (nor can the user). When the user uninstalls your application, these files are removed. To create and write a private file to the internal storage: 1. Call openFileOutput() with the name of the file and the operating mode. This returns a FileOutputStream. 2. Write to the file with write(). 3. Close the stream with close(). String FILENAME = "hello_file"; String string = "hello world!"; FileOutputStream fos = openFileOutput(FILENAME, Context.MODE_PRIVATE); fos.write(string.getBytes()); fos.close(); MODE_PRIVATE will create the file (or replace a file of the same name) and make it private to your application. Other modes available are: MODE_APPEND, MODE_WORLD_READABLE, and MODE_WORLD_WRITEABLE.  External Storage Every Android-compatible device supports a shared "external storage" that you can use to save files. This can be a removable storage media (such as an SD card) or an internal (non-removable)
  • 28. storage. Files saved to the external storage are world-readable and can be modified by the user when they enable USB mass storage to transfer files on a computer. In order to read or write files on the external storage, your app must acquire the READ_EXTERNAL_STORAGE or WRITE_EXTERNAL_STORAGE system permissions. For example: <manifest ...> <uses-permission android:name="android.permission.WRITE_EXTERNAL_STORAGE" /> ... </manifest>  Network Connection - Store data on the web with your own network server.  Database: SQLite Android comes in with built in SQLite database implementation. SQLite is an open source SQL database that stores data to a text file on a device. SQLite supports all the relational database features. In order to access this database, you don't need to establish any kind of connections for it like JDBC,ODBC e.t.c 1. Create Database In order to create a database you just need to call this method openOrCreateDatabase with your database name and mode as a parameter. It returns an instance of SQLite database which you have to receive in your own object. Its syntax is given below SQLiteDatabase mydatabase = openOrCreateDatabase("your database name"); 2. Insert data in Database We can create table or insert data into table using execSQL method defined in SQLiteDatabase class. Its syntax is given below
  • 29. mydatabase.execSQL("CREATE TABLE IF NOT EXISTS tableName(Username VARCHAR,Password VARCHAR);"); mydatabase.execSQL("INSERT INTO tableName VALUES('admin','admin');"); 3. Fetch data from Database We can retrieve anything from database using an object of the Cursor class. We will call a method of this class called raw Query and it will return a result set with the cursor pointing to the table. We can move the cursor forward and retrieve the data. Cursor resultSet = mydatbase.rawQuery("Select * from tableName",null); resultSet.moveToFirst(); String username = resultSet.getString(1); String password = resultSet.getString(2); Database –Helper Class For managing all the operations related to the database, an helper class has been given and is called SQLiteOpenHelper. It automatically manages the creation and update of the database. Its syntax is given below public class DBHelper extends SQLiteOpenHelper { public DBHelper(){ super(context,DATABASE_NAME,null,1); } public void onCreate(SQLiteDatabase db) {} public void onUpgrade(SQLiteDatabase database, int oldVersion, int newVersion) {} } onCreate() - These is where we need to write create table statements. This is called when database is created. onUpgrade() – This method is called when database is upgraded like modifying the table structure, adding constraints to database etc.