1. ROBIT (R)EVOLUTION
Concept to conception
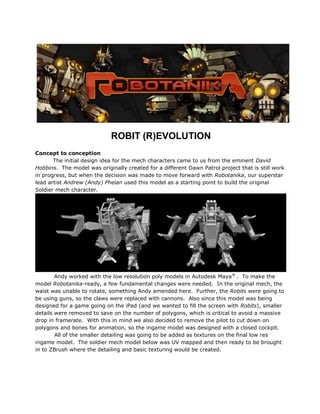
The initial design idea for the mech characters came to us from the eminent David
Hobbins. The model was originally created for a different Dawn Patrol project that is still work
in progress, but when the decision was made to move forward with Robotanika, our superstar
lead artist Andrew (Andy) Phelan used this model as a starting point to build the original
Soldier mech character.
Andy worked with the low resolution poly models in Autodesk Maya®
. To make the
model Robotanika-ready, a few fundamental changes were needed. In the original mech, the
waist was unable to rotate, something Andy amended here. Further, the Robits were going to
be using guns, so the claws were replaced with cannons. Also since this model was being
designed for a game going on the iPad (and we wanted to fill the screen with Robits), smaller
details were removed to save on the number of polygons, which is critical to avoid a massive
drop in framerate. With this in mind we also decided to remove the pilot to cut down on
polygons and bones for animation, so the ingame model was designed with a closed cockpit.
All of the smaller detailing was going to be added as textures on the final low res
ingame model. The soldier mech model below was UV mapped and then ready to be brought
in to ZBrush where the detailing and basic texturing would be created.
2. Andy says; “This is not a step that is always done but I‟m a huge fan of ZBrush so I
prefer to create my detailing and base line texturing here, as this means that any later
changes made to the ingame asset much easier can be moved across through the likes of
XNormal. This has saved me many nightmares in the past when minor changes to models
have led to major changes to the ingame asset UV‟s; the ability to simply be able to transfer
all the map data from ZBrush in one go saves a huge amount of time.”
To save time and be able to reuse animations for all of the Robit characters we had in
store, we decided to base all the models around the one and same rig/skeleton. This put
some restraints on the shape and form of the various characters. We decided that the main
body parts of the Robits would be reused for most of the character lineup. Above is an
example of a heavier Soldier mech type that would use fist rockets. A front shield and some
other details were removed, and rocket launchers are replacing the original cannons.
The ZBrush process
3. To get the models fully ready for ZBrush some extra cuts and edges were added to
help bring out some of the details that would later be included in the texture. The above
model shows three stages of a mech chest plate. (1) is the ingame model that was built in
Maya and that has been split by hand in ZBrush. (2) shows the vamped model in ZBrush with
the detail work added, these are the details that will be transferred via XNormal as a map to
the low res ingame model. Andy created some custom brushes to use for the mechs so that
there would be a consistent look across all the models and their components. (3) shows an
example of how the detail work will appear on the low res ingame asset after the XNormal
map has been applied. To save further on the number of polygons, the two cylinders were
taken out from the ingame model, but the map will still give the impression that the depth and
volume is there.
Color design
Once the details had been added in ZBrush, the team went ahead to create a variety
of color designs for the mechs. Above you can see two of the color variants that were
suggested prior to our Art Director, Silje Nilsen, joined the team on site in Sri Lanka. In the
case of these two examples, we felt that the grey blue color made the mechs too stark
looking, whereas the camouflage color (of which we had several variants) made it hard to
make out the mechs shape, it was simply too „busy‟ for the eye.
One of the very first tasks Silje took on after coming on board was to work out the
color design of the mechs. She says: “There was something about these mechs that
4. immediately intrigued me. They really have character, and it felt like they at any minute could
pop out of the screen and start running around on my desk. I think my love for patterns and
gadgets together inspired these color designs.”
The above image shows one example of the initial design that Silje suggested for three levels
of the Soldier mech. The two grey tones were introduced to help break up the shapes of the
model and give a feeling of sleek and stylish, but heavy, machinery. The front pattern in a
bright accent color was introduced for two reasons. First, the warm bright colors were
introduced to soften up the starkness of the design, and second, the patterns were supposed
to help the player distinguish between the different mech types. These patterns were inspired
by military insignia and were applied in a way that would further help accentuate the mechs
form.
Meanwhile, on a different desk..
Andy went on to create the next set of mechs for the game, again using ZBrush to do
freeform design which helps him get concepts up quickly for the team to see. The image
below shows the cockpit and wheel attachments for the Deathscout, most of the parts are
elements taken from the Soldier and Devastator mechs and further
reshaped and rearranged in ZBrush.
5. From here the new design was then re-meshed to create the ingame model. This image
shows how the mesh was taken from 9.7 million triangles in ZBrush model to a 300 triangle
ingame mesh, while keeping the main shape intact. The model was then exported to Maya for
the creation of its UV map, and in the same way as with the chest plate example above, the
ZBrush model was painted and the detail and textures were transferred using XNormal. About
80 percent of the other mechs were created and designed in ZBrush based on the initial
creation of the Soldier and Devastator mech.
For game design purposes we early on decided on 5 variants of mechs. Of these were
the Soldier mech the generic enemy and the Devastator mech the heavy hitter. Mixed in with
these we designed a suicide mech, the Deathscout, a super hitter, the Sniper, and last but not
least a small and fast mech that were to become the Swarmer. Below you can see turntables
of the five classes in that same order.
6. Turn of events
Around this point in time we decided to move the camera further down, from a
isometric view to a third person over-the-shoulder view. We were also very lucky to have the
wise and generous Richard Lemarchand visiting us, he had a closer look at our game and gave
us some great feedback. His biggest issue was that with a large number of mechs on the
screen at the same time, he had difficulties making out the different types. This made us
7. realize that the front of the mechs needed to be further differentiated, as the insignia pattern
did not prove to be as distinctive as we had hoped. We also came to the conclusion that we
needed to change the silhouettes of each class to help the player out further. Simultaneously,
the Tech team was also having issues with getting the Deathscout and Sniper to move the way
we wanted them to. There was no other way but to rethink the whole lineup.
Andy explains; “In order to make these changes, a lot more modeling work was
required. With a small team and limited time available, we realized that we would not be able
to achieve this across the whole lineup and also retain the quality we wanted. It was decided
that I would go ahead and rework the Soldier and the Devastator, and also do a full redesign
of the Swarmer. We also aimed to create a boss mech for the end battles.”
This image shows two iterations of the end boss, at the time called Hades. We were
planning a massive scale for it, the final model would be 3 times the length of the module you
see here. About 80 percent of this model was fully designed and built in ZBrush which allowed
for a lot of changes to be made on the fly without having to work within the confines of an
ingame model. Hades went through several iterations that we were not happy with, so we took
a weeks break from it and then after coming back to it, Andy came up with the version that
would spark the final design for our whole iron squad. Using the yellow/orange color scheme
from the insignia design, bits and bobs and glowing lights appeared, as well as a mouth grid
that was a close resemblance of massive teeth. This felt like something that suited our mechs
very well!
Another occurrence that further pushed this design was actually the animation. Silje,
whose other hat is lead animator, had started doing rough animations for the characters, and
having been devoted to more cartoony styled animation for quite some time, they came out
far from mechanical looking. She says: “Finding myself pushed on time, I decided to knock out
8. as many animations as I could in the fastest way I knew - which means I thought of the
characters as creatures rather than mechs. As these quick animations came together with the
AI driven behaviours in game, we all found them to be rather charming and to add yet another
layer of life to the Robits. We decided to keep the style, and that inspired Andy further in
adding some funky facial features as he was redesigning them.”
The above image shows the level one Soldier mech redesigned, the character that later came
to be known as Samanfeld in the game. This character is the standards cannon fodder enemy
for the player.
Now it’s starting to look like something!
To accompany Samanfeld, the level 2 Soldier, called Varunaquez, had a more
aggressive face added. A set of jet packs allows him to speed dash from side to side as well as
back and forward to give the player more of a challenge. His bulky silhouette helps distinguish
him from the other Robits.
9. The level 3 Soldier mech seen below is a jumping mech who was given fins to make
him stand out from the ground based soldier models, along with a very distinct face inspired
by the crazy jumping and dodging antics of the animation. This mech is a more complex
enemy for the player, and can be targeted with all of our heroine, Peaches’, weapons. This
character is known as Chaturamour in game.
10. The final enemy soldier, seen below, was the level 4 soldier mech which is always
airborne. The fact that this model was always in the air and a some influence of Sri Lankan
festival masks, inspired this design. This Robit can only be targeted by Peaches‟ pods, making
for a frustrating enemy that you need skill and timing to take down. He came to be named
Nalakastein.
With the soldier models ready it was now time for Andy to take on the redesign of the
Devastator model and to add the same level of character variation there.
Devastators!
The new level 1 Devastator, was created as a heavy hitting light armored version of the
larger soldier mechs, and with a multi barreled back laser pod. This heavy mech was to be the
most mobile of the Devastators and therefore still resembles the soldier design, but would be
1.5 times the scale of the soldier mechs. The change in scale as well as the addition of the
heavy arm weapons and back pod led to this model‟s silhouette making it stand out from the
soldier mechs even in the far distance.
With addition to the change in body size and silhouette we also have the Devastators
firing rockets from their fist, and each devastator fires a different combination of rockets as
well as design for added differences to their classes as well as a different laser effect from
their back pack.
Heeeeere‟s Janaklaus!
11. The level 2 Devastator has a larger backpack, rockets and fins to bulk out his size when
compared to the level 1. Also, the addition of the mohawk do‟ means that in a 3 quarter view
he stands out even further. This guy is a real tough enemy, with the ability to fly out of range
of your cannons, have a super heavy back pack laser that he fires at a regular rate and a
punishing fist rocket attack. So to add to his aggressive attitude Andy made sure that his face
has the degree of menace that this bad boy deserves. His name? Menakong.
12. Then finally for the devastators we have level 3, which is Pathumalas. This guy is a
heavy hitter but his biggest skill is in his ability to soak up damage when he is in his “walling”
state. While in this state he can take a huge amount of damage and can block other mechs
from being hit by the player while allowing them to do the player damage. Pathumalas has
one of the largest silhouettes in game with his huge jetpack and the added shields on his
arms, giving the feeling that he will just soak up all that damage you try to imply on him. He
has a brutish look to his face to match his animation, which made us think of the motion not
unlike that of gorillas.
13. During these final stages of character design it was decided that we would be able to
add a few more characters to the mix. We decided on a Sub Boss class for both the soldier and
devastator class and to add a set of mini mechs that would act as easy targets - that is if you
could hit them. The variety of character designs Andy was able to come up with - and single
handedly build - in such a short amount of time would hardly have been possible without a
system we like to call The Robit Socket System.
14. The Robit Socket System
One of the things we realized once we were going along the route of having only the
walker Robits in the game was that we still were going to need different variants for each class
in order to make the silhouettes stand out. The other thing that we wanted was the ability to
change weapons and backpacks for greater flexibility in the generation of our Robits. We
came up with a socket system method, where a wide range of additional elements could be
placed on to the initial torso model with the help of sockets that would indicate where the
elements would get attached. Below we show a grab from the socket manager.
In the torso on the left, you can see the LeftGun and RightGun sockets, which were both used
for the placement of weapons. When the torso was created the arm was cut just below the
elbow and all of the weapons that were designed were made in such a way that they would fit
this elbow joint. In front of these we see the LeftFire1 and RightFire1 sockets; these are
rotating with the elbow joint and tell the gun particle which way the gun is pointing so the
particles would be fired in the correct direction. Above the torso, the HealthIndicator socket
shows where the Robit’s health bar should get attached. On the torso on the right we have
the BackSocket, which was used for the placement of all the rocket packs and jet packs. On
top of this we have the sockets used to determine where the rocket packs are facing so that
the projectiles would be fired off correctly; the Rocket1 and Rocket2.
Below are the elements that make up the Devastator Sub Boss, called Amaulah in the
game. We can see the head, the rocket pack that has the jetpack added to it, and last the two
separate mace like rocket fists all separated from the torso model. The code places all these
elements on their corresponding sockets using their pivot points derived from Maya. As long as
the pivot point is correct any scaling, rotations or translations will be applied correctly to the
element in game.
15. “This way of creating the Robits came in very handy when at the last hour a new class
was added. These Robits were to be the lowest and smallest, and all put under the class name
of PodiPodi. With the socket system it was very easy to cut and paste the current elements to
create these new Robit characters.” Andy explains. Below you see four different Sub classes
of PodiPodi, they are literally mini versions of Samanfeld, but all sporting the same head to
make them stand out from the other classes. All the minis in game also had a glowing antenna
to make them stand out even more. These guys are half the size of the soldiers so the big
eyes and stark facial features help their character pop even at a distance.
16. Because of how our system worked, the uniform rig and the socket system, even with the
changes in scale the animations were transferable across the different classes. The code
recognizes the backpack being applied to the BackSocket, and makes sure that the correct
animations and behaviors were applied in game. The final addition to the PodiPodi squad was
the mini Robit Sub Boss seen below, called Podapus; this Robit is using the Soldier Sub Boss
backpack and also inherited his animations and behaviors. Podapus is just slightly larger than
the minis, but with all the tricks of the Soldier Sub Boss almost as hard to kill.
There is no doubt that this socket system has great flexibility and enabled us to try out
a great number of Robit variations in a rapid manner, as well as placement of other temporary
art assets in the game while the actual elements were in production. Most importantly it
allowed for quick changes to be done without comprising the art or the code.
17. Back to business!
In the image below is the soldier sub boss called Karunahelm, standing as tall as one of
the Devastators. He is fast and smart and works in conjunction with a twin version, the only
difference being their back samurai style flag which they sport ingame. Karunahelm is like the
allround super soldier and so we went ahead with a samurai style look for him, and in game he
has two glowing antennas on his swords that are attached to his backpack. These guys are
smart and will try to block each others hits so you don‟t get far with just targeting one of
them. Karunahelm also throws in an occasional kick attack for good measure, to make
matters worse.
Following below is the Devastator Sub Boss. This mech is a super heavy hitter and the
biggest mech in game apart from the end level boss. This mech has two fist maces that are
used to pound your character as well as to shoot four rockets at a time. He has a backpack
that fires a super heavy laser and he can fly and shield. This guy is a monster and his metallic
skull like face says it all - this is Amaulah. Once the sub bosses were in game we started work
on the mini‟s and also a mini sub boss.
18. Andy says: “With all these mechs now changed and in game I felt that the swarmers,
who so far had remained untouched, also needed a major change to fit in with the new design
of the more characterful mechs. Janaka, one of the lead programmers had created a
swarming like dynamic to them in game and they had a look of a shoal of fish, so this got me
thinking and after a few iterations the new swarmers made it into the game.”
The swarmers are more of a support mech to the other mechs in game. They are
blocking your rockets, boosting the mechs damage power and healing them - as well as at
times just being mean a driving directly into you to do you damage. So this is why when they
were being redesigned to be more fish-like, they still had to have somewhat of a mean look.
19. Above you see one of the swarmer types redesigned, there are three color variants total in
game. The swarmer has no rig and the only animation is the rotation of the tail, which uses a
material effect, so this makes for a very light ingame model.
Once we had all the mechs in game, and with all the changes that had happened, it
came to light that the original version of Hades was not going to make it in game as the
version that currently existed and so a rethink and hence yet another redesign was needed.
Hades’ name was changed to Kavika, and below you see how she now looks in game,
with her shield in two positions. Kavika moves around the arena like the other flying mechs.
She has the ability to heal and boost all the Robits, and the shield protects her against
Peaches’ attacks. When Kavika wants to directly attack the player she has to rotate her shield
away to reveal her guns and her face, which puts her in a vulnerable state (hint, hint).
20. On the final level, after losing her shield and underslung cannons, she has a final death
blossom mode. We will let you play the game to see what that looks like.
21. Production run repeated
The first stage of the design phase is getting the base model from Autodesk Maya®
into
ZBrush. For the Robotanika mechs Andy used a capped model of the one that was going to
be used in game for the starting phase, and added some extra edges, see below. The basic
shape was passed through for any design changes at this stage - once it got the ok the model
was exported over to ZBrush.
Once the model had been split into its different poly groups to allow for hard edges,
the model was subdivided and the extra detail pieces for pipes and rivets etc. were all added
in ZBrush. This production step is shown in the image below. To unite all the Robit designs,
Andy created custom brushes that could be used across the lineup to retain a similar feeling
despite the different classes. Once all amends were made and the design was approved, the
model would get prepared for poly painting.
22. Below we show the ZBrush poly painted mesh, again the model was sent for approval,
once this was done the model was linked with the ingame mesh in XNormal and the maps
were generated for the ingame mesh. The mesh that is painted in ZBrush does not need any
UV coordinates, as the polypaint is applied to each vertice of the hi-resolution model and is not
a texture. It is important to note however, that the ingame model must have the correct UVs
generated for it prior to being used in XNormal.
23. And last, below you see the ingame mesh. The image shows the stages from the
models ingame wireframe to the fully textured model and far right how it will be seen in game.
All of the mechs in Robotanika went through this process.