
Recommandé
Contenu connexe
Plus de Cimpeanemese
Plus de Cimpeanemese (20)
Dernier
Dernier (20)
Handout online event 31.03.2016 emese
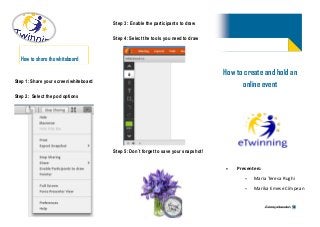
- 1. Step 1: Share your screen/whiteboard Step 2: Select the pod options How to share the whiteboard How to create and hold an online event Presenters: Maria Teresa Rughi Marika Emese Cîmpean Step 3: Enable the participants to draw Step 4: Select the tools you need to draw Step 5: Don`t forget to save your snapshot!
- 2. Step 1 - Events (Create an event) Step 2 - Describe your event (title and short description) Step 3 - Specify the kind of the event: on-site/ online Step 4 - Upload a picture and select the lan- guage of the event Step 5 - Choose the number of participants to the event Step 6 - Specify the type of the event: (partner finding, school/project presentation etc.) Step 7 - Set the preferences about who can attend (anyone in eTwinning; only your con- tacts or restricted to countries/languages) Step 8 - Select an available slot (the duration of the event) Step 9 - Select the date of your event Step 9 - Select a time slot (they are set for CET timezone) Step 10 - Invite contacts to attend Step 11 - Select tools (forum, file archive) Step 12 - Preview your event information Step 13 - Submit Step 14 - Your event has been created. You can enter the meeting room with 24 hours be- fore the time of the event Step 15 - Enter the meeting room and prepare the materials you will need to use for the event Step 16 - Connect audio Step 17 - Adjust your microphone Step 18 - Open your webcam Step 19 - Manage meeting settings Step 20 - Manage layouts (sharing, discus- sion, collaboration) Step 21 - Pods (Share Whiteboard; add notes, chat, files, web links, poll) Step 22 - Now you are ready. Prepare your event and let us know! It is best to work in pairs (at least at the beginning) Pay attention to the rights you allow to your participants (ex. enabling audio) Prepare for the event in advance Be prepared for the unexpected Practice and... practice! You will end up loving it! Good to know Remember the steps!