Guide Complete Set of Residential Architectural Drawings PDF
High tunnels constructiontips
1. Construction Tips
• cordless drill and drill bits (plus
H oop house construction can be
as exacting or casual as you
like. However, not paying
attention to initial details can cost
spares) for the various size
fasteners you plan to use;
• good step ladder;
confidence whenever you are ready.
There is nothing worse than grabbing
an hour here or there to work on a
high tunnel only to find that someone
extra time in the long run, and the • socket set; bumped the stake and all your work is
resulting structure may not look as • drift punch or pipe wrench; now out of line.
nice or stand as long. • miter saw or circular saw;
• speed square; Ground Posts
Two people with good construction As farmers, we are striving for a
• hacksaw or saws-all;
skills can erect a 30' x 96' high tunnel loose, well-structured soil in which to
• power cord; and
in about a week. The 75 to 100 hour grow our plants. But we need a
• tape measures (12', 25', and 100').
estimated completion time assumes medium with the opposite
that all materials are on site. Setting characteristics to support a building.
An experienced high tunnel builder
up the metal frame, installing (If you have concerns about your site
advises: “a cordless drill (preferably
baseboards and hipboards, roll-up and its ability to support a high tunnel,
one with ample batteries) will be your
sides, and building endwalls are check with a qualified professional.)
best friend for fastening those millions
included. Additional time will be
of quarter inch bolts and nuts.”
required for site preparation, utility A high tunnel’s foundation is
installation and covering the tunnel provided by ground posts, which are
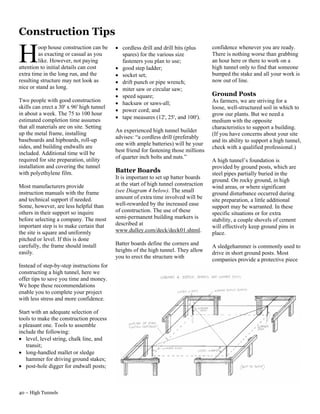
with polyethylene film. Batter Boards steel pipes partially buried in the
It is important to set up batter boards
ground. On rocky ground, in high
Most manufacturers provide at the start of high tunnel construction
wind areas, or where significant
instruction manuals with the frame (see Diagram 4 below). The small
ground disturbance occurred during
and technical support if needed. amount of extra time involved will be
site preparation, a little additional
Some, however, are less helpful than well-rewarded by the increased ease
support may be warranted. In these
others in their support so inquire of construction. The use of these
specific situations or for extra
before selecting a company. The most semi-permanent building markers is
stability, a couple shovels of cement
important step is to make certain that described at
will effectively keep ground pins in
the site is square and uniformly www.dulley.com/deck/deck01.shtml.
place.
pitched or level. If this is done
carefully, the frame should install Batter boards define the corners and
A sledgehammer is commonly used to
easily. heights of the high tunnel. They allow
drive in short ground posts. Most
you to erect the structure with
companies provide a protective piece
Instead of step-by-step instructions for
constructing a high tunnel, here we
offer tips to save you time and money.
We hope these recommendations
enable you to complete your project
with less stress and more confidence.
Start with an adequate selection of
tools to make the construction process
a pleasant one. Tools to assemble
include the following:
• level, level string, chalk line, and
transit;
• long-handled mallet or sledge
hammer for driving ground stakes;
• post-hole digger for endwall posts;
40 – High Tunnels
2. to put in the pipe to protect the end To ensure that the posts are placed at Raising a heavy bow on a wide tunnel
from being damaged or the correct height, use a transit, hose (20' or wider) is best accomplished
“doughnuting.” For a taller structure level, or laser level. Then take down with at least three people. One person
with extended ground posts, John the batter boards and run a high- stands at each leg of the bow, and a
Biernbaum (who researches and strength nylon mason cord between third pushes the bow up in the air with
teaches about high tunnels at the corner ground posts. Pull the a pike pole. This is heavy work. Each
Michigan State University) has found string as tightly as you can to bow will need to be picked up and
that a post or fence pounder works minimize droop over the long wiggled onto the spline/ground posts.
better. distance. Be careful; if a tight nylon Use one or two pike poles to keep the
string breaks, it can hurt someone as bow assembly from falling while the
The ground posts at the four corners the end whips past. crew wiggles it onto the ground posts.
should be solidly cemented in. For
tunnels over 70' long, also cement in The bows – and therefore the ground Purlins
the intermediate ground posts in the posts – of most high tunnels are Purlins help stabilize the high tunnel.
middle of the long sides. Cement must spaced on 4', 5', or 6' centers. A They are bolted to the bows, along the
be placed below the soil freeze zone, wooden template with notches at 4' length of the structure. Typically a 30'
as the freezing action can force the (or whatever the bow spacing is) tunnel will have five purlins,
ground pin up out of the ground. You eliminates the need for the time- including the ridge pole.
may want to use caution when consuming and awkward task of
employing cement as this may move measuring from bow center to center. The purlins can be attached once the
the structure into a ‘permanent’ Ledgewood and Rimol provide their bows are loosely assembled and in
classification. greenhouse customers with these place. A platform is much safer than
spacers. They are also easy to make. ladders and saves a tremendous
Steve Moore suggests a good way to John Biernbaum regards them as amount of time and energy. Use a hay
keep the ground posts in place so they essential for construction. wagon, truck bed, or scaffolding,
don’t pull out of the cement or slide especially if you can pull it along as
down: pre-drill the ground posts Alternatively, Steve Moore you go!
within 2" or 3" of the bottom and recommends measuring from the
insert a 4" to 6" piece of rebar. same side of a post every time to A drift punch or pipe wrench can be
attain an accurate center used to help align bow and purlin
The ground posts need to be in the measurement. Taping the end of the holes. As you attach the purlins,
right location and at the right height. measuring tape to the corner ground tighten all bow bolts, except those that
A jig made with two old boards and post is one simple way to do this. A connect the bow to the ground pin.
some broccoli-type rubber bands or level should be used to ensure the Finally, when you are at the end bow,
thin bungee cords will align the posts posts are vertical/plumb. A post level with all the purlins in place, you are
with the strings between the batter that has bubbles at 90 degree angles is ready to “plumb” the gable end to
boards that outline the high tunnel. useful because both directions can be straighten the entire bow/purlin
(See diagram below.) It will also keep seen at once. assembly.
the posts at the desired height. This
simple device is removed once the Bows Attach one string with a plumb bob to
cement hardens in 12 to 24 hours. Bows typically consist of two or three the top point of the outside edge of the
shorter pieces of metal tubing. last bow, and a second ground string
Preassemble bows loosely. Do not to the outside edge of the bottom bow.
tighten the bolts. This loose bow Allow the plumb bob string to come
assembly will help in purlin within 1/8" of the ground string.
installation. (Purlins are horizontal
pieces typically made of pipe that is a A good way to adjust and hold the
smaller diameter on one end high tunnel plumb is to attach a come-
(swedged) to fit inside the next pipe.) along to a large immovable object like
a tree or truck and then attach a rope
Historically, pike poles were used to or chain from the come-along up to
push up large sections of timber the bow. A come-along’s ratcheting
framing for barns. Pike poles also mechanism and its steel cable allow
have a place in erecting high tunnels. for quick and precise alignment of the
tunnel. Now you can tighten all
41 – High Tunnels
3. remaining bolts and install the wind the bow. Ted Blomgren recommends If you use a rigid gable-end covering,
braces. using a washer on the wood screw. such as polycarbonate, the outside of
the baseboard will need to be flush
Baseboards The frame will be complete after the with the outside of the bow. To make
The baseboards sit on the ground hip board (2" x 6" lumber) along with it flush, attach an 8" piece of universal
along the sides of a high tunnel. They “poly lock” or “wiggle wire” base is corner (a thin-walled piece of angle
are bolted to the ground posts. Use attached to the bows approximately 5' iron with multiple holes for bolting)
1.5" x 8" lumber for baseboards. or 6' off the ground. (Poly lock is the with the same bolts that hold the side
trade name for an extrusion for baseboard.
Consider sourcing your lumber from attaching the polyethylene film to the
local family-owned and operated structure. It serves the same purpose Insulation
sawmills. Often boards from these as wiggle wire.) This will serve as the In cold climates, insulation can make a
mills are sawn several inches longer point of attachment for the plastic significant difference in the
than their designated length, rather covering. performance of high tunnels. In Zone 6,
than being trimmed down to an exact, burying 1" thick by 2' wide rigid foam
even foot measure. This extra length The hip board should be inspected at (i.e. polystyrene) isolates frozen ground
will allow you to cut the ends at a 45 each change of polyethylene to make from growing areas. The thickness and
degree angle for joining together at sure it will be sound for another four depth of insulation should be modified
the bows with a 1/4" machine bolt or five years. Farmers should be according to your climatic zone. This
(see diagram below). aware of rot and ready to replace the foam should be buried at an angle to
baseboard as necessary; the plastic gain more benefit from the thermal
need not be removed to do so. mass of the earth. The angled placement
also makes installation easier and
Gable Ends allows space for the cement support at
Doors should be large enough for the bottom of the ground pin (see
ventilation and easy access. They can diagram below). Insulation can also be
span even the full width of the high used in pathways and along the lower
tunnel. To maximize airflow and portion of the sidewalls.
accessibility, some farmers construct
removable end walls. A smaller,
Use a long 1/4" bit to drill out the personal door that opens inward
holes for the bolt through the wood makes a convenient winter passage.
from the inside of the high tunnel.
This added length is helpful when Unless the high tunnel will have very
attaching framing to bows. wide doors, some tasks such as adding
compost, tilling the soil, and installing
Machine bolts are superior to carriage utilities are best accomplished before
bolts for attaching the poly hold-down the gable ends are closed in and
strips to the baseboard. Carriage bolts access is restricted.
are often used for this purpose, but
they rust fast. When the baseboard Gable end framing can be done with
needs to be replaced, sometimes the steel or wood. If using wood, either
nuts are stuck in place and won’t turn. select one of the rot-resistant species Hiring Out Construction
With a wrench on either side of the recommended for the baseboards (see For some farmers, hiring an
nut and bolt, the machine bolts will materials section) or be prepared to experienced crew to do the installation
break off much faster and easier than replace the wood as needed. Steve may be the best option. The estimated
hack sawing carriage bolts, which Moore uses rough sawn 2 x 4s to frame labor cost for basic high tunnel
only turn in the wood. the gable end. When the wood rots construction used to be fifty cents to
right at the soil line where moisture one dollar per square foot. However,
While bolts may be better for and air meet, rather than take apart the due to inflation, the labor bill for high
attaching the base boards and hip whole assembly, he just pounds in a U- tunnel construction in previous years
boards to the bows, galvanized pipe shaped steel fence post and lag or may not be relevant for estimating
straps can also do a good job, as long machine bolts it to the post that had costs under current conditions. Like
as the pipe strap is also tek-screwed to rotted off. “This buys me a good many any construction project today, expect
more years service,” he says. skilled contractors to be expensive.
42 – High Tunnels
4. Bending Your Own Frames
Rather than purchasing a hoop house kit, some farmers choose to bend their own. A good role model for this activity is
Ed Person of Ledgewood Greenhouse. This New Hampshire farmer went from bending frames for his own use to
developing a substantial independent business that sells and delivers high tunnel frames throughout the Northeast.
For savvy shoppers, fabricating a high tunnel steel frame can save money. It also allows farmers to realize a better
design idea, satisfy unique needs, or add onto an existing high tunnel.
Ted and Jan Blomgren bent several Gothic arch high tunnel frames for their farm. Three people worked for about the
equivalent of one week fabricating the jigs and bending and drilling the component parts for three and a half 30' x 96'
high tunnels with trusses.
At the time, they were able to make their own high tunnel frames for a third of the cost of a kit, thanks to a farmer
friend’s tip about a supplier of economically priced steel. Ted cautions though that purchasing steel from a local chain
link fence supplier might actually cost more than buying a kit with pre-bent, pre-drilled steel.
The Blomgrens’ bows consisted of two long side pieces with a shorter, smaller diameter piece at the ridge. In all, they
used three sizes of steel pipe—1.9", 1.6" and 1.3" diameter for bow, small ridge bow, and purlins, respectively—to
fabricate all the high tunnel components including trusses. The only new tools they needed were a chop saw and drill
press outfitted for cutting and drilling steel. After four years, there is no rust at the bends and the galvanized coating
has not popped off.
They built the two jigs needed for bending the steel for the bows by replicating a bow they had removed from their
existing high tunnel. To bend the steel, they placed a jig, made of two-ply 3/4" plywood and lumber, on the level
cement floor of their garage, braced against its foundation. For the easier, shallow bend, they were able to use their
sedan with a steel cable attached to the trailer hitch. The more acute portion of the bow required the weight and
traction of their heavy John Deere tractor. To compensate for the springback in steel, they bent it until it fit a pattern
they had outlined on the floor.
Bending the bows for a high tunnel can be a simpler process. For example, Thomas Christenfeld, a neighbor of the
Blomgrens, bent the bows for his Quonset-style greenhouse using a silo as a jig. He stuck one end on one of the hoop
bolts that holds the concrete panels of the silo together and bent the other end around the silo. Two people are needed
to get a good enough bend in the pipe and that it probably only works for a single piece hoop. Thomas notes, “You
cannot get any real bend in the ends of the pipe so two pieces stuck together leaves a flat part on top of the hoop house,
which is far from ideal in a snowy climate.”
Another Way to Bend Your Own
Kevin Loth, who is contractor as well as a farmer, has fabricated his family’s 20' x 200' Quonset-style high tunnels
near Lincoln, Nebraska. The Loths have two heated greenhouses and two year round high tunnels. By bending his own
bows, he was able to get twice as much ground under cover than if he purchased kits. His calculation included what he
paid a helper but not his own time. He said if you don’t drill the bows, you could probably bend them in a day, though
set up might take a couple of days.
With a borrowed pipe bender, he made bows out of the 15 gauge metal pipe used as a chain-link fence top rail. He
saved considerably on the pipe by purchasing it by the bundle of 91 pipes. Because the pipe comes in 21' lengths, he
had to swedge together one and a half lengths for each bow. While a swedging tool can be expensive, often when you
buy fencing steel, one end comes already swedged.
His finished tunnels are Quonset-shaped, 10' high at the peak. Their bows are 4' on center, and they have two purlins
but no trusses.
Kevin has attached the purlins and bows in several ways. Holes should be drilled prior to bending the bows. For the
less technically adept, purlin clamp connectors (available from greenhouse suppliers) or pipe clamps (from plumbing
supply outfits) preclude the need to drill holes for the bolts attaching the purlins. Getting these holes to line up properly
can be difficult. Moreover, the very act of drilling holes weakens the steel.
While the purlin connectors are aluminum, Kevin dismisses concern about mixing metals as the tunnel’s steel is
galvanized. He thinks this is less of an issue than drilling holes as that action exposes ungalvanized steel and weakens
the structural pieces. Also he noted that the ends of the bows are in contact with corrosive cement and soil acids.
43 – High Tunnels
5. Covering a High Tunnel stroke, bringing the plastic overhead plastic down to the end and finish the
Farmers employ several methods for so that it clears the peak without gable end. The reason for the
getting the unwieldy expanse of getting caught. staggered start and attachment is to
polyethylene film over the top of large avoid see-sawing the plastic side to
hoop house structures and evenly The two people walking along the side. The lead attachers must always
attached. The size of your crew helps sides can have an exceedingly long keep the selvage edge the same while
determine which methods are most way to pull the plastic. When they the other side pulls the plastic to
feasible. The most important rule of reach the middle of a long tunnel, two match.
thumb is never attempt to cover a more people standing at the original
tunnel on a windy day. gable end should assist pulling the Getting all of the wrinkles out is not
plastic along. These additional people important if you are going to inflate. It
Covering a large (i.e., 30' x 96') high also help keep the plastic from is important not to pull the poly film
tunnel with a single layer of poly becoming a sail if a sudden gust of so tight that the wiggle wire in the U
should take four or five people two or wind comes along. channel perforates the new plastic.
three hours. There is a learning curve
so the first few times may take longer. After the whole tunnel has been A variation on the pull-over-the-end
covered, it’s time to even out the method of covering a high tunnel is
Method A: Pull over the end. plastic. The selvage edge must be used by the Kilpatrick family. They
For this method, four or five people even for the entire length of the tunnel set up the plastic on scaffolding at one
and a center-folded roll of and should be 12" or longer. You end of the tunnel as described above.
polyethylene are required. (You can don’t want the edge to run out! “Make sure the scaffolding is above
order your polyethylene folded in the peak of the structure. While one
several ways.) If you are putting a second covering person pulls the plastic down the
on, just tack it on the first layer using length of the high tunnel, the others
The first step is unrolling the plastic. just a couple strategically placed poly assist from the ground.” Philip and
To do this, set up a pair of fasteners (i.e., wiggle wire) and repeat Michael Kilpatrick have found that for
cinderblocks a few feet further apart the process with the second covering. work on the purlins, scaffolding
than the length of the roll of Otherwise, proceed to the next step. mounted on a cart is far more
polyethylene. For a 12' tube, set the convenient than using a ladder.
blocks about 14' apart. Then put a Once you are satisfied that the plastic
pipe in the tube. Make cardboard is even on the edge, temporarily Method B: Ridge-roll.
washers about 1' square to put on the secure the plastic in place at three or This is one of the two ways that the
ends of the pipe. The washers serve to four points on each side. The most Blomgrens cover their tunnels. (The
protect the ends of the rolled up common method for securing the other way is described in Method C.)
polyethylene from abrasion against plastic is wiggle wire inserted into a U Both methods involve climbing up the
the cinderblocks when you unroll it. channel. An alternative assembly is high tunnel and thus entail danger.
This set up should allow the plastic to homemade—wood attached with Use these methods at your own risk.
freely unroll. drywall screws every 6" to 8".
Covering a high tunnel with a lean
The next step, getting the plastic over Now you are ready to fully secure the crew (four people) necessitates a
the tunnel, requires five people. One single or double layer of plastic. The different method. Once again, make
person is stationed on a ladder at a person on the ladder inserts wiggle sure to obtain greenhouse plastic with
gable end of the high tunnel. Wearing wire from the top down on one of the its fold down the center so it will
a hooded sweatshirt is recommended gable ends. Next the plastic film at the unfurl properly.
to avoid plastic rubbing and to other gable end should be pulled and
counteract the static electric generated that plastic “tacked” down. Once one In this technique two people carry the
by moving the plastic film over head. gable-end plastic is permanently entire roll of poly up to the top of the
The center of the end of the poly is attached and the other gable end has high tunnel. A bucket loader is handy
passed to the person on the ladder. been “tacked” in place (with a short for this purpose. Before climbing up,
The film unrolls as it is pulled up the wiggle wire), one side can be attached they insert a pipe into the cardboard
ladder. Two people on the ground for a distance of about three bows. tube to assist in unrolling it. With the
hold the corners and walk along side Remember to keep a constant selvage roll sitting on the top purlin, they
the tunnel as the plastic is unfurled. (waste) edge. Another person (or two) temporarily fasten it on the gable end
Meanwhile the person on the ladder starts on the opposite side of the first of the tunnel. Then they proceed to
does a sort of butterfly swimming group and both groups attach side walk it down the tunnel, making use
44 – High Tunnels
6. of the side purlins, walking the roll For a big tunnel (30' x 96' or 150'), at If you choose to use wooden batten
along as they go. By the time the pair least eight people are needed for this boards to fasten the plastic to the hip
has walked halfway down the tunnel, method. Start by unrolling the plastic board, you would be wise to use a pair
the plastic will have begun unfurling, (without unfolding it) along the side of batten boards one above the other
with half falling down one side and of the high tunnel. If there is a risk of with the plastic outside of the top one
half down the other. (This unrolling the slightest wind, it is best to be on and behind the bottom one. This more
procedure will go much more quickly the windward side of the tunnel. effectively locks the poly in place.
if the high tunnel is designed so that (See diagram below.)
the ridge purlin is situated on top of After the plastic has been unrolled,
the bow. This is an atypical purlin people station themselves at regular
placement and is only advisable for intervals along the tunnel. They each
tunnels that will never be covered take hold of what will become the far
with a double, inflated layer of poly.) edge of the poly. Pulling this edge,
they climb up and over the tunnel.
Meanwhile the two other people, who With enough people, the weight of the
are on the ground, are starting to poly is distributed and not
tentatively connect the poly to the hip burdensome to anyone.
board just above the roll up sides.
Once the plastic is over the top of the
After the plastic has been unrolled structure, it is squared up, and then
along the entire length of the tunnel, temporarily fastened to the gable
the two people who have been ends. They then proceed as in the
walking the ridge with the roll of poly above description, with teams starting
temporarily connect the poly with from opposite sides of one end and After you have to undo rusty screws
wiggle wire at the top of the second both working toward the far end. or other failing attachments to remove
gable end. They then climb down and old poly, you will probably come to
join the two folks on the ground. With There is an alternative to climbing up believe that wiggle wire is a bargain at
two people on each side of the tunnel, and over the greenhouse. Ropes may a $1 per foot. When attaching new
they square up the plastic, and then be attached to the plastic along its poly with wiggle wire, don’t pull the
begin attaching the plastic along the side. Clips available from greenhouse poly too tight (or over inflate). The
top of the roll up sides. With the two suppliers can be used to secure the wiggle wire will actually cut
teams working on opposite sides of rope to the plastic. Alternatively, wrap perforations (corresponding to the
the tunnel, they start at one end, and tennis balls in the plastic and use them wiggle wire) in the new cover if there
work toward the other end. to help fasten the rope. Toss the ropes is too much tension. This applies to
over the tunnel structure and, once on double layers of poly, too.
They then finish the gable ends, the other side, pull the plastic over.
taking up the slack and smoothing out When attaching plastic to battens (thin
wrinkles, before permanently boards less than 1/2" x 1-1/2"), use
attaching it there. They trim off the Tips for Attaching the double headed nails—rather than
regular nails—for easier removal.
excess plastic at the gable ends so it Plastic
doesn’t flap in the wind. To complete Galvanized screws are another option.
Single poly can be difficult to keep on
the covering, the roll up sides must be a structure because there is no tension
attached. from an inflation fan to reduce
flapping. Steve Moore has used wide
Method C: Over the side. poly strapping placed between every
Like the previous method, this other bow and attached to the
covering procedure used by the baseboard to keep the cover in place.
Blomgrens has safety and liability This increases the longevity of the
issues. As an alternative to climbing plastic film, and also reduces a
over the tunnel frame, Steve Moore farmer’s worry about losing the
suggests attaching grommets to the plastic on the tunnels (and sleep) on
plastic and using ropes to pull it over windy nights.
the structure.
45 – High Tunnels
7. Getting the Right Pressure on Your Inflation
Correct pressure ensures a balance between over and under inflation. By providing sufficient tightness of the plastic,
flapping is minimized. If the plastic is stretched too tightly, light transmission is reduced. Simply put, correct pressure
increases the life of the plastic and its ability to transmit light.
A manometer is an instrument used to measure the pressure of a gas. For high tunnels with a double poly layer, it is
useful for determining the proper inflation pressure. Steve Moore makes his own homemade manometer using this
simple procedure.
On the inside of the tunnel, attach a 2" x 8" (or wider) board with carriage bolts to two of the bows at a 4' to 6' height.
(This board can be used to mount the inflation fan as well.) After covering the high tunnel with the first layer of poly, a
4" to 6" square piece of polycarbonate is attached with drywall screws to the wood before the tunnel is covered with a
second layer of poly.
From the interior of the tunnel, drill a hole through the wood, the inside layer of plastic and the small piece of rigid
material. From the inside, push a clear flexible plastic tube (available by the foot at most hardware store) into the
wood, allowing the tube free access to the air between the layers. The tube's internal diameter can be from 3/4" to 1".
Caulk around the tube so that it is airtight to prevent leaks.
Let the tube form a "U" with one of the top legs of the U going through the wood. Attach the other top of the U tube to
the board and fill the bottom of the U with a colored liquid (blue washer fluid or colored water). Mark level horizontal
lines ¼ of an inch apart on the board next to the U portion of the clear tube. If the interior air level of the U is ¼ inch
higher than the inflation side of the U, then the pressure is about right. The liquid level on the side of the U that is
attached to the board should be 1/4 " lower than the side of the U that is open to the inside of the tunnel.
Adjust the pressure by using a damper on the intake of the inflation fan. You can make a damper with a flat piece of
metal, like an old can lid (taped to keep from cutting yourself). Insert a screw through the top edge of the metal lid.
Attach it tightly enough to the intake of the inflation fan that it will stay in place at various degrees of opening.
Steve has used solar power to run the inflation fan and his monitoring equipment.
46 – High Tunnels