Producing yam mother plants to collect vines for propagation
•
1 like•454 views

Producing yam mother plants to collect vines for propagation

Recommended
More Related Content
What's hot
What's hot (20)
Similar to Producing yam mother plants to collect vines for propagation
Similar to Producing yam mother plants to collect vines for propagation (20)
More from International Institute of Tropical Agriculture
More from International Institute of Tropical Agriculture (20)
Recently uploaded
Recently uploaded (20)
Producing yam mother plants to collect vines for propagation
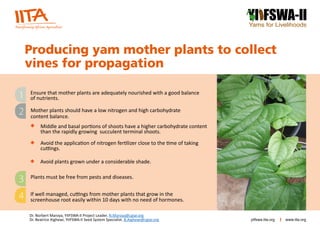
- 1. Producing yam mother plants to collect vines for propagation YI FSWA Yams for Livelihoods II - Mother plants should have a low nitrogen and high carbohydrate content balance. Middle and basal portions of shoots have a higher carbohydrate content than the rapidly growing succulent terminal shoots. Avoid the application of nitrogen fertilizer close to the time of taking cuttings. Plants must be free from pests and diseases. If well managed, cuttings from mother plants that grow in the screenhouse root easily within 10 days with no need of hormones. 1 2 3 4 Ensure that mother plants are adequately nourished with a good balance of nutrients. Avoid plants grown under a considerable shade. www.iita.org yiifswa.iita.org Dr. Norbert Maroya, YIIFSWA-II Project Leader. N.Maroya@cgiar.org Dr. Beatrice Aighewi, YIIFSWA-II Seed System Specialist. B.Aighewi@cgiar.org
- 2. Making single-node vine cuttings for yam propagation YI FSWA Yams for Livelihoods II - Select healthy mother plants. Use pruning shears (or other shape implement) to cut the main vine from the mother plant leaving at least two nodes to produce new shoots. Place the cut vines into a container of water, ensuring that cut surfaces are submerged to prevent dehydration. Make a clean cut through the vine at an angle, with each cutting containing one bud, one leaf, and about 1 cm stem piece on either side of the node. Drop the cuttings into a broad-spectrum fungicide solution. The cut surfaces of the single-node cuttings must not be allowed to dry before or after planting. Plant the nodal cuttings in a moist medium as soon as possible, firming the substrate around the stem portion. Ensure that the leaf is well exposed after planting. Apply water as necessary to maintain leaf turgidity always. 1 2 3 4 5 2 3 4 5 1 www.iita.org yiifswa.iita.org Dr. Norbert Maroya, YIIFSWA-II Project Leader. N.Maroya@cgiar.org Dr. Beatrice Aighewi, YIIFSWA-II Seed System Specialist. B.Aighewi@cgiar.org
- 3. Maintenance of yam nodal vine cuttings after planting YI FSWA Yams for Livelihoods II - Do not apply too much water to avoid a loss of nutrients through leaching. The addition of organic matter to the planting medium before planting increases its water retention capacity. Where automatic sprinklers are used, adjust the timers to suit ambient conditions. Ensure that leaves stay turgid especially during the first two weeks of planting (flaccid or rolled up leaves indicate dehydration). Apply fertilizer when rooting starts (from about eight days) then as needed depending on the type of substrate used. 1 2 3 4 5 Apply water to the substrate in the morning and/or evening when the temperature is lowest to reduce water loss from evaporation. www.iita.org yiifswa.iita.org Dr. Norbert Maroya, YIIFSWA-II Project Leader. N.Maroya@cgiar.org Dr. Beatrice Aighewi, YIIFSWA-II Seed System Specialist. B.Aighewi@cgiar.org
- 4. Producing seed yam from nodal vine cuttings planted directly in outdoor beds YI FSWA Yams for Livelihoods II - Select healthy mother plants in the screenhouse. Cut the main vine (stem) from the mother plant leaving at least two nodes to produce new shoots. Place the cut vine into a container of water. Make a clean cut through the vine; each cutting must contain one bud, one leaf, and about 1 cm stem piece on either side of the node. Place the cuttings in a broad-spectrum fungicide solution. Prepare nursery beds of 1-1.4 m width and a convenient length. Place about 3 cm thick of mulch (e.g., cured rice husk, cocopeat) on the bed. Provide a good shade to protect the cuttings from exposure to direct sun. Plant the cuttings on well-watered beds with the leaf well exposed. Water the beds frequently and mist cuttings to avoid excessive moisture loss. Nodal yam vine cuttings Healthy mother plants in a screenhouse Newly planted yam nodal cuttings Growth from cuttings at 4 weeks Lush growth after 12 weeks Tubers harvested 16 weeks after planting 1 2 3 4 5 6 7 8 9 10 Maintain good agronomic practices and harvest tubers after 4−5 months. www.iita.org yiifswa.iita.org Dr. Norbert Maroya, YIIFSWA-II Project Leader. N.Maroya@cgiar.org Dr. Beatrice Aighewi, YIIFSWA-II Seed System Specialist. B.Aighewi@cgiar.org
- 5. Producing yam minitubers in containers using single node cuttings YI FSWA Yams for Livelihoods II - Maintain disease-free mother plants in the screenhouse to harvest vines. Prepare the substrate for planting and place in containers. Cut the vine off the mother plant and place in water. Make nodal cuttings, each containing one bud, one leaf, and about 1 cm stem piece on either side of the node. Plant the nodal cuttings in a moist substrate. Provide adequate moisture to maintain leaf turgidity, initiate rooting, and for good establishment. Stake plants were possible and apply fertilizer, as necessary. Harvest carefully at 3-4 months after planting. 1 2 3 4 5 6 7 8 Note The size of container, amount and quality of substrate, fertilizer regime, and crop duration will determine the minituber size. Using virus-free mother plants and producing minitubers in a disease and pest-free environment, minitubers of even less than 1 g have great potential for seed yam production. Dr. Norbert Maroya, YIIFSWA-II Project Leader. N.Maroya@cgiar.org Dr. Beatrice Aighewi, YIIFSWA-II Seed System Specialist. B.Aighewi@cgiar.org www.iita.org yiifswa.iita.org
- 6. Producing seed yam from minitubers in the field YI FSWA Yams for Livelihoods II - Select healthy yam minitubers (0.1−10 g) that have broken dormancy. Prepare friable soil that has good organic matter content. The soil should be free of nematodes, noxious weeds, stones and gravel. Make ridges spaced 75−100 cm apart. Plant directly in moist soil when the rains are established or pre-sprout minitubers in a suitable substrate before planting in the field. Plant minitubers at 10 cm between plants to have a density of at least 100,000 plants/ha (10 x 100 cm). Keep the crop weed-free. 1 2 3 4 5 6 7 Sprouted minitubers ready for planting Plants from minitubers with a population of 100,000 stands/ha www.iita.org yiifswa.iita.org Dr. Norbert Maroya, YIIFSWA-II Project Leader. N.Maroya@cgiar.org Dr. Beatrice Aighewi, YIIFSWA-II Seed System Specialist. B.Aighewi@cgiar.org
- 7. Producing seed yam from minitubers in the field The trellis method of staking is recommended to reduce cost of staking materials and optimize the yield potential. The rate of fertilizer application depends on the fertility status of the soil and may not be necessary on fertile soil. Harvest tubers carefully to avoid injury at 4-5 months after planting (MAP). Sort the tubers into different size categories. Treat with an insecticide and fungicide mixture and allow cuts to cure properly before storage. Store in a cool and well-ventilated place. Inspect regularly and discard rotted tubers. 8 9 10 11 12 13 Seed yam harvested at 5 MAP Plants from minitubers at about 3 MAP Note The size of minituber planted, plant population, crop husbandry, and crop duration are major determinants of the individual seed tuber size and overall yield. www.iita.org yiifswa.iita.org Dr. Norbert Maroya, YIIFSWA-II Project Leader. N.Maroya@cgiar.org Dr. Beatrice Aighewi, YIIFSWA-II Seed System Specialist. B.Aighewi@cgiar.org
- 8. Substrates for rooting yam nodal cuttings and/or producing minitubers YI FSWA Yams for Livelihoods II - Using soilless mixes gives growers more control over the management of their inputs (nutrients, labour, pesticides, and water, and eliminate biotic challenges (fungi, bacteria). Soilless substrates include rice husk, coco peat and sand. Topsoil is also used. Rice husk (Rice hull): Very good substrate and soil conditioner as it contains Phosphorous (P), Potassium (K), Calcium (Ca), Magnesium (Mg), and micronutrients that are essential for plant growth. It should be carbonized or composted well before use. Carbonization: Apply heat to coarse rice husk, stirring frequently until it turns black without producing ash. Composting: Use powdery husk. Soak well with water and arrange in heaps. Temperature within the heap will rise rapidly before dropping to ambient condition, then it is ready for use. Cover the heap or bag and keep composted rice husk to prevent rainfall from leaching out its nutrients. 1 www.iita.org yiifswa.iita.org Dr. Norbert Maroya, YIIFSWA-II Project Leader. N.Maroya@cgiar.org Dr. Beatrice Aighewi, YIIFSWA-II Seed System Specialist. B.Aighewi@cgiar.org Composted rice husk Carbonized rice husk
- 9. Coco peat: Good growing media with acceptable pH, electrical conductivity, and other chemical attributes if well drenched before use. It is highly porous and can hold 8-9 times its weight in water. Sand: It should be fumigated or steam-pasteurized before use. Sand has no mineral nutrients, no buffering capacity or cation exchange capacity (CEC). It should be used in combination with other substrates or in hydroponics (sandponics). Sieve, wash, and treat in 3.5% Sodium hypo chloride solution. Rinse thoroughly before use. Topsoil: Made up of sand, silt, clay, and organic matter (living and dead organisms) in varying proportions. Sterilize topsoil to eliminate harmful biotic components. Composite substrates: Rice husk, coco peat, sand and topsoil can be combined in different proportions. Ensure that the mix has good water-holding capacity and porosity. It must have a low level of salinity, high CEC, and be devoid of harmful organisms and substances. 2 3 4 5 Substrates for rooting yam nodal cuttings and/or producing minitubers www.iita.org yiifswa.iita.org Dr. Norbert Maroya, YIIFSWA-II Project Leader. N.Maroya@cgiar.org Dr. Beatrice Aighewi, YIIFSWA-II Seed System Specialist. B.Aighewi@cgiar.org Topsoil River sand Coco peat