1. Introduction to Microsoft Access
Part 5 – From Database to Application
If you want your database to be used in an office environment, you will want to take
some steps to make your database user-friendly and secure. You've already taken
some steps in this direction by creating helpful data entry forms.
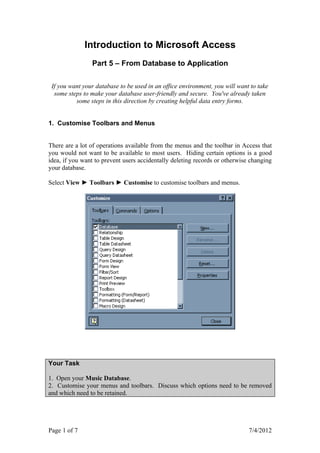
1. Customise Toolbars and Menus
There are a lot of operations available from the menus and the toolbar in Access that
you would not want to be available to most users. Hiding certain options is a good
idea, if you want to prevent users accidentally deleting records or otherwise changing
your database.
Select View ► Toolbars ► Customise to customise toolbars and menus.
Your Task
1. Open your Music Database.
2. Customise your menus and toolbars. Discuss which options need to be removed
and which need to be retained.
Page 1 of 7 7/4/2012
2. 2. Custom Help
1. You can create your own Help File with the Windows Help Compiler. Help files
can include hyperlinks and screenshots to provide easy-to-understand information for
the user.
2. You can set Tool Tips that appear when the mouse is held over a particular button
or control. To set a Tool Tip for a toolbar button, first select View ► Toolbars ►
Customise and, with the Customise dialog box open, click the Right Mouse Button
on a button. You should see this menu:
Select Properties to see the properties for that button:
Enter your Tool Tip.
Page 2 of 7 7/4/2012
3. 3. A What's This tip appears when you select What's This? from the Help menu or,
alternatively, press SHIFT+F1. If you want to create your own What's This Tip you
have to use the Windows Help Compiler to create the file and then assign the Help
File to the toolbar button's Properties (see previous page).
4. You can create Control Tips for controls (e.g. combo or list boxes or just data
boxes) on your forms. First, take the form to Design View and then select the
Properties box for the control. In the ControlTipText property, you can type up to
255 characters.
Your Task
1. Open your Music Database.
2. Open a Form and add a ControlTip.
3. Add Status Bar Text to the control. You enter this in the same way as for the
ControlTip. Add up to 255 characters to the Status Bar Text property.
Page 3 of 7 7/4/2012
4. 3. Setting Startup Options
This is where you actually turn your database file into an application. You will
control how the database looks when it starts and set a form to open when the
database starts up.
1. Select Startup from the Tools menu to see the following dialog box:
2. First of all, give your application a name. This will appear in the blue Title Bar at
the top of your application.
3. Next, assign an Icon to your database. An icon file has a .ICO extension. You
will find lots of icons already on your computer and others can be downloaded from
http://www.winfiles.com/apps/98/icons.html
4. You can untick the boxes that allow the user access to menus, including Shortcut
Menus (a shortcut menu is a menu that appears when the user clicks the right mouse
button).
5. You can decide whether or not you want the user to be able to see the Database
Window. The database window is the window that contains your tables, queries,
reports and forms. You can set the Display Form to start a data entry form when the
application is started.
Your Task
Give your application a title, assign an icon to it, prevent the user from viewing
toolbars and shortcut menus and hide the database window. Set an form to open when
the application is started.
Close your database down and then open it once again. You have now run your
application for the first time! You should notice that the menus are much restricted
and only one form of the database should be accessible.
To start your application normally, hold down the SHIFT key when it starts. You
should then have full administrator access to the database.
Page 4 of 7 7/4/2012
5. 4. Create a Switchboard Form
If you set a form to display on start-up and also hide the Database Window, the
problem will be that the user can access only one form. If you want the user to be
able to access several functions of your database and yet you still want to hide the
Database Window, the solution is to create a Switchboard Form.
1. Select Tools ► Add-ins ► Switchboard Manager. If Access asks you if you
want to create a switchboard form, select Yes. When the Switchboard Form has
been created, click Edit.
2. Give your switchboard a name and then click New.
Add a switchboard button for each of the items in your database (e.g. forms, reports,
queries) that you want the user to have access to.
3. Click Close when all the Switchboard Items have been added and your
Switchboard Form will have been created. You will be able to see your new form in
the Forms tab of the Database Window and you can edit it like any other form.
4. You will now need to change your Startup Options and make the Switchboard
Form open when the application starts.
Your Task
Create a Switchboard Form for your application and have it start when the
application is started. Ensure that the Database Window is invisible.
Page 5 of 7 7/4/2012
6. 5. Adding Security to Your Application
1. You can make any object in the Database Window invisible. Click the Right
Mouse Button and select Properties. Select Hidden and then click OK.
2. Encrypting a database will compact the database file and make it indecipherable.
Select Tools ► Security ► Encrypt/Decrypt Database. First you have to select the
database file that you want to encrypt and then you name the encrypted version.
3. You can password-protect the database by selecting Tools ► Security ► Set
Database Password.
4. User-level security is the most flexible method of securing a database, if you have
multiple users. The operation is similar to setting access levels on a network. By
default, there are two categories of user (you can add more): Administrators (e.g.
yourself, the network manager) and Users. The two categories of user have different
Permissions i.e. different access levels.
The purpose of setting user-level security is to prevent data being damaged, to prevent
users accidentally damaging the database and to protect sensitive information (you
can make certain tables and forms invisible to certain users.
For Discussion
What sort of security would be appropriate for your database?
When might encryption be useful?
When might you want certain data to be invisible from certain users?
What other security procedures could a business follow?
What are the legal obligations on businesses regarding data security?
Page 6 of 7 7/4/2012
7. 6. Putting Your Application on the Web
1. You can create Hyperlinks on forms, reports and datasheets. To make a hyperlink
that changes with each record, set the Data Type of that field to Hyperlink. The
hyperlink must start with the recognised protocol of http://.
2. Select Save As HTML from the FILE menu to launch the Web Publishing
Wizard:
There is a difference between a Static and a Dynamic web page. A Static web page
is a document e.g. a report being published to the web. A dynamic web site is an
online application that interacts with the user. Dynamic web sites are powerful web
applications that could revolutionise commerce and many other aspects of society.
Use Save As/Export from the File menu to save an Access object (e.g. a Report or a
Table) in static HTML format. This file can then be uploaded to a web site.
Use Save As HTML from the File menu to create a web application.
3. You can add a web page to an Access Form. Select the Microsoft WebBrowser
Control from the toolbox.
Your Task
1. Open the Artists Database and select the Artists table. Add a field called
WebSite. Then open the Artists form (if there isn't one, create one) and enter some
URLs into the database. Clicking on a Hyperlink should jump to the appropriate
web site.
2. Save the Artists Table as an HTML file.
Page 7 of 7 7/4/2012