1. Working With Selections
Working with Selections
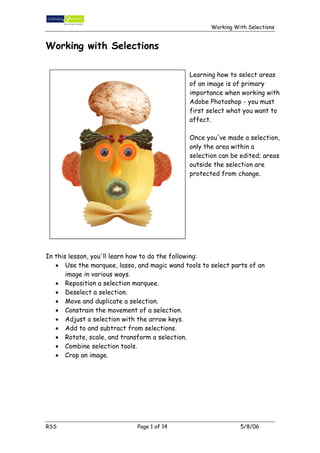
Learning how to select areas
of an image is of primary
importance when working with
Adobe Photoshop - you must
first select what you want to
affect.
Once you've made a selection,
only the area within a
selection can be edited; areas
outside the selection are
protected from change.
In this lesson, you'll learn how to do the following:
• Use the marquee, lasso, and magic wand tools to select parts of an
image in various ways.
• Reposition a selection marquee.
• Deselect a selection.
• Move and duplicate a selection.
• Constrain the movement of a selection.
• Adjust a selection with the arrow keys.
• Add to and subtract from selections.
• Rotate, scale, and transform a selection.
• Combine selection tools.
• Crop an image.
RSS Page 1 of 14 5/8/06
2. Working With Selections
Tool overview
In Adobe Photoshop, you can make selections based on size, shape, and
color using four basic sets of tools-the marquee, lasso, magic wand, and pen
tools. In addition, you can use a fifth tool, the move tool, to reposition the
selections you create.
.
A. Marquee Tool B. Move Tool
C. Lasso Tool D. Magic Wand Tool
The marquee and lasso tool icons contain hidden tools, which you can select
by holding down the mouse button on the toolbox icon and dragging to the
desired tool in the pop-up menu.
The rectangular marquee tool lets you select a rectangular area in an
image. The elliptical marquee tool lets you select elliptical areas. The
lasso tool lets you make a freehand selection around an area.
The polygon lasso tool lets you make a straight-line selection around an
area. The magnetic lasso tool lets you draw a freehand border that
snaps to the edges of an area.
The magic wand tool lets you select parts of an image based on the
similarity in color of adjacent pixels. This tool is useful for selecting odd-
shaped areas without having to trace a complex outline using the lasso tool.
You can also use the crop tool to crop an image.
Getting started
1. Open the finished art file for this lesson to see what you'll be creating.
2. Choose File > Open then select SelectEnd.psd and click Open. An image
of a face, constructed using various types of fruits and vegetables, is
displayed.
3. If you like, choose View> Zoom Out to make the image smaller and leave
it on your screen as you work. If you don't want to leave the image
open, choose File > Close.
4. Now open the start file to begin the lesson.
5. Choose File > Open. Locate Selecting.psd, and click Open.
RSS Page 2 of 14 5/8/06
3. Working With Selections
Selecting with the rectangular marquee tool
You'll start by practicing selection techniques using the rectangular
marquee tool.
1. Click the rectangle marquee tool in the toolbox.
2. Drag it diagonally from the top left to the bottom right corner of the
melon to create a rectangular selection.
3.
Initial Selection Marquee tool placed Selection border
Within selection repositioned
You can move a selection border after you've created it by positioning
the tool within the selection and dragging. Notice this technique
changes the location of just the selection border; it does not affect the
size or shape of the selection.
4. Place the marquee tool anywhere inside the selection surrounding the
melon. The pointer becomes an arrow with a small selection icon next to
it.
5. Drag to reposition the border around the melon.
If you are still not happy with the selection after repositioning it, you can
deselect it and redraw it.
6. Deselect the selection by using either of these methods:
Choose Select > Deselect.
Click anywhere in the window outside the selection border.
7. Reselect the melon using the rectangle marquee tool.
8. To back up one action at any point in the lesson, choose Edit > Undo.
RSS Page 3 of 14 5/8/06
4. Working With Selections
Selecting with the elliptical marquee tool
Next you'll use the elliptical marquee tool to select eyes for the face
1. Select the zoom tool , and click twice on the blueberry to zoom in to
a 300% view.
2. Hold down the mouse button on the rectangular marquee tool, and drag
to the elliptical marquee tool .
3. Move the pointer over the blueberry, and drag it diagonally from the
top left to the bottom right edge of the blueberry to create a
selection. Do not release the mouse button.
Repositioning a selection border while creating it
If a selection border isn't placed exactly where you want it, you can adjust
its position and size while creating it.
1. Still holding down the mouse button, hold down the spacebar and drag
the selection. The border moves as you drag.
2. Release the spacebar (but not the mouse button), and drag again.
Notice that when you drag without the spacebar, the size and shape of
the selection changes, but its point of origin does not.
Incorrect point of origin Corrected point of origin Adjusted border
(Click and drag) (Spacebar depressed) (Spacebar released)
3. When the selection border is positioned and sized correctly, release
the mouse button.
Selecting from a center point
Sometimes it's easier to make elliptical or rectangular selections by
drawing a selection from the center point of the object to the outside
edge. Using this method, you'll reselect the blueberry.
1. Choose Select > Deselect.
2. Position the marquee tool at the approximate center of the blueberry.
3. Click and begin dragging. Then without releasing the mouse button, hold
RSS Page 4 of 14 5/8/06
5. Working With Selections
down Alt (Windows) and continue dragging the selection to the
blueberry's outer edge. Notice that the selection is centered over its
starting point.
4. When you have the entire blueberry selected, release first the mouse
button and then the Alt key.
If necessary, adjust the selection border using one of the methods you
learned earlier.
Moving a selection
Now you'll use the move tool to move the blueberry onto the carrot slice to
create an eye for the face. Then you'll duplicate and move the selection to
make a second eye.
1. Make sure that the blueberry is selected. Then click the move tool ,
and position the pointer within the blueberry's selection. The pointer
becomes an arrow with a pair of scissors to indicate that dragging the
selection will cut it from its present location and move it to the new
location.
2. Drag the blueberry onto the carrot slice.
Move tool placed Blueberry moved onto
within blueberry carrot slice
selection
3. Choose Select > Deselect.
4. Choose File > Save.
Moving and duplicating simultaneously
Next you'll move and duplicate a selection simultaneously.
1. Choose View > Fit on Screen to resin the document to fit on your
screen.
2. Select the elliptical marquee tool.
3. Drag a selection around the carrot slice containing the blueberry. If
necessary, adjust the selection border using one of the methods you
learned earlier.
RSS Page 5 of 14 5/8/06
6. Working With Selections
4. 4 Click the move tool, then hold down Alt, and position the pointer
within the selection. The pointer becomes a double arrow, which
indicates that a duplicate will be made when you move the selection.
5. Continue holding down Alt/Option, and drag a duplicate of the eye onto
the left side of the melon face. Release the mouse button and
Alt/Option, but do not deselect the eye.
Holding down Shift when you move a selection constrains the
movement horizontally or vertically. Using this technique, you'll drag
a copy of the left eye to the right side of the face so that the two
eyes are level.
6. Hold down Shift+Alt and drag a copy of the eye to the right side of the
face.
7. Choose File > Save.
Eye moved onto left side of face Duplicate of eye moved with Shift+Alt
Moving with a keyboard shortcut
Next you'll select the kiwi fruit for the melon's mouth and then move it
onto the melon using a keyboard shortcut. The shortcut allows you to
temporarily access the move tool instead of selecting it from the toolbox.
1. Select the elliptical marquee tool from the toolbox.
2. Drag a selection around the kiwi fruit using one of the methods you
learned earlier.
3. With the marquee tool still selected, hold down Control, and position
the pointer within the selection. A pair of scissors appears with the
RSS Page 6 of 14 5/8/06
7. Working With Selections
pointer to indicate the selection will be cut from its current location.
4. Drag the kiwi mouth onto the face. Do not deselect.
Selection to be cut Selection moved onto melon
Moving with the arrow keys
You can make minor adjustments to the position of a selection using the
arrow keys, which allow you to nudge the selection 1 pixel or 10 pixels at a
time.
1. Press the up arrow key a few times to move the mouth upward. Notice
that each time you press the arrow key, the mouth moves in 1-pixel
increments. Experiment with the other arrow keys to see how they
affect the selection.
Sometimes, the border around a selected area can distract you as
you make adjustments. You can hide the edges of a selection
temporarily without actually deselecting and then display the
selection border once you've completed the adjustments.
2. Choose View > Hide Edges. The selection border around the mouth
disappears.
3. Now hold down Shift and press an arrow key. Notice that the selection
moves in 10-pixel increments.
4. Use the arrow keys to nudge the mouth until it is positioned where you
want it. Then choose View > Show Edges.
5. Choose File > Save.
Selecting with the magic wand
The magic wand tool lets you select adjacent pixels in an image based on
their similarity in color. You'll use the magic wand tool to select the pear
tomato, which you'll use as a nose for the face.
1. Double-click the magic wand tool in the toolbox to select the tool
and display its Options
In the Magic Wand Options , the Tolerance setting controls how many
similar tones of a color are selected when you click an area. The default
value is 32, indicating that 32 similar lighter tones and 32 similar darker
RSS Page 7 of 14 5/8/06
8. Working With Selections
tones will be selected.
2. For Tolerance, enter 50 to increase the number of shades that will be
selected.
3. Click the magic wand tool anywhere within the pear tomato. Most of it
will be selected.
4. To select the remaining area of the pear, hold down Shift and click the
unelected areas. Notice that a plus sign appears with the magic wand
pointer indicating that you're adding to the current selection.
Initial selection Adding to selection Complete selection
(Shift key depressed)
5. When the pear is completely selected, hold down Control, position the
pointer within the selection, and drag the tomato nose onto the melon
face.
6. Choose Select > Deselect.
7. Choose File > Save.
Selecting with the lasso tool
You can use the lasso tool to make selections that require both freehand
and straight lines. You'll select a bow tie for the face using the lasso tool
this way. It takes a bit of practice to use the lasso tool to alternate
between straight line and freehand selections-if you make a mistake while
you're selecting the bow tie, simply deselect and start again.
1. Select the zoom tool, and click twice on the bow tie pasta to enlarge its
view to 300%.
2. Select the lasso tool . Starting at the top left corner of the bow
tie pasta, drag to the right to create a freehand outline across the
curves at the top of the bow tie. Continue holding down the mouse.
3. To select the right edge of the bow tie, hold down Alt, release the
mouse button, and then begin outlining with short, straight lines by
clicking along the edge. (Notice that the pointer changes from the lasso
RSS Page 8 of 14 5/8/06
9. Working With Selections
icon to the polygon lasso icon.) When you reach the bottom right corner
of the bow tie, do not release the mouse button.
Freehand outline with Straight-line outline with Completed selection (outline
lasso tool polygon lasso tool crosses starting point)
4. Release Alt, and drag to the left to create a freehand outline across
the bottom of the bow tie. (The pointer returns to the lasso icon.)
5. Hold down Alt again, and click the mouse button along the left edge of
the bow tie to draw straight lines.
6. To complete the selection, make sure that the last straight line crosses
the start of the selection, release Alt, and then release the mouse
button.
7. Choose View > Fit on Screen to resise the document to fit on your
screen.
8. Hold down Control, and drag the bow tie selection to the bottom of the
melon face.
Adding and subtracting selections
Holding down Shift while you are selecting an area adds to the current
selection; holding down Alt subtracts from the selection. You'll now use
these techniques with the lasso tool to perfect a rough selection of the
mushroom image. The mushroom will become a hat for the melon face.
1. Select the zoom tool, and click twice on the mushroom to enlarge its
view to 300%.
2. Select the lasso tool, and drag a rough outline around the mushroom
(include some of the area outside the mushroom and some of the stem).
3. Hold down Shift. A plus sign appears with the lasso tool pointer.
4. Drag the lasso tool around an area you want to add to the selection;
then release the mouse button. The area is added to the current
selection.
Initial selection Adding to selection Result (Shift key depressed)
RSS Page 9 of 14 5/8/06
10. Working With Selections
Next, you'll remove, or subtract, part of the selection.
5. Hold down Alt. A minus sign appears with the lasso tool pointer.
6. Drag the lasso tool around an area you want to remove from the
selection; then repeat the process until you've finished removing all the
unwanted parts of the selection.
Selection Subtracting from selection Result (Alt depressed)
7. Choose View > Fit on Screen.
8. To move the mushroom hat onto the melon head, hold down Alt+Control,
and drag a copy of the mushroom to the top of the melon.
9. Choose File > Save.
Selecting with the magnetic lasso
You can use the magnetic lasso tool to make freehand selections of areas
with high contrast edges. When you draw with the magnetic lasso, the
border automatically snaps to the edge you are tracing. You can also control
the direction of the tool's path by clicking the mouse to place occasional
fastening points in the selection border.
You'll now make an ear for the melon face by using the magnetic lasso to
select the red part of the grapefruit slice.
1. Select the zoom tool, and click the grapefruit slice to zoom in to a
200% view.
2. Hold down the mouse button on the lasso tool in the toolbox, and drag
to the magnetic lasso tool to select it.
3. Now click once at the lower left corner of the red flesh of the
grapefruit slice, release the mouse button, and begin tracing the outline
of the flesh by dragging to the right over the curved upper edge.
Notice that the tool snaps to the edge and automatically puts in
fastending points.
If you think the tool is not following the edge closely enough (in low
contrast areas), you can place your own fastening point in the border by
clicking the mouse button. You can add as many fastening points as you
feel necessary. You can also remove fastening points and back up in the
path by pressing the Delete key and moving the mouse back to the last
remaining fastening point.
4. When you reach the lower right corner of the grapefruit flesh, double-
RSS Page 10 of 14 5/8/06
11. Working With Selections
click the mouse button, which signals the magnetic lasso tool to return
to the starting point and close the selection. Notice that the tool
automatically follows the remaining edge of the flesh as it completes
the border.
Laying down fastening points Removing fastening points Double-clicking at corner to
close path
You can now move the selected part of the grapefruit next to the melon.
5. Double-click the hand tool to fit the image on screen.
6. Click the move tool, and drag the grapefruit ear to the middle of the
left side of the melon face. Do not deselect.
Transforming a selection
Next you'll use the Free Transform command to rotate and scale the
melon's left ear, and then you'll duplicate and flip a copy to create a right
ear.
1. Choose Edit > Free Transform. A bounding box appears around the ear
selection.
2. To rotate the ear, position the pointer outside a corner handle until you
see a double-headed arrow, and then drag in the direction you want the
ear to rotate. Notice that the ear rotates around the selection's
center point .
3. To scale the ear, position the pointer directly on one of the corner
handles, and drag to reduce the size of the ear. To scale the ear
proportionately, hold down Shift as you drag.
4. To reposition the ear, place your pointer within the bounding box, but
not on the center point, and drag.
Dragging outside border to Dragging on corner to scale ear Dragging within border to
rotate ear reposition ear
RSS Page 11 of 14 5/8/06
12. Working With Selections
If you don't like the results of a Free Transform, press Escape and
start over.
5. When you have the ear positioned correctly, press Enter to apply the
transformation. The ear remains selected.
6. You will now move a copy of the ear to the right side of the face, flip
the ear horizontally, and fine-tune its placement.
7. Position the pointer within the ear selection, hold down Shift+Alt, and
drag a copy of the ear to the right side of the face.
8. Choose Edit > Transform > Flip Horizontal.
9. If necessary, place the pointer within the selection, and drag to
reposition it next to the melon face.
10. If necessary, choose Edit > Free Transform, rotate the ear to fit the
right side of the face, and press Enter to complete the transformation.
Combining selection tools
As you already know, the magic wand tool makes selections based on color.
If an object you want to select is on a solid-colored background, it can be
much easier to select the object and the background and then use the
magic wand tool to subtract the background color, leaving the desired
object selected.
You'll see how this works by using the rectangular marquee tool and the
magic wand tool to select radish eyebrows for the face.
1. Hold down the mouse button on the elliptical marquee tool, and drag to
the rectangular marquee tool.
2. Drag a selection around the radishes. Notice that some of the white
background is included in the selection.
At this point, the radishes and the white background area are selected.
You'll subtract the white area from the selection, resulting in only the
radishes being selected.
3. Click the magic wand tool in the toolbox; then hold down Alt. A minus
sign appears with the magic wand pointer.
4. Click anywhere in the white area surrounding the radishes. Now only the
radishes are selected.
Initial selection Subtracting from selection with Result
Alt magic wand
5. To duplicate and move the radish eyebrow to the melon face, hold down
RSS Page 12 of 14 5/8/06
13. Working With Selections
Alt+Control, and drag the radish above the left eye on the melon face.
Do not deselect.
Left eyebrow placed with Right eyebrow placed with Right eyebrow flipped
Alt+Control Command Shift+Alt+Control Command horizontally
6. Hold down Shift+Alt+Control, position the pointer within the selection,
and drag to duplicate and reposition another eyebrow above the right
eye.
7. Choose Edit > Transform > Flip Horizontal to adjust the right eyebrow.
If you like, reposition the eyebrow using any of the methods you've
learned.
8. Choose File > Save.
Cropping the completed image
To complete the artwork, you'll crop the image to a final size.
1. Choose the crop tool from the toolbox. The crop tool is located in
the hidden tools palette under the marquee tool.
2. Move the pointer into the image window, and drag diagonally from the
top left to the bottom right corner of the completed artwork to create
a crop marquee.
RSS Page 13 of 14 5/8/06
14. Working With Selections
3. If you need to reposition the crop marquee, position the pointer
anywhere inside the marquee and drag.
4. If you want to resize the marquee, drag a handle.
5. When the marquee is positioned where you want it, press Enter to crop
the image.
6. Choose File > Save. The fruit-and-vegetable face is complete.
RSS Page 14 of 14 5/8/06