SlideShare a Scribd company logo
1 of 5
Download to read offline
open Excel
Sheet 1
adjust columns to the following "pixel" widths
A: 59
B: 179
C: 179
D: 46
E: 179
F: 179
adjust rows to the following "pixel" widths
1 : 51
2 : 343
3 : 51
4 : 343
(half of all 51 pixel rows will be deleted at the end of the process. Row 1 will be the first to be deleted)
(they are required at this point in the process so that you can copy-drag-paste the ascending formula)
copy-drag-paste the format of rows 1 through 4 down to line 400
in column B row 2 type this formula
copy-drag-paste the formula to the cell in column C row 2
in column E row 2 type this formula
copy-drag-paste the formula to the cell in column F row 2
in column B row 4 type this formula
copy-drag-paste the formula to the cell in column C row 4
in column E row 4 type this formula
copy-drag-paste the formula to the cell in column F row 4
highlight cells A1 across to F1 and down to F4
copy-drag-paste the formula down through row 400 and across columns A through F
select column B and click the drop down menu on the orientation icon
from the drop down menu choose "Rotate text Down"
select column C and click the drop down menu on the orientation icon
from the drop down menu choose "Rotate text Up"
select column E and click the drop down menu on the orientation icon
from the drop down menu choose "Rotate text Down"
select column F and click the drop down menu on the orientation icon
from the drop down menu choose "Rotate text Up"
Sheet 2
beginning on line 1 paste (up to 400) names as they should appear on placecards
=Sheet2!$A1
=Sheet2!$A2
=Sheet2!$A3
=Sheet2!$A4
Sheet 1
Select File tab
Select Print
change the print orientation to landscape and the custom margins to .5 for the top & bottom, .62 for left & right,
and 0 for Header & Footer
Select Home tab
dotted lines are now shown along the grid indicating the pages as they will print
delete row 1, which is thin (59 pixels)
row 2 becomes row 1
you will now see that rows 1, 2, & 3 will be printed on the first page
you want each page to fall within the dotted gridlines the way page one does
to accomplish this you will need to delete every other thin row
leaving only the one that falls in the center of each page
Sheet 1
Select File tab
Select Print
Print the document
400 placecards requires 100 sheets
1 Person
2 Person
3 Person
4 Person
5 Person
6 Person
7 Person
8 Person
9 Person
10 Person
11 Person
12 Person
13 Person
14 Person
15 Person
16 Person
17 Person
18 Person
19 Person
20 Person
21 Person
22 Person
23 Person
24 Person
25 Person
26 Person
27 Person
28 Person
29 Person
30 Person
31 Person
32 Person
33 Person
34 Person
35 Person
36 Person
37 Person
38 Person
39 Person
40 Person
41 Person
42 Person
43 Person
44 Person
45 Person
46 Person
47 Person
1Person
1Person
2Person
2Person
3Person
3Person
4Person
4Person
5Person
5Person
6Person
6Person
7Person
7Person
8Person
8Person

More Related Content

What's hot

Calculating a correlation coefficient and scatter plot using excel
Calculating a correlation coefficient and scatter plot using excelCalculating a correlation coefficient and scatter plot using excel
Calculating a correlation coefficient and scatter plot using excel
Sandra Nicks
 
Unit 4 ms excel of class 8
Unit 4 ms excel of class 8Unit 4 ms excel of class 8
Unit 4 ms excel of class 8
Geethu Bijesh
 
Making an xy scatter plot
Making an xy scatter plotMaking an xy scatter plot
Making an xy scatter plot
ilanasaxe
 
How to make your own population pyramid in six simple steps
How to make your own population pyramid in six simple stepsHow to make your own population pyramid in six simple steps
How to make your own population pyramid in six simple steps
Ned Baring
 
Concatenate excel
Concatenate excelConcatenate excel
Concatenate excel
kpperumalla
 

What's hot (20)

Periodic table of_excel_keyboard_shortcuts
Periodic table of_excel_keyboard_shortcutsPeriodic table of_excel_keyboard_shortcuts
Periodic table of_excel_keyboard_shortcuts
 
Excel
Excel Excel
Excel
 
Excel 2007 keyboard shortcut
Excel 2007 keyboard shortcutExcel 2007 keyboard shortcut
Excel 2007 keyboard shortcut
 
Excel & others
Excel & othersExcel & others
Excel & others
 
Calculating a correlation coefficient and scatter plot using excel
Calculating a correlation coefficient and scatter plot using excelCalculating a correlation coefficient and scatter plot using excel
Calculating a correlation coefficient and scatter plot using excel
 
Excel shortcuts
Excel shortcutsExcel shortcuts
Excel shortcuts
 
Excel Basics 2
Excel Basics 2Excel Basics 2
Excel Basics 2
 
Excel
ExcelExcel
Excel
 
MS Excel Basics
 MS Excel Basics MS Excel Basics
MS Excel Basics
 
Unit 4 ms excel of class 8
Unit 4 ms excel of class 8Unit 4 ms excel of class 8
Unit 4 ms excel of class 8
 
MS EXCEL
MS EXCELMS EXCEL
MS EXCEL
 
Making an xy scatter plot
Making an xy scatter plotMaking an xy scatter plot
Making an xy scatter plot
 
Ccc
CccCcc
Ccc
 
MS Excel 2010 tutorial 4
MS Excel 2010 tutorial 4MS Excel 2010 tutorial 4
MS Excel 2010 tutorial 4
 
How to make your own population pyramid in six simple steps
How to make your own population pyramid in six simple stepsHow to make your own population pyramid in six simple steps
How to make your own population pyramid in six simple steps
 
Ms excel
Ms excelMs excel
Ms excel
 
Use of MathType software with MSWord
Use of MathType software with MSWordUse of MathType software with MSWord
Use of MathType software with MSWord
 
ch 9
ch 9ch 9
ch 9
 
Concatenate excel
Concatenate excelConcatenate excel
Concatenate excel
 
MS Excel 2010 training module
MS Excel 2010 training moduleMS Excel 2010 training module
MS Excel 2010 training module
 

Similar to PlacecardTemplateInstructions

Sample Training Ppt Excel Basics
Sample Training Ppt Excel BasicsSample Training Ppt Excel Basics
Sample Training Ppt Excel Basics
AudreyMc
 
Excel Powerpoint class with video
Excel Powerpoint class with videoExcel Powerpoint class with video
Excel Powerpoint class with video
Rich Johnson
 
MICROSOFT EXCELBASIC OPERATIONSCET-10501LESSON OBJ.docx
MICROSOFT EXCELBASIC OPERATIONSCET-10501LESSON OBJ.docxMICROSOFT EXCELBASIC OPERATIONSCET-10501LESSON OBJ.docx
MICROSOFT EXCELBASIC OPERATIONSCET-10501LESSON OBJ.docx
annandleola
 
Microsoft excel tutorial06
Microsoft excel tutorial06Microsoft excel tutorial06
Microsoft excel tutorial06
Alam Khan
 
Notes of Information technology
Notes of Information technology Notes of Information technology
Notes of Information technology
Asif Jamal
 
Excel Project 2 – MS Excel (Summer 2019) Use the pro.docx
Excel Project 2 – MS Excel (Summer 2019)  Use the pro.docxExcel Project 2 – MS Excel (Summer 2019)  Use the pro.docx
Excel Project 2 – MS Excel (Summer 2019) Use the pro.docx
AASTHA76
 
Coaching Corps Excel User Manual
Coaching Corps Excel User ManualCoaching Corps Excel User Manual
Coaching Corps Excel User Manual
Karen Cohen
 
Excel Project 3 – MS Excel (Fall 2018) Use the project.docx
Excel Project 3 – MS Excel (Fall 2018) Use the project.docxExcel Project 3 – MS Excel (Fall 2018) Use the project.docx
Excel Project 3 – MS Excel (Fall 2018) Use the project.docx
cravennichole326
 
Excel Project 2 Check FiguresSteps 1-2-3 As instructedStep
Excel Project 2 Check FiguresSteps 1-2-3  As instructedStepExcel Project 2 Check FiguresSteps 1-2-3  As instructedStep
Excel Project 2 Check FiguresSteps 1-2-3 As instructedStep
galinagrabow44ms
 

Similar to PlacecardTemplateInstructions (20)

Sample Training Ppt Excel Basics
Sample Training Ppt Excel BasicsSample Training Ppt Excel Basics
Sample Training Ppt Excel Basics
 
Powerpoint school
Powerpoint schoolPowerpoint school
Powerpoint school
 
Powerpoint school
Powerpoint schoolPowerpoint school
Powerpoint school
 
Microsoft Excel 2007 Tutorial
Microsoft Excel 2007 TutorialMicrosoft Excel 2007 Tutorial
Microsoft Excel 2007 Tutorial
 
Excel Powerpoint class with video
Excel Powerpoint class with videoExcel Powerpoint class with video
Excel Powerpoint class with video
 
microsoft ecexl
microsoft ecexlmicrosoft ecexl
microsoft ecexl
 
Microsoft excel part 2
Microsoft excel part 2Microsoft excel part 2
Microsoft excel part 2
 
MICROSOFT EXCELBASIC OPERATIONSCET-10501LESSON OBJ.docx
MICROSOFT EXCELBASIC OPERATIONSCET-10501LESSON OBJ.docxMICROSOFT EXCELBASIC OPERATIONSCET-10501LESSON OBJ.docx
MICROSOFT EXCELBASIC OPERATIONSCET-10501LESSON OBJ.docx
 
Lecture 10: introduction to computer
Lecture 10: introduction to computerLecture 10: introduction to computer
Lecture 10: introduction to computer
 
PPT On Microsoft Excel 2007 Full Information.
PPT On Microsoft Excel 2007 Full Information.PPT On Microsoft Excel 2007 Full Information.
PPT On Microsoft Excel 2007 Full Information.
 
Microsoft excel tutorial06
Microsoft excel tutorial06Microsoft excel tutorial06
Microsoft excel tutorial06
 
Microsoft excel tutorial06
Microsoft excel tutorial06Microsoft excel tutorial06
Microsoft excel tutorial06
 
Notes of Information technology
Notes of Information technology Notes of Information technology
Notes of Information technology
 
Excel Project 2 – MS Excel (Summer 2019) Use the pro.docx
Excel Project 2 – MS Excel (Summer 2019)  Use the pro.docxExcel Project 2 – MS Excel (Summer 2019)  Use the pro.docx
Excel Project 2 – MS Excel (Summer 2019) Use the pro.docx
 
Coaching Corps Excel User Manual
Coaching Corps Excel User ManualCoaching Corps Excel User Manual
Coaching Corps Excel User Manual
 
MS Excel and Visual Basic Applications.pptx
MS Excel and Visual Basic Applications.pptxMS Excel and Visual Basic Applications.pptx
MS Excel and Visual Basic Applications.pptx
 
Excel Project 3 – MS Excel (Fall 2018) Use the project.docx
Excel Project 3 – MS Excel (Fall 2018) Use the project.docxExcel Project 3 – MS Excel (Fall 2018) Use the project.docx
Excel Project 3 – MS Excel (Fall 2018) Use the project.docx
 
Karan Goyal
Karan GoyalKaran Goyal
Karan Goyal
 
Mop excel proj 1 power point
Mop excel proj 1   power pointMop excel proj 1   power point
Mop excel proj 1 power point
 
Excel Project 2 Check FiguresSteps 1-2-3 As instructedStep
Excel Project 2 Check FiguresSteps 1-2-3  As instructedStepExcel Project 2 Check FiguresSteps 1-2-3  As instructedStep
Excel Project 2 Check FiguresSteps 1-2-3 As instructedStep
 

PlacecardTemplateInstructions

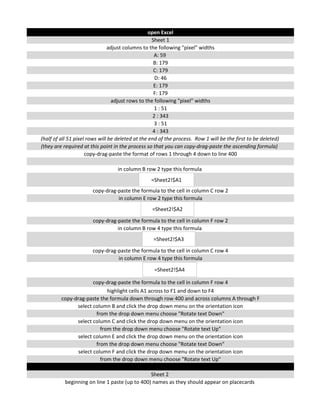
  • 1. open Excel Sheet 1 adjust columns to the following "pixel" widths A: 59 B: 179 C: 179 D: 46 E: 179 F: 179 adjust rows to the following "pixel" widths 1 : 51 2 : 343 3 : 51 4 : 343 (half of all 51 pixel rows will be deleted at the end of the process. Row 1 will be the first to be deleted) (they are required at this point in the process so that you can copy-drag-paste the ascending formula) copy-drag-paste the format of rows 1 through 4 down to line 400 in column B row 2 type this formula copy-drag-paste the formula to the cell in column C row 2 in column E row 2 type this formula copy-drag-paste the formula to the cell in column F row 2 in column B row 4 type this formula copy-drag-paste the formula to the cell in column C row 4 in column E row 4 type this formula copy-drag-paste the formula to the cell in column F row 4 highlight cells A1 across to F1 and down to F4 copy-drag-paste the formula down through row 400 and across columns A through F select column B and click the drop down menu on the orientation icon from the drop down menu choose "Rotate text Down" select column C and click the drop down menu on the orientation icon from the drop down menu choose "Rotate text Up" select column E and click the drop down menu on the orientation icon from the drop down menu choose "Rotate text Down" select column F and click the drop down menu on the orientation icon from the drop down menu choose "Rotate text Up" Sheet 2 beginning on line 1 paste (up to 400) names as they should appear on placecards =Sheet2!$A1 =Sheet2!$A2 =Sheet2!$A3 =Sheet2!$A4
  • 2. Sheet 1 Select File tab Select Print change the print orientation to landscape and the custom margins to .5 for the top & bottom, .62 for left & right, and 0 for Header & Footer Select Home tab dotted lines are now shown along the grid indicating the pages as they will print delete row 1, which is thin (59 pixels) row 2 becomes row 1 you will now see that rows 1, 2, & 3 will be printed on the first page you want each page to fall within the dotted gridlines the way page one does to accomplish this you will need to delete every other thin row leaving only the one that falls in the center of each page Sheet 1 Select File tab Select Print Print the document 400 placecards requires 100 sheets
  • 3. 1 Person 2 Person 3 Person 4 Person 5 Person 6 Person 7 Person 8 Person 9 Person 10 Person 11 Person 12 Person 13 Person 14 Person 15 Person 16 Person 17 Person 18 Person 19 Person 20 Person 21 Person 22 Person 23 Person 24 Person 25 Person 26 Person 27 Person 28 Person 29 Person 30 Person 31 Person 32 Person 33 Person 34 Person 35 Person 36 Person 37 Person 38 Person 39 Person 40 Person 41 Person 42 Person 43 Person 44 Person 45 Person 46 Person 47 Person