What is maven? how maven works? how to integrate maven with eclipse? how to develop a maven project? If you are looking answers for these questions then go through this article, I'm sure it will answer all of them and trust me it's way easy than you are thinking. Come have a look.
Axa Assurance Maroc - Insurer Innovation Award 2024
Integrating Maven with Eclipse
1. Integrating Maven with Eclipse and using it with Selenium
By –Nikhil Bharati
This is for the people who haven’t used maven, or the people who are using it but don’t know much
about it and want to implement it in their project from scratch. We all know about advantages of Java
and that’s why we are using it. Being an open source and platform independent Java is ruling in the
world of tech. When it comes to testing, it plays a vital role too. In the recent days we have seen huge
demand of Selenium and other open source tools over QTP/UFT, Test Complete, Ranorex and other
licensed tool. This shows the demand of open source tool and the days are not far when commercial
tools will become the past.
In this article I’ll show you how easily we can implement maven with selenium and eclipse. To start with
Maven is a build tool which is used to define project structure, dependencies, build, and test
management. For working with Java you need to use several API’s in order to do your work easier. For
us Maven takes care of all of it, we just need to write our code and execute them using Maven.
What you should know?
To have a clear understanding you should have eclipse installed in your system, you should have basic
knowledge of selenium using Java. Even if you don’t know, it’s not rocket science, it’s pretty simple, just
follow the steps and you should be good.
Why Maven?
In a traditional way, we need to add the external jars every time when we need to use them. In real time
projects, as the time progress it may become difficult to maintain them, they might look clumsy as well.
This can work if you are working alone but if you are working as a team you won’t know who is using
what Jar and what the version of that jar is. Let’s say you send an email to update the team every time
you update your jar files or add a new jar. Don’t you think it will still be a new task for everyone to do it
and if someone misses then the code will break in their system? Wouldn’t it be nice if we share a file
and ask everyone to replace it with their old one? Sounds great right. This is what I like most about the
Maven. Just one XML and the whole team is good to go.
To cut it short:
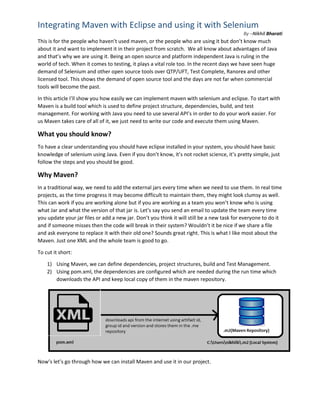
1) Using Maven, we can define dependencies, project structures, build and Test Management.
2) Using pom.xml, the dependencies are configured which are needed during the run time which
downloads the API and keep local copy of them in the maven repository.
Now’s let’s go through how we can install Maven and use it in our project.
2. Steps to install Maven and create a Project using Eclipse in Selenium
I’m using Eclipse Java Mars and will show how we can download it using Eclipse. Same process can be
followed for any Eclipse version. For using Maven, m2eclipse eclipse plugin will be required and should
be added to eclipse. This will help to facilitate the build process and create pom.xml file. Follow the
following steps to add m2eclipse plugin.
1) In Eclipse IDE, select Help | Install New Software from Eclipse Main Menu.
2) Fill the Work with edit box with http://download.eclipse.org/technology/m2e/releases/
3) Select the Maven Integration for Eclipse checkbox and click on Next button to finish installation.
Maven installation is now completed and can start a new project. Before that how should we
check whether the Maven is installed or not?
How to check the Maven installation?
Follow the following steps to check the maven installation.
1) Open Eclipse and click on Windows -> Preferences.
3. 2) Choose Maven from left panel, and select installations.
3) Click on Maven -> "User Settings" option form left panel, to check local repository location.
Now, we are all set up. Let’s create a new Maven project and start working on it.
4. Steps for creating Maven project and executing it
1) Open Eclipse IDE, Go to File New Other Maven Select Maven Project and click Next >
2) Select your workspace and click Next .
3) Select the Archetype based on your requirement, Maven provides varieties of Archetype, for my
requirement I’ll select “quickstart” and click Next .
5. 4) Provide the group id, artifact id and package name as you want and click on Finish. It’s good to
give the same name to all three to avoid any confusion.
5) Eclipse will create the maven project named “SeleniumMaven” as given below.
6. The M symbol at the top of Folder icon represents a Maven project.
6) Right-click on JRE System Library and select the Properties option from the menu.
Select Workspace default JRE and click on OK.
7) Now double click on pom.xml file in the project explorer. The file shown below should open by
default. Make sure you are on the pom.xml tab.
7. 8) Add all the dependencies you would need in your project. You would be probably thinking how I
would know the group id, artifact id and version for the dependencies. Don’t get afraid, this is
quite simple. Google the API you are looking for followed by maven dependency. Ex. poi 3.15
maven dependency, Click on the first link that comes in search and copy.
8. You should get the dependency like below:
Copy this and paste it in your pom.xml as shown
The project explorer looks like this.
In order to execute anything using Maven make sure you have these 3 dependencies in your pom.xml
9. maven-compiler-plugin
maven-surefire-plugin
testng.xml
9) Now select your project from the project explorer, do right click Maven Update Project.
This will update your project with the all the required dependencies, download them and keep
them in the local repository. The project explorer will look like as below.
All the poi dependencies were downloaded. You can also check the local copy in the location
“C:Userschq-nikhilb.m2repository”
10. Inside the poi folder you will find the jar file which was mentioned in pom.xml
All the configuration has been done, now let’s create a class and run it using Maven. We will
create a testng class and then convert the project to testng project in order to generate testng.xml. Let’s
move to the next step and start writing code.
10) Select your Maven project src/test/javaright click on SeleniumMaven package New
OtherSelect TestNG Class and click Next Provide the class name and click on Finish.
I have named my class as “ReadXlTest”. In this class I’ll use apache poi to open an excel file, read
its contents and display it on the console.
11. 11) In this step, I’ll convert this project to Testng inorder to generate the testng.xml, which will help
us to define the annotations in selenium and using it we will execute our tests.
For doing this, select your project Right Click TestNG Convert to TestNG Finish. Now
a basic xml file will be generated below your pom.xml in the project explorer named as
testng.xml.
12. 12) Go to ReadXlTest.java and copy paste this code,
package SeleniumMaven;
import java.io.File;
import java.io.FileInputStream;
import java.io.IOException;
import org.apache.poi.hssf.usermodel.HSSFWorkbook;
import org.apache.poi.ss.usermodel.Row;
import org.apache.poi.ss.usermodel.Sheet;
import org.apache.poi.ss.usermodel.Workbook;
import org.apache.poi.xssf.usermodel.XSSFWorkbook;
import org.testng.annotations.Test;
public class ReadXlTest {
@Test
public void readWrite() throws IOException {
String strFilepath = "C:WorkspaceUpload";
String strFile = "ticTactoe.xlsx";
File file = new File(strFilepath+strFile);
FileInputStream inputstream = new FileInputStream(file);
String strFileExtension = strFile.substring(strFile.indexOf("."));
Workbook xlWorkbook = null;
if (strFileExtension.equals(".xlsx")){
xlWorkbook =new XSSFWorkbook(inputstream);
}
else if (strFileExtension.equals(".xls")){
xlWorkbook = new HSSFWorkbook(inputstream);
}
Sheet xlSheet = xlWorkbook.getSheet("AdjTypeByJuris");
int iRowCount = xlSheet.getLastRowNum()-xlSheet.getFirstRowNum();
System.out.println(iRowCount);
System.out.println("Rowcount is : "+ iRowCount);
for(int i = 0; i<iRowCount+1;i++){
Row row = xlSheet.getRow(i);
for (int j=0;j<row.getLastCellNum();j++){
String strData = row.getCell(j).toString();
System.out.println(strData + " # # ");
}
}
}
}
13. In this class I am using poi api to read the excel files which I’m getting local .m2 repository
downloaded using pom.xml.
Save your class. Go to pom.xml and verify if you the dependencies for maven-compiler-plugin,
maven-surefire-plugin and testng. Without these dependencies, maven won’t work.
The maven-compiler-plugin is used to help in compiling the code and using the particular JDK
version for compilation.
The maven-surefire-plugin is used to configure and execute tests. Here plugin is used to
configure the testing.xml for TestNG test and generate test reports.
Now we are all set to go, let’s run the test and see.
13) Select your project, perform right click Run as Maven Test . In the console you can see the
build successful message and the required test will execute.
14. I hope this was useful. Feel free to reach me @ bharati.nikhil@gmail.com for any issues, I’ll be
happy to assist. See you soon again, till then happy coding!!