Instruction manual Primary Arms SLX6 1-6x24 SFP GEN III ACSS 300BO
•
1 like•1,492 views

https://www.optics-trade.eu/en/primary-arms-1-6x24-sfp-gen-iii.html

Recommended
Recommended
More Related Content
What's hot
Similar to Instruction manual Primary Arms SLX6 1-6x24 SFP GEN III ACSS 300BO
Similar to Instruction manual Primary Arms SLX6 1-6x24 SFP GEN III ACSS 300BO (20)
More from Optics-Trade
More from Optics-Trade (20)
Recently uploaded
Recently uploaded (20)
Instruction manual Primary Arms SLX6 1-6x24 SFP GEN III ACSS 300BO
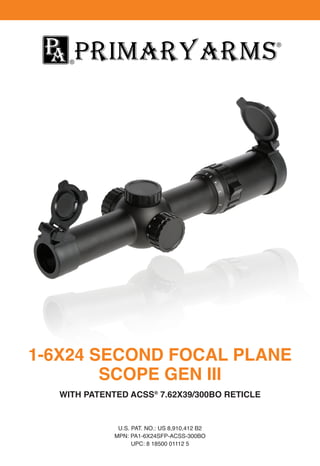
- 1. 1-6X24 SECOND FOCAL PLANE SCOPE GEN III WITH PATENTED ACSS® 7.62X39/300BO RETICLE U.S. PAT. NO.: US 8,910,412 B2 MPN: PA1-6X24SFP-ACSS-300BO UPC: 8 18500 01112 5
- 2. THE 1-6X24 SCOPE GEN III WITH ACSS® 7.62X39/300BO RETICLE The ACSS® (Advanced Combined Sighting System) is a giant leap forward in reticle design that utilizes bullet drop compensation correlated with range estimation, wind, and leads in one simple to use system. The ACSS® reticle increases first hit ratio and decreases time of engagement dramatically. It is a two-part reticle that allows you to be very fast from 0 to 300 yards, and very accurate from 400 to 600 yards. 1 2 ACHIEVING A CLEAR RETICLE PICTURE Your 1-6X24 SFP scope comes with an adjustable diopter ring that must be set to match your eye. Located at the rear of the eyepiece, the diopter ring changes the focus of the reticle as you see it inside the scope. It does not change the focus of objects that you look at through the scope. Setting the diopter is the critical first step to successful precision shooting. You can set the diopter before you have even mounted the scope in its rings. 1. Turn the Power Ring to the highest setting, 6x, and point the scope at a bright, featureless background such as blue sky or a blank white wall. 2. With your head in position behind the scope’s ocular lens, look at the wall or sky instead. If you look through prescription glasses when shooting, wear them now too. After 5 or 6 seconds, close your eyes. 3. Now open your eye, glance through the scope and immediately see if the reticle is sharp or blurry. If you notice that the reticle seems blurry at first and then suddenly sharpens, your eyes have focused on the reticle itself instead of looking through the scope. You must adjust the diopter ring and try again. 4. If the reticle was blurry, turn the diopter ring and repeat the process again. The process will take multiple adjustments. Each time you repeat the process, ask yourself if the reticle was sharper or more blurry than before. The final adjustments may be very fine. If your eyes get watery or tired, walk away for a bit and come back to this later. 5. Once the reticle appears sharp as soon as you glance through the scope, the diopter is set for your eyes. Everyone’s eyes are slightly different, so the ideal adjustment changes from person to person. Many shooters will mark their correct diopter position with a little dab of paint or fingernail polish across the ring and the scope body, in case the ring gets turned accidentally later on. Others will apply electrical tape around the diameter of the ring to hold it in place.
- 3. 3 RETICLE ILLUMINATION The Illumination Knob control on the left side of the scope is marked with numbers of increasing brightness from 1 to 11. The knob cap unscrews counter-clockwise, holding a CR2032 battery with the positive (+) side facing towards the cap. The windage turret cap on the opposite side holds a spare CR2032 battery inside. Reticle illumination at the lower settings is useful in low light situations like sunrise and sunset. At the higher settings reticle illumination provides a quick aiming point even in daylight, especially at low magnification. GETTING TO KNOW THE ACSS® RETICLE From a well-supported position using a bipod or sandbags, turn the power ring to maximum, and adjust your windage and elevation turrets to dial in your point of impact to the tip of the chevron at 100 yards. Each click is 0.5 MOA, or 0.5 inches at 100 yards. How high up or down you dial in relative to the chevron tip depends on your rifle and ammunition, as shown in the charts. 4 ADJUSTING POINT OF IMPACT With the scope mounted on your rifle, the turret caps can be removed revealing finger adjustable turrets underneath. From a well-supported position using a bipod or sandbags, turn the power ring to maximum, and adjust your windage and elevation turrets to dial in your point of impact to the tip of the chevron. When sighting in your rifle, if your shots are hitting low, turn the elevation turret counterclockwise to bring the point of impact up. If your shots are hitting to the left, turn the windage turret counterclockwise to bring the point of impact right. Each turret click will change the point of bullet impact 0.5 minute of angle (MOA), roughly .25 inches at 50 yards distance or 0.5 inches at 100 yards distance. Please note that the ACSS® reticle calibrated for 7.62x39/300BLK requires a 50 yard zero rather than the traditional 100 yard zero.
- 4. 5 Once your rifle is sighted in, you can use a screwdriver or fingernail to turn the indicator dial set into the turret until the “0” matches up with a dimple machined into the turret cap threads. Turning this dial does not affect the point of impact and no clicks will be heard or felt. If you adjust the turrets later to compensate for wind or range, it will be easy to return your scope to your rifle’s original “zero”. Each white line represents one click, or 0.5 MOA. The numbers 8, 12, 16, 32, and 36 represent total adjustment in MOA. Thus, if you turn the elevation turret from “0” to “8” you will hear and feel the turret click 16 times, and your bullet will impact the target 8 inches higher than before at 100 yards distance. GETTING TO KNOW YOUR BULLET DROP COMPENSATION (BDC) Gravity will affect your bullet’s trajectory (or path). The BDC starts at the tip of the chevron and finishes at the 600-yard mark, indicated by the number 6. Simply aim using the hash mark that coincides with the range to target. For targets at ranges between hash marks you can split the difference. For example, for a target at 450 yards you should aim halfway between the 400 and 500-yard hash marks. Bullet trajectory for the common 220gr subsonic 300BLK loading corresponds to the dots along the BDC rather than the hash marks. We recommend that you establish a steady, supported position in order to utilize the BDC. The optic needs to be set to the highest magnification, 6x, for the BDC to work properly. 6
- 5. UNDERSTANDING THE WIND AND BULLET DRIFT Notice the dots aligned with the BDC. They are 5 mph wind marks. Wind will cause the bullet to drift left or right depending on wind direction. Understanding wind is important, as even a 2 mph wind at a 90 degree angle to the bullet’s path can cause the bullet to drift over 10” at 600 yards. For a wind blowing from your left to your right, use the dots on the right side. For a wind blowing right to left, use the left side dots. You can use the dots as a starting point in different conditions. For example, if you have approximately a 2.5 mph wind, you would hold half-way to the dot. If you have a 10 mph wind, you would double the hold of the dot, and so on. The wind hold dots are calibrated to work with the scope set to its maximum magnification, 6x. LEADING YOUR TARGET The average target moves at 8.6 mph. The “lead dots” on each side of the chevron are set for a target moving at a 90 degree angle to the shooter. Depending on the direction of the target’s movement, fire using the “lead dots” instead of the chevron. If the target is moving left to right, use the left lead dot. If the target is moving right to left, use the right lead dot. The lead dots are best used at 100 to 300 yards and are highly effective on moving targets. You can use the leading edge of the chevron in the same way to lead targets moving at 3.1 mph. Remember, for the ACSS® reticle’s advanced features to be effective, the optic must be set to maximum power, 6x. 7 VERTICAL AND HORIZONTAL AUTO RANGING Knowing the proper range to your target is crucial in order to use the right hold on the BDC. Ranging can be accomplished using the range marks on the right side of the reticle, or using the BDC itself. To auto range a standard 5’10” target vertically, turn the power ring to maximum power, 6x. Then place the bottom of the target on the lowest line of the vertical range marks, and range upwards. Auto ranging a standard 18” wide target horizontally is correlated with the BDC. The horizontal bars range estimate center mass on targets 18" wide, and predators or small game with an approximately 18" measurement from shoulder to hip. When using the BDC to auto range, simply fit the target’s width inside the hash mark that matches it, and fire. All the math has been done. 8
- 6. 9 10 NOTES For more information about how to use the ACSS® reticle, please check out our YouTube video at https://goo.gl/1IQEHJ. Please type in the link exactly, it is case sensitive. • Tube diameter: 30 mm • Magnification: 1-6x • Objective diameter: 24 mm • Ocular diameter: 33.2 mm • Exit pupil: 9–4 mm • Eye relief: 3.3 in–3.5 in • Field of view: 110 feet @ 100 yards at 1x 19.3 feet @ 100 yards at 6x • Click value: 0.5 MOA • Total elevation adjustment: 140 MOA • Total windage adjustment: 140 MOA • Length: 10.04 inches • Net weight: 18.1 oz. with lens covers • Red partial illumination • Fast focus eyepiece • Second focal plane • Waterproof • Nitrogen purged • Fog resistant • Fully multi-coated • 6063 aluminum • Uses one CR2032 battery (included) • Flip up lens covers included • Lifetime warranty SPECIFICATIONS AND FEATURES
- 7. WARRANTY Your PA1-6X24SFP-ACSS-300BO scope is covered by the Primary Arms Limited Lifetime Warranty. If a defect due to materials or workmanship, or even normal wear and tear, has caused your product to malfunction, Primary Arms will either repair or replace your product. You can find out more details at www.primaryarmsoptics.com. Email: info@primaryarmsoptics.com Phone: 713-570-1910 www.primaryarmsoptics.com