SlideShare a Scribd company logo
1 of 76
Download to read offline
MANUAL NO. TOEP C730600 0FC
YASKAWA AC Drive
Fan Replacement Procedure
Applicable Drive
Model
CIPR-HV6xxxxxxxxxx
CIPR-FP6xxxxxxxxxx
To properly use the product, read this manual.
This Page Intentionally Blank
2 YASKAWA TOEP C730600 0FC Fan Replacement Procedure
YASKAWA TOEP C730600 0FC Fan Replacement Procedure 3
Table of Contents
1. Overview. . . . . . . . . . . . . . . . . . . . . . . . . . . . . . . . . . . . . . . . . . . . . . . . . . . . . . . . . 5
2. Explanation of Signal Words . . . . . . . . . . . . . . . . . . . . . . . . . . . . . . . . . . . . . . . . . 5
3. Section Safety . . . . . . . . . . . . . . . . . . . . . . . . . . . . . . . . . . . . . . . . . . . . . . . . . . . . 5
4. Cooling Fans and Circulation Fans by Drive Model. . . . . . . . . . . . . . . . . . . . . . . 6
HV600 . . . . . . . . . . . . . . . . . . . . . . . . . . . . . . . . . . . . . . . . . . . . . . . . . . . . . . . . . . . . . . . . . . . 6
FP605 . . . . . . . . . . . . . . . . . . . . . . . . . . . . . . . . . . . . . . . . . . . . . . . . . . . . . . . . . . . . . . . . . . . 7
5. Replace Cooling Fans and Circulation Fans . . . . . . . . . . . . . . . . . . . . . . . . . . . . 8
Fan Replacement (Procedure A). . . . . . . . . . . . . . . . . . . . . . . . . . . . . . . . . . . . . . . . . . . . . . 8
Fan Removal. . . . . . . . . . . . . . . . . . . . . . . . . . . . . . . . . . . . . . . . . . . . . . . . . . . . . . . . . . 9
Fan Installation . . . . . . . . . . . . . . . . . . . . . . . . . . . . . . . . . . . . . . . . . . . . . . . . . . . . . . . . 9
Circulation Fan Removal . . . . . . . . . . . . . . . . . . . . . . . . . . . . . . . . . . . . . . . . . . . . . . . 12
Circulation Fan Installation. . . . . . . . . . . . . . . . . . . . . . . . . . . . . . . . . . . . . . . . . . . . . . 14
Fan Replacement (Procedure B). . . . . . . . . . . . . . . . . . . . . . . . . . . . . . . . . . . . . . . . . . . . . 16
Fan Removal. . . . . . . . . . . . . . . . . . . . . . . . . . . . . . . . . . . . . . . . . . . . . . . . . . . . . . . . . 17
Fan Installation . . . . . . . . . . . . . . . . . . . . . . . . . . . . . . . . . . . . . . . . . . . . . . . . . . . . . . . 17
Circulation Fan Removal . . . . . . . . . . . . . . . . . . . . . . . . . . . . . . . . . . . . . . . . . . . . . . . 19
Circulation Fan Installation. . . . . . . . . . . . . . . . . . . . . . . . . . . . . . . . . . . . . . . . . . . . . . 21
Fan Replacement (Procedure C). . . . . . . . . . . . . . . . . . . . . . . . . . . . . . . . . . . . . . . . . . . . . 24
Fan Removal. . . . . . . . . . . . . . . . . . . . . . . . . . . . . . . . . . . . . . . . . . . . . . . . . . . . . . . . . 24
Fan Installation . . . . . . . . . . . . . . . . . . . . . . . . . . . . . . . . . . . . . . . . . . . . . . . . . . . . . . . 24
Circulation Fan Removal . . . . . . . . . . . . . . . . . . . . . . . . . . . . . . . . . . . . . . . . . . . . . . . 26
Circulation Fan Installation. . . . . . . . . . . . . . . . . . . . . . . . . . . . . . . . . . . . . . . . . . . . . . 28
Fan Replacement (Procedure D). . . . . . . . . . . . . . . . . . . . . . . . . . . . . . . . . . . . . . . . . . . . . 30
Fan Removal. . . . . . . . . . . . . . . . . . . . . . . . . . . . . . . . . . . . . . . . . . . . . . . . . . . . . . . . . 31
Fan Installation . . . . . . . . . . . . . . . . . . . . . . . . . . . . . . . . . . . . . . . . . . . . . . . . . . . . . . . 31
Fan Replacement (Procedure E). . . . . . . . . . . . . . . . . . . . . . . . . . . . . . . . . . . . . . . . . . . . . 34
Fan Removal. . . . . . . . . . . . . . . . . . . . . . . . . . . . . . . . . . . . . . . . . . . . . . . . . . . . . . . . . 34
Fan Installation . . . . . . . . . . . . . . . . . . . . . . . . . . . . . . . . . . . . . . . . . . . . . . . . . . . . . . . 35
Circulation Fan Removal . . . . . . . . . . . . . . . . . . . . . . . . . . . . . . . . . . . . . . . . . . . . . . . 37
Circulation Fan Installation. . . . . . . . . . . . . . . . . . . . . . . . . . . . . . . . . . . . . . . . . . . . . . 39
Fan Replacement (Procedure F) . . . . . . . . . . . . . . . . . . . . . . . . . . . . . . . . . . . . . . . . . . . . . 42
Fan Removal. . . . . . . . . . . . . . . . . . . . . . . . . . . . . . . . . . . . . . . . . . . . . . . . . . . . . . . . . 42
Fan Installation . . . . . . . . . . . . . . . . . . . . . . . . . . . . . . . . . . . . . . . . . . . . . . . . . . . . . . . 42
Fan Replacement (Procedure G). . . . . . . . . . . . . . . . . . . . . . . . . . . . . . . . . . . . . . . . . . . . . 45
Fan Removal. . . . . . . . . . . . . . . . . . . . . . . . . . . . . . . . . . . . . . . . . . . . . . . . . . . . . . . . . 45
4 YASKAWA TOEP C730600 0FC Fan Replacement Procedure
Fan Installation . . . . . . . . . . . . . . . . . . . . . . . . . . . . . . . . . . . . . . . . . . . . . . . . . . . . . . . . 46
Circulation Fan Removal . . . . . . . . . . . . . . . . . . . . . . . . . . . . . . . . . . . . . . . . . . . . . . . . 48
Circulation Fan Installation. . . . . . . . . . . . . . . . . . . . . . . . . . . . . . . . . . . . . . . . . . . . . . . 50
Fan Replacement (Procedure H). . . . . . . . . . . . . . . . . . . . . . . . . . . . . . . . . . . . . . . . . . . . . . 53
Fan Removal. . . . . . . . . . . . . . . . . . . . . . . . . . . . . . . . . . . . . . . . . . . . . . . . . . . . . . . . . . 53
Fan Installation . . . . . . . . . . . . . . . . . . . . . . . . . . . . . . . . . . . . . . . . . . . . . . . . . . . . . . . . 56
Circuit Board Cooling Fan Removal . . . . . . . . . . . . . . . . . . . . . . . . . . . . . . . . . . . . . . . 61
Circuit Board Cooling Fan Installation. . . . . . . . . . . . . . . . . . . . . . . . . . . . . . . . . . . . . . 63
Fan Replacement (Procedure I) . . . . . . . . . . . . . . . . . . . . . . . . . . . . . . . . . . . . . . . . . . . . . . 65
Fan Removal. . . . . . . . . . . . . . . . . . . . . . . . . . . . . . . . . . . . . . . . . . . . . . . . . . . . . . . . . . 65
Fan Installation . . . . . . . . . . . . . . . . . . . . . . . . . . . . . . . . . . . . . . . . . . . . . . . . . . . . . . . . 67
Circuit Board Cooling Fan Removal . . . . . . . . . . . . . . . . . . . . . . . . . . . . . . . . . . . . . . . 71
Circuit Board Cooling Fan Installation. . . . . . . . . . . . . . . . . . . . . . . . . . . . . . . . . . . . . . 73
Revision History . . . . . . . . . . . . . . . . . . . . . . . . . . . . . . . . . . . . . . . . . . . . . . . . . . . . . . . 75
1 Overview
YASKAWA TOEP C730600 0FC Fan Replacement Procedure 5
1 Overview
This manual shows you how to replace the cooling fans, circuit board cooling fans, and
circulation fans on Yaskawa drives.
2 Explanation of Signal Words
WARNING Read and understand this manual before you install, operate, or do maintenance on the
drive. Install the drive as specified by this manual and local codes. The symbols in this section identify safety
messages in this manual. If you do not obey these safety messages, the hazards can cause serious injury, death,
or damage to the products and related equipment and systems.
These identifier words categorize and emphasize important safety precautions in these
instructions.
DANGER This signal word identifies a hazard that will cause serious injury or death if you do not
prevent it.
WARNING This signal word identifies a hazard that can cause death or serious injuries if you do not
prevent it.
CAUTION Identifies a hazardous situation, which, if not avoided, can cause minor or moderate injury.
NOTICE This signal word identifies a property damage message that is not related to personal
injury.
3 Section Safety
DANGER Electrical Shock Hazard. Do not examine, connect, or disconnect wiring on an energized
drive. Before servicing, disconnect all power to the equipment and wait for the time specified on the warning label
at a minimum. The internal capacitor stays charged after the drive is de-energized. The charge indicator LED
extinguishes when the DC bus voltage decreases below 50 Vdc. When all indicators are OFF, remove the covers
before measuring for dangerous voltages to make sure that the drive is safe. If you do work on the drive when it is
energized, it will cause serious injury or death from electrical shock.
DANGER Electrical Shock Hazard. Disconnect all power to the drive and wait for the time specified
on the warning label before you remove covers. Check the drive for dangerous voltages before servicing or repair
work. If you do work on the drive when it is energized and there is no cover over the electronic circuits, it will
cause serious injury or death from electrical shock. The drive has internal capacitors that stay charged after you
de-energize the drive.
WARNING Electrical Shock Hazard. The motor will run after you de-energize the drive. PM motors
can generate induced voltage to the terminal of the motor after you de-energize the drive. If you touch a motor
that is moving or energized, it can cause serious injury or death.
WARNING Electrical Shock Hazard. Do not wear loose clothing or jewelry when you do work on the
drive. Tighten loose clothing and remove all metal objects, for example watches or rings. Loose clothing can
catch on the drive and jewelry can conduct electricity and cause serious injury or death.
CAUTION Burn Hazard. Do not touch a hot drive heatsink. De-energize the drive, wait for a minimum
of 15 minutes, then make sure that the heatsink is cool before you replace the cooling fans. If you touch a hot
drive heatsink, it can burn you.
NOTICE Damage to Equipment. When you touch the drive and circuit boards, make sure that you
observe correct electrostatic discharge (ESD) procedures. If you do not follow procedures, it can cause ESD
damage to the drive circuitry.
NOTICE Use the instructions in this manual to replace the cooling fans. When you do maintenance
on the fans, replace all the fans to increase product life. If you install the fans incorrectly, it can cause damage to
the drive.
4 Cooling Fans and Circulation Fans by Drive Model
6 YASKAWA TOEP C730600 0FC Fan Replacement Procedure
4 Cooling Fans and Circulation Fans by Drive Model
◆ HV600
Table 4.1 Cooling Fans and Circulation Fans for IP20/UL Open Type and IP20/UL Type 1
Drives
Model Cooling Fan Circulation Fan
Replacement
Procedure Reference
4005 - 4008 - - - -
2011 - 2031
4011 - 4034
1 - Procedure A 8
2046, 2059
4040 - 4052
1 -
Procedure B 16
4065 1 1
2075 - 2114
4077 - 4124
2 - Procedure C 24
2143 - 2273
4156 - 4240
2 - Procedure D 30
4302 2 1 Procedure E 34
Table 4.2 Cooling Fans and Circulation Fans for IP55/UL Type 12 Drives
Model Cooling Fan Circulation Fan Replacement
Procedure
Reference
4005 - - - -
2011, 2017
4006 - 4014
1 -
Procedure A 8
2024, 2031
4021 - 4034
1 1
2046, 2059
4040 - 4065
1 1 Procedure B 16
2075 - 2114
4077 - 4124
2 1 Procedure C 24
4 Cooling Fans and Circulation Fans by Drive Model
YASKAWA TOEP C730600 0FC Fan Replacement Procedure 7
Table 4.3 Cooling Fans and Circulation Fans for IP55/UL Type 12 Drives with Main Switch
Model Cooling Fan Circulation Fan
Replacement
Procedure
Reference
4005 - - - -
2011, 2017
4008 - 4014
1 -
Procedure A 8
2024, 2031
4021 - 4034
1 1
2046, 2059
4040 - 4065
1 1 Procedure B 16
2075 - 2114
4077 - 4096
2 1 Procedure C 24
◆ FP605
Table 4.4 Cooling Fans and Circulation Fans for IP20/UL Open Type and IP20/UL Type 1
Drives
Model Cooling Fan Circulation Fan
Circuit Board
Cooling Fan
Replacement
Procedure Reference
4005, 4008 - - - - -
2011 - 2031
4011 - 4034
1 - - Procedure A 8
2046, 2059
4040 - 4052
1 - -
Procedure B 16
4065 1 1 -
2075 - 2114
4077 - 4124
2 - - Procedure C 24
2143, 2169
4156
2 - - Procedure D 30
2211, 2273
4180 - 4302
2 - - Procedure F 42
4361 2 1 -
Procedure G 45
2343, 2396
4414
3 1 -
4477 - 4590 2 1 2 Procedure H 53
4720 3 1 2 Procedure I 65
Table 4.5 Cooling Fans and Circulation Fans for IP55/UL Type 12 Drives
Model Cooling Fan Circulation Fan Replacement
Procedure
Reference
4005 - - - -
2011, 2017 1 - Procedure A 8
5 Replace Cooling Fans and Circulation Fans
8 YASKAWA TOEP C730600 0FC Fan Replacement Procedure
Model Cooling Fan Circulation Fan Replacement
Procedure
Reference
4008 - 4014
2024, 2031
4021 - 4034
1 1
2046, 2059
4040 - 4065
1 1 Procedure B 16
2075 - 2114
4077 - 4124
2 1 Procedure C 24
Table 4.6 Cooling Fans and Circulation Fans for IP55/UL Type 12 Drives with Main Switch
Model Cooling Fan Circulation Fan
Replacement
Procedure
Reference
4005 - - - -
2011, 2017
4008 - 4014
1 -
Procedure A 8
2024, 2031
4021 - 4034
1 1
2046, 2059
4040 - 4065
1 1 Procedure B 16
2075 - 2114
4077 - 4096
2 1 Procedure C 24
5 Replace Cooling Fans and Circulation Fans
CAUTION Injury to Personnel. Some fan units are not easily accessible from a standing position.
Make sure that you can safely and comfortably remove and replace the fan. If you try to remove a fan that you
cannot easily access, the fan unit can fall and cause minor to moderate injury.
NOTICE Use the instructions in this manual to replace the cooling fans. When you do maintenance
on the fans, replace all the fans to increase product life. If you install the fans incorrectly, it can cause damage to
the drive.
◆ Fan Replacement (Procedure A)
DANGER Electrical Shock Hazard. Do not examine, connect, or disconnect wiring on an energized
drive. Before servicing, disconnect all power to the equipment and wait for the time specified on the warning label
at a minimum. The internal capacitor stays charged after the drive is de-energized. The charge indicator LED
extinguishes when the DC bus voltage decreases below 50 Vdc. When all indicators are OFF, remove the covers
before measuring for dangerous voltages to make sure that the drive is safe. If you do work on the drive when it is
energized, it will cause serious injury or death from electrical shock.
CAUTION Burn Hazard. Do not touch a hot drive heatsink. De-energize the drive, wait for a minimum
of 15 minutes, then make sure that the heatsink is cool before you replace the cooling fans. If you touch a hot
drive heatsink, it can burn you.
NOTICE Use the instructions in this manual to replace the cooling fans. When you do maintenance
on the fans, replace all the fans to increase product life. If you install the fans incorrectly, it can cause damage to
the drive.
5 Replace Cooling Fans and Circulation Fans
YASKAWA TOEP C730600 0FC Fan Replacement Procedure 9
■ Fan Removal
1. Push the tab on the back side of the fan finger guard and pull up to remove the fan finger
guard from the drive.
A - Fan finger guard
Figure 5.1 Remove the Fan Finger Guard
2. Pull the cooling fan straight up from the drive. Remove the protective tube on the relay
connector and disconnect the connector to remove the fan from the drive.
A - Cooling fan B - Protective tube
Figure 5.2 Remove the Cooling Fan
■ Fan Installation
Reverse the removal procedure for fan installation.
5 Replace Cooling Fans and Circulation Fans
10 YASKAWA TOEP C730600 0FC Fan Replacement Procedure
1. Connect the relay connector between the drive and cooling fan, and attach the
protective tube.
A - Protective tube
Figure 5.3 Connect the Relay Connector
2. Align the notches on the fan with the pin on the drive and install the cooling fan in the
drive.
Note:
The positions of notch on the fan and alignment pin on the drive are different for different drive models. Use
these figures to make sure that you use correct positions for your drive.
A - Notch on fan
B - Alignment pin on drive
C - Front of drive
Figure 5.4 Install the Cooling Fan (Drive Models: 2011, 2017, 4006xV, 4008xV/T, 4011, 4014)
5 Replace Cooling Fans and Circulation Fans
YASKAWA TOEP C730600 0FC Fan Replacement Procedure 11
A - Notch on fan
B - Alignment pin on drive
C - Front of drive
Figure 5.5 Install the Cooling Fan (Drive Models: 2024, 2031, 4021 to 4034)
3. Put the cable and connector in the recess of the drive.
A - Front of drive B - Recess for cable and connector *1
Figure 5.6 Put the Cable and Connector in the Drive Recess
*1 Make sure that the cable and connector are in the correct space.
5 Replace Cooling Fans and Circulation Fans
12 YASKAWA TOEP C730600 0FC Fan Replacement Procedure
4. Hold the fan finger guard at an angle and put the connector tabs on the fan finger guard
into the holes on the drive.
A - Front of drive
B - Drive holes
C - Connector tabs
Figure 5.7 Install the Fan Finger Guard
5. Push the tab on the back side of the fan finger guard and click it into place on the drive.
Figure 5.8 Install the Fan Finger Guard
6. Energize the drive and set o4-03 = 0 [Fan Operation Time Setting = 0 h] to reset the fan
operation time.
■ Circulation Fan Removal
Note:
Use this procedure only when you use one of these drive models:
• 2024xV, 2031xV
• 4021xV to 4034xV
• 2024xT, 2031xT
• 4021xT to 4034xT
Remove the drive cover before you start this procedure.
5 Replace Cooling Fans and Circulation Fans
YASKAWA TOEP C730600 0FC Fan Replacement Procedure 13
CAUTION Crush Hazard. Loosen the cover screws. Do not fully remove them. If you fully remove the
cover screws, the terminal cover can fall and cause moderate injury.
1. Disconnect the connector and remove the fan cable from the hook.
A - Circulation fan
B - Hook
C - Fan cable
Figure 5.9 Disconnect the Connector and Remove the Fan Cable
5 Replace Cooling Fans and Circulation Fans
14 YASKAWA TOEP C730600 0FC Fan Replacement Procedure
2. Pull the bottom of the fan forward to remove it from the drive.
A - Circulation fan
Figure 5.10 Remove the Circulation Fan
■ Circulation Fan Installation
Note:
Use this procedure only when you use one of these drive models:
• 2024xV, 2031xV
• 4021xV to 4034xV
• 2024xT, 2031xT
• 4021xT to 4034xT
Reverse the removal procedure for circulation fan installation.
5 Replace Cooling Fans and Circulation Fans
YASKAWA TOEP C730600 0FC Fan Replacement Procedure 15
1. Put the side of the fan nearest to the top of the drive in first, and push it until the tabs
click into position.
A - Circulation fan B - Tabs
Figure 5.11 Install the Circulation Fan
5 Replace Cooling Fans and Circulation Fans
16 YASKAWA TOEP C730600 0FC Fan Replacement Procedure
2. Put the cable back into its initial position and connect the connector.
A - Fan cable B - Hook
Figure 5.12 Put the Cable Back into the Drive and Connect the Connector
◆ Fan Replacement (Procedure B)
DANGER Electrical Shock Hazard. Do not examine, connect, or disconnect wiring on an energized
drive. Before servicing, disconnect all power to the equipment and wait for the time specified on the warning label
at a minimum. The internal capacitor stays charged after the drive is de-energized. The charge indicator LED
extinguishes when the DC bus voltage decreases below 50 Vdc. When all indicators are OFF, remove the covers
before measuring for dangerous voltages to make sure that the drive is safe. If you do work on the drive when it is
energized, it will cause serious injury or death from electrical shock.
CAUTION Burn Hazard. Do not touch a hot drive heatsink. De-energize the drive, wait for a minimum
of 15 minutes, then make sure that the heatsink is cool before you replace the cooling fans. If you touch a hot
drive heatsink, it can burn you.
NOTICE Use the instructions in this manual to replace the cooling fans. When you do maintenance
on the fans, replace all the fans to increase product life. If you install the fans incorrectly, it can cause damage to
the drive.
5 Replace Cooling Fans and Circulation Fans
YASKAWA TOEP C730600 0FC Fan Replacement Procedure 17
■ Fan Removal
1. Push the tab on the back side of the fan finger guard and pull up to remove the fan finger
guard from the drive.
A - Fan finger guard
Figure 5.13 Remove the Fan Finger Guard
2. Pull the cooling fan straight up from the drive. Remove the protective tube on the relay
connector and disconnect the connector to remove the fan from the drive.
A - Cooling fan B - Protective tube
Figure 5.14 Remove the Cooling Fan
■ Fan Installation
Reverse the removal procedure for fan installation.
5 Replace Cooling Fans and Circulation Fans
18 YASKAWA TOEP C730600 0FC Fan Replacement Procedure
1. Connect the relay connector between the drive and cooling fan, and attach the
protective tube.
A - Protective tube
Figure 5.15 Connect the Relay Connector
2. Align the notch on the fan with the pin on the drive and install the cooling fan in the drive.
A - Notch on fan
B - Alignment pin on drive
C - Front of drive
Figure 5.16 Install the Cooling Fan
3. Put the cable and connector in the recess of the drive.
A - Front of drive B - Recess for cable and connector *1
Figure 5.17 Put the Cable in the Drive Recess
*1 Make sure that the cable and connector are in the correct space.
5 Replace Cooling Fans and Circulation Fans
YASKAWA TOEP C730600 0FC Fan Replacement Procedure 19
4. Hold the fan finger guard at an angle and put the connector tabs on the fan finger guard
into the holes on the drive.
A - Front of drive
B - Drive holes
C - Connector tabs
Figure 5.18 Install the Fan Finger Guard
5. Push the tab on the back side of the fan finger guard and click it into place on the drive.
Figure 5.19 Install the Fan Finger Guard
6. Energize the drive and set o4-03 = 0 [Fan Operation Time Setting = 0 h] to reset the fan
operation time.
■ Circulation Fan Removal
Note:
Use this procedure only when you use one of these drive models:
• 4065xF
• 2046xV, 2059xV
• 4040xV to 4065xV
• 2046xT, 2059xT
• 4040xT to 4065xT
Remove the drive cover before you start this procedure.
5 Replace Cooling Fans and Circulation Fans
20 YASKAWA TOEP C730600 0FC Fan Replacement Procedure
CAUTION Crush Hazard. Loosen the cover screws. Do not fully remove them. If you fully remove the
cover screws, the terminal cover can fall and cause moderate injury.
1. Remove the fan cable from the hooks.
A - Circulation fan
B - Hooks
C - Fan cable
Figure 5.20 Remove the Fan Cable
2. Disconnect the relay connector.
Figure 5.21 Disconnect the Relay Connector
5 Replace Cooling Fans and Circulation Fans
YASKAWA TOEP C730600 0FC Fan Replacement Procedure 21
3. Pull the bottom of the fan forward to remove it from the drive.
A - Circulation fan
Figure 5.22 Remove the Circulation Fan
■ Circulation Fan Installation
Note:
Use this procedure only when you use one of these drive models:
• 4065xF
• 2046xV, 2059xV
• 4040xV to 4065xV
• 2046xT, 2059xT
• 4040xT to 4065xT
Reverse the removal procedure for circulation fan installation.
5 Replace Cooling Fans and Circulation Fans
22 YASKAWA TOEP C730600 0FC Fan Replacement Procedure
1. Align the notch on the fan with the pin on the drive and install the fan in the drive.
A - Notch on fan
B - Circulation fan
C - Alignment pin on drive
Figure 5.23 Install the Circulation Fan
2. Put the side of the fan nearest to the top of the drive in first, and push it until the tabs
click into position.
A - Circulation fan B - Tabs
Figure 5.24 Install the Circulation Fan
5 Replace Cooling Fans and Circulation Fans
YASKAWA TOEP C730600 0FC Fan Replacement Procedure 23
3. Connect the relay connector.
Figure 5.25 Connect the Relay Connector
4. Put the cable and connector back into their initial positions.
A - Hooks B - Fan cable
Figure 5.26 Put the Cable Back into the Drive
5 Replace Cooling Fans and Circulation Fans
24 YASKAWA TOEP C730600 0FC Fan Replacement Procedure
◆ Fan Replacement (Procedure C)
DANGER Electrical Shock Hazard. Do not examine, connect, or disconnect wiring on an energized
drive. Before servicing, disconnect all power to the equipment and wait for the time specified on the warning label
at a minimum. The internal capacitor stays charged after the drive is de-energized. The charge indicator LED
extinguishes when the DC bus voltage decreases below 50 Vdc. When all indicators are OFF, remove the covers
before measuring for dangerous voltages to make sure that the drive is safe. If you do work on the drive when it is
energized, it will cause serious injury or death from electrical shock.
CAUTION Burn Hazard. Do not touch a hot drive heatsink. De-energize the drive, wait for a minimum
of 15 minutes, then make sure that the heatsink is cool before you replace the cooling fans. If you touch a hot
drive heatsink, it can burn you.
NOTICE Use the instructions in this manual to replace the cooling fans. When you do maintenance
on the fans, replace all the fans to increase product life. If you install the fans incorrectly, it can cause damage to
the drive.
■ Fan Removal
1. Push the tabs on the left and right sides of the fan finger guard and pull up to remove the
fan finger guard from the drive.
A - Fan finger guard
Figure 5.27 Remove the Fan Finger Guard
2. Pull the cooling fans straight up from the drive. Remove the protective tubes on the relay
connectors and disconnect the connectors to remove the fans from the drive.
A - Cooling fans B - Protective tubes
Figure 5.28 Remove the Cooling Fans
■ Fan Installation
Reverse the removal procedure for fan installation.
5 Replace Cooling Fans and Circulation Fans
YASKAWA TOEP C730600 0FC Fan Replacement Procedure 25
1. Connect the relay connectors between the drive and cooling fans, and attach the
protective tubes.
A - Protective tubes
Figure 5.29 Connect the Relay Connectors
2. Align the notches on the fans with the pins on the drive and install the cooling fans in the
drive.
A - Notch on fan
B - Alignment pins on drive
C - Front of drive
Figure 5.30 Install the Cooling Fans
3. Put the cables and connectors in the recess of the drive.
A - Front of drive B - Recess for cables and connectors *1
Figure 5.31 Put the Cables and Connectors in the Drive Recess
*1 Make sure that the cables and connectors are in the correct space.
5 Replace Cooling Fans and Circulation Fans
26 YASKAWA TOEP C730600 0FC Fan Replacement Procedure
4. Install the fan finger guard straight until the tabs click into place.
Figure 5.32 Install the Fan Finger Guard
5. Energize the drive and set o4-03 = 0 [Fan Operation Time Setting = 0 h] to reset the fan
operation time.
■ Circulation Fan Removal
Note:
Use this procedure only when you use one of these drive models:
• 2075xV to 2114xV
• 4077xV to 4124xV
• 2075xT to 2114xT
• 4077xT, 4096xT
Remove the drive cover before you start this procedure.
CAUTION Crush Hazard. Loosen the cover screws. Do not fully remove them. If you fully remove the
cover screws, the terminal cover can fall and cause moderate injury.
5 Replace Cooling Fans and Circulation Fans
YASKAWA TOEP C730600 0FC Fan Replacement Procedure 27
1. Pull the relay connector toward the top of the drive to remove from the hook then
remove the cable from the hooks.
A - Hooks
B - Circulation fan
C - Relay connector
Figure 5.33 Remove the Cable
5 Replace Cooling Fans and Circulation Fans
28 YASKAWA TOEP C730600 0FC Fan Replacement Procedure
2. Disconnect the relay connector.
Figure 5.34 Disconnect the Relay Connector
3. Pull the top of the fan forward to remove it from the drive.
A - Circulation fan
Figure 5.35 Remove the Circulation Fan
■ Circulation Fan Installation
Note:
Use this procedure only when you use one of these drive models:
• 2075xV to 2114xV
• 4077xV to 4124xV
• 2075xT to 2114xT
• 4077xT, 4096xT
Reverse the removal procedure for circulation fan installation.
5 Replace Cooling Fans and Circulation Fans
YASKAWA TOEP C730600 0FC Fan Replacement Procedure 29
1. Put the bottom of the fan on the tabs in position A then push the fan until the tabs in
position B click into position to put the fan back into the drive.
A - Tabs at the bottom of the fan
B - Tabs at the top of the fan
C - Circulation fan
Figure 5.36 Install the Circulation Fan
2. Connect the relay connector.
Figure 5.37 Connect the Relay Connector
5 Replace Cooling Fans and Circulation Fans
30 YASKAWA TOEP C730600 0FC Fan Replacement Procedure
3. Put the cable and relay connector back into their initial position.
A - Hooks
B - Circulation fan
C - Relay connector
Figure 5.38 Put the Cable and Relay Connector Back into the Drive
◆ Fan Replacement (Procedure D)
DANGER Electrical Shock Hazard. Do not examine, connect, or disconnect wiring on an energized
drive. Before servicing, disconnect all power to the equipment and wait for the time specified on the warning label
at a minimum. The internal capacitor stays charged after the drive is de-energized. The charge indicator LED
extinguishes when the DC bus voltage decreases below 50 Vdc. When all indicators are OFF, remove the covers
before measuring for dangerous voltages to make sure that the drive is safe. If you do work on the drive when it is
energized, it will cause serious injury or death from electrical shock.
CAUTION Burn Hazard. Do not touch a hot drive heatsink. De-energize the drive, wait for a minimum
of 15 minutes, then make sure that the heatsink is cool before you replace the cooling fans. If you touch a hot
drive heatsink, it can burn you.
5 Replace Cooling Fans and Circulation Fans
YASKAWA TOEP C730600 0FC Fan Replacement Procedure 31
NOTICE Use the instructions in this manual to replace the cooling fans. When you do maintenance
on the fans, replace all the fans to increase product life. If you install the fans incorrectly, it can cause damage to
the drive.
■ Fan Removal
1. Push the tabs on the left and right sides of the fan finger guard and pull up to remove the
fan finger guard from the drive.
A - Fan finger guard
Figure 5.39 Remove the Fan Finger Guard
2. Pull the cooling fans straight up from the drive. Remove the protective tubes on the relay
connectors and disconnect the connectors to remove the fans from the drive.
A - Cooling fans B - Protective tubes
Figure 5.40 Remove the Cooling Fans
■ Fan Installation
Reverse the removal procedure for fan installation.
5 Replace Cooling Fans and Circulation Fans
32 YASKAWA TOEP C730600 0FC Fan Replacement Procedure
1. Connect the relay connectors, and attach the protective tubes.
A - Protective tubes
Figure 5.41 Connect the Relay Connectors
2. Align the notches on the fans with the pins on the drive and install the cooling fans in the
drive.
A - Notch on fan
B - Alignment pins on drive
C - Front of drive
Figure 5.42 Install the Cooling Fans
5 Replace Cooling Fans and Circulation Fans
YASKAWA TOEP C730600 0FC Fan Replacement Procedure 33
3. Put the cables and connectors in the recess of the drive.
A - Front of drive B - Recess for cables and connectors *1
Figure 5.43 Put the Cables and Connectors in the Drive Recess
*1 Make sure that the cables and connectors are in the correct space.
4. Hold the fan finger guard at an angle and put the connector tabs on the fan finger guard
into the holes on the drive.
A - Front of drive
B - Drive holes
C - Connector tabs
Figure 5.44 Install the Fan Finger Guard
5. Push the tabs on the left and right sides of the fan finger guard and click it into place on
the drive.
Figure 5.45 Install the Fan Finger Guard
5 Replace Cooling Fans and Circulation Fans
34 YASKAWA TOEP C730600 0FC Fan Replacement Procedure
6. Energize the drive and set o4-03 = 0 [Fan Operation Time Setting = 0 h] to reset the fan
operation time.
◆ Fan Replacement (Procedure E)
DANGER Electrical Shock Hazard. Do not examine, connect, or disconnect wiring on an energized
drive. Before servicing, disconnect all power to the equipment and wait for the time specified on the warning label
at a minimum. The internal capacitor stays charged after the drive is de-energized. The charge indicator LED
extinguishes when the DC bus voltage decreases below 50 Vdc. When all indicators are OFF, remove the covers
before measuring for dangerous voltages to make sure that the drive is safe. If you do work on the drive when it is
energized, it will cause serious injury or death from electrical shock.
CAUTION Burn Hazard. Do not touch a hot drive heatsink. De-energize the drive, wait for a minimum
of 15 minutes, then make sure that the heatsink is cool before you replace the cooling fans. If you touch a hot
drive heatsink, it can burn you.
NOTICE Use the instructions in this manual to replace the cooling fans. When you do maintenance
on the fans, replace all the fans to increase product life. If you install the fans incorrectly, it can cause damage to
the drive.
■ Fan Removal
1. Push the tab on the back side of each fan finger guard and pull up to remove the fan
finger guards from the drive.
A - Fan finger guards
Figure 5.46 Remove the Fan Finger Guards
2. Pull the cooling fans straight up from the drive. Remove the protective tubes on the relay
connectors and disconnect the connectors to remove the fans from the drive.
A - Cooling fans B - Protective tubes
Figure 5.47 Remove the Cooling Fans
5 Replace Cooling Fans and Circulation Fans
YASKAWA TOEP C730600 0FC Fan Replacement Procedure 35
■ Fan Installation
Reverse the removal procedure for fan installation.
1. Connect the relay connectors, and attach the protective tubes.
A - Protective tubes
Figure 5.48 Connect the Relay Connectors
2. Align the notches on the fans with the pins on the drive and install the cooling fans in the
drive.
A - Notch on fan
B - Alignment pins on drive
C - Front of drive
Figure 5.49 Install the Cooling Fans
5 Replace Cooling Fans and Circulation Fans
36 YASKAWA TOEP C730600 0FC Fan Replacement Procedure
3. Put the cables and connectors in the recess of the drive.
A - Front of drive B - Recess for the cables and connectors
*1
Figure 5.50 Put the Cables and Connectors in the Drive Recess
*1 Make sure that the cables and connectors are in the correct space.
4. Hold the fan finger guards at an angle and put the connector tabs on the fan finger
guards into the receiving areas on the drive.
Note:
When you install the cooling fans, make sure that you do not pinch cables between the fan finger guards and
the drive.
A - Front of drive
B - Receiving area
C - Tab
Figure 5.51 Install the Fan Finger Guards
5 Replace Cooling Fans and Circulation Fans
YASKAWA TOEP C730600 0FC Fan Replacement Procedure 37
5. Push the tabs on the back side of the fan finger guards and click them into place on the
drive.
Figure 5.52 Install the Fan Finger Guards
6. Energize the drive and set o4-03 = 0 [Fan Operation Time Setting = 0 h] to reset the fan
operation time.
■ Circulation Fan Removal
Remove the drive cover before you start this procedure.
CAUTION Crush Hazard. Loosen the cover screws. Do not fully remove them. If you fully remove the
cover screws, the terminal cover can fall and cause moderate injury.
1. Remove the cable from the clamps.
A - Fan unit
B - Clamps
C - Fan cable
Figure 5.53 Remove the Fan Cable
5 Replace Cooling Fans and Circulation Fans
38 YASKAWA TOEP C730600 0FC Fan Replacement Procedure
2. Loosen the screws that safety the fan unit and slide the fan unit to the right.
Note:
To remove the fan unit, it is only necessary to loosen the screws.
A - Fan unit B - Screws
Figure 5.54 Slide the Fan Unit
3. Disconnect the relay connector and remove the fan unit.
Figure 5.55 Remove the Fan Unit
5 Replace Cooling Fans and Circulation Fans
YASKAWA TOEP C730600 0FC Fan Replacement Procedure 39
4. Remove the screws that safety the circulation fan and remove the fan.
A - Circulation fan
Figure 5.56 Remove the Circulation Fan
■ Circulation Fan Installation
Reverse the removal procedure for fan installation.
1. Connect the relay connector between the drive and circulation fan.
A - Circulation fan B - Fan unit base
Figure 5.57 Connect the Relay Connector
2. Align the pin on the fan unit base with the notch on the fan and put the fan in the fan unit
base, then use the screws to safety it.
Tighten the screws to a tightening torque of 0.98 N∙m to 1.33 N∙m (8.67 lbf∙in to 11.77
lbf∙in).
5 Replace Cooling Fans and Circulation Fans
40 YASKAWA TOEP C730600 0FC Fan Replacement Procedure
A - Circulation fan
B - Fan unit base
C - Alignment pin on fan unit base
D - Circulation fan connector
Figure 5.58 Install the Circulation Fan
3. Safety the fan cable through the clamp.
A - Clamp
Figure 5.59 Safety the Fan Cable
4. Put the fan unit into the specified location and slide it to the left, then use screws to
safety it to the drive.
Tighten the screws to a tightening torque of 1.96 N∙m to 2.53 N∙m (17.35 lbf∙in to 22.39
lbf∙in).
5 Replace Cooling Fans and Circulation Fans
YASKAWA TOEP C730600 0FC Fan Replacement Procedure 41
Figure 5.60 Install the Fan Unit
5. Safety the cable through the clamps.
A - Clamps B - Fan cable
Figure 5.61 Safety the Fan Cable through the Clamps
6. Install the drive cover.
7. Energize the drive and set o4-03 = 0 [Fan Operation Time Setting = 0 h] to reset the fan
operation time.
5 Replace Cooling Fans and Circulation Fans
42 YASKAWA TOEP C730600 0FC Fan Replacement Procedure
◆ Fan Replacement (Procedure F)
DANGER Electrical Shock Hazard. Do not examine, connect, or disconnect wiring on an energized
drive. Before servicing, disconnect all power to the equipment and wait for the time specified on the warning label
at a minimum. The internal capacitor stays charged after the drive is de-energized. The charge indicator LED
extinguishes when the DC bus voltage decreases below 50 Vdc. When all indicators are OFF, remove the covers
before measuring for dangerous voltages to make sure that the drive is safe. If you do work on the drive when it is
energized, it will cause serious injury or death from electrical shock.
CAUTION Burn Hazard. Do not touch a hot drive heatsink. De-energize the drive, wait for a minimum
of 15 minutes, then make sure that the heatsink is cool before you replace the cooling fans. If you touch a hot
drive heatsink, it can burn you.
NOTICE Use the instructions in this manual to replace the cooling fans. When you do maintenance
on the fans, replace all the fans to increase product life. If you install the fans incorrectly, it can cause damage to
the drive.
■ Fan Removal
1. Push the tabs on the left and right sides of the fan finger guard and pull up to remove the
fan finger guard from the drive.
A - Fan finger guard
Figure 5.62 Remove the Fan Finger Guard
2. Pull the cooling fans straight up from the drive. Disconnect the relay connectors and
remove the fans from the drive.
A - Cooling fans
Figure 5.63 Remove the Cooling Fans
■ Fan Installation
Reverse the removal procedure for fan installation.
5 Replace Cooling Fans and Circulation Fans
YASKAWA TOEP C730600 0FC Fan Replacement Procedure 43
1. Connect the relay connectors between the drive and cooling fans.
Figure 5.64 Connect the Relay Connectors
2. Align the notches on the fans with the pins on the drive and install the cooling fans in the
drive.
A - Notch on fan
B - Alignment pins on drive
C - Front of drive
Figure 5.65 Install the Cooling Fans
5 Replace Cooling Fans and Circulation Fans
44 YASKAWA TOEP C730600 0FC Fan Replacement Procedure
3. Put the cables and connectors in the recess of the drive.
A - Front of drive B - Recess for cables and connectors *1
Figure 5.66 Put the Cables and Connectors in the Drive Recess
*1 Make sure that the cables and connectors are in the correct space.
4. Hold the fan finger guard at an angle and put the connector tabs on the fan finger guard
into the holes on the drive.
A - Front of drive
B - Drive holes
C - Connector tabs
Figure 5.67 Install the Fan Finger Guard
5 Replace Cooling Fans and Circulation Fans
YASKAWA TOEP C730600 0FC Fan Replacement Procedure 45
5. Push the tabs on the left and right sides of the fan finger guard and click it into place on
the drive.
Figure 5.68 Install the Fan Finger Guard
6. Energize the drive and set o4-03 = 0 [Fan Operation Time Setting = 0 h] to reset the fan
operation time.
◆ Fan Replacement (Procedure G)
DANGER Electrical Shock Hazard. Do not examine, connect, or disconnect wiring on an energized
drive. Before servicing, disconnect all power to the equipment and wait for the time specified on the warning label
at a minimum. The internal capacitor stays charged after the drive is de-energized. The charge indicator LED
extinguishes when the DC bus voltage decreases below 50 Vdc. When all indicators are OFF, remove the covers
before measuring for dangerous voltages to make sure that the drive is safe. If you do work on the drive when it is
energized, it will cause serious injury or death from electrical shock.
CAUTION Burn Hazard. Do not touch a hot drive heatsink. De-energize the drive, wait for a minimum
of 15 minutes, then make sure that the heatsink is cool before you replace the cooling fans. If you touch a hot
drive heatsink, it can burn you.
NOTICE Use the instructions in this manual to replace the cooling fans. When you do maintenance
on the fans, replace all the fans to increase product life. If you install the fans incorrectly, it can cause damage to
the drive.
■ Fan Removal
1. Push the tab on the back side of each fan finger guard and pull up to remove the fan
finger guards from the drive.
A - Fan finger guards
Figure 5.69 Remove the Fan Finger Guards
2. Pull the cooling fans straight up from the drive. Disconnect the relay connectors to
remove the fans from the drive.
Note:
The number of fans is different for different drive models.
5 Replace Cooling Fans and Circulation Fans
46 YASKAWA TOEP C730600 0FC Fan Replacement Procedure
A - Cooling fans
Figure 5.70 Remove the Cooling Fans
■ Fan Installation
Reverse the removal procedure for fan installation.
1. Connect the relay connectors between the drive and cooling fans.
Figure 5.71 Connect the Relay Connectors
5 Replace Cooling Fans and Circulation Fans
YASKAWA TOEP C730600 0FC Fan Replacement Procedure 47
2. Align the notches on the fans with the pins on the drive and install the cooling fans in the
drive.
A - Notch on fan
B - Alignment pins on drive
C - Front of drive
Figure 5.72 Install the Cooling Fans
3. Put the cables and connectors in the recess of the drive.
A - Front of drive B - Recess for the cables and connectors
*1
Figure 5.73 Put the Cables and Connectors in the Drive Recess
*1 Make sure that the cables and connectors are in the correct space.
5 Replace Cooling Fans and Circulation Fans
48 YASKAWA TOEP C730600 0FC Fan Replacement Procedure
4. Hold the fan finger guards at an angle and put the connector tabs on the fan finger
guards into the receiving areas on the drive.
Note:
When you install the cooling fans, make sure that you do not pinch cables between the fan finger guards and
the drive.
A - Front of drive
B - Receiving area
C - Tab
Figure 5.74 Install the Fan Finger Guards
5. Push the tabs on the back side of the fan finger guards and click them into place on the
drive.
Figure 5.75 Install the Fan Finger Guards
6. Energize the drive and set o4-03 = 0 [Fan Operation Time Setting = 0 h] to reset the fan
operation time.
■ Circulation Fan Removal
Remove the drive cover before you start this procedure.
5 Replace Cooling Fans and Circulation Fans
YASKAWA TOEP C730600 0FC Fan Replacement Procedure 49
CAUTION Crush Hazard. Loosen the cover screws. Do not fully remove them. If you fully remove the
cover screws, the terminal cover can fall and cause moderate injury.
1. Remove the cable from the clamps.
A - Fan unit
B - Clamps
C - Fan cable
Figure 5.76 Remove the Fan Cable
2. Loosen the screws that safety the fan unit and slide the fan unit to the right.
Note:
To remove the fan unit, it is only necessary to loosen the screws.
A - Fan unit B - Screws
Figure 5.77 Slide the Fan Unit
5 Replace Cooling Fans and Circulation Fans
50 YASKAWA TOEP C730600 0FC Fan Replacement Procedure
3. Disconnect the relay connector and remove the fan unit.
Figure 5.78 Remove the Fan Unit
4. Remove the screws that safety the circulation fan and remove the fan.
A - Circulation fan
Figure 5.79 Remove the Circulation Fan
■ Circulation Fan Installation
Reverse the removal procedure for fan installation.
5 Replace Cooling Fans and Circulation Fans
YASKAWA TOEP C730600 0FC Fan Replacement Procedure 51
1. Connect the relay connector between the drive and circulation fan.
A - Circulation fan B - Fan unit base
Figure 5.80 Connect the Relay Connector
2. Align the pin on the fan unit base with the notch on the fan and put the fan in the fan unit
base, then use the screws to safety it.
Tighten the screws to a tightening torque of 0.98 N∙m to 1.33 N∙m (8.67 lbf∙in to 11.77
lbf∙in).
A - Circulation fan
B - Fan unit base
C - Alignment pin on fan unit base
D - Circulation fan connector
Figure 5.81 Install the Circulation Fan
5 Replace Cooling Fans and Circulation Fans
52 YASKAWA TOEP C730600 0FC Fan Replacement Procedure
3. Safety the fan cable through the clamp.
A - Clamp
Figure 5.82 Safety the Fan Cable
4. Put the fan unit into the specified location and slide it to the left, then use screws to
safety it to the drive.
Tighten the screws to a tightening torque of 1.96 N∙m to 2.53 N∙m (17.35 lbf∙in to 22.39
lbf∙in).
Figure 5.83 Install the Fan Unit
5 Replace Cooling Fans and Circulation Fans
YASKAWA TOEP C730600 0FC Fan Replacement Procedure 53
5. Safety the cable through the clamps.
A - Clamps B - Fan cable
Figure 5.84 Safety the Fan Cable through the Clamps
6. Install the drive cover.
7. Energize the drive and set o4-03 = 0 [Fan Operation Time Setting = 0 h] to reset the fan
operation time.
◆ Fan Replacement (Procedure H)
DANGER Electrical Shock Hazard. Do not examine, connect, or disconnect wiring on an energized
drive. Before servicing, disconnect all power to the equipment and wait for the time specified on the warning label
at a minimum. The internal capacitor stays charged after the drive is de-energized. The charge indicator LED
extinguishes when the DC bus voltage decreases below 50 Vdc. When all indicators are OFF, remove the covers
before measuring for dangerous voltages to make sure that the drive is safe. If you do work on the drive when it is
energized, it will cause serious injury or death from electrical shock.
CAUTION Burn Hazard. Do not touch a hot drive heatsink. De-energize the drive, wait for a minimum
of 15 minutes, then make sure that the heatsink is cool before you replace the cooling fans. If you touch a hot
drive heatsink, it can burn you.
NOTICE Use the instructions in this manual to replace the cooling fans. When you do maintenance
on the fans, replace all the fans to increase product life. If you install the fans incorrectly, it can cause damage to
the drive.
■ Fan Removal
1. Remove the drive cover.
CAUTION Crush Hazard. Loosen the cover screws. Do not fully remove them. If you
fully remove the cover screws, the terminal cover can fall and cause moderate injury.
5 Replace Cooling Fans and Circulation Fans
54 YASKAWA TOEP C730600 0FC Fan Replacement Procedure
2. Unplug the fan cable from the fan connectors.
A - Fan unit
B - Fan connectors
C - Fan cable
Figure 5.85 Remove the Fan Cable
3. Loosen the screws that safety the fan unit and slide the slide panel to the left.
Note:
• To remove the fan unit, it is only necessary to loosen the screws in position B.
• Remove the screws in position A.
A - Screw position A
B - Screw position B
C - Slide panel
Figure 5.86 Slide the Slide Panel
5 Replace Cooling Fans and Circulation Fans
YASKAWA TOEP C730600 0FC Fan Replacement Procedure 55
4. Remove the fan unit and the slide panel at the same time.
Note:
When you remove the fan unit, make sure that it does not fall.
Figure 5.87 Remove the Fan Unit
5 Replace Cooling Fans and Circulation Fans
56 YASKAWA TOEP C730600 0FC Fan Replacement Procedure
5. Unplug the relay connectors, remove the screws that safety the cooling fans and
circulation fan, and then remove the fans.
A - Cooling fans
B - Relay connectors
C - Fan unit base
D - Circulation fan
Figure 5.88 Remove the Cooling Fans and Circulation Fan
■ Fan Installation
Reverse the removal procedure for fan installation.
1. Connect the relay connectors on the fan unit base to the cooling fans and the circulation
fan.
A - Cooling fans
B - Relay connectors
C - Fan unit base
D - Circulation fan
Figure 5.89 Connect the Relay Connectors
2. Align the pins on the fan unit base with the notches on the fans and put the fans in the
fan unit base, then use the screws to safety them.
Tighten the M4 screws to a tightening torque of 0.98 N∙m to 1.33 N∙m (8.67 lbf∙in to
11.77 lbf∙in).
5 Replace Cooling Fans and Circulation Fans
YASKAWA TOEP C730600 0FC Fan Replacement Procedure 57
Note:
Make sure that you do not pinch cables between the fans and the fan unit base.
A - Cooling fans
B - Fan unit base
C - Alignment pin on fan unit base
D - Circulation fan
E - Notch on fan
Figure 5.90 Install the Cooling Fans and Circulation Fan
3. Put the cables and connectors in the recess of the drive.
Note:
Safety the relay cables to the hooks.
5 Replace Cooling Fans and Circulation Fans
58 YASKAWA TOEP C730600 0FC Fan Replacement Procedure
A - Cooling fans
B - Cable hooks
C - Relay connectors
D - Relay cables
E - Circulation fan
Figure 5.91 Put the Cables and Connectors in the Drive Recess
5 Replace Cooling Fans and Circulation Fans
YASKAWA TOEP C730600 0FC Fan Replacement Procedure 59
4. Put the fan unit into the specified location.
Figure 5.92 Install the Fan Unit
5. Slide the fan unit to the right and use the screws to safety it to the drive.
Tighten the screws to a correct tightening torque:
• Screws in Position A: 0.98 N∙m to 1.33 N∙m (8.67 lbf∙in to 11.77 lbf∙in)
• Screws in Position B: 1.96 N∙m to 2.53 N∙m (17.35 lbf∙in to 22.39 lbf∙in)
5 Replace Cooling Fans and Circulation Fans
60 YASKAWA TOEP C730600 0FC Fan Replacement Procedure
A - Screw position A
B - Screw position B
C - Fan unit
Figure 5.93 Slide the Fan Unit
6. Connect the fan cable to the fan connectors.
A - Fan unit
B - Fan connectors
C - Fan cable
Figure 5.94 Connect Cooling Fan Connectors
7. Install the drive cover.
8. Energize the drive and set o4-03 = 0 [Fan Operation Time Setting = 0 h] to reset the fan
operation time.
5 Replace Cooling Fans and Circulation Fans
YASKAWA TOEP C730600 0FC Fan Replacement Procedure 61
■ Circuit Board Cooling Fan Removal
Remove the drive cover before you start this procedure.
CAUTION Crush Hazard. Loosen the cover screws. Do not fully remove them. If you fully remove the
cover screws, the terminal cover can fall and cause moderate injury.
1. Disconnect the relay cables from the fan connectors.
A - Fan connectors
B - Relay cables
C - Circuit board cooling fan units
Figure 5.95 Disconnect the Relay Cables
2. Loosen the screws that safety the circuit board cooling fan unit and slide the circuit
board cooling fan unit up.
Note:
To remove the fan unit, it is only necessary to loosen the screws.
5 Replace Cooling Fans and Circulation Fans
62 YASKAWA TOEP C730600 0FC Fan Replacement Procedure
A - Screws
Figure 5.96 Slide the Circuit Board Cooling Fan Units
3. Remove the circuit board cooling fan units.
Figure 5.97 Remove the Circuit Board Cooling Fan Units
5 Replace Cooling Fans and Circulation Fans
YASKAWA TOEP C730600 0FC Fan Replacement Procedure 63
4. Remove the screws that safety the circuit board cooling fans and remove the fans.
A - Circuit board cooling fan B - Fan unit base
Figure 5.98 Remove the Circuit Board Cooling Fans
■ Circuit Board Cooling Fan Installation
Reverse the removal procedure for fan installation.
1. Align the pin on the fan unit base with the notch on the fan and put the circuit board
cooling fan in the fan unit, then use the screws to safety the circuit board cooling fan to
the fan unit base.
Tighten the screws to a tightening torque of 0.98 N∙m to 1.33 N∙m (8.67 lbf∙in to 11.77
lbf∙in).
Note:
Make sure that you do not pinch cables between the circuit board cooling fan and the fan unit base.
A - Circuit board cooling fan
B - Fan unit base
C - Alignment pin on fan unit base
Figure 5.99 Install the Circuit Board Cooling Fan
2. Put the circuit board cooling fan unit into the specified location and slide it down, then
use the screws to safety it to the drive.
Tighten the screws to a tightening torque of 0.98 N∙m to 1.33 N∙m (8.67 lbf∙in to 11.77
lbf∙in).
5 Replace Cooling Fans and Circulation Fans
64 YASKAWA TOEP C730600 0FC Fan Replacement Procedure
Figure 5.100 Install the Circuit Board Cooling Fan Unit
3. Connect the relay cables to the fan connectors.
A - Fan connectors
B - Relay cables
C - Circuit board cooling fan units
Figure 5.101 Connect the Relay Cables
4. Install the drive cover.
5. Energize the drive and set o4-03 = 0 [Fan Operation Time Setting = 0 h] to reset the fan
operation time.
5 Replace Cooling Fans and Circulation Fans
YASKAWA TOEP C730600 0FC Fan Replacement Procedure 65
◆ Fan Replacement (Procedure I)
DANGER Electrical Shock Hazard. Do not examine, connect, or disconnect wiring on an energized
drive. Before servicing, disconnect all power to the equipment and wait for the time specified on the warning label
at a minimum. The internal capacitor stays charged after the drive is de-energized. The charge indicator LED
extinguishes when the DC bus voltage decreases below 50 Vdc. When all indicators are OFF, remove the covers
before measuring for dangerous voltages to make sure that the drive is safe. If you do work on the drive when it is
energized, it will cause serious injury or death from electrical shock.
CAUTION Burn Hazard. Do not touch a hot drive heatsink. De-energize the drive, wait for a minimum
of 15 minutes, then make sure that the heatsink is cool before you replace the cooling fans. If you touch a hot
drive heatsink, it can burn you.
NOTICE Use the instructions in this manual to replace the cooling fans. When you do maintenance
on the fans, replace all the fans to increase product life. If you install the fans incorrectly, it can cause damage to
the drive.
■ Fan Removal
1. Remove the drive cover.
CAUTION Crush Hazard. Loosen the cover screws. Do not fully remove them. If you
fully remove the cover screws, the terminal cover can fall and cause moderate injury.
2. Unplug the fan cables from the fan connectors.
A - Fan unit
B - Fan connectors
C - Fan cable
Figure 5.102 Unplug the Fan Cables
3. Loosen the screws that safety the fan unit.
Note:
• To remove the fan unit, it is only necessary to loosen the screws in position B.
• Remove the screws in position A.
5 Replace Cooling Fans and Circulation Fans
66 YASKAWA TOEP C730600 0FC Fan Replacement Procedure
A - Screw position A B - Screw position B
Figure 5.103 Loosen the Screws
4. Remove the fan unit.
Note:
When you remove the fan unit, make sure that it does not fall.
Figure 5.104 Remove the Fan Unit
5 Replace Cooling Fans and Circulation Fans
YASKAWA TOEP C730600 0FC Fan Replacement Procedure 67
5. Unplug the relay connectors, remove the screws that safety the cooling fans and
circulation fan, and then remove the fans.
A - Cooling fans
B - Relay connectors
C - Fan unit base
D - Circulation fan
Figure 5.105 Remove the Cooling Fans and Circulation Fan
■ Fan Installation
Reverse the removal procedure for fan installation.
1. Connect the relay connectors on the fan unit base to the cooling fans and the circulation
fan.
A - Cooling fans
B - Relay connectors
C - Fan unit base
D - Circulation fan
Figure 5.106 Connect the Relay Connectors
2. Align the pins on the fan unit base with the notches on the fans and put the fans in the
fan unit base, then use the screws to safety them.
Tighten the M4 screws to a tightening torque of 0.98 N∙m to 1.33 N∙m (8.67 lbf∙in to
11.77 lbf∙in).
5 Replace Cooling Fans and Circulation Fans
68 YASKAWA TOEP C730600 0FC Fan Replacement Procedure
Note:
Make sure that you do not pinch cables between the fans and the fan unit base.
A - Cooling fans
B - Fan unit base
C - Alignment pin on fan unit base
D - Circulation fan
E - Notch on fan
Figure 5.107 Install the Cooling Fans and Circulation Fan
3. Put the cables and connectors in the recess of the drive.
Note:
Safety the relay cables to the hooks.
5 Replace Cooling Fans and Circulation Fans
YASKAWA TOEP C730600 0FC Fan Replacement Procedure 69
A - Cooling fans
B - Relay cables
C - Cable hooks
D - Relay connectors
E - Circulation fan
4. Put the fan unit into the specified location and use screws to safety it to the drive.
Tighten the screws to a correct tightening torque:
• Screws in Position A: 0.98 N∙m to 1.33 N∙m (8.67 lbf∙in to 11.77 lbf∙in)
• Screws in Position B: 1.96 N∙m to 2.53 N∙m (17.35 lbf∙in to 22.39 lbf∙in)
5 Replace Cooling Fans and Circulation Fans
70 YASKAWA TOEP C730600 0FC Fan Replacement Procedure
A - Screw position A B - Screw position B
Figure 5.108 Install the Fan Unit
5. Connect the fan cable to the fan connectors.
A - Fan unit
B - Fan connectors
C - Fan cable
Figure 5.109 Connect Cooling Fan Connectors
6. Install the drive cover.
5 Replace Cooling Fans and Circulation Fans
YASKAWA TOEP C730600 0FC Fan Replacement Procedure 71
7. Energize the drive and set o4-03 = 0 [Fan Operation Time Setting = 0 h] to reset the fan
operation time.
■ Circuit Board Cooling Fan Removal
Remove the drive cover before you start this procedure.
CAUTION Crush Hazard. Loosen the cover screws. Do not fully remove them. If you fully remove the
cover screws, the terminal cover can fall and cause moderate injury.
1. Disconnect the relay cables from the fan connectors.
A - Fan connectors
B - Relay cables
C - Circuit board cooling fan units
Figure 5.110 Disconnect the Relay Cables
2. Loosen the screws that safety the circuit board cooling fan unit and slide the circuit
board cooling fan unit up.
Note:
To remove the fan unit, it is only necessary to loosen the screws.
5 Replace Cooling Fans and Circulation Fans
72 YASKAWA TOEP C730600 0FC Fan Replacement Procedure
A - Screws
Figure 5.111 Slide the Circuit Board Cooling Fan Unit
3. Remove the circuit board cooling fan units.
Figure 5.112 Remove the Circuit Board Cooling Fan Units
5 Replace Cooling Fans and Circulation Fans
YASKAWA TOEP C730600 0FC Fan Replacement Procedure 73
4. Remove the screws that safety the circuit board cooling fans and remove the fans.
A - Circuit board cooling fan B - Fan unit base
Figure 5.113 Remove the Circuit Board Cooling Fans
■ Circuit Board Cooling Fan Installation
Reverse the removal procedure for fan installation.
1. Align the pin on the fan unit base with the notch on the fan and put the circuit board
cooling fan in the fan unit, then use the screws to safety the circuit board cooling fan to
the fan unit base.
Tighten the screws to a tightening torque of 0.98 N∙m to 1.33 N∙m (8.67 lbf∙in to 11.77
lbf∙in).
Note:
Make sure that you do not pinch cables between the circuit board cooling fan and the fan unit base.
A - Circuit board cooling fan
B - Fan unit base
C - Alignment pin on fan unit base
Figure 5.114 Install the Circuit Board Cooling Fan
2. Put the circuit board cooling fan unit into the specified location and use screws to safety
it to the drive.
Tighten the screws to a tightening torque of 0.98 N∙m to 1.33 N∙m (8.67 lbf∙in to 11.77
lbf∙in).
5 Replace Cooling Fans and Circulation Fans
74 YASKAWA TOEP C730600 0FC Fan Replacement Procedure
Figure 5.115 Install the Circuit Board Cooling Fan Unit
3. Connect the relay cables to the fan connectors.
A - Fan connectors
B - Relay cables
C - Circuit board cooling fan units
Figure 5.116 Connect the Relay Cables
4. Install the drive cover.
5. Energize the drive and set o4-03 = 0 [Fan Operation Time Setting = 0 h] to reset the fan
operation time.
YASKAWA TOEP C730600 0FC Fan Replacement Procedure 75
Revision History
Date of
Publication
Revision
Number Section Revised Content
June 2021 2
All Revision: Reviewed and corrected entire documentation.
4, 5
Revision: Modified documentation because of design
changes for these models:
• HV600: 4006 and 4008 (IP55/UL Type 12)
• FP605: 4008 (IP55/UL Type 12)
February 2021 1 4, 5 Addition: Information on FP605
December 2019 - - First Edition
YASKAWA AC Drive
Fan Replacement Procedure
In the event that the end user of this product is to be the military and said product is to be
employed in any weapons systems or the manufacture thereof, the export will fall under the
relevant regulations as stipulated in the Foreign Exchange and Foreign Trade Regulations.
Therefore, be sure to follow all procedures and submit all relevant documentation according to
any and all rules, regulations and laws that may apply.
Specifications are subject to change without notice for ongoing product modifications and
improvements.
© 2019 YASKAWA Electric Corporation
MANUAL NO. TOEP C730600 0FC <2>-0
Published in Japan June 2021
20-2-22
*TOEPC7306000F*
YASKAWA AMERICA, INC.
2121, Norman Drive South, Waukegan, IL 60085, U.S.A.
Phone: +1-800-YASKAWA (927-5292) or +1-847-887-7000 Fax: +1-847-887-7310
www.yaskawa.com
DRIVE CENTER (INVERTER PLANT)
2-13-1, Nishimiyaichi, Yukuhashi, Fukuoka, 824-8511, Japan
Phone: +81-930-25-2548 Fax: +81-930-25-3431
www.yaskawa.co.jp
YASKAWA ELECTRIC CORPORATION
New Pier Takeshiba South Tower, 1-16-1, Kaigan, Minatoku, Tokyo, 105-6891, Japan
Phone: +81-3-5402-4502 Fax: +81-3-5402-4580
www.yaskawa.co.jp
YASKAWA ELÉTRICO DO BRASIL LTDA.
777, Avenida Piraporinha, Diadema, São Paulo, 09950-000, Brasil
Phone: +55-11-3585-1100 Fax: +55-11-3585-1187
www.yaskawa.com.br
YASKAWA EUROPE GmbH
Hauptstraße 185, 65760 Eschborn, Germany
Phone: +49-6196-569-300 Fax: +49-6196-569-398
E-mail: info@yaskawa.eu.com
www.yaskawa.eu.com
YASKAWA ELECTRIC KOREA CORPORATION
35F, Three IFC, 10 Gukjegeumyung-ro, Yeongdeungpo-gu, Seoul, 07326, Korea
Phone: +82-2-784-7844 Fax: +82-2-784-8495
www.yaskawa.co.kr
YASKAWA ASIA PACIFIC PTE. LTD
30A, Kallang Place, #06-01, 339213, Singapore
Phone: +65-6282-3003 Fax: +65-6289-3003
www.yaskawa.com.sg
YASKAWA ELECTRIC (THAILAND) CO., LTD.
59, 1F-5F, Flourish Building, Soi Ratchadapisek 18, Ratchadapisek Road, Huaykwang, Bangkok, 10310, Thailand
Phone: +66-2-017-0099 Fax: +66-2-017-0799
www.yaskawa.co.th
YASKAWA ELECTRIC (CHINA) CO., LTD.
22F, Link Square 1, No.222, Hubin Road, Shanghai, 200021, China
Phone: +86-21-5385-2200 Fax: +86-21-5385-3299
www.yaskawa.com.cn
YASKAWA ELECTRIC (CHINA) CO., LTD. BEIJING OFFICE
Room 1011, Tower W3 Oriental Plaza, No. 1, East Chang An Avenue,
Dong Cheng District, Beijing, 100738, China
Phone: +86-10-8518-4086 Fax: +86-10-8518-4082
YASKAWA ELECTRIC TAIWAN CORPORATION
12F, No. 207, Section 3, Beishin Road, Shindian District, New Taipei City 23143, Taiwan
Phone: +886-2-8913-1333 Fax: +886-2-8913-1513 or +886-2-8913-1519
www.yaskawa.com.tw
YASKAWA INDIA PRIVATE LIMITED
#17/A, Electronics City, Hosur Road, Bengaluru, 560 100 (Karnataka), India
Phone: +91-80-4244-1900 Fax: +91-80-4244-1901
www.yaskawaindia.in

More Related Content

Similar to Yaskawa vff cooling fan

Troy bilt 700 series rider service repair manual
Troy bilt 700 series rider service repair manualTroy bilt 700 series rider service repair manual
Troy bilt 700 series rider service repair manualdidkkkdmdmd
 
Troy bilt 700 series rider service repair manual
Troy bilt 700 series rider service repair manualTroy bilt 700 series rider service repair manual
Troy bilt 700 series rider service repair manualfhsjekdmme
 
Troy bilt 700 series rider service repair manual
Troy bilt 700 series rider service repair manualTroy bilt 700 series rider service repair manual
Troy bilt 700 series rider service repair manualfjjseksxckmdme
 
Troy bilt 700 series rider service repair manual
Troy bilt 700 series rider service repair manualTroy bilt 700 series rider service repair manual
Troy bilt 700 series rider service repair manualfhjskemme
 
Man marine diesel engines r6 730 series service repair manual
Man marine diesel engines r6 730 series service repair manualMan marine diesel engines r6 730 series service repair manual
Man marine diesel engines r6 730 series service repair manualjfjskekdhnejd
 
Man marine diesel engines r6 800 series service repair manual
Man marine diesel engines r6 800 series service repair manualMan marine diesel engines r6 800 series service repair manual
Man marine diesel engines r6 800 series service repair manualfjjskdmnenemm
 
MAN INDUSTRIAL GAS ENGINE E 2876 E 302 Service Repair Manual
MAN INDUSTRIAL GAS ENGINE E 2876 E 302 Service Repair ManualMAN INDUSTRIAL GAS ENGINE E 2876 E 302 Service Repair Manual
MAN INDUSTRIAL GAS ENGINE E 2876 E 302 Service Repair Manualjhennd iesofku
 
Man industrial gas engine e 2842 e 312 service repair manual
Man industrial gas engine e 2842 e 312 service repair manualMan industrial gas engine e 2842 e 312 service repair manual
Man industrial gas engine e 2842 e 312 service repair manualjksmjekmd
 
Man industrial gas engine e 2842 e 312 service repair manual
Man industrial gas engine e 2842 e 312 service repair manualMan industrial gas engine e 2842 e 312 service repair manual
Man industrial gas engine e 2842 e 312 service repair manualjksejkmds
 
Man industrial gas engine e 2842 e 302 service repair manual
Man industrial gas engine e 2842 e 302 service repair manualMan industrial gas engine e 2842 e 302 service repair manual
Man industrial gas engine e 2842 e 302 service repair manualhjsemmmd
 
Man industrial diesel engine d 2876 le 201 service repair manual
Man industrial diesel engine d 2876 le 201 service repair manualMan industrial diesel engine d 2876 le 201 service repair manual
Man industrial diesel engine d 2876 le 201 service repair manualjksnmdm
 

Similar to Yaskawa vff cooling fan (11)

Troy bilt 700 series rider service repair manual
Troy bilt 700 series rider service repair manualTroy bilt 700 series rider service repair manual
Troy bilt 700 series rider service repair manual
 
Troy bilt 700 series rider service repair manual
Troy bilt 700 series rider service repair manualTroy bilt 700 series rider service repair manual
Troy bilt 700 series rider service repair manual
 
Troy bilt 700 series rider service repair manual
Troy bilt 700 series rider service repair manualTroy bilt 700 series rider service repair manual
Troy bilt 700 series rider service repair manual
 
Troy bilt 700 series rider service repair manual
Troy bilt 700 series rider service repair manualTroy bilt 700 series rider service repair manual
Troy bilt 700 series rider service repair manual
 
Man marine diesel engines r6 730 series service repair manual
Man marine diesel engines r6 730 series service repair manualMan marine diesel engines r6 730 series service repair manual
Man marine diesel engines r6 730 series service repair manual
 
Man marine diesel engines r6 800 series service repair manual
Man marine diesel engines r6 800 series service repair manualMan marine diesel engines r6 800 series service repair manual
Man marine diesel engines r6 800 series service repair manual
 
MAN INDUSTRIAL GAS ENGINE E 2876 E 302 Service Repair Manual
MAN INDUSTRIAL GAS ENGINE E 2876 E 302 Service Repair ManualMAN INDUSTRIAL GAS ENGINE E 2876 E 302 Service Repair Manual
MAN INDUSTRIAL GAS ENGINE E 2876 E 302 Service Repair Manual
 
Man industrial gas engine e 2842 e 312 service repair manual
Man industrial gas engine e 2842 e 312 service repair manualMan industrial gas engine e 2842 e 312 service repair manual
Man industrial gas engine e 2842 e 312 service repair manual
 
Man industrial gas engine e 2842 e 312 service repair manual
Man industrial gas engine e 2842 e 312 service repair manualMan industrial gas engine e 2842 e 312 service repair manual
Man industrial gas engine e 2842 e 312 service repair manual
 
Man industrial gas engine e 2842 e 302 service repair manual
Man industrial gas engine e 2842 e 302 service repair manualMan industrial gas engine e 2842 e 302 service repair manual
Man industrial gas engine e 2842 e 302 service repair manual
 
Man industrial diesel engine d 2876 le 201 service repair manual
Man industrial diesel engine d 2876 le 201 service repair manualMan industrial diesel engine d 2876 le 201 service repair manual
Man industrial diesel engine d 2876 le 201 service repair manual
 

Recently uploaded

Top Rated Pune Call Girls Katraj ⟟ 6297143586 ⟟ Call Me For Genuine Sex Serv...
Top Rated  Pune Call Girls Katraj ⟟ 6297143586 ⟟ Call Me For Genuine Sex Serv...Top Rated  Pune Call Girls Katraj ⟟ 6297143586 ⟟ Call Me For Genuine Sex Serv...
Top Rated Pune Call Girls Katraj ⟟ 6297143586 ⟟ Call Me For Genuine Sex Serv...Call Girls in Nagpur High Profile
 
Call Girls in Vashi Escorts Services - 7738631006
Call Girls in Vashi Escorts Services - 7738631006Call Girls in Vashi Escorts Services - 7738631006
Call Girls in Vashi Escorts Services - 7738631006Pooja Nehwal
 
Call Girls in Nagpur Bhavna Call 7001035870 Meet With Nagpur Escorts
Call Girls in Nagpur Bhavna Call 7001035870 Meet With Nagpur EscortsCall Girls in Nagpur Bhavna Call 7001035870 Meet With Nagpur Escorts
Call Girls in Nagpur Bhavna Call 7001035870 Meet With Nagpur Escortsranjana rawat
 
Top Rated Pune Call Girls Ravet ⟟ 6297143586 ⟟ Call Me For Genuine Sex Servi...
Top Rated  Pune Call Girls Ravet ⟟ 6297143586 ⟟ Call Me For Genuine Sex Servi...Top Rated  Pune Call Girls Ravet ⟟ 6297143586 ⟟ Call Me For Genuine Sex Servi...
Top Rated Pune Call Girls Ravet ⟟ 6297143586 ⟟ Call Me For Genuine Sex Servi...Call Girls in Nagpur High Profile
 
Shikrapur Call Girls Most Awaited Fun 6297143586 High Profiles young Beautie...
Shikrapur Call Girls Most Awaited Fun  6297143586 High Profiles young Beautie...Shikrapur Call Girls Most Awaited Fun  6297143586 High Profiles young Beautie...
Shikrapur Call Girls Most Awaited Fun 6297143586 High Profiles young Beautie...tanu pandey
 
Low Rate Call Girls Nashik Vedika 7001305949 Independent Escort Service Nashik
Low Rate Call Girls Nashik Vedika 7001305949 Independent Escort Service NashikLow Rate Call Girls Nashik Vedika 7001305949 Independent Escort Service Nashik
Low Rate Call Girls Nashik Vedika 7001305949 Independent Escort Service NashikCall Girls in Nagpur High Profile
 
Develop Keyboard Skill.pptx er power point
Develop Keyboard Skill.pptx er power pointDevelop Keyboard Skill.pptx er power point
Develop Keyboard Skill.pptx er power pointGetawu
 
Book Sex Workers Available Pune Call Girls Yerwada 6297143586 Call Hot India...
Book Sex Workers Available Pune Call Girls Yerwada  6297143586 Call Hot India...Book Sex Workers Available Pune Call Girls Yerwada  6297143586 Call Hot India...
Book Sex Workers Available Pune Call Girls Yerwada 6297143586 Call Hot India...Call Girls in Nagpur High Profile
 
(ANIKA) Wanwadi Call Girls Just Call 7001035870 [ Cash on Delivery ] Pune Esc...
(ANIKA) Wanwadi Call Girls Just Call 7001035870 [ Cash on Delivery ] Pune Esc...(ANIKA) Wanwadi Call Girls Just Call 7001035870 [ Cash on Delivery ] Pune Esc...
(ANIKA) Wanwadi Call Girls Just Call 7001035870 [ Cash on Delivery ] Pune Esc...ranjana rawat
 
Call Girls Chikhali Call Me 7737669865 Budget Friendly No Advance Booking
Call Girls Chikhali Call Me 7737669865 Budget Friendly No Advance BookingCall Girls Chikhali Call Me 7737669865 Budget Friendly No Advance Booking
Call Girls Chikhali Call Me 7737669865 Budget Friendly No Advance Bookingroncy bisnoi
 
Top Rated Pune Call Girls Shirwal ⟟ 6297143586 ⟟ Call Me For Genuine Sex Ser...
Top Rated  Pune Call Girls Shirwal ⟟ 6297143586 ⟟ Call Me For Genuine Sex Ser...Top Rated  Pune Call Girls Shirwal ⟟ 6297143586 ⟟ Call Me For Genuine Sex Ser...
Top Rated Pune Call Girls Shirwal ⟟ 6297143586 ⟟ Call Me For Genuine Sex Ser...Call Girls in Nagpur High Profile
 
(👉Ridhima)👉VIP Model Call Girls Mulund ( Mumbai) Call ON 9967824496 Starting ...
(👉Ridhima)👉VIP Model Call Girls Mulund ( Mumbai) Call ON 9967824496 Starting ...(👉Ridhima)👉VIP Model Call Girls Mulund ( Mumbai) Call ON 9967824496 Starting ...
(👉Ridhima)👉VIP Model Call Girls Mulund ( Mumbai) Call ON 9967824496 Starting ...motiram463
 
Call Girls in Nagpur Sakshi Call 7001035870 Meet With Nagpur Escorts
Call Girls in Nagpur Sakshi Call 7001035870 Meet With Nagpur EscortsCall Girls in Nagpur Sakshi Call 7001035870 Meet With Nagpur Escorts
Call Girls in Nagpur Sakshi Call 7001035870 Meet With Nagpur EscortsCall Girls in Nagpur High Profile
 
VVIP Pune Call Girls Warje (7001035870) Pune Escorts Nearby with Complete Sat...
VVIP Pune Call Girls Warje (7001035870) Pune Escorts Nearby with Complete Sat...VVIP Pune Call Girls Warje (7001035870) Pune Escorts Nearby with Complete Sat...
VVIP Pune Call Girls Warje (7001035870) Pune Escorts Nearby with Complete Sat...Call Girls in Nagpur High Profile
 
Book Paid Lohegaon Call Girls Pune 8250192130Low Budget Full Independent High...
Book Paid Lohegaon Call Girls Pune 8250192130Low Budget Full Independent High...Book Paid Lohegaon Call Girls Pune 8250192130Low Budget Full Independent High...
Book Paid Lohegaon Call Girls Pune 8250192130Low Budget Full Independent High...ranjana rawat
 
presentation about microsoft power point
presentation about microsoft power pointpresentation about microsoft power point
presentation about microsoft power pointchhavia330
 
Call Girls Dubai Slut Wife O525547819 Call Girls Dubai Gaped
Call Girls Dubai Slut Wife O525547819 Call Girls Dubai GapedCall Girls Dubai Slut Wife O525547819 Call Girls Dubai Gaped
Call Girls Dubai Slut Wife O525547819 Call Girls Dubai Gapedkojalkojal131
 
VVIP Pune Call Girls Balaji Nagar (7001035870) Pune Escorts Nearby with Compl...
VVIP Pune Call Girls Balaji Nagar (7001035870) Pune Escorts Nearby with Compl...VVIP Pune Call Girls Balaji Nagar (7001035870) Pune Escorts Nearby with Compl...
VVIP Pune Call Girls Balaji Nagar (7001035870) Pune Escorts Nearby with Compl...Call Girls in Nagpur High Profile
 

Recently uploaded (20)

Vip Call Girls Noida ➡️ Delhi ➡️ 9999965857 No Advance 24HRS Live
Vip Call Girls Noida ➡️ Delhi ➡️ 9999965857 No Advance 24HRS LiveVip Call Girls Noida ➡️ Delhi ➡️ 9999965857 No Advance 24HRS Live
Vip Call Girls Noida ➡️ Delhi ➡️ 9999965857 No Advance 24HRS Live
 
Top Rated Pune Call Girls Katraj ⟟ 6297143586 ⟟ Call Me For Genuine Sex Serv...
Top Rated  Pune Call Girls Katraj ⟟ 6297143586 ⟟ Call Me For Genuine Sex Serv...Top Rated  Pune Call Girls Katraj ⟟ 6297143586 ⟟ Call Me For Genuine Sex Serv...
Top Rated Pune Call Girls Katraj ⟟ 6297143586 ⟟ Call Me For Genuine Sex Serv...
 
Call Girls in Vashi Escorts Services - 7738631006
Call Girls in Vashi Escorts Services - 7738631006Call Girls in Vashi Escorts Services - 7738631006
Call Girls in Vashi Escorts Services - 7738631006
 
Call Girls In Vaishali 📱 9999965857 🤩 Delhi 🫦 HOT AND SEXY VVIP 🍎 SERVICE
Call Girls In Vaishali 📱  9999965857  🤩 Delhi 🫦 HOT AND SEXY VVIP 🍎 SERVICECall Girls In Vaishali 📱  9999965857  🤩 Delhi 🫦 HOT AND SEXY VVIP 🍎 SERVICE
Call Girls In Vaishali 📱 9999965857 🤩 Delhi 🫦 HOT AND SEXY VVIP 🍎 SERVICE
 
Call Girls in Nagpur Bhavna Call 7001035870 Meet With Nagpur Escorts
Call Girls in Nagpur Bhavna Call 7001035870 Meet With Nagpur EscortsCall Girls in Nagpur Bhavna Call 7001035870 Meet With Nagpur Escorts
Call Girls in Nagpur Bhavna Call 7001035870 Meet With Nagpur Escorts
 
Top Rated Pune Call Girls Ravet ⟟ 6297143586 ⟟ Call Me For Genuine Sex Servi...
Top Rated  Pune Call Girls Ravet ⟟ 6297143586 ⟟ Call Me For Genuine Sex Servi...Top Rated  Pune Call Girls Ravet ⟟ 6297143586 ⟟ Call Me For Genuine Sex Servi...
Top Rated Pune Call Girls Ravet ⟟ 6297143586 ⟟ Call Me For Genuine Sex Servi...
 
Shikrapur Call Girls Most Awaited Fun 6297143586 High Profiles young Beautie...
Shikrapur Call Girls Most Awaited Fun  6297143586 High Profiles young Beautie...Shikrapur Call Girls Most Awaited Fun  6297143586 High Profiles young Beautie...
Shikrapur Call Girls Most Awaited Fun 6297143586 High Profiles young Beautie...
 
Low Rate Call Girls Nashik Vedika 7001305949 Independent Escort Service Nashik
Low Rate Call Girls Nashik Vedika 7001305949 Independent Escort Service NashikLow Rate Call Girls Nashik Vedika 7001305949 Independent Escort Service Nashik
Low Rate Call Girls Nashik Vedika 7001305949 Independent Escort Service Nashik
 
Develop Keyboard Skill.pptx er power point
Develop Keyboard Skill.pptx er power pointDevelop Keyboard Skill.pptx er power point
Develop Keyboard Skill.pptx er power point
 
Book Sex Workers Available Pune Call Girls Yerwada 6297143586 Call Hot India...
Book Sex Workers Available Pune Call Girls Yerwada  6297143586 Call Hot India...Book Sex Workers Available Pune Call Girls Yerwada  6297143586 Call Hot India...
Book Sex Workers Available Pune Call Girls Yerwada 6297143586 Call Hot India...
 
(ANIKA) Wanwadi Call Girls Just Call 7001035870 [ Cash on Delivery ] Pune Esc...
(ANIKA) Wanwadi Call Girls Just Call 7001035870 [ Cash on Delivery ] Pune Esc...(ANIKA) Wanwadi Call Girls Just Call 7001035870 [ Cash on Delivery ] Pune Esc...
(ANIKA) Wanwadi Call Girls Just Call 7001035870 [ Cash on Delivery ] Pune Esc...
 
Call Girls Chikhali Call Me 7737669865 Budget Friendly No Advance Booking
Call Girls Chikhali Call Me 7737669865 Budget Friendly No Advance BookingCall Girls Chikhali Call Me 7737669865 Budget Friendly No Advance Booking
Call Girls Chikhali Call Me 7737669865 Budget Friendly No Advance Booking
 
Top Rated Pune Call Girls Shirwal ⟟ 6297143586 ⟟ Call Me For Genuine Sex Ser...
Top Rated  Pune Call Girls Shirwal ⟟ 6297143586 ⟟ Call Me For Genuine Sex Ser...Top Rated  Pune Call Girls Shirwal ⟟ 6297143586 ⟟ Call Me For Genuine Sex Ser...
Top Rated Pune Call Girls Shirwal ⟟ 6297143586 ⟟ Call Me For Genuine Sex Ser...
 
(👉Ridhima)👉VIP Model Call Girls Mulund ( Mumbai) Call ON 9967824496 Starting ...
(👉Ridhima)👉VIP Model Call Girls Mulund ( Mumbai) Call ON 9967824496 Starting ...(👉Ridhima)👉VIP Model Call Girls Mulund ( Mumbai) Call ON 9967824496 Starting ...
(👉Ridhima)👉VIP Model Call Girls Mulund ( Mumbai) Call ON 9967824496 Starting ...
 
Call Girls in Nagpur Sakshi Call 7001035870 Meet With Nagpur Escorts
Call Girls in Nagpur Sakshi Call 7001035870 Meet With Nagpur EscortsCall Girls in Nagpur Sakshi Call 7001035870 Meet With Nagpur Escorts
Call Girls in Nagpur Sakshi Call 7001035870 Meet With Nagpur Escorts
 
VVIP Pune Call Girls Warje (7001035870) Pune Escorts Nearby with Complete Sat...
VVIP Pune Call Girls Warje (7001035870) Pune Escorts Nearby with Complete Sat...VVIP Pune Call Girls Warje (7001035870) Pune Escorts Nearby with Complete Sat...
VVIP Pune Call Girls Warje (7001035870) Pune Escorts Nearby with Complete Sat...
 
Book Paid Lohegaon Call Girls Pune 8250192130Low Budget Full Independent High...
Book Paid Lohegaon Call Girls Pune 8250192130Low Budget Full Independent High...Book Paid Lohegaon Call Girls Pune 8250192130Low Budget Full Independent High...
Book Paid Lohegaon Call Girls Pune 8250192130Low Budget Full Independent High...
 
presentation about microsoft power point
presentation about microsoft power pointpresentation about microsoft power point
presentation about microsoft power point
 
Call Girls Dubai Slut Wife O525547819 Call Girls Dubai Gaped
Call Girls Dubai Slut Wife O525547819 Call Girls Dubai GapedCall Girls Dubai Slut Wife O525547819 Call Girls Dubai Gaped
Call Girls Dubai Slut Wife O525547819 Call Girls Dubai Gaped
 
VVIP Pune Call Girls Balaji Nagar (7001035870) Pune Escorts Nearby with Compl...
VVIP Pune Call Girls Balaji Nagar (7001035870) Pune Escorts Nearby with Compl...VVIP Pune Call Girls Balaji Nagar (7001035870) Pune Escorts Nearby with Compl...
VVIP Pune Call Girls Balaji Nagar (7001035870) Pune Escorts Nearby with Compl...
 

Yaskawa vff cooling fan

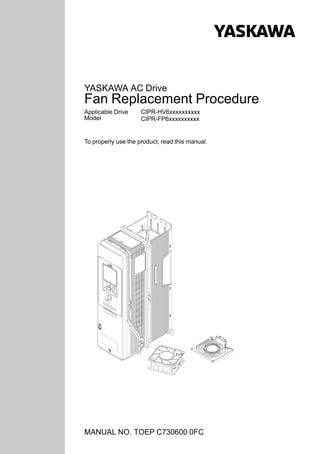
  • 1. MANUAL NO. TOEP C730600 0FC YASKAWA AC Drive Fan Replacement Procedure Applicable Drive Model CIPR-HV6xxxxxxxxxx CIPR-FP6xxxxxxxxxx To properly use the product, read this manual.
  • 2. This Page Intentionally Blank 2 YASKAWA TOEP C730600 0FC Fan Replacement Procedure
  • 3. YASKAWA TOEP C730600 0FC Fan Replacement Procedure 3 Table of Contents 1. Overview. . . . . . . . . . . . . . . . . . . . . . . . . . . . . . . . . . . . . . . . . . . . . . . . . . . . . . . . . 5 2. Explanation of Signal Words . . . . . . . . . . . . . . . . . . . . . . . . . . . . . . . . . . . . . . . . . 5 3. Section Safety . . . . . . . . . . . . . . . . . . . . . . . . . . . . . . . . . . . . . . . . . . . . . . . . . . . . 5 4. Cooling Fans and Circulation Fans by Drive Model. . . . . . . . . . . . . . . . . . . . . . . 6 HV600 . . . . . . . . . . . . . . . . . . . . . . . . . . . . . . . . . . . . . . . . . . . . . . . . . . . . . . . . . . . . . . . . . . . 6 FP605 . . . . . . . . . . . . . . . . . . . . . . . . . . . . . . . . . . . . . . . . . . . . . . . . . . . . . . . . . . . . . . . . . . . 7 5. Replace Cooling Fans and Circulation Fans . . . . . . . . . . . . . . . . . . . . . . . . . . . . 8 Fan Replacement (Procedure A). . . . . . . . . . . . . . . . . . . . . . . . . . . . . . . . . . . . . . . . . . . . . . 8 Fan Removal. . . . . . . . . . . . . . . . . . . . . . . . . . . . . . . . . . . . . . . . . . . . . . . . . . . . . . . . . . 9 Fan Installation . . . . . . . . . . . . . . . . . . . . . . . . . . . . . . . . . . . . . . . . . . . . . . . . . . . . . . . . 9 Circulation Fan Removal . . . . . . . . . . . . . . . . . . . . . . . . . . . . . . . . . . . . . . . . . . . . . . . 12 Circulation Fan Installation. . . . . . . . . . . . . . . . . . . . . . . . . . . . . . . . . . . . . . . . . . . . . . 14 Fan Replacement (Procedure B). . . . . . . . . . . . . . . . . . . . . . . . . . . . . . . . . . . . . . . . . . . . . 16 Fan Removal. . . . . . . . . . . . . . . . . . . . . . . . . . . . . . . . . . . . . . . . . . . . . . . . . . . . . . . . . 17 Fan Installation . . . . . . . . . . . . . . . . . . . . . . . . . . . . . . . . . . . . . . . . . . . . . . . . . . . . . . . 17 Circulation Fan Removal . . . . . . . . . . . . . . . . . . . . . . . . . . . . . . . . . . . . . . . . . . . . . . . 19 Circulation Fan Installation. . . . . . . . . . . . . . . . . . . . . . . . . . . . . . . . . . . . . . . . . . . . . . 21 Fan Replacement (Procedure C). . . . . . . . . . . . . . . . . . . . . . . . . . . . . . . . . . . . . . . . . . . . . 24 Fan Removal. . . . . . . . . . . . . . . . . . . . . . . . . . . . . . . . . . . . . . . . . . . . . . . . . . . . . . . . . 24 Fan Installation . . . . . . . . . . . . . . . . . . . . . . . . . . . . . . . . . . . . . . . . . . . . . . . . . . . . . . . 24 Circulation Fan Removal . . . . . . . . . . . . . . . . . . . . . . . . . . . . . . . . . . . . . . . . . . . . . . . 26 Circulation Fan Installation. . . . . . . . . . . . . . . . . . . . . . . . . . . . . . . . . . . . . . . . . . . . . . 28 Fan Replacement (Procedure D). . . . . . . . . . . . . . . . . . . . . . . . . . . . . . . . . . . . . . . . . . . . . 30 Fan Removal. . . . . . . . . . . . . . . . . . . . . . . . . . . . . . . . . . . . . . . . . . . . . . . . . . . . . . . . . 31 Fan Installation . . . . . . . . . . . . . . . . . . . . . . . . . . . . . . . . . . . . . . . . . . . . . . . . . . . . . . . 31 Fan Replacement (Procedure E). . . . . . . . . . . . . . . . . . . . . . . . . . . . . . . . . . . . . . . . . . . . . 34 Fan Removal. . . . . . . . . . . . . . . . . . . . . . . . . . . . . . . . . . . . . . . . . . . . . . . . . . . . . . . . . 34 Fan Installation . . . . . . . . . . . . . . . . . . . . . . . . . . . . . . . . . . . . . . . . . . . . . . . . . . . . . . . 35 Circulation Fan Removal . . . . . . . . . . . . . . . . . . . . . . . . . . . . . . . . . . . . . . . . . . . . . . . 37 Circulation Fan Installation. . . . . . . . . . . . . . . . . . . . . . . . . . . . . . . . . . . . . . . . . . . . . . 39 Fan Replacement (Procedure F) . . . . . . . . . . . . . . . . . . . . . . . . . . . . . . . . . . . . . . . . . . . . . 42 Fan Removal. . . . . . . . . . . . . . . . . . . . . . . . . . . . . . . . . . . . . . . . . . . . . . . . . . . . . . . . . 42 Fan Installation . . . . . . . . . . . . . . . . . . . . . . . . . . . . . . . . . . . . . . . . . . . . . . . . . . . . . . . 42 Fan Replacement (Procedure G). . . . . . . . . . . . . . . . . . . . . . . . . . . . . . . . . . . . . . . . . . . . . 45 Fan Removal. . . . . . . . . . . . . . . . . . . . . . . . . . . . . . . . . . . . . . . . . . . . . . . . . . . . . . . . . 45
  • 4. 4 YASKAWA TOEP C730600 0FC Fan Replacement Procedure Fan Installation . . . . . . . . . . . . . . . . . . . . . . . . . . . . . . . . . . . . . . . . . . . . . . . . . . . . . . . . 46 Circulation Fan Removal . . . . . . . . . . . . . . . . . . . . . . . . . . . . . . . . . . . . . . . . . . . . . . . . 48 Circulation Fan Installation. . . . . . . . . . . . . . . . . . . . . . . . . . . . . . . . . . . . . . . . . . . . . . . 50 Fan Replacement (Procedure H). . . . . . . . . . . . . . . . . . . . . . . . . . . . . . . . . . . . . . . . . . . . . . 53 Fan Removal. . . . . . . . . . . . . . . . . . . . . . . . . . . . . . . . . . . . . . . . . . . . . . . . . . . . . . . . . . 53 Fan Installation . . . . . . . . . . . . . . . . . . . . . . . . . . . . . . . . . . . . . . . . . . . . . . . . . . . . . . . . 56 Circuit Board Cooling Fan Removal . . . . . . . . . . . . . . . . . . . . . . . . . . . . . . . . . . . . . . . 61 Circuit Board Cooling Fan Installation. . . . . . . . . . . . . . . . . . . . . . . . . . . . . . . . . . . . . . 63 Fan Replacement (Procedure I) . . . . . . . . . . . . . . . . . . . . . . . . . . . . . . . . . . . . . . . . . . . . . . 65 Fan Removal. . . . . . . . . . . . . . . . . . . . . . . . . . . . . . . . . . . . . . . . . . . . . . . . . . . . . . . . . . 65 Fan Installation . . . . . . . . . . . . . . . . . . . . . . . . . . . . . . . . . . . . . . . . . . . . . . . . . . . . . . . . 67 Circuit Board Cooling Fan Removal . . . . . . . . . . . . . . . . . . . . . . . . . . . . . . . . . . . . . . . 71 Circuit Board Cooling Fan Installation. . . . . . . . . . . . . . . . . . . . . . . . . . . . . . . . . . . . . . 73 Revision History . . . . . . . . . . . . . . . . . . . . . . . . . . . . . . . . . . . . . . . . . . . . . . . . . . . . . . . 75
  • 5. 1 Overview YASKAWA TOEP C730600 0FC Fan Replacement Procedure 5 1 Overview This manual shows you how to replace the cooling fans, circuit board cooling fans, and circulation fans on Yaskawa drives. 2 Explanation of Signal Words WARNING Read and understand this manual before you install, operate, or do maintenance on the drive. Install the drive as specified by this manual and local codes. The symbols in this section identify safety messages in this manual. If you do not obey these safety messages, the hazards can cause serious injury, death, or damage to the products and related equipment and systems. These identifier words categorize and emphasize important safety precautions in these instructions. DANGER This signal word identifies a hazard that will cause serious injury or death if you do not prevent it. WARNING This signal word identifies a hazard that can cause death or serious injuries if you do not prevent it. CAUTION Identifies a hazardous situation, which, if not avoided, can cause minor or moderate injury. NOTICE This signal word identifies a property damage message that is not related to personal injury. 3 Section Safety DANGER Electrical Shock Hazard. Do not examine, connect, or disconnect wiring on an energized drive. Before servicing, disconnect all power to the equipment and wait for the time specified on the warning label at a minimum. The internal capacitor stays charged after the drive is de-energized. The charge indicator LED extinguishes when the DC bus voltage decreases below 50 Vdc. When all indicators are OFF, remove the covers before measuring for dangerous voltages to make sure that the drive is safe. If you do work on the drive when it is energized, it will cause serious injury or death from electrical shock. DANGER Electrical Shock Hazard. Disconnect all power to the drive and wait for the time specified on the warning label before you remove covers. Check the drive for dangerous voltages before servicing or repair work. If you do work on the drive when it is energized and there is no cover over the electronic circuits, it will cause serious injury or death from electrical shock. The drive has internal capacitors that stay charged after you de-energize the drive. WARNING Electrical Shock Hazard. The motor will run after you de-energize the drive. PM motors can generate induced voltage to the terminal of the motor after you de-energize the drive. If you touch a motor that is moving or energized, it can cause serious injury or death. WARNING Electrical Shock Hazard. Do not wear loose clothing or jewelry when you do work on the drive. Tighten loose clothing and remove all metal objects, for example watches or rings. Loose clothing can catch on the drive and jewelry can conduct electricity and cause serious injury or death. CAUTION Burn Hazard. Do not touch a hot drive heatsink. De-energize the drive, wait for a minimum of 15 minutes, then make sure that the heatsink is cool before you replace the cooling fans. If you touch a hot drive heatsink, it can burn you. NOTICE Damage to Equipment. When you touch the drive and circuit boards, make sure that you observe correct electrostatic discharge (ESD) procedures. If you do not follow procedures, it can cause ESD damage to the drive circuitry. NOTICE Use the instructions in this manual to replace the cooling fans. When you do maintenance on the fans, replace all the fans to increase product life. If you install the fans incorrectly, it can cause damage to the drive.
  • 6. 4 Cooling Fans and Circulation Fans by Drive Model 6 YASKAWA TOEP C730600 0FC Fan Replacement Procedure 4 Cooling Fans and Circulation Fans by Drive Model ◆ HV600 Table 4.1 Cooling Fans and Circulation Fans for IP20/UL Open Type and IP20/UL Type 1 Drives Model Cooling Fan Circulation Fan Replacement Procedure Reference 4005 - 4008 - - - - 2011 - 2031 4011 - 4034 1 - Procedure A 8 2046, 2059 4040 - 4052 1 - Procedure B 16 4065 1 1 2075 - 2114 4077 - 4124 2 - Procedure C 24 2143 - 2273 4156 - 4240 2 - Procedure D 30 4302 2 1 Procedure E 34 Table 4.2 Cooling Fans and Circulation Fans for IP55/UL Type 12 Drives Model Cooling Fan Circulation Fan Replacement Procedure Reference 4005 - - - - 2011, 2017 4006 - 4014 1 - Procedure A 8 2024, 2031 4021 - 4034 1 1 2046, 2059 4040 - 4065 1 1 Procedure B 16 2075 - 2114 4077 - 4124 2 1 Procedure C 24
  • 7. 4 Cooling Fans and Circulation Fans by Drive Model YASKAWA TOEP C730600 0FC Fan Replacement Procedure 7 Table 4.3 Cooling Fans and Circulation Fans for IP55/UL Type 12 Drives with Main Switch Model Cooling Fan Circulation Fan Replacement Procedure Reference 4005 - - - - 2011, 2017 4008 - 4014 1 - Procedure A 8 2024, 2031 4021 - 4034 1 1 2046, 2059 4040 - 4065 1 1 Procedure B 16 2075 - 2114 4077 - 4096 2 1 Procedure C 24 ◆ FP605 Table 4.4 Cooling Fans and Circulation Fans for IP20/UL Open Type and IP20/UL Type 1 Drives Model Cooling Fan Circulation Fan Circuit Board Cooling Fan Replacement Procedure Reference 4005, 4008 - - - - - 2011 - 2031 4011 - 4034 1 - - Procedure A 8 2046, 2059 4040 - 4052 1 - - Procedure B 16 4065 1 1 - 2075 - 2114 4077 - 4124 2 - - Procedure C 24 2143, 2169 4156 2 - - Procedure D 30 2211, 2273 4180 - 4302 2 - - Procedure F 42 4361 2 1 - Procedure G 45 2343, 2396 4414 3 1 - 4477 - 4590 2 1 2 Procedure H 53 4720 3 1 2 Procedure I 65 Table 4.5 Cooling Fans and Circulation Fans for IP55/UL Type 12 Drives Model Cooling Fan Circulation Fan Replacement Procedure Reference 4005 - - - - 2011, 2017 1 - Procedure A 8
  • 8. 5 Replace Cooling Fans and Circulation Fans 8 YASKAWA TOEP C730600 0FC Fan Replacement Procedure Model Cooling Fan Circulation Fan Replacement Procedure Reference 4008 - 4014 2024, 2031 4021 - 4034 1 1 2046, 2059 4040 - 4065 1 1 Procedure B 16 2075 - 2114 4077 - 4124 2 1 Procedure C 24 Table 4.6 Cooling Fans and Circulation Fans for IP55/UL Type 12 Drives with Main Switch Model Cooling Fan Circulation Fan Replacement Procedure Reference 4005 - - - - 2011, 2017 4008 - 4014 1 - Procedure A 8 2024, 2031 4021 - 4034 1 1 2046, 2059 4040 - 4065 1 1 Procedure B 16 2075 - 2114 4077 - 4096 2 1 Procedure C 24 5 Replace Cooling Fans and Circulation Fans CAUTION Injury to Personnel. Some fan units are not easily accessible from a standing position. Make sure that you can safely and comfortably remove and replace the fan. If you try to remove a fan that you cannot easily access, the fan unit can fall and cause minor to moderate injury. NOTICE Use the instructions in this manual to replace the cooling fans. When you do maintenance on the fans, replace all the fans to increase product life. If you install the fans incorrectly, it can cause damage to the drive. ◆ Fan Replacement (Procedure A) DANGER Electrical Shock Hazard. Do not examine, connect, or disconnect wiring on an energized drive. Before servicing, disconnect all power to the equipment and wait for the time specified on the warning label at a minimum. The internal capacitor stays charged after the drive is de-energized. The charge indicator LED extinguishes when the DC bus voltage decreases below 50 Vdc. When all indicators are OFF, remove the covers before measuring for dangerous voltages to make sure that the drive is safe. If you do work on the drive when it is energized, it will cause serious injury or death from electrical shock. CAUTION Burn Hazard. Do not touch a hot drive heatsink. De-energize the drive, wait for a minimum of 15 minutes, then make sure that the heatsink is cool before you replace the cooling fans. If you touch a hot drive heatsink, it can burn you. NOTICE Use the instructions in this manual to replace the cooling fans. When you do maintenance on the fans, replace all the fans to increase product life. If you install the fans incorrectly, it can cause damage to the drive.
  • 9. 5 Replace Cooling Fans and Circulation Fans YASKAWA TOEP C730600 0FC Fan Replacement Procedure 9 ■ Fan Removal 1. Push the tab on the back side of the fan finger guard and pull up to remove the fan finger guard from the drive. A - Fan finger guard Figure 5.1 Remove the Fan Finger Guard 2. Pull the cooling fan straight up from the drive. Remove the protective tube on the relay connector and disconnect the connector to remove the fan from the drive. A - Cooling fan B - Protective tube Figure 5.2 Remove the Cooling Fan ■ Fan Installation Reverse the removal procedure for fan installation.
  • 10. 5 Replace Cooling Fans and Circulation Fans 10 YASKAWA TOEP C730600 0FC Fan Replacement Procedure 1. Connect the relay connector between the drive and cooling fan, and attach the protective tube. A - Protective tube Figure 5.3 Connect the Relay Connector 2. Align the notches on the fan with the pin on the drive and install the cooling fan in the drive. Note: The positions of notch on the fan and alignment pin on the drive are different for different drive models. Use these figures to make sure that you use correct positions for your drive. A - Notch on fan B - Alignment pin on drive C - Front of drive Figure 5.4 Install the Cooling Fan (Drive Models: 2011, 2017, 4006xV, 4008xV/T, 4011, 4014)
  • 11. 5 Replace Cooling Fans and Circulation Fans YASKAWA TOEP C730600 0FC Fan Replacement Procedure 11 A - Notch on fan B - Alignment pin on drive C - Front of drive Figure 5.5 Install the Cooling Fan (Drive Models: 2024, 2031, 4021 to 4034) 3. Put the cable and connector in the recess of the drive. A - Front of drive B - Recess for cable and connector *1 Figure 5.6 Put the Cable and Connector in the Drive Recess *1 Make sure that the cable and connector are in the correct space.
  • 12. 5 Replace Cooling Fans and Circulation Fans 12 YASKAWA TOEP C730600 0FC Fan Replacement Procedure 4. Hold the fan finger guard at an angle and put the connector tabs on the fan finger guard into the holes on the drive. A - Front of drive B - Drive holes C - Connector tabs Figure 5.7 Install the Fan Finger Guard 5. Push the tab on the back side of the fan finger guard and click it into place on the drive. Figure 5.8 Install the Fan Finger Guard 6. Energize the drive and set o4-03 = 0 [Fan Operation Time Setting = 0 h] to reset the fan operation time. ■ Circulation Fan Removal Note: Use this procedure only when you use one of these drive models: • 2024xV, 2031xV • 4021xV to 4034xV • 2024xT, 2031xT • 4021xT to 4034xT Remove the drive cover before you start this procedure.
  • 13. 5 Replace Cooling Fans and Circulation Fans YASKAWA TOEP C730600 0FC Fan Replacement Procedure 13 CAUTION Crush Hazard. Loosen the cover screws. Do not fully remove them. If you fully remove the cover screws, the terminal cover can fall and cause moderate injury. 1. Disconnect the connector and remove the fan cable from the hook. A - Circulation fan B - Hook C - Fan cable Figure 5.9 Disconnect the Connector and Remove the Fan Cable
  • 14. 5 Replace Cooling Fans and Circulation Fans 14 YASKAWA TOEP C730600 0FC Fan Replacement Procedure 2. Pull the bottom of the fan forward to remove it from the drive. A - Circulation fan Figure 5.10 Remove the Circulation Fan ■ Circulation Fan Installation Note: Use this procedure only when you use one of these drive models: • 2024xV, 2031xV • 4021xV to 4034xV • 2024xT, 2031xT • 4021xT to 4034xT Reverse the removal procedure for circulation fan installation.
  • 15. 5 Replace Cooling Fans and Circulation Fans YASKAWA TOEP C730600 0FC Fan Replacement Procedure 15 1. Put the side of the fan nearest to the top of the drive in first, and push it until the tabs click into position. A - Circulation fan B - Tabs Figure 5.11 Install the Circulation Fan
  • 16. 5 Replace Cooling Fans and Circulation Fans 16 YASKAWA TOEP C730600 0FC Fan Replacement Procedure 2. Put the cable back into its initial position and connect the connector. A - Fan cable B - Hook Figure 5.12 Put the Cable Back into the Drive and Connect the Connector ◆ Fan Replacement (Procedure B) DANGER Electrical Shock Hazard. Do not examine, connect, or disconnect wiring on an energized drive. Before servicing, disconnect all power to the equipment and wait for the time specified on the warning label at a minimum. The internal capacitor stays charged after the drive is de-energized. The charge indicator LED extinguishes when the DC bus voltage decreases below 50 Vdc. When all indicators are OFF, remove the covers before measuring for dangerous voltages to make sure that the drive is safe. If you do work on the drive when it is energized, it will cause serious injury or death from electrical shock. CAUTION Burn Hazard. Do not touch a hot drive heatsink. De-energize the drive, wait for a minimum of 15 minutes, then make sure that the heatsink is cool before you replace the cooling fans. If you touch a hot drive heatsink, it can burn you. NOTICE Use the instructions in this manual to replace the cooling fans. When you do maintenance on the fans, replace all the fans to increase product life. If you install the fans incorrectly, it can cause damage to the drive.
  • 17. 5 Replace Cooling Fans and Circulation Fans YASKAWA TOEP C730600 0FC Fan Replacement Procedure 17 ■ Fan Removal 1. Push the tab on the back side of the fan finger guard and pull up to remove the fan finger guard from the drive. A - Fan finger guard Figure 5.13 Remove the Fan Finger Guard 2. Pull the cooling fan straight up from the drive. Remove the protective tube on the relay connector and disconnect the connector to remove the fan from the drive. A - Cooling fan B - Protective tube Figure 5.14 Remove the Cooling Fan ■ Fan Installation Reverse the removal procedure for fan installation.
  • 18. 5 Replace Cooling Fans and Circulation Fans 18 YASKAWA TOEP C730600 0FC Fan Replacement Procedure 1. Connect the relay connector between the drive and cooling fan, and attach the protective tube. A - Protective tube Figure 5.15 Connect the Relay Connector 2. Align the notch on the fan with the pin on the drive and install the cooling fan in the drive. A - Notch on fan B - Alignment pin on drive C - Front of drive Figure 5.16 Install the Cooling Fan 3. Put the cable and connector in the recess of the drive. A - Front of drive B - Recess for cable and connector *1 Figure 5.17 Put the Cable in the Drive Recess *1 Make sure that the cable and connector are in the correct space.
  • 19. 5 Replace Cooling Fans and Circulation Fans YASKAWA TOEP C730600 0FC Fan Replacement Procedure 19 4. Hold the fan finger guard at an angle and put the connector tabs on the fan finger guard into the holes on the drive. A - Front of drive B - Drive holes C - Connector tabs Figure 5.18 Install the Fan Finger Guard 5. Push the tab on the back side of the fan finger guard and click it into place on the drive. Figure 5.19 Install the Fan Finger Guard 6. Energize the drive and set o4-03 = 0 [Fan Operation Time Setting = 0 h] to reset the fan operation time. ■ Circulation Fan Removal Note: Use this procedure only when you use one of these drive models: • 4065xF • 2046xV, 2059xV • 4040xV to 4065xV • 2046xT, 2059xT • 4040xT to 4065xT Remove the drive cover before you start this procedure.
  • 20. 5 Replace Cooling Fans and Circulation Fans 20 YASKAWA TOEP C730600 0FC Fan Replacement Procedure CAUTION Crush Hazard. Loosen the cover screws. Do not fully remove them. If you fully remove the cover screws, the terminal cover can fall and cause moderate injury. 1. Remove the fan cable from the hooks. A - Circulation fan B - Hooks C - Fan cable Figure 5.20 Remove the Fan Cable 2. Disconnect the relay connector. Figure 5.21 Disconnect the Relay Connector
  • 21. 5 Replace Cooling Fans and Circulation Fans YASKAWA TOEP C730600 0FC Fan Replacement Procedure 21 3. Pull the bottom of the fan forward to remove it from the drive. A - Circulation fan Figure 5.22 Remove the Circulation Fan ■ Circulation Fan Installation Note: Use this procedure only when you use one of these drive models: • 4065xF • 2046xV, 2059xV • 4040xV to 4065xV • 2046xT, 2059xT • 4040xT to 4065xT Reverse the removal procedure for circulation fan installation.
  • 22. 5 Replace Cooling Fans and Circulation Fans 22 YASKAWA TOEP C730600 0FC Fan Replacement Procedure 1. Align the notch on the fan with the pin on the drive and install the fan in the drive. A - Notch on fan B - Circulation fan C - Alignment pin on drive Figure 5.23 Install the Circulation Fan 2. Put the side of the fan nearest to the top of the drive in first, and push it until the tabs click into position. A - Circulation fan B - Tabs Figure 5.24 Install the Circulation Fan
  • 23. 5 Replace Cooling Fans and Circulation Fans YASKAWA TOEP C730600 0FC Fan Replacement Procedure 23 3. Connect the relay connector. Figure 5.25 Connect the Relay Connector 4. Put the cable and connector back into their initial positions. A - Hooks B - Fan cable Figure 5.26 Put the Cable Back into the Drive
  • 24. 5 Replace Cooling Fans and Circulation Fans 24 YASKAWA TOEP C730600 0FC Fan Replacement Procedure ◆ Fan Replacement (Procedure C) DANGER Electrical Shock Hazard. Do not examine, connect, or disconnect wiring on an energized drive. Before servicing, disconnect all power to the equipment and wait for the time specified on the warning label at a minimum. The internal capacitor stays charged after the drive is de-energized. The charge indicator LED extinguishes when the DC bus voltage decreases below 50 Vdc. When all indicators are OFF, remove the covers before measuring for dangerous voltages to make sure that the drive is safe. If you do work on the drive when it is energized, it will cause serious injury or death from electrical shock. CAUTION Burn Hazard. Do not touch a hot drive heatsink. De-energize the drive, wait for a minimum of 15 minutes, then make sure that the heatsink is cool before you replace the cooling fans. If you touch a hot drive heatsink, it can burn you. NOTICE Use the instructions in this manual to replace the cooling fans. When you do maintenance on the fans, replace all the fans to increase product life. If you install the fans incorrectly, it can cause damage to the drive. ■ Fan Removal 1. Push the tabs on the left and right sides of the fan finger guard and pull up to remove the fan finger guard from the drive. A - Fan finger guard Figure 5.27 Remove the Fan Finger Guard 2. Pull the cooling fans straight up from the drive. Remove the protective tubes on the relay connectors and disconnect the connectors to remove the fans from the drive. A - Cooling fans B - Protective tubes Figure 5.28 Remove the Cooling Fans ■ Fan Installation Reverse the removal procedure for fan installation.
  • 25. 5 Replace Cooling Fans and Circulation Fans YASKAWA TOEP C730600 0FC Fan Replacement Procedure 25 1. Connect the relay connectors between the drive and cooling fans, and attach the protective tubes. A - Protective tubes Figure 5.29 Connect the Relay Connectors 2. Align the notches on the fans with the pins on the drive and install the cooling fans in the drive. A - Notch on fan B - Alignment pins on drive C - Front of drive Figure 5.30 Install the Cooling Fans 3. Put the cables and connectors in the recess of the drive. A - Front of drive B - Recess for cables and connectors *1 Figure 5.31 Put the Cables and Connectors in the Drive Recess *1 Make sure that the cables and connectors are in the correct space.
  • 26. 5 Replace Cooling Fans and Circulation Fans 26 YASKAWA TOEP C730600 0FC Fan Replacement Procedure 4. Install the fan finger guard straight until the tabs click into place. Figure 5.32 Install the Fan Finger Guard 5. Energize the drive and set o4-03 = 0 [Fan Operation Time Setting = 0 h] to reset the fan operation time. ■ Circulation Fan Removal Note: Use this procedure only when you use one of these drive models: • 2075xV to 2114xV • 4077xV to 4124xV • 2075xT to 2114xT • 4077xT, 4096xT Remove the drive cover before you start this procedure. CAUTION Crush Hazard. Loosen the cover screws. Do not fully remove them. If you fully remove the cover screws, the terminal cover can fall and cause moderate injury.
  • 27. 5 Replace Cooling Fans and Circulation Fans YASKAWA TOEP C730600 0FC Fan Replacement Procedure 27 1. Pull the relay connector toward the top of the drive to remove from the hook then remove the cable from the hooks. A - Hooks B - Circulation fan C - Relay connector Figure 5.33 Remove the Cable
  • 28. 5 Replace Cooling Fans and Circulation Fans 28 YASKAWA TOEP C730600 0FC Fan Replacement Procedure 2. Disconnect the relay connector. Figure 5.34 Disconnect the Relay Connector 3. Pull the top of the fan forward to remove it from the drive. A - Circulation fan Figure 5.35 Remove the Circulation Fan ■ Circulation Fan Installation Note: Use this procedure only when you use one of these drive models: • 2075xV to 2114xV • 4077xV to 4124xV • 2075xT to 2114xT • 4077xT, 4096xT Reverse the removal procedure for circulation fan installation.
  • 29. 5 Replace Cooling Fans and Circulation Fans YASKAWA TOEP C730600 0FC Fan Replacement Procedure 29 1. Put the bottom of the fan on the tabs in position A then push the fan until the tabs in position B click into position to put the fan back into the drive. A - Tabs at the bottom of the fan B - Tabs at the top of the fan C - Circulation fan Figure 5.36 Install the Circulation Fan 2. Connect the relay connector. Figure 5.37 Connect the Relay Connector
  • 30. 5 Replace Cooling Fans and Circulation Fans 30 YASKAWA TOEP C730600 0FC Fan Replacement Procedure 3. Put the cable and relay connector back into their initial position. A - Hooks B - Circulation fan C - Relay connector Figure 5.38 Put the Cable and Relay Connector Back into the Drive ◆ Fan Replacement (Procedure D) DANGER Electrical Shock Hazard. Do not examine, connect, or disconnect wiring on an energized drive. Before servicing, disconnect all power to the equipment and wait for the time specified on the warning label at a minimum. The internal capacitor stays charged after the drive is de-energized. The charge indicator LED extinguishes when the DC bus voltage decreases below 50 Vdc. When all indicators are OFF, remove the covers before measuring for dangerous voltages to make sure that the drive is safe. If you do work on the drive when it is energized, it will cause serious injury or death from electrical shock. CAUTION Burn Hazard. Do not touch a hot drive heatsink. De-energize the drive, wait for a minimum of 15 minutes, then make sure that the heatsink is cool before you replace the cooling fans. If you touch a hot drive heatsink, it can burn you.
  • 31. 5 Replace Cooling Fans and Circulation Fans YASKAWA TOEP C730600 0FC Fan Replacement Procedure 31 NOTICE Use the instructions in this manual to replace the cooling fans. When you do maintenance on the fans, replace all the fans to increase product life. If you install the fans incorrectly, it can cause damage to the drive. ■ Fan Removal 1. Push the tabs on the left and right sides of the fan finger guard and pull up to remove the fan finger guard from the drive. A - Fan finger guard Figure 5.39 Remove the Fan Finger Guard 2. Pull the cooling fans straight up from the drive. Remove the protective tubes on the relay connectors and disconnect the connectors to remove the fans from the drive. A - Cooling fans B - Protective tubes Figure 5.40 Remove the Cooling Fans ■ Fan Installation Reverse the removal procedure for fan installation.
  • 32. 5 Replace Cooling Fans and Circulation Fans 32 YASKAWA TOEP C730600 0FC Fan Replacement Procedure 1. Connect the relay connectors, and attach the protective tubes. A - Protective tubes Figure 5.41 Connect the Relay Connectors 2. Align the notches on the fans with the pins on the drive and install the cooling fans in the drive. A - Notch on fan B - Alignment pins on drive C - Front of drive Figure 5.42 Install the Cooling Fans
  • 33. 5 Replace Cooling Fans and Circulation Fans YASKAWA TOEP C730600 0FC Fan Replacement Procedure 33 3. Put the cables and connectors in the recess of the drive. A - Front of drive B - Recess for cables and connectors *1 Figure 5.43 Put the Cables and Connectors in the Drive Recess *1 Make sure that the cables and connectors are in the correct space. 4. Hold the fan finger guard at an angle and put the connector tabs on the fan finger guard into the holes on the drive. A - Front of drive B - Drive holes C - Connector tabs Figure 5.44 Install the Fan Finger Guard 5. Push the tabs on the left and right sides of the fan finger guard and click it into place on the drive. Figure 5.45 Install the Fan Finger Guard
  • 34. 5 Replace Cooling Fans and Circulation Fans 34 YASKAWA TOEP C730600 0FC Fan Replacement Procedure 6. Energize the drive and set o4-03 = 0 [Fan Operation Time Setting = 0 h] to reset the fan operation time. ◆ Fan Replacement (Procedure E) DANGER Electrical Shock Hazard. Do not examine, connect, or disconnect wiring on an energized drive. Before servicing, disconnect all power to the equipment and wait for the time specified on the warning label at a minimum. The internal capacitor stays charged after the drive is de-energized. The charge indicator LED extinguishes when the DC bus voltage decreases below 50 Vdc. When all indicators are OFF, remove the covers before measuring for dangerous voltages to make sure that the drive is safe. If you do work on the drive when it is energized, it will cause serious injury or death from electrical shock. CAUTION Burn Hazard. Do not touch a hot drive heatsink. De-energize the drive, wait for a minimum of 15 minutes, then make sure that the heatsink is cool before you replace the cooling fans. If you touch a hot drive heatsink, it can burn you. NOTICE Use the instructions in this manual to replace the cooling fans. When you do maintenance on the fans, replace all the fans to increase product life. If you install the fans incorrectly, it can cause damage to the drive. ■ Fan Removal 1. Push the tab on the back side of each fan finger guard and pull up to remove the fan finger guards from the drive. A - Fan finger guards Figure 5.46 Remove the Fan Finger Guards 2. Pull the cooling fans straight up from the drive. Remove the protective tubes on the relay connectors and disconnect the connectors to remove the fans from the drive. A - Cooling fans B - Protective tubes Figure 5.47 Remove the Cooling Fans
  • 35. 5 Replace Cooling Fans and Circulation Fans YASKAWA TOEP C730600 0FC Fan Replacement Procedure 35 ■ Fan Installation Reverse the removal procedure for fan installation. 1. Connect the relay connectors, and attach the protective tubes. A - Protective tubes Figure 5.48 Connect the Relay Connectors 2. Align the notches on the fans with the pins on the drive and install the cooling fans in the drive. A - Notch on fan B - Alignment pins on drive C - Front of drive Figure 5.49 Install the Cooling Fans
  • 36. 5 Replace Cooling Fans and Circulation Fans 36 YASKAWA TOEP C730600 0FC Fan Replacement Procedure 3. Put the cables and connectors in the recess of the drive. A - Front of drive B - Recess for the cables and connectors *1 Figure 5.50 Put the Cables and Connectors in the Drive Recess *1 Make sure that the cables and connectors are in the correct space. 4. Hold the fan finger guards at an angle and put the connector tabs on the fan finger guards into the receiving areas on the drive. Note: When you install the cooling fans, make sure that you do not pinch cables between the fan finger guards and the drive. A - Front of drive B - Receiving area C - Tab Figure 5.51 Install the Fan Finger Guards
  • 37. 5 Replace Cooling Fans and Circulation Fans YASKAWA TOEP C730600 0FC Fan Replacement Procedure 37 5. Push the tabs on the back side of the fan finger guards and click them into place on the drive. Figure 5.52 Install the Fan Finger Guards 6. Energize the drive and set o4-03 = 0 [Fan Operation Time Setting = 0 h] to reset the fan operation time. ■ Circulation Fan Removal Remove the drive cover before you start this procedure. CAUTION Crush Hazard. Loosen the cover screws. Do not fully remove them. If you fully remove the cover screws, the terminal cover can fall and cause moderate injury. 1. Remove the cable from the clamps. A - Fan unit B - Clamps C - Fan cable Figure 5.53 Remove the Fan Cable
  • 38. 5 Replace Cooling Fans and Circulation Fans 38 YASKAWA TOEP C730600 0FC Fan Replacement Procedure 2. Loosen the screws that safety the fan unit and slide the fan unit to the right. Note: To remove the fan unit, it is only necessary to loosen the screws. A - Fan unit B - Screws Figure 5.54 Slide the Fan Unit 3. Disconnect the relay connector and remove the fan unit. Figure 5.55 Remove the Fan Unit
  • 39. 5 Replace Cooling Fans and Circulation Fans YASKAWA TOEP C730600 0FC Fan Replacement Procedure 39 4. Remove the screws that safety the circulation fan and remove the fan. A - Circulation fan Figure 5.56 Remove the Circulation Fan ■ Circulation Fan Installation Reverse the removal procedure for fan installation. 1. Connect the relay connector between the drive and circulation fan. A - Circulation fan B - Fan unit base Figure 5.57 Connect the Relay Connector 2. Align the pin on the fan unit base with the notch on the fan and put the fan in the fan unit base, then use the screws to safety it. Tighten the screws to a tightening torque of 0.98 N∙m to 1.33 N∙m (8.67 lbf∙in to 11.77 lbf∙in).
  • 40. 5 Replace Cooling Fans and Circulation Fans 40 YASKAWA TOEP C730600 0FC Fan Replacement Procedure A - Circulation fan B - Fan unit base C - Alignment pin on fan unit base D - Circulation fan connector Figure 5.58 Install the Circulation Fan 3. Safety the fan cable through the clamp. A - Clamp Figure 5.59 Safety the Fan Cable 4. Put the fan unit into the specified location and slide it to the left, then use screws to safety it to the drive. Tighten the screws to a tightening torque of 1.96 N∙m to 2.53 N∙m (17.35 lbf∙in to 22.39 lbf∙in).
  • 41. 5 Replace Cooling Fans and Circulation Fans YASKAWA TOEP C730600 0FC Fan Replacement Procedure 41 Figure 5.60 Install the Fan Unit 5. Safety the cable through the clamps. A - Clamps B - Fan cable Figure 5.61 Safety the Fan Cable through the Clamps 6. Install the drive cover. 7. Energize the drive and set o4-03 = 0 [Fan Operation Time Setting = 0 h] to reset the fan operation time.
  • 42. 5 Replace Cooling Fans and Circulation Fans 42 YASKAWA TOEP C730600 0FC Fan Replacement Procedure ◆ Fan Replacement (Procedure F) DANGER Electrical Shock Hazard. Do not examine, connect, or disconnect wiring on an energized drive. Before servicing, disconnect all power to the equipment and wait for the time specified on the warning label at a minimum. The internal capacitor stays charged after the drive is de-energized. The charge indicator LED extinguishes when the DC bus voltage decreases below 50 Vdc. When all indicators are OFF, remove the covers before measuring for dangerous voltages to make sure that the drive is safe. If you do work on the drive when it is energized, it will cause serious injury or death from electrical shock. CAUTION Burn Hazard. Do not touch a hot drive heatsink. De-energize the drive, wait for a minimum of 15 minutes, then make sure that the heatsink is cool before you replace the cooling fans. If you touch a hot drive heatsink, it can burn you. NOTICE Use the instructions in this manual to replace the cooling fans. When you do maintenance on the fans, replace all the fans to increase product life. If you install the fans incorrectly, it can cause damage to the drive. ■ Fan Removal 1. Push the tabs on the left and right sides of the fan finger guard and pull up to remove the fan finger guard from the drive. A - Fan finger guard Figure 5.62 Remove the Fan Finger Guard 2. Pull the cooling fans straight up from the drive. Disconnect the relay connectors and remove the fans from the drive. A - Cooling fans Figure 5.63 Remove the Cooling Fans ■ Fan Installation Reverse the removal procedure for fan installation.
  • 43. 5 Replace Cooling Fans and Circulation Fans YASKAWA TOEP C730600 0FC Fan Replacement Procedure 43 1. Connect the relay connectors between the drive and cooling fans. Figure 5.64 Connect the Relay Connectors 2. Align the notches on the fans with the pins on the drive and install the cooling fans in the drive. A - Notch on fan B - Alignment pins on drive C - Front of drive Figure 5.65 Install the Cooling Fans
  • 44. 5 Replace Cooling Fans and Circulation Fans 44 YASKAWA TOEP C730600 0FC Fan Replacement Procedure 3. Put the cables and connectors in the recess of the drive. A - Front of drive B - Recess for cables and connectors *1 Figure 5.66 Put the Cables and Connectors in the Drive Recess *1 Make sure that the cables and connectors are in the correct space. 4. Hold the fan finger guard at an angle and put the connector tabs on the fan finger guard into the holes on the drive. A - Front of drive B - Drive holes C - Connector tabs Figure 5.67 Install the Fan Finger Guard
  • 45. 5 Replace Cooling Fans and Circulation Fans YASKAWA TOEP C730600 0FC Fan Replacement Procedure 45 5. Push the tabs on the left and right sides of the fan finger guard and click it into place on the drive. Figure 5.68 Install the Fan Finger Guard 6. Energize the drive and set o4-03 = 0 [Fan Operation Time Setting = 0 h] to reset the fan operation time. ◆ Fan Replacement (Procedure G) DANGER Electrical Shock Hazard. Do not examine, connect, or disconnect wiring on an energized drive. Before servicing, disconnect all power to the equipment and wait for the time specified on the warning label at a minimum. The internal capacitor stays charged after the drive is de-energized. The charge indicator LED extinguishes when the DC bus voltage decreases below 50 Vdc. When all indicators are OFF, remove the covers before measuring for dangerous voltages to make sure that the drive is safe. If you do work on the drive when it is energized, it will cause serious injury or death from electrical shock. CAUTION Burn Hazard. Do not touch a hot drive heatsink. De-energize the drive, wait for a minimum of 15 minutes, then make sure that the heatsink is cool before you replace the cooling fans. If you touch a hot drive heatsink, it can burn you. NOTICE Use the instructions in this manual to replace the cooling fans. When you do maintenance on the fans, replace all the fans to increase product life. If you install the fans incorrectly, it can cause damage to the drive. ■ Fan Removal 1. Push the tab on the back side of each fan finger guard and pull up to remove the fan finger guards from the drive. A - Fan finger guards Figure 5.69 Remove the Fan Finger Guards 2. Pull the cooling fans straight up from the drive. Disconnect the relay connectors to remove the fans from the drive. Note: The number of fans is different for different drive models.
  • 46. 5 Replace Cooling Fans and Circulation Fans 46 YASKAWA TOEP C730600 0FC Fan Replacement Procedure A - Cooling fans Figure 5.70 Remove the Cooling Fans ■ Fan Installation Reverse the removal procedure for fan installation. 1. Connect the relay connectors between the drive and cooling fans. Figure 5.71 Connect the Relay Connectors
  • 47. 5 Replace Cooling Fans and Circulation Fans YASKAWA TOEP C730600 0FC Fan Replacement Procedure 47 2. Align the notches on the fans with the pins on the drive and install the cooling fans in the drive. A - Notch on fan B - Alignment pins on drive C - Front of drive Figure 5.72 Install the Cooling Fans 3. Put the cables and connectors in the recess of the drive. A - Front of drive B - Recess for the cables and connectors *1 Figure 5.73 Put the Cables and Connectors in the Drive Recess *1 Make sure that the cables and connectors are in the correct space.
  • 48. 5 Replace Cooling Fans and Circulation Fans 48 YASKAWA TOEP C730600 0FC Fan Replacement Procedure 4. Hold the fan finger guards at an angle and put the connector tabs on the fan finger guards into the receiving areas on the drive. Note: When you install the cooling fans, make sure that you do not pinch cables between the fan finger guards and the drive. A - Front of drive B - Receiving area C - Tab Figure 5.74 Install the Fan Finger Guards 5. Push the tabs on the back side of the fan finger guards and click them into place on the drive. Figure 5.75 Install the Fan Finger Guards 6. Energize the drive and set o4-03 = 0 [Fan Operation Time Setting = 0 h] to reset the fan operation time. ■ Circulation Fan Removal Remove the drive cover before you start this procedure.
  • 49. 5 Replace Cooling Fans and Circulation Fans YASKAWA TOEP C730600 0FC Fan Replacement Procedure 49 CAUTION Crush Hazard. Loosen the cover screws. Do not fully remove them. If you fully remove the cover screws, the terminal cover can fall and cause moderate injury. 1. Remove the cable from the clamps. A - Fan unit B - Clamps C - Fan cable Figure 5.76 Remove the Fan Cable 2. Loosen the screws that safety the fan unit and slide the fan unit to the right. Note: To remove the fan unit, it is only necessary to loosen the screws. A - Fan unit B - Screws Figure 5.77 Slide the Fan Unit
  • 50. 5 Replace Cooling Fans and Circulation Fans 50 YASKAWA TOEP C730600 0FC Fan Replacement Procedure 3. Disconnect the relay connector and remove the fan unit. Figure 5.78 Remove the Fan Unit 4. Remove the screws that safety the circulation fan and remove the fan. A - Circulation fan Figure 5.79 Remove the Circulation Fan ■ Circulation Fan Installation Reverse the removal procedure for fan installation.
  • 51. 5 Replace Cooling Fans and Circulation Fans YASKAWA TOEP C730600 0FC Fan Replacement Procedure 51 1. Connect the relay connector between the drive and circulation fan. A - Circulation fan B - Fan unit base Figure 5.80 Connect the Relay Connector 2. Align the pin on the fan unit base with the notch on the fan and put the fan in the fan unit base, then use the screws to safety it. Tighten the screws to a tightening torque of 0.98 N∙m to 1.33 N∙m (8.67 lbf∙in to 11.77 lbf∙in). A - Circulation fan B - Fan unit base C - Alignment pin on fan unit base D - Circulation fan connector Figure 5.81 Install the Circulation Fan
  • 52. 5 Replace Cooling Fans and Circulation Fans 52 YASKAWA TOEP C730600 0FC Fan Replacement Procedure 3. Safety the fan cable through the clamp. A - Clamp Figure 5.82 Safety the Fan Cable 4. Put the fan unit into the specified location and slide it to the left, then use screws to safety it to the drive. Tighten the screws to a tightening torque of 1.96 N∙m to 2.53 N∙m (17.35 lbf∙in to 22.39 lbf∙in). Figure 5.83 Install the Fan Unit
  • 53. 5 Replace Cooling Fans and Circulation Fans YASKAWA TOEP C730600 0FC Fan Replacement Procedure 53 5. Safety the cable through the clamps. A - Clamps B - Fan cable Figure 5.84 Safety the Fan Cable through the Clamps 6. Install the drive cover. 7. Energize the drive and set o4-03 = 0 [Fan Operation Time Setting = 0 h] to reset the fan operation time. ◆ Fan Replacement (Procedure H) DANGER Electrical Shock Hazard. Do not examine, connect, or disconnect wiring on an energized drive. Before servicing, disconnect all power to the equipment and wait for the time specified on the warning label at a minimum. The internal capacitor stays charged after the drive is de-energized. The charge indicator LED extinguishes when the DC bus voltage decreases below 50 Vdc. When all indicators are OFF, remove the covers before measuring for dangerous voltages to make sure that the drive is safe. If you do work on the drive when it is energized, it will cause serious injury or death from electrical shock. CAUTION Burn Hazard. Do not touch a hot drive heatsink. De-energize the drive, wait for a minimum of 15 minutes, then make sure that the heatsink is cool before you replace the cooling fans. If you touch a hot drive heatsink, it can burn you. NOTICE Use the instructions in this manual to replace the cooling fans. When you do maintenance on the fans, replace all the fans to increase product life. If you install the fans incorrectly, it can cause damage to the drive. ■ Fan Removal 1. Remove the drive cover. CAUTION Crush Hazard. Loosen the cover screws. Do not fully remove them. If you fully remove the cover screws, the terminal cover can fall and cause moderate injury.
  • 54. 5 Replace Cooling Fans and Circulation Fans 54 YASKAWA TOEP C730600 0FC Fan Replacement Procedure 2. Unplug the fan cable from the fan connectors. A - Fan unit B - Fan connectors C - Fan cable Figure 5.85 Remove the Fan Cable 3. Loosen the screws that safety the fan unit and slide the slide panel to the left. Note: • To remove the fan unit, it is only necessary to loosen the screws in position B. • Remove the screws in position A. A - Screw position A B - Screw position B C - Slide panel Figure 5.86 Slide the Slide Panel
  • 55. 5 Replace Cooling Fans and Circulation Fans YASKAWA TOEP C730600 0FC Fan Replacement Procedure 55 4. Remove the fan unit and the slide panel at the same time. Note: When you remove the fan unit, make sure that it does not fall. Figure 5.87 Remove the Fan Unit
  • 56. 5 Replace Cooling Fans and Circulation Fans 56 YASKAWA TOEP C730600 0FC Fan Replacement Procedure 5. Unplug the relay connectors, remove the screws that safety the cooling fans and circulation fan, and then remove the fans. A - Cooling fans B - Relay connectors C - Fan unit base D - Circulation fan Figure 5.88 Remove the Cooling Fans and Circulation Fan ■ Fan Installation Reverse the removal procedure for fan installation. 1. Connect the relay connectors on the fan unit base to the cooling fans and the circulation fan. A - Cooling fans B - Relay connectors C - Fan unit base D - Circulation fan Figure 5.89 Connect the Relay Connectors 2. Align the pins on the fan unit base with the notches on the fans and put the fans in the fan unit base, then use the screws to safety them. Tighten the M4 screws to a tightening torque of 0.98 N∙m to 1.33 N∙m (8.67 lbf∙in to 11.77 lbf∙in).
  • 57. 5 Replace Cooling Fans and Circulation Fans YASKAWA TOEP C730600 0FC Fan Replacement Procedure 57 Note: Make sure that you do not pinch cables between the fans and the fan unit base. A - Cooling fans B - Fan unit base C - Alignment pin on fan unit base D - Circulation fan E - Notch on fan Figure 5.90 Install the Cooling Fans and Circulation Fan 3. Put the cables and connectors in the recess of the drive. Note: Safety the relay cables to the hooks.
  • 58. 5 Replace Cooling Fans and Circulation Fans 58 YASKAWA TOEP C730600 0FC Fan Replacement Procedure A - Cooling fans B - Cable hooks C - Relay connectors D - Relay cables E - Circulation fan Figure 5.91 Put the Cables and Connectors in the Drive Recess
  • 59. 5 Replace Cooling Fans and Circulation Fans YASKAWA TOEP C730600 0FC Fan Replacement Procedure 59 4. Put the fan unit into the specified location. Figure 5.92 Install the Fan Unit 5. Slide the fan unit to the right and use the screws to safety it to the drive. Tighten the screws to a correct tightening torque: • Screws in Position A: 0.98 N∙m to 1.33 N∙m (8.67 lbf∙in to 11.77 lbf∙in) • Screws in Position B: 1.96 N∙m to 2.53 N∙m (17.35 lbf∙in to 22.39 lbf∙in)
  • 60. 5 Replace Cooling Fans and Circulation Fans 60 YASKAWA TOEP C730600 0FC Fan Replacement Procedure A - Screw position A B - Screw position B C - Fan unit Figure 5.93 Slide the Fan Unit 6. Connect the fan cable to the fan connectors. A - Fan unit B - Fan connectors C - Fan cable Figure 5.94 Connect Cooling Fan Connectors 7. Install the drive cover. 8. Energize the drive and set o4-03 = 0 [Fan Operation Time Setting = 0 h] to reset the fan operation time.
  • 61. 5 Replace Cooling Fans and Circulation Fans YASKAWA TOEP C730600 0FC Fan Replacement Procedure 61 ■ Circuit Board Cooling Fan Removal Remove the drive cover before you start this procedure. CAUTION Crush Hazard. Loosen the cover screws. Do not fully remove them. If you fully remove the cover screws, the terminal cover can fall and cause moderate injury. 1. Disconnect the relay cables from the fan connectors. A - Fan connectors B - Relay cables C - Circuit board cooling fan units Figure 5.95 Disconnect the Relay Cables 2. Loosen the screws that safety the circuit board cooling fan unit and slide the circuit board cooling fan unit up. Note: To remove the fan unit, it is only necessary to loosen the screws.
  • 62. 5 Replace Cooling Fans and Circulation Fans 62 YASKAWA TOEP C730600 0FC Fan Replacement Procedure A - Screws Figure 5.96 Slide the Circuit Board Cooling Fan Units 3. Remove the circuit board cooling fan units. Figure 5.97 Remove the Circuit Board Cooling Fan Units
  • 63. 5 Replace Cooling Fans and Circulation Fans YASKAWA TOEP C730600 0FC Fan Replacement Procedure 63 4. Remove the screws that safety the circuit board cooling fans and remove the fans. A - Circuit board cooling fan B - Fan unit base Figure 5.98 Remove the Circuit Board Cooling Fans ■ Circuit Board Cooling Fan Installation Reverse the removal procedure for fan installation. 1. Align the pin on the fan unit base with the notch on the fan and put the circuit board cooling fan in the fan unit, then use the screws to safety the circuit board cooling fan to the fan unit base. Tighten the screws to a tightening torque of 0.98 N∙m to 1.33 N∙m (8.67 lbf∙in to 11.77 lbf∙in). Note: Make sure that you do not pinch cables between the circuit board cooling fan and the fan unit base. A - Circuit board cooling fan B - Fan unit base C - Alignment pin on fan unit base Figure 5.99 Install the Circuit Board Cooling Fan 2. Put the circuit board cooling fan unit into the specified location and slide it down, then use the screws to safety it to the drive. Tighten the screws to a tightening torque of 0.98 N∙m to 1.33 N∙m (8.67 lbf∙in to 11.77 lbf∙in).
  • 64. 5 Replace Cooling Fans and Circulation Fans 64 YASKAWA TOEP C730600 0FC Fan Replacement Procedure Figure 5.100 Install the Circuit Board Cooling Fan Unit 3. Connect the relay cables to the fan connectors. A - Fan connectors B - Relay cables C - Circuit board cooling fan units Figure 5.101 Connect the Relay Cables 4. Install the drive cover. 5. Energize the drive and set o4-03 = 0 [Fan Operation Time Setting = 0 h] to reset the fan operation time.
  • 65. 5 Replace Cooling Fans and Circulation Fans YASKAWA TOEP C730600 0FC Fan Replacement Procedure 65 ◆ Fan Replacement (Procedure I) DANGER Electrical Shock Hazard. Do not examine, connect, or disconnect wiring on an energized drive. Before servicing, disconnect all power to the equipment and wait for the time specified on the warning label at a minimum. The internal capacitor stays charged after the drive is de-energized. The charge indicator LED extinguishes when the DC bus voltage decreases below 50 Vdc. When all indicators are OFF, remove the covers before measuring for dangerous voltages to make sure that the drive is safe. If you do work on the drive when it is energized, it will cause serious injury or death from electrical shock. CAUTION Burn Hazard. Do not touch a hot drive heatsink. De-energize the drive, wait for a minimum of 15 minutes, then make sure that the heatsink is cool before you replace the cooling fans. If you touch a hot drive heatsink, it can burn you. NOTICE Use the instructions in this manual to replace the cooling fans. When you do maintenance on the fans, replace all the fans to increase product life. If you install the fans incorrectly, it can cause damage to the drive. ■ Fan Removal 1. Remove the drive cover. CAUTION Crush Hazard. Loosen the cover screws. Do not fully remove them. If you fully remove the cover screws, the terminal cover can fall and cause moderate injury. 2. Unplug the fan cables from the fan connectors. A - Fan unit B - Fan connectors C - Fan cable Figure 5.102 Unplug the Fan Cables 3. Loosen the screws that safety the fan unit. Note: • To remove the fan unit, it is only necessary to loosen the screws in position B. • Remove the screws in position A.
  • 66. 5 Replace Cooling Fans and Circulation Fans 66 YASKAWA TOEP C730600 0FC Fan Replacement Procedure A - Screw position A B - Screw position B Figure 5.103 Loosen the Screws 4. Remove the fan unit. Note: When you remove the fan unit, make sure that it does not fall. Figure 5.104 Remove the Fan Unit
  • 67. 5 Replace Cooling Fans and Circulation Fans YASKAWA TOEP C730600 0FC Fan Replacement Procedure 67 5. Unplug the relay connectors, remove the screws that safety the cooling fans and circulation fan, and then remove the fans. A - Cooling fans B - Relay connectors C - Fan unit base D - Circulation fan Figure 5.105 Remove the Cooling Fans and Circulation Fan ■ Fan Installation Reverse the removal procedure for fan installation. 1. Connect the relay connectors on the fan unit base to the cooling fans and the circulation fan. A - Cooling fans B - Relay connectors C - Fan unit base D - Circulation fan Figure 5.106 Connect the Relay Connectors 2. Align the pins on the fan unit base with the notches on the fans and put the fans in the fan unit base, then use the screws to safety them. Tighten the M4 screws to a tightening torque of 0.98 N∙m to 1.33 N∙m (8.67 lbf∙in to 11.77 lbf∙in).
  • 68. 5 Replace Cooling Fans and Circulation Fans 68 YASKAWA TOEP C730600 0FC Fan Replacement Procedure Note: Make sure that you do not pinch cables between the fans and the fan unit base. A - Cooling fans B - Fan unit base C - Alignment pin on fan unit base D - Circulation fan E - Notch on fan Figure 5.107 Install the Cooling Fans and Circulation Fan 3. Put the cables and connectors in the recess of the drive. Note: Safety the relay cables to the hooks.
  • 69. 5 Replace Cooling Fans and Circulation Fans YASKAWA TOEP C730600 0FC Fan Replacement Procedure 69 A - Cooling fans B - Relay cables C - Cable hooks D - Relay connectors E - Circulation fan 4. Put the fan unit into the specified location and use screws to safety it to the drive. Tighten the screws to a correct tightening torque: • Screws in Position A: 0.98 N∙m to 1.33 N∙m (8.67 lbf∙in to 11.77 lbf∙in) • Screws in Position B: 1.96 N∙m to 2.53 N∙m (17.35 lbf∙in to 22.39 lbf∙in)
  • 70. 5 Replace Cooling Fans and Circulation Fans 70 YASKAWA TOEP C730600 0FC Fan Replacement Procedure A - Screw position A B - Screw position B Figure 5.108 Install the Fan Unit 5. Connect the fan cable to the fan connectors. A - Fan unit B - Fan connectors C - Fan cable Figure 5.109 Connect Cooling Fan Connectors 6. Install the drive cover.
  • 71. 5 Replace Cooling Fans and Circulation Fans YASKAWA TOEP C730600 0FC Fan Replacement Procedure 71 7. Energize the drive and set o4-03 = 0 [Fan Operation Time Setting = 0 h] to reset the fan operation time. ■ Circuit Board Cooling Fan Removal Remove the drive cover before you start this procedure. CAUTION Crush Hazard. Loosen the cover screws. Do not fully remove them. If you fully remove the cover screws, the terminal cover can fall and cause moderate injury. 1. Disconnect the relay cables from the fan connectors. A - Fan connectors B - Relay cables C - Circuit board cooling fan units Figure 5.110 Disconnect the Relay Cables 2. Loosen the screws that safety the circuit board cooling fan unit and slide the circuit board cooling fan unit up. Note: To remove the fan unit, it is only necessary to loosen the screws.
  • 72. 5 Replace Cooling Fans and Circulation Fans 72 YASKAWA TOEP C730600 0FC Fan Replacement Procedure A - Screws Figure 5.111 Slide the Circuit Board Cooling Fan Unit 3. Remove the circuit board cooling fan units. Figure 5.112 Remove the Circuit Board Cooling Fan Units
  • 73. 5 Replace Cooling Fans and Circulation Fans YASKAWA TOEP C730600 0FC Fan Replacement Procedure 73 4. Remove the screws that safety the circuit board cooling fans and remove the fans. A - Circuit board cooling fan B - Fan unit base Figure 5.113 Remove the Circuit Board Cooling Fans ■ Circuit Board Cooling Fan Installation Reverse the removal procedure for fan installation. 1. Align the pin on the fan unit base with the notch on the fan and put the circuit board cooling fan in the fan unit, then use the screws to safety the circuit board cooling fan to the fan unit base. Tighten the screws to a tightening torque of 0.98 N∙m to 1.33 N∙m (8.67 lbf∙in to 11.77 lbf∙in). Note: Make sure that you do not pinch cables between the circuit board cooling fan and the fan unit base. A - Circuit board cooling fan B - Fan unit base C - Alignment pin on fan unit base Figure 5.114 Install the Circuit Board Cooling Fan 2. Put the circuit board cooling fan unit into the specified location and use screws to safety it to the drive. Tighten the screws to a tightening torque of 0.98 N∙m to 1.33 N∙m (8.67 lbf∙in to 11.77 lbf∙in).
  • 74. 5 Replace Cooling Fans and Circulation Fans 74 YASKAWA TOEP C730600 0FC Fan Replacement Procedure Figure 5.115 Install the Circuit Board Cooling Fan Unit 3. Connect the relay cables to the fan connectors. A - Fan connectors B - Relay cables C - Circuit board cooling fan units Figure 5.116 Connect the Relay Cables 4. Install the drive cover. 5. Energize the drive and set o4-03 = 0 [Fan Operation Time Setting = 0 h] to reset the fan operation time.
  • 75. YASKAWA TOEP C730600 0FC Fan Replacement Procedure 75 Revision History Date of Publication Revision Number Section Revised Content June 2021 2 All Revision: Reviewed and corrected entire documentation. 4, 5 Revision: Modified documentation because of design changes for these models: • HV600: 4006 and 4008 (IP55/UL Type 12) • FP605: 4008 (IP55/UL Type 12) February 2021 1 4, 5 Addition: Information on FP605 December 2019 - - First Edition
  • 76. YASKAWA AC Drive Fan Replacement Procedure In the event that the end user of this product is to be the military and said product is to be employed in any weapons systems or the manufacture thereof, the export will fall under the relevant regulations as stipulated in the Foreign Exchange and Foreign Trade Regulations. Therefore, be sure to follow all procedures and submit all relevant documentation according to any and all rules, regulations and laws that may apply. Specifications are subject to change without notice for ongoing product modifications and improvements. © 2019 YASKAWA Electric Corporation MANUAL NO. TOEP C730600 0FC <2>-0 Published in Japan June 2021 20-2-22 *TOEPC7306000F* YASKAWA AMERICA, INC. 2121, Norman Drive South, Waukegan, IL 60085, U.S.A. Phone: +1-800-YASKAWA (927-5292) or +1-847-887-7000 Fax: +1-847-887-7310 www.yaskawa.com DRIVE CENTER (INVERTER PLANT) 2-13-1, Nishimiyaichi, Yukuhashi, Fukuoka, 824-8511, Japan Phone: +81-930-25-2548 Fax: +81-930-25-3431 www.yaskawa.co.jp YASKAWA ELECTRIC CORPORATION New Pier Takeshiba South Tower, 1-16-1, Kaigan, Minatoku, Tokyo, 105-6891, Japan Phone: +81-3-5402-4502 Fax: +81-3-5402-4580 www.yaskawa.co.jp YASKAWA ELÉTRICO DO BRASIL LTDA. 777, Avenida Piraporinha, Diadema, São Paulo, 09950-000, Brasil Phone: +55-11-3585-1100 Fax: +55-11-3585-1187 www.yaskawa.com.br YASKAWA EUROPE GmbH Hauptstraße 185, 65760 Eschborn, Germany Phone: +49-6196-569-300 Fax: +49-6196-569-398 E-mail: info@yaskawa.eu.com www.yaskawa.eu.com YASKAWA ELECTRIC KOREA CORPORATION 35F, Three IFC, 10 Gukjegeumyung-ro, Yeongdeungpo-gu, Seoul, 07326, Korea Phone: +82-2-784-7844 Fax: +82-2-784-8495 www.yaskawa.co.kr YASKAWA ASIA PACIFIC PTE. LTD 30A, Kallang Place, #06-01, 339213, Singapore Phone: +65-6282-3003 Fax: +65-6289-3003 www.yaskawa.com.sg YASKAWA ELECTRIC (THAILAND) CO., LTD. 59, 1F-5F, Flourish Building, Soi Ratchadapisek 18, Ratchadapisek Road, Huaykwang, Bangkok, 10310, Thailand Phone: +66-2-017-0099 Fax: +66-2-017-0799 www.yaskawa.co.th YASKAWA ELECTRIC (CHINA) CO., LTD. 22F, Link Square 1, No.222, Hubin Road, Shanghai, 200021, China Phone: +86-21-5385-2200 Fax: +86-21-5385-3299 www.yaskawa.com.cn YASKAWA ELECTRIC (CHINA) CO., LTD. BEIJING OFFICE Room 1011, Tower W3 Oriental Plaza, No. 1, East Chang An Avenue, Dong Cheng District, Beijing, 100738, China Phone: +86-10-8518-4086 Fax: +86-10-8518-4082 YASKAWA ELECTRIC TAIWAN CORPORATION 12F, No. 207, Section 3, Beishin Road, Shindian District, New Taipei City 23143, Taiwan Phone: +886-2-8913-1333 Fax: +886-2-8913-1513 or +886-2-8913-1519 www.yaskawa.com.tw YASKAWA INDIA PRIVATE LIMITED #17/A, Electronics City, Hosur Road, Bengaluru, 560 100 (Karnataka), India Phone: +91-80-4244-1900 Fax: +91-80-4244-1901 www.yaskawaindia.in