
Recommended
More Related Content
What's hot
What's hot (20)
Similar to EPISIOTOMY AND ITS REPAIR.pptx
Similar to EPISIOTOMY AND ITS REPAIR.pptx (20)
Recently uploaded
Recently uploaded (20)
EPISIOTOMY AND ITS REPAIR.pptx
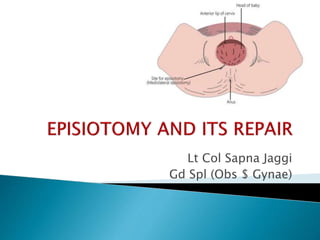
- 1. Lt Col Sapna Jaggi Gd Spl (Obs $ Gynae)
- 2. Definition Purpose Indications Advantages Types Perineal repair Complications Health education Perineal care
- 3. A surgically planned incision on the perineum and the posterior vaginal wall during the second stage of labour
- 4. To enlarge the vaginal introitus To facilitate easy and safe delivery To minimize rupture of the perineal muscles and fascia To reduce stress and strain on fetal head
- 5. In rigid perineum(Primigravidas mostly) Anticipating perineal tear Big baby Instrumental delivery Breech delivery Preterm delivery
- 6. MATERNAL FETAL • Easy to repair • Minimises intracranial injuries esp in premature babies, after coming head of breech • Reduction in duration of labour • Reduction of traumatic injuries like perineal tears, lacerations
- 7. Bulging thinned perineum during contraction just prior to crowning(when 3-4 cm of head is visible) is the ideal time
- 8. Mediolateral ( Most common) Median Lateral J shaped
- 9. The incision is made downwards and outwards from the midpoint of the fourchette either to the right or to the left. It is directed diagonally in a straight line which runs about 2.5 cm away from the anus (midpoint between anus and ischial tuberosity). MOST COMMONLY USED
- 10. MEDIAN MEDIOLATERAL • The muscles are not cut • Relative safety from rectal involvement from extension • Blood loss is least • If necessary,incision can be extended • Repair is easy • Postoperative comfort is maximum • Healing is superior • Wound disruption is rare • Dyspareunia is rare
- 11. MEDIAN MEDIOLATERAL • Extension, if occurs, may involve rectum(MAIN DRAWBACK) • Apposition of tissues is not so good • Not suitable for manipulative delivery or in malpresentation • Blood loss is little more • Postoperative discomfort is more • Dyspareunia is comparatively more • Relative increased incidence of wound disruption
- 12. Step 1 : Preliminaries Step 2 : Incision Step 3 : Repair
- 13. EQUIPMENTS: Sterile drape Sterile gown and gloves Gauze swabs Needle holder Sponge holder Scissors, 10 ml syringe Toothed forceps Suture material 1% Lignocaine
- 14. 1. PRELIMINARIES: The perineum is thoroughly swabbed with antiseptic solution Draped properly Empty the bladder Incision line –The perineum, in the line of proposed incision is infiltrated with 10 mL of 1% solutionof lignocaine (Fan shaped) Note: Aspirate( pull back on plunger) to be sure that no vessel has been penetrated)
- 15. 2. MAKING EPISIOTOMY: Two fingers are placed in the vagina between the presenting part and posterior vaginal wall The incision is made by straight/ curved blunt sharp scissors The open blades are positioned Deliberate cut should be made
- 16. Incision should be made at the height of an contraction Cut should be made starting from the centre of the fourchette extending laterally either to the left or right It is directed diagonally in a straight line which runs about 2.5 cm from the anus If delivery of the head does not follow immediately, apply pressure to the episiotomy site Control delivery of the head to avoid extension of episiotomy(PERINEAL SUPPORT0
- 17. Posterior vaginal wall Superficial and deep transverse perineal muscles ,bulbospongiosus and part of levator ani Fascia covering those muscles Transverse perineal branches of pudendal vessels and nerves Subcutaneous tissue and skin
- 19. 3. PERINEAL REPAIR Repair is done soon after the expulsion of placenta Advantage - Repair is not interrupted or disrupted by placenta delivery, especially true if manual removal must be performed Disadvantage -Continuing blood loss.Direct pressure from an applied gauze sponge will help to limit this volume.
- 20. PRINCIPLES OF REPAIR: (1) Perfect hemostasis (2) To obliterate the dead space (3) Suture without tension.
- 21. Polyglactin 910 suture: Coated Vicryl, Vicryl Rapide Traditional sutures: Catgut, chromic catgut
- 22. PRELIMINARIES: Patient placed in lithotomy position A good source of light from behind is needed to find the APEX first The perineum and the wound area is cleaned with antiseptics Blood clots are removed from the vagina and wound area
- 23. Patient is draped properly and repair should be done under strict aseptic precaution A vaginal pack is inserted and is placed high up (Do not forget to remove the pack after the repair is completed.)
- 24. PRINCIPLES IN SUTURING: Close all dead space- ensure hemostasis and prevent infection Cotton balls must not be used Handle tissue gently using non toothed forceps Ensure good anatomical restoration and alignment to facilitate healing
- 25. Use minimal amount of suture material and do not over tighten suture this may impede healing Following the repair a rectal examination should be performed to ensure no suture material has been inserted through rectal mucosa
- 26. LAYERS OF PERINEAL REPAIR: Vaginal mucosa and submucosal tissue Perineal muscles Skin and subcutaneous tissues
- 27. STEPS OF REPAIR OF EPISIOTOMY
- 28. Step 1 SUTURING THE VAGINA Identify apex Insert the anchoring suture 0.5 cm above the apex The vaginal epithelium and deeper tissues are closed with a single, continuous, locking suture.
- 29. Step 2: SUTURING THE PERINEAL MUSCLE Check the depth of the trauma Repair the perineal muscles in one or two layers Ensure the muscle edges are apposed carefully leaving no dead space Deeper perineal tissues are reapproximated by a nonlocking suture. Small episiotomies may not require this deeper layer.
- 30. Step 3: SUTURING THE SKIN The perineal skin is closed using a subcuticular stitch/Interrupted mattress sutures.
- 31. Inspect the repair to check that haemostasis has been achieved Remove the vaginal swab Account for all instruments, swabs and needles Discard sharps safely Apply sterile pad following through perineal wash Wait for minimum one hour to shift the patient to ward Check for bleeding and urine output Always check the fundal height
- 32. IMMEDIATE RARE • Extension of hematoma to involve rectum • Dyspareunia • Vulval hematoma • Perineal lacerations • Infection • Scar endometriosis rare • Wound dehiscence • Injury to anal sphincter • Rarely rectovaginal fistula
- 33. Eat a diet high in fibre and fluids to prevent constipation Ask the women to walk with thighs apposed Not to use squatting position since the wound is healing Laxatives
- 34. Change sanitary pads at least every 4 hours to help prevent infection Squirt warm tap water over the perineum, beginning at the front and moving toward the back Sit in a tub of warm water Always wash hands before and after going to the bathroom Always keep the wound clean and dry after each urination and defecation
- 35. THANK YOU