DevEX - reference for building teams, processes, and platforms
Mẫu Template ppt
1. Background templates for PowerPoint slides
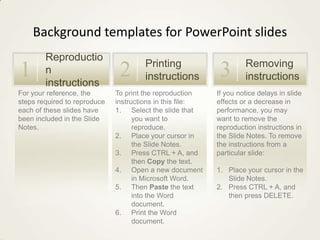
Reproductio
Printing Removing
1 n
instructions
2 instructions 3 instructions
For your reference, the To print the reproduction If you notice delays in slide
steps required to reproduce instructions in this file: effects or a decrease in
each of these slides have 1. Select the slide that performance, you may
been included in the Slide you want to want to remove the
Notes. reproduce. reproduction instructions in
2. Place your cursor in the Slide Notes. To remove
the Slide Notes. the instructions from a
3. Press CTRL + A, and particular slide:
then Copy the text.
4. Open a new document 1. Place your cursor in the
in Microsoft Word. Slide Notes.
5. Then Paste the text 2. Press CTRL + A, and
into the Word then press DELETE.
document.
6. Print the Word
document.
Editor's Notes
For reproduction steps for this slide, refer to the PowerPoint template titled “Combined picture and text effects for PowerPoint slides” (ANI_TEXT.potx), slide number 8.
Faded background picture(Basic)To reproduce the background effects on this slide, do the following:On the Home tab, in the Slides group, click Layout and then click Blank. Right-click the slide and click FormatBackground.In the Format Background dialog box, click Fill in the left pane. In the Fill pane, select Picture or texture fill, and then under Insert from, click File. In the Insert Picture dialog box, select a picture, and then click Insert.Also in the Format Background dialog box, in the Fill pane, in the Transparency box, enter 85%.
Round bullet pattern(Basic)To reproduce the background effects on this slide, do the following:On the Home tab, in the Slides group, click Layout, and then click Blank. On the Design tab, in the Background group, click BackgroundStyles, and then click Style 8 (second row, fourth option from the left).(Note: If this action is taken in a PowerPoint presentation containing more than one slide, the background style will be applied to all of the slides.) On the Insert tab, in the Text group, click Text Box, and then on the slide, drag to draw a text box that spans the entire width of the slide.On the Insert tab, in the Text group, click Symbol. In the Symbol dialog box, do the following:In the Font list, select (normal text).In the Subset list, select General Punctuation.In the Character Code box, enter 2022 to select Bullet, and then click Insert.Click Insert 27 more times until there is a row of 28 bullets in the text box. Select the row of bullets. On the Home tab, in the Clipboard group, click Copy. In the text box, click to the right of the line of text and press ENTER to begin a new line of text. On the Home tab, in the Clipboard group, click the button above Paste. Repeat this process to create seven total rows of bullets within the text box. Select the text box. On the Home tab, in the Font group, select Calibrifrom the Font list, and then enter 50 in the Font Size box.On the Home tab, in the Paragraph group, click Center to center the text in the text box.Under Drawing Tools, on the Format tab, in the WordArt Styles group, click Text Effects, point to Transform, and then under Warp, click Curve Down (fourth row, second option from the left). On the slide, drag the text box to position the seven rows of bullets on the slide.On the text box, drag the pink diamond adjustment handle to adjust the amount of warp on the rows of bullets.Under Drawing Tools, on the Format tab, in the WordArt Styles group, click the arrow next to Text Fill, point to Gradient Fill, and then click More Gradients. In the Format Text Effects dialog box, click Text Fill in the left pane. In the TextFill pane, select Gradient fill, and then do the following:In the Type list, select Linear.Click the button next to Direction, and then click Linear Right (first row, fourth option from the left).In the Angle box, enter 180°.Under Gradient stops, click Add or Remove until two stops appear in the drop-down list.Also under Gradient stops, customize the gradient stops that you added as follows:Select Stop 1 from the list, and then do the following:In the Stop position box, enter 0%.Click the button next to Color, and then under Theme Colors click Black, Background 1, Lighter 35% (third row, first option from the left).In the Transparency box, enter 70%.Select Stop 2 from the list, and then do the following: In the Stop position box, enter 100%.Click the button next to Color, and then under Theme Colors click Black, Background 1 (first row, first option from the left).In the Transparency box, enter 75%.
Square bullet pattern(Basic)To reproduce the background effects on this slide, do the following:On the Home tab, in the Slides group, click Layout, and then click Blank. On the Insert tab, in the Text group, click Text Box, and then on the slide, drag to draw a text box that spans the entire width of the slide.On the Insert tab, in the Text group, click Symbol. In the Symbol dialog box, do the following:In the Font list, select Arial.In the Character Code box, enter 25A0 and inthefrom box, select Unicode (hex)to select BLACK SQUARE,and then click Insert.Click Insert 29 more times until there is a row of 30 squares in the text box. Select the row of squares. On the Home tab, in the Clipboard group, click Copy. In the text box, click to the right of the line of text and press ENTER to begin a new line of text. On the Home tab, in the Clipboard group, click the button above Paste. Repeat this process to create 16 total rows of squares within the text box. Select the text box. On the Home tab, in the Font group, select Arialfrom the Font list and then select 28 from the Font Size list.On the Home tab, in the Paragraph group, click Center to center the text in the text box.On the Home tab, in the Font group, click Character Spacing, and then click Very Loose. Under Drawing Tools, on the Format tab, in the WordArt Styles group, click Text Effects, point to Transform, and then under Warp click Inflate (sixth row, first option from the left).On the Home tab, in the Drawing group, click Arrange, point to Align, and then do the following:Click Align to Slide.Click Align Center.Click Align Middle. On the slide, drag the pink diamond adjustment handle to adjust the amount of warp on the rows of squares. Under Drawing Tools, on the Format tab, in the WordArt Styles group, click the arrow next to Text Fill, point to Gradient, and then click More Gradients. In the Format Text Effects dialog box, click Text Fill in the left pane. In the TextFill pane, select Gradient fill, and then do the following:In the Type list, select Radial.Click the button next to Direction, and then click From Center (thirdoption from the left).Under Gradient stops, click Add or Remove until two stops appear in the drop-down list.Also under Gradient stops, customize the gradient stops that you added as follows:Select Stop 1 from the list, and then do the following:In the Stop position box, enter 0%.Click the button next to Color, and then under Theme Colors click White, Background 1, Darker 5%(second row, first option from the left).Select Stop 2 from the list, and then do the following: In the Stop position box, enter 100%.Click the button next to Color, and then under Theme Colors click White, Text 1, Darker 35%(fifth row, first option from the left).On the Design tab, in the bottom right corner of the Background group, click the FormatBackground dialog box launcher. In the FormatBackground dialog box, click Fill in the left pane, select Gradient fill in the Fill pane, and then do the following:In the Type list, select Radial.Click the button next to Direction, and then click From Center (thirdoption from the left).Under Gradient stops, click Add or Remove until two stops appear in the drop-down list.Also under Gradient stops, customize the gradient stops that you added as follows:Select Stop 1 from the list, and then do the following:In the Stop position box, enter 0%.Click the button next to Color, and then under Theme Colors click White, Background 1, Darker 15%(third row, first option from the left).Select Stop 2 from the list, and then do the following: In the Stop position box, enter 100%.Click the button next to Color, and then under Theme Colors click White, Text 1, Darker 35%(fifth row, first option from the left).
Transparent light effect(Basic)To reproduce one of the shapes on this slide, do the following:On the Home tab, in the Slides group, click Layout and then click Blank. On the Home tab, in the Drawing group, click Shapes, and then under Basic Shapes click Oval (first row, second option from the left). Press and hold SHIFT to constrain the shape to a circle, and then drag to draw a circle on the slide. On the Home tab, in the bottom right corner of the Drawing group, click the Format Shape dialog box launcher. In the Format Shape dialog box, click Line Color in the left pane, and then select No line in the Line Color pane. Also in the Format Shape dialog box, click Fill in the left pane, select Gradient fill in the Fill pane, and then do the following:In the Type list, select Radial.Click the button next to Direction, and then click From Center (thirdoption from the left).Under Gradient stops, click Add or Remove until three stops appear in the drop-down list.Also under Gradient stops, customize the gradient stops that you added as follows:Select Stop 1 from the list, and then do the following:In the Stop position box, enter 0%.Click the button next to Color, and then under Theme Colors click Dark Blue, Text 2, Lighter 60%(third row, fourth option from the left).In the Transparency box, enter 80%.Select Stop 2 from the list, and then do the following: In the Stop position box, enter 50%.Click the button next to Color, and then under Dark Blue, Text 2, Lighter 40%(fourth row, fourth option from the left).In the Transparency box, enter 70%.Select Stop 3 from the list, and then do the following: In the Stop position box, enter 100%.Click the button next to Color, and then under Theme Colors click Dark Blue, Text 2, Lighter 40% (fourth row, fourth option from the left). In the Transparency box, enter 100%.On the Home tab, in the Drawing group, click Shape Effects, point to Soft Edges, and then click 10 Point. To reproduce the other shapeson this slide, do the following:Select the circle on the slide. On the Home tab, in the Clipboard group, click the arrow under Paste, and then click Duplicate. Repeat this process to create a total of 10 circles. On the slide, drag the circles to position them at random intervals. For each circle, press and hold SHIFT and then drag the adjustment handles to resize as needed.To reproduce the different color and transparency effects in each of the shapes, do the following:Select the shape. On the Home tab, in the bottom right corner of the Drawing group, click the Format Shape dialog box launcher.In the Format Shape dialog box, click Fill in the left pane, and then select Gradient fill in the Fill pane. Under Gradient stops, click Add or Remove until three stops appear in the drop-down list, and then do the following:For the first and third (small circle below larger circle) circles from the left:Select Stop 1 from the list, and then do the following:In the Stop position box, enter 0%.Click the button next to Color, and then under Theme Colors click Dark Blue, Text 2, Lighter 60%(third row, fourth option from the left).In the Transparency box, enter 90%.Select Stop 2 from the list, and then do the following: In the Stop position box, enter 50%.Click the button next to Color, and then under Dark Blue, Text 2, Lighter 40%(fourth row, fourth option from the left).In the Transparency box, enter 85%.Select Stop 3 from the list, and then do the following: In the Stop position box, enter 100%.Click the button next to Color, and then under Theme Colors click Dark Blue, Text 2, Lighter 40% (fourth row, fourth option from the left). In the Transparency box, enter 100%.For the second circle from the left, do not change the Gradient stops settings in the Format Shape dialog box. For the fourth circle from the left (large circle above third circle):Select Stop 1 from the list, and then do the following:In the Stop position box, enter 0%.Click the button next to Color, and then under Theme Colors click Dark Blue, Text 2, Lighter 60%(third row, fourth option from the left).In the Transparency box, enter 80%.Select Stop 2 from the list, and then do the following: In the Stop position box, enter 50%.Click the button next to Color, and then under Dark Blue, Text 2, Lighter 40%(fourth row, fourth option from the left).In the Transparency box, enter 70%.Select Stop 3 from the list, and then do the following: In the Stop position box, enter 100%.Click the button next to Color, and then under Theme Colors click Dark Blue, Text 2, Lighter 60% (third row, fourth option from the left). In the Transparency box, enter 100%.For the fifth circle from the left:Select Stop 1 from the list, and then do the following:In the Stop position box, enter 0%.Click the button next to Color, and then under Theme Colors click Dark Blue, Text 2, Lighter 40%(fourth row, fourth option from the left).In the Transparency box, enter 88%.Select Stop 2 from the list, and then do the following: In the Stop position box, enter 50%.Click the button next to Color, and then under Dark Blue, Text 2, Lighter 40%(fourth row, fourth option from the left).In the Transparency box, enter 71%.Select Stop 3 from the list, and then do the following: In the Stop position box, enter 100%.Click the button next to Color, and then under Theme Colors click Dark Blue, Text 2, Lighter 40% (fourth row, fourth option from the left). In the Transparency box, enter 100%.For the sixth circle from the left:Select Stop 1 from the list, and then do the following:In the Stop position box, enter 0%.Click the button next to Color, click More Colors, and then in the Colors dialog box, on the Custom tab, enter values for Red: 227, Green: 209, Blue: 143.In the Transparency box, enter 84%.Select Stop 2 from the list, and then do the following: In the Stop position box, enter 50%.Click the button next to Color, click More Colors, and then in the Colors dialog box, on the Custom tab, enter values for Red: 223, Green: 205, Blue: 75.In the Transparency box, enter 85%.Select Stop 3 from the list, and then do the following: In the Stop position box, enter 100%.Click the button next to Color, click More Colors, and then in the Colors dialog box, on the Custom tab, enter values for Red: 214, Green: 195, Blue: 84.In the Transparency box, enter 100%.For the seventh circle from the left:Select Stop 1 from the list, and then do the following:In the Stop position box, enter 0%.Click the button next to Color, and then under Theme Colors click Dark Blue, Text 2, Lighter 60%(third row, fourth option from the left).In the Transparency box, enter 60%.Select Stop 2 from the list, and then do the following: In the Stop position box, enter 50%.Click the button next to Color, and then under Dark Blue, Text 2, Lighter 40%(fourth row, fourth option from the left).In the Transparency box, enter 60%.Select Stop 3 from the list, and then do the following: In the Stop position box, enter 100%.Click the button next to Color, and then under Theme Colors click Dark Blue, Text 2, Lighter 40% (fourth row, fourth option from the left). In the Transparency box, enter 100%.For the eighth circle from the left, do not change the Gradient stops settings in the Format Shape dialog box. For the ninth circle from the left (small brown circle below larger blue circle):Select Stop 1 from the list, and then do the following:In the Stop position box, enter 0%.Click the button next to Color, click More Colors, and then in the Colors dialog box, on the Custom tab, enter values for Red: 227, Green: 209, Blue: 143.In the Transparency box, enter 70%.Select Stop 2 from the list, and then do the following: In the Stop position box, enter 50%.Click the button next to Color, click More Colors, and then in the Colors dialog box, on the Custom tab, enter values for Red: 223, Green: 205, Blue: 75.In the Transparency box, enter 85%.Select Stop 3 from the list, and then do the following: In the Stop position box, enter 100%.Click the button next to Color, click More Colors, and then in the Colors dialog box, on the Custom tab, enter values for Red: 214, Green: 195, Blue: 84.In the Transparency box, enter 100%.For the tenth circle from the left (large blue circle above ninth circle):Select Stop 1 from the list, and then do the following:In the Stop position box, enter 0%.Click the button next to Color, and then under Theme Colors click Dark Blue, Text 2, Lighter 60%(third row, fourth option from the left).In the Transparency box, enter 80%.Select Stop 2 from the list, and then do the following: In the Stop position box, enter 50%.Click the button next to Color, and then under Dark Blue, Text 2, Lighter 40%(fourth row, fourth option from the left).In the Transparency box, enter 74%.Select Stop 3 from the list, and then do the following: In the Stop position box, enter 100%.Click the button next to Color, and then under Theme Colors click Dark Blue, Text 2, Lighter 40% (fourth row, fourth option from the left). In the Transparency box, enter 100%.To reproduce the background on this slide, do the following: Right-click the slide background area, and then click Format Background. In the Format Background dialog box, click Fill in the left pane, select Gradient fill in the Fill pane, and then do the following:In the Type list, select Radial.Click the button next to Direction, and then click From Center (third option from the left).Under Gradient stops, click Add or Remove until two stops appear in the drop-down list.Also under Gradient stops, customize the gradient stops that you added as follows:Select Stop 1 from the list, and then do the following:In the Stop position box, enter 0%.Click the button next to Color, click More Colors, and then in the Colors dialog box, on the Custom tab, enter values for Red: 65, Green: 68, Blue: 97.Select Stop 2 from the list, and then do the following: In the Stop position box, enter 99%.Click the button next to Color, and then click Black, Text 1(first row, second option from the left).
Lace background(Basic)To reproduce the shape effects on this slide, do the following:On the Home tab, in the Slides group, click Layout and then click Blank. On the Insert tab, in the Illustrations group, click Clip Art. In the Clip Art pane, in the Search for box, enterj0437868. In the Search in list, select Everywhere. Select the clip art file to insert it into the slide. (Note: If you choose another clip art file, the clip art must be in the Windows Metafile format [.wmf].) On the slide, select the clip art.On the Home tab, in the Drawing group, click Arrange, and then click Ungroup. In the Microsoft Office PowerPoint dialog box, click Yes. On the slide, select the converted clip art. On the Home tab, in the Editing group, click Select, and then click Selection Pane. In the Selection and Visibility pane, select the top-level group. On the Home tab, in the Drawing group, click Arrange, and then click Ungroup. Also in the Selection and Visibility pane, select the Autoshape object, and then press DELETE. On the Home tab, in the Editing group, click Select, and then click Select All. On the Home tab, in the Drawing group, click Arrange, and then click Regroup. On the slide, drag the adjustment handles on the group to increase its size so that it extends beyond the edges of the slide. Select the group. On the Home tab, in the bottom right corner of the Drawing group, click the Format Shape dialog box launcher. In the Format Shape dialog box , click Fill in the left pane, select Solid fill in the Fill pane, and then do the following:Click the button next to Color, and then under Theme Colors click White, Background 1 (first row, first option from the left). In the Transparency box, enter 80%.Also in the Format Shape dialog box , click LineColor in the left pane, select Gradient line in the Line Color pane, and then do the following:In the Type list, select Linear.Click the button next to Direction, and then click Linear Down (first row, second option from the left).In the Angle box, enter 90%.Under Gradient stops, click Add or Remove until two stops appear in the drop-down list.Also under Gradient stops, customize the gradient stops that you added as follows:Select Stop 1 from the list, and then do the following:In the Stop position box, enter 0%.Click the button next to Color, and then under Theme Colors click White, Background 1(first row, first option from the left).In the Transparency box, enter 100%.Select Stop 2 from the list, and then do the following: In the Stop position box, enter 100%.Click the button next to Color, and then under Theme Colors click White, Background 1(first row, first option from the left).In the Transparency box, enter 0%.To reproduce the background on this slide, do the following: On the Design tab, in the bottom right corner of the Background group, click the Format Background dialog box launcher. In the Format Background dialog box, click Fill in the left pane, select Gradient fill in the Fill pane, and then do the following:In the Type list, select Linear.Click the button next to Direction, and then click Linear Diagonal (first row, first option from the left). In the Angle box, enter 225⁰.Under Gradient stops, click Add or Remove until three stops appear in the drop-down list.Also under Gradient stops, customize the gradient stops that you added as follows:Select Stop 1 from the list, and then do the following:In the Stop position box, enter 0%.Click the button next to Color, and then under Theme Colors click Tan, Background 2, Darker 10% (second row, third option from the left).Select Stop 2 from the list, and then do the following: In the Stop position box, enter 18%.Click the button next to Color, and then under Theme Colors click White, Background 1 (first row, first option from the left).Select Stop 3 from the list, and then do the following: In the Stop position box, enter 100%.Click the button next to Color, click More Colors, and then in the Colors dialog box, on the Custom tab, enter values for Red: 209, Green: 211, Blue: 191.
Half-circle picture with accent arcs(Basic)To reproduce the shape effects on this slide, do the following:On the Home tab, in the Slides group, click Layout, and then click Blank. On the Home tab, in the Drawing group, click Shapes, and then under Basic Shapes, click Arc (third row, 12th option from the left). On the slide, drag to draw an arc.Select the arc. Under Drawing Tools, on the Format tab, in the Size group, do the following:In the Shape Height box, enter 7.5”.In the Shape Width box, enter 7.5”.Drag the yellow diamond adjustment handle on the right side of the arc to the bottom of the slide to create a half-circle. Under Drawing Tools, on the Format tab, in the bottom right corner of the Shape Styles group, click the Format Shape dialog box launcher. In the Format Shape dialog box, click Fill in the left pane. In the Fill pane, select Pictureor texture fill, and then do the following under Insert from: Click File. In the Insert Picture dialog box, select a picture, and then click Insert. Select Tile picture as texture. Also in the Format Shape dialog box, click Line Color in the left pane. In the Line Color pane, select No line. Also in the Format Shape dialog box, click Shadow in the left pane. In the Shadow pane, click the button next to Presets, under Inner click Inside Diagonal Top Right (first row, third option from the left), and then do the following:In the Transparency box, enter 70%.In the Blur box, enter 20 pt.In the Distance box, enter 20 pt. Drag the half-circle to the left until the two middle yellow adjustment diamonds are lined up with the left edge of the slide. On the Home tab, in the Drawing group, click Arrange, point to Align, and then do the following:Click Align to Slide.Click Align Middle. Select the arc. On the Home tab, in the Clipboard group, click the arrow under Paste, and then click Duplicate. Select the second arc. Under Drawing Tools, on the Format tab, in the Size group, do the following:In the Shape Height box, enter 6.79”.In the Shape Width box, enter 10.03”.On the Home tab, in the bottom right corner of the Drawing group, click the Format Shape dialog box launcher. In the Format Picture dialog box, click Fill in the left pane. In the Fill pane, select No fill. Also in the Format Shape dialog box, click Line Color in the left pane. In the Line Color pane, select Solid line and then do the following:Click the button next to Color, and then under Theme Colors click White, Background 1 (first row, first option from the left).In the Transparency box, enter 50%.Also in the Format Shape dialog box, click Line Style in the left pane. In the Line Style pane, in the Width box, enter 1.5 pt.Drag the second arc left on the slide until the two middle yellow adjustment diamonds are lined up with the left edge of the slide. On the Home tab, in the Drawing group, click Arrange, point to Align, and then do the following:Click Align to Slide.Click Align Middle.Select the second arc. On the Home tab, in the Clipboard group, click the arrow under Paste, and then click Duplicate. Select the third arc. Under Drawing Tools, on the Format tab, in the Size group, do the following:In the Shape Height box, enter 6.86”.In the ShapeWidth box, enter 9.98”.On the Home tab, in the bottom right corner of the Drawing group, click the Format Shape dialog box launcher. In the Format Shape dialog box, click Line Color in the left pane, select Gradient line in the Line Color pane, and then do the following: In the Type list, select Linear.Click the button next to Direction, and then click Linear Down (first row, second option from the left).Under Gradient stops, click Add or Remove until two stops appear in the drop-down list.Also under Gradient stops, customize the gradient stops that you added as follows:Select Stop 1 from the list, and then do the following:In the Stop position box, enter 0%.Click the button next to Color, and then under Theme Colors click Blue, Accent 1, Lighter 40%(fourth row, fifth option from the left).In the Transparency box, enter 77%.Select Stop 2 from the list, and then do the following: In the Stop position box, enter 100%.Click the button next to Color, click More Colors, and then in the Colors dialog box, on the Custom tab, enter values for Red: 208, Green: 215, Blue: 222.In the Format Shape dialog box, in the Line Style pane, in the Transparency box, enter 90%.Also in the Format Shape dialog box, click Line Style in the left pane. In the Line Style pane, in the Width box, enter 4.25 pt. On the Home tab, in the Drawing group, click Arrange, point to Align, and then do the following:Click Align to Slide.Click Align Left. Drag the third arc left on the slide until the two middle yellow adjustment diamonds are lined up with the left edge of the slide. Drag the third arc vertically as needed to position it slightly above the second arc on the slide. To reproduce the background on this slide, do the following: Right-click the slide background area, and then click Format Background. In the Format Background dialog box, click Fill in the left pane, select Gradient fill in the Fill pane, and then do the following:In the Type list, select Linear.Click the button next to Direction, and then click Linear Up (second row, second option from the left). In the Angle box, enter 270⁰.Under Gradient stops, click Add or Remove until four stops appear in the drop-down list.Also under Gradient stops, customize the gradient stops that you added as follows:Select Stop 1 from the list, and then do the following:In the Stop position box, enter 0%.Click the button next to Color, click More Colors, and then in the Colors dialog box, on the Custom tab, enter values for Red: 167, Green: 185, Blue: 197.Select Stop 2 from the list, and then do the following: In the Stop position box, enter 30%.Click the button next to Color, and then under Theme Colors click White, Background 1 (first row, first option from the left).Select Stop 3 from the list, and then do the following: In the Stop position box, enter 70%.Click the button next to Color, and then under Theme Colors click White, Background 1 (first row, first option from the left).Select Stop 4 from the list, and then do the following: In the Stop position box, enter 100%.Click the button next to Color, click More Colors, and then in the Colors dialog box, on the Custom tab, enter values for Red: 167, Green: 185, Blue: 197.
Picture with multicolored tint(Basic)To reproduce the picture effects on this slide, do the following:On the Home tab, in the Slides group, click Layout, and then click Blank. On the Insert tab, in the Illustrations group, click Picture. In the Insert Picture dialog box, select a picture, and then click Insert. Under Picture Tools, on the Format tab, in the bottom right corner of the Size group, click the Size and Position dialog box launcher. In the Size and Position dialog box, on the Size tab, resize or crop the picture as needed so that under Size and rotate, the Height box is set to 4.08” and the Width box is set to 10”. Resize the picture under Size and rotate by entering values into the Height and Width boxes. Crop the picture under Crop from by entering values into the Left, Right, Top, and Bottom boxes. Select the picture. On the Home tab, in the bottom right corner of the Drawing group, click the Format Shape dialog box launcher. In the Format Picture dialog box, click Picture in the left pane, and then do the following in the Picture pane:Click the button next to Recolor, and then under Color Modes, click Grayscale (first option from the left).In the Brightness box, enter 25%.In the Contrast box, enter 25%.Also in the Format Shape dialog box, click Shadow in the left pane. In the Shadow pane, click the button next to Presets, and then under Inner click Inside Top (first row, second option from the left). On the Home tab, in the Drawing group, click Shapes, and then under Rectangles, click Rectangle (first option from the left). Drag to draw a rectangle on the slide. Under Drawing Tools, on the Format tab, in the Size group, do the following:In the Shape Height box, enter 4.08”.In the Shape Width box, enter 10”.On the Home tab, in the bottom right corner of the Drawing group, click the Format Shape dialog box launcher. In the Format Shape dialog box, click Fill in the left pane, select Gradient fill in the Fill pane, and then do the following:Click the button next to Preset colors, and then click Rainbow II (fourth row, second option from the left).In the Type list, select Linear. Click the button next to Direction, and then click Linear Left (first row, fifth option from the left).In the Angle box, enter 180°.Under Gradient stops, in the drop-down list, select each of the five stops individually, and then in the Transparency box, enter 70%. Also in the Format Shape dialog box, click Line Color in the left pane, and then select No line in the Line Color pane. Press and hold SHIFT and select both the picture and the rectangle. On the Home tab, in the Drawing group, click Arrange, and then do the following:Point to Align, and then click Align to Slide. Point to Align, and then click Align Middle.Point to Align, and then click Align Center.Click Group.Drag the group vertically on the slide to position as needed. If the group is no longer centered horizontally on the slide, on the Home tab, in the Drawing group, click Arrange, point to Align, and then do the following:Click Align to Slide. Click Align Center. To reproduce the background on this slide, do the following: Right-click the slide background area, and then click Format Background. In the Format Background dialog box, click Fill in the left pane, select Gradient fill in the Fill pane, and then do the following:In the Type list, select Linear.Click the button next to Direction, and then click Linear Right (first row, fourth option from the left). In the Angle text box, enter 0⁰.Under Gradient stops, click Add or Remove until three stops appear in the drop-down list.Also under Gradient stops, customize the gradient stops that you added as follows:Select Stop 1 from the list, and then do the following:In the Stop position box, enter 0%.Click the button next to Color, then under Theme Colors click White, Background 1, Darker 15% (third row, first option from the left).Select Stop 2 from the list, and then do the following: In the Stop position box, enter 20%.Click the button next to Color, and then under Theme Colors click White, Background 1 (first row, first option from the left).Select Stop 3 from the list, and then do the following: In the Stop position box, enter 100%.Click the button next to Color, and then under Theme Colors click White, Background1, Darker 25% (fourth row, first option from the left).
Diffused arches(Intermediate)To reproduce the shape effects on this slide, do the following:On the Home tab, in theSlides group, click Layout, and then click Blank.On the Home tab, in the Drawing group, click Shapes, and then under Lines click Curve (tenth option from the left). On the slide, click three points to draw a simple curved line, double-clicking the final point to finish. Select the curved line. On the Home tab, in the Drawing group, click the arrow next to Shape Fill, point to Gradient, and then click More Gradients. In the Format Shape dialog box, click Fill in the left pane, select Gradient fill in the Fill pane, and then do the following:In the Type list, select Linear.Click the button next to Direction, and then click Linear Down (first row, second option from the left).Under Gradient stops, click Add or Remove until two stops appear in the drop-down list.Also under Gradient stops, customize the gradient stops that you added as follows:Select Stop 1 from the list, and then do the following:In the Stop position box, enter 0%.Click the button next to Color, and then underTheme Colorsclick White, Background 1 (first row, first option from the left). In the Transparency box, enter 50%.Select Stop 2 from the list, and then do the following: In the Stop position box, enter 100%.Click the button next to Color, and then underTheme Colorsclick White, Background 1 (first row, first option from the left). In the Transparency box, enter 100%.On the Home tab, in the Drawing group, click Shape Effects, point to Soft Edges, and then click 5 point. On the Home tab, in the Drawing group, click the arrow next to Shape Outline, and then click No Outline. To reproduce the background effects on this slide, do the following:Right-click the slide background area, and then click Format Background. In the Format Background dialog box, click Fill in the left pane, select Gradient fill in the right pane, and then do the following:In the Type list, select Radial.Click the button next to Direction, and then click From Center (third option from the left). Under Gradient stops, click Add or Remove until two stops appear in the drop-down list.Also under Gradient stops, customize the gradient stops that you added as follows:Select Stop 1 from the list, and then do the following:In the Stop position box, enter 0%.Click the button next to Color, and then under Theme Colors click White, Background 1 (first row, first option from the left).Select Stop 2 from the list, and then do the following: In the Stop position box, enter 100%.Click the button next to Color, and then under Theme Colors click White, Background 1, Darker 50% (sixth row, first option from the left).To reproduce the duplicate curved lines on the slide, do the following:On the Home tab, in the Clipboard group, click the arrow under Paste, and then click Duplicate. Repeat the process for a total of three curved lines. On the slide, drag the curved lines to position them as needed. Right-click one of the duplicate curved lines, click Edit Points, and then drag the points on the curve to make a new shape. Repeat the process with the other duplicate curved line.
Faded picture background with full-color overlay(Intermediate)Tip: For best results with the picture overlay on this slide, use a picture that is the same dimensions as the slide: 7.5” high and 10” wide. If the picture is not the same height and width, resize or crop to those dimensions before following the instructions below. To reproduce the background effects on this slide, do the following:On the Home tab, in the Slides group, click Layout, and then click Blank. Right-click the slide and then click FormatBackground.In the Format Background dialog box, click Fill in the left pane. In the Fill pane, select Picture or texture fill, and then under Insert from, click File. In the Insert Picture dialog box, select a picture, and then click Insert.Also in the Format Background dialog box, in the Fill pane, in the Transparency box, enter 50%.Also in the Format Background dialog box, click Picture in the left pane. In the Picture pane, click the button next to Recolor, and then under Light Variations, click Background color 2 Light (first option from the left). On the Insert tab, in the Illustrations group, click Picture.In the Insert Picture dialog box, select the same picture chosen for the background, and then click Insert. Select the picture. Under Picture Tools, on the Format tab, in the bottom right corner of the Size group, click the Size and Position dialog box launcher. In the Size and Position dialog box, on the Size tab, under Crop from,enter 8.27” into the Right box to crop the picture to a width of 2.25”. On the Home tab, in the Drawing group, click Shape Effects, point to Soft Edges, and then click 10 point.
Darkened picture background with full-color circle(Intermediate)Tip: For best results with the picture overlay on this slide, use a picture that is the same dimensions as the slide: 10” wide and 7.5” high. If the picture is not the same width and height, resize or crop to those dimensions before following the instructions below. To reproduce the background effects on this slide, do the following:On the Home tab, in the Slides group, click Layout, and then click Blank. Right-click the slide and then click FormatBackground.In the Format Background dialog box, click Fill in the left pane. In the Fill pane, select Picture or texture fill, and then under Insert from, click File. In the Insert Picture dialog box, select a picture, and then click Insert.Also in the Format Background dialog box, click Picture in the left pane, and then do the following in the Picture pane: Click the button next to Recolor, and then under Color Modes, click Grayscale (first option from the left). In the Brightness box, enter -50%.In the Contrast box, enter -60%.On the Insert tab, in the Illustrations group, click Picture. In the Insert Picture dialog box, select the same picture used for the background, and then click Insert.On the Home tab, in the Drawing group, click Shape Effects, point to Soft Edges, and then click 10 Point. Under Picture Tools, on the Format tab, in the Picture Styles group, click Picture Shape, and then under Basic Shapes, click Oval (first row, first option from the left). Select the oval. Under Picture Tools, on the Format tab, in the bottom right corner of the Size group, click the Size and Position dialog box launcher. In the Size and Position dialog box, on the Size tab, under Crop from,enter values into the Left, Right, Top, and Bottom boxes to crop the oval as needed.
Recolored picture background with transparent overlay(Intermediate)To reproduce the background effects on this slide, do the following:On the Home tab, in the Slides group, click Layout, and then click Blank. Right-click the slide and then click FormatBackground.In the Format Background dialog box, click Fill in the left pane. In the Fill pane, select Picture or texture fill, and then under Insert from, click File. In the Insert Picture dialog box, select a picture, and then click Insert.Also in the Format Background dialog box, click Picture in the left pane. In the Picture pane, click the button next to Recolor, and then under Dark Variations, click Accent color 3 Dark (fourth option from the left). On the Home tab, in the Drawing group, click Shapes, and then under Rectangles, click Rectangle (first option from the left). On the slide, drag to draw a rectangle. Select the rectangle. Under Drawing Tools, on the Format tab, in the Size group, do the following:In the Shape Height box, enter 7.5”.In the Shape Width box, enter 10”.On the Home tab, in the Drawing group, click Arrange, point to Align, and then do the following:Click Align to Slide.Click Align Center.Click Align Middle.On the Home tab, in the Drawing group, click the arrow next to Shape Outline, and then click No Outline.On the Home tab, in the Drawing group, click the arrow next to Shape Fill, point to Gradient, and then click More Gradients. In the Format Shape dialog box, click Fill in the left pane. In the Fill pane, select Gradient fill, and then do the following:In the Type list, select Linear.Click the button next to Direction, and then click Linear Down (first row, second option from the left).Under Gradient stops, click Add or Remove until two stops appear in the drop-down list.Also under Gradient stops, customize the gradient stops that you added as follows:Select Stop 1 from the list, and then do the following:In the Stop position box, enter 0%.Click the button next to Color, and then under Theme Colors click Black, Text 1, Lighter 5% (sixth row, second option from the left).Select Stop 2 from the list, and then do the following: In the Stop position box, enter 100%.Click the button next to Color, and then under Theme Colors click Black, Text 1, Lighter 5%(sixth row, second option from the left).In the Transparency box, enter 100%.
For reproduction steps for this slide, refer to the PowerPoint template titled “Static text effects for PowerPoint slides” (STATIC_TEXT.potx), slide number 17.