

Recommandé
Contenu connexe
Tendances
Tendances (20)
Similaire à DHCP windows server 2012
Similaire à DHCP windows server 2012 (20)
Dernier
Dernier (20)
DHCP windows server 2012
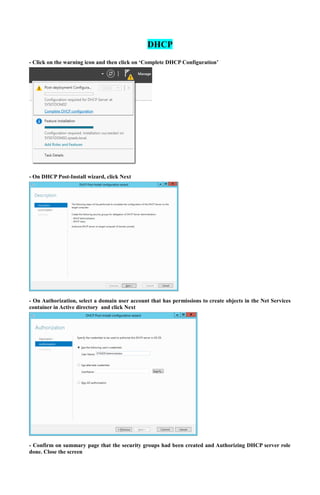
- 1. DHCP - Click on the warning icon and then click on ‘Complete DHCP Configuration’ - On DHCP Post-Install wizard, click Next - On Authorization, select a domain user account that has permissions to create objects in the Net Services container in Active directory and click Next - Confirm on summary page that the security groups had been created and Authorizing DHCP server role done. Close the screen
- 2. Configure the DHCP Server to dish-out IP’s to systems on the networ Click on DHCP from Tools Menu on Server Manager screen - In the the DHCP mmc console, right-click on the DHCP Server and than click on “Add/Remove Bindings…“ - Ensure the static IP address of the server should appear here. Note: If you have more than one static IP, the DHCP server will bind to the first static IP address configured on the adapter
- 3. - Back to the DHCP mmc console, right-click on IPv4, and select New Scope - Click Next on the welcome screen - Enter the new Scope Name details
- 4. - Enter the Start and End IP address, the Subnet mask, leave the Length as default ’24’ and click Next - Enter your IP range in the exclusion list. You only need to do this if you have devices on the network that require static IP address and also ensure that the excluded range falls with the Start and End range earlier specified - Enter desired lease duration for assigned IP’s or leave as default
- 5. - Select Yes to configure the DHCP options for the new scope - Enter the default gateway if any (Required in Live environment) - Specify your WINS Server if any
- 6. - Select Yes to activate the scope immediately or No if you choose to activate later