Adding supplemental material to the Lesson Content folder
Adding slideshare
1. Blackboard
9.1
Quick
Start
Guide
Educational
Technologies,
JPGM
2010
1
Adding
Slideshare
Presentations
Slideshare
presentations
can
be
added
to
course
content
from
two
different
locations:
the
Build
Content
area
in
Content
modules
and
most
text
areas
throughout
the
course.
To
add
a
presentation
as
a
Content
Item:
1. Navigate
to
the
area
where
the
Slideshare
will
be
added
and
place
your
pointer
over
the
Build
Content
tab.
A
resource
list
will
be
displayed.
2. Click
on
the
Slideshare
Presentation
link.
The
Search
screen
will
be
displayed.
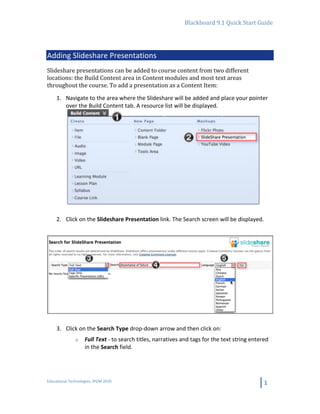
3. Click
on
the
Search
Type
drop-‐down
arrow
and
then
click
on:
o Full
Text
-‐
to
search
titles,
narratives
and
tags
for
the
text
string
entered
in
the
Search
field.
2. Blackboard
9.1
Quick
Start
Guide
Educational
Technologies,
JPGM
2010
2
o Tags
Only
-‐to
only
search
tags
for
the
text
string
entered
in
the
Search
field.
(Warning:
tag
fields
are
optional
in
Slideshare
and
are
often
not
populated.)
o Specific
Presentation
(URL)
-‐
if
you
know
the
specific
Slideshare
that
you
want
to
link
to,
then
type
or
paste
the
URL
into
the
Search
field.
4. Enter
the
text
string
you
wish
to
search
for
or
the
presentation
URL
in
the
Search
text
box.
5. If
you
would
like
to
limit
the
number
of
content
languages
to
one,
click
on
the
Language
drop-‐down
arrow
located
to
the
right
of
the
field,
then
click
on
a
language.
Next
click
on
the
[Go]
button
the
start
the
search.
6. Click
on
the
drop-‐down
arrow
to
the
right
of
the
License
field,
then
click
on
the
license
type
that
address
how
you
plan
on
using
the
content
in
your
course.
7. Click
on
the
[Preview]
button
under
the
Slideshare
thumbnails
to
open
the
review
window.
3. Blackboard
9.1
Quick
Start
Guide
Educational
Technologies,
JPGM
2010
3
8. Next
click
on
the
review
arrow
in
the
popup
window
to
play
the
presentation.
Click
the
[X]
at
the
top
of
the
view
window
when
you
have
finished
reviewing
the
Slideshare
to
close
the
pop-‐up
window.
9. Click
on
the
[Select]
button
to
add
the
item
to
your
course.
The
Create
Mashup
Item
page
will
be
displayed.
10. The
default
name
provided
by
Slideshare
will
automatically
by
posted
in
the
Name
field.
Click
in
the
field
to
type
in
a
new
name
for
the
presentation.
11. Type
a
description
of
the
presentation
or
instructions
to
the
students
in
the
Description
field.
4. Blackboard
9.1
Quick
Start
Guide
Educational
Technologies,
JPGM
2010
4
12. Click
on
the
drop-‐down
arrow
to
the
right
of
the
View
field
and
select:
o Thumbnail
-‐
to
insert
a
small
50
X
50px
clickable
image.
When
the
student
clicks
on
the
image
a
popup
player
window
containing
the
Slideshare
will
be
displayed.
o Text
Link
with
Player
-‐
to
insert
a
hyperlink.
When
the
student
clicks
on
the
hyperlink
a
popup
player
window
containing
the
Slideshare
will
be
displayed.
o Embed
Presentation
-‐
to
insert
the
Slideshare
player
into
a
content
page.
This
option
takes
up
more
room
on
the
page,
but
will
reduce
the
number
of
the
clicks
required
to
view
materials.
13. By
default
Blackboard
will
display
the
date
the
presentation
was
posted
to
Slideshare,
who
posted
the
item,
how
often
it
has
been
viewed
and
downloaded
as
well
as
a
link
to
the
resource
on
the
Slideshare
server.
Click
on
the
"No"
radio
button
to
the
right
of
the
Show
Slideshare
Information
field
to
hide
the
information
from
students.
14. You
can
provide
students
with
additional
information
associated
with
the
slide
presentation
or
the
concept
addressed
in
the
presentation
by
attaching
a
link
or
file
to
the
Slideshare.
For
example
you
could
link
the
Importance
of
Failure
presentation
to
the
"Importance
of
Failure"
article
by
Unsworth,
thereby
providing
a
media
presentation
as
well
as
textual
information.
Click:
o [Browse
My
Computer]
button
to
attach
a
file
from
your
local
computer.
o [Browse
Course]
button
to
link
to
a
file
that
is
already
in
your
course.
15. By
default
students
will
be
able
to
view
the
Slideshare
image.
If
you
click
on
the
No
radio
button
you
will
be
able
to
view
the
item
but
it
will
be
hidden
from
students.
5. Blackboard
9.1
Quick
Start
Guide
Educational
Technologies,
JPGM
2010
5
16. Click
on
the
Yes
radio
button
to
the
right
of
Track
Number
of
Views
if
you
would
like
to
know
how
often
students
view
the
Slideshare.
17. If
you
would
like
to
Slideshare
presentation
to
be
visible
to
students
for
a
limited
period
of
time,
enter
dates
and
times
in
the
Display
After
and/or
the
Display
Until
text
fields,
or
click
on
the
icons
to
the
right
of
each
of
the
fields
and
select
dates
from
a
pop-‐up
calendar
and
pre-‐defined
time
periods
from
a
drop-‐down
menu.
Blackboard
will
automatically
display
and/or
hide
the
presentation
based
on
these
defined
dates
and
times.
![Blackboard
9.1
Quick
Start
Guide
Educational
Technologies,
JPGM
2010
2
o Tags
Only
-‐to
only
search
tags
for
the
text
string
entered
in
the
Search
field.
(Warning:
tag
fields
are
optional
in
Slideshare
and
are
often
not
populated.)
o Specific
Presentation
(URL)
-‐
if
you
know
the
specific
Slideshare
that
you
want
to
link
to,
then
type
or
paste
the
URL
into
the
Search
field.
4. Enter
the
text
string
you
wish
to
search
for
or
the
presentation
URL
in
the
Search
text
box.
5. If
you
would
like
to
limit
the
number
of
content
languages
to
one,
click
on
the
Language
drop-‐down
arrow
located
to
the
right
of
the
field,
then
click
on
a
language.
Next
click
on
the
[Go]
button
the
start
the
search.
6. Click
on
the
drop-‐down
arrow
to
the
right
of
the
License
field,
then
click
on
the
license
type
that
address
how
you
plan
on
using
the
content
in
your
course.
7. Click
on
the
[Preview]
button
under
the
Slideshare
thumbnails
to
open
the
review
window.](data:image/gif;base64,R0lGODlhAQABAIAAAAAAAP///yH5BAEAAAAALAAAAAABAAEAAAIBRAA7)