SlideShare une entreprise Scribd logo
1  sur  4
To start I imported the
short film Plurarity so I
could take clips out of the
film at ease. This is done
by going to
file/import/files… or
pressing the short cut
(control,I)
For my
opening shot I
found a nice
small clip of a
aerial shot of a
city that states
where the
movie is set
and the time it
is set in.


                   This was done by finding the the
                   starting point of the footage I wanted
                   and and marking it in as well as marking
                   the out point for the end. After that you
                   can drag the clip from the viewer to the
                   timeline. I add in all the clips using this
                   method
Next I added a text to
show the release date. I
did this by clicking this
button and going to text
then text this creates a
text clip. Now double click
the text clip and go to
controls and enter
“coming soon.
11/9/2013”in text. I used
the font I used was big
Caslon at size 22 after I
moved the text under the
video of the plurality text.
Then I went to motion
and put the opacity to 0
and added a key point
then I added a key point
at opacity 100 this makes
it fade in.
Next I added a the clip from 00:01:58:16 to 00:02:06:01 then I set
the crop at left 14 and right 45 at then set a at 01:00:24:09 and the
set another at 01:00:27:22 and set the crop left to 26 and right to 39
then I go to opacity and set a key point at 01:00:22:12 set opacity to
0 and
01:00:22:19 = 30 ,01:00:23:23 = 50 ,01:00:24:10 = 0 ,01:00:27:10 = 0
01:00:27:22 = 50 ,01:00:29:22 = 0
Now go to basic motion and make a center key point at 01:00:23:03
set to -172.00 and 6.00 and another at 01:00:27:20 set -335.00 and
6.00. now go to crop and set the edge feather to 50

Contenu connexe

Tendances

9863137 final cut-evaluation
9863137 final cut-evaluation9863137 final cut-evaluation
9863137 final cut-evaluationRyan Worcester
 
Green screen tutorial
Green screen tutorialGreen screen tutorial
Green screen tutorialSoniaP16
 
Final editing log upload
Final editing log uploadFinal editing log upload
Final editing log uploadhaverstockmedia
 
Silhouette Script
Silhouette ScriptSilhouette Script
Silhouette Scriptcameronnws
 
Edtech 2 (powerpoint animation)
Edtech 2 (powerpoint animation)Edtech 2 (powerpoint animation)
Edtech 2 (powerpoint animation)franzhiska
 
Using final cut pro
Using final cut proUsing final cut pro
Using final cut proMaria Salib
 
Print screens for final cut pro
Print screens for final cut proPrint screens for final cut pro
Print screens for final cut profatemajohara
 
Premiere Elements 13
Premiere Elements 13Premiere Elements 13
Premiere Elements 13amydedman1
 
Editing techniques
Editing techniquesEditing techniques
Editing techniquesenamulmiah95
 
06 use puppet_warp
06 use puppet_warp06 use puppet_warp
06 use puppet_warpChiara Berti
 
ANNA Movie Maker
ANNA Movie MakerANNA Movie Maker
ANNA Movie MakerRECSAM
 

Tendances (16)

9863137 final cut-evaluation
9863137 final cut-evaluation9863137 final cut-evaluation
9863137 final cut-evaluation
 
CALL SHEET
CALL SHEETCALL SHEET
CALL SHEET
 
Green screen tutorial
Green screen tutorialGreen screen tutorial
Green screen tutorial
 
Lecture nine
Lecture nineLecture nine
Lecture nine
 
Digital story photo_story
Digital story photo_storyDigital story photo_story
Digital story photo_story
 
Final editing log upload
Final editing log uploadFinal editing log upload
Final editing log upload
 
technologies
 technologies  technologies
technologies
 
..
....
..
 
Silhouette Script
Silhouette ScriptSilhouette Script
Silhouette Script
 
Edtech 2 (powerpoint animation)
Edtech 2 (powerpoint animation)Edtech 2 (powerpoint animation)
Edtech 2 (powerpoint animation)
 
Using final cut pro
Using final cut proUsing final cut pro
Using final cut pro
 
Print screens for final cut pro
Print screens for final cut proPrint screens for final cut pro
Print screens for final cut pro
 
Premiere Elements 13
Premiere Elements 13Premiere Elements 13
Premiere Elements 13
 
Editing techniques
Editing techniquesEditing techniques
Editing techniques
 
06 use puppet_warp
06 use puppet_warp06 use puppet_warp
06 use puppet_warp
 
ANNA Movie Maker
ANNA Movie MakerANNA Movie Maker
ANNA Movie Maker
 

Similaire à Trailer

Music video editing
Music video editingMusic video editing
Music video editingKayleeH55
 
Video diary
Video diaryVideo diary
Video diaryCrashin
 
Video diary
Video diaryVideo diary
Video diaryCrashin
 
Creating My Trailer
Creating My TrailerCreating My Trailer
Creating My TrailerMeganReanne
 
New editing powerpoint
New editing powerpointNew editing powerpoint
New editing powerpointalicewiggins
 
Music Video Construction
Music Video ConstructionMusic Video Construction
Music Video Constructionmediafan
 
Step by step editing how
Step by step editing howStep by step editing how
Step by step editing howmegoreilly
 
Step by step editing how
Step by step editing howStep by step editing how
Step by step editing howmegoreilly
 
9865044 final cut-self_assessment
9865044 final cut-self_assessment9865044 final cut-self_assessment
9865044 final cut-self_assessmentBeth Farrington
 
Using final cut pro
Using final cut proUsing final cut pro
Using final cut proalicewiggins
 
Evaluation, Question 4
Evaluation, Question 4Evaluation, Question 4
Evaluation, Question 4kait-gc
 
My Editing process
My Editing processMy Editing process
My Editing processvickilennon
 
Music Video Printscreens
Music Video PrintscreensMusic Video Printscreens
Music Video PrintscreensFazBegum
 
Music Video Constuction
Music Video ConstuctionMusic Video Constuction
Music Video ConstuctionFazBegum
 
'Mrs robinson' step by step editing
'Mrs robinson'   step by step editing'Mrs robinson'   step by step editing
'Mrs robinson' step by step editingthomassmit
 
(Pro forma) - production log.
(Pro forma) - production log. (Pro forma) - production log.
(Pro forma) - production log. Robert Ryan
 

Similaire à Trailer (20)

Music video editing
Music video editingMusic video editing
Music video editing
 
Unit 4, 5 and 62 diary
Unit 4, 5 and 62   diaryUnit 4, 5 and 62   diary
Unit 4, 5 and 62 diary
 
Video diary
Video diaryVideo diary
Video diary
 
Video diary
Video diaryVideo diary
Video diary
 
Creating My Trailer
Creating My TrailerCreating My Trailer
Creating My Trailer
 
New editing powerpoint
New editing powerpointNew editing powerpoint
New editing powerpoint
 
Music Video Construction
Music Video ConstructionMusic Video Construction
Music Video Construction
 
Step by step editing how
Step by step editing howStep by step editing how
Step by step editing how
 
Step by step editing how
Step by step editing howStep by step editing how
Step by step editing how
 
Screenshots on process
Screenshots on process Screenshots on process
Screenshots on process
 
9865044 final cut-self_assessment
9865044 final cut-self_assessment9865044 final cut-self_assessment
9865044 final cut-self_assessment
 
Using final cut pro
Using final cut proUsing final cut pro
Using final cut pro
 
Evaluation, Question 4
Evaluation, Question 4Evaluation, Question 4
Evaluation, Question 4
 
My Editing process
My Editing processMy Editing process
My Editing process
 
Music Video Printscreens
Music Video PrintscreensMusic Video Printscreens
Music Video Printscreens
 
Music Video Constuction
Music Video ConstuctionMusic Video Constuction
Music Video Constuction
 
'Mrs robinson' step by step editing
'Mrs robinson'   step by step editing'Mrs robinson'   step by step editing
'Mrs robinson' step by step editing
 
(Pro forma) - production log.
(Pro forma) - production log. (Pro forma) - production log.
(Pro forma) - production log.
 
Question 4
Question 4 Question 4
Question 4
 
Kdenlive
KdenliveKdenlive
Kdenlive
 

Trailer

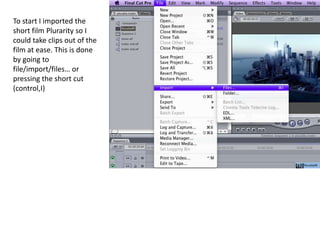
  • 1. To start I imported the short film Plurarity so I could take clips out of the film at ease. This is done by going to file/import/files… or pressing the short cut (control,I)
  • 2. For my opening shot I found a nice small clip of a aerial shot of a city that states where the movie is set and the time it is set in. This was done by finding the the starting point of the footage I wanted and and marking it in as well as marking the out point for the end. After that you can drag the clip from the viewer to the timeline. I add in all the clips using this method
  • 3. Next I added a text to show the release date. I did this by clicking this button and going to text then text this creates a text clip. Now double click the text clip and go to controls and enter “coming soon. 11/9/2013”in text. I used the font I used was big Caslon at size 22 after I moved the text under the video of the plurality text. Then I went to motion and put the opacity to 0 and added a key point then I added a key point at opacity 100 this makes it fade in.
  • 4. Next I added a the clip from 00:01:58:16 to 00:02:06:01 then I set the crop at left 14 and right 45 at then set a at 01:00:24:09 and the set another at 01:00:27:22 and set the crop left to 26 and right to 39 then I go to opacity and set a key point at 01:00:22:12 set opacity to 0 and 01:00:22:19 = 30 ,01:00:23:23 = 50 ,01:00:24:10 = 0 ,01:00:27:10 = 0 01:00:27:22 = 50 ,01:00:29:22 = 0 Now go to basic motion and make a center key point at 01:00:23:03 set to -172.00 and 6.00 and another at 01:00:27:20 set -335.00 and 6.00. now go to crop and set the edge feather to 50