

Recommandé
Contenu connexe
Tendances
Tendances (9)
En vedette
En vedette (14)
Similaire à CDTECH
Similaire à CDTECH (20)
Dernier
Dernier (20)
CDTECH
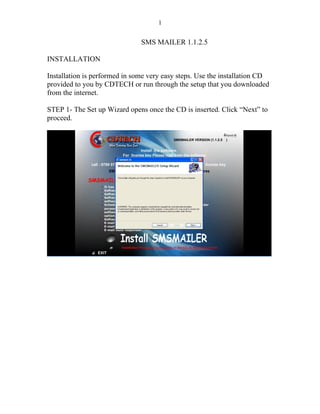
- 1. 1 SMS MAILER 1.1.2.5 INSTALLATION Installation is performed in some very easy steps. Use the installation CD provided to you by CDTECH or run through the setup that you downloaded from the internet. STEP 1- The Set up Wizard opens once the CD is inserted. Click “Next” to proceed.
- 2. 2 STEP 2- Select a path for the set up files by clicking “Browse”. However, an icon of SMS MAILER is generated irrespective of the path you chose here. Checking “Just Me” will open the application only for you/user currently logged in. “Everyone” will enable any user logging in to the computer system use SMS MAILER.
- 3. 3 STEP 3- Click “Next” to start the installation
- 4. 4 SMS MAILER is now being installed…. A desktop shortcut of SMS MAILER will appear on successful completion of installation.
- 5. 5 LICENSE KEY Once the installation is complete, the application begins loading. In order to start using the application type in the license key you receive. • You will receive a license key after revealing the 32-digit software key that appears in the window (highlighted here in blue color) • Enter the license key and hit “OK”. LICENSE KEY VIA EMAIL To receive license key via email, use the “Send Mail” option. Fill in the form that opens up with your details. CDTECH associates will get back to you with the license key. NOTE: Internet has to be enabled to use “Send Mail” option.
- 6. 6 WORKING WITH SMS MAILER 1.1.2.5 This is what the default application window looks like. Apart from the menus in the menu bar there are several shortcuts in the form of icons to help you work the application. DEFAULT APPLICATION WINDOW The window opened at the start is the Send Bulk Mail window, by default. Select New> Send Bulk Mail to get there.
- 7. 7 ICON LIST Import- Lets you upload email addresses for your bulk email operations from a previously created document or from contact lists of your various email accounts. Account Details- Clicking this icon will take you to “User Accounts” window meant for entering bulk email account details. Same as selecting Settings>Account Details Scheduled Email- Lets you view all emails scheduled to be sent today/later. Groups- Enables group creation. Use it if you have to organize your recipients into various groups; same as selecting Settings>Add Groups. Email2SMS- Window can be viewed only when a mobile is connected to the system. Email2SMS concerns operations that let you send/receive emails without a computer. Check Mail- The icon opens your inbox to check your mails for the day. Extractor- Allows you to extract email addresses from anywhere on the web. Refresh- Clicking “Refresh” will close the application and re-open it. Auto Generate Nos- Opens “Auto Generate Number” window that lets you create a database of mobile numbers if you don’t already have one.
- 8. 8 MENU LIST 1. New • Send Bulk Mail – The window allows you to send bulk Email. It is the default window that appears on opening SMS MAILER. • Emergency Email- Select the option if you have to send one single email without interrupting the bulk email operation. • Email2SMS- Settings that will guide you through how to set up an ordinary mobile phone to send/receive emails. • Scheduled Email- Opens the scheduler that also shows all scheduled emails. • Check Mail- Opens your Inbox • Auto Generation Nos- Lets you create fresh databases of mobile numbers.
- 9. 9 2. Settings • Options- Lets you change the password that you use to log in to SMS MAILER. The option is applicable only if you had chosen “Everyone” during installation. • Account Details- Settings related to your bulk Email account. Same as “Account Details” icon seen in the main window. • Add New User- This option is valid only if you had chosen “Everyone” during installation. That is, if SMS Mailer is used by more than one person then this option lets you add new users to the application. • Check Mail Account- Settings of the email account/accounts that are registered in SMS Mailer’s inbox. • Add Groups- Lets you organize recipients into groups. Same as “Groups” icon seen in the main window. • Auto Reply- Allows you to set auto replies for the emails you receive. CONNECTING YOUR MOBILE PHONE TO YOUR SYSTEM
- 10. 10 SMS MAILER sends both emails and SMS messages. To send SMS, connect the mobile phone through which you wish to send SMS to the system. Forming the connection with your mobile phone is simple. STEP 1- Select New> Send Bulk Mail to get to the main window. STEP 2- “Mobile Connection” panel is used to adjust the logistics of the connection.
- 11. 11 STEP 3- Beside “Select Port No” select the port number to which the phone is connected.
- 12. 12 STEP 4- Click “Connect” to establish the connection. “Disconnect” will disconnect the established connection.
- 13. 13 LOCATING THE PORT NUMBER STEP 5- If you have trouble locating the port number then check Control Panel Settings by selecting Start>Control Panel> Phone and Modem Options. Check the port number by clicking on “Modems” tab. In case of Bluetooth, the heading “Standard Modem over Bluetooth Link” specifies the correct port number.
- 14. 14 STEP 6- Successful mobile phone connection establishment will automatically highlight “Disconnect” icon and “Device connected” message is flashed.
- 15. 15 ADDING A NEW USER To add another user who should be allowed to use SMS MAILER when he/she is logged on complete the following steps. This is applicable only to users who chose “Everyone” during installation. (See Pg. 2) Step 1: Select Settings>Add New User Step 2- In the “Add Login” window, give the user’s name and password.
- 16. 16 Step 3- Click “Add” and that user will be added.
- 17. 17 CHANGING A USER’S PASSWORD Select Settings>Options. In the Options window change your password by giving your old password. Click “OK” to save the new password. This is applicable only to users who chose “Everyone” during installation. (See Pg. 2)
- 18. 18 CHOSING AN EMAIL ACCOUNT TO SEND YOUR EMAILS • The first step in starting a bulk email operation is setting up an account that you intend to use for sending bulk email. That is, all your bulk emails will be sent from this account. • The account used here can be of any type- Yahoo, Gmail, Hotmail, AOL etc. • The “User Accounts” window will help you adjust SMTP settings and complete account creation. STEP 1- Select Settings>Account Details or click “Account Details” icon in the main window. “User Accounts” window opens. STEP 2- Adjusting server information. “Server Information” in “User Accounts” window specifies server side information required to set up the account.
- 19. 19 • These details vary for different email account types- Yahoo, Gmail, Hotmail and so on. • Entering the correct SMTP Server name and Port Number is necessary to carry out bulk email sending successfully. • Therefore, please consult CDTECH associates to know them correctly. • Checking “SSL” or Secure Socket Layer will ensure secure sending of bulk emails. • Hit “Save” to save the settings recorded. SAVING EMAIL ADDRESSES STEP 3- “SMTP Settings” will contain details of the email ID used.
- 20. 20 • User ID- Enter the email address that you wish to use to send bulk mail. • Password- Enter exactly the password that you use to access the email address’s account • From Name- The name that should appear on your bulk email. That is, the name the recipient will see in the From line of his/her inbox. • Reply To Address- If the recipients you send bulk emails to chose to reply, then the address entered here will receive those emails. Hit “Save” to record these details. NOTE: You can also use the editable database panel found below. All saved address details appear in the database panel below.
- 21. 21 USING MORE THAN ONE EMAIL ADDRESS TO SEND BULK MAILS
- 22. 22 “User Accounts” window formulates bulk email settings. Select Settings> User Accounts or click “Account Details” icon. MULTIPLE IDs • The advantage of using many email IDs is that it gives a greater chance of achieving your target in a shorter time period. • Check “Use Multiple Id” option in “Action to Perform” section • Consult CDTECH associates to obtain more details. USING ONE EMAIL ACCOUNT TO SEND BULK MAILS
- 23. 23 “User Accounts” window formulates bulk email settings. Select Settings> User Accounts or click “Account Details” icon. SELECTING A SINGLE EMAIL ADDRESS • If you wish to choose only one email address to perform bulk email operation then select the address from “Select” list in “Action to perform” section. • “Set Default” allows you to set the ID currently selected as the default ID from which bulk emails will be sent. EFFECTING TIME DELAYS BETWEEN EMAILS
- 24. 24 • Effecting a time delay between emails is very useful since most SMTP servers on the internet are sensitive to bulk email sending. But the time delay that is set will ensure all your bulk emails reach the intended recipients safely without being blocked. • Time delay has no meaning while using Multiple IDs STEP 1- To set a time delay either select Settings>Account Details or click “Account Details” icon in the main window. STEP 2- Edit “Delay Settings” section in “User Accounts” window.
- 25. 25 STEP3- “Number of Mails” indicates the number of mails to be sent before the time delay “Delay” indicates the time that will elapse after the set number of mails is sent. STEP 4- Hit “Save” to save the detail. Ex. Here there will be a gap of 5 seconds after every 20 emails sent. CHOOSING ACCOUNTS FOR SMS MAILER’S INBOX
- 26. 26 SMS MAILER can be tuned to check incoming emails of any of your email accounts. To checking incoming emails of an account, the details of the account should be loaded in SMS MAILER. STEP 1- Select Settings> Check Mail Account STEP 2- Fill in your account details like Email ID, Password. Other information like Server Name, Port No etc are specific to individual domains. CDTECH Associates can give you those details.
- 27. 27 “Clear” icon will clear all the text boxes in the form. Alternately, you can enter account details field-wise into the database panel provided below there. STEP 3- Click “Save” to save the details.
- 28. 28 STEP 4- Now all inbox details of the email accounts saved here will appear in the “Inbox” page. Selecting New> Check Mail will take you there. STEP 5- Inboxes of all saved email accounts appear in the Inbox page. Other mail options like Compose, Reply, Forward are also available.
- 29. 29 REMOVING AN ACCOUNT FROM SMS MAILER’S INBOX
- 30. 30 If you do not want SMS MAILER to display details (inbox, compose mail text box etc) of any of your saved email accounts then that account has to be removed from the “Check Mail Account” table. STEP 1- Select Settings > Check Mail Account to open Check Mail Account window. STEP 2- Select the email address of the account you wish to delete from the list beside “Email ID”.
- 31. 31 STEP 3- Press “Remove” to remove the account. Now details of the account will not appear in the “Inbox” window. You can check by selecting New > Check Mail The selected email account has been removed from the inbox.
- 32. 32 UPDATING DETAILS OF SAVED EMAIL ACCOUNT
- 33. 33 To change/update details of an email account that you saved STEP 1- Select Settings> Check Mail Account
- 34. 34 STEP 2- To make details of an account appear in the form, select the email address from the list beside “Email ID” STEP 3- Edit details that have to be changed and click “Update”
- 35. 35 STEP 4- Details are now updated successfully. CREATING GROUPS
- 36. 36 Most broadcasts deal with huge numbers of email addresses and mobile numbers. Categorizing these recipients’ details into groups will save your time spent in identifying them individually. Ex. A group named “Customers” could store customer details and “Employees” employee details. STEP 1- To create a group, select Settings>Add Groups or click “Groups” icon in the main window. STEP 2- In “Add Groups” window that appears, type a name that you wish to give your group in the text box beside “Group Name”.
- 37. 37 Then click “Add Group” icon. STEP 3- A “File Selection” dialogue box opens. You can either
- 38. 38 a) Import email addresses of your contacts from a file saved earlier: Use “File Name” section b) Import them from the contact lists of any of your email accounts: Use “Import Contacts From Mail” section a) To import email addresses from an existing document,
- 39. 39 STEP 4- Click “Browse” in the “File Selection” window. The Open dialogue box appears. Select the document that contains the email addresses and click “Open” STEP 5- Click “Next” to proceed. STEP 6- An “Import Wizard” opens.
- 40. 40 TABLE NAME- Select the name of the table that contains all the details. NAME- Select the field (of the saved document) that contains the names of the contacts. EMAIL ID- Select the field (of the saved document) that contains email addresses of the contacts. MOBILE No- Select the field (of the saved document) that contains mobile numbers of the contacts. Checking “Remove Duplicates” icon will remove all the duplicate entries that may have accidentally occurred due to errors in typing. Click “OK” to upload the details. “Close” button will close the wizard without saving the details added. STEP 7- Details are now added successfully.
- 41. 41 b) To import contacts from your email address account,
- 42. 42 STEP 8- Fill out the text boxes in “Import Contacts from Mail” section. Beside “Email Address” enter the email address of the account that contains the contacts you wish to import Beside “Password” enter password of that account Beside “Select Any One” select the domain that contains the account- Hotmail, Gmail, Yahoo etc Click “Import” and these contacts will be imported.
- 43. 43 STEP 9- Once finish importing, all the email addresses you imported are shown in the “Add Groups” window. “Clear” icon will clear the details entered temporarily. STEP 10- Hit “Save” to save the details entered.
- 44. 44 DELETING A SAVED GROUP
- 45. 45 To delete a saved group… STEP 1- Select Settings> Add Groups STEP 2- “Add Groups” window appears. Select the group you wish to remove from “Select Group Name” list as shown here. STEP 3- Hit “Remove” and the selected group will be deleted.
- 46. 46
- 47. 47 IMPORTING RECIPIENTS FROM ADDRESS BOOK/ SAVED DOCUMENTS/ SAVED GROUPS To easily add email addresses and mobile numbers to the “To:” list/ send list “Import” option can be used. “Load Group” option will bring all entries of a saved group to the send list. To know more on loading groups refer Pg. 49.
- 48. 48 You can either a) Import email addresses of your contacts from a file saved earlier: Use “File Name” section or b) Import them from the contact lists of any of your email accounts: Use “Import Contacts From Mail” section.
- 49. 49 a) To import email addresses from an existing document, STEP 1- Click “Browse” in the “File Selection” window. The Open dialogue box appears. Select the document that contains the email addresses and click “Open” STEP 2- Click “Next” to proceed.
- 50. 50 STEP 3- An “Import Wizard” opens. TABLE NAME- Select the name of the table that contains all the details. NAME- Select the field (of the saved document) that contains the names of the contacts. EMAIL ID- Select the field (of the saved document) that contains email addresses of the contacts. MOBILE No- Select the field (of the saved document) that contains mobile numbers of the contacts. Checking “Remove Duplicates” icon will remove all the duplicate entries that may have accidentally occurred due to errors in typing. Click “OK” to upload the details. “Close” icon will close the wizard without saving the details entered.
- 51. 51 STEP 4- Details are now added successfully.
- 52. 52 b) To import contacts from your email address account, STEP 1- Fill out the text boxes in “Import Contacts from Mail” section. Beside “Email Address” enter the email address of the account that contains the contacts you wish to import Beside “Password” enter password of that account Beside “Select Any One” select the domain that contains the account- Hotmail, Gmail, Yahoo etc Click “Import” and these contacts will be imported.
- 53. 53 STEP 2- Once finish importing, all the email addresses you imported will appear in the database panel as shown here.
- 54. 54 Importing entries of a saved group to recipient list • Just like “Import” option that allows you to import any document/address book to the application, “Load Group” button in the main window will bring entries of a saved group. • Any group previously saved can be added to the “To:” list/ send list seen in the main window. This option can be used instead of typing up the recipient list manually. STEP 1- Select a saved group from “Group Name” list.
- 55. 55 STEP 2- Press “Load Group” icon seen near the list. STEP 3- All entries in the group appear in the recipient list/ send list
- 56. 56 SENDING EMAILS AND SMS MESSAGES- STEP-BY-STEP SMS Mailer is the only technology that integrates SMS and Email messages smoothly giving you the benefits alone from both these technologies. STEP 1- To start SMS & Email operations go to the main window by selecting New> Send Bulk Email. SUBJECT STEP 2- The e-mail’s subject is given in the text box beside “Subject” in the “Message” section.
- 57. 57 FORMATTING YOUR EMAIL MESSAGE The format tool bar is used for the purpose. They are From Left: Cut, Copy, Paste, Bold, Italic, Underline, Font Selection, Font Size, Font Color INSERTING A PICTURE IN THE TEXT BOX Unlike normal Email technology you have the option to insert pictures of your choice here. STEP 3- Click the “Insert Picture” symbol seen in the box. (First icon in the line below the format tool bar)
- 58. 58 STEP 4- “Open” dialogue box appears. Choose an image to upload in the text box. Then, click “Open”
- 59. 59 STEP 5- For easy editing of your email message, make use of “Preview” icon. “Full view” icon will show you what your message looks like in a separate window. STEP 6- A message after formatting and insertion of pictures could look like this.
- 60. 60 STEP 7- If you like what you see, press “Save Change” button and save the message. !!!NOTE: Any changes made will be recorded only if “Save Change” is pressed.
- 61. 61 SETTING THE SAME EMAIL MESSAGE FOR SMS • If you wish to send the same message for SMS as well then check “Set For SMS” as shown here. • Choosing this will automatically disable “Mobile Connection” panel. NOTE: • If you have to choose the “Set For SMS” option make sure the “Mobile No” field in “To” list (highlighted here) is appropriately filled. • If your email Message exceeds 160 characters then a different SMS message should be created.
- 62. 62 SETTING A FRESH MESSAGE FOR SMS • To set a new message different from the email message for SMS, check if the mobile phone is connected to the system. • More on mobile phone connection in “CONNECTING YOUR MOBILE PHONE TO YOUR SYSTEM” on Pg.11 • Draft the SMS message in “Mobile Message” section. • The character count of the message is also displayed. (Highlighted in black in the window here)
- 63. 63 ATTACHMENTS: With SMS MAILER you can attach any number of attachments to your messages. STEP 1- To attach a document, click “Add” in the Attachments section.
- 64. 64 STEP 2- “Open” dialogue box appears. Select the document you want to attach and hit “Open”.
- 65. 65 STEP 3- The document is now successfully attached. “Remove” icon will remove the selected document.
- 66. 66 CUSTOMIZING/PERSONALIZING MESSAGES SMS MAILER can very easily personalize your message according to the recipient by including details like his Name, Email address etc. !!!! NOTE: TO TAKE FULL ADVANTAGE OF CUSTOMIZATION IT IS RECOMMENDED THAT YOU SAVE THE RECIPIENT LIST IN AN EXCEL DOCUMENT. Step 1- Right click in the message box seen in the “Message” section in the main window. A list of personal details that can be included in your message appears.
- 67. 67 Step 2- Select the detail you wish to include. Step 3- The selected personal detail appears enclosed in “[ ]”
- 68. 68 CREATING THE RECIPIENT LIST All recipients are added in the “To:” list section present in the Bulk E-Mail window. Select New>Send Bulk Email to go to the bulk Email window. To add recipients you can either a) Import them from contact lists present in your email account: Pg 42 b) Import them from a saved excel document: Pg 47 c) Load a saved group: Pg 49
- 69. 69 STARTING “SEND” OPERATION Once you have added the recipient list- with name, email address and mobile numbers, click “Send” to start sending the email and SMS messages. !!! NOTE: 1) Before sending bulk e-mails first make sure “User Accounts” settings are set as per your requirements- that is, check if the e-mail ID YOU WISH TO USE CURRENTLY is selected. 1) Select New>User Accounts to go to “User Accounts” window. 2) Select the email address you want to use from the list. 3) If you want to set that email address as your default email address in SMS MAILER’s bulk email operations, then click “Set default” 4) This means all emails will be sent from this ID by default. However, at any time, you can change the set default by changing the ID selected from the list. 5) Press “Save” to save the details entered. Ex: Here the address cdtech@cdtech.in is selected. This means all emails will be sent from this e-mail address.
- 70. 70 2) If you are about to send emails along with SMS then make sure a mobile phone is connected to the system. All SMS messages will be sent from that mobile. To know about how to connect your mobile phone refer Pg.11
- 71. 71 Once you have made sure specifications explained on Pg. 68, Pg. 69 are satisfied, start operation by clicking “Send”. You can set the same message for email and SMS by checking “Set For SMS” Check 1: Email address settings saved. Check 2: Mobile connected Check 3: Required Recipient List loaded properly.
- 72. 72 OPTIONS AVAILABLE WHEN BULK EMAIL/SMS OPERATION BEGINS Once you click “Send” to begin operations, the following buttons are automatically highlighted. “Pause” and “Resume” “Pause”: It will stop the operations temporarily. “Resume”: Resume will resume the paused operations. • After pressing “Pause” it is highly recommended that you save the current window using “Save info” button. Read about “Save info” on Pg.75 “Clear ToAddress” will clear the recipient list temporarily “Auto Shut Down” will shut down the computer system after the current bulk operation is completed fully.
- 73. 73 Since the “Pause” button was pressed, “Resume” is highlighted.
- 74. 74 “Stop” button and Pending List “Stop” – To stop bulk SMS/Email sending completely. !!!! NOTE: If you have pressed “Stop” then “Resume” will not be highlighted. • Pressing “Stop” will automatically create a pending list in the “Pending Emails” panel as shown here. • After pressing “Stop” it is highly recommended that you save the current window using “Save info” button. Read about “Save info” on Pg.75 • Click “Send” will restart stopped operations. Now the operation will start from the beginning of the list. So recipients who have already received your message may receive it again!
- 75. 75 • “Add” in “Pending Emails” will add the pending list in the “To” list • “Remove” will remove the entries from the “To” list.
- 76. 76 CREATING TEMPLATES/ SAVING ALL SMS/EMAIL INFORMATION “Save info” present in “Templates” section is very useful as it will help save the following information regarding SMS MAILER’s current operation. 1. The recipient list will be saved- that is all receiver’s name, email address and mobile number will be saved 2. The formatted email message with subject will be saved. Step 1- Finding “Save Info” button
- 77. 77 Step 2- To save details of recipient list you can select some entries by selecting the entries (window no.1) or you can select all entries by clicking the corner button (window no.2) Window no. 1 Window no.2
- 78. 78 Step 3- Then click “Save info” button to save all the details. Step 4- An “Input” box appears. Give a name of your choice to this window that you are saving.
- 79. 79 Step 4- Clicking “OK” will save the window successfully. But if you get a message “Already stored” then save the window again with a different name.
- 80. 80 Step 5- Now you can view the window you just saved by selecting its name from the list seen in “Templates” section. Then click “Read” Step 6- Then click “Read”. The required window is loaded now.
- 81. 81 DELETING A SAVED TEMPLATE To delete a saved template, select the template from the list in “Templates” section. Then hit “Delete” The template is now deleted.
- 82. 82 EMAIL2SMS “EMAIL2SMS settings” decide which emails received are forwarded to your mobile number. To get into “Email2SMS” window, a mobile must be connected to the system. Step 1- Select New>Email2SMS or click “Email2SMS” icon in the main window.
- 83. 83 Step 1- SETTING A USER ACCOUNT/EMAIL ID FOR SMS FORWARDING • In “Sever@ User Name Settings” section, fill in the following details. • “Server Name” – Is the name of the SMTP server that’s associated with the domain. • “Port No”- The port used for sending/receiving emails. • “Server” type- can be Pop/IMAP depending on the email address. • Consult CD TECH associates for these technicalities. • “User Name”- Specifies the email address/user name that will receive the required emails. • “Password”- Password associated with that email ID Step 2- SETTING EMAIL ADDRESSES FOR SMS FORWARDING
- 84. 84 • In the “Filter” section enter an email address beside “From Address” • Now all emails from this address will be ready for forwarding. • If you do not want all emails from that email address to be forwarded then you can filter the emails received from that address. Go to “Step 3” to know more STEP 3- FILTER OPTIONS FOR THE EMAILS RECEIVED
- 85. 85 • Under “Choose any one” choose your option • “From Address with Subject”- will forward as SMS message the email address and the subject of the email message • “SMS Full Message with Subject”- will send the full email message along with the subject as SMS • “Subject with Char”- This option will forward the subject but not up to the number of characters you specify. Ex: If you enter “60” in the box then first 60 characters of the message is forwarded. STEP 4- ADDING MOBILE NUMBERS TO RECEIVE EMAILS
- 86. 86 • Add a mobile number that should receive the emails from the specified email address. • In “Mobile Number settings” section, type in the mobile number beside “Cell Number” • Then click “ADD MOBILE NO” to add the typed mobile number.
- 87. 87 STEP 5- Once you have entered a single set- User Name, Email Address, Filter conditions, Mobile Number, click “Save” to save the typed entry. That entry will now appear in the database panel shown below. “Remove” will remove the selected entry from the database panel. “Remove all” will erase the database completely. ADDING MORE THAN ONE MOBILE NUMBER
- 88. 88 You can add up to four mobile numbers for any entry. To start adding numbers, select the required “User Name” and begin editing in the database panel. Then press “Save Change” to save the details entered. SETTINGS MENU IN EMAIL2SMS
- 89. 89 The “Settings” window decides general settings while using Email2SMS • “Show” will show only the database panel seen at the bottom of the window. • “Hide” will close/hide Email2SMS window • “Edit” will highlight the “Setting” section as well as the database panel. • “Exit” will close SMS MAILER. SENDING SINGLE/EMERGENCY EMAIL/SMS MESSAGE
- 90. 90 When bulk operations are in progress, a single email/SMS message can be sent for emergency purposes. Your mobile phone may be busy so this option is very useful. Step 1- Select New>Emergency Email or click “Emergency Mail” icon to get to the “Emergency e-mail” window. Step 2- Type in the email message with the required subject. Check “Set For SMS” if you wish to send the same email as SMS message.
- 91. 91 Step 3- In the “To” section, enter the required name, mobile number and email address. Hit “Send” to start sending the message. “Clear” will clear the entries in the database panel. !!!NOTE: PLEASE DO NOT CLOSE THE WINDOW WHILE EMERGENCY EMAIL IS GOING ON. PRESS THE MINIMIZE BUTTON TO SWITCH TO ANOTHER WINDOW. SCHEDULER
- 92. 92 Scheduler is very useful to store messages that you would invariably send repeatedly- Ex. Good Morning greetings, Weekend announcements etc Step 1- Select New>Scheduled Email or click on “Scheduled Email” to go to the scheduler window.
- 93. 93 Step 2- In “Scheduler Details” window give a name to the scheduler. And fill in the following details Date/Time- The date/time when the email operation should start Scheduling options “Schedule Type” – Indicates whether you want to send the message daily/monthly/weekly etc “Weekly Task”- If you want bulk operations to be set for a particular day of the week “Day for Monthly Task”- Gives the date… that is, if you want bulk operations to be set for the 1st of every month or 31st of every month etc “Interval” – Indicates the number of days in between ANY TWO scheduled operations
- 94. 94 Step 3- Type the email message in the message box. Step 4- Create a recipient list. You can either a) Import recipients from a saved document (refer Pg.42) or b) Import recipients from contact lists of email accounts (refer Pg.47) or c) Load a saved group (refer Pg.49)
- 95. 95 Step 5- Other options • Add attachments of your choice using the attachment option. • To save the recipient list in a separate document click “Export” • Customize your scheduled message using customization options. Know more on customization on Pg. 65 • “Refresh” will refresh the scheduler window. • “Clear All” WILL CLEAR THE WINDOW- MESSAGE, RECIPIENT LIST, SCHEDULING DETAILS TEMPORARILY
- 96. 96 Step 6- Click “Save” to save all the details entered. Only saving will ensure this schedule is carried out.
- 97. 97 VIEWING A SAVED SCHEDULE To view a previously saved schedule, select the schedule you wish to view from the “Select Scheduled Name”.
- 98. 98 VIEWING ALL SCHEDULES CREATED To view all schedules created up until now click on “View All” button. REMOVING A SAVED SCHEDULE To remove a saved schedule select the schedule you wish to remove from “Select Scheduled Name” and click “Remove”
- 99. 99 AUTO GENERATING MOBILE NUMBERS SMS MAILER will generate mobile numbers of any series/service provider according to your specifications. Step 1- Select New>Auto Generate Nos or click on “Auto Generate” icon
- 100. 100 Step 2- In the “Auto generation” window, give the following details: 1) “Provider Code”- A 4 digit code that is specific to individual service providers. 2) “Mobile Number”- The last 6 digits of the 10-digit mobile number 3) “No of Count”- Number of numbers to be generated 4) “Increment By” or “Decrement By”: Gives the increment/decrement value that has to be added/subtracted from the 10-digit code. 5) “Add Country Code”- Checking this option will generate the mobile numbers with the country code.
- 101. 101 Step 3- Click “Generate” to generate mobile numbers according to these specifics. The numbers generated appear in the panel at right.
- 102. 102 CREATING BLOCK LISTS Block lists will make sure your email messages (and hence your SMS message) do not go to recipients who you don’t wish to communicate with. Step 1- Select New>Send Bulk Mail to get to the main window.
- 103. 103 Step 2- In the “Block List” panel; add the email addresses you don’t wish to email/SMS message to. Then click “Add” to add that email address. REMOVING AN EMAIL ADDRESS FROM THE BLOCK LIST Step 3- Select the entry/entries to be blocked and hit “Delete”. “Delete All” will remove all entries from the list permanently.
- 104. 104 REPORTS SMS MAILER gives a number of flexible options to view reports that will give details on all SMS/Emails sent/received. Click on “Reports” icon in the main window.
- 105. 105 AUTO REPLY SMS MAILER will allow you to set automatic replies for the emails you receive. These can be set based on a number of conditions Step 1- Select Settings>Auto Reply to get to the Auto reply window. In the Auto Reply window, check “Auto Reply” under “Action to Perform”.
- 106. 106 Account Settings for Auto Reply Step 2- Enter the account details for the email account for which you wish to set auto reply. That is, all emails received in this email address will use the auto reply saved in this Auto Reply window. “Email ID”- The email account which will receive the emails. “Password”- The password for that email address “Server Name”- The URL of the server that’s associated with the email account. “Smtp Server”- The URL of SMTP server associated with the email account. “Port Number”- Port number associated with the internet connection. “Server”- Can be Imap/Pop. Consult CD TECH associates for these technicalities
- 107. 107 Keyword specifications in Auto Reply Step 3- • Beside “Keyword” enter the keyword to be searched for in the received email. • That is, enter “Complaint” if you think the received email will contain a complaint etc
- 108. 108 Setting Auto Reply Step 4- Set your reply in the “Reply” section. Give a subject to your reply and enter the reply in “Reply Message” box.
- 109. 109 Keyword Check while setting Auto Reply Step 5: “Keyword Check” will specify where/which portion of the email message will be checked for the auto reply operation. “Check Subject Only”- will only check the subject of the email message received “Content only”- will only check the text/content of the email message received. “Both”- will check both the subject and the content.
- 110. 110 Date Specifications for Auto Replies Step 6: • Select “Start” date and “End” date to specify the days between which your auto reply must be used. • Checking “Emails that arrive from now on” will send your auto reply to all emails that is received after the auto reply was set.
- 111. 111 Enabling/Disabling Auto Reply settings Step 7- At any time if you wish to enable/disable auto reply settings for an email address then select the email address that must be currently enabled beside “Email Id” present in “Account Settings” section. Then check “Enable”
- 112. 112 Step 8- To enable/disable auto reply settings completely for all email accounts press the flag icon seen at right. On: Flag is green; Off: Flag is red.
- 113. 113 Saving the Auto Reply Step 9: Press “Save” to save the auto reply. The saved reply will appear in the database panel below. NOTE: • To quickly add auto replies, use the editable database panel shown below. • You can add any number of entries by clicking there. • Press “Save” after typing the entries.
- 114. 114 FORWARDING EMAILS TO ANOTHER EMAIL ADDRESS To forward received mails received in one email address to another email address Step 1: Select Settings>Auto Reply to go to the Auto Reply window Select “Forward” under “Action to Perform”
- 115. 115 Account Settings for Forward Step 2- Enter the account details for the email account which will first receive the emails. That is, all emails received in this email address will be forwarded. “Email ID”- The email account which will receive the emails. “Password”- The password for that email address “Server Name”- The URL of the server that’s associated with the email account. “Smtp Server”- The URL of SMTP server associated with the email account. “Port Number”- Port number associated with the internet connection. “Server”- Can be Imap/Pop. Consult CD TECH associates for these technicalities
- 116. 116 Forwarding Emails based on their keywords Step 3- • Beside “Keyword” enter the keyword to be searched for in the received email. That is, the email will be forwarded only if it contains this keyword. • That is, enter “Complaint” if you think the received email will contain a complaint etc Step 4- Beside “To Address”, enter the email address to which you wish to forward the received email.
- 117. 117 Keyword check while forwarding Step 5: “Keyword Check” will specify where/which portion of the email message will be checked for the forward operation “Check Subject Only”- will only check the subject of the email message received “Content only”- will only check the text/content of the email message received. “Both”- will check both the subject and the content.
- 118. 118 Date specifications for Forward Step 6: • Select “Start” date and “End” date to specify the days between which emails must be forwarded. • Checking “Emails that arrive from now on” will forward all emails received after saving this entry.
- 119. 119 Enabling/Disabling Forward settings Step 7- At any time if you wish to enable/disable Forward settings for an email address then select the email address that must be currently enabled beside “Email Id” present in “Account Settings” section. Then check “Enable”
- 120. 120 Step 8- To enable/disable Forward settings completely for all email accounts press the flag icon seen at right. On: Flag is green; Off: Flag is red. Step 9: Press “Save” to save the email address for forwarding purposes.
- 121. 121 CREATING BLOCK LISTS DYNAMICALLY BASED ON EMAILS RECEIVED Step 1- Select Settings>Auto Reply to get to the Auto Reply window. Select “Add Block List” under “Action to Perform”
- 122. 122 Step 2- In “Account Settings”, enter details of the email account that should perform the block operation. Step 3- The keyword based on which the email addresses should be blocked. That is, all emails containing this keyword will be blocked.
- 123. 123 Step 4- “Keyword Check” will specify where/which portion of the email message will be checked for the block operation “Check Subject Only”- will only check the subject of the email message received “Content only”- will only check the text/content of the email message received. “Both”- will check both the subject and the content.
- 124. 124 Enabling/Disabling Block settings Step 5- At any time if you wish to enable/disable Block settings for an email address then select the email address that must be currently enabled beside “Email Id” present in “Account Settings” section.
- 125. 125 Then check “Enable” Step 6- To enable/disable Block settings completely for all email accounts press the flag icon seen at right. On: Flag is green; Off: Flag is red.
- 126. 126 Step 7- Press “Save” to save the details entered. UPDATING/DELETING SAVED ENTRIES OF FORWARD, BLOCK AND AUTO REPLY OPERATIONS Step 1- Select Settings> Auto Reply to get to the Auto Reply window
- 127. 127 Step 2- Load the email account whose settings have to be updated or deleted. Step 3- Click on “Update” to edit the details. Click on “Delete” to delete the record completely.
- 128. 128 “Delete All” will delete all saved records of auto reply/block/forward settings of all email accounts. EXTRACTOR
- 129. 129 EXTRACTOR in SMS MAILER will extract email addresses from anywhere on the internet. It will also perform the operation based on any category you specify. Step 1- Select New> Send Bulk E-Mail to get to the main window. Click on “Extractor” icon present in the main window.
- 130. 130 Step 2- In the “Search Information” section; enter a URL and keyword of your choice. Any one detail- URL or keyword can be entered. “URL” indicates the websites you wish to search in. “Keyword” specifies the keywords you want to look for while extracting email addresses e.g.: Students, Doctors in Chennai etc Click on “Search” to start searching. Click on “Stop” to stop the search. NOTE: URL MUST BE ENTERED WITH “http://” prefix
- 131. 131 Step 3- All results (URL addresses) pertaining to your keywords will be displayed in the panel titled “Search Result”
- 132. 132 OTHER OPTIONS WHILE EXTRACTING “Search Sub links”- Checking this option will search both the entered URL and its sub links “Select Search Engine”- will allow you to select a search engine of your choice to perform the search. “Refresh”- Refreshes the extractor. NOTE: In case the extractor continues to perform the search even after “Stop” button is pressed click on “Refresh”. “Clear All”- will clear the entries in the result panel. “Remove” icon will remove or clear all the results from the panel. “Start From Pending” will start the search from exactly where it was stopped.
- 133. 133 EXTRACTED EMAILS All email addresses extracted will appear in the panel titled “Search Information” at right. “Clear” will clear the box temporarily.
- 134. 134 SAVING EXTRACTED EMAILS To save the emails extracted you can save the email addresses in a separate document by clicking on “Export” Step 1- Click on “Export” icon in the “Search Information” panel.
- 135. 135 Step 2- In the “Save As” dialogue box give your document a name and click “Save”.
- 136. 136 VIEWING EXTRACTED EMAIL ADDRESSES a) URL-WISE viewing: Step 1- Instead of performing the search over and over again you can comfortably view the extracted email addresses from a previous search by selecting that URL from a list in the “Load URL Wise” panel. Step 2- Click on “Load” to load the email addresses. “Remove” and “Remove All” will delete those email addresses permanently.
- 137. 137 b) Date-Wise viewing: Step 1- To view all extracted email addresses date wise, select “From Date” and “To Date” from “Load Date Wise” panel. Step 2- Click on “Load” icon to load the email addresses. “Remove” icon will delete those email addresses permanently.
- 138. 138 c) Search Information Wise viewing: Step 1- To view all extracted email addresses according to the keyword, select the keyword from the list in “Load Search Information Wise” panel. Step 2- Click on “Load” icon to load the email addresses.
- 139. 139 “Remove” and “Remove All” will delete those email addresses permanently.