More Related Content
Similar to Frida and diego_art
Similar to Frida and diego_art (20)
More from cisenberg2 (20)
Frida and diego_art
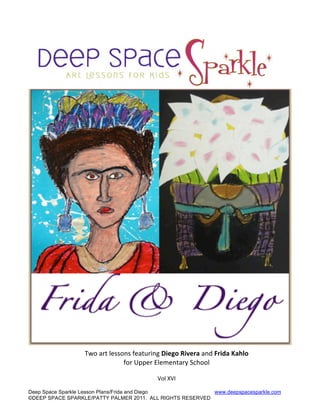
- 1. Deep Space Sparkle Lesson Plans/Frida and Diego www.deepspacesparkle.com
©DEEP SPACE SPARKLE/PATTY PALMER 2011. ALL RIGHTS RESERVED
!"#$%&'$()**#+*$,)%'-&.+/$!"#$%&'"(#)*$%+0$+)",*&-*./%$$
,#&$122)&$3()4)+'%&5$678##($
&
9#($:9;$
- 2. Deep Space Sparkle Lesson Plans/Frida & Diego www.deepspacesparkle.com
©DEEP SPACE SPARKLE/PATTY PALMER 2011. ALL RIGHTS RESERVED.
2
Frida Kahlo Portrait
David Diaz has illustrated a wonderful book about
Frida Kahlo and Diego Rivera. It’s called “Me, Frida”
written by Amy Novesky. The cover art is beautiful
and once I saw it, I knew I had found the
inspiration for a Frida Kahlo art lesson.
The story tells the story of Frida and her husband,
Diego Rivera, travelling to San Francisco. The cover
illustration is the inspiration and guide for the Frida
Portrait lesson.
Diego Rivera
I love Diego Rivera’s “El Vendedor de
Alcatraces”. The strong color contrast and
symmetry make it a perfect example to
demonstrate these art terms to elementary
students.
To embellish the concept of symmetry, I used a
simple transfer technique. The children draw half of
the picture with oil pastel, then fold the paper in
half and rub. The process is fun and engaging.
Websites
Diego Rivera online Museum:
http://www.diegorivera.com/
Frida Kahlo:
http://www.fridakahlofans.com/index.html
Abrams Books for Young Readers
http://www.abramsbooks.com/Books/Me,_Frida-
9780810989696.html
My main criteria when developing lessons (especially for older
students) is to focus on innovative techniques. These two lessons were
a big hit with my 5th
and 6th
grade students. I hope you enjoy them as
well.
Patty
- 3. Deep Space Sparkle Lesson Plans/Frida & Diego www.deepspacesparkle.com
©DEEP SPACE SPARKLE/PATTY PALMER 2011. ALL RIGHTS RESERVED.
3
Frida Kahlo Portraits
By fifth grade, most kids will have drawn
a portrait at least once in their school
careers.
Most often, it’s a self-portrait. As the
kid’s advance with their portrait skills,
they usually begin studying their
features in mirrors. Not always what fifth
and sixth graders want!
Far easier are portraits of someone else.
Children tend to be less self-conscience
and more interested in learning the
technique.
David Diaz’s stunning portrait on the
cover of his book “Me, Frida” is perfect
for this portrait demonstration.
I’m offering a pretty cool tip for you to
use with your students. It makes feature
placement easy!
Supplies
• 12” x 18” white drawing paper
• Black oil pastel
• Colored oil pastels
• Metallic oil pastels (optional)
• 12” x 18” colored drawing paper
• White, metallic and colored
tempera paint
• Chalk Pastels
- 4. Deep Space Sparkle Lesson Plans/Frida & Diego www.deepspacesparkle.com
©DEEP SPACE SPARKLE/PATTY PALMER 2011. ALL RIGHTS RESERVED.
4
Step One: Prepping the Paper
Here is a super easy way to teach
facial proportions:
1. Fold the white paper in half (top
meets bottom). This is crease A.
2. Fold top towards crease A to form
crease B.
3. Fold up bottom to touch crease A.
This is crease C.
4. Finally (and this is the tricky one)
fold bottom up to Crease B to form
crease D.
5. Fold paper in half lengthwise to
achieve a center line)
The creases will help with the placement
of the facial feature drawings for the next
step…
- 5. Deep Space Sparkle Lesson Plans/Frida & Diego www.deepspacesparkle.com
©DEEP SPACE SPARKLE/PATTY PALMER 2011. ALL RIGHTS RESERVED.
5
Step Two: Drawing the Face
1. Begin by placing the
black oil pastel on crease
B. Make a small mark in
the middle.
2. Make a similar mark on
crease c.
3. Using feather strokes,
draw each side of the
head lightly. I really
encourage a light stroke
here and if the kids make
a mistake, I tell them to
just move on. Often, the
colored oil pastels will
cover most lines. If using
a black oil pastel
intimidates either you or
your students, just use a
flesh colored pastel.
4. Draw two dots on crease
A. Make sure to space
them apart. Now draw
circles around the dot
and ovals around the
eyes.
5. On crease D, draw the
bottom of the nose. Join
the bridge of the nose to
the eyes.
6. Just below crease D,
make a mouth. I like to
draw the inside line first,
then the top lip, and then
the bottom.
7. Draw a line from the very
first dot on crease B,
down about 2-4”. This is
Frida’s hair part.
8. Draw ears between
crease A and D.
9. Draw hair, neck and
shoulders.
- 6. Deep Space Sparkle Lesson Plans/Frida & Diego www.deepspacesparkle.com
©DEEP SPACE SPARKLE/PATTY PALMER 2011. ALL RIGHTS RESERVED.
6
- 7. Deep Space Sparkle Lesson Plans/Frida & Diego www.deepspacesparkle.com
©DEEP SPACE SPARKLE/PATTY PALMER 2011. ALL RIGHTS RESERVED.
7
After the drawing is complete, set a
few trays of oil pastels and metallic
oil pastels on the tables.
Begin with the face.
Since I don’t have many colors in my
oil pastel sets, I suggest that the
kids use two colors for the face. Use
a medium brown first and then blend
using a flesh color. This seems to
achieve a good skin tone.
Color the hair next using a blend of
dark brown and black oil pastel.
For the hair combs, jewelry and
robe, I encourage the kids to select
what pleases them.
To add texture to the garment, color
the first layer with a light colored oil
pastel and then color directly over
the light color with a dark color. Use
a wooden dowel to etch a design.
Kids LOVE this part!
After everything is colored, use a
black oil pastel to darken all lines.
Make sure to add Frida’s famous
eyebrows!
Step Three: Coloring the Portrait
- 8. Deep Space Sparkle Lesson Plans/Frida & Diego www.deepspacesparkle.com
©DEEP SPACE SPARKLE/PATTY PALMER 2011. ALL RIGHTS RESERVED.
8
Step Four: Making the Background
After detailing with black oil pastel, cut
around shape of portrait.
On a separate piece of colored paper
(I offered blue or red), use colored
chalk pastel to create any type of
pattern.
Splatter paint all over the background
paper. White is effective but so is metallic
paint. Be careful not to set out too many
splatter paint color options.
Glue down portrait to splatter-
painted background.
Lovely!
- 9. Deep Space Sparkle Lesson Plans/Frida & Diego www.deepspacesparkle.com
©DEEP SPACE SPARKLE/PATTY PALMER 2011. ALL RIGHTS RESERVED.
9
Frida Kahlo Potraits
5th
& 6th
Grade
- 10. Deep Space Sparkle Lesson Plans/Frida & Diego www.deepspacesparkle.com
©DEEP SPACE SPARKLE/PATTY PALMER 2011. ALL RIGHTS RESERVED.
10
Diego Rivera’s
El Vendedor De Alcatraces
Supplies:
• 12” x 18” yellow or
orange paper
• Black oil pastel
• Colored chalk pastels
• Scissors & glue
• 12” x 18” Black paper
• 3” x 5” (approx.) pieces
of white, lime or light
yellow papers for flowers
Lesson length:
Three, 45-minute
sessions
- 11. Deep Space Sparkle Lesson Plans/Frida & Diego www.deepspacesparkle.com
©DEEP SPACE SPARKLE/PATTY PALMER 2011. ALL RIGHTS RESERVED.
11
Step One: Creating the drawing
Following the directions on the handout,
guide the children through a directed line
lesson. Some children will prefer to
attempt the drawing on their own but it
helps to at least go over the steps on the
white board.
Placement can be tricky.
Once the drawing is complete and the
background cut away, children can begin
coloring. I really like the chalk pastels on
the yellow or orange paper. The colored
paper gives the pastels depth. The only
exception is the hair and skirt. We used
black oil pastel as the black chalk is far too
messy.
After the coloring is complete, trace over all
lines with the black oil pastel. This makes the
colors pop and gives the artist the
opportunity to add details on the basket,
facial features and stems for flowers.
Many children opted not to add a face, but
mostly because they ran out of time.
Now the picture is ready for the next step…
Here is a close-up of a good basket
detail. This artist used a grid and then
added double horizontal and vertical
marks in each “box”.
You could also add the basket details
without the grid (see left).
- 12. Deep Space Sparkle Lesson Plans/Frida & Diego www.deepspacesparkle.com
©DEEP SPACE SPARKLE/PATTY PALMER 2011. ALL RIGHTS RESERVED.
12
Step-by-Step Visual Drawing Aid
Diego Rivera Art
- 13. Deep Space Sparkle Lesson Plans/Frida & Diego www.deepspacesparkle.com
©DEEP SPACE SPARKLE/PATTY PALMER 2011. ALL RIGHTS RESERVED.
13
- 14. Deep Space Sparkle Lesson Plans/Frida & Diego www.deepspacesparkle.com
©DEEP SPACE SPARKLE/PATTY PALMER 2011. ALL RIGHTS RESERVED.
14
Step Two: Making the Oil Pastel Transfer
#1 Draw
figure on one
side of
paper. Press
hard with
black oil
pastel.
#2 Fold paper in half and rub the
paper with your fingers. The more you
rub, the warmer the paper becomes.
This makes the transfer even better!
#3 Open
paper…see the
transfer?
#4 Trace over the light
transfer with the oil
pastel. Now you have a
symmetrical drawing!
- 15. Deep Space Sparkle Lesson Plans/Frida & Diego www.deepspacesparkle.com
©DEEP SPACE SPARKLE/PATTY PALMER 2011. ALL RIGHTS RESERVED.
15
Step Three:
Adding the Flowers
It helps to make a dozen or so flowers and
then arrange them onto the artwork. Start
above the basket line and work your way
up to the top of the flowers.
Place 2-4 pieces of paper on top of one another and draw a lily shape. It looks like a
wobbly teardrop! Cut the stack of paper. Using some chalk pastel, draw a circle in the
center of the flowers and smudge with your fingers. Some kids chose one color and
some chose multiple colors. You decide! Make as many flowers as you would like.
- 16. Deep Space Sparkle Lesson Plans/Frida & Diego www.deepspacesparkle.com
©DEEP SPACE SPARKLE/PATTY PALMER 2011. ALL RIGHTS RESERVED.
16
Diego Rivera
5th & 6th Grade