Transportation in Sales and Distribution Management
•Télécharger en tant que PPTX, PDF•
4 j'aime•3,215 vues

Transportation in Sales and Distribution Management. Modes of Transportation, Advantages & Disadvantages

Recommandé
Contenu connexe
Tendances
Tendances (20)
En vedette
En vedette (18)
Similaire à Transportation in Sales and Distribution Management
Similaire à Transportation in Sales and Distribution Management (20)
Plus de Darshana Chauhan
Plus de Darshana Chauhan (17)
Transportation in Sales and Distribution Management
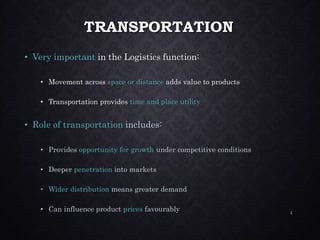
- 1. TRANSPORTATION • Very important in the Logistics function: • Movement across space or distance adds value to products • Transportation provides time and place utility • Role of transportation includes: • Provides opportunity for growth under competitive conditions • Deeper penetration into markets • Wider distribution means greater demand • Can influence product prices favourably 1
- 2. TRANSPORTATION PRINCIPLES • Continuous flow • Optimise unit of cargo – stackability • Maximum vehicle unit – capacity utilization • Adaptation of vehicle unit to volume and nature of traffic • Standardisation • Compatibility of unit load equipment • Minimum of dead weight to total weight • Maximum utilization of capital, equipment and personnel 2
- 3. THE SELECTION CRITERIA • Environmental analysis: shipper, carrier, government regulations, public influence • Deciding objectives • Selecting mode • Select transport type within the mode • Define functions of transport • Evaluation and control – customer perception / satisfaction, best practice benchmarking 3
- 4. COST FACTORS • Can be product related or market related. • Product related: density, stowability, ease or difficulty of handling and liability • Market related: competition, location of markets, Government regulations, traffic in and out of the market, seasonality of movements and impact on customer service • Five prominent modes: • Road, rail, air, water and pipeline. • Sixth one is use of Ropeways 4
- 5. CUSTOMER SERVICE FACTORS • Consistency, dependability • Transit time • Coverage – door-to-door for example • Flexibility in handling a range of products • Loss and damage performance • Additional services provided 5
- 6. REVERSE LOGISTICS • Movement of goods from the market or customer back to the company • The need: • Increased awareness of the environment • Stringent legislation • For some it is part of the business • Profitability of dealing with scrap, surplus • Surplus, obsolescence can result due to: • Over optimistic sales forecasts, change in product specs, errors in estimating material usage, losses in processing or overbuying based on incentives 6
- 8. ADVANTAGES OF RAIL • Economy – more so for goods over long distances • Efficiency of energy • Reliability – not affected by weather conditions • High speed • Cheaper transportation • Safety and large capacity 8
- 9. DISADVANTAGES • Uneconomical for small shipments and short distances • Not suitable for remote stations • Costly terminal handling facilities • Inflexible time schedules • Lack of door to door service 9
- 11. ROAD FREIGHT ADVANTAGES • Through movement – direct from consignor to consignee, no transshipment • Flexibility – routes and loading routines can be easily altered, operate day and night • Less capital costs – for own fleet + immunity from industrial action • Fast turn-around – if articulated units like tractors and trailers are used • Minimum delays 11
- 12. DISADVANTAGES • Susceptibility to weather and road conditions – in spite of the best protection • Unsuitability for heavy loads – rail transport more economical for bulk loads • Unsuitability for long distances – again the rail telescopic rates are more favourable 12
- 14. AIR TRANSPORT ADVANTAGES • Faster mode • Reduction in cost particularly inventory • Broad service range • Increasing capabilities • Disadvantages: • High cost • Weather affects flight conditions • Limitations on heavy consignments 14
- 16. WATER TRANSPORT • Advantages: • Mass movement of bulk • Lowest freight cost • Preferred for long haul of low value commodities • Disadvantages: • Not for quick transit 16
- 18. PIPELINE MOVEMENT • Advantages: • Reliable, continuous, all weather transport • Low energy consumption – hence low cost • Low maintenance and operating costs • Underground, no space problem • Can traverse difficult terrain • Minimal transit losses • Operation round the clock, safe • Economies of scale – double the throughput for only 30% additional cost • Disadvantage is in the investment cost 18
- 20. ROPEWAYS • Advantages: • In hilly or inaccessible areas • Long and circuitous routes with streams / deep valleys • For commodities capable of movement in ropeway buckets • Short haulages of less than 50 kms • Areas where other carriers are uneconomical • Disadvantages: • Heavy investments • Limitations on size and quantity of haul 20
- 21. • Prepared by: • Darshana Chauhan • Heeral Brijlani • Datt Dubal • Lakshman Dangar • Sanjay Vadher • Atman Dave • Guided by: • Prof. Archana Gadhavi
- 22. 22 THANK YOU
Notes de l'éditeur
- Fly Through 3-D transition effect and pictures (Basic) To reproduce the picture effects on this slide, do the following: On the Home tab, in the Slides group, click Layout, and then click Blank. On the Insert tab, in the Images group, click Picture. In the Insert Picture dialog box, select a picture and then click Insert. Select the picture. Under Picture Tools, on the Format tab, in the Size group, click the Size and Position dialog box launcher. In the Format Picture dialog box, resize or crop the image so that the height is set to 5.33” and the width is set to 8”. To crop the picture, click Crop in the left pane, and in the right pane, under Crop position, enter values into the Height, Width, Left, and Top boxes. To resize the picture, click Size in the left pane, and in the right pane, under Size and rotate, enter values into the Height and Width boxes. Under Picture Tools, on the Format tab, in the Picture Styles group, click Rotated White. To reproduce the shape effects on this slide, do the following: On the Home tab, in the Drawing group, click Shapes, and then under Block Arrows, click Left-Right Arrow (first row). On the slide, drag to draw a left-right arrow. Select the left-right arrow. Under Drawing Tools, on the Format tab, in the Size group, enter 0.45” in the Height box and 3.65” in the Width box. Also on the Format tab, in the Shape Styles group, click the Format Shape dialog box launcher. In the Format Shape dialog box, click Fill in the left pane, in the Fill pane, click Gradient fill, and then do the following: In the Type list, select Linear. In the Angle box, enter 0°. Under Gradient stops, click Add gradient stops or Remove gradient stops until two stops appear in the slider. Also under Gradient stops, customize the gradient stops as follows: Select the first stop in the slider, and then do the following: In the Position box, enter 0%. Click the button next to Color, and then under Theme Colors, click White, Background 1, Darker 5%. Select the second stop in the slider, and then do the following: In the Position box, enter 100%. Click the button next to Color, and then under Theme Colors, click White, Background 1, Darker 15%. Also in the Format Shape dialog box, click Line Color in the left pane, in the Line Color pane, click No line. Also in the Format Shape dialog box, click Shadow in the left pane, in the Shadow pane, click the button next to Presets, and then under Outer click Offset Center (second row). Also in the Format Shape dialog box, click Size in the left pane, in the Size pane, under Size and rotate, in the Rotation box, enter 354°. On the slide, select the shape. Begin typing to enter your text into the shape. Select the edge of the shape. On the Home tab, in the Font group, do the following: In the Font list, select Corbel. In the Font Size list, select 20 pt. Click Font Color, and then click Black, Text 1 (first row). Click Italic. Also on the Home tab, in the Paragraph group, click Center. To reproduce the transition effects on this slide, do the following: On the Transitions tab, in the Transition to This Slide group, click More, and then click Fly Through. On the Transitions tab, in the Transition to This Slide, click Effect Options, and then click In with Bounce. Also on the Transitions tab, in the Timing group, do the following: Clear the On Mouse Click box. Select After, and then in the After box enter 2.00 seconds. To reproduce the second, third, and fourth slides, do the following: In the Slides pane, select the slide. On the Home tab, in the Slides group, click the arrow below New Slide, and then click Duplicate Selected Slides. Repeat this process until there are four slides. In the Slides pane, select the second slide. On the slide, select the picture. Under Picture Tools, on the Format tab, in the Adjust group, click Change Picture. In the Insert Picture dialog box, select a picture and then click Insert. Also on the Format tab, in the Size group, click the Size and Position dialog box launcher. In the Format Picture dialog box, click Size in the left pane, in the Size pane, under Size and rotate, in the Rotation box, enter 9°. Select the shape. Under Drawing Tools, on the Format tab, in the Size group, click the Size and Position dialog box launcher. In the Format Shape dialog box, click Size in the left pane, in the Size pane, under Size and rotate, in the Rotation box, enter 3°. In the Slides pane, select the third slide. On the slide, select the picture. Under Picture Tools, on the Format tab, in the Adjust group, click Change Picture. In the Insert Picture dialog box, select a picture and then click Insert. Also on the Format tab, in the Size group, click the Size and Position dialog box launcher. In the Format Picture dialog box, click Size in the left pane, in the Size pane, under Size and rotate, in the Rotation box, enter 5°. Select the shape. Under Drawing Tools, on the Format tab, in the Size group, click the Size and Position dialog box launcher. In the Format Shape dialog box, click Size in the left pane, in the Size pane, under Size and rotate, in the Rotation box, enter 359°. In the Slides pane, select the fourth slide. On the slide, select the picture. Under Picture Tools, on the Format tab, in the Adjust group, click Change Picture. In the Insert Picture dialog box, select a picture and then click Insert. Also on the Format tab, in the Size group, click the Size and Position dialog box launcher. In the Format Picture dialog box, click Size in the left pane, in the Size pane, under Size and rotate, in the Rotation box, enter 8°. Select the shape. Under Drawing Tools, on the Format tab, in the Size group, click the Size and Position dialog box launcher. In the Format Shape dialog box, click Size in the left pane, in the Size pane, under Size and rotate, in the Rotation box, enter 2°. To reproduce the background effects on this slide, do the following: On the Design tab, in the Background group, click Background Styles, and then click Style 4. (Note: Selecting this background style will change the colors on the slide.)
- Fly Through 3-D transition effect and pictures (Basic) To reproduce the picture effects on this slide, do the following: On the Home tab, in the Slides group, click Layout, and then click Blank. On the Insert tab, in the Images group, click Picture. In the Insert Picture dialog box, select a picture and then click Insert. Select the picture. Under Picture Tools, on the Format tab, in the Size group, click the Size and Position dialog box launcher. In the Format Picture dialog box, resize or crop the image so that the height is set to 5.33” and the width is set to 8”. To crop the picture, click Crop in the left pane, and in the right pane, under Crop position, enter values into the Height, Width, Left, and Top boxes. To resize the picture, click Size in the left pane, and in the right pane, under Size and rotate, enter values into the Height and Width boxes. Under Picture Tools, on the Format tab, in the Picture Styles group, click Rotated White. To reproduce the shape effects on this slide, do the following: On the Home tab, in the Drawing group, click Shapes, and then under Block Arrows, click Left-Right Arrow (first row). On the slide, drag to draw a left-right arrow. Select the left-right arrow. Under Drawing Tools, on the Format tab, in the Size group, enter 0.45” in the Height box and 3.65” in the Width box. Also on the Format tab, in the Shape Styles group, click the Format Shape dialog box launcher. In the Format Shape dialog box, click Fill in the left pane, in the Fill pane, click Gradient fill, and then do the following: In the Type list, select Linear. In the Angle box, enter 0°. Under Gradient stops, click Add gradient stops or Remove gradient stops until two stops appear in the slider. Also under Gradient stops, customize the gradient stops as follows: Select the first stop in the slider, and then do the following: In the Position box, enter 0%. Click the button next to Color, and then under Theme Colors, click White, Background 1, Darker 5%. Select the second stop in the slider, and then do the following: In the Position box, enter 100%. Click the button next to Color, and then under Theme Colors, click White, Background 1, Darker 15%. Also in the Format Shape dialog box, click Line Color in the left pane, in the Line Color pane, click No line. Also in the Format Shape dialog box, click Shadow in the left pane, in the Shadow pane, click the button next to Presets, and then under Outer click Offset Center (second row). Also in the Format Shape dialog box, click Size in the left pane, in the Size pane, under Size and rotate, in the Rotation box, enter 354°. On the slide, select the shape. Begin typing to enter your text into the shape. Select the edge of the shape. On the Home tab, in the Font group, do the following: In the Font list, select Corbel. In the Font Size list, select 20 pt. Click Font Color, and then click Black, Text 1 (first row). Click Italic. Also on the Home tab, in the Paragraph group, click Center. To reproduce the transition effects on this slide, do the following: On the Transitions tab, in the Transition to This Slide group, click More, and then click Fly Through. On the Transitions tab, in the Transition to This Slide, click Effect Options, and then click In with Bounce. Also on the Transitions tab, in the Timing group, do the following: Clear the On Mouse Click box. Select After, and then in the After box enter 2.00 seconds. To reproduce the second, third, and fourth slides, do the following: In the Slides pane, select the slide. On the Home tab, in the Slides group, click the arrow below New Slide, and then click Duplicate Selected Slides. Repeat this process until there are four slides. In the Slides pane, select the second slide. On the slide, select the picture. Under Picture Tools, on the Format tab, in the Adjust group, click Change Picture. In the Insert Picture dialog box, select a picture and then click Insert. Also on the Format tab, in the Size group, click the Size and Position dialog box launcher. In the Format Picture dialog box, click Size in the left pane, in the Size pane, under Size and rotate, in the Rotation box, enter 9°. Select the shape. Under Drawing Tools, on the Format tab, in the Size group, click the Size and Position dialog box launcher. In the Format Shape dialog box, click Size in the left pane, in the Size pane, under Size and rotate, in the Rotation box, enter 3°. In the Slides pane, select the third slide. On the slide, select the picture. Under Picture Tools, on the Format tab, in the Adjust group, click Change Picture. In the Insert Picture dialog box, select a picture and then click Insert. Also on the Format tab, in the Size group, click the Size and Position dialog box launcher. In the Format Picture dialog box, click Size in the left pane, in the Size pane, under Size and rotate, in the Rotation box, enter 5°. Select the shape. Under Drawing Tools, on the Format tab, in the Size group, click the Size and Position dialog box launcher. In the Format Shape dialog box, click Size in the left pane, in the Size pane, under Size and rotate, in the Rotation box, enter 359°. In the Slides pane, select the fourth slide. On the slide, select the picture. Under Picture Tools, on the Format tab, in the Adjust group, click Change Picture. In the Insert Picture dialog box, select a picture and then click Insert. Also on the Format tab, in the Size group, click the Size and Position dialog box launcher. In the Format Picture dialog box, click Size in the left pane, in the Size pane, under Size and rotate, in the Rotation box, enter 8°. Select the shape. Under Drawing Tools, on the Format tab, in the Size group, click the Size and Position dialog box launcher. In the Format Shape dialog box, click Size in the left pane, in the Size pane, under Size and rotate, in the Rotation box, enter 2°. To reproduce the background effects on this slide, do the following: On the Design tab, in the Background group, click Background Styles, and then click Style 4. (Note: Selecting this background style will change the colors on the slide.)