4.18.24 Movement Legacies, Reflection, and Review.pptx
Usb Write Protect En Us
1. Write Protect USB Devices
in Windows XP
Dustin Hurlbut
In the recent release of Windows XP Service Pack 2 (SP2), a new feature was added by Microsoft to
allow the write protection of USB block storage devices. This entails a simple Registry modification that
requires no hardware devices to write protect thumb drives. This allows us to examine and duplicate
USB devices with write protection that previously didn’t exist.
To enable this feature, we’ll go step by step to modify the Registry. As in all Registry operations, it is
advisable to back up your Registry files prior to modification. You can do this easily by either creating a
Restore Point in XP or by using FTK Imager to look at your own drive and export the Registry Files.
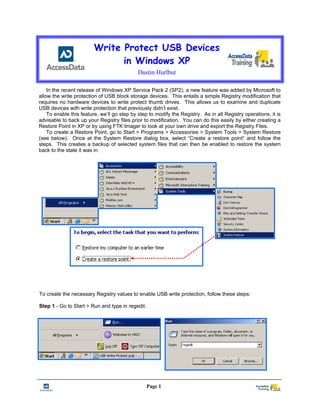
To create a Restore Point, go to Start > Programs > Accessories > System Tools > System Restore
(see below). Once at the System Restore dialog box, select “Create a restore point” and follow the
steps. This creates a backup of selected system files that can then be enabled to restore the system
back to the state it was in.
To create the necessary Registry values to enable USB write protection, follow these steps:
Step 1 - Go to Start > Run and type in regedit.
Page 1
2. Step 2 - Navigate to HKEY_LOCAL_MACHINESYSTEMCurrentControlSet and highlight the Control
key. The CurrentControlSet key has system information about the current configuration of the machine.
The system keeps a backup of this key. You will see the current and backup listed as ControlSet001
and 002 in this example. The select key will show which is valid. The key CurrentControlSet is the one
being used at this moment and is the one you want to modify.
Highlight the
Control Key
Select Key Showing the
Current Control Set
(001)
Step 3 - Right click on Control and select New > Key. Name the key StorageDevicePolicies.
Page 2
3. Step 4 - Right click on StorageDevicePolicies and select DWORD. Name the value WriteProtect.
Step 5 - Right click (or double click) on WriteProtect and select Modify. To write protect USB devices
select 1 as the value. To turn off write protection, change this value to 0.
Page 3
4. We have created a new key and value in the Registry that will write protect USB devices. You may
want to place this on your examination machine full time. However, if you need to be able to switch back
and forth from a write protected state to an non write protected state, it is cumbersome to have to go
through this procedure each time. To automate this process, create a .REG file to enable you to select
either on or off.
To create a write protect switch, right click on the key StorageDevicePolicies we just modified and
select "Export". Name it and you can send a file with the extension of .reg to your Desktop. Name it
"USB Write Protect ON".
Recreate the key with the switch turned off to un-write protect the USB making another .reg file. You
can activate either .reg file by clicking on it to modify the Registry key.
Be sure to test and verify this procedure and write protect function. The National Center for
Forensic Science (NCFS) has a free program available to automate this function. They also have a five
Page 4