SlideShare a Scribd company logo
1 of 20
Download to read offline
SECTION 00 -- GENERAL INFORMATION -- CHAPTER 1
00-4
SAFETY
PRECAUTIONARY STATEMENTS
A careful operator is the best operator. Most accidents can be avoided by observing certain precautions. To help
prevent accidents, read the following precautions before operating this equipment. Equipment should be oper-
ated only by those who are responsible and instructed to do so.
Carefully review the procedures given in this manual with all operators. It is important that all operators be familiar
with and follow safety precautions.
THE TRACTOR
1. Read the Operator’s Manual carefully before
using the tractor. Lack of operating knowl-
edge can lead to accidents.
2. Use an approved roll bar and seat belt for safe
operation. Overturning a tractor without a roll
bar can result in death or injury. If your tractor
is not equipped with a roll bar and seat belt,
see your New Holland Dealer.
3. Always use the seat belt. The only instance
when the seat belt should not be used is if the
roll bar has been removed from the tractor.
4. If a front end loader is to be installed, always
use a FOPS (Falling Object Protective
Structure) canopy to avoid injury from falling
objects.
5. Use the handholds and step plates when
getting on and off the tractor to prevent falls.
Keep steps and platform cleared of mud and
debris.
6. Do not permit anyone but the operator to ride
on the tractor. There is no safe place for extra
riders.
7. Keep all safety decals clean of dirt and grime,
and replace all missing, illegible, or damaged
safety decals. See the list of decals in the
Decal section of this manual.
SERVICING THE TRACTOR
1. The cooling system operates under pressure
which is controlled by the radiator cap. It is
dangerous to remove the cap while the
system is hot. Always turn the cap slowly to
the first stop and allow pressure to escape
before removing the cap entirely.
2. Keep any type of open flame away from the
tractor and do not smoke while refueling.
Wait for the engine to cool before refueling.
3. Keep the tractor and equipment, particularly
brakes and steering, maintained in a reliable
and satisfactory condition to ensure your
safety and comply with legal requirements.
4. Keep open flame or cold weather starting
aids away from the battery to prevent fires or
explosions. Use jumper cables according to
instructions to prevent sparks which could
cause explosion.
5. Stop the engine before performing any
service on the tractor.
6. Escaping hydraulic/diesel fluid under pres-
sure can penetrate the skin causing serious
injury. If fluid is injected into the skin, obtain
medical attention immediately or gangrene
may result.
• DO NOT use your hand to check for leaks.
Use a piece of cardboard or paper to
search for leaks.
• Stop the engine and relieve pressure
before connecting or disconnecting
lines.
• Tighten all connections before starting
the engine or pressurizing lines.
7. Do not modify or permit anyone else to
modify or alter this tractor or any of its
components or functions without first
consulting a New Holland Dealer.
8. The fuel oil in the injection system is under
high pressure and can penetrate the skin.
Unqualified persons should not remove or
attempt to adjust a pump, injector, nozzle, or
any other part of the fuel injection system.
Failure to follow these instructions can result
in serious injury.
9. Continuous long-term contact with used
engine oil may cause skin cancer. Avoid
prolonged contact with used engine oil.
Wash skin promptly with soap and water.
SECTION 00 -- GENERAL INFORMATION -- CHAPTER 1
00-5
10. Some components of your tractor, such as
gaskets and friction surfaces (brake linings,
clutch linings, etc.) may contain asbestos.
Breathing asbestos dust is dangerous to
your health. You are advised to have any
maintenance or repair on such components
carried out by an authorized New Holland
Dealer. However, if service operations are to
be undertaken on parts that contain asbes-
tos, the essential precautions listed below
must be observed:
• Work out of doors or in a well ventilated
area.
• Dust found on the tractor or produced
during work on the tractor should be
removed by extraction, not by blowing.
• Dust waste should be dampened, placed
in a sealed container, and marked to
ensure safe disposal.
• If any cutting, drilling, etc. is attempted on
materials containing asbestos, the item
should be dampened and only hand tools
or low speed power tools used.
OPERATING THE TRACTOR
1. Before starting the tractor, apply the parking
brake, place the PTO lever in the “OFF”
position, the lift control lever in the down
position, the remote control valve levers in
the neutral position, and the transmission in
neutral.
2. Always sit in the tractor seat when starting
the engine or operating controls. Do not start
the engine or operate controls while standing
beside the tractor.
3. Do not bypass the neutral start switches.
Consult your New Holland Dealer if your
neutral start controls malfunction. Use
jumper cables only in the recommended
manner. Improper use can result in tractor
runaway.
4. Avoid accidental contact with the gear shift
lever while the engine is running, as this can
cause unexpected tractor movement.
5. Before getting off the tractor, disengage the
PTO, turn the engine off, and apply the
parking brake. Never get off the tractor while
it is in motion.
6. Do not park the tractor on a steep incline.
7. Do not operate the tractor engine in an
enclosed building without adequate ventila-
tion. Exhaust fumes can cause death or
illness.
8. If the power steering or engine ceases
operating, stop the tractor immediately.
9. Pull only from the drawbar or the lower link
drawbar in the down position. Use only a
drawbar pin that locks in place. Pulling from
the tractor rear axle or any point above the
axle may cause the tractor to upset.
10. If the front end of the tractor tends to rise
when heavy implements are attached to the
three-point hitch, install front end or front
wheel weights. Do not operate the tractor
with a light front end.
11. Always set the hydraulic selector lever in
position control when attaching or transport-
ing equipment. Ensure hydraulic couplers
are properly mounted and will disconnect
safely in case of accidental detachment of
implement.
12. Do not leave equipment in the raised
position.
13. Use the flasher/turn signal lights and SMV
signs when traveling on public roads both
day and night (unless prohibited by law).
14. When operating at night, adjust lights to
prevent blinding oncoming drivers.
DRIVING THE TRACTOR
1. Watch where you are going, especially at row
ends, on roads, around trees and low
hanging obstacles.
2. To avoid upsets, drive the tractor with care
and at a safe speed. Use extra caution when
operating over rough ground, when crossing
ditches or slopes, and when turning corners.
3. To provide two-wheel braking, one pedal
actuates both brakes.
4. Do not coast or free wheel down hills. Use the
same gear when going downhill as is used
when going uphill.
5. Any towed vehicle with a total weight
exceeding that of the towing tractor should
be equipped with brakes for safe operation.
6. If the tractor becomes stuck or the tires
become frozen to the ground, back up the
tractor to prevent upset.
SECTION 00 -- GENERAL INFORMATION -- CHAPTER 1
00-6
7. Always check overhead clearance, especial-
ly when transporting the tractor.
8. When operating at night, adjust lights to
prevent blinding oncoming drivers.
OPERATING THE PTO
1. When operating PTO driven equipment, shut
off the engine and wait until the PTO stops
before getting off the tractor and disconnect-
ing the equipment.
2. Do not wear loose clothing when operating
the power take-off or when near rotating
equipment.
3. When operating stationary PTO driven
equipment, always place both gear shift
levers in neutral, apply the tractor parking
brake, and block the rear wheels front and
back.
4. To avoid injury, do not clean, adjust, unclog,
or service PTO driven equipment when the
tractor engine is running.
5. Ensure the PTO master shield is installed at
all times. Always replace the PTO shield cap
when the PTO is not in use.
DIESEL FUEL
1. UNDER NO CIRCUMSTANCES should gaso-
line, alcohol, or blended fuels be added to
diesel fuel. These combinations can create
an increased fire or explosive hazard. Such
blends are more explosive than pure
gasoline in a closed container such as a fuel
tank. DO NOT USE THESE BLENDS.
2. Never remove the fuel cap or refuel with the
engine running or hot.
3. Do not smoke while refueling or when
standing near fuel.
4. Maintain control of the fuel filler pipe nozzle
when filling the tank.
5. Do not fill the fuel tank to capacity. Allow
room for expansion.
6. Wipe up spilled fuel immediately.
7. Always tighten the fuel tank cap securely.
8. If the original fuel tank cap is lost, replace it
with a New Holland approved cap. A
non-approved, proprietary cap may not be
safe.
9. Keep equipment clean and properly main-
tained.
10. Do not drive equipment near open fires.
11. Never use fuel for cleaning purposes.
12. Arrange fuel purchases so that winter grade
fuels are not held over and used in the spring.
SAFETY FRAME (ROPS)
Your New Holland tractor is equipped with a
safety frame. It must be maintained in a
serviceable condition. Be careful when driving
through doorways or working in confined spaces
with low headroom.
UNDER NO CIRCUMSTANCES should you:
• modify, drill, or alter the safety frame in any
way. Doing so may render you liable to legal
prosecution.
• attempt to straighten or weld any part of the
main frame or retaining brackets which have
suffered damage. Doing so may weaken the
structure and endanger your safety.
• secure any parts on the main frame or attach
your safety frame with anything other than
the special high tensile bolts and nuts speci-
fied.
• attach chains or ropes to the main frame for
pulling purposes.
• take unnecessary risks even though your
safety frame affords you the maximum
protection possible.
WHEN YOU SEE THIS SYMBOL
IT MEANS:
ATTENTION!
BECOME ALERT!
YOUR SAFETY IS INVOLVED!
SECTION 00 -- GENERAL INFORMATION -- CHAPTER 1
00-15
76077177
SECTION 00 -- GENERAL INFORMATION -- CHAPTER 1
00-16
ECOLOGY AND THE ENVIRONMENT
Soil, air, and water are vital factors of agriculture and
life in general. When legislation does not yet rule the
treatment of some of the substances which are
required by advanced technology, common sense
should govern the use and disposal of products of a
chemical and petrochemical nature.
The following are recommendations which may be of
assistance:
• Become acquainted with and ensure that you
understand the relative legislation applicable to
your country.
• Where no legislation exists, obtain information
from suppliers of oils, filters, batteries, fuels,
antifreeze, cleaning agents, etc., with regard to
their effect on man and nature and how to safely
store, use and dispose of these substances.
Agricultural consultants will, in many cases, be
able to help you as well.
HELPFUL HINTS
1. Avoid filling fuel tanks using cans or inappropri-
ate pressurized fuel delivery systems which may
cause considerable spillage.
2. In general, avoid skin contact with all fuels, oils,
acids, solvents, etc. Most of them contain
substances which may be harmful to your health.
3. Modern oils contain additives. Do not burn
contaminated fuels and or waste oils in ordinary
heating systems.
4. Avoid spillage when draining off used engine
coolant mixtures, engine, gearbox and hydraulic
oils, brake fluids, etc. Do not mix drained brake
fluids or fuels with lubricants. Store them safely
until they can be disposed of in a proper way to
comply with local legislation and available
resources.
5. Modern coolant mixtures, i.e. antifreeze and
other additives, should be replaced every two
years. They should not be allowed to get into the
soil but should be collected and disposed of
safely.
6. Repair any leaks or defects in the engine cooling
or hydraulic system immediately.
7. Do not increase the pressure in a pressurized
circuit as this may lead to a component failure.
8. Protect hoses during welding as penetrating
weld splatter may burn a hole or weaken them,
allowing the loss of oils, coolant, etc.
SECTION 10 -- ENGINE SYSTEMS -- CHAPTER 1
10-1
SECTION 10 - ENGINE SYSTEMS
Chapter 1 - Engine Systems
CONTENTS
Section Description Page
Specifications 6. . . . . . . . . . . . . . . . . . . . . . . . . . . . . . . . . . . . . . . . . . . . . . . . . . . . . . . . . . . . . . . . . .
Torque Specifications 15. . . . . . . . . . . . . . . . . . . . . . . . . . . . . . . . . . . . . . . . . . . . . . . . . . . . . . . . .
Metric Bolt Torque Specifications 15. . . . . . . . . . . . . . . . . . . . . . . . . . . . . . . . . . . . . . . . . . . . . . .
Special Tools 16. . . . . . . . . . . . . . . . . . . . . . . . . . . . . . . . . . . . . . . . . . . . . . . . . . . . . . . . . . . . . . . .
General Information -- Description of Operation 17. . . . . . . . . . . . . . . . . . . . . . . . . . . . . . . . . . .
Identification Chart 17. . . . . . . . . . . . . . . . . . . . . . . . . . . . . . . . . . . . . . . . . . . . . . . . . . . . . . . .
Cylinder Head and Valve Train Components 17. . . . . . . . . . . . . . . . . . . . . . . . . . . . . . . . . .
Cylinder Block Assembly 19. . . . . . . . . . . . . . . . . . . . . . . . . . . . . . . . . . . . . . . . . . . . . . . . . . .
Troubleshooting 20. . . . . . . . . . . . . . . . . . . . . . . . . . . . . . . . . . . . . . . . . . . . . . . . . . . . . . . . . . . . . .
Overhaul 26. . . . . . . . . . . . . . . . . . . . . . . . . . . . . . . . . . . . . . . . . . . . . . . . . . . . . . . . . . . . . . . . . . . .
Engine Access 26. . . . . . . . . . . . . . . . . . . . . . . . . . . . . . . . . . . . . . . . . . . . . . . . . . . . . . . . . . .
Disassembly 26. . . . . . . . . . . . . . . . . . . . . . . . . . . . . . . . . . . . . . . . . . . . . . . . . . . . . . . . . .
Fuel Injector and Glow Plug 29. . . . . . . . . . . . . . . . . . . . . . . . . . . . . . . . . . . . . . . . . . . . . . . .
Removal 29. . . . . . . . . . . . . . . . . . . . . . . . . . . . . . . . . . . . . . . . . . . . . . . . . . . . . . . . . . . . .
Hydraulic Pump 30. . . . . . . . . . . . . . . . . . . . . . . . . . . . . . . . . . . . . . . . . . . . . . . . . . . . . . . . . .
Removal 30. . . . . . . . . . . . . . . . . . . . . . . . . . . . . . . . . . . . . . . . . . . . . . . . . . . . . . . . . . . . .
Fan, Water Pump and External Oil Tube 30. . . . . . . . . . . . . . . . . . . . . . . . . . . . . . . . . . . . .
Removal 30. . . . . . . . . . . . . . . . . . . . . . . . . . . . . . . . . . . . . . . . . . . . . . . . . . . . . . . . . . . . .
Fuel Shutoff Solenoid 30. . . . . . . . . . . . . . . . . . . . . . . . . . . . . . . . . . . . . . . . . . . . . . . . . . . . . .
Removal 30. . . . . . . . . . . . . . . . . . . . . . . . . . . . . . . . . . . . . . . . . . . . . . . . . . . . . . . . . . . . .
Oil Pressure Switch 31. . . . . . . . . . . . . . . . . . . . . . . . . . . . . . . . . . . . . . . . . . . . . . . . . . . . . . .
Removal 31. . . . . . . . . . . . . . . . . . . . . . . . . . . . . . . . . . . . . . . . . . . . . . . . . . . . . . . . . . . . .
Temperature Sending Switch and Alternator 31. . . . . . . . . . . . . . . . . . . . . . . . . . . . . . . . . .
Removal 31. . . . . . . . . . . . . . . . . . . . . . . . . . . . . . . . . . . . . . . . . . . . . . . . . . . . . . . . . . . . .
Throttle Cable 31. . . . . . . . . . . . . . . . . . . . . . . . . . . . . . . . . . . . . . . . . . . . . . . . . . . . . . . . . . . .
Disconnection 31. . . . . . . . . . . . . . . . . . . . . . . . . . . . . . . . . . . . . . . . . . . . . . . . . . . . . . . . .
Support Frame 32. . . . . . . . . . . . . . . . . . . . . . . . . . . . . . . . . . . . . . . . . . . . . . . . . . . . . . . . . . .
Removal 32. . . . . . . . . . . . . . . . . . . . . . . . . . . . . . . . . . . . . . . . . . . . . . . . . . . . . . . . . . . . .
Engine 32. . . . . . . . . . . . . . . . . . . . . . . . . . . . . . . . . . . . . . . . . . . . . . . . . . . . . . . . . . . . . . . . . .
Removal 32. . . . . . . . . . . . . . . . . . . . . . . . . . . . . . . . . . . . . . . . . . . . . . . . . . . . . . . . . . . . .
Valve Cover 33. . . . . . . . . . . . . . . . . . . . . . . . . . . . . . . . . . . . . . . . . . . . . . . . . . . . . . . . . . . . . .
Removal 33. . . . . . . . . . . . . . . . . . . . . . . . . . . . . . . . . . . . . . . . . . . . . . . . . . . . . . . . . . . . .
SECTION 10 -- ENGINE SYSTEMS -- CHAPTER 1
10-2
Section Description Page
Rocker Shaft and Push Rod 34. . . . . . . . . . . . . . . . . . . . . . . . . . . . . . . . . . . . . . . . . . . . . . . .
Removal 34. . . . . . . . . . . . . . . . . . . . . . . . . . . . . . . . . . . . . . . . . . . . . . . . . . . . . . . . . . . . .
Cylinder Head 34. . . . . . . . . . . . . . . . . . . . . . . . . . . . . . . . . . . . . . . . . . . . . . . . . . . . . . . . . . . .
Removal 34. . . . . . . . . . . . . . . . . . . . . . . . . . . . . . . . . . . . . . . . . . . . . . . . . . . . . . . . . . . . .
Valve Tappet 35. . . . . . . . . . . . . . . . . . . . . . . . . . . . . . . . . . . . . . . . . . . . . . . . . . . . . . . . . . . . .
Removal 35. . . . . . . . . . . . . . . . . . . . . . . . . . . . . . . . . . . . . . . . . . . . . . . . . . . . . . . . . . . . .
Engine Timing Gear Cover, Timing Gears and Camshaft 35. . . . . . . . . . . . . . . . . . . . . . .
Timing Gears and Camshaft 36. . . . . . . . . . . . . . . . . . . . . . . . . . . . . . . . . . . . . . . . . . . . . . . .
Removal 36. . . . . . . . . . . . . . . . . . . . . . . . . . . . . . . . . . . . . . . . . . . . . . . . . . . . . . . . . . . . .
Oil Sump 36. . . . . . . . . . . . . . . . . . . . . . . . . . . . . . . . . . . . . . . . . . . . . . . . . . . . . . . . . . . . . . . .
Removal 36. . . . . . . . . . . . . . . . . . . . . . . . . . . . . . . . . . . . . . . . . . . . . . . . . . . . . . . . . . . . .
Oil Suction Pipe and Strainer 37. . . . . . . . . . . . . . . . . . . . . . . . . . . . . . . . . . . . . . . . . . . . . . .
Removal 37. . . . . . . . . . . . . . . . . . . . . . . . . . . . . . . . . . . . . . . . . . . . . . . . . . . . . . . . . . . . .
Connecting Rods, Bearings and Piston 37. . . . . . . . . . . . . . . . . . . . . . . . . . . . . . . . . . . . . .
Removal 37. . . . . . . . . . . . . . . . . . . . . . . . . . . . . . . . . . . . . . . . . . . . . . . . . . . . . . . . . . . . .
Flywheel 38. . . . . . . . . . . . . . . . . . . . . . . . . . . . . . . . . . . . . . . . . . . . . . . . . . . . . . . . . . . . . . . . .
Removal 38. . . . . . . . . . . . . . . . . . . . . . . . . . . . . . . . . . . . . . . . . . . . . . . . . . . . . . . . . . . . .
Backplate and Oil Seal 38. . . . . . . . . . . . . . . . . . . . . . . . . . . . . . . . . . . . . . . . . . . . . . . . . . . .
Removal 38. . . . . . . . . . . . . . . . . . . . . . . . . . . . . . . . . . . . . . . . . . . . . . . . . . . . . . . . . . . . .
Crankshaft and Main Bearings 38. . . . . . . . . . . . . . . . . . . . . . . . . . . . . . . . . . . . . . . . . . . . . .
Removal 38. . . . . . . . . . . . . . . . . . . . . . . . . . . . . . . . . . . . . . . . . . . . . . . . . . . . . . . . . . . . .
Cylinder Head 39. . . . . . . . . . . . . . . . . . . . . . . . . . . . . . . . . . . . . . . . . . . . . . . . . . . . . . . . . . . .
Disassembly 39. . . . . . . . . . . . . . . . . . . . . . . . . . . . . . . . . . . . . . . . . . . . . . . . . . . . . . . . . .
Inspection and Repair 39. . . . . . . . . . . . . . . . . . . . . . . . . . . . . . . . . . . . . . . . . . . . . . . . . .
Valve Seats 40. . . . . . . . . . . . . . . . . . . . . . . . . . . . . . . . . . . . . . . . . . . . . . . . . . . . . . . . . . . . . .
Inspection and Repair 40. . . . . . . . . . . . . . . . . . . . . . . . . . . . . . . . . . . . . . . . . . . . . . . . . .
Valves 40. . . . . . . . . . . . . . . . . . . . . . . . . . . . . . . . . . . . . . . . . . . . . . . . . . . . . . . . . . . . . . . . . . .
Inspection and Repair 40. . . . . . . . . . . . . . . . . . . . . . . . . . . . . . . . . . . . . . . . . . . . . . . . . .
Valve Guides 42. . . . . . . . . . . . . . . . . . . . . . . . . . . . . . . . . . . . . . . . . . . . . . . . . . . . . . . . . . . . .
Inspection and Repair 42. . . . . . . . . . . . . . . . . . . . . . . . . . . . . . . . . . . . . . . . . . . . . . . . . .
Valve Springs 42. . . . . . . . . . . . . . . . . . . . . . . . . . . . . . . . . . . . . . . . . . . . . . . . . . . . . . . . . . . .
Inspection and Repair 42. . . . . . . . . . . . . . . . . . . . . . . . . . . . . . . . . . . . . . . . . . . . . . . . . .
Rocker Arms 43. . . . . . . . . . . . . . . . . . . . . . . . . . . . . . . . . . . . . . . . . . . . . . . . . . . . . . . . . . . . .
Inspection and Replacement 43. . . . . . . . . . . . . . . . . . . . . . . . . . . . . . . . . . . . . . . . . . . .
Push Rods 43. . . . . . . . . . . . . . . . . . . . . . . . . . . . . . . . . . . . . . . . . . . . . . . . . . . . . . . . . . . . . . .
Inspection and Replacement 43. . . . . . . . . . . . . . . . . . . . . . . . . . . . . . . . . . . . . . . . . . . .
Cylinder Head 44. . . . . . . . . . . . . . . . . . . . . . . . . . . . . . . . . . . . . . . . . . . . . . . . . . . . . . . . . . . .
Assembly 44. . . . . . . . . . . . . . . . . . . . . . . . . . . . . . . . . . . . . . . . . . . . . . . . . . . . . . . . . . . .
SECTION 10 -- ENGINE SYSTEMS -- CHAPTER 1
10-3
Section Description Page
Cylinder Block 44. . . . . . . . . . . . . . . . . . . . . . . . . . . . . . . . . . . . . . . . . . . . . . . . . . . . . . . . . . . .
Inspection and Repair 44. . . . . . . . . . . . . . . . . . . . . . . . . . . . . . . . . . . . . . . . . . . . . . . . . .
Pistons 45. . . . . . . . . . . . . . . . . . . . . . . . . . . . . . . . . . . . . . . . . . . . . . . . . . . . . . . . . . . . . . . . . .
Disassembly and Inspection 45. . . . . . . . . . . . . . . . . . . . . . . . . . . . . . . . . . . . . . . . . . . .
Piston Rings 47. . . . . . . . . . . . . . . . . . . . . . . . . . . . . . . . . . . . . . . . . . . . . . . . . . . . . . . . . . . . .
Inspection and Replacement 47. . . . . . . . . . . . . . . . . . . . . . . . . . . . . . . . . . . . . . . . . . . .
Connecting Rods 48. . . . . . . . . . . . . . . . . . . . . . . . . . . . . . . . . . . . . . . . . . . . . . . . . . . . . . . . .
Inspection and Repair 48. . . . . . . . . . . . . . . . . . . . . . . . . . . . . . . . . . . . . . . . . . . . . . . . . .
Connecting Rod Bearing Oil Clearance Check 50. . . . . . . . . . . . . . . . . . . . . . . . . . . . . . . .
Pistons, Rings and Connecting Rod 50. . . . . . . . . . . . . . . . . . . . . . . . . . . . . . . . . . . . . . . . .
Assembly 50. . . . . . . . . . . . . . . . . . . . . . . . . . . . . . . . . . . . . . . . . . . . . . . . . . . . . . . . . . . .
Main Bearing and Thrust Bearing 51. . . . . . . . . . . . . . . . . . . . . . . . . . . . . . . . . . . . . . . . . . .
Removal and Inspection 51. . . . . . . . . . . . . . . . . . . . . . . . . . . . . . . . . . . . . . . . . . . . . . . .
Crankshaft 52. . . . . . . . . . . . . . . . . . . . . . . . . . . . . . . . . . . . . . . . . . . . . . . . . . . . . . . . . . . . . . .
Inspection 52. . . . . . . . . . . . . . . . . . . . . . . . . . . . . . . . . . . . . . . . . . . . . . . . . . . . . . . . . . . .
Crankshaft Journal Wear Limit and Bearing Usage 52. . . . . . . . . . . . . . . . . . . . . . . . . . . . . . . .
Crankshaft Front Main Bearing (Bushing) 53. . . . . . . . . . . . . . . . . . . . . . . . . . . . . . . . . . . .
Inspection 53. . . . . . . . . . . . . . . . . . . . . . . . . . . . . . . . . . . . . . . . . . . . . . . . . . . . . . . . . . . .
Replacement 53. . . . . . . . . . . . . . . . . . . . . . . . . . . . . . . . . . . . . . . . . . . . . . . . . . . . . . . . .
Crankshaft Main Bearing 54. . . . . . . . . . . . . . . . . . . . . . . . . . . . . . . . . . . . . . . . . . . . . . . . . . .
Assembly 54. . . . . . . . . . . . . . . . . . . . . . . . . . . . . . . . . . . . . . . . . . . . . . . . . . . . . . . . . . . .
Port Block 54. . . . . . . . . . . . . . . . . . . . . . . . . . . . . . . . . . . . . . . . . . . . . . . . . . . . . . . . . . . . . . .
Removal 54. . . . . . . . . . . . . . . . . . . . . . . . . . . . . . . . . . . . . . . . . . . . . . . . . . . . . . . . . . . . .
Installation 55. . . . . . . . . . . . . . . . . . . . . . . . . . . . . . . . . . . . . . . . . . . . . . . . . . . . . . . . . . . .
Timing Gear 55. . . . . . . . . . . . . . . . . . . . . . . . . . . . . . . . . . . . . . . . . . . . . . . . . . . . . . . . . . . . . .
Inspection 55. . . . . . . . . . . . . . . . . . . . . . . . . . . . . . . . . . . . . . . . . . . . . . . . . . . . . . . . . . . .
Camshaft 55. . . . . . . . . . . . . . . . . . . . . . . . . . . . . . . . . . . . . . . . . . . . . . . . . . . . . . . . . . . . . . . .
Disassembly 55. . . . . . . . . . . . . . . . . . . . . . . . . . . . . . . . . . . . . . . . . . . . . . . . . . . . . . . . . .
Inspection 56. . . . . . . . . . . . . . . . . . . . . . . . . . . . . . . . . . . . . . . . . . . . . . . . . . . . . . . . . . . .
Assembly 56. . . . . . . . . . . . . . . . . . . . . . . . . . . . . . . . . . . . . . . . . . . . . . . . . . . . . . . . . . . .
Flywheel 57. . . . . . . . . . . . . . . . . . . . . . . . . . . . . . . . . . . . . . . . . . . . . . . . . . . . . . . . . . . . . . . . .
Inspection 57. . . . . . . . . . . . . . . . . . . . . . . . . . . . . . . . . . . . . . . . . . . . . . . . . . . . . . . . . . . .
Timing Gear Housing 57. . . . . . . . . . . . . . . . . . . . . . . . . . . . . . . . . . . . . . . . . . . . . . . . . . . . . .
Front Oil Seal and Steering Pump Seal 57. . . . . . . . . . . . . . . . . . . . . . . . . . . . . . . . . . . . . .
Replacement 57. . . . . . . . . . . . . . . . . . . . . . . . . . . . . . . . . . . . . . . . . . . . . . . . . . . . . . . . .
Crankshaft and Bearing Holder 58. . . . . . . . . . . . . . . . . . . . . . . . . . . . . . . . . . . . . . . . . . . . .
Assembly 58. . . . . . . . . . . . . . . . . . . . . . . . . . . . . . . . . . . . . . . . . . . . . . . . . . . . . . . . . . . .
SECTION 10 -- ENGINE SYSTEMS -- CHAPTER 1
10-4
Section Description Page
Rear Oil Seal and Backplate 58. . . . . . . . . . . . . . . . . . . . . . . . . . . . . . . . . . . . . . . . . . . . . . . .
Assembly 58. . . . . . . . . . . . . . . . . . . . . . . . . . . . . . . . . . . . . . . . . . . . . . . . . . . . . . . . . . . .
Flywheel 59. . . . . . . . . . . . . . . . . . . . . . . . . . . . . . . . . . . . . . . . . . . . . . . . . . . . . . . . . . . . . . . . .
Installation 59. . . . . . . . . . . . . . . . . . . . . . . . . . . . . . . . . . . . . . . . . . . . . . . . . . . . . . . . . . . .
Piston and Connecting Rod 59. . . . . . . . . . . . . . . . . . . . . . . . . . . . . . . . . . . . . . . . . . . . . . . .
Installation 59. . . . . . . . . . . . . . . . . . . . . . . . . . . . . . . . . . . . . . . . . . . . . . . . . . . . . . . . . . . .
Oil Suction Pipe and Suction Strainer 60. . . . . . . . . . . . . . . . . . . . . . . . . . . . . . . . . . . . . . . .
Installation 60. . . . . . . . . . . . . . . . . . . . . . . . . . . . . . . . . . . . . . . . . . . . . . . . . . . . . . . . . . . .
Oil Sump 60. . . . . . . . . . . . . . . . . . . . . . . . . . . . . . . . . . . . . . . . . . . . . . . . . . . . . . . . . . . . . . . .
Installation 60. . . . . . . . . . . . . . . . . . . . . . . . . . . . . . . . . . . . . . . . . . . . . . . . . . . . . . . . . . . .
Timing Gear Cover, Timing Gears and Camshaft 60. . . . . . . . . . . . . . . . . . . . . . . . . . . . . .
Assembly 60. . . . . . . . . . . . . . . . . . . . . . . . . . . . . . . . . . . . . . . . . . . . . . . . . . . . . . . . . . . .
Head Gasket Selection 62. . . . . . . . . . . . . . . . . . . . . . . . . . . . . . . . . . . . . . . . . . . . . . . . . . . .
Cylinder Head 63. . . . . . . . . . . . . . . . . . . . . . . . . . . . . . . . . . . . . . . . . . . . . . . . . . . . . . . . . . . .
Assembly 63. . . . . . . . . . . . . . . . . . . . . . . . . . . . . . . . . . . . . . . . . . . . . . . . . . . . . . . . . . . .
Valve Clearance Adjustment 64. . . . . . . . . . . . . . . . . . . . . . . . . . . . . . . . . . . . . . . . . . . . . . . .
Valve Cover 64. . . . . . . . . . . . . . . . . . . . . . . . . . . . . . . . . . . . . . . . . . . . . . . . . . . . . . . . . . . . . .
Installation 64. . . . . . . . . . . . . . . . . . . . . . . . . . . . . . . . . . . . . . . . . . . . . . . . . . . . . . . . . . . .
Engine 65. . . . . . . . . . . . . . . . . . . . . . . . . . . . . . . . . . . . . . . . . . . . . . . . . . . . . . . . . . . . . . . . . .
Installation 65. . . . . . . . . . . . . . . . . . . . . . . . . . . . . . . . . . . . . . . . . . . . . . . . . . . . . . . . . . . .
Drive Train 66. . . . . . . . . . . . . . . . . . . . . . . . . . . . . . . . . . . . . . . . . . . . . . . . . . . . . . . . . . . . . . .
Installation 66. . . . . . . . . . . . . . . . . . . . . . . . . . . . . . . . . . . . . . . . . . . . . . . . . . . . . . . . . . . .
Support Frame 66. . . . . . . . . . . . . . . . . . . . . . . . . . . . . . . . . . . . . . . . . . . . . . . . . . . . . . . . . . .
Installation 66. . . . . . . . . . . . . . . . . . . . . . . . . . . . . . . . . . . . . . . . . . . . . . . . . . . . . . . . . . . .
Tachometer and Throttle Cables 66. . . . . . . . . . . . . . . . . . . . . . . . . . . . . . . . . . . . . . . . . . . .
Installation 66. . . . . . . . . . . . . . . . . . . . . . . . . . . . . . . . . . . . . . . . . . . . . . . . . . . . . . . . . . . .
Alternator and Temperature Sending Switch 67. . . . . . . . . . . . . . . . . . . . . . . . . . . . . . . . . .
Installation 67. . . . . . . . . . . . . . . . . . . . . . . . . . . . . . . . . . . . . . . . . . . . . . . . . . . . . . . . . . . .
Oil Pressure Switch 67. . . . . . . . . . . . . . . . . . . . . . . . . . . . . . . . . . . . . . . . . . . . . . . . . . . . . . .
Installation 67. . . . . . . . . . . . . . . . . . . . . . . . . . . . . . . . . . . . . . . . . . . . . . . . . . . . . . . . . . . .
Fuel Shutoff Solenoid 67. . . . . . . . . . . . . . . . . . . . . . . . . . . . . . . . . . . . . . . . . . . . . . . . . . . . . .
Installation 67. . . . . . . . . . . . . . . . . . . . . . . . . . . . . . . . . . . . . . . . . . . . . . . . . . . . . . . . . . . .
Fan, Water Pump and External Oil Tube 68. . . . . . . . . . . . . . . . . . . . . . . . . . . . . . . . . . . . .
Installation 68. . . . . . . . . . . . . . . . . . . . . . . . . . . . . . . . . . . . . . . . . . . . . . . . . . . . . . . . . . . .
Hydraulic Pump 68. . . . . . . . . . . . . . . . . . . . . . . . . . . . . . . . . . . . . . . . . . . . . . . . . . . . . . . . . .
Installation 68. . . . . . . . . . . . . . . . . . . . . . . . . . . . . . . . . . . . . . . . . . . . . . . . . . . . . . . . . . . .
Glow Plug and Connector 68. . . . . . . . . . . . . . . . . . . . . . . . . . . . . . . . . . . . . . . . . . . . . . . . . .
Installation 68. . . . . . . . . . . . . . . . . . . . . . . . . . . . . . . . . . . . . . . . . . . . . . . . . . . . . . . . . . . .
SECTION 10 -- ENGINE SYSTEMS -- CHAPTER 1
10-5
Section Description Page
Fuel Injection Pump 69. . . . . . . . . . . . . . . . . . . . . . . . . . . . . . . . . . . . . . . . . . . . . . . . . . . . . . .
Installation 69. . . . . . . . . . . . . . . . . . . . . . . . . . . . . . . . . . . . . . . . . . . . . . . . . . . . . . . . . . . .
Fuel Injector 70. . . . . . . . . . . . . . . . . . . . . . . . . . . . . . . . . . . . . . . . . . . . . . . . . . . . . . . . . . . . .
Installation 70. . . . . . . . . . . . . . . . . . . . . . . . . . . . . . . . . . . . . . . . . . . . . . . . . . . . . . . . . . . .
Fuel Line 70. . . . . . . . . . . . . . . . . . . . . . . . . . . . . . . . . . . . . . . . . . . . . . . . . . . . . . . . . . . . . . . .
Installation 70. . . . . . . . . . . . . . . . . . . . . . . . . . . . . . . . . . . . . . . . . . . . . . . . . . . . . . . . . . . .
Exhaust Manifold, Air Cleaner and Radiator 71. . . . . . . . . . . . . . . . . . . . . . . . . . . . . . . . . .
Installation 71. . . . . . . . . . . . . . . . . . . . . . . . . . . . . . . . . . . . . . . . . . . . . . . . . . . . . . . . . . . .
Engine Lubrication System -- Description of Operation 74. . . . . . . . . . . . . . . . . . . . . . . . . . . . .
Engine Oil Filter 77. . . . . . . . . . . . . . . . . . . . . . . . . . . . . . . . . . . . . . . . . . . . . . . . . . . . . . . . . .
Construction and Function 77. . . . . . . . . . . . . . . . . . . . . . . . . . . . . . . . . . . . . . . . . . . . . .
Maintenance 77. . . . . . . . . . . . . . . . . . . . . . . . . . . . . . . . . . . . . . . . . . . . . . . . . . . . . . . . . .
Oil Pump 77. . . . . . . . . . . . . . . . . . . . . . . . . . . . . . . . . . . . . . . . . . . . . . . . . . . . . . . . . . . . . . . .
Removal 77. . . . . . . . . . . . . . . . . . . . . . . . . . . . . . . . . . . . . . . . . . . . . . . . . . . . . . . . . . . . .
Inspection 77. . . . . . . . . . . . . . . . . . . . . . . . . . . . . . . . . . . . . . . . . . . . . . . . . . . . . . . . . . . .
Installation and Adjustment 78. . . . . . . . . . . . . . . . . . . . . . . . . . . . . . . . . . . . . . . . . . . . .
Engine Oil Pressure Check 79. . . . . . . . . . . . . . . . . . . . . . . . . . . . . . . . . . . . . . . . . . . . . . . . .
Oil Pressure Relief Valve 79. . . . . . . . . . . . . . . . . . . . . . . . . . . . . . . . . . . . . . . . . . . . . . . . . . .
Removal 79. . . . . . . . . . . . . . . . . . . . . . . . . . . . . . . . . . . . . . . . . . . . . . . . . . . . . . . . . . . . .
Installation 79. . . . . . . . . . . . . . . . . . . . . . . . . . . . . . . . . . . . . . . . . . . . . . . . . . . . . . . . . . . .
Oil Consumption 80. . . . . . . . . . . . . . . . . . . . . . . . . . . . . . . . . . . . . . . . . . . . . . . . . . . . . . . . .
Cooling System -- Description of Operation 81. . . . . . . . . . . . . . . . . . . . . . . . . . . . . . . . . . . . . .
Maintenance 83. . . . . . . . . . . . . . . . . . . . . . . . . . . . . . . . . . . . . . . . . . . . . . . . . . . . . . . . . . . . .
Coolant 83. . . . . . . . . . . . . . . . . . . . . . . . . . . . . . . . . . . . . . . . . . . . . . . . . . . . . . . . . . . . . . . . . .
Thermostat 83. . . . . . . . . . . . . . . . . . . . . . . . . . . . . . . . . . . . . . . . . . . . . . . . . . . . . . . . . . . . . .
Water Pump 83. . . . . . . . . . . . . . . . . . . . . . . . . . . . . . . . . . . . . . . . . . . . . . . . . . . . . . . . . . . . .
Cooling Fan 83. . . . . . . . . . . . . . . . . . . . . . . . . . . . . . . . . . . . . . . . . . . . . . . . . . . . . . . . . . . . . .
Radiator 83. . . . . . . . . . . . . . . . . . . . . . . . . . . . . . . . . . . . . . . . . . . . . . . . . . . . . . . . . . . . . . . . .
Radiator Cap 83. . . . . . . . . . . . . . . . . . . . . . . . . . . . . . . . . . . . . . . . . . . . . . . . . . . . . . . . . . . . .
Cooling System Overhaul 84. . . . . . . . . . . . . . . . . . . . . . . . . . . . . . . . . . . . . . . . . . . . . . . . . . . . .
Radiator 84. . . . . . . . . . . . . . . . . . . . . . . . . . . . . . . . . . . . . . . . . . . . . . . . . . . . . . . . . . . . . . . . .
Removal 84. . . . . . . . . . . . . . . . . . . . . . . . . . . . . . . . . . . . . . . . . . . . . . . . . . . . . . . . . . . . .
Inspection and Repair 85. . . . . . . . . . . . . . . . . . . . . . . . . . . . . . . . . . . . . . . . . . . . . . . . . .
Installation 86. . . . . . . . . . . . . . . . . . . . . . . . . . . . . . . . . . . . . . . . . . . . . . . . . . . . . . . . . . . .
Water Pump and Thermostat 87. . . . . . . . . . . . . . . . . . . . . . . . . . . . . . . . . . . . . . . . . . . . . . .
Removal 87. . . . . . . . . . . . . . . . . . . . . . . . . . . . . . . . . . . . . . . . . . . . . . . . . . . . . . . . . . . . .
Inspection and Repair 89. . . . . . . . . . . . . . . . . . . . . . . . . . . . . . . . . . . . . . . . . . . . . . . . . .
Installation 90. . . . . . . . . . . . . . . . . . . . . . . . . . . . . . . . . . . . . . . . . . . . . . . . . . . . . . . . . . . .
Testing 93. . . . . . . . . . . . . . . . . . . . . . . . . . . . . . . . . . . . . . . . . . . . . . . . . . . . . . . . . . . . . . . . . . . . .
Compression Test and Tools 93. . . . . . . . . . . . . . . . . . . . . . . . . . . . . . . . . . . . . . . . . . . . . . . .
SECTION 10 -- ENGINE SYSTEMS -- CHAPTER 1
10-6
SPECIFICATIONS
GENERAL
Tractor Model T1010 T1030 T1110
PTO H.P. 20.0 26.0 28.0
Engine Model S753 S773L S773L
Number of Cylinders 3 3 3
Bore x Stroke 75 x 72 mm
(2.96 x 2.83 in.)
77 x 81 mm
(3.03 x 3.19 in.)
77 x 81 mm
(3.03 x 3.19 in.)
Displacement 0.95 L, 954 cc
(58.2 cu. in.)
1.13 L, 1131 cc
(69.0 cu. in.)
1.13 L, 1131 cc
(69.0 cu. in.)
Compression Ratio 23.5:1 22.8:1 22.8:1
Rated Speed (rpm) 3000 3000 3000
Muffler In the hood In the hood In the hood
Firing Order 1 -- 2 -- 3 1 -- 2 -- 3 1 -- 2 -- 3
Low Idle Speed (rpm) 1350 ± 50 1350 ± 50 1350 ± 50
High Idle Speed (rpm) 3250 ± 25 3350 ± 25 3350 ± 25
Cylinder Arrangement In-line Vertical In-line Vertical In-line Vertical
Valve Arrangement Overhead Overhead Overhead
Compression Pressure
@ 200 rpm (cylinder speed)
Variation between cylinders
427 ± 70 psi
70 psi
427 ± 70 psi
70 psi
427 ± 70 psi
70 psi
CYLINDER HEAD
Tractor Model T1010 T1030 T1110
Head Warp
Standard
Maximum
0.05 mm (0.002 in.)
0.12 mm (0.005 in.)
0.05 mm (0.002 in.)
0.12 mm (0.005 in.)
0.05 mm (0.002 in.)
0.12 mm (0.005 in.)
Valve Seat Width
Standard
Maximum
1.7 -- 2.1 mm
(0.067 -- 0.082 in.)
2.5 mm (0.098 in.)
1.7 -- 2.1 mm
(0.067 -- 0.082 in.)
2.5 mm (0.098 in.)
1.7 -- 2.1 mm
(0.067 -- 0.082 in.)
2.5 mm (0.098 in.)
Valve Seat Sink
Standard
Maximum
0.85 -- 1.15 mm
(0.0334 -- 0.0453 in.)
1.8 mm (0.0708 in.)
0.85 -- 1.15 mm
(0.0334 -- 0.0453 in.)
1.8 mm (0.0708 in.)
0.85 -- 1.15 mm
(0.0334 -- 0.0453 in.)
1.8 mm (0.0708 in.)
Valve Angle 45_ 45_ 45_
Piston to Valve
Clearance
1.0 mm (0.039 in.) @
Piston TDC
(Minimum 0.8 mm
[0.031 in.])
1.0 mm (0.039 in.) @
Piston TDC
(Minimum 0.8 mm
[0.031 in.])
1.0 mm (0.039 in.) @
Piston TDC
(Minimum 0.8 mm
[0.031 in.])
SECTION 10 -- ENGINE SYSTEMS -- CHAPTER 1
10-7
CYLINDER BLOCK
Tractor Model T1010 T1030 T1110
Bore
Standard
Maximum
75.0 -- 75.019 mm
(2.952 -- 2.953 in.)
75.2 mm (2.960 in.)
77.0 -- 77.019 mm
(3.031 -- 3.032 in.)
77.2 mm (3.039 in.)
77.0 -- 77.019 mm
(3.031 -- 3.032 in.)
77.2 mm (3.039 in.)
Head Surface Warp
Standard
Maximum
0.05 mm (0.002 in.)
0.12 mm (0.005 in.)
0.05 mm (0.002 in.)
0.12 mm (0.005 in.)
0.05 mm (0.002 in.)
0.12 mm (0.005 in.)
*T1010 -- If bore size exceeds 75.2 mm (2.96 in.) replace the block.
*T1030 -- If bore size exceeds 77.2 mm (3.039 in.) replace the block.
*T1110 -- If bore size exceeds 77.2 mm (3.039 in.) replace the block.
PISTON
Tractor Model T1010 T1030 T1110
Diameter
Standard
Minimum
74.9325 -- 74.9475 mm
(2.95 -- 2.9506 in.)
74.7 (2.941 in.)
76.9325 -- 76.9475 mm
(3.029 -- 3.0294 in.)
76.7 (3.0197 in.)
76.9325 -- 76.9475 mm
(3.029 -- 3.0294 in.)
76.7 (3.0197 in.)
Bore Clearance
Standard
Maximum
0.0525 -- 0.0865 mm
(0.0021 -- 0.0034 in.)
0.25 mm
(0.010 in.)
0.0525 -- 0.0865 mm
(0.0021 -- 0.0034 in.)
0.25 mm
(0.010 in.)
0.0525 -- 0.0865 mm
(0.0021 -- 0.0034 in.)
0.25 mm
(0.010 in.)
Wrist Pin Bore
Standard
Maximum
20.998 -- 21.004 mm
(0.8267 -- 0.8269 in.)
21.016 mm
(0.827 in.)
20.998 -- 21.004 mm
(0.8267 -- 0.8269 in.)
21.016 mm
(0.827 in.)
20.998 -- 21.004 mm
(0.8267 -- 0.8269 in.)
21.016 mm
(0.827 in.)
Wrist Pin Diameter
Standard
Minimum
20.998 -- 21.002 mm
(0.8267 -- 0.8268 in.)
20.98 mm
(0.826 in.)
20.998 -- 21.002 mm
(0.8267 -- 0.8268 in.)
20.98 mm
(0.826 in.)
20.998 -- 21.002 mm
(0.8267 -- 0.8268 in.)
20.98 mm
(0.826 in.)
Wrist Pin Clearance
Standard
Maximum
--0.004 -- 0.006 mm
(--0.00016 -- 0.00024 in.)
0.02 mm
(0.00078 in.)
--0.004 -- 0.006 mm
(--0.00016 -- 0.00024 in.)
0.02 mm
(0.00078 in.)
--0.004 -- 0.006 mm
(--0.00016 -- 0.00024 in.)
0.02 mm
(0.00078 in.)
Available Oversizes Not Available Not Available Not Available
SECTION 10 -- ENGINE SYSTEMS -- CHAPTER 1
10-17
GENERAL INFORMATION -- DESCRIPTION OF OPERATION
This section describes the engine overhaul and
repair procedures of the T1010, T1030, and T1110
series tractors. Repair procedures are essentially the
same for all models except as noted in the repair
procedures.
The tractors are equipped with three-cylinder in-line
engines. They are all four cycle, overhead valve,
liquid cooled engines. The engines are identified by
a code, 1, cast into the lower right side of the cylinder
block, just behind the hydraulic pump. The
identification numbers of the engines used are
shown in the following chart.
NOTE: Numeric value, 2, under the Engine Code
indicates displacement of the engine in liters.
IDENTIFICATION CHART
Engine
Identification
Tractor
Model Horsepower
S753 T1010 20.0
S773L T1030 26.0
S773L T1110 28.0
S753
954 cc
1
2
1
CYLINDER HEAD AND VALVE TRAIN
COMPONENTS
The cylinder head incorporates the valve assem-
blies, rocker arms, rocker shaft, push rods, lifters,
and pre-combustion chambers. The air intake
manifold is incorporated into the top left hand side of
the valve cover assembly. The exhaust manifold is
bolted on the left-hand side of the cylinder head. The
cylinder heads have integral valve guides. Standard
size valves only are used. Figure 3 provides a
cut-away front and side view of an engine.
A pre-combustion chamber is located between the
injector assembly and the combustion chamber of
the cylinder and provides an area for initial ignition of
the fuel for improved starting. A glow plug located in
the head extends into the pre-combustion chamber
and, when energized, pre-heats the fuel-air mixture
for improved fuel ignition under cold weather
conditions.
SECTION 10 -- ENGINE SYSTEMS -- CHAPTER 1
10-18
20043818
2
A breather valve is located on the valve cover. The
valve opens when the crank housing pressure rises
and the gas runs away to the intake manifold. The
gas flows into the cylinder and is exhausted as
exhaust fumes.
SECTION 10 -- ENGINE SYSTEMS -- CHAPTER 1
10-19
76076931
3
CYLINDER BLOCK ASSEMBLY
The cylinder block assembly contains the pistons,
connecting rods, crankshaft, timing gears, and
engine oil pump. The engine crankshaft is supported
by four main bearings. The front main bearing is a full
circle bearing positioned in a bore in the front of the
block. The second, third, and fourth main bearings
are split liners located in holders bolted to the block.
The camshaft is supported by two ball bearings one
located on each end of the block. The engines utilize
a straight connecting rod and a three ring piston.
SECTION 10 -- ENGINE SYSTEMS -- CHAPTER 1
10-26
OVERHAUL
ENGINE ACCESS
Disassembly
1. Remove the engine compartment side panels.
2. Open the radiator drain, 1, and drain the coolant
from the radiator.
NOTE: The cooling system capacity is 3.5 L (3.69 qt.).
3. Remove the radiator assembly. See “Radiator
Removal”, discussed later in this section.
76076932
1
4
4. Disconnect the electrical connector, 1, joining the
headlamp wiring harness to the main harness.
76076933
1
5
5. Remove the four hex nuts, 1, securing the hood
hinge bracket, 2, to the firewall support, and
carefully remove the hood with the hinge bracket
attached.
76076934
2
1
1
6
Thank you very much for
your reading. Please Click
Here. Then Get COMPLETE
MANUAL. NO WAITING
NOTE:
If there is no response to
click on the link above,
please download the PDF
document first and then
click on it.
SECTION 10 -- ENGINE SYSTEMS -- CHAPTER 1
10-27
6. Remove the complete air cleaner assembly, 1,
along with the air hoses.
10034397
1
7
7. Remove the two bolts, 1, securing the air cleaner
mounting bracket, 2, to the engine. Remove the
bracket.
8. Remove the two hex-head bolts securing the
upper panel to the rear of the transverse support
crossmember.
9. Disconnect the two relays mounted on the upper
panel from the electrical harness. (The electrical
connectors are located on the bottom of the
relays.) Remove the upper panel.
10. Remove the steering wheel hub cover, and the
locking nut and lockwasher beneath the cover.
Slide the steering wheel off of the steering
column.
11. Remove the control knob from the hand throttle
lever.
10040632
2
1
8
12. Remove the four bolts securing the forward
cowling to the cowling support frame. Slide the
cowling upward to gain access to the wiring
behind the instrument panel.
13. Disconnect the tachometer cable, 1, behind the
instrument panel. Loosen the knurled locking
ring and pull the cable straight out of the receiver.
14. Separate the electrical connectors, 2, found in
the wiring harness on each side of the steering
column. Detach the two round electrical
connectors from the rear of the instrument panel.
15. Disconnect the harness electrical connector on
the bottom of the ignition switch.
16. Slide the cowling up and over the steering
column and throttle lever to remove it.
10040644
1 2
2
9
SECTION 10 -- ENGINE SYSTEMS -- CHAPTER 1
10-28
17. Remove the eight hex-head bolts securing the
firewall box, 1, to the cowling support frame, 2,
and the four bolts securing the firewall box to the
steering column support, 3.
18. Carefully slide the firewall box upward from
between the two support structures and remove
the box.
76076935
1
2
3
10
19. Remove the exhaust pipe bracket, 1. Separate
and remove the exhaust pipe extension, 2, from
the muffler outlet pipe, 3.
20. Remove the four bolts attaching the exhaust pipe
flange, 5, to the exhaust manifold outlet, 6, and
the two flanged hex nuts securing the muffler to
the mounting studs on the rear transverse engine
plate, 4.
21. Remove the exhaust muffler assembly, retaining
the metal gasket for the connecting flange on the
exhaust manifold.
76076936
1
2
3
5
6
4
11
22. Remove the four hex-head bolts, 1, and two
flanged hex nuts, 2, securing the exhaust
manifold, 3, to the LH side of the engine. Remove
the manifold and its metal gasket.
10040647
2
3
2 1
1
12

More Related Content

Similar to New holland t1030 tractor service repair manual

Takeuchi tb180 fr hydraulic excavator service repair workshop manual (serial ...
Takeuchi tb180 fr hydraulic excavator service repair workshop manual (serial ...Takeuchi tb180 fr hydraulic excavator service repair workshop manual (serial ...
Takeuchi tb180 fr hydraulic excavator service repair workshop manual (serial ...ujjjjfkksekmmdm
 
Takeuchi tb180 fr hydraulic excavator service repair workshop manual (serial ...
Takeuchi tb180 fr hydraulic excavator service repair workshop manual (serial ...Takeuchi tb180 fr hydraulic excavator service repair workshop manual (serial ...
Takeuchi tb180 fr hydraulic excavator service repair workshop manual (serial ...jfdjjskekksemm
 
Takeuchi tb180 fr hydraulic excavator service repair workshop manual (serial ...
Takeuchi tb180 fr hydraulic excavator service repair workshop manual (serial ...Takeuchi tb180 fr hydraulic excavator service repair workshop manual (serial ...
Takeuchi tb180 fr hydraulic excavator service repair workshop manual (serial ...olfjsekdmmes
 
Takeuchi tb180 fr hydraulic excavator service repair workshop manual (serial ...
Takeuchi tb180 fr hydraulic excavator service repair workshop manual (serial ...Takeuchi tb180 fr hydraulic excavator service repair workshop manual (serial ...
Takeuchi tb180 fr hydraulic excavator service repair workshop manual (serial ...dfujskeksmefm
 
Takeuchi tb180 fr hydraulic excavator service repair workshop manual (serial ...
Takeuchi tb180 fr hydraulic excavator service repair workshop manual (serial ...Takeuchi tb180 fr hydraulic excavator service repair workshop manual (serial ...
Takeuchi tb180 fr hydraulic excavator service repair workshop manual (serial ...fkksejfjskemm
 
Takeuchi tb180 fr hydraulic excavator service repair workshop manual (serial ...
Takeuchi tb180 fr hydraulic excavator service repair workshop manual (serial ...Takeuchi tb180 fr hydraulic excavator service repair workshop manual (serial ...
Takeuchi tb180 fr hydraulic excavator service repair workshop manual (serial ...fujsjefskememaq
 
Takeuchi tb153 fr compact excavator service repair workshop manual (serial no...
Takeuchi tb153 fr compact excavator service repair workshop manual (serial no...Takeuchi tb153 fr compact excavator service repair workshop manual (serial no...
Takeuchi tb153 fr compact excavator service repair workshop manual (serial no...udjjjksmemmmd
 
Electrolux hu 9027 st snow thrower service repair manual
Electrolux hu 9027 st snow thrower service repair manualElectrolux hu 9027 st snow thrower service repair manual
Electrolux hu 9027 st snow thrower service repair manualfhsjekkdkem
 
Electrolux hu 1130 st snow thrower service repair manual
Electrolux hu 1130 st snow thrower service repair manualElectrolux hu 1130 st snow thrower service repair manual
Electrolux hu 1130 st snow thrower service repair manualdiskkemmdmd
 
Electrolux hu 8024 st snow thrower service repair manual
Electrolux hu 8024 st snow thrower service repair manualElectrolux hu 8024 st snow thrower service repair manual
Electrolux hu 8024 st snow thrower service repair manualfhsjekkdkem
 
Electrolux hu 9027 st snow thrower service repair manual
Electrolux hu 9027 st snow thrower service repair manualElectrolux hu 9027 st snow thrower service repair manual
Electrolux hu 9027 st snow thrower service repair manualfjskedsxmmem
 
Electrolux hu 1130 st snow thrower service repair manual
Electrolux hu 1130 st snow thrower service repair manualElectrolux hu 1130 st snow thrower service repair manual
Electrolux hu 1130 st snow thrower service repair manualfhsjejkdmem
 

Similar to New holland t1030 tractor service repair manual (12)

Takeuchi tb180 fr hydraulic excavator service repair workshop manual (serial ...
Takeuchi tb180 fr hydraulic excavator service repair workshop manual (serial ...Takeuchi tb180 fr hydraulic excavator service repair workshop manual (serial ...
Takeuchi tb180 fr hydraulic excavator service repair workshop manual (serial ...
 
Takeuchi tb180 fr hydraulic excavator service repair workshop manual (serial ...
Takeuchi tb180 fr hydraulic excavator service repair workshop manual (serial ...Takeuchi tb180 fr hydraulic excavator service repair workshop manual (serial ...
Takeuchi tb180 fr hydraulic excavator service repair workshop manual (serial ...
 
Takeuchi tb153 fr compact excavator service repair workshop manual (serial no...
Takeuchi tb153 fr compact excavator service repair workshop manual (serial no...Takeuchi tb153 fr compact excavator service repair workshop manual (serial no...
Takeuchi tb153 fr compact excavator service repair workshop manual (serial no...
 
Electrolux hu 9027 st snow thrower service repair manual
Electrolux hu 9027 st snow thrower service repair manualElectrolux hu 9027 st snow thrower service repair manual
Electrolux hu 9027 st snow thrower service repair manual
 
Electrolux hu 1130 st snow thrower service repair manual
Electrolux hu 1130 st snow thrower service repair manualElectrolux hu 1130 st snow thrower service repair manual
Electrolux hu 1130 st snow thrower service repair manual
 
Electrolux hu 8024 st snow thrower service repair manual
Electrolux hu 8024 st snow thrower service repair manualElectrolux hu 8024 st snow thrower service repair manual
Electrolux hu 8024 st snow thrower service repair manual
 
Electrolux hu 9027 st snow thrower service repair manual
Electrolux hu 9027 st snow thrower service repair manualElectrolux hu 9027 st snow thrower service repair manual
Electrolux hu 9027 st snow thrower service repair manual
 
Electrolux hu 1130 st snow thrower service repair manual
Electrolux hu 1130 st snow thrower service repair manualElectrolux hu 1130 st snow thrower service repair manual
Electrolux hu 1130 st snow thrower service repair manual
 

More from fdujsjeksemm

New holland tb120 tractor service repair manual
New holland tb120 tractor service repair manualNew holland tb120 tractor service repair manual
New holland tb120 tractor service repair manualfdujsjeksemm
 
New holland tb110 tractor service repair manual
New holland tb110 tractor service repair manualNew holland tb110 tractor service repair manual
New holland tb110 tractor service repair manualfdujsjeksemm
 
New holland t4050 tractor service repair manual
New holland t4050 tractor service repair manualNew holland t4050 tractor service repair manual
New holland t4050 tractor service repair manualfdujsjeksemm
 
New holland t2420 tractor service repair manual
New holland t2420 tractor service repair manualNew holland t2420 tractor service repair manual
New holland t2420 tractor service repair manualfdujsjeksemm
 
New holland t1010 tractor service repair manual
New holland t1010 tractor service repair manualNew holland t1010 tractor service repair manual
New holland t1010 tractor service repair manualfdujsjeksemm
 
Kubota v3800 cr-tie4 diesel engine service repair manual
Kubota v3800 cr-tie4 diesel engine service repair manualKubota v3800 cr-tie4 diesel engine service repair manual
Kubota v3800 cr-tie4 diesel engine service repair manualfdujsjeksemm
 
Caterpillar cat el300 hydraulic excavator (prefix 2 cf) service repair manual...
Caterpillar cat el300 hydraulic excavator (prefix 2 cf) service repair manual...Caterpillar cat el300 hydraulic excavator (prefix 2 cf) service repair manual...
Caterpillar cat el300 hydraulic excavator (prefix 2 cf) service repair manual...fdujsjeksemm
 
Caterpillar cat el200 b excavator (prefix 6kf) service repair manual (6kf0000...
Caterpillar cat el200 b excavator (prefix 6kf) service repair manual (6kf0000...Caterpillar cat el200 b excavator (prefix 6kf) service repair manual (6kf0000...
Caterpillar cat el200 b excavator (prefix 6kf) service repair manual (6kf0000...fdujsjeksemm
 
Caterpillar cat d25 d articulated truck (prefix 3aj) service repair manual (3...
Caterpillar cat d25 d articulated truck (prefix 3aj) service repair manual (3...Caterpillar cat d25 d articulated truck (prefix 3aj) service repair manual (3...
Caterpillar cat d25 d articulated truck (prefix 3aj) service repair manual (3...fdujsjeksemm
 
Caterpillar cat d8 n track type tractor dozer bulldozer (prefix 7tk) service ...
Caterpillar cat d8 n track type tractor dozer bulldozer (prefix 7tk) service ...Caterpillar cat d8 n track type tractor dozer bulldozer (prefix 7tk) service ...
Caterpillar cat d8 n track type tractor dozer bulldozer (prefix 7tk) service ...fdujsjeksemm
 
Caterpillar cat d8 n track type tractor dozer bulldozer (prefix 5tj) service ...
Caterpillar cat d8 n track type tractor dozer bulldozer (prefix 5tj) service ...Caterpillar cat d8 n track type tractor dozer bulldozer (prefix 5tj) service ...
Caterpillar cat d8 n track type tractor dozer bulldozer (prefix 5tj) service ...fdujsjeksemm
 
Caterpillar cat 329 d l excavator (prefix bfc) service repair manual (bfc0000...
Caterpillar cat 329 d l excavator (prefix bfc) service repair manual (bfc0000...Caterpillar cat 329 d l excavator (prefix bfc) service repair manual (bfc0000...
Caterpillar cat 329 d l excavator (prefix bfc) service repair manual (bfc0000...fdujsjeksemm
 
Caterpillar cat 320 n excavator (prefix 4zj) service repair manual (4zj00001 ...
Caterpillar cat 320 n excavator (prefix 4zj) service repair manual (4zj00001 ...Caterpillar cat 320 n excavator (prefix 4zj) service repair manual (4zj00001 ...
Caterpillar cat 320 n excavator (prefix 4zj) service repair manual (4zj00001 ...fdujsjeksemm
 
Caterpillar cat 320 l excavator (prefix 4zj) service repair manual (4zj00001 ...
Caterpillar cat 320 l excavator (prefix 4zj) service repair manual (4zj00001 ...Caterpillar cat 320 l excavator (prefix 4zj) service repair manual (4zj00001 ...
Caterpillar cat 320 l excavator (prefix 4zj) service repair manual (4zj00001 ...fdujsjeksemm
 
Caterpillar cat 320 excavator (prefix 4 zj) service repair manual (4zj00001 0...
Caterpillar cat 320 excavator (prefix 4 zj) service repair manual (4zj00001 0...Caterpillar cat 320 excavator (prefix 4 zj) service repair manual (4zj00001 0...
Caterpillar cat 320 excavator (prefix 4 zj) service repair manual (4zj00001 0...fdujsjeksemm
 
Case ih wd2303 series ii self propelled windrower service repair manual
Case ih wd2303 series ii self propelled windrower service repair manualCase ih wd2303 series ii self propelled windrower service repair manual
Case ih wd2303 series ii self propelled windrower service repair manualfdujsjeksemm
 

More from fdujsjeksemm (16)

New holland tb120 tractor service repair manual
New holland tb120 tractor service repair manualNew holland tb120 tractor service repair manual
New holland tb120 tractor service repair manual
 
New holland tb110 tractor service repair manual
New holland tb110 tractor service repair manualNew holland tb110 tractor service repair manual
New holland tb110 tractor service repair manual
 
New holland t4050 tractor service repair manual
New holland t4050 tractor service repair manualNew holland t4050 tractor service repair manual
New holland t4050 tractor service repair manual
 
New holland t2420 tractor service repair manual
New holland t2420 tractor service repair manualNew holland t2420 tractor service repair manual
New holland t2420 tractor service repair manual
 
New holland t1010 tractor service repair manual
New holland t1010 tractor service repair manualNew holland t1010 tractor service repair manual
New holland t1010 tractor service repair manual
 
Kubota v3800 cr-tie4 diesel engine service repair manual
Kubota v3800 cr-tie4 diesel engine service repair manualKubota v3800 cr-tie4 diesel engine service repair manual
Kubota v3800 cr-tie4 diesel engine service repair manual
 
Caterpillar cat el300 hydraulic excavator (prefix 2 cf) service repair manual...
Caterpillar cat el300 hydraulic excavator (prefix 2 cf) service repair manual...Caterpillar cat el300 hydraulic excavator (prefix 2 cf) service repair manual...
Caterpillar cat el300 hydraulic excavator (prefix 2 cf) service repair manual...
 
Caterpillar cat el200 b excavator (prefix 6kf) service repair manual (6kf0000...
Caterpillar cat el200 b excavator (prefix 6kf) service repair manual (6kf0000...Caterpillar cat el200 b excavator (prefix 6kf) service repair manual (6kf0000...
Caterpillar cat el200 b excavator (prefix 6kf) service repair manual (6kf0000...
 
Caterpillar cat d25 d articulated truck (prefix 3aj) service repair manual (3...
Caterpillar cat d25 d articulated truck (prefix 3aj) service repair manual (3...Caterpillar cat d25 d articulated truck (prefix 3aj) service repair manual (3...
Caterpillar cat d25 d articulated truck (prefix 3aj) service repair manual (3...
 
Caterpillar cat d8 n track type tractor dozer bulldozer (prefix 7tk) service ...
Caterpillar cat d8 n track type tractor dozer bulldozer (prefix 7tk) service ...Caterpillar cat d8 n track type tractor dozer bulldozer (prefix 7tk) service ...
Caterpillar cat d8 n track type tractor dozer bulldozer (prefix 7tk) service ...
 
Caterpillar cat d8 n track type tractor dozer bulldozer (prefix 5tj) service ...
Caterpillar cat d8 n track type tractor dozer bulldozer (prefix 5tj) service ...Caterpillar cat d8 n track type tractor dozer bulldozer (prefix 5tj) service ...
Caterpillar cat d8 n track type tractor dozer bulldozer (prefix 5tj) service ...
 
Caterpillar cat 329 d l excavator (prefix bfc) service repair manual (bfc0000...
Caterpillar cat 329 d l excavator (prefix bfc) service repair manual (bfc0000...Caterpillar cat 329 d l excavator (prefix bfc) service repair manual (bfc0000...
Caterpillar cat 329 d l excavator (prefix bfc) service repair manual (bfc0000...
 
Caterpillar cat 320 n excavator (prefix 4zj) service repair manual (4zj00001 ...
Caterpillar cat 320 n excavator (prefix 4zj) service repair manual (4zj00001 ...Caterpillar cat 320 n excavator (prefix 4zj) service repair manual (4zj00001 ...
Caterpillar cat 320 n excavator (prefix 4zj) service repair manual (4zj00001 ...
 
Caterpillar cat 320 l excavator (prefix 4zj) service repair manual (4zj00001 ...
Caterpillar cat 320 l excavator (prefix 4zj) service repair manual (4zj00001 ...Caterpillar cat 320 l excavator (prefix 4zj) service repair manual (4zj00001 ...
Caterpillar cat 320 l excavator (prefix 4zj) service repair manual (4zj00001 ...
 
Caterpillar cat 320 excavator (prefix 4 zj) service repair manual (4zj00001 0...
Caterpillar cat 320 excavator (prefix 4 zj) service repair manual (4zj00001 0...Caterpillar cat 320 excavator (prefix 4 zj) service repair manual (4zj00001 0...
Caterpillar cat 320 excavator (prefix 4 zj) service repair manual (4zj00001 0...
 
Case ih wd2303 series ii self propelled windrower service repair manual
Case ih wd2303 series ii self propelled windrower service repair manualCase ih wd2303 series ii self propelled windrower service repair manual
Case ih wd2303 series ii self propelled windrower service repair manual
 

Recently uploaded

如何办理(UC毕业证书)堪培拉大学毕业证毕业证成绩单原版一比一
如何办理(UC毕业证书)堪培拉大学毕业证毕业证成绩单原版一比一如何办理(UC毕业证书)堪培拉大学毕业证毕业证成绩单原版一比一
如何办理(UC毕业证书)堪培拉大学毕业证毕业证成绩单原版一比一fjjwgk
 
办理克莱姆森大学毕业证成绩单|购买美国文凭证书
办理克莱姆森大学毕业证成绩单|购买美国文凭证书办理克莱姆森大学毕业证成绩单|购买美国文凭证书
办理克莱姆森大学毕业证成绩单|购买美国文凭证书zdzoqco
 
Call Girl Service Global Village Dubai +971509430017 Independent Call Girls G...
Call Girl Service Global Village Dubai +971509430017 Independent Call Girls G...Call Girl Service Global Village Dubai +971509430017 Independent Call Girls G...
Call Girl Service Global Village Dubai +971509430017 Independent Call Girls G...kexey39068
 
原版1:1定制(IC大学毕业证)帝国理工学院大学毕业证国外文凭复刻成绩单#电子版制作#留信入库#多年经营绝对保证质量
原版1:1定制(IC大学毕业证)帝国理工学院大学毕业证国外文凭复刻成绩单#电子版制作#留信入库#多年经营绝对保证质量原版1:1定制(IC大学毕业证)帝国理工学院大学毕业证国外文凭复刻成绩单#电子版制作#留信入库#多年经营绝对保证质量
原版1:1定制(IC大学毕业证)帝国理工学院大学毕业证国外文凭复刻成绩单#电子版制作#留信入库#多年经营绝对保证质量208367051
 
原版1:1定制阳光海岸大学毕业证(JCU毕业证)#文凭成绩单#真实留信学历认证永久存档
原版1:1定制阳光海岸大学毕业证(JCU毕业证)#文凭成绩单#真实留信学历认证永久存档原版1:1定制阳光海岸大学毕业证(JCU毕业证)#文凭成绩单#真实留信学历认证永久存档
原版1:1定制阳光海岸大学毕业证(JCU毕业证)#文凭成绩单#真实留信学历认证永久存档208367051
 
办理(PITT毕业证书)美国匹兹堡大学毕业证成绩单原版一比一
办理(PITT毕业证书)美国匹兹堡大学毕业证成绩单原版一比一办理(PITT毕业证书)美国匹兹堡大学毕业证成绩单原版一比一
办理(PITT毕业证书)美国匹兹堡大学毕业证成绩单原版一比一F La
 
2024 TOP 10 most fuel-efficient vehicles according to the US agency
2024 TOP 10 most fuel-efficient vehicles according to the US agency2024 TOP 10 most fuel-efficient vehicles according to the US agency
2024 TOP 10 most fuel-efficient vehicles according to the US agencyHyundai Motor Group
 
Not Sure About VW EGR Valve Health Look For These Symptoms
Not Sure About VW EGR Valve Health Look For These SymptomsNot Sure About VW EGR Valve Health Look For These Symptoms
Not Sure About VW EGR Valve Health Look For These SymptomsFifth Gear Automotive
 
UNIT-III-TRANSMISSION SYSTEMS REAR AXLES
UNIT-III-TRANSMISSION SYSTEMS REAR AXLESUNIT-III-TRANSMISSION SYSTEMS REAR AXLES
UNIT-III-TRANSMISSION SYSTEMS REAR AXLESDineshKumar4165
 
定制(Plymouth文凭证书)普利茅斯大学毕业证毕业证成绩单学历认证原版一比一
定制(Plymouth文凭证书)普利茅斯大学毕业证毕业证成绩单学历认证原版一比一定制(Plymouth文凭证书)普利茅斯大学毕业证毕业证成绩单学历认证原版一比一
定制(Plymouth文凭证书)普利茅斯大学毕业证毕业证成绩单学历认证原版一比一fhhkjh
 
Digamma - CertiCon Team Skills and Qualifications
Digamma - CertiCon Team Skills and QualificationsDigamma - CertiCon Team Skills and Qualifications
Digamma - CertiCon Team Skills and QualificationsMihajloManjak
 
定制(MSVU毕业证书)圣文森山大学毕业证毕业证成绩单原版一比一定制
定制(MSVU毕业证书)圣文森山大学毕业证毕业证成绩单原版一比一定制定制(MSVU毕业证书)圣文森山大学毕业证毕业证成绩单原版一比一定制
定制(MSVU毕业证书)圣文森山大学毕业证毕业证成绩单原版一比一定制miwhjk
 
原版1:1定制中央昆士兰大学毕业证(CQU毕业证)#文凭成绩单#真实留信学历认证永久存档
原版1:1定制中央昆士兰大学毕业证(CQU毕业证)#文凭成绩单#真实留信学历认证永久存档原版1:1定制中央昆士兰大学毕业证(CQU毕业证)#文凭成绩单#真实留信学历认证永久存档
原版1:1定制中央昆士兰大学毕业证(CQU毕业证)#文凭成绩单#真实留信学历认证永久存档208367051
 
Call Girls in Karachi | +923081633338 | Karachi Call Girls
Call Girls in Karachi  | +923081633338 | Karachi Call GirlsCall Girls in Karachi  | +923081633338 | Karachi Call Girls
Call Girls in Karachi | +923081633338 | Karachi Call GirlsAyesha Khan
 
原版1:1定制宾州州立大学毕业证(PSU毕业证)#文凭成绩单#真实留信学历认证永久存档
原版1:1定制宾州州立大学毕业证(PSU毕业证)#文凭成绩单#真实留信学历认证永久存档原版1:1定制宾州州立大学毕业证(PSU毕业证)#文凭成绩单#真实留信学历认证永久存档
原版1:1定制宾州州立大学毕业证(PSU毕业证)#文凭成绩单#真实留信学历认证永久存档208367051
 
(Griffith毕业证)格里菲斯大学毕业证毕业证成绩单修改留信学历认证原版一比一
(Griffith毕业证)格里菲斯大学毕业证毕业证成绩单修改留信学历认证原版一比一(Griffith毕业证)格里菲斯大学毕业证毕业证成绩单修改留信学历认证原版一比一
(Griffith毕业证)格里菲斯大学毕业证毕业证成绩单修改留信学历认证原版一比一ejgeojhg
 
UNIT-1-VEHICLE STRUCTURE AND ENGINES.ppt
UNIT-1-VEHICLE STRUCTURE AND ENGINES.pptUNIT-1-VEHICLE STRUCTURE AND ENGINES.ppt
UNIT-1-VEHICLE STRUCTURE AND ENGINES.pptDineshKumar4165
 
Equity & Freight Electrification by Jose Miguel Acosta Cordova
Equity & Freight Electrification by Jose Miguel Acosta CordovaEquity & Freight Electrification by Jose Miguel Acosta Cordova
Equity & Freight Electrification by Jose Miguel Acosta CordovaForth
 
call girls in G.T.B. Nagar (DELHI) 🔝 >༒9953330565🔝 genuine Escort Service 🔝✔️✔️
call girls in  G.T.B. Nagar (DELHI) 🔝 >༒9953330565🔝 genuine Escort Service 🔝✔️✔️call girls in  G.T.B. Nagar (DELHI) 🔝 >༒9953330565🔝 genuine Escort Service 🔝✔️✔️
call girls in G.T.B. Nagar (DELHI) 🔝 >༒9953330565🔝 genuine Escort Service 🔝✔️✔️9953056974 Low Rate Call Girls In Saket, Delhi NCR
 
-The-Present-Simple-Tense.pdf english hh
-The-Present-Simple-Tense.pdf english hh-The-Present-Simple-Tense.pdf english hh
-The-Present-Simple-Tense.pdf english hhmhamadhawlery16
 

Recently uploaded (20)

如何办理(UC毕业证书)堪培拉大学毕业证毕业证成绩单原版一比一
如何办理(UC毕业证书)堪培拉大学毕业证毕业证成绩单原版一比一如何办理(UC毕业证书)堪培拉大学毕业证毕业证成绩单原版一比一
如何办理(UC毕业证书)堪培拉大学毕业证毕业证成绩单原版一比一
 
办理克莱姆森大学毕业证成绩单|购买美国文凭证书
办理克莱姆森大学毕业证成绩单|购买美国文凭证书办理克莱姆森大学毕业证成绩单|购买美国文凭证书
办理克莱姆森大学毕业证成绩单|购买美国文凭证书
 
Call Girl Service Global Village Dubai +971509430017 Independent Call Girls G...
Call Girl Service Global Village Dubai +971509430017 Independent Call Girls G...Call Girl Service Global Village Dubai +971509430017 Independent Call Girls G...
Call Girl Service Global Village Dubai +971509430017 Independent Call Girls G...
 
原版1:1定制(IC大学毕业证)帝国理工学院大学毕业证国外文凭复刻成绩单#电子版制作#留信入库#多年经营绝对保证质量
原版1:1定制(IC大学毕业证)帝国理工学院大学毕业证国外文凭复刻成绩单#电子版制作#留信入库#多年经营绝对保证质量原版1:1定制(IC大学毕业证)帝国理工学院大学毕业证国外文凭复刻成绩单#电子版制作#留信入库#多年经营绝对保证质量
原版1:1定制(IC大学毕业证)帝国理工学院大学毕业证国外文凭复刻成绩单#电子版制作#留信入库#多年经营绝对保证质量
 
原版1:1定制阳光海岸大学毕业证(JCU毕业证)#文凭成绩单#真实留信学历认证永久存档
原版1:1定制阳光海岸大学毕业证(JCU毕业证)#文凭成绩单#真实留信学历认证永久存档原版1:1定制阳光海岸大学毕业证(JCU毕业证)#文凭成绩单#真实留信学历认证永久存档
原版1:1定制阳光海岸大学毕业证(JCU毕业证)#文凭成绩单#真实留信学历认证永久存档
 
办理(PITT毕业证书)美国匹兹堡大学毕业证成绩单原版一比一
办理(PITT毕业证书)美国匹兹堡大学毕业证成绩单原版一比一办理(PITT毕业证书)美国匹兹堡大学毕业证成绩单原版一比一
办理(PITT毕业证书)美国匹兹堡大学毕业证成绩单原版一比一
 
2024 TOP 10 most fuel-efficient vehicles according to the US agency
2024 TOP 10 most fuel-efficient vehicles according to the US agency2024 TOP 10 most fuel-efficient vehicles according to the US agency
2024 TOP 10 most fuel-efficient vehicles according to the US agency
 
Not Sure About VW EGR Valve Health Look For These Symptoms
Not Sure About VW EGR Valve Health Look For These SymptomsNot Sure About VW EGR Valve Health Look For These Symptoms
Not Sure About VW EGR Valve Health Look For These Symptoms
 
UNIT-III-TRANSMISSION SYSTEMS REAR AXLES
UNIT-III-TRANSMISSION SYSTEMS REAR AXLESUNIT-III-TRANSMISSION SYSTEMS REAR AXLES
UNIT-III-TRANSMISSION SYSTEMS REAR AXLES
 
定制(Plymouth文凭证书)普利茅斯大学毕业证毕业证成绩单学历认证原版一比一
定制(Plymouth文凭证书)普利茅斯大学毕业证毕业证成绩单学历认证原版一比一定制(Plymouth文凭证书)普利茅斯大学毕业证毕业证成绩单学历认证原版一比一
定制(Plymouth文凭证书)普利茅斯大学毕业证毕业证成绩单学历认证原版一比一
 
Digamma - CertiCon Team Skills and Qualifications
Digamma - CertiCon Team Skills and QualificationsDigamma - CertiCon Team Skills and Qualifications
Digamma - CertiCon Team Skills and Qualifications
 
定制(MSVU毕业证书)圣文森山大学毕业证毕业证成绩单原版一比一定制
定制(MSVU毕业证书)圣文森山大学毕业证毕业证成绩单原版一比一定制定制(MSVU毕业证书)圣文森山大学毕业证毕业证成绩单原版一比一定制
定制(MSVU毕业证书)圣文森山大学毕业证毕业证成绩单原版一比一定制
 
原版1:1定制中央昆士兰大学毕业证(CQU毕业证)#文凭成绩单#真实留信学历认证永久存档
原版1:1定制中央昆士兰大学毕业证(CQU毕业证)#文凭成绩单#真实留信学历认证永久存档原版1:1定制中央昆士兰大学毕业证(CQU毕业证)#文凭成绩单#真实留信学历认证永久存档
原版1:1定制中央昆士兰大学毕业证(CQU毕业证)#文凭成绩单#真实留信学历认证永久存档
 
Call Girls in Karachi | +923081633338 | Karachi Call Girls
Call Girls in Karachi  | +923081633338 | Karachi Call GirlsCall Girls in Karachi  | +923081633338 | Karachi Call Girls
Call Girls in Karachi | +923081633338 | Karachi Call Girls
 
原版1:1定制宾州州立大学毕业证(PSU毕业证)#文凭成绩单#真实留信学历认证永久存档
原版1:1定制宾州州立大学毕业证(PSU毕业证)#文凭成绩单#真实留信学历认证永久存档原版1:1定制宾州州立大学毕业证(PSU毕业证)#文凭成绩单#真实留信学历认证永久存档
原版1:1定制宾州州立大学毕业证(PSU毕业证)#文凭成绩单#真实留信学历认证永久存档
 
(Griffith毕业证)格里菲斯大学毕业证毕业证成绩单修改留信学历认证原版一比一
(Griffith毕业证)格里菲斯大学毕业证毕业证成绩单修改留信学历认证原版一比一(Griffith毕业证)格里菲斯大学毕业证毕业证成绩单修改留信学历认证原版一比一
(Griffith毕业证)格里菲斯大学毕业证毕业证成绩单修改留信学历认证原版一比一
 
UNIT-1-VEHICLE STRUCTURE AND ENGINES.ppt
UNIT-1-VEHICLE STRUCTURE AND ENGINES.pptUNIT-1-VEHICLE STRUCTURE AND ENGINES.ppt
UNIT-1-VEHICLE STRUCTURE AND ENGINES.ppt
 
Equity & Freight Electrification by Jose Miguel Acosta Cordova
Equity & Freight Electrification by Jose Miguel Acosta CordovaEquity & Freight Electrification by Jose Miguel Acosta Cordova
Equity & Freight Electrification by Jose Miguel Acosta Cordova
 
call girls in G.T.B. Nagar (DELHI) 🔝 >༒9953330565🔝 genuine Escort Service 🔝✔️✔️
call girls in  G.T.B. Nagar (DELHI) 🔝 >༒9953330565🔝 genuine Escort Service 🔝✔️✔️call girls in  G.T.B. Nagar (DELHI) 🔝 >༒9953330565🔝 genuine Escort Service 🔝✔️✔️
call girls in G.T.B. Nagar (DELHI) 🔝 >༒9953330565🔝 genuine Escort Service 🔝✔️✔️
 
-The-Present-Simple-Tense.pdf english hh
-The-Present-Simple-Tense.pdf english hh-The-Present-Simple-Tense.pdf english hh
-The-Present-Simple-Tense.pdf english hh
 

New holland t1030 tractor service repair manual

  • 1.
  • 2. SECTION 00 -- GENERAL INFORMATION -- CHAPTER 1 00-4 SAFETY PRECAUTIONARY STATEMENTS A careful operator is the best operator. Most accidents can be avoided by observing certain precautions. To help prevent accidents, read the following precautions before operating this equipment. Equipment should be oper- ated only by those who are responsible and instructed to do so. Carefully review the procedures given in this manual with all operators. It is important that all operators be familiar with and follow safety precautions. THE TRACTOR 1. Read the Operator’s Manual carefully before using the tractor. Lack of operating knowl- edge can lead to accidents. 2. Use an approved roll bar and seat belt for safe operation. Overturning a tractor without a roll bar can result in death or injury. If your tractor is not equipped with a roll bar and seat belt, see your New Holland Dealer. 3. Always use the seat belt. The only instance when the seat belt should not be used is if the roll bar has been removed from the tractor. 4. If a front end loader is to be installed, always use a FOPS (Falling Object Protective Structure) canopy to avoid injury from falling objects. 5. Use the handholds and step plates when getting on and off the tractor to prevent falls. Keep steps and platform cleared of mud and debris. 6. Do not permit anyone but the operator to ride on the tractor. There is no safe place for extra riders. 7. Keep all safety decals clean of dirt and grime, and replace all missing, illegible, or damaged safety decals. See the list of decals in the Decal section of this manual. SERVICING THE TRACTOR 1. The cooling system operates under pressure which is controlled by the radiator cap. It is dangerous to remove the cap while the system is hot. Always turn the cap slowly to the first stop and allow pressure to escape before removing the cap entirely. 2. Keep any type of open flame away from the tractor and do not smoke while refueling. Wait for the engine to cool before refueling. 3. Keep the tractor and equipment, particularly brakes and steering, maintained in a reliable and satisfactory condition to ensure your safety and comply with legal requirements. 4. Keep open flame or cold weather starting aids away from the battery to prevent fires or explosions. Use jumper cables according to instructions to prevent sparks which could cause explosion. 5. Stop the engine before performing any service on the tractor. 6. Escaping hydraulic/diesel fluid under pres- sure can penetrate the skin causing serious injury. If fluid is injected into the skin, obtain medical attention immediately or gangrene may result. • DO NOT use your hand to check for leaks. Use a piece of cardboard or paper to search for leaks. • Stop the engine and relieve pressure before connecting or disconnecting lines. • Tighten all connections before starting the engine or pressurizing lines. 7. Do not modify or permit anyone else to modify or alter this tractor or any of its components or functions without first consulting a New Holland Dealer. 8. The fuel oil in the injection system is under high pressure and can penetrate the skin. Unqualified persons should not remove or attempt to adjust a pump, injector, nozzle, or any other part of the fuel injection system. Failure to follow these instructions can result in serious injury. 9. Continuous long-term contact with used engine oil may cause skin cancer. Avoid prolonged contact with used engine oil. Wash skin promptly with soap and water.
  • 3. SECTION 00 -- GENERAL INFORMATION -- CHAPTER 1 00-5 10. Some components of your tractor, such as gaskets and friction surfaces (brake linings, clutch linings, etc.) may contain asbestos. Breathing asbestos dust is dangerous to your health. You are advised to have any maintenance or repair on such components carried out by an authorized New Holland Dealer. However, if service operations are to be undertaken on parts that contain asbes- tos, the essential precautions listed below must be observed: • Work out of doors or in a well ventilated area. • Dust found on the tractor or produced during work on the tractor should be removed by extraction, not by blowing. • Dust waste should be dampened, placed in a sealed container, and marked to ensure safe disposal. • If any cutting, drilling, etc. is attempted on materials containing asbestos, the item should be dampened and only hand tools or low speed power tools used. OPERATING THE TRACTOR 1. Before starting the tractor, apply the parking brake, place the PTO lever in the “OFF” position, the lift control lever in the down position, the remote control valve levers in the neutral position, and the transmission in neutral. 2. Always sit in the tractor seat when starting the engine or operating controls. Do not start the engine or operate controls while standing beside the tractor. 3. Do not bypass the neutral start switches. Consult your New Holland Dealer if your neutral start controls malfunction. Use jumper cables only in the recommended manner. Improper use can result in tractor runaway. 4. Avoid accidental contact with the gear shift lever while the engine is running, as this can cause unexpected tractor movement. 5. Before getting off the tractor, disengage the PTO, turn the engine off, and apply the parking brake. Never get off the tractor while it is in motion. 6. Do not park the tractor on a steep incline. 7. Do not operate the tractor engine in an enclosed building without adequate ventila- tion. Exhaust fumes can cause death or illness. 8. If the power steering or engine ceases operating, stop the tractor immediately. 9. Pull only from the drawbar or the lower link drawbar in the down position. Use only a drawbar pin that locks in place. Pulling from the tractor rear axle or any point above the axle may cause the tractor to upset. 10. If the front end of the tractor tends to rise when heavy implements are attached to the three-point hitch, install front end or front wheel weights. Do not operate the tractor with a light front end. 11. Always set the hydraulic selector lever in position control when attaching or transport- ing equipment. Ensure hydraulic couplers are properly mounted and will disconnect safely in case of accidental detachment of implement. 12. Do not leave equipment in the raised position. 13. Use the flasher/turn signal lights and SMV signs when traveling on public roads both day and night (unless prohibited by law). 14. When operating at night, adjust lights to prevent blinding oncoming drivers. DRIVING THE TRACTOR 1. Watch where you are going, especially at row ends, on roads, around trees and low hanging obstacles. 2. To avoid upsets, drive the tractor with care and at a safe speed. Use extra caution when operating over rough ground, when crossing ditches or slopes, and when turning corners. 3. To provide two-wheel braking, one pedal actuates both brakes. 4. Do not coast or free wheel down hills. Use the same gear when going downhill as is used when going uphill. 5. Any towed vehicle with a total weight exceeding that of the towing tractor should be equipped with brakes for safe operation. 6. If the tractor becomes stuck or the tires become frozen to the ground, back up the tractor to prevent upset.
  • 4. SECTION 00 -- GENERAL INFORMATION -- CHAPTER 1 00-6 7. Always check overhead clearance, especial- ly when transporting the tractor. 8. When operating at night, adjust lights to prevent blinding oncoming drivers. OPERATING THE PTO 1. When operating PTO driven equipment, shut off the engine and wait until the PTO stops before getting off the tractor and disconnect- ing the equipment. 2. Do not wear loose clothing when operating the power take-off or when near rotating equipment. 3. When operating stationary PTO driven equipment, always place both gear shift levers in neutral, apply the tractor parking brake, and block the rear wheels front and back. 4. To avoid injury, do not clean, adjust, unclog, or service PTO driven equipment when the tractor engine is running. 5. Ensure the PTO master shield is installed at all times. Always replace the PTO shield cap when the PTO is not in use. DIESEL FUEL 1. UNDER NO CIRCUMSTANCES should gaso- line, alcohol, or blended fuels be added to diesel fuel. These combinations can create an increased fire or explosive hazard. Such blends are more explosive than pure gasoline in a closed container such as a fuel tank. DO NOT USE THESE BLENDS. 2. Never remove the fuel cap or refuel with the engine running or hot. 3. Do not smoke while refueling or when standing near fuel. 4. Maintain control of the fuel filler pipe nozzle when filling the tank. 5. Do not fill the fuel tank to capacity. Allow room for expansion. 6. Wipe up spilled fuel immediately. 7. Always tighten the fuel tank cap securely. 8. If the original fuel tank cap is lost, replace it with a New Holland approved cap. A non-approved, proprietary cap may not be safe. 9. Keep equipment clean and properly main- tained. 10. Do not drive equipment near open fires. 11. Never use fuel for cleaning purposes. 12. Arrange fuel purchases so that winter grade fuels are not held over and used in the spring. SAFETY FRAME (ROPS) Your New Holland tractor is equipped with a safety frame. It must be maintained in a serviceable condition. Be careful when driving through doorways or working in confined spaces with low headroom. UNDER NO CIRCUMSTANCES should you: • modify, drill, or alter the safety frame in any way. Doing so may render you liable to legal prosecution. • attempt to straighten or weld any part of the main frame or retaining brackets which have suffered damage. Doing so may weaken the structure and endanger your safety. • secure any parts on the main frame or attach your safety frame with anything other than the special high tensile bolts and nuts speci- fied. • attach chains or ropes to the main frame for pulling purposes. • take unnecessary risks even though your safety frame affords you the maximum protection possible. WHEN YOU SEE THIS SYMBOL IT MEANS: ATTENTION! BECOME ALERT! YOUR SAFETY IS INVOLVED!
  • 5. SECTION 00 -- GENERAL INFORMATION -- CHAPTER 1 00-15 76077177
  • 6. SECTION 00 -- GENERAL INFORMATION -- CHAPTER 1 00-16 ECOLOGY AND THE ENVIRONMENT Soil, air, and water are vital factors of agriculture and life in general. When legislation does not yet rule the treatment of some of the substances which are required by advanced technology, common sense should govern the use and disposal of products of a chemical and petrochemical nature. The following are recommendations which may be of assistance: • Become acquainted with and ensure that you understand the relative legislation applicable to your country. • Where no legislation exists, obtain information from suppliers of oils, filters, batteries, fuels, antifreeze, cleaning agents, etc., with regard to their effect on man and nature and how to safely store, use and dispose of these substances. Agricultural consultants will, in many cases, be able to help you as well. HELPFUL HINTS 1. Avoid filling fuel tanks using cans or inappropri- ate pressurized fuel delivery systems which may cause considerable spillage. 2. In general, avoid skin contact with all fuels, oils, acids, solvents, etc. Most of them contain substances which may be harmful to your health. 3. Modern oils contain additives. Do not burn contaminated fuels and or waste oils in ordinary heating systems. 4. Avoid spillage when draining off used engine coolant mixtures, engine, gearbox and hydraulic oils, brake fluids, etc. Do not mix drained brake fluids or fuels with lubricants. Store them safely until they can be disposed of in a proper way to comply with local legislation and available resources. 5. Modern coolant mixtures, i.e. antifreeze and other additives, should be replaced every two years. They should not be allowed to get into the soil but should be collected and disposed of safely. 6. Repair any leaks or defects in the engine cooling or hydraulic system immediately. 7. Do not increase the pressure in a pressurized circuit as this may lead to a component failure. 8. Protect hoses during welding as penetrating weld splatter may burn a hole or weaken them, allowing the loss of oils, coolant, etc.
  • 7. SECTION 10 -- ENGINE SYSTEMS -- CHAPTER 1 10-1 SECTION 10 - ENGINE SYSTEMS Chapter 1 - Engine Systems CONTENTS Section Description Page Specifications 6. . . . . . . . . . . . . . . . . . . . . . . . . . . . . . . . . . . . . . . . . . . . . . . . . . . . . . . . . . . . . . . . . . Torque Specifications 15. . . . . . . . . . . . . . . . . . . . . . . . . . . . . . . . . . . . . . . . . . . . . . . . . . . . . . . . . Metric Bolt Torque Specifications 15. . . . . . . . . . . . . . . . . . . . . . . . . . . . . . . . . . . . . . . . . . . . . . . Special Tools 16. . . . . . . . . . . . . . . . . . . . . . . . . . . . . . . . . . . . . . . . . . . . . . . . . . . . . . . . . . . . . . . . General Information -- Description of Operation 17. . . . . . . . . . . . . . . . . . . . . . . . . . . . . . . . . . . Identification Chart 17. . . . . . . . . . . . . . . . . . . . . . . . . . . . . . . . . . . . . . . . . . . . . . . . . . . . . . . . Cylinder Head and Valve Train Components 17. . . . . . . . . . . . . . . . . . . . . . . . . . . . . . . . . . Cylinder Block Assembly 19. . . . . . . . . . . . . . . . . . . . . . . . . . . . . . . . . . . . . . . . . . . . . . . . . . . Troubleshooting 20. . . . . . . . . . . . . . . . . . . . . . . . . . . . . . . . . . . . . . . . . . . . . . . . . . . . . . . . . . . . . . Overhaul 26. . . . . . . . . . . . . . . . . . . . . . . . . . . . . . . . . . . . . . . . . . . . . . . . . . . . . . . . . . . . . . . . . . . . Engine Access 26. . . . . . . . . . . . . . . . . . . . . . . . . . . . . . . . . . . . . . . . . . . . . . . . . . . . . . . . . . . Disassembly 26. . . . . . . . . . . . . . . . . . . . . . . . . . . . . . . . . . . . . . . . . . . . . . . . . . . . . . . . . . Fuel Injector and Glow Plug 29. . . . . . . . . . . . . . . . . . . . . . . . . . . . . . . . . . . . . . . . . . . . . . . . Removal 29. . . . . . . . . . . . . . . . . . . . . . . . . . . . . . . . . . . . . . . . . . . . . . . . . . . . . . . . . . . . . Hydraulic Pump 30. . . . . . . . . . . . . . . . . . . . . . . . . . . . . . . . . . . . . . . . . . . . . . . . . . . . . . . . . . Removal 30. . . . . . . . . . . . . . . . . . . . . . . . . . . . . . . . . . . . . . . . . . . . . . . . . . . . . . . . . . . . . Fan, Water Pump and External Oil Tube 30. . . . . . . . . . . . . . . . . . . . . . . . . . . . . . . . . . . . . Removal 30. . . . . . . . . . . . . . . . . . . . . . . . . . . . . . . . . . . . . . . . . . . . . . . . . . . . . . . . . . . . . Fuel Shutoff Solenoid 30. . . . . . . . . . . . . . . . . . . . . . . . . . . . . . . . . . . . . . . . . . . . . . . . . . . . . . Removal 30. . . . . . . . . . . . . . . . . . . . . . . . . . . . . . . . . . . . . . . . . . . . . . . . . . . . . . . . . . . . . Oil Pressure Switch 31. . . . . . . . . . . . . . . . . . . . . . . . . . . . . . . . . . . . . . . . . . . . . . . . . . . . . . . Removal 31. . . . . . . . . . . . . . . . . . . . . . . . . . . . . . . . . . . . . . . . . . . . . . . . . . . . . . . . . . . . . Temperature Sending Switch and Alternator 31. . . . . . . . . . . . . . . . . . . . . . . . . . . . . . . . . . Removal 31. . . . . . . . . . . . . . . . . . . . . . . . . . . . . . . . . . . . . . . . . . . . . . . . . . . . . . . . . . . . . Throttle Cable 31. . . . . . . . . . . . . . . . . . . . . . . . . . . . . . . . . . . . . . . . . . . . . . . . . . . . . . . . . . . . Disconnection 31. . . . . . . . . . . . . . . . . . . . . . . . . . . . . . . . . . . . . . . . . . . . . . . . . . . . . . . . . Support Frame 32. . . . . . . . . . . . . . . . . . . . . . . . . . . . . . . . . . . . . . . . . . . . . . . . . . . . . . . . . . . Removal 32. . . . . . . . . . . . . . . . . . . . . . . . . . . . . . . . . . . . . . . . . . . . . . . . . . . . . . . . . . . . . Engine 32. . . . . . . . . . . . . . . . . . . . . . . . . . . . . . . . . . . . . . . . . . . . . . . . . . . . . . . . . . . . . . . . . . Removal 32. . . . . . . . . . . . . . . . . . . . . . . . . . . . . . . . . . . . . . . . . . . . . . . . . . . . . . . . . . . . . Valve Cover 33. . . . . . . . . . . . . . . . . . . . . . . . . . . . . . . . . . . . . . . . . . . . . . . . . . . . . . . . . . . . . . Removal 33. . . . . . . . . . . . . . . . . . . . . . . . . . . . . . . . . . . . . . . . . . . . . . . . . . . . . . . . . . . . .
  • 8. SECTION 10 -- ENGINE SYSTEMS -- CHAPTER 1 10-2 Section Description Page Rocker Shaft and Push Rod 34. . . . . . . . . . . . . . . . . . . . . . . . . . . . . . . . . . . . . . . . . . . . . . . . Removal 34. . . . . . . . . . . . . . . . . . . . . . . . . . . . . . . . . . . . . . . . . . . . . . . . . . . . . . . . . . . . . Cylinder Head 34. . . . . . . . . . . . . . . . . . . . . . . . . . . . . . . . . . . . . . . . . . . . . . . . . . . . . . . . . . . . Removal 34. . . . . . . . . . . . . . . . . . . . . . . . . . . . . . . . . . . . . . . . . . . . . . . . . . . . . . . . . . . . . Valve Tappet 35. . . . . . . . . . . . . . . . . . . . . . . . . . . . . . . . . . . . . . . . . . . . . . . . . . . . . . . . . . . . . Removal 35. . . . . . . . . . . . . . . . . . . . . . . . . . . . . . . . . . . . . . . . . . . . . . . . . . . . . . . . . . . . . Engine Timing Gear Cover, Timing Gears and Camshaft 35. . . . . . . . . . . . . . . . . . . . . . . Timing Gears and Camshaft 36. . . . . . . . . . . . . . . . . . . . . . . . . . . . . . . . . . . . . . . . . . . . . . . . Removal 36. . . . . . . . . . . . . . . . . . . . . . . . . . . . . . . . . . . . . . . . . . . . . . . . . . . . . . . . . . . . . Oil Sump 36. . . . . . . . . . . . . . . . . . . . . . . . . . . . . . . . . . . . . . . . . . . . . . . . . . . . . . . . . . . . . . . . Removal 36. . . . . . . . . . . . . . . . . . . . . . . . . . . . . . . . . . . . . . . . . . . . . . . . . . . . . . . . . . . . . Oil Suction Pipe and Strainer 37. . . . . . . . . . . . . . . . . . . . . . . . . . . . . . . . . . . . . . . . . . . . . . . Removal 37. . . . . . . . . . . . . . . . . . . . . . . . . . . . . . . . . . . . . . . . . . . . . . . . . . . . . . . . . . . . . Connecting Rods, Bearings and Piston 37. . . . . . . . . . . . . . . . . . . . . . . . . . . . . . . . . . . . . . Removal 37. . . . . . . . . . . . . . . . . . . . . . . . . . . . . . . . . . . . . . . . . . . . . . . . . . . . . . . . . . . . . Flywheel 38. . . . . . . . . . . . . . . . . . . . . . . . . . . . . . . . . . . . . . . . . . . . . . . . . . . . . . . . . . . . . . . . . Removal 38. . . . . . . . . . . . . . . . . . . . . . . . . . . . . . . . . . . . . . . . . . . . . . . . . . . . . . . . . . . . . Backplate and Oil Seal 38. . . . . . . . . . . . . . . . . . . . . . . . . . . . . . . . . . . . . . . . . . . . . . . . . . . . Removal 38. . . . . . . . . . . . . . . . . . . . . . . . . . . . . . . . . . . . . . . . . . . . . . . . . . . . . . . . . . . . . Crankshaft and Main Bearings 38. . . . . . . . . . . . . . . . . . . . . . . . . . . . . . . . . . . . . . . . . . . . . . Removal 38. . . . . . . . . . . . . . . . . . . . . . . . . . . . . . . . . . . . . . . . . . . . . . . . . . . . . . . . . . . . . Cylinder Head 39. . . . . . . . . . . . . . . . . . . . . . . . . . . . . . . . . . . . . . . . . . . . . . . . . . . . . . . . . . . . Disassembly 39. . . . . . . . . . . . . . . . . . . . . . . . . . . . . . . . . . . . . . . . . . . . . . . . . . . . . . . . . . Inspection and Repair 39. . . . . . . . . . . . . . . . . . . . . . . . . . . . . . . . . . . . . . . . . . . . . . . . . . Valve Seats 40. . . . . . . . . . . . . . . . . . . . . . . . . . . . . . . . . . . . . . . . . . . . . . . . . . . . . . . . . . . . . . Inspection and Repair 40. . . . . . . . . . . . . . . . . . . . . . . . . . . . . . . . . . . . . . . . . . . . . . . . . . Valves 40. . . . . . . . . . . . . . . . . . . . . . . . . . . . . . . . . . . . . . . . . . . . . . . . . . . . . . . . . . . . . . . . . . . Inspection and Repair 40. . . . . . . . . . . . . . . . . . . . . . . . . . . . . . . . . . . . . . . . . . . . . . . . . . Valve Guides 42. . . . . . . . . . . . . . . . . . . . . . . . . . . . . . . . . . . . . . . . . . . . . . . . . . . . . . . . . . . . . Inspection and Repair 42. . . . . . . . . . . . . . . . . . . . . . . . . . . . . . . . . . . . . . . . . . . . . . . . . . Valve Springs 42. . . . . . . . . . . . . . . . . . . . . . . . . . . . . . . . . . . . . . . . . . . . . . . . . . . . . . . . . . . . Inspection and Repair 42. . . . . . . . . . . . . . . . . . . . . . . . . . . . . . . . . . . . . . . . . . . . . . . . . . Rocker Arms 43. . . . . . . . . . . . . . . . . . . . . . . . . . . . . . . . . . . . . . . . . . . . . . . . . . . . . . . . . . . . . Inspection and Replacement 43. . . . . . . . . . . . . . . . . . . . . . . . . . . . . . . . . . . . . . . . . . . . Push Rods 43. . . . . . . . . . . . . . . . . . . . . . . . . . . . . . . . . . . . . . . . . . . . . . . . . . . . . . . . . . . . . . . Inspection and Replacement 43. . . . . . . . . . . . . . . . . . . . . . . . . . . . . . . . . . . . . . . . . . . . Cylinder Head 44. . . . . . . . . . . . . . . . . . . . . . . . . . . . . . . . . . . . . . . . . . . . . . . . . . . . . . . . . . . . Assembly 44. . . . . . . . . . . . . . . . . . . . . . . . . . . . . . . . . . . . . . . . . . . . . . . . . . . . . . . . . . . .
  • 9. SECTION 10 -- ENGINE SYSTEMS -- CHAPTER 1 10-3 Section Description Page Cylinder Block 44. . . . . . . . . . . . . . . . . . . . . . . . . . . . . . . . . . . . . . . . . . . . . . . . . . . . . . . . . . . . Inspection and Repair 44. . . . . . . . . . . . . . . . . . . . . . . . . . . . . . . . . . . . . . . . . . . . . . . . . . Pistons 45. . . . . . . . . . . . . . . . . . . . . . . . . . . . . . . . . . . . . . . . . . . . . . . . . . . . . . . . . . . . . . . . . . Disassembly and Inspection 45. . . . . . . . . . . . . . . . . . . . . . . . . . . . . . . . . . . . . . . . . . . . Piston Rings 47. . . . . . . . . . . . . . . . . . . . . . . . . . . . . . . . . . . . . . . . . . . . . . . . . . . . . . . . . . . . . Inspection and Replacement 47. . . . . . . . . . . . . . . . . . . . . . . . . . . . . . . . . . . . . . . . . . . . Connecting Rods 48. . . . . . . . . . . . . . . . . . . . . . . . . . . . . . . . . . . . . . . . . . . . . . . . . . . . . . . . . Inspection and Repair 48. . . . . . . . . . . . . . . . . . . . . . . . . . . . . . . . . . . . . . . . . . . . . . . . . . Connecting Rod Bearing Oil Clearance Check 50. . . . . . . . . . . . . . . . . . . . . . . . . . . . . . . . Pistons, Rings and Connecting Rod 50. . . . . . . . . . . . . . . . . . . . . . . . . . . . . . . . . . . . . . . . . Assembly 50. . . . . . . . . . . . . . . . . . . . . . . . . . . . . . . . . . . . . . . . . . . . . . . . . . . . . . . . . . . . Main Bearing and Thrust Bearing 51. . . . . . . . . . . . . . . . . . . . . . . . . . . . . . . . . . . . . . . . . . . Removal and Inspection 51. . . . . . . . . . . . . . . . . . . . . . . . . . . . . . . . . . . . . . . . . . . . . . . . Crankshaft 52. . . . . . . . . . . . . . . . . . . . . . . . . . . . . . . . . . . . . . . . . . . . . . . . . . . . . . . . . . . . . . . Inspection 52. . . . . . . . . . . . . . . . . . . . . . . . . . . . . . . . . . . . . . . . . . . . . . . . . . . . . . . . . . . . Crankshaft Journal Wear Limit and Bearing Usage 52. . . . . . . . . . . . . . . . . . . . . . . . . . . . . . . . Crankshaft Front Main Bearing (Bushing) 53. . . . . . . . . . . . . . . . . . . . . . . . . . . . . . . . . . . . Inspection 53. . . . . . . . . . . . . . . . . . . . . . . . . . . . . . . . . . . . . . . . . . . . . . . . . . . . . . . . . . . . Replacement 53. . . . . . . . . . . . . . . . . . . . . . . . . . . . . . . . . . . . . . . . . . . . . . . . . . . . . . . . . Crankshaft Main Bearing 54. . . . . . . . . . . . . . . . . . . . . . . . . . . . . . . . . . . . . . . . . . . . . . . . . . . Assembly 54. . . . . . . . . . . . . . . . . . . . . . . . . . . . . . . . . . . . . . . . . . . . . . . . . . . . . . . . . . . . Port Block 54. . . . . . . . . . . . . . . . . . . . . . . . . . . . . . . . . . . . . . . . . . . . . . . . . . . . . . . . . . . . . . . Removal 54. . . . . . . . . . . . . . . . . . . . . . . . . . . . . . . . . . . . . . . . . . . . . . . . . . . . . . . . . . . . . Installation 55. . . . . . . . . . . . . . . . . . . . . . . . . . . . . . . . . . . . . . . . . . . . . . . . . . . . . . . . . . . . Timing Gear 55. . . . . . . . . . . . . . . . . . . . . . . . . . . . . . . . . . . . . . . . . . . . . . . . . . . . . . . . . . . . . . Inspection 55. . . . . . . . . . . . . . . . . . . . . . . . . . . . . . . . . . . . . . . . . . . . . . . . . . . . . . . . . . . . Camshaft 55. . . . . . . . . . . . . . . . . . . . . . . . . . . . . . . . . . . . . . . . . . . . . . . . . . . . . . . . . . . . . . . . Disassembly 55. . . . . . . . . . . . . . . . . . . . . . . . . . . . . . . . . . . . . . . . . . . . . . . . . . . . . . . . . . Inspection 56. . . . . . . . . . . . . . . . . . . . . . . . . . . . . . . . . . . . . . . . . . . . . . . . . . . . . . . . . . . . Assembly 56. . . . . . . . . . . . . . . . . . . . . . . . . . . . . . . . . . . . . . . . . . . . . . . . . . . . . . . . . . . . Flywheel 57. . . . . . . . . . . . . . . . . . . . . . . . . . . . . . . . . . . . . . . . . . . . . . . . . . . . . . . . . . . . . . . . . Inspection 57. . . . . . . . . . . . . . . . . . . . . . . . . . . . . . . . . . . . . . . . . . . . . . . . . . . . . . . . . . . . Timing Gear Housing 57. . . . . . . . . . . . . . . . . . . . . . . . . . . . . . . . . . . . . . . . . . . . . . . . . . . . . . Front Oil Seal and Steering Pump Seal 57. . . . . . . . . . . . . . . . . . . . . . . . . . . . . . . . . . . . . . Replacement 57. . . . . . . . . . . . . . . . . . . . . . . . . . . . . . . . . . . . . . . . . . . . . . . . . . . . . . . . . Crankshaft and Bearing Holder 58. . . . . . . . . . . . . . . . . . . . . . . . . . . . . . . . . . . . . . . . . . . . . Assembly 58. . . . . . . . . . . . . . . . . . . . . . . . . . . . . . . . . . . . . . . . . . . . . . . . . . . . . . . . . . . .
  • 10. SECTION 10 -- ENGINE SYSTEMS -- CHAPTER 1 10-4 Section Description Page Rear Oil Seal and Backplate 58. . . . . . . . . . . . . . . . . . . . . . . . . . . . . . . . . . . . . . . . . . . . . . . . Assembly 58. . . . . . . . . . . . . . . . . . . . . . . . . . . . . . . . . . . . . . . . . . . . . . . . . . . . . . . . . . . . Flywheel 59. . . . . . . . . . . . . . . . . . . . . . . . . . . . . . . . . . . . . . . . . . . . . . . . . . . . . . . . . . . . . . . . . Installation 59. . . . . . . . . . . . . . . . . . . . . . . . . . . . . . . . . . . . . . . . . . . . . . . . . . . . . . . . . . . . Piston and Connecting Rod 59. . . . . . . . . . . . . . . . . . . . . . . . . . . . . . . . . . . . . . . . . . . . . . . . Installation 59. . . . . . . . . . . . . . . . . . . . . . . . . . . . . . . . . . . . . . . . . . . . . . . . . . . . . . . . . . . . Oil Suction Pipe and Suction Strainer 60. . . . . . . . . . . . . . . . . . . . . . . . . . . . . . . . . . . . . . . . Installation 60. . . . . . . . . . . . . . . . . . . . . . . . . . . . . . . . . . . . . . . . . . . . . . . . . . . . . . . . . . . . Oil Sump 60. . . . . . . . . . . . . . . . . . . . . . . . . . . . . . . . . . . . . . . . . . . . . . . . . . . . . . . . . . . . . . . . Installation 60. . . . . . . . . . . . . . . . . . . . . . . . . . . . . . . . . . . . . . . . . . . . . . . . . . . . . . . . . . . . Timing Gear Cover, Timing Gears and Camshaft 60. . . . . . . . . . . . . . . . . . . . . . . . . . . . . . Assembly 60. . . . . . . . . . . . . . . . . . . . . . . . . . . . . . . . . . . . . . . . . . . . . . . . . . . . . . . . . . . . Head Gasket Selection 62. . . . . . . . . . . . . . . . . . . . . . . . . . . . . . . . . . . . . . . . . . . . . . . . . . . . Cylinder Head 63. . . . . . . . . . . . . . . . . . . . . . . . . . . . . . . . . . . . . . . . . . . . . . . . . . . . . . . . . . . . Assembly 63. . . . . . . . . . . . . . . . . . . . . . . . . . . . . . . . . . . . . . . . . . . . . . . . . . . . . . . . . . . . Valve Clearance Adjustment 64. . . . . . . . . . . . . . . . . . . . . . . . . . . . . . . . . . . . . . . . . . . . . . . . Valve Cover 64. . . . . . . . . . . . . . . . . . . . . . . . . . . . . . . . . . . . . . . . . . . . . . . . . . . . . . . . . . . . . . Installation 64. . . . . . . . . . . . . . . . . . . . . . . . . . . . . . . . . . . . . . . . . . . . . . . . . . . . . . . . . . . . Engine 65. . . . . . . . . . . . . . . . . . . . . . . . . . . . . . . . . . . . . . . . . . . . . . . . . . . . . . . . . . . . . . . . . . Installation 65. . . . . . . . . . . . . . . . . . . . . . . . . . . . . . . . . . . . . . . . . . . . . . . . . . . . . . . . . . . . Drive Train 66. . . . . . . . . . . . . . . . . . . . . . . . . . . . . . . . . . . . . . . . . . . . . . . . . . . . . . . . . . . . . . . Installation 66. . . . . . . . . . . . . . . . . . . . . . . . . . . . . . . . . . . . . . . . . . . . . . . . . . . . . . . . . . . . Support Frame 66. . . . . . . . . . . . . . . . . . . . . . . . . . . . . . . . . . . . . . . . . . . . . . . . . . . . . . . . . . . Installation 66. . . . . . . . . . . . . . . . . . . . . . . . . . . . . . . . . . . . . . . . . . . . . . . . . . . . . . . . . . . . Tachometer and Throttle Cables 66. . . . . . . . . . . . . . . . . . . . . . . . . . . . . . . . . . . . . . . . . . . . Installation 66. . . . . . . . . . . . . . . . . . . . . . . . . . . . . . . . . . . . . . . . . . . . . . . . . . . . . . . . . . . . Alternator and Temperature Sending Switch 67. . . . . . . . . . . . . . . . . . . . . . . . . . . . . . . . . . Installation 67. . . . . . . . . . . . . . . . . . . . . . . . . . . . . . . . . . . . . . . . . . . . . . . . . . . . . . . . . . . . Oil Pressure Switch 67. . . . . . . . . . . . . . . . . . . . . . . . . . . . . . . . . . . . . . . . . . . . . . . . . . . . . . . Installation 67. . . . . . . . . . . . . . . . . . . . . . . . . . . . . . . . . . . . . . . . . . . . . . . . . . . . . . . . . . . . Fuel Shutoff Solenoid 67. . . . . . . . . . . . . . . . . . . . . . . . . . . . . . . . . . . . . . . . . . . . . . . . . . . . . . Installation 67. . . . . . . . . . . . . . . . . . . . . . . . . . . . . . . . . . . . . . . . . . . . . . . . . . . . . . . . . . . . Fan, Water Pump and External Oil Tube 68. . . . . . . . . . . . . . . . . . . . . . . . . . . . . . . . . . . . . Installation 68. . . . . . . . . . . . . . . . . . . . . . . . . . . . . . . . . . . . . . . . . . . . . . . . . . . . . . . . . . . . Hydraulic Pump 68. . . . . . . . . . . . . . . . . . . . . . . . . . . . . . . . . . . . . . . . . . . . . . . . . . . . . . . . . . Installation 68. . . . . . . . . . . . . . . . . . . . . . . . . . . . . . . . . . . . . . . . . . . . . . . . . . . . . . . . . . . . Glow Plug and Connector 68. . . . . . . . . . . . . . . . . . . . . . . . . . . . . . . . . . . . . . . . . . . . . . . . . . Installation 68. . . . . . . . . . . . . . . . . . . . . . . . . . . . . . . . . . . . . . . . . . . . . . . . . . . . . . . . . . . .
  • 11. SECTION 10 -- ENGINE SYSTEMS -- CHAPTER 1 10-5 Section Description Page Fuel Injection Pump 69. . . . . . . . . . . . . . . . . . . . . . . . . . . . . . . . . . . . . . . . . . . . . . . . . . . . . . . Installation 69. . . . . . . . . . . . . . . . . . . . . . . . . . . . . . . . . . . . . . . . . . . . . . . . . . . . . . . . . . . . Fuel Injector 70. . . . . . . . . . . . . . . . . . . . . . . . . . . . . . . . . . . . . . . . . . . . . . . . . . . . . . . . . . . . . Installation 70. . . . . . . . . . . . . . . . . . . . . . . . . . . . . . . . . . . . . . . . . . . . . . . . . . . . . . . . . . . . Fuel Line 70. . . . . . . . . . . . . . . . . . . . . . . . . . . . . . . . . . . . . . . . . . . . . . . . . . . . . . . . . . . . . . . . Installation 70. . . . . . . . . . . . . . . . . . . . . . . . . . . . . . . . . . . . . . . . . . . . . . . . . . . . . . . . . . . . Exhaust Manifold, Air Cleaner and Radiator 71. . . . . . . . . . . . . . . . . . . . . . . . . . . . . . . . . . Installation 71. . . . . . . . . . . . . . . . . . . . . . . . . . . . . . . . . . . . . . . . . . . . . . . . . . . . . . . . . . . . Engine Lubrication System -- Description of Operation 74. . . . . . . . . . . . . . . . . . . . . . . . . . . . . Engine Oil Filter 77. . . . . . . . . . . . . . . . . . . . . . . . . . . . . . . . . . . . . . . . . . . . . . . . . . . . . . . . . . Construction and Function 77. . . . . . . . . . . . . . . . . . . . . . . . . . . . . . . . . . . . . . . . . . . . . . Maintenance 77. . . . . . . . . . . . . . . . . . . . . . . . . . . . . . . . . . . . . . . . . . . . . . . . . . . . . . . . . . Oil Pump 77. . . . . . . . . . . . . . . . . . . . . . . . . . . . . . . . . . . . . . . . . . . . . . . . . . . . . . . . . . . . . . . . Removal 77. . . . . . . . . . . . . . . . . . . . . . . . . . . . . . . . . . . . . . . . . . . . . . . . . . . . . . . . . . . . . Inspection 77. . . . . . . . . . . . . . . . . . . . . . . . . . . . . . . . . . . . . . . . . . . . . . . . . . . . . . . . . . . . Installation and Adjustment 78. . . . . . . . . . . . . . . . . . . . . . . . . . . . . . . . . . . . . . . . . . . . . Engine Oil Pressure Check 79. . . . . . . . . . . . . . . . . . . . . . . . . . . . . . . . . . . . . . . . . . . . . . . . . Oil Pressure Relief Valve 79. . . . . . . . . . . . . . . . . . . . . . . . . . . . . . . . . . . . . . . . . . . . . . . . . . . Removal 79. . . . . . . . . . . . . . . . . . . . . . . . . . . . . . . . . . . . . . . . . . . . . . . . . . . . . . . . . . . . . Installation 79. . . . . . . . . . . . . . . . . . . . . . . . . . . . . . . . . . . . . . . . . . . . . . . . . . . . . . . . . . . . Oil Consumption 80. . . . . . . . . . . . . . . . . . . . . . . . . . . . . . . . . . . . . . . . . . . . . . . . . . . . . . . . . Cooling System -- Description of Operation 81. . . . . . . . . . . . . . . . . . . . . . . . . . . . . . . . . . . . . . Maintenance 83. . . . . . . . . . . . . . . . . . . . . . . . . . . . . . . . . . . . . . . . . . . . . . . . . . . . . . . . . . . . . Coolant 83. . . . . . . . . . . . . . . . . . . . . . . . . . . . . . . . . . . . . . . . . . . . . . . . . . . . . . . . . . . . . . . . . . Thermostat 83. . . . . . . . . . . . . . . . . . . . . . . . . . . . . . . . . . . . . . . . . . . . . . . . . . . . . . . . . . . . . . Water Pump 83. . . . . . . . . . . . . . . . . . . . . . . . . . . . . . . . . . . . . . . . . . . . . . . . . . . . . . . . . . . . . Cooling Fan 83. . . . . . . . . . . . . . . . . . . . . . . . . . . . . . . . . . . . . . . . . . . . . . . . . . . . . . . . . . . . . . Radiator 83. . . . . . . . . . . . . . . . . . . . . . . . . . . . . . . . . . . . . . . . . . . . . . . . . . . . . . . . . . . . . . . . . Radiator Cap 83. . . . . . . . . . . . . . . . . . . . . . . . . . . . . . . . . . . . . . . . . . . . . . . . . . . . . . . . . . . . . Cooling System Overhaul 84. . . . . . . . . . . . . . . . . . . . . . . . . . . . . . . . . . . . . . . . . . . . . . . . . . . . . Radiator 84. . . . . . . . . . . . . . . . . . . . . . . . . . . . . . . . . . . . . . . . . . . . . . . . . . . . . . . . . . . . . . . . . Removal 84. . . . . . . . . . . . . . . . . . . . . . . . . . . . . . . . . . . . . . . . . . . . . . . . . . . . . . . . . . . . . Inspection and Repair 85. . . . . . . . . . . . . . . . . . . . . . . . . . . . . . . . . . . . . . . . . . . . . . . . . . Installation 86. . . . . . . . . . . . . . . . . . . . . . . . . . . . . . . . . . . . . . . . . . . . . . . . . . . . . . . . . . . . Water Pump and Thermostat 87. . . . . . . . . . . . . . . . . . . . . . . . . . . . . . . . . . . . . . . . . . . . . . . Removal 87. . . . . . . . . . . . . . . . . . . . . . . . . . . . . . . . . . . . . . . . . . . . . . . . . . . . . . . . . . . . . Inspection and Repair 89. . . . . . . . . . . . . . . . . . . . . . . . . . . . . . . . . . . . . . . . . . . . . . . . . . Installation 90. . . . . . . . . . . . . . . . . . . . . . . . . . . . . . . . . . . . . . . . . . . . . . . . . . . . . . . . . . . . Testing 93. . . . . . . . . . . . . . . . . . . . . . . . . . . . . . . . . . . . . . . . . . . . . . . . . . . . . . . . . . . . . . . . . . . . . Compression Test and Tools 93. . . . . . . . . . . . . . . . . . . . . . . . . . . . . . . . . . . . . . . . . . . . . . . .
  • 12. SECTION 10 -- ENGINE SYSTEMS -- CHAPTER 1 10-6 SPECIFICATIONS GENERAL Tractor Model T1010 T1030 T1110 PTO H.P. 20.0 26.0 28.0 Engine Model S753 S773L S773L Number of Cylinders 3 3 3 Bore x Stroke 75 x 72 mm (2.96 x 2.83 in.) 77 x 81 mm (3.03 x 3.19 in.) 77 x 81 mm (3.03 x 3.19 in.) Displacement 0.95 L, 954 cc (58.2 cu. in.) 1.13 L, 1131 cc (69.0 cu. in.) 1.13 L, 1131 cc (69.0 cu. in.) Compression Ratio 23.5:1 22.8:1 22.8:1 Rated Speed (rpm) 3000 3000 3000 Muffler In the hood In the hood In the hood Firing Order 1 -- 2 -- 3 1 -- 2 -- 3 1 -- 2 -- 3 Low Idle Speed (rpm) 1350 ± 50 1350 ± 50 1350 ± 50 High Idle Speed (rpm) 3250 ± 25 3350 ± 25 3350 ± 25 Cylinder Arrangement In-line Vertical In-line Vertical In-line Vertical Valve Arrangement Overhead Overhead Overhead Compression Pressure @ 200 rpm (cylinder speed) Variation between cylinders 427 ± 70 psi 70 psi 427 ± 70 psi 70 psi 427 ± 70 psi 70 psi CYLINDER HEAD Tractor Model T1010 T1030 T1110 Head Warp Standard Maximum 0.05 mm (0.002 in.) 0.12 mm (0.005 in.) 0.05 mm (0.002 in.) 0.12 mm (0.005 in.) 0.05 mm (0.002 in.) 0.12 mm (0.005 in.) Valve Seat Width Standard Maximum 1.7 -- 2.1 mm (0.067 -- 0.082 in.) 2.5 mm (0.098 in.) 1.7 -- 2.1 mm (0.067 -- 0.082 in.) 2.5 mm (0.098 in.) 1.7 -- 2.1 mm (0.067 -- 0.082 in.) 2.5 mm (0.098 in.) Valve Seat Sink Standard Maximum 0.85 -- 1.15 mm (0.0334 -- 0.0453 in.) 1.8 mm (0.0708 in.) 0.85 -- 1.15 mm (0.0334 -- 0.0453 in.) 1.8 mm (0.0708 in.) 0.85 -- 1.15 mm (0.0334 -- 0.0453 in.) 1.8 mm (0.0708 in.) Valve Angle 45_ 45_ 45_ Piston to Valve Clearance 1.0 mm (0.039 in.) @ Piston TDC (Minimum 0.8 mm [0.031 in.]) 1.0 mm (0.039 in.) @ Piston TDC (Minimum 0.8 mm [0.031 in.]) 1.0 mm (0.039 in.) @ Piston TDC (Minimum 0.8 mm [0.031 in.])
  • 13. SECTION 10 -- ENGINE SYSTEMS -- CHAPTER 1 10-7 CYLINDER BLOCK Tractor Model T1010 T1030 T1110 Bore Standard Maximum 75.0 -- 75.019 mm (2.952 -- 2.953 in.) 75.2 mm (2.960 in.) 77.0 -- 77.019 mm (3.031 -- 3.032 in.) 77.2 mm (3.039 in.) 77.0 -- 77.019 mm (3.031 -- 3.032 in.) 77.2 mm (3.039 in.) Head Surface Warp Standard Maximum 0.05 mm (0.002 in.) 0.12 mm (0.005 in.) 0.05 mm (0.002 in.) 0.12 mm (0.005 in.) 0.05 mm (0.002 in.) 0.12 mm (0.005 in.) *T1010 -- If bore size exceeds 75.2 mm (2.96 in.) replace the block. *T1030 -- If bore size exceeds 77.2 mm (3.039 in.) replace the block. *T1110 -- If bore size exceeds 77.2 mm (3.039 in.) replace the block. PISTON Tractor Model T1010 T1030 T1110 Diameter Standard Minimum 74.9325 -- 74.9475 mm (2.95 -- 2.9506 in.) 74.7 (2.941 in.) 76.9325 -- 76.9475 mm (3.029 -- 3.0294 in.) 76.7 (3.0197 in.) 76.9325 -- 76.9475 mm (3.029 -- 3.0294 in.) 76.7 (3.0197 in.) Bore Clearance Standard Maximum 0.0525 -- 0.0865 mm (0.0021 -- 0.0034 in.) 0.25 mm (0.010 in.) 0.0525 -- 0.0865 mm (0.0021 -- 0.0034 in.) 0.25 mm (0.010 in.) 0.0525 -- 0.0865 mm (0.0021 -- 0.0034 in.) 0.25 mm (0.010 in.) Wrist Pin Bore Standard Maximum 20.998 -- 21.004 mm (0.8267 -- 0.8269 in.) 21.016 mm (0.827 in.) 20.998 -- 21.004 mm (0.8267 -- 0.8269 in.) 21.016 mm (0.827 in.) 20.998 -- 21.004 mm (0.8267 -- 0.8269 in.) 21.016 mm (0.827 in.) Wrist Pin Diameter Standard Minimum 20.998 -- 21.002 mm (0.8267 -- 0.8268 in.) 20.98 mm (0.826 in.) 20.998 -- 21.002 mm (0.8267 -- 0.8268 in.) 20.98 mm (0.826 in.) 20.998 -- 21.002 mm (0.8267 -- 0.8268 in.) 20.98 mm (0.826 in.) Wrist Pin Clearance Standard Maximum --0.004 -- 0.006 mm (--0.00016 -- 0.00024 in.) 0.02 mm (0.00078 in.) --0.004 -- 0.006 mm (--0.00016 -- 0.00024 in.) 0.02 mm (0.00078 in.) --0.004 -- 0.006 mm (--0.00016 -- 0.00024 in.) 0.02 mm (0.00078 in.) Available Oversizes Not Available Not Available Not Available
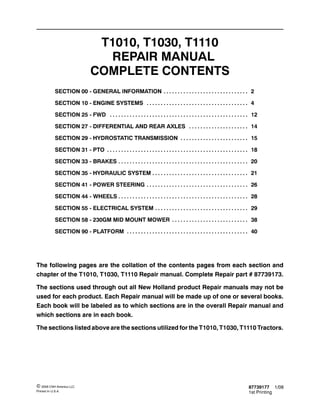
  • 14. SECTION 10 -- ENGINE SYSTEMS -- CHAPTER 1 10-17 GENERAL INFORMATION -- DESCRIPTION OF OPERATION This section describes the engine overhaul and repair procedures of the T1010, T1030, and T1110 series tractors. Repair procedures are essentially the same for all models except as noted in the repair procedures. The tractors are equipped with three-cylinder in-line engines. They are all four cycle, overhead valve, liquid cooled engines. The engines are identified by a code, 1, cast into the lower right side of the cylinder block, just behind the hydraulic pump. The identification numbers of the engines used are shown in the following chart. NOTE: Numeric value, 2, under the Engine Code indicates displacement of the engine in liters. IDENTIFICATION CHART Engine Identification Tractor Model Horsepower S753 T1010 20.0 S773L T1030 26.0 S773L T1110 28.0 S753 954 cc 1 2 1 CYLINDER HEAD AND VALVE TRAIN COMPONENTS The cylinder head incorporates the valve assem- blies, rocker arms, rocker shaft, push rods, lifters, and pre-combustion chambers. The air intake manifold is incorporated into the top left hand side of the valve cover assembly. The exhaust manifold is bolted on the left-hand side of the cylinder head. The cylinder heads have integral valve guides. Standard size valves only are used. Figure 3 provides a cut-away front and side view of an engine. A pre-combustion chamber is located between the injector assembly and the combustion chamber of the cylinder and provides an area for initial ignition of the fuel for improved starting. A glow plug located in the head extends into the pre-combustion chamber and, when energized, pre-heats the fuel-air mixture for improved fuel ignition under cold weather conditions.
  • 15. SECTION 10 -- ENGINE SYSTEMS -- CHAPTER 1 10-18 20043818 2 A breather valve is located on the valve cover. The valve opens when the crank housing pressure rises and the gas runs away to the intake manifold. The gas flows into the cylinder and is exhausted as exhaust fumes.
  • 16. SECTION 10 -- ENGINE SYSTEMS -- CHAPTER 1 10-19 76076931 3 CYLINDER BLOCK ASSEMBLY The cylinder block assembly contains the pistons, connecting rods, crankshaft, timing gears, and engine oil pump. The engine crankshaft is supported by four main bearings. The front main bearing is a full circle bearing positioned in a bore in the front of the block. The second, third, and fourth main bearings are split liners located in holders bolted to the block. The camshaft is supported by two ball bearings one located on each end of the block. The engines utilize a straight connecting rod and a three ring piston.
  • 17. SECTION 10 -- ENGINE SYSTEMS -- CHAPTER 1 10-26 OVERHAUL ENGINE ACCESS Disassembly 1. Remove the engine compartment side panels. 2. Open the radiator drain, 1, and drain the coolant from the radiator. NOTE: The cooling system capacity is 3.5 L (3.69 qt.). 3. Remove the radiator assembly. See “Radiator Removal”, discussed later in this section. 76076932 1 4 4. Disconnect the electrical connector, 1, joining the headlamp wiring harness to the main harness. 76076933 1 5 5. Remove the four hex nuts, 1, securing the hood hinge bracket, 2, to the firewall support, and carefully remove the hood with the hinge bracket attached. 76076934 2 1 1 6
  • 18. Thank you very much for your reading. Please Click Here. Then Get COMPLETE MANUAL. NO WAITING NOTE: If there is no response to click on the link above, please download the PDF document first and then click on it.
  • 19. SECTION 10 -- ENGINE SYSTEMS -- CHAPTER 1 10-27 6. Remove the complete air cleaner assembly, 1, along with the air hoses. 10034397 1 7 7. Remove the two bolts, 1, securing the air cleaner mounting bracket, 2, to the engine. Remove the bracket. 8. Remove the two hex-head bolts securing the upper panel to the rear of the transverse support crossmember. 9. Disconnect the two relays mounted on the upper panel from the electrical harness. (The electrical connectors are located on the bottom of the relays.) Remove the upper panel. 10. Remove the steering wheel hub cover, and the locking nut and lockwasher beneath the cover. Slide the steering wheel off of the steering column. 11. Remove the control knob from the hand throttle lever. 10040632 2 1 8 12. Remove the four bolts securing the forward cowling to the cowling support frame. Slide the cowling upward to gain access to the wiring behind the instrument panel. 13. Disconnect the tachometer cable, 1, behind the instrument panel. Loosen the knurled locking ring and pull the cable straight out of the receiver. 14. Separate the electrical connectors, 2, found in the wiring harness on each side of the steering column. Detach the two round electrical connectors from the rear of the instrument panel. 15. Disconnect the harness electrical connector on the bottom of the ignition switch. 16. Slide the cowling up and over the steering column and throttle lever to remove it. 10040644 1 2 2 9
  • 20. SECTION 10 -- ENGINE SYSTEMS -- CHAPTER 1 10-28 17. Remove the eight hex-head bolts securing the firewall box, 1, to the cowling support frame, 2, and the four bolts securing the firewall box to the steering column support, 3. 18. Carefully slide the firewall box upward from between the two support structures and remove the box. 76076935 1 2 3 10 19. Remove the exhaust pipe bracket, 1. Separate and remove the exhaust pipe extension, 2, from the muffler outlet pipe, 3. 20. Remove the four bolts attaching the exhaust pipe flange, 5, to the exhaust manifold outlet, 6, and the two flanged hex nuts securing the muffler to the mounting studs on the rear transverse engine plate, 4. 21. Remove the exhaust muffler assembly, retaining the metal gasket for the connecting flange on the exhaust manifold. 76076936 1 2 3 5 6 4 11 22. Remove the four hex-head bolts, 1, and two flanged hex nuts, 2, securing the exhaust manifold, 3, to the LH side of the engine. Remove the manifold and its metal gasket. 10040647 2 3 2 1 1 12