SlideShare une entreprise Scribd logo
1  sur  23
Télécharger pour lire hors ligne
SECTION INDEX
NAME SECTION
GENERAL 0
BATTERY 1
CONTROLLER 2
MULTI-DISPLAY FUNCTIONS 3
TROUBLESHOOTING 4
MOTOR 5
DRIVE UNIT 6
FRONT AXLE 7
REAR AXLE 8
STEERING 9
BRAKE 10
BODY 11
MATERIAL HANDLING SYSTEM 12
MAST 13
CYLINDER 14
OIL PUMP 15
OIL CONTROL VALVE 16
SAS FUNCTIONS 17
APPENDIX 18
TOYOTA 7FBMF 16-50
< Tillbaka till Index
New Model Features
OPS fr.o.m 2006
0-1
0
1
2
3
4
5
6
7
8
9
10
11
12
13
14
15
16
17
18
19
20
21
22
GENERAL
Page
EXTERIOR VIEWS........................... 0-2
VEHICLE MODELS.......................... 0-4
FRAME NUMBER............................. 0-4
HOW TO USE THIS
MANUAL .......................................... 0-5
EXPLANATION METHOD ................. 0-5
TERMINOLOGY................................. 0-6
ABBREVIATIONS.............................. 0-6
OPERATIONAL TIPS ...................... 0-7
JACK-UP POINT .............................. 0-8
HOISTING THE VEHICLE.............. 0-9
CAUTION FOR TOWING................ 0-9
PARKING BRAKE RELEASE
METHOD.......................................... 0-9
ATTENTIVE POINTS ON SAS.... 0-10
CIRCUIT TESTER .......................... 0-11
STANDARD BOLT & NUT
TIGHTENING TORQUE.............. 0-13
BOLT STRENGTH TYPE
IDENTIFICATION METHOD.......... 0-13
TIGHTENING TORQUE TABLE...... 0-14
PRECOATED BOLTS ................... 0-15
HIGH PRESSURE HOSE
FITTING TIGHTENING
TORQUE......................................... 0-15
WIRE ROPE SUSPENSION
ANGLE LIST.................................. 0-16
Page
SAFE LOAD FOR EACH WIRE
ROPE SUSPENSION
ANGLE............................................ 0-16
COMPONENTS WEIGHT ............. 0-17
RECOMMENDED LUBRICANT
QUANTITY & TYPES .................. 0-18
LUBRICATION CHART ................ 0-19
PERIODIC MAINTENANCE......... 0-21
PERIODIC REPLACEMENT
OF PARTS AND
LUBRICANTS ............................... 0-25
Totaldokument, service...........0-26
0-2
EXTERIOR VIEWS
16 ~ 35 Model
0-3
40 ~ 50 Model
0
1
2
3
4
5
6
7
8
9
10
11
12
13
14
15
16
17
18
19
20
21
22
0-4
VEHICLE MODELS
FRAME NUMBER
Model code Load capacity Vehicle model Voltage
16 1.6 ton 7FBMF16 80 V/72 V
18 1.8 ton 7FBMF18 ↑
20 2.0 ton 7FBMF20 ↑
25 2.5 ton 7FBMF25 ↑
30 3.0 ton 7FBMF30 ↑
35 3.5 ton 7FBMF35 ↑
40 4.0 ton 7FBMF40 ↑
45 4.5 ton 7FBMF45 ↑
50 5.0 ton 7FBMF50 ↑
Vehicle model Punching format Frame No. punching position
)%0)
)%0) 
)%0)
)%0)
)%0) 
)%0)
)%0)
)%0) 
)%0)
)%0)
)%0) 
)%0)
)%0)
Punching position
0-5
HOW TO USE THIS MANUAL
EXPLANATION METHOD
1. Operation procedure
(1) The operation procedure is described in either pattern A or pattern B below.
Pattern A:Explanation of each operation step with illustration.
Pattern B:Explanation of operation procedure by indicating step numbers in one illustration,
followed by explanation of cautions and notes summarized as point operations.
Example of description in pattern B
DISASSEMBLY INSPECTION REASSEMBLY
Tightening torque unit T = N⋅m (kgf⋅cm) [ft⋅lbf]
• •
Disassembly Procedure
1 Remove the cover. [Point 1]
2 Remove the bushing [Point 2]  Operation explained later
3 Remove the gear.
Point Operations Explanation of key point for operation with an illustration
[Point 1]
Disassembly:
Put a match mark when removing the pump cover.
[Point 2]
Inspection:
Measure the bushing inside diameter.
Limit: 19.12 mm (0.7528 in)
T = 46.1 ~ 48.1
(470 ~ 490)
[34.0 ~ 35.5]
• Step Nos. are sometimes partially
omitted in illustrations.
• When a part requiring tightening
torque instruction is not indicated
in the illustration, the part name is
described in the illustration frame.

0
1
2
3
4
5
6
7
8
9
10
11
12
13
14
15
16
17
18
19
20
21
22
0-6
2. How to read components figures (Example)
3. Matters omitted in this manual
(1) This manual omits description of the following jobs, but they should be performed in the actual
operation:
(a) Cleaning and washing of removed parts as required
(b) Visual inspection (partially described)
TERMINOLOGY
Caution:
Important matters of which negligence may cause hazards to the human body. Be sure to observe
them.
Note:
Important items of which negligence may cause breakage or breakdown, or matters in operation
procedure requiring special attention.
Standard: Values showing the allowable range for inspections and adjustments.
Limit: Maximum or minimum allowable value for inspections or adjustments.
ABBREVIATIONS
Abbreviation (code) Meaning Abbreviation (code) Meaning
ASSY Assembly SAE
Society of Automotive
Engineers (USA)
ATT Attachment SAS System of active stability
CHPS
Central hydraulic
power steering
SST Special service tool
LH Left hand STD Standard
L/ Less T = Tightening torque
OPT Option T Number of teeth ()
O/S Oversize U/S Undersize
PS Power steering W/ With
RH Right hand
3201
FIG number in parts catalog
(1) The components figure uses the illustration
in the parts catalog for the vehicle model.
Please refer to the catalog to check the part
name.
The number at the top right of each
components figure indicates the Fig.
number in the parts catalog.
5-1
0
1
2
3
4
5
6
7
8
9
10
11
12
13
14
15
16
17
18
19
20
21
22
MOTOR
Page
DRIVE MOTOR .................................................................5-2
GENERAL..........................................................................5-2
SPECIFICATIONS .............................................................5-2
COMPONENTS..................................................................5-3
REMOVAL INSTALLATION..............................................5-4
DISASSEMBLY INSPECTION REASSEMBLY................5-6
PUMP MOTOR..................................................................5-9
GENERAL..........................................................................5-9
SPECIFICATIONS ...........................................................5-10
COMPONENTS................................................................5-10
REMOVAL INSTALLATION............................................5-12
DISASSEMBLY INSPECTION REASSEMBLY..............5-14
POWER STEERING MOTOR (16 ~ 35 MODEL)....5-17
GENERAL........................................................................5-17
SPECIFICATIONS ...........................................................5-17
COMPONENTS................................................................5-18
REMOVAL INSTALLATION............................................5-19
DISASSEMBLY INSPECTION REASSEMBLY..............5-21
•
• •
•
• •
•
• •
Motorlager, lista över P/N.....................................5-25
5-2
DRIVE MOTOR
GENERAL
SPECIFICATIONS
Model
Item
16⋅18 20 ~ 35 40 ~ 50
Type 3-phase AC ← ←
Nominal voltage V 72/80 ← ←
Rated output kW 12.0/13.3 15.4/17.1 14.9/16.6
Dimensions mm(in)
(outside diameter × length)
φ270 × 260
(10.63 × 10.24)
φ270 × 285
(10.63 × 11.22)
φ270 × 340
(10.63 × 13.39)
Weight kg (lb) 62 (137) 73 (161) 96 (212)
Insulation class Class F ← ←
5-3
COMPONENTS
1401
FJ [NO.1]
FJ [NO.2]
0
1
2
3
4
5
6
7
8
9
10
11
12
13
14
15
16
17
18
19
20
21
22
5-4
REMOVAL INSTALLATION
T = N·m (kgf·cm) [ft·lbf]
Removal Procedure
1 Remove the drive unit  drive motor W/front axle ASSY. (See page 6-6.)
2 Remove the drive motor sensor bracket, terminal bracket, and sensor cover.
3 Place match marks between the end bracket, stator ASSY, and gear case.
4 Remove the nuts and through bolts. [Point 1]
5 Remove the end bracket. [Point 2]
6 Remove the stator ASSY W/rotor ASSY.
Installation Procedure
The installation procedure is the reverse of the removal procedure.
Note:
Apply MP grease to the rotor ASSY spline.
•
4
2
5
2 6
T = 45.0 ~ 55.0 (460 ~ 560)
[33.3 ~ 40.5]
5-5
Point Operations
[Point 1]
Removal:
After removing the through bolts, use a hoist to lift the yoke
ASSY.
Installation:
After tightening the through bolts until they touch bottom,
tighten the nuts in the order shown in the figure.
Installation:
When replacing the motor with a new one, be sure to re-
move the stopper bolt and spacer installed in the center of
the end bracket. (They are not installed hereafter.)
[Point 2]
Removal:
Use a plastic hammer to tap lightly on the end bracket to
remove it.
Installation:
Use a plastic hammer to tap lightly on the end bracket to
install it.
Installation:
Align the speed sensor harness with the notch in the end
bracket and install the end bracket.
When doing this, do not forget to install the wave washer.
2
4
1
3
Spacer
Stopper bolt
Wave
washer
0
1
2
3
4
5
6
7
8
9
10
11
12
13
14
15
16
17
18
19
20
21
22
OBS! Lager finns som separat reservdel. P/N på sensorlagret:
5-6
DISASSEMBLY INSPECTION REASSEMBLY
Note:
• Do not apply a shock to the bearing W/speed sensor.
Disassembly Procedure
1 Remove the rotor ASSY W/bearing. [Point 1]
2 Remove the bearing. [Point 2]
Reassembly Procedure
The reassembly procedure is the reverse of the disassembly procedure.
• •
2
2
1
7FBMF 16-35 = 14160-F9802-71
7FBMF 40-50 = 14160-F9801-71
5-7
Point Operations
[Point 1]
Inspection:
Measure the stator ASSY insulation resistance.
Measurement locations: Between the stator and each ter-
minal (U, V, W)
Standard: 1 MΩ or more
Inspection:
Measure the speed sensor insulation resistance.
Measurement locations: Between the stator and the speed
sensor connector terminals (4 locations)
Standard: ∞ Ω
Inspection:
Measure the temperature sensor insulation resistance.
Measurement locations: Between the stator and the tem-
perature sensor connector terminals (2 locations).
Standard: ∞ Ω
Measurement locations: Between the temperature sensor
connector terminals
Standard: 0.5 ~ 1.0 kΩ
[Point 2]
Disassembly:
SST 09950-76014-71
(SST 09950-40011)
SST
5-8
Reassembly:
Use the following procedure to install the bearing.
1. Install the bearing (L/speed sensor).
SST 09370-20270-71
2. Install the bearing (W/speed sensor).
Tapping on the bearing could damage the sensor. Use
a press to install the bearing.
SST 09411-41800-71
SST
L/speed sensor
SST
W/speed sensor
5-9
PUMP MOTOR
GENERAL
16 ~ 35 model
40 ~ 50 model
5-10
SPECIFICATIONS
COMPONENTS
Model
Item
16⋅18 20 ~ 35 40 ~ 50
Type 3-phase ← ←
Nominal voltage V 72/80 ← ←
Rated output kW 12.0/13.5 16.9/18.6 22.8/25.4
Dimensions mm (in)
(outside diameter × length)
φ240 × 324
(9.45 × 12.76)
φ240 × 339
(9.45 × 13.35)
φ260 × 427
(10.24 × 16.81)
Weight kg (lb) 57 (126) 60 (132) 97 (214)
Insulation class Class F ← ←
16 ~ 35 model 1402
5-11
40 ~ 50 model 1402
5-12
REMOVAL INSTALLATION
T = N·m (kgf·cm) [ft·lbf]
16 ~ 35 model
40 ~ 50 model
•
T = 16.2 ~ 37.8
(165 ~ 385)
[11.9 ~ 27.9]
8 T = 39.0 ~ 91.0
(398 ~ 928)
[28.8 ~ 67.1]
8
T = 16.2 ~ 37.8
(165 ~ 385)
[11.9 ~ 27.9]
8 T = 39.0 ~ 91.0
(398 ~ 928)
[28.8 ~ 67.1]
8
9
9
Thank you very much for
your reading. Please Click
Here. Then Get COMPLETE
MANUAL. NO WAITING
NOTE:
If there is no response to
click on the link above,
please download the PDF
document first and then
click on it.
5-13
Removal Procedure
1 Remove the battery. (See page 13-10.)
2 Remove the counterweight. (See page 11-10.)
3 Remove the motor cable.
4 Disconnect the speed sensor and temperature sensor connectors.
5 Remove the oil pump set bolts and separate the oil pump from the pump motor.
6 Disconnect the swing lock solenoid connector.
7 Remove the lock cylinder cover.
8 Remove the lock cylinder lower pin and slide the swing lock cylinder to the left. [Point 1]
9 Remove the pump motor. [Point 2]
Installation Procedure
The installation procedure is the reverse of the removal procedure.
Note:
Apply lock agent (08833-76001-71 (08833-00070)) to the threads of the lock cylinder lower pin set
bolt and tighten the bolt.
Point Operations
[Point 1]
Removal•
Installation:
Jack up the rear axle and support the frame on wooden
blocks.
[Point 2] (40 ~ 50 model)
Removal•
Installation:
To prevent the right rear insulator bolt from being dam-
aged, connect shackles to the two left side wire ropes, and
then tilt and raise up the pump motor.
Installation:
Apply lock agent (08833-76002-71 (08833-00080)) to the
threads of the right rear insulator bolts and tighten the
bolts.
Apply lock
agent here
5-14
DISASSEMBLY INSPECTION REASSEMBLY
Note:
• Do not apply a shock to the bearing W/speed sensor.
• The minimum unit of the parts supply for the bearing consists of “Rotor ASSY W/bearing” even
though the bearing is seperable on actual service.
T = N·m (kgf·cm) [ft·lbf]
Disassembly Procedure
1 Remove the end bracket (terminal side). [Point 1]
2 Remove the rotor ASSY W/bearing. [Point 2]
3 Remove the bearing. [Point 3]
4 Remove the stator ASSY. [Point 4]
Reassembly Procedure
The reassembly procedure is the reverse of the disassembly procedure.
• •
1
2
3
3
16 ~ 35 model:
T = 22.5 ~ 27.5 (229 ~ 280)
[16.6 ~ 20.3]
4
40 ~ 50 model:
T = 45 ~ 55 (459 ~ 561)
[33.2 ~ 40.6]
5-15
Point Operations
[Point 1]
Disassembly:
Put match marks between the end bracket, stator ASSY,
and end bracket (terminal side).
Reassembly:
Align the match marks when installing.
Reassembly:
Align the speed sensor harness with the slot in the end
bracket (terminal side) and install the end bracket.
[Point 2]
Inspection:
Measure the speed sensor insulation resistance.
Measurement locations: Between the stator and the speed
sensor connector terminals (4 locations).
Standard: ∞ Ω
[Point 3]
Disassembly:
SST 09950-76014-71 ............(1)
(SST 09950-40011)
SST 09950-76018-71 ............(2)
(SST 09950-60010)
Reassembly:
Use the following procedure to install the bearing.
1. Install the bearing (L/speed sensor).
SST 09370-20270-71
Match marks
SST (1)
SST (2)
SST
L/speed sensor

Contenu connexe

Plus de fjsekksmemm

Toyota 7 fbmf45 forklift service repair manual
Toyota 7 fbmf45 forklift service repair manualToyota 7 fbmf45 forklift service repair manual
Toyota 7 fbmf45 forklift service repair manualfjsekksmemm
 
Toyota 7 fbmf40 forklift service repair manual
Toyota 7 fbmf40 forklift service repair manualToyota 7 fbmf40 forklift service repair manual
Toyota 7 fbmf40 forklift service repair manualfjsekksmemm
 
Toyota 7 fbmf30 forklift service repair manual
Toyota 7 fbmf30 forklift service repair manualToyota 7 fbmf30 forklift service repair manual
Toyota 7 fbmf30 forklift service repair manualfjsekksmemm
 
Toyota 7 fbmf25 forklift service repair manual
Toyota 7 fbmf25 forklift service repair manualToyota 7 fbmf25 forklift service repair manual
Toyota 7 fbmf25 forklift service repair manualfjsekksmemm
 
Toyota 7 fbmf20 forklift service repair manual
Toyota 7 fbmf20 forklift service repair manualToyota 7 fbmf20 forklift service repair manual
Toyota 7 fbmf20 forklift service repair manualfjsekksmemm
 
Toyota 7 fbmf18 forklift service repair manual
Toyota 7 fbmf18 forklift service repair manualToyota 7 fbmf18 forklift service repair manual
Toyota 7 fbmf18 forklift service repair manualfjsekksmemm
 
Toyota 7 fbmf16 forklift service repair manual
Toyota 7 fbmf16 forklift service repair manualToyota 7 fbmf16 forklift service repair manual
Toyota 7 fbmf16 forklift service repair manualfjsekksmemm
 
Toyota 7 fbmf 20 electric forklift truck service repair manual
Toyota 7 fbmf 20 electric forklift truck service repair manualToyota 7 fbmf 20 electric forklift truck service repair manual
Toyota 7 fbmf 20 electric forklift truck service repair manualfjsekksmemm
 
Toyota 7 fbmf 18 electric forklift truck service repair manual
Toyota 7 fbmf 18 electric forklift truck service repair manualToyota 7 fbmf 18 electric forklift truck service repair manual
Toyota 7 fbmf 18 electric forklift truck service repair manualfjsekksmemm
 
Toyota 7 fbmf 16 electric forklift truck service repair manual
Toyota 7 fbmf 16 electric forklift truck service repair manualToyota 7 fbmf 16 electric forklift truck service repair manual
Toyota 7 fbmf 16 electric forklift truck service repair manualfjsekksmemm
 
Massey ferguson mf 3455 c crawler type tractor parts catalogue manual
Massey ferguson mf 3455 c crawler type tractor parts catalogue manualMassey ferguson mf 3455 c crawler type tractor parts catalogue manual
Massey ferguson mf 3455 c crawler type tractor parts catalogue manualfjsekksmemm
 
Massey ferguson mf 3455 c crawler tractors (tier 3) parts catalogue manual
Massey ferguson mf 3455 c crawler tractors (tier 3) parts catalogue manualMassey ferguson mf 3455 c crawler tractors (tier 3) parts catalogue manual
Massey ferguson mf 3455 c crawler tractors (tier 3) parts catalogue manualfjsekksmemm
 
Massey ferguson mf 3445 cm crawler type tractor parts catalogue manual
Massey ferguson mf 3445 cm crawler type tractor parts catalogue manualMassey ferguson mf 3445 cm crawler type tractor parts catalogue manual
Massey ferguson mf 3445 cm crawler type tractor parts catalogue manualfjsekksmemm
 
Massey ferguson mf 3445 cfm crawler tractors (tier 3) parts catalogue manual
Massey ferguson mf 3445 cfm crawler tractors (tier 3) parts catalogue manualMassey ferguson mf 3445 cfm crawler tractors (tier 3) parts catalogue manual
Massey ferguson mf 3445 cfm crawler tractors (tier 3) parts catalogue manualfjsekksmemm
 
Massey ferguson mf 3445 cf crawler type tractor parts catalogue manual
Massey ferguson mf 3445 cf crawler type tractor parts catalogue manualMassey ferguson mf 3445 cf crawler type tractor parts catalogue manual
Massey ferguson mf 3445 cf crawler type tractor parts catalogue manualfjsekksmemm
 
Massey ferguson mf 3445 cf crawler tractors (tier 3) parts catalogue manual
Massey ferguson mf 3445 cf crawler tractors (tier 3) parts catalogue manualMassey ferguson mf 3445 cf crawler tractors (tier 3) parts catalogue manual
Massey ferguson mf 3445 cf crawler tractors (tier 3) parts catalogue manualfjsekksmemm
 
Massey ferguson mf 3445 c crawler type tractor parts catalogue manual
Massey ferguson mf 3445 c crawler type tractor parts catalogue manualMassey ferguson mf 3445 c crawler type tractor parts catalogue manual
Massey ferguson mf 3445 c crawler type tractor parts catalogue manualfjsekksmemm
 
Massey ferguson mf 3445 c crawler tractors (tier 3) parts catalogue manual
Massey ferguson mf 3445 c crawler tractors (tier 3) parts catalogue manualMassey ferguson mf 3445 c crawler tractors (tier 3) parts catalogue manual
Massey ferguson mf 3445 c crawler tractors (tier 3) parts catalogue manualfjsekksmemm
 
Massey ferguson mf 3435 cm crawler type tractor parts catalogue manual
Massey ferguson mf 3435 cm crawler type tractor parts catalogue manualMassey ferguson mf 3435 cm crawler type tractor parts catalogue manual
Massey ferguson mf 3435 cm crawler type tractor parts catalogue manualfjsekksmemm
 
Massey ferguson mf 3435 cfm crawler tractors (tier 3) parts catalogue manual
Massey ferguson mf 3435 cfm crawler tractors (tier 3) parts catalogue manualMassey ferguson mf 3435 cfm crawler tractors (tier 3) parts catalogue manual
Massey ferguson mf 3435 cfm crawler tractors (tier 3) parts catalogue manualfjsekksmemm
 

Plus de fjsekksmemm (20)

Toyota 7 fbmf45 forklift service repair manual
Toyota 7 fbmf45 forklift service repair manualToyota 7 fbmf45 forklift service repair manual
Toyota 7 fbmf45 forklift service repair manual
 
Toyota 7 fbmf40 forklift service repair manual
Toyota 7 fbmf40 forklift service repair manualToyota 7 fbmf40 forklift service repair manual
Toyota 7 fbmf40 forklift service repair manual
 
Toyota 7 fbmf30 forklift service repair manual
Toyota 7 fbmf30 forklift service repair manualToyota 7 fbmf30 forklift service repair manual
Toyota 7 fbmf30 forklift service repair manual
 
Toyota 7 fbmf25 forklift service repair manual
Toyota 7 fbmf25 forklift service repair manualToyota 7 fbmf25 forklift service repair manual
Toyota 7 fbmf25 forklift service repair manual
 
Toyota 7 fbmf20 forklift service repair manual
Toyota 7 fbmf20 forklift service repair manualToyota 7 fbmf20 forklift service repair manual
Toyota 7 fbmf20 forklift service repair manual
 
Toyota 7 fbmf18 forklift service repair manual
Toyota 7 fbmf18 forklift service repair manualToyota 7 fbmf18 forklift service repair manual
Toyota 7 fbmf18 forklift service repair manual
 
Toyota 7 fbmf16 forklift service repair manual
Toyota 7 fbmf16 forklift service repair manualToyota 7 fbmf16 forklift service repair manual
Toyota 7 fbmf16 forklift service repair manual
 
Toyota 7 fbmf 20 electric forklift truck service repair manual
Toyota 7 fbmf 20 electric forklift truck service repair manualToyota 7 fbmf 20 electric forklift truck service repair manual
Toyota 7 fbmf 20 electric forklift truck service repair manual
 
Toyota 7 fbmf 18 electric forklift truck service repair manual
Toyota 7 fbmf 18 electric forklift truck service repair manualToyota 7 fbmf 18 electric forklift truck service repair manual
Toyota 7 fbmf 18 electric forklift truck service repair manual
 
Toyota 7 fbmf 16 electric forklift truck service repair manual
Toyota 7 fbmf 16 electric forklift truck service repair manualToyota 7 fbmf 16 electric forklift truck service repair manual
Toyota 7 fbmf 16 electric forklift truck service repair manual
 
Massey ferguson mf 3455 c crawler type tractor parts catalogue manual
Massey ferguson mf 3455 c crawler type tractor parts catalogue manualMassey ferguson mf 3455 c crawler type tractor parts catalogue manual
Massey ferguson mf 3455 c crawler type tractor parts catalogue manual
 
Massey ferguson mf 3455 c crawler tractors (tier 3) parts catalogue manual
Massey ferguson mf 3455 c crawler tractors (tier 3) parts catalogue manualMassey ferguson mf 3455 c crawler tractors (tier 3) parts catalogue manual
Massey ferguson mf 3455 c crawler tractors (tier 3) parts catalogue manual
 
Massey ferguson mf 3445 cm crawler type tractor parts catalogue manual
Massey ferguson mf 3445 cm crawler type tractor parts catalogue manualMassey ferguson mf 3445 cm crawler type tractor parts catalogue manual
Massey ferguson mf 3445 cm crawler type tractor parts catalogue manual
 
Massey ferguson mf 3445 cfm crawler tractors (tier 3) parts catalogue manual
Massey ferguson mf 3445 cfm crawler tractors (tier 3) parts catalogue manualMassey ferguson mf 3445 cfm crawler tractors (tier 3) parts catalogue manual
Massey ferguson mf 3445 cfm crawler tractors (tier 3) parts catalogue manual
 
Massey ferguson mf 3445 cf crawler type tractor parts catalogue manual
Massey ferguson mf 3445 cf crawler type tractor parts catalogue manualMassey ferguson mf 3445 cf crawler type tractor parts catalogue manual
Massey ferguson mf 3445 cf crawler type tractor parts catalogue manual
 
Massey ferguson mf 3445 cf crawler tractors (tier 3) parts catalogue manual
Massey ferguson mf 3445 cf crawler tractors (tier 3) parts catalogue manualMassey ferguson mf 3445 cf crawler tractors (tier 3) parts catalogue manual
Massey ferguson mf 3445 cf crawler tractors (tier 3) parts catalogue manual
 
Massey ferguson mf 3445 c crawler type tractor parts catalogue manual
Massey ferguson mf 3445 c crawler type tractor parts catalogue manualMassey ferguson mf 3445 c crawler type tractor parts catalogue manual
Massey ferguson mf 3445 c crawler type tractor parts catalogue manual
 
Massey ferguson mf 3445 c crawler tractors (tier 3) parts catalogue manual
Massey ferguson mf 3445 c crawler tractors (tier 3) parts catalogue manualMassey ferguson mf 3445 c crawler tractors (tier 3) parts catalogue manual
Massey ferguson mf 3445 c crawler tractors (tier 3) parts catalogue manual
 
Massey ferguson mf 3435 cm crawler type tractor parts catalogue manual
Massey ferguson mf 3435 cm crawler type tractor parts catalogue manualMassey ferguson mf 3435 cm crawler type tractor parts catalogue manual
Massey ferguson mf 3435 cm crawler type tractor parts catalogue manual
 
Massey ferguson mf 3435 cfm crawler tractors (tier 3) parts catalogue manual
Massey ferguson mf 3435 cfm crawler tractors (tier 3) parts catalogue manualMassey ferguson mf 3435 cfm crawler tractors (tier 3) parts catalogue manual
Massey ferguson mf 3435 cfm crawler tractors (tier 3) parts catalogue manual
 

Dernier

Centering Equity Panel by Samantha Bingham
Centering Equity Panel by Samantha BinghamCentering Equity Panel by Samantha Bingham
Centering Equity Panel by Samantha BinghamForth
 
Can't Roll Up Your Audi A4 Power Window Let's Uncover the Issue!
Can't Roll Up Your Audi A4 Power Window Let's Uncover the Issue!Can't Roll Up Your Audi A4 Power Window Let's Uncover the Issue!
Can't Roll Up Your Audi A4 Power Window Let's Uncover the Issue!Mint Automotive
 
Dubai Call Girls Services Call 09900000000
Dubai Call Girls Services Call 09900000000Dubai Call Girls Services Call 09900000000
Dubai Call Girls Services Call 09900000000Komal Khan
 
办理昆士兰科技大学毕业证QUT毕业证留信学历认证
办理昆士兰科技大学毕业证QUT毕业证留信学历认证办理昆士兰科技大学毕业证QUT毕业证留信学历认证
办理昆士兰科技大学毕业证QUT毕业证留信学历认证jdkhjh
 
Building a Budget by Cat Plein and Josh Rodriguez
Building a Budget by Cat Plein and Josh RodriguezBuilding a Budget by Cat Plein and Josh Rodriguez
Building a Budget by Cat Plein and Josh RodriguezForth
 
(Griffith毕业证)格里菲斯大学毕业证毕业证成绩单修改留信学历认证原版一比一
(Griffith毕业证)格里菲斯大学毕业证毕业证成绩单修改留信学历认证原版一比一(Griffith毕业证)格里菲斯大学毕业证毕业证成绩单修改留信学历认证原版一比一
(Griffith毕业证)格里菲斯大学毕业证毕业证成绩单修改留信学历认证原版一比一ejgeojhg
 
Transportation Electrification Funding Strategy by Jeff Allen and Brandt Hert...
Transportation Electrification Funding Strategy by Jeff Allen and Brandt Hert...Transportation Electrification Funding Strategy by Jeff Allen and Brandt Hert...
Transportation Electrification Funding Strategy by Jeff Allen and Brandt Hert...Forth
 
英国Bradford学位证,布拉德福德大学毕业证书1:1制作
英国Bradford学位证,布拉德福德大学毕业证书1:1制作英国Bradford学位证,布拉德福德大学毕业证书1:1制作
英国Bradford学位证,布拉德福德大学毕业证书1:1制作yjvk25x9
 
(办理学位证)(Toledo毕业证)托莱多大学毕业证成绩单修改留信学历认证原版一模一样
(办理学位证)(Toledo毕业证)托莱多大学毕业证成绩单修改留信学历认证原版一模一样(办理学位证)(Toledo毕业证)托莱多大学毕业证成绩单修改留信学历认证原版一模一样
(办理学位证)(Toledo毕业证)托莱多大学毕业证成绩单修改留信学历认证原版一模一样gfghbihg
 
办理学位证(MLU文凭证书)哈勒 维滕贝格大学毕业证成绩单原版一模一样
办理学位证(MLU文凭证书)哈勒 维滕贝格大学毕业证成绩单原版一模一样办理学位证(MLU文凭证书)哈勒 维滕贝格大学毕业证成绩单原版一模一样
办理学位证(MLU文凭证书)哈勒 维滕贝格大学毕业证成绩单原版一模一样umasea
 
办理萨省大学毕业证成绩单|购买加拿大USASK文凭证书
办理萨省大学毕业证成绩单|购买加拿大USASK文凭证书办理萨省大学毕业证成绩单|购买加拿大USASK文凭证书
办理萨省大学毕业证成绩单|购买加拿大USASK文凭证书zdzoqco
 
办理科廷科技大学毕业证Curtin毕业证留信学历认证
办理科廷科技大学毕业证Curtin毕业证留信学历认证办理科廷科技大学毕业证Curtin毕业证留信学历认证
办理科廷科技大学毕业证Curtin毕业证留信学历认证jdkhjh
 
-The-Present-Simple-Tense.pdf english hh
-The-Present-Simple-Tense.pdf english hh-The-Present-Simple-Tense.pdf english hh
-The-Present-Simple-Tense.pdf english hhmhamadhawlery16
 
(USQ毕业证)南昆士兰大学毕业证学位证成绩单修改留信学历认证原版一比一
(USQ毕业证)南昆士兰大学毕业证学位证成绩单修改留信学历认证原版一比一(USQ毕业证)南昆士兰大学毕业证学位证成绩单修改留信学历认证原版一比一
(USQ毕业证)南昆士兰大学毕业证学位证成绩单修改留信学历认证原版一比一gfghbihg
 
Program Design by Prateek Suri and Christian Williss
Program Design by Prateek Suri and Christian WillissProgram Design by Prateek Suri and Christian Williss
Program Design by Prateek Suri and Christian WillissForth
 
Equity & Freight Electrification by Jose Miguel Acosta Cordova
Equity & Freight Electrification by Jose Miguel Acosta CordovaEquity & Freight Electrification by Jose Miguel Acosta Cordova
Equity & Freight Electrification by Jose Miguel Acosta CordovaForth
 
248649330-Animatronics-Technical-Seminar-Report-by-Aswin-Sarang.pdf
248649330-Animatronics-Technical-Seminar-Report-by-Aswin-Sarang.pdf248649330-Animatronics-Technical-Seminar-Report-by-Aswin-Sarang.pdf
248649330-Animatronics-Technical-Seminar-Report-by-Aswin-Sarang.pdfkushkruthik555
 
原版1:1定制宾州州立大学毕业证(PSU毕业证)#文凭成绩单#真实留信学历认证永久存档
原版1:1定制宾州州立大学毕业证(PSU毕业证)#文凭成绩单#真实留信学历认证永久存档原版1:1定制宾州州立大学毕业证(PSU毕业证)#文凭成绩单#真实留信学历认证永久存档
原版1:1定制宾州州立大学毕业证(PSU毕业证)#文凭成绩单#真实留信学历认证永久存档208367051
 
办理阳光海岸大学毕业证成绩单原版一比一
办理阳光海岸大学毕业证成绩单原版一比一办理阳光海岸大学毕业证成绩单原版一比一
办理阳光海岸大学毕业证成绩单原版一比一F La
 

Dernier (20)

Centering Equity Panel by Samantha Bingham
Centering Equity Panel by Samantha BinghamCentering Equity Panel by Samantha Bingham
Centering Equity Panel by Samantha Bingham
 
Can't Roll Up Your Audi A4 Power Window Let's Uncover the Issue!
Can't Roll Up Your Audi A4 Power Window Let's Uncover the Issue!Can't Roll Up Your Audi A4 Power Window Let's Uncover the Issue!
Can't Roll Up Your Audi A4 Power Window Let's Uncover the Issue!
 
Dubai Call Girls Services Call 09900000000
Dubai Call Girls Services Call 09900000000Dubai Call Girls Services Call 09900000000
Dubai Call Girls Services Call 09900000000
 
办理昆士兰科技大学毕业证QUT毕业证留信学历认证
办理昆士兰科技大学毕业证QUT毕业证留信学历认证办理昆士兰科技大学毕业证QUT毕业证留信学历认证
办理昆士兰科技大学毕业证QUT毕业证留信学历认证
 
Building a Budget by Cat Plein and Josh Rodriguez
Building a Budget by Cat Plein and Josh RodriguezBuilding a Budget by Cat Plein and Josh Rodriguez
Building a Budget by Cat Plein and Josh Rodriguez
 
(Griffith毕业证)格里菲斯大学毕业证毕业证成绩单修改留信学历认证原版一比一
(Griffith毕业证)格里菲斯大学毕业证毕业证成绩单修改留信学历认证原版一比一(Griffith毕业证)格里菲斯大学毕业证毕业证成绩单修改留信学历认证原版一比一
(Griffith毕业证)格里菲斯大学毕业证毕业证成绩单修改留信学历认证原版一比一
 
Transportation Electrification Funding Strategy by Jeff Allen and Brandt Hert...
Transportation Electrification Funding Strategy by Jeff Allen and Brandt Hert...Transportation Electrification Funding Strategy by Jeff Allen and Brandt Hert...
Transportation Electrification Funding Strategy by Jeff Allen and Brandt Hert...
 
英国Bradford学位证,布拉德福德大学毕业证书1:1制作
英国Bradford学位证,布拉德福德大学毕业证书1:1制作英国Bradford学位证,布拉德福德大学毕业证书1:1制作
英国Bradford学位证,布拉德福德大学毕业证书1:1制作
 
(办理学位证)(Toledo毕业证)托莱多大学毕业证成绩单修改留信学历认证原版一模一样
(办理学位证)(Toledo毕业证)托莱多大学毕业证成绩单修改留信学历认证原版一模一样(办理学位证)(Toledo毕业证)托莱多大学毕业证成绩单修改留信学历认证原版一模一样
(办理学位证)(Toledo毕业证)托莱多大学毕业证成绩单修改留信学历认证原版一模一样
 
办理学位证(MLU文凭证书)哈勒 维滕贝格大学毕业证成绩单原版一模一样
办理学位证(MLU文凭证书)哈勒 维滕贝格大学毕业证成绩单原版一模一样办理学位证(MLU文凭证书)哈勒 维滕贝格大学毕业证成绩单原版一模一样
办理学位证(MLU文凭证书)哈勒 维滕贝格大学毕业证成绩单原版一模一样
 
办理萨省大学毕业证成绩单|购买加拿大USASK文凭证书
办理萨省大学毕业证成绩单|购买加拿大USASK文凭证书办理萨省大学毕业证成绩单|购买加拿大USASK文凭证书
办理萨省大学毕业证成绩单|购买加拿大USASK文凭证书
 
办理科廷科技大学毕业证Curtin毕业证留信学历认证
办理科廷科技大学毕业证Curtin毕业证留信学历认证办理科廷科技大学毕业证Curtin毕业证留信学历认证
办理科廷科技大学毕业证Curtin毕业证留信学历认证
 
-The-Present-Simple-Tense.pdf english hh
-The-Present-Simple-Tense.pdf english hh-The-Present-Simple-Tense.pdf english hh
-The-Present-Simple-Tense.pdf english hh
 
(USQ毕业证)南昆士兰大学毕业证学位证成绩单修改留信学历认证原版一比一
(USQ毕业证)南昆士兰大学毕业证学位证成绩单修改留信学历认证原版一比一(USQ毕业证)南昆士兰大学毕业证学位证成绩单修改留信学历认证原版一比一
(USQ毕业证)南昆士兰大学毕业证学位证成绩单修改留信学历认证原版一比一
 
Program Design by Prateek Suri and Christian Williss
Program Design by Prateek Suri and Christian WillissProgram Design by Prateek Suri and Christian Williss
Program Design by Prateek Suri and Christian Williss
 
Equity & Freight Electrification by Jose Miguel Acosta Cordova
Equity & Freight Electrification by Jose Miguel Acosta CordovaEquity & Freight Electrification by Jose Miguel Acosta Cordova
Equity & Freight Electrification by Jose Miguel Acosta Cordova
 
Hot Sexy call girls in Pira Garhi🔝 9953056974 🔝 escort Service
Hot Sexy call girls in Pira Garhi🔝 9953056974 🔝 escort ServiceHot Sexy call girls in Pira Garhi🔝 9953056974 🔝 escort Service
Hot Sexy call girls in Pira Garhi🔝 9953056974 🔝 escort Service
 
248649330-Animatronics-Technical-Seminar-Report-by-Aswin-Sarang.pdf
248649330-Animatronics-Technical-Seminar-Report-by-Aswin-Sarang.pdf248649330-Animatronics-Technical-Seminar-Report-by-Aswin-Sarang.pdf
248649330-Animatronics-Technical-Seminar-Report-by-Aswin-Sarang.pdf
 
原版1:1定制宾州州立大学毕业证(PSU毕业证)#文凭成绩单#真实留信学历认证永久存档
原版1:1定制宾州州立大学毕业证(PSU毕业证)#文凭成绩单#真实留信学历认证永久存档原版1:1定制宾州州立大学毕业证(PSU毕业证)#文凭成绩单#真实留信学历认证永久存档
原版1:1定制宾州州立大学毕业证(PSU毕业证)#文凭成绩单#真实留信学历认证永久存档
 
办理阳光海岸大学毕业证成绩单原版一比一
办理阳光海岸大学毕业证成绩单原版一比一办理阳光海岸大学毕业证成绩单原版一比一
办理阳光海岸大学毕业证成绩单原版一比一
 

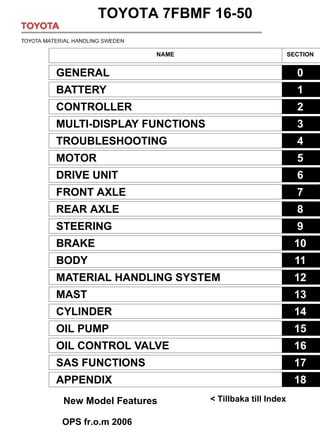
Toyota 7FBMF 16-50 Service Manual Section Index

  • 1. SECTION INDEX NAME SECTION GENERAL 0 BATTERY 1 CONTROLLER 2 MULTI-DISPLAY FUNCTIONS 3 TROUBLESHOOTING 4 MOTOR 5 DRIVE UNIT 6 FRONT AXLE 7 REAR AXLE 8 STEERING 9 BRAKE 10 BODY 11 MATERIAL HANDLING SYSTEM 12 MAST 13 CYLINDER 14 OIL PUMP 15 OIL CONTROL VALVE 16 SAS FUNCTIONS 17 APPENDIX 18 TOYOTA 7FBMF 16-50 < Tillbaka till Index New Model Features OPS fr.o.m 2006
  • 2. 0-1 0 1 2 3 4 5 6 7 8 9 10 11 12 13 14 15 16 17 18 19 20 21 22 GENERAL Page EXTERIOR VIEWS........................... 0-2 VEHICLE MODELS.......................... 0-4 FRAME NUMBER............................. 0-4 HOW TO USE THIS MANUAL .......................................... 0-5 EXPLANATION METHOD ................. 0-5 TERMINOLOGY................................. 0-6 ABBREVIATIONS.............................. 0-6 OPERATIONAL TIPS ...................... 0-7 JACK-UP POINT .............................. 0-8 HOISTING THE VEHICLE.............. 0-9 CAUTION FOR TOWING................ 0-9 PARKING BRAKE RELEASE METHOD.......................................... 0-9 ATTENTIVE POINTS ON SAS.... 0-10 CIRCUIT TESTER .......................... 0-11 STANDARD BOLT & NUT TIGHTENING TORQUE.............. 0-13 BOLT STRENGTH TYPE IDENTIFICATION METHOD.......... 0-13 TIGHTENING TORQUE TABLE...... 0-14 PRECOATED BOLTS ................... 0-15 HIGH PRESSURE HOSE FITTING TIGHTENING TORQUE......................................... 0-15 WIRE ROPE SUSPENSION ANGLE LIST.................................. 0-16 Page SAFE LOAD FOR EACH WIRE ROPE SUSPENSION ANGLE............................................ 0-16 COMPONENTS WEIGHT ............. 0-17 RECOMMENDED LUBRICANT QUANTITY & TYPES .................. 0-18 LUBRICATION CHART ................ 0-19 PERIODIC MAINTENANCE......... 0-21 PERIODIC REPLACEMENT OF PARTS AND LUBRICANTS ............................... 0-25 Totaldokument, service...........0-26
  • 4. 0-3 40 ~ 50 Model 0 1 2 3 4 5 6 7 8 9 10 11 12 13 14 15 16 17 18 19 20 21 22
  • 5. 0-4 VEHICLE MODELS FRAME NUMBER Model code Load capacity Vehicle model Voltage 16 1.6 ton 7FBMF16 80 V/72 V 18 1.8 ton 7FBMF18 ↑ 20 2.0 ton 7FBMF20 ↑ 25 2.5 ton 7FBMF25 ↑ 30 3.0 ton 7FBMF30 ↑ 35 3.5 ton 7FBMF35 ↑ 40 4.0 ton 7FBMF40 ↑ 45 4.5 ton 7FBMF45 ↑ 50 5.0 ton 7FBMF50 ↑ Vehicle model Punching format Frame No. punching position )%0) )%0) )%0) )%0) )%0) )%0) )%0) )%0) )%0) )%0) )%0) )%0) )%0) Punching position
  • 6. 0-5 HOW TO USE THIS MANUAL EXPLANATION METHOD 1. Operation procedure (1) The operation procedure is described in either pattern A or pattern B below. Pattern A:Explanation of each operation step with illustration. Pattern B:Explanation of operation procedure by indicating step numbers in one illustration, followed by explanation of cautions and notes summarized as point operations. Example of description in pattern B DISASSEMBLY INSPECTION REASSEMBLY Tightening torque unit T = N⋅m (kgf⋅cm) [ft⋅lbf] • • Disassembly Procedure 1 Remove the cover. [Point 1] 2 Remove the bushing [Point 2] Operation explained later 3 Remove the gear. Point Operations Explanation of key point for operation with an illustration [Point 1] Disassembly: Put a match mark when removing the pump cover. [Point 2] Inspection: Measure the bushing inside diameter. Limit: 19.12 mm (0.7528 in) T = 46.1 ~ 48.1 (470 ~ 490) [34.0 ~ 35.5] • Step Nos. are sometimes partially omitted in illustrations. • When a part requiring tightening torque instruction is not indicated in the illustration, the part name is described in the illustration frame. 0 1 2 3 4 5 6 7 8 9 10 11 12 13 14 15 16 17 18 19 20 21 22
  • 7. 0-6 2. How to read components figures (Example) 3. Matters omitted in this manual (1) This manual omits description of the following jobs, but they should be performed in the actual operation: (a) Cleaning and washing of removed parts as required (b) Visual inspection (partially described) TERMINOLOGY Caution: Important matters of which negligence may cause hazards to the human body. Be sure to observe them. Note: Important items of which negligence may cause breakage or breakdown, or matters in operation procedure requiring special attention. Standard: Values showing the allowable range for inspections and adjustments. Limit: Maximum or minimum allowable value for inspections or adjustments. ABBREVIATIONS Abbreviation (code) Meaning Abbreviation (code) Meaning ASSY Assembly SAE Society of Automotive Engineers (USA) ATT Attachment SAS System of active stability CHPS Central hydraulic power steering SST Special service tool LH Left hand STD Standard L/ Less T = Tightening torque OPT Option T Number of teeth () O/S Oversize U/S Undersize PS Power steering W/ With RH Right hand 3201 FIG number in parts catalog (1) The components figure uses the illustration in the parts catalog for the vehicle model. Please refer to the catalog to check the part name. The number at the top right of each components figure indicates the Fig. number in the parts catalog.
  • 8. 5-1 0 1 2 3 4 5 6 7 8 9 10 11 12 13 14 15 16 17 18 19 20 21 22 MOTOR Page DRIVE MOTOR .................................................................5-2 GENERAL..........................................................................5-2 SPECIFICATIONS .............................................................5-2 COMPONENTS..................................................................5-3 REMOVAL INSTALLATION..............................................5-4 DISASSEMBLY INSPECTION REASSEMBLY................5-6 PUMP MOTOR..................................................................5-9 GENERAL..........................................................................5-9 SPECIFICATIONS ...........................................................5-10 COMPONENTS................................................................5-10 REMOVAL INSTALLATION............................................5-12 DISASSEMBLY INSPECTION REASSEMBLY..............5-14 POWER STEERING MOTOR (16 ~ 35 MODEL)....5-17 GENERAL........................................................................5-17 SPECIFICATIONS ...........................................................5-17 COMPONENTS................................................................5-18 REMOVAL INSTALLATION............................................5-19 DISASSEMBLY INSPECTION REASSEMBLY..............5-21 • • • • • • • • • Motorlager, lista över P/N.....................................5-25
  • 9. 5-2 DRIVE MOTOR GENERAL SPECIFICATIONS Model Item 16⋅18 20 ~ 35 40 ~ 50 Type 3-phase AC ← ← Nominal voltage V 72/80 ← ← Rated output kW 12.0/13.3 15.4/17.1 14.9/16.6 Dimensions mm(in) (outside diameter × length) φ270 × 260 (10.63 × 10.24) φ270 × 285 (10.63 × 11.22) φ270 × 340 (10.63 × 13.39) Weight kg (lb) 62 (137) 73 (161) 96 (212) Insulation class Class F ← ←
  • 11. 5-4 REMOVAL INSTALLATION T = N·m (kgf·cm) [ft·lbf] Removal Procedure 1 Remove the drive unit drive motor W/front axle ASSY. (See page 6-6.) 2 Remove the drive motor sensor bracket, terminal bracket, and sensor cover. 3 Place match marks between the end bracket, stator ASSY, and gear case. 4 Remove the nuts and through bolts. [Point 1] 5 Remove the end bracket. [Point 2] 6 Remove the stator ASSY W/rotor ASSY. Installation Procedure The installation procedure is the reverse of the removal procedure. Note: Apply MP grease to the rotor ASSY spline. • 4 2 5 2 6 T = 45.0 ~ 55.0 (460 ~ 560) [33.3 ~ 40.5]
  • 12. 5-5 Point Operations [Point 1] Removal: After removing the through bolts, use a hoist to lift the yoke ASSY. Installation: After tightening the through bolts until they touch bottom, tighten the nuts in the order shown in the figure. Installation: When replacing the motor with a new one, be sure to re- move the stopper bolt and spacer installed in the center of the end bracket. (They are not installed hereafter.) [Point 2] Removal: Use a plastic hammer to tap lightly on the end bracket to remove it. Installation: Use a plastic hammer to tap lightly on the end bracket to install it. Installation: Align the speed sensor harness with the notch in the end bracket and install the end bracket. When doing this, do not forget to install the wave washer. 2 4 1 3 Spacer Stopper bolt Wave washer 0 1 2 3 4 5 6 7 8 9 10 11 12 13 14 15 16 17 18 19 20 21 22
  • 13. OBS! Lager finns som separat reservdel. P/N på sensorlagret: 5-6 DISASSEMBLY INSPECTION REASSEMBLY Note: • Do not apply a shock to the bearing W/speed sensor. Disassembly Procedure 1 Remove the rotor ASSY W/bearing. [Point 1] 2 Remove the bearing. [Point 2] Reassembly Procedure The reassembly procedure is the reverse of the disassembly procedure. • • 2 2 1 7FBMF 16-35 = 14160-F9802-71 7FBMF 40-50 = 14160-F9801-71
  • 14. 5-7 Point Operations [Point 1] Inspection: Measure the stator ASSY insulation resistance. Measurement locations: Between the stator and each ter- minal (U, V, W) Standard: 1 MΩ or more Inspection: Measure the speed sensor insulation resistance. Measurement locations: Between the stator and the speed sensor connector terminals (4 locations) Standard: ∞ Ω Inspection: Measure the temperature sensor insulation resistance. Measurement locations: Between the stator and the tem- perature sensor connector terminals (2 locations). Standard: ∞ Ω Measurement locations: Between the temperature sensor connector terminals Standard: 0.5 ~ 1.0 kΩ [Point 2] Disassembly: SST 09950-76014-71 (SST 09950-40011) SST
  • 15. 5-8 Reassembly: Use the following procedure to install the bearing. 1. Install the bearing (L/speed sensor). SST 09370-20270-71 2. Install the bearing (W/speed sensor). Tapping on the bearing could damage the sensor. Use a press to install the bearing. SST 09411-41800-71 SST L/speed sensor SST W/speed sensor
  • 16. 5-9 PUMP MOTOR GENERAL 16 ~ 35 model 40 ~ 50 model
  • 17. 5-10 SPECIFICATIONS COMPONENTS Model Item 16⋅18 20 ~ 35 40 ~ 50 Type 3-phase ← ← Nominal voltage V 72/80 ← ← Rated output kW 12.0/13.5 16.9/18.6 22.8/25.4 Dimensions mm (in) (outside diameter × length) φ240 × 324 (9.45 × 12.76) φ240 × 339 (9.45 × 13.35) φ260 × 427 (10.24 × 16.81) Weight kg (lb) 57 (126) 60 (132) 97 (214) Insulation class Class F ← ← 16 ~ 35 model 1402
  • 18. 5-11 40 ~ 50 model 1402
  • 19. 5-12 REMOVAL INSTALLATION T = N·m (kgf·cm) [ft·lbf] 16 ~ 35 model 40 ~ 50 model • T = 16.2 ~ 37.8 (165 ~ 385) [11.9 ~ 27.9] 8 T = 39.0 ~ 91.0 (398 ~ 928) [28.8 ~ 67.1] 8 T = 16.2 ~ 37.8 (165 ~ 385) [11.9 ~ 27.9] 8 T = 39.0 ~ 91.0 (398 ~ 928) [28.8 ~ 67.1] 8 9 9
  • 20. Thank you very much for your reading. Please Click Here. Then Get COMPLETE MANUAL. NO WAITING NOTE: If there is no response to click on the link above, please download the PDF document first and then click on it.
  • 21. 5-13 Removal Procedure 1 Remove the battery. (See page 13-10.) 2 Remove the counterweight. (See page 11-10.) 3 Remove the motor cable. 4 Disconnect the speed sensor and temperature sensor connectors. 5 Remove the oil pump set bolts and separate the oil pump from the pump motor. 6 Disconnect the swing lock solenoid connector. 7 Remove the lock cylinder cover. 8 Remove the lock cylinder lower pin and slide the swing lock cylinder to the left. [Point 1] 9 Remove the pump motor. [Point 2] Installation Procedure The installation procedure is the reverse of the removal procedure. Note: Apply lock agent (08833-76001-71 (08833-00070)) to the threads of the lock cylinder lower pin set bolt and tighten the bolt. Point Operations [Point 1] Removal• Installation: Jack up the rear axle and support the frame on wooden blocks. [Point 2] (40 ~ 50 model) Removal• Installation: To prevent the right rear insulator bolt from being dam- aged, connect shackles to the two left side wire ropes, and then tilt and raise up the pump motor. Installation: Apply lock agent (08833-76002-71 (08833-00080)) to the threads of the right rear insulator bolts and tighten the bolts. Apply lock agent here
  • 22. 5-14 DISASSEMBLY INSPECTION REASSEMBLY Note: • Do not apply a shock to the bearing W/speed sensor. • The minimum unit of the parts supply for the bearing consists of “Rotor ASSY W/bearing” even though the bearing is seperable on actual service. T = N·m (kgf·cm) [ft·lbf] Disassembly Procedure 1 Remove the end bracket (terminal side). [Point 1] 2 Remove the rotor ASSY W/bearing. [Point 2] 3 Remove the bearing. [Point 3] 4 Remove the stator ASSY. [Point 4] Reassembly Procedure The reassembly procedure is the reverse of the disassembly procedure. • • 1 2 3 3 16 ~ 35 model: T = 22.5 ~ 27.5 (229 ~ 280) [16.6 ~ 20.3] 4 40 ~ 50 model: T = 45 ~ 55 (459 ~ 561) [33.2 ~ 40.6]
  • 23. 5-15 Point Operations [Point 1] Disassembly: Put match marks between the end bracket, stator ASSY, and end bracket (terminal side). Reassembly: Align the match marks when installing. Reassembly: Align the speed sensor harness with the slot in the end bracket (terminal side) and install the end bracket. [Point 2] Inspection: Measure the speed sensor insulation resistance. Measurement locations: Between the stator and the speed sensor connector terminals (4 locations). Standard: ∞ Ω [Point 3] Disassembly: SST 09950-76014-71 ............(1) (SST 09950-40011) SST 09950-76018-71 ............(2) (SST 09950-60010) Reassembly: Use the following procedure to install the bearing. 1. Install the bearing (L/speed sensor). SST 09370-20270-71 Match marks SST (1) SST (2) SST L/speed sensor