iMovR Trackless Keyboard Mounting Template / Instructions
•
1 j'aime•23,088 vues

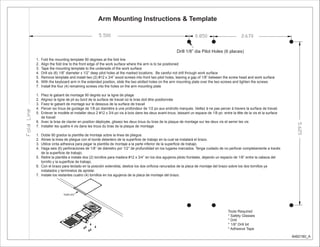
El documento proporciona instrucciones para montar un brazo de teclado en una superficie de trabajo. Se requiere usar una plantilla de montaje, taladrar seis agujeros piloto con una broca de 1/8 de pulgada, instalar tornillos en los agujeros frontales y deslizar la placa de montaje del brazo sobre los tornillos para fijarlo en posición.

Recommandé
Contenu connexe
Similaire à iMovR Trackless Keyboard Mounting Template / Instructions
Similaire à iMovR Trackless Keyboard Mounting Template / Instructions (20)
Plus de iMovR
Plus de iMovR (20)
iMovR Trackless Keyboard Mounting Template / Instructions
- 1. Arm Mounting Instructions & Template Tools Required * Safety Glasses * Drill * 1/8” Drill bit * Adhesive Tape TEMPLATE Drill 1/8” dia Pilot Holes (6 places) 1. Fold the mounting template 90 degrees at the fold line 2. Align the fold line to the front edge of the work surface where the arm is to be positioned 3. Tape the mounting template to the underside of the work surface 4. Drill six (6) 1/8” diameter x 1/2” deep pilot holes at the marked locations. Be careful not drill through work surface 5. Remove template and install two (2) #12 x 3/4” wood screws into front two pilot holes, leaving a gap of 1/8” between the screw head and work surface 6. With the keyboard arm in the extended position, slide the two slotted holes on the arm mounting plate over the two screws and tighten the screws 7. Install the four (4) remaining screws into the holes on the arm mounting plate 1. Pliez le gabarit de montage 90 degrés sur la ligne de pliage 2. Alignez la ligne de pli au bord de la surface de travail où le bras doit être positionnée 3. Fixez le gabarit de montage sur le dessous de la surface de travail 4. Percer six trous de guidage de 1/8 po diamètre à une profondeur de 1/2 po aux endroits marqués. Veillez à ne pas percer à travers la surface de travail. 5. Enlever le modèle et installer deux 2 #12 x 3/4 po vis à bois dans les deux avant-trous, laissant un espace de 1/8 po entre la tête de la vis et la surface de travail 6. Avec la bras de clavier en position déployée, glissez les deux trous du bras de la plaque de montage sur les deux vis et serrer les vis 7. Installer les quatre 4 vis dans les trous du bras de la plaque de montage 1. Doble 90 grados la plantilla de montaje sobre la linea de pliegue. 2. Alinee la linea de pliegue con el borde delantero de la superficie de trabajo en la cual se instalará el brazo. 3. Utilice cinta adhesiva para pegar la plantilla de montaje a la parte inferior de la superficie de trabajo. 4. Haga seis (6) perforaciones de 1/8’’ de diámetro por 1/2’’ de profundidad en los lugares marcados. Tenga cuidado de no perforar completamente a través de la superficie de trabajo. 5. Retire la plantilla e instale dos (2) tornillos para madera #12 x 3/4’’ en los dos agujeros piloto frontales, dejando un espacio de 1/8’’ entre la cabeza del tornillo y la superficie de trabajo. 6. Con el brazo para teclado en la posición extendida, deslice los dos orificios ranurados de la placa de montaje del brazo sobre los dos tornillos ya instalados y terminelos de apretar. 7. Instale los restantes cuatro (4) tornillos en los agujeros de la placa de montaje del brazo. 8482180_A