Good Stuff Happens in 1:1 Meetings: Why you need them and how to do them well
Glogster EDU Tutorial
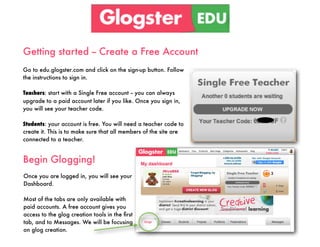
1. Getting started -- Create a Free Account
Go to edu.glogster.com and click on the sign-up button. Follow
the instructions to sign in.
Teachers: start with a Single Free account -- you can always
upgrade to a paid account later if you like. Once you sign in,
you will see your teacher code.
Students: your account is free. You will need a teacher code to
create it. This is to make sure that all members of the site are
connected to a teacher.
Begin Glogging!
Once you are logged in, you will see your
Dashboard.
Most of the tabs are only available with
paid accounts. A free account gives you
access to the glog creation tools in the first
tab, and to Messages. We will be focusing
on glog creation.
2. Create Your First Glog
Clicking on the CREATE NEW
BLOG or CREATE YOUR FIRST
BLOG button will bring you to the
blank glog canvas with this easy-to-
navigate menu.
Choose and edit existing items,
upload your own from your
computer, or link to something
from the web. (“Grab” is a paid
feature.)
3. Refine Your Layout and Save Your Work
Click and drag objects around the canvas.
Click on objects to see layout options, such as resize and rotate, as well as the EDIT
button that allows you to change content, add hyperlinks, etc.
Autosave is on by default, or you can manually save (as well as preview your work).
4. Publish and Share
When you’re done, click the SAVE OR
PUBLISH button. Give your glog a name,
add categories and tags (optional), mark it
as Finished or Unfinished, and hit SAVE.
This is the URL you will use to share
your glog with others.
You can email it, tweet it, post it to
Facebook, etc.
At the bottom of your glog you will see other share
options, including embed code.
5. And you’re done!
Here are some screenshots of glogs created by students for a variety of projects:
Science: Effects of Fungi on Tomatoes
The student documents an experiment and
enhances the report with visuals and music.
English: Onomatopoeia
History: Evolution of Protest Music
The student has used video and sound
clips to demonstrate the principle of Audio and visuals provide additional
onomatopoeia in addition to simply interest and concrete demonstration of the
defining it or finding straight visuals from music the student is examining.
comic books to illustrate it.
See the Video Tutorial page at http://edu.glogster.com/?page=videos for more help.