Leading by Example: Marie Curie, Florence Nightingale, and Eleanor Roosevelt
•
2 j'aime•904 vues

This document profiles the lives and accomplishments of Marie Curie, Florence Nightingale, and Eleanor Roosevelt. It discusses their exemplary leadership qualities and preconditions for leadership, including intelligence, tolerance for change, desire to lead, and strong communication skills. It also examines how they managed their energy through focus, restoration, and flow. Key leadership dimensions discussed are positive framing through self-awareness and learned optimism, and connecting through network design, sponsorship, reciprocity, and inclusiveness.

Recommandé
Contenu connexe
Similaire à Leading by Example: Marie Curie, Florence Nightingale, and Eleanor Roosevelt
Similaire à Leading by Example: Marie Curie, Florence Nightingale, and Eleanor Roosevelt (20)
Plus de Kelley Conrad
Plus de Kelley Conrad (7)
Dernier
Dernier (20)
Leading by Example: Marie Curie, Florence Nightingale, and Eleanor Roosevelt
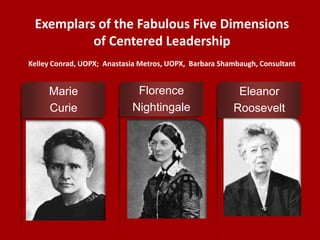
- 1. t Marie Curie Florence Nightingale Eleanor Roosevelt Exemplars of the Fabulous Five Dimensions of Centered Leadership Kelley Conrad, UOPX; Anastasia Metros, UOPX, Barbara Shambaugh, Consultant
- 2. Why these Women? It started with an interest in Florence Nightingale. We were researching her recently published “Collected Works” when someone said she was one of only three women on a list of the 100 most influential People of the last 1000 years. We never found that list. But we found several others and noted very few women on them. We found Florence Nightingale, Marie Curie, and Eleanor Roosevelt on several lists.
- 3. Marie Curie 1867-1934 • Coined word “radioactivity” • Discovered Radium • Shared Nobel Prize in Physics with her husband – 1898 • Earned Doctorate in 1903 – still considered one of the greatest scientific contributions made by a doctoral student • Took over Radium Lab after husband’s death in 1906 • Managed construction of Sorbonne’s Institute of Radium • Awarded second Nobel Prize in Chemistry in 1911 (Only woman with 2) • During WWII invented portable X-ray machines and trained 150 French housewives to operate them • First woman in 650 years to be admitted to faculty of Sorbonne • First woman elected to Académie de Médicine • Member of the International Committee on Intellectual Cooperation for the League of Nations • Recipient of 125 awards and Honorary titles “I am among those who think that science has great beauty. A scientist in his laboratory is not only a technician: He is also a child placed before natural phenomena which impress him like a fairy tale.”
- 4. Florence Nightingale 1820-1910 • In 1851, trained as a nurse at the Institute of Protestant Deaconnesses at Kaiserswerth • In 1853, accepted position as superintendent of the Institution for the Care of Sick Gentlewomen in London. • Single handedly raised the standard of hospital and nursing care in Great Britain. • In 1854, agreed to supervise a contingent of nurses being sent to Scutari to assist doctors at the Barracks Hospital. • With astonishing speed and skill began to improve the conditions and aid the sick and wounded. Eventually 12,000 patients were treated. • “Two figures emerged from the Crimea as heroic, the soldier and the nurse and in each case the transformation was due to Miss Nightingale.” • Shunned publicity • Spent 16 years after the war working on medical and public health reform. • Completely changed the profession of nursing. • A genius for organization and innovation. • First woman to receive the British Order of Merit “Miss Nightingale did inspire awe, not because one felt afraid of her per se, but because the very essence of truth seem to emanate from her, and because of her perfect fearlessness in telling it.” Wm. Richmond
- 5. Eleanor Roosevelt 1884-1962 • Called, “the most influential woman of our times.” • “Used her influence as first lady and private citizen to advance the cause of human rights and in doing so, became the conscience of the country and the most important public woman of the twentieth century.” Deborah Felder • Orphaned by 10 and raised by maternal grandmother • Attended Allenswood boarding school in England and was tutored by Marie Souvestre • 1902 made her debut in society while working at settlement houses and visiting factories as a member of National Consumer’s League • 1905 married FDR, they had 6 children • 1918 discovered FDR affair and defined a new and different partnership with FDR • In 1933 held the first press conference of a first lady. These continued through her term. • Wrote a syndicated newspaper column, hosted a radio show, and wrote a number of books. • 1945 Became U.S. ambassador to UN and was key in drafting the Universal Declaration of Human Rights • 1961 Chaired JFK’s Commission on the Status of Women “Her liberation was not an uncovenanted gift. She attained it only through a terrifying exertion of self- discipline….” A. Schlesinger
- 6. Centered Leadership Model McKinsey & Company How remarkable women lead: The breakthrough model for work and life. Barsch, J., & Cranston, S. TheFabulousFive
- 7. Marie Curie Florence Nightingale Eleanor Roosevelt Precondition: Intelligence At 4 demonstrated she could read – astonishing memory of Polish holidays (MC 10-11) - by 8 was avid reader –two years younger that classmates in private school (MC 18) - valedictorian of her HS class – worked as a private tutor after HS Learned French and Italian in boarding school in London - Was poised and wandered in European cities on her own when in boarding school Taught by governesses, Tutored by father in classical and modern literature, mathematics, and philosophy
- 8. Marie Curie Florence Nightingale Eleanor Roosevelt Precondition: Tolerance for Change In early life she experienced many tragedies – mother dies of TB –Father demoted – She had to learn Polish on the sly – elder sister died of typhus Sought out change – first from expectations of women in her social class, Adapted to a dominating mother- in-law, widely different roles of mother, wife of governor and wife of president
- 9. Marie Curie Florence Nightingale Eleanor Roosevelt Precondition: Desire to Lead Taught in floating university, later as a governess – In Szczuki secretly taught peasant children to read and write (MC-67-69) – Accepted leadership but did not seek it. After Pierre’s death took over management of the Radium institute. Great interest & Concern for poor and their suffering – Visited the sick on her father’s estate. Quickly accepted the opportunity and call to lead a group of nurses to travel to Scutari to work in the British military hospital At Allenswood, the girls could not resist…the qualities of leadership she displayed in unaffected ways (p. 26) Expanded philanthropic activities into leadership of organizations beginning with leadership of the WWI Red Cross canteen. That experience generated a new opinion of herself
- 10. Marie Curie Florence Nightingale Eleanor Roosevelt Precondition: Communication Skills Learned French – wrote passionate letters – kept meticulous financial records – Coined the word “radioactivity” to describe the emissions from uranium. – Resented intrusions of press and curiosity seekers – Her notebooks from the 19th Century are still too radioactive to be handled. Early in life began keeping a journal, had a special Bible with alternate blank pages for notes. Used her family’s social connections to develop support for her work. Avoided the limelight but used letters to persuade key officials of her cause. During the 1920 campaign ER was often the only woman among the traveling politicians and newspaper men. As First Lady traveled and talked extensively to support FDR. In response to FDR’s campaign manager became a political activist. Had a daily newspaper column, wrote books, had a monthly article in WHC
- 11. MANAGING ENERGY: Minimizing Depletion Marie Curie Florence Nightingale Eleanor Roosevelt So concentrated on studies did not cook or eat and suffered from malnutrition – at Sorbonne for three years lives life of solitude, devoted to study alone (MC105) – Her secret universe of implacable rigor, dominated by passion for science, excludes love, marriage (MC119) Unhappy with life in her social station, found happiness through development of nursing as a profession. Withstood criticism and resistance of doctors and military in Scutari. Waited till they recognized her nurses and she could help. Later when famous avoided publicity. Careful strategizer – social adeptness across economic groups and social classes. Redefined her marriage with FDR after his affair with her social secretary. After FDR’s election, commented, “A nd now – I shall have to work out my own salvation” (LS, p. 86).
- 12. MANAGING ENERGY: Restoration Marie Curie Florence Nightingale Eleanor Roosevelt Passional love of atmosphere of laboratory (MC111). Single minded in pursuit of radioactivity source and then radium. Withstood criticism and resistance of doctors and military officers in Scutari. Felt called by God to be a nurse. Driven to ease the suffering of soldiers. ER used Lorena Hickok as someone to whom she could bare her soul, which became effective therapy for her sense of self-worth over the decade. “I never talked to anyone, perhaps that is why it all ate into my soul, and I look upon so many emotions more seriously than the younger generation.” (LS.
- 13. MANAGING ENERGY: Flow Marie Curie Florence Nightingale Eleanor Roosevelt Moved from Poland to France, addressed academic challenges at the Sorbonne – During building of Physics Laboratory climbs builders’ scaffoldings, draw plans, argued with architect (MC285-286) On outbreak of war had one thought, to save France (MC290) installed 200 radiological rooms for wounded, learned to drive Renault Eagerly accepted assignment to lead 38 nurse delegation to Scutari, Turkey – Did not resist doctor and military unwillingness, simply organized the nurses and the hospital demonstrating their value and was ready to assist when asked. Took advantage of opportunities presented her as a leader in many organizations – quit several organizations to make important points – advocate for blacks and youth worldwide. As first lady began holding press conferences for women reporters. The women became devoted followers and protective guardians as well (LS. p. 88).
- 14. POSITIVE FRAMING: Self Awareness Marie Curie Florence Nightingale Eleanor Roosevelt “I does not exist for me.” MC p. 403; at Sorbonne “discovers enormous holes in her ‘culture’” (MC 95) Explains living alone in Spartan apartment – as a girl had not learned to keep house and didn’t want to (MC106-7) Decided she wanted to be a nurse had to convince her father and family. Unceasing concern for suffering of soldiers – “Angel of the Crimea” – Continued her work in Balaclava even after contracting Crimean fever - Often sat in the sections reserved for Blacks at meetings, When DAR closed Constitution Hall to contralto Marian Anderson, invited her to sing at the White House – Held first press conferences as a First Lady, did not invite the male press – Entertained gridiron widows on the night the press gave a stag party for the president.
- 15. POSITIVE FRAMING: Learned Optimism Marie Curie Florence Nightingale Eleanor Roosevelt In Spartan existence as a student did not admit she could be cold or hungry (MC108-109) Not discouraged by lack of cooperation by school and French authorities or attacks from the French press, inadequate equipment dismal facilities Unceasing concern for suffering of soldiers – Persisted in efforts even though resisted by doctors and military until they recognized her nurses could be of help. “Angel of the Crimea” – Continued her work in Balaclava even after contracting Crimean fever . After becoming first lady, “I had no way of knowing then that I would have more mail of my own than I could handle without spending hours and hours far into the night on it.” (TIK, p. 76) Built relationships supportive of women and equal rights in the UN later served on the Human Rights commission UN committee.
- 16. POSITIVE FRAMING: Moving On Marie Curie Florence Nightingale Eleanor Roosevelt After being prohibited to proceed with engagement to Casimir Z, met with him to burn the bridges even though he was hesitating and fearsome (MC 87). After Pierre’s death Marie took over his teaching position and laboratory in the Sorbonne. She was the first woman to teach at the University of Paris From Scutari moved to Balaclava and instituted sanitary reforms there. After return to England wrote a major paper on the medical conditions in military hospitals which then was applied in India. After FDR’s affair, she remained married to him but became a separate partner - After FDR''s death she remained active and accepted major leadership roles in the Truman, Eisenhower, and Kennedy administrations
- 17. CONNECTING: Network Design Marie Curie Florence Nightingale Eleanor Roosevelt After WWI had no radium accepted offer of Mrs. Meloney and women’s clubs to raise money then made US Trip to accept the “Standard” gram of Radium – Was the first and only woman in several major scientific organizations. Although she resisted the expectations of her class in England to pursue nursing, Responded to Herbert’s request to head nursing group for Scutari. When she needed to connect with influential friends was willing to do so. Appealed to Queen Victoria to secure supplies for the hospital in Scutari. Initially connect by her family’s prominent role in NYC. Joined League of Women Voters. As first lady built relationships supportive of women and equal rights – women only news conferences and stag party. In the UN won followers for her support of minorities & children.
- 18. CONNECTING: Sponsorship Marie Curie Florence Nightingale Eleanor Roosevelt After award of Nobel prize (70,000 gold francs), spend much of money to subsidize needy friends and struggling students and loans to her sisters and Pierre’s brother – but failed to buy a new hat (MC 211- 212) Visited 300-400 French and Belgian hospitals during the war (MC 298) Sidney Herbert, British Sec. of War who asked her to go to Scutari (1853 or 54) – When military refused suggestions Florence went directly to Queen Victoria and in 1857 convened a royal commission to implement health reforms in army – First woman to receive British Order of Merit During the 1920 presidential campaign ER made peace with Louis Howe, the ex-reporter determined to make FDR president some day (LS, p. 61). Accepted a position on the legislative committee of the NY League of Women voters (LS, p. 63). ER learned to address problems and critique legislative remedies, and was soon serving on policy making committees
- 19. CONNECTING: Reciprocity Marie Curie Florence Nightingale Eleanor Roosevelt Donated entire 200,000 Franks of second Nobel prize to French Government for WWI. Patent on radium would have enabled her to give hospitals and laboratories to France, but she said humanity needs dreamers (MC336) Spent 45,000 pounds raised by the public to found St Thomas Hospital nurses training school (1860) Although ER understated the impact she had, she recognized the leverage one gained from easy access to the seat of power, and she cleared the path for colleagues who had issues to discuss and candidates to promote (LS, p.78).
- 20. CONNECTING: Inclusiveness Marie Curie Florence Nightingale Eleanor Roosevelt Willingly supported others and their efforts in scholarly activities and in research. Fame and publicity brought them misery and torment (MC213) Marie’s war against fame an instinct with her, and curious glances fastened on her bring on dizziness and physical discomfort (MC219) Avoided public recognition – secluded herself in London after return from Scutari – Governments consulted her – US for hospitals during Civil War – British War Office routinely sent her all sanitary reports. Wrote major report on sanitation that became the guide for the British Army in India and then everywhere. Readily related to others regardless of their backgrounds. During WWII visited troops in the field and Pacific theater. At first was discouraged from doing this by military leaders but while the tour was still underway was recognized by Adm. Nimitz as a major morale booster
- 21. ENGAGING: Voice Marie Curie Florence Nightingale Eleanor Roosevelt Describes happy, absorbed days in shed extracting Radium “I wonder what It will be like, what It will look like?” (MC 171) From 1899 to 1904 Marie and Pierre published thirty-two scientific communications (MC194) From then one they receive letters signed by greatest names in science (MC194) After royal commission in 1857 Florence composed an 800 page report in 1858 on British Army – This led to requests to advise improving sanitary conditions for the army in India Took lessons to improve her speaking voice and develop skill presenting her ideas and values – made sure FDR heard the voices for reform by inviting people with different political persuasions to dinner and seating them next to him.
- 22. ENGAGING: Ownership Marie Curie Florence Nightingale Eleanor Roosevelt Could have patented Radium but instead divulged the secrets to other scientists – (MC 202- 205) Makes no material profit form discovery (1 gram of radium then worth $150,000) (MC200)Won Nobel prize in Chemistry and a second one in Physics. Refused Legion of Honor twice for war service (MC307 Once she decided she wanted to be a nurse, worked steadily toward becoming one. When she met resistance to her ideas to improve conditions in the British Army, she took her case directly to the queen. Denials aside, politics did excite her, and ER was not indifferent to FDR’s political fate. By 1928 she had completed her apprenticeship and was a full-fledged master of the trade (LS, p. 79).
- 23. ENGAGING: Risk Taking Marie Curie Florence Nightingale Eleanor Roosevelt Abandoned study of uranium and undertakes to examine all known chemical bodies either in pure state or in compounds (MC 155-156) – Ignored initial symptoms of radiation sickness (it was not known) New element exists only in her and Pierre’s imagination but she tells Bronya: “ the new element is there and I’ve got to find it. We are sure!” (MC157) Compiled statistics on Crimean Hospital conditions – 1856 sent proposal to Ministry of war to revamp army medial services During the 1928 presidential campaign ER accepted an invitation to codirect the Women’s Division of the national office…The pace at headquarters was staggering, “I worked until 4:30 a.m. on account of the radio speech this morning,” …The work was discouraging.
- 24. ENGAGING: Adaptability Marie Curie Florence Nightingale Eleanor Roosevelt Originally planned on being a HS teacher, earned three master’s degrees and a doctorate – assumed management of the physics lab and the physics department after the death of her husband. Worked with military, civilian, and governmental bodies Individual performer, manager, advoca te Able to relate to people from all walks of life. Wrote books, edited a magazine, wrote a daily newspaper column, held press conferences, visited many places as a way of gathering information for FDR. In all the twelve years I cannot remember that my office made any mistakes that caused either my husband or me
- 25. MEANING: Happiness Marie Curie Florence Nightingale Eleanor Roosevelt First love was in the family where she was the governess. “Now that I have lost hope of every becoming anybody, all my ambition has been transferred to Bronya and you” (MC75) Marie longed to join her sister in Paris but had to work to support her sister’s medical studies – Husband killed in 1906. Caused Marie to become despondent Unhappy with life in her social station, Found happiness through development of nursing as a profession. However, always felt she had not done enough when in Scutari. Was described a homely and doir as a young woman – was in love with FDR and they married over protests from both their families – After FDR’s affair with Eleanor’s secretary became an independent partner – but remained married and an advocate for the rights of the poor and disadvantaged
- 26. MEANING: Signature Strengths Marie Curie Florence Nightingale Eleanor Roosevelt Gift of absorption (MC26-7)-Dedicated – focused – hard working – Precise and Persistent (long hours of exacting effort required to extract radium from pitchblend Independence, persisten ce, organization (Harley St, London nursing home superintendent), take Charge Administrator in Scutari – Hard worker (20 hrs/day in Scutari) Willing and vocal advocate for many causes – Skilled negotiator and speaker –able to persuade FDR to address many issues he might otherwise have ignored – Strong voice for a new more equal role for women
- 27. MEANING: Purpose Marie Curie Florence Nightingale Eleanor Roosevelt Original plan was to become a HS teacher in Poland – became interested in radioactivity in 1895 and began serious study of it in 1897 –Longed to discover the source of radioactivity. Thinking she has made an error in experiment, she starts measurement over again ten, twenty times, is forced to yield to evidence and comes to only one possible explanation At 17 diaried direct call from God to enter his service – Moved by suffering she saw in European hospitals – in 1850 impressed by Sisters of St Vincent de Paul nursing order – 1851 three months with nursing deaconesses in Kaiserswerth, Germany – two weeks with nursing order in Paris – 1853 decided to make a career in nursing During the 1924 Democratic convention, ER held hearings to determine the resolutions of her advisory group. “Her subcommittee called for vigorous enforcement of Prohibition and for ratification of the Child Labor Amendment…*and+ demanded increased appropriations to the Children’s and Women’s bureaus of the Department of Labor as well as expanded services under the Shepard- Towner Act. Landmark Legis.
- 28. IMPACT: Presence Marie Curie Florence Nightingale Eleanor Roosevelt Too shy to make friends with French, takes refuge among copatriots of Latin Quarter (MC101) On rare occasions when entertains, she is a meticulous hostess (MC231) at banquet in her honor, Warsaw, leaves place to kiss Mlle Sikorska, childhood teacher now very old (MC283- 284) Charming to wounded (MC304) Never speaks of hardships and dangers of war service or of physical damage to her from X-rays and radium. Wrote many letters and documents. 6 official reports and 12 books. Her collected papers fill 13 volumes In 1932, ER was sent by FDR to the second bonus march of unemployed WWI veterans ER visited the camp and walked among the veterans. The casual manner in which she described the camp defused the situation. ER afterward used the impact of personal appearance to affect the tone on subsequent publicity and on public policy. Initiated press conferences for female reporters.
- 29. IMPACT: Resilience Marie Curie Florence Nightingale Eleanor Roosevelt Persisted in spite of a critical French press – against personal character that led her to brink of suicide and made her gravely ill (MC279) continued her studies and won second Nobel prize based on her own efforts even though rejected by the French Academy of Sciences. Persisted in work even when sick and house bound. After the first presidential election, “As I saw it, this meant the end of any personal life of my own….The turmoil in my heart and mind was rather great that night….” (TIR, p.. 74-75)
- 30. IMPACT: Belonging Marie Curie Florence Nightingale Eleanor Roosevelt Strongly identified with her native Poland, always intended to return – supported her sister’s studies – after the death of her husband fell in love with a married man but had to abandon the relationship because of the criticism in the press Inspirational model for women and nurses. Defined and developed a new professional role for nurses. Became loved in England and the “lady with the lamp” but shunned the publicity . During the mid-1920’s ER moved comfortably in both sufferage camps (LS, p. 72). “…*I+ tried to remember to invite TIR, to the White House old friends and other people to whom I thought it would mean a great deal to come at least once into that historic mansion”
- 31. Centered Leadership Our analysis of the lives of MC, FN, and ER found good evidence in their lived experiences for the usefulness of the Fabulous Five Dimensions of Centered Leadership. We believe women with a desire to lead would do well to examine these three women and their models of how to succeed through the expression of their own values and wisdom. The Fabulous Five Dimensions are: 1. Meaning 2. Managing Energy 3. Positive Framing 4. Connecting 5. Engaging
- 32. Contact Information Conrad, K. A., Metros, A., & Shambaugh, B. (2013, June). Nightingale, Curie, and Roosevelt as exemplars of the fabulous five dimensions of Centered Leadership. Paper presented at the International Leadership Association Women and Leadership Affinity Group Conference, Asilomar, Pacific Grove, CA. For a copy of the paper itself, please email your request to Kelley. • Kelley A. Conrad, School of Advanced Studies, University of Phoenix Kelley.Conrad@Phoenix.edu 402 Genesee St. Apt. 201 Delafield, WI 53018 262-443-3662 • Anastasia Metros, School of Advanced Studies, University of Phoenix ametros@gmail.com 608-577-5773 • Barbara Shambaugh, Nursing Systems Consultant Barbara.Shambaugh@Phoenix.edu 77 Pond Avenue #1501 Brookline, MA 02445 617-974-3084
Notes de l'éditeur
- SmartArt graphic with pictures on red background(Intermediate)To reproduce the SmartArt graphic on this slide, do the following:On the Home tab, in the Slides group, click Layout, and then click Blank.On the Insert tab, in the Illustrations group, click SmartArt.In the Choose a SmartArt Graphic dialog box, in the left pane, click Picture. In the Picture pane, double-click Title Picture Lineup (fifth row) to insert the graphic into the slide. Click each of the four picture placeholders in the SmartArt graphic, select a picture, and then click Insert.Select the graphic. Under SmartArt Tools, on the Format tab, in the Size group, enter 5.92” in the Height box and 8.75” in the Width box.Also under SmartArt Tools, on the Format tab, in the Arrange group, click Align, and then do the following:Click Align to Slide.Click Align Center.Click Align Middle.Select the graphic, and then click one of the arrows on the left border. In the Type your text here dialog box, enter text.Press and hold CTRL, and then select all of the text boxes above the pictures. On the Home tab, in the Font group, select Gill Sans MT from the Font list, and then select 26 pt. from the FontSize list. Click Font Color and select White, Background 1.Press and hold CTRL, and then select all of the text boxes above the pictures. Under SmartArt Tools, on the Format tab, in the Shapes group, click Change Shape, and then under Rectangles, click Round Diagonal Corner Rectangle.Also under SmartArt Tools, on the Format tab, in the Shape Styles group, click the Format Shape dialog box launcher. In the Format Shape dialog box, click Fill in the left pane, in the Fill pane, click Gradient fill, and then do the following:In the Type list, select Linear.In the Angle box, enter 0.3°.Under Gradient stops, click Add gradient stop or Remove gradient stop until three stops appear in the slider.Also under Gradient stops, customize the gradient stops as follows:Select the first stop in the slider, and then do the following: In the Position box, enter 0%.Click the button next to Color, click More Colors, and then in the Colors dialog box, on the Custom tab, enter values for Red: 77, Green: 28, and Blue: 27.Select the next stop in the slider, and then do the following: In the Position box, enter 50%.Click the button next to Color, click More Colors, and then in the Colors dialog box, on the Custom tab, enter values for Red: 136, Green: 50, and Blue: 48.Select the last stop in the slider, and then do the following: In the Position box, enter 100%.Click the button next to Color, click More Colors, and then in the Colors dialog box, on the Custom tab, enter values for Red: 77, Green: 28, and Blue: 27Also in the Format Shape dialog box, click Line Color in the left pane, in the Line Color pane, click No line.Also in the Format Shape dialog box, click Shadow in the left pane, in the Shadow pane, click the button next to Presets, and then under Outer, click Offset Diagonal Bottom Left (first row).Press and hold CTRL, and then select the three text boxes below the pictures. On the Home tab, in the Font group, select Gill Sans MT from the Font list,select 24 in the Font Size box, and then click Font Color and select White, Background 1.Also on the Home tab, in the Paragraph group, click Align Text Left. Press and hold CTRL, and then select the three vertical lines in the SmartArt graphic. Under SmartArt Tools, on the Format tab, in the Shape Styles group, click the Format Shape dialog box launcher. In the Format Shape dialog box, click Line Color in the left pane, in the Line Color pane, click Gradient line, and then do the following:In the Type list, click Linear.In the Angle box, enter 90°.Under Gradient stops, click Add gradient stop or Remove gradient stop until two stops appear in the slider.Also under Gradient stops, customize the gradient stops as follows:Select the first stop in the slider, and then do the following: In the Position box, enter 46%.Click the button next to Color, click More Colors, and then in the Colors dialog box, on the Custom tab, enter values for Red: 40, Green: 15, and Blue: 14.In the Transparency box, enter 0%. Select the last stop in the slider, and then do the following: In the Position box, enter 100%.Click the button next to Color, and then under Theme Colors click Black, Text 1 (first row).In the Transparency box, enter 100%. Press and hold CTRL, and then select all three pictures. Under SmartArt Tools, on the Format tab, in the Shapes group, click Change Shape, and then under Rectangles, click Round Single Corner Rectangle.Under Picture Tools, on the Format tab, in the Picture Styles group, click Picture Effects, point to Shadow, and then under Inner, click Inside Diagonal Top Right.Also under PictureTools, on the Format tab, in the Picture Styles group, click Picture Border, and then click No Outline.To reproduce the background effects on this slide, do the following:On the Design tab, in the Background group, click BackgroundStyles, and then click Format Background. In the FormatBackground dialog box, click Gradient fill, and then do the following:In the Type list, click Radial.In the Direction list, click From Center.Under Gradient stops, click Add gradient stop or Remove gradient stop until three stops appear in the slider.Also under Gradient stops, customize the gradient stops as follows:Select the first stop in the slider, and then do the following: In the Position box, enter 0%.Click the button next to Color, click More Colors, and then in the Colors dialog box, on the Custom tab, enter values for Red: 153, Green: 57, and Blue: 55.Select the next stop in the slider, and then do the following: In the Position box, enter 50%.Click the button next to Color, click More Colors, and then in the Colors dialog box, on the Custom tab, enter values for Red: 114, Green: 42, and Blue: 40.Select the last stop in the slider, and then do the following: In the Position box, enter 100%.Click the button next to Color, click More Colors, and then in the Colors dialog box, on the Custom tab, enter values for Red: 40, Green: 15, and Blue: 14.
- SmartArt graphic with pictures on red background(Intermediate)To reproduce the SmartArt graphic on this slide, do the following:On the Home tab, in the Slides group, click Layout, and then click Blank.On the Insert tab, in the Illustrations group, click SmartArt.In the Choose a SmartArt Graphic dialog box, in the left pane, click Picture. In the Picture pane, double-click Title Picture Lineup (fifth row) to insert the graphic into the slide. Click each of the four picture placeholders in the SmartArt graphic, select a picture, and then click Insert.Select the graphic. Under SmartArt Tools, on the Format tab, in the Size group, enter 5.92” in the Height box and 8.75” in the Width box.Also under SmartArt Tools, on the Format tab, in the Arrange group, click Align, and then do the following:Click Align to Slide.Click Align Center.Click Align Middle.Select the graphic, and then click one of the arrows on the left border. In the Type your text here dialog box, enter text.Press and hold CTRL, and then select all of the text boxes above the pictures. On the Home tab, in the Font group, select Gill Sans MT from the Font list, and then select 26 pt. from the FontSize list. Click Font Color and select White, Background 1.Press and hold CTRL, and then select all of the text boxes above the pictures. Under SmartArt Tools, on the Format tab, in the Shapes group, click Change Shape, and then under Rectangles, click Round Diagonal Corner Rectangle.Also under SmartArt Tools, on the Format tab, in the Shape Styles group, click the Format Shape dialog box launcher. In the Format Shape dialog box, click Fill in the left pane, in the Fill pane, click Gradient fill, and then do the following:In the Type list, select Linear.In the Angle box, enter 0.3°.Under Gradient stops, click Add gradient stop or Remove gradient stop until three stops appear in the slider.Also under Gradient stops, customize the gradient stops as follows:Select the first stop in the slider, and then do the following: In the Position box, enter 0%.Click the button next to Color, click More Colors, and then in the Colors dialog box, on the Custom tab, enter values for Red: 77, Green: 28, and Blue: 27.Select the next stop in the slider, and then do the following: In the Position box, enter 50%.Click the button next to Color, click More Colors, and then in the Colors dialog box, on the Custom tab, enter values for Red: 136, Green: 50, and Blue: 48.Select the last stop in the slider, and then do the following: In the Position box, enter 100%.Click the button next to Color, click More Colors, and then in the Colors dialog box, on the Custom tab, enter values for Red: 77, Green: 28, and Blue: 27Also in the Format Shape dialog box, click Line Color in the left pane, in the Line Color pane, click No line.Also in the Format Shape dialog box, click Shadow in the left pane, in the Shadow pane, click the button next to Presets, and then under Outer, click Offset Diagonal Bottom Left (first row).Press and hold CTRL, and then select the three text boxes below the pictures. On the Home tab, in the Font group, select Gill Sans MT from the Font list,select 24 in the Font Size box, and then click Font Color and select White, Background 1.Also on the Home tab, in the Paragraph group, click Align Text Left. Press and hold CTRL, and then select the three vertical lines in the SmartArt graphic. Under SmartArt Tools, on the Format tab, in the Shape Styles group, click the Format Shape dialog box launcher. In the Format Shape dialog box, click Line Color in the left pane, in the Line Color pane, click Gradient line, and then do the following:In the Type list, click Linear.In the Angle box, enter 90°.Under Gradient stops, click Add gradient stop or Remove gradient stop until two stops appear in the slider.Also under Gradient stops, customize the gradient stops as follows:Select the first stop in the slider, and then do the following: In the Position box, enter 46%.Click the button next to Color, click More Colors, and then in the Colors dialog box, on the Custom tab, enter values for Red: 40, Green: 15, and Blue: 14.In the Transparency box, enter 0%. Select the last stop in the slider, and then do the following: In the Position box, enter 100%.Click the button next to Color, and then under Theme Colors click Black, Text 1 (first row).In the Transparency box, enter 100%. Press and hold CTRL, and then select all three pictures. Under SmartArt Tools, on the Format tab, in the Shapes group, click Change Shape, and then under Rectangles, click Round Single Corner Rectangle.Under Picture Tools, on the Format tab, in the Picture Styles group, click Picture Effects, point to Shadow, and then under Inner, click Inside Diagonal Top Right.Also under PictureTools, on the Format tab, in the Picture Styles group, click Picture Border, and then click No Outline.To reproduce the background effects on this slide, do the following:On the Design tab, in the Background group, click BackgroundStyles, and then click Format Background. In the FormatBackground dialog box, click Gradient fill, and then do the following:In the Type list, click Radial.In the Direction list, click From Center.Under Gradient stops, click Add gradient stop or Remove gradient stop until three stops appear in the slider.Also under Gradient stops, customize the gradient stops as follows:Select the first stop in the slider, and then do the following: In the Position box, enter 0%.Click the button next to Color, click More Colors, and then in the Colors dialog box, on the Custom tab, enter values for Red: 153, Green: 57, and Blue: 55.Select the next stop in the slider, and then do the following: In the Position box, enter 50%.Click the button next to Color, click More Colors, and then in the Colors dialog box, on the Custom tab, enter values for Red: 114, Green: 42, and Blue: 40.Select the last stop in the slider, and then do the following: In the Position box, enter 100%.Click the button next to Color, click More Colors, and then in the Colors dialog box, on the Custom tab, enter values for Red: 40, Green: 15, and Blue: 14.
- SmartArt graphic with pictures on red background(Intermediate)To reproduce the SmartArt graphic on this slide, do the following:On the Home tab, in the Slides group, click Layout, and then click Blank.On the Insert tab, in the Illustrations group, click SmartArt.In the Choose a SmartArt Graphic dialog box, in the left pane, click Picture. In the Picture pane, double-click Title Picture Lineup (fifth row) to insert the graphic into the slide. Click each of the four picture placeholders in the SmartArt graphic, select a picture, and then click Insert.Select the graphic. Under SmartArt Tools, on the Format tab, in the Size group, enter 5.92” in the Height box and 8.75” in the Width box.Also under SmartArt Tools, on the Format tab, in the Arrange group, click Align, and then do the following:Click Align to Slide.Click Align Center.Click Align Middle.Select the graphic, and then click one of the arrows on the left border. In the Type your text here dialog box, enter text.Press and hold CTRL, and then select all of the text boxes above the pictures. On the Home tab, in the Font group, select Gill Sans MT from the Font list, and then select 26 pt. from the FontSize list. Click Font Color and select White, Background 1.Press and hold CTRL, and then select all of the text boxes above the pictures. Under SmartArt Tools, on the Format tab, in the Shapes group, click Change Shape, and then under Rectangles, click Round Diagonal Corner Rectangle.Also under SmartArt Tools, on the Format tab, in the Shape Styles group, click the Format Shape dialog box launcher. In the Format Shape dialog box, click Fill in the left pane, in the Fill pane, click Gradient fill, and then do the following:In the Type list, select Linear.In the Angle box, enter 0.3°.Under Gradient stops, click Add gradient stop or Remove gradient stop until three stops appear in the slider.Also under Gradient stops, customize the gradient stops as follows:Select the first stop in the slider, and then do the following: In the Position box, enter 0%.Click the button next to Color, click More Colors, and then in the Colors dialog box, on the Custom tab, enter values for Red: 77, Green: 28, and Blue: 27.Select the next stop in the slider, and then do the following: In the Position box, enter 50%.Click the button next to Color, click More Colors, and then in the Colors dialog box, on the Custom tab, enter values for Red: 136, Green: 50, and Blue: 48.Select the last stop in the slider, and then do the following: In the Position box, enter 100%.Click the button next to Color, click More Colors, and then in the Colors dialog box, on the Custom tab, enter values for Red: 77, Green: 28, and Blue: 27Also in the Format Shape dialog box, click Line Color in the left pane, in the Line Color pane, click No line.Also in the Format Shape dialog box, click Shadow in the left pane, in the Shadow pane, click the button next to Presets, and then under Outer, click Offset Diagonal Bottom Left (first row).Press and hold CTRL, and then select the three text boxes below the pictures. On the Home tab, in the Font group, select Gill Sans MT from the Font list,select 24 in the Font Size box, and then click Font Color and select White, Background 1.Also on the Home tab, in the Paragraph group, click Align Text Left. Press and hold CTRL, and then select the three vertical lines in the SmartArt graphic. Under SmartArt Tools, on the Format tab, in the Shape Styles group, click the Format Shape dialog box launcher. In the Format Shape dialog box, click Line Color in the left pane, in the Line Color pane, click Gradient line, and then do the following:In the Type list, click Linear.In the Angle box, enter 90°.Under Gradient stops, click Add gradient stop or Remove gradient stop until two stops appear in the slider.Also under Gradient stops, customize the gradient stops as follows:Select the first stop in the slider, and then do the following: In the Position box, enter 46%.Click the button next to Color, click More Colors, and then in the Colors dialog box, on the Custom tab, enter values for Red: 40, Green: 15, and Blue: 14.In the Transparency box, enter 0%. Select the last stop in the slider, and then do the following: In the Position box, enter 100%.Click the button next to Color, and then under Theme Colors click Black, Text 1 (first row).In the Transparency box, enter 100%. Press and hold CTRL, and then select all three pictures. Under SmartArt Tools, on the Format tab, in the Shapes group, click Change Shape, and then under Rectangles, click Round Single Corner Rectangle.Under Picture Tools, on the Format tab, in the Picture Styles group, click Picture Effects, point to Shadow, and then under Inner, click Inside Diagonal Top Right.Also under PictureTools, on the Format tab, in the Picture Styles group, click Picture Border, and then click No Outline.To reproduce the background effects on this slide, do the following:On the Design tab, in the Background group, click BackgroundStyles, and then click Format Background. In the FormatBackground dialog box, click Gradient fill, and then do the following:In the Type list, click Radial.In the Direction list, click From Center.Under Gradient stops, click Add gradient stop or Remove gradient stop until three stops appear in the slider.Also under Gradient stops, customize the gradient stops as follows:Select the first stop in the slider, and then do the following: In the Position box, enter 0%.Click the button next to Color, click More Colors, and then in the Colors dialog box, on the Custom tab, enter values for Red: 153, Green: 57, and Blue: 55.Select the next stop in the slider, and then do the following: In the Position box, enter 50%.Click the button next to Color, click More Colors, and then in the Colors dialog box, on the Custom tab, enter values for Red: 114, Green: 42, and Blue: 40.Select the last stop in the slider, and then do the following: In the Position box, enter 100%.Click the button next to Color, click More Colors, and then in the Colors dialog box, on the Custom tab, enter values for Red: 40, Green: 15, and Blue: 14.
- SmartArt graphic with pictures on red background(Intermediate)To reproduce the SmartArt graphic on this slide, do the following:On the Home tab, in the Slides group, click Layout, and then click Blank.On the Insert tab, in the Illustrations group, click SmartArt.In the Choose a SmartArt Graphic dialog box, in the left pane, click Picture. In the Picture pane, double-click Title Picture Lineup (fifth row) to insert the graphic into the slide. Click each of the four picture placeholders in the SmartArt graphic, select a picture, and then click Insert.Select the graphic. Under SmartArt Tools, on the Format tab, in the Size group, enter 5.92” in the Height box and 8.75” in the Width box.Also under SmartArt Tools, on the Format tab, in the Arrange group, click Align, and then do the following:Click Align to Slide.Click Align Center.Click Align Middle.Select the graphic, and then click one of the arrows on the left border. In the Type your text here dialog box, enter text.Press and hold CTRL, and then select all of the text boxes above the pictures. On the Home tab, in the Font group, select Gill Sans MT from the Font list, and then select 26 pt. from the FontSize list. Click Font Color and select White, Background 1.Press and hold CTRL, and then select all of the text boxes above the pictures. Under SmartArt Tools, on the Format tab, in the Shapes group, click Change Shape, and then under Rectangles, click Round Diagonal Corner Rectangle.Also under SmartArt Tools, on the Format tab, in the Shape Styles group, click the Format Shape dialog box launcher. In the Format Shape dialog box, click Fill in the left pane, in the Fill pane, click Gradient fill, and then do the following:In the Type list, select Linear.In the Angle box, enter 0.3°.Under Gradient stops, click Add gradient stop or Remove gradient stop until three stops appear in the slider.Also under Gradient stops, customize the gradient stops as follows:Select the first stop in the slider, and then do the following: In the Position box, enter 0%.Click the button next to Color, click More Colors, and then in the Colors dialog box, on the Custom tab, enter values for Red: 77, Green: 28, and Blue: 27.Select the next stop in the slider, and then do the following: In the Position box, enter 50%.Click the button next to Color, click More Colors, and then in the Colors dialog box, on the Custom tab, enter values for Red: 136, Green: 50, and Blue: 48.Select the last stop in the slider, and then do the following: In the Position box, enter 100%.Click the button next to Color, click More Colors, and then in the Colors dialog box, on the Custom tab, enter values for Red: 77, Green: 28, and Blue: 27Also in the Format Shape dialog box, click Line Color in the left pane, in the Line Color pane, click No line.Also in the Format Shape dialog box, click Shadow in the left pane, in the Shadow pane, click the button next to Presets, and then under Outer, click Offset Diagonal Bottom Left (first row).Press and hold CTRL, and then select the three text boxes below the pictures. On the Home tab, in the Font group, select Gill Sans MT from the Font list,select 24 in the Font Size box, and then click Font Color and select White, Background 1.Also on the Home tab, in the Paragraph group, click Align Text Left. Press and hold CTRL, and then select the three vertical lines in the SmartArt graphic. Under SmartArt Tools, on the Format tab, in the Shape Styles group, click the Format Shape dialog box launcher. In the Format Shape dialog box, click Line Color in the left pane, in the Line Color pane, click Gradient line, and then do the following:In the Type list, click Linear.In the Angle box, enter 90°.Under Gradient stops, click Add gradient stop or Remove gradient stop until two stops appear in the slider.Also under Gradient stops, customize the gradient stops as follows:Select the first stop in the slider, and then do the following: In the Position box, enter 46%.Click the button next to Color, click More Colors, and then in the Colors dialog box, on the Custom tab, enter values for Red: 40, Green: 15, and Blue: 14.In the Transparency box, enter 0%. Select the last stop in the slider, and then do the following: In the Position box, enter 100%.Click the button next to Color, and then under Theme Colors click Black, Text 1 (first row).In the Transparency box, enter 100%. Press and hold CTRL, and then select all three pictures. Under SmartArt Tools, on the Format tab, in the Shapes group, click Change Shape, and then under Rectangles, click Round Single Corner Rectangle.Under Picture Tools, on the Format tab, in the Picture Styles group, click Picture Effects, point to Shadow, and then under Inner, click Inside Diagonal Top Right.Also under PictureTools, on the Format tab, in the Picture Styles group, click Picture Border, and then click No Outline.To reproduce the background effects on this slide, do the following:On the Design tab, in the Background group, click BackgroundStyles, and then click Format Background. In the FormatBackground dialog box, click Gradient fill, and then do the following:In the Type list, click Radial.In the Direction list, click From Center.Under Gradient stops, click Add gradient stop or Remove gradient stop until three stops appear in the slider.Also under Gradient stops, customize the gradient stops as follows:Select the first stop in the slider, and then do the following: In the Position box, enter 0%.Click the button next to Color, click More Colors, and then in the Colors dialog box, on the Custom tab, enter values for Red: 153, Green: 57, and Blue: 55.Select the next stop in the slider, and then do the following: In the Position box, enter 50%.Click the button next to Color, click More Colors, and then in the Colors dialog box, on the Custom tab, enter values for Red: 114, Green: 42, and Blue: 40.Select the last stop in the slider, and then do the following: In the Position box, enter 100%.Click the button next to Color, click More Colors, and then in the Colors dialog box, on the Custom tab, enter values for Red: 40, Green: 15, and Blue: 14.
- SmartArt graphic with pictures on red background(Intermediate)To reproduce the SmartArt graphic on this slide, do the following:On the Home tab, in the Slides group, click Layout, and then click Blank.On the Insert tab, in the Illustrations group, click SmartArt.In the Choose a SmartArt Graphic dialog box, in the left pane, click Picture. In the Picture pane, double-click Title Picture Lineup (fifth row) to insert the graphic into the slide. Click each of the four picture placeholders in the SmartArt graphic, select a picture, and then click Insert.Select the graphic. Under SmartArt Tools, on the Format tab, in the Size group, enter 5.92” in the Height box and 8.75” in the Width box.Also under SmartArt Tools, on the Format tab, in the Arrange group, click Align, and then do the following:Click Align to Slide.Click Align Center.Click Align Middle.Select the graphic, and then click one of the arrows on the left border. In the Type your text here dialog box, enter text.Press and hold CTRL, and then select all of the text boxes above the pictures. On the Home tab, in the Font group, select Gill Sans MT from the Font list, and then select 26 pt. from the FontSize list. Click Font Color and select White, Background 1.Press and hold CTRL, and then select all of the text boxes above the pictures. Under SmartArt Tools, on the Format tab, in the Shapes group, click Change Shape, and then under Rectangles, click Round Diagonal Corner Rectangle.Also under SmartArt Tools, on the Format tab, in the Shape Styles group, click the Format Shape dialog box launcher. In the Format Shape dialog box, click Fill in the left pane, in the Fill pane, click Gradient fill, and then do the following:In the Type list, select Linear.In the Angle box, enter 0.3°.Under Gradient stops, click Add gradient stop or Remove gradient stop until three stops appear in the slider.Also under Gradient stops, customize the gradient stops as follows:Select the first stop in the slider, and then do the following: In the Position box, enter 0%.Click the button next to Color, click More Colors, and then in the Colors dialog box, on the Custom tab, enter values for Red: 77, Green: 28, and Blue: 27.Select the next stop in the slider, and then do the following: In the Position box, enter 50%.Click the button next to Color, click More Colors, and then in the Colors dialog box, on the Custom tab, enter values for Red: 136, Green: 50, and Blue: 48.Select the last stop in the slider, and then do the following: In the Position box, enter 100%.Click the button next to Color, click More Colors, and then in the Colors dialog box, on the Custom tab, enter values for Red: 77, Green: 28, and Blue: 27Also in the Format Shape dialog box, click Line Color in the left pane, in the Line Color pane, click No line.Also in the Format Shape dialog box, click Shadow in the left pane, in the Shadow pane, click the button next to Presets, and then under Outer, click Offset Diagonal Bottom Left (first row).Press and hold CTRL, and then select the three text boxes below the pictures. On the Home tab, in the Font group, select Gill Sans MT from the Font list,select 24 in the Font Size box, and then click Font Color and select White, Background 1.Also on the Home tab, in the Paragraph group, click Align Text Left. Press and hold CTRL, and then select the three vertical lines in the SmartArt graphic. Under SmartArt Tools, on the Format tab, in the Shape Styles group, click the Format Shape dialog box launcher. In the Format Shape dialog box, click Line Color in the left pane, in the Line Color pane, click Gradient line, and then do the following:In the Type list, click Linear.In the Angle box, enter 90°.Under Gradient stops, click Add gradient stop or Remove gradient stop until two stops appear in the slider.Also under Gradient stops, customize the gradient stops as follows:Select the first stop in the slider, and then do the following: In the Position box, enter 46%.Click the button next to Color, click More Colors, and then in the Colors dialog box, on the Custom tab, enter values for Red: 40, Green: 15, and Blue: 14.In the Transparency box, enter 0%. Select the last stop in the slider, and then do the following: In the Position box, enter 100%.Click the button next to Color, and then under Theme Colors click Black, Text 1 (first row).In the Transparency box, enter 100%. Press and hold CTRL, and then select all three pictures. Under SmartArt Tools, on the Format tab, in the Shapes group, click Change Shape, and then under Rectangles, click Round Single Corner Rectangle.Under Picture Tools, on the Format tab, in the Picture Styles group, click Picture Effects, point to Shadow, and then under Inner, click Inside Diagonal Top Right.Also under PictureTools, on the Format tab, in the Picture Styles group, click Picture Border, and then click No Outline.To reproduce the background effects on this slide, do the following:On the Design tab, in the Background group, click BackgroundStyles, and then click Format Background. In the FormatBackground dialog box, click Gradient fill, and then do the following:In the Type list, click Radial.In the Direction list, click From Center.Under Gradient stops, click Add gradient stop or Remove gradient stop until three stops appear in the slider.Also under Gradient stops, customize the gradient stops as follows:Select the first stop in the slider, and then do the following: In the Position box, enter 0%.Click the button next to Color, click More Colors, and then in the Colors dialog box, on the Custom tab, enter values for Red: 153, Green: 57, and Blue: 55.Select the next stop in the slider, and then do the following: In the Position box, enter 50%.Click the button next to Color, click More Colors, and then in the Colors dialog box, on the Custom tab, enter values for Red: 114, Green: 42, and Blue: 40.Select the last stop in the slider, and then do the following: In the Position box, enter 100%.Click the button next to Color, click More Colors, and then in the Colors dialog box, on the Custom tab, enter values for Red: 40, Green: 15, and Blue: 14.
- SmartArt graphic with pictures on red background(Intermediate)To reproduce the SmartArt graphic on this slide, do the following:On the Home tab, in the Slides group, click Layout, and then click Blank.On the Insert tab, in the Illustrations group, click SmartArt.In the Choose a SmartArt Graphic dialog box, in the left pane, click Picture. In the Picture pane, double-click Title Picture Lineup (fifth row) to insert the graphic into the slide. Click each of the four picture placeholders in the SmartArt graphic, select a picture, and then click Insert.Select the graphic. Under SmartArt Tools, on the Format tab, in the Size group, enter 5.92” in the Height box and 8.75” in the Width box.Also under SmartArt Tools, on the Format tab, in the Arrange group, click Align, and then do the following:Click Align to Slide.Click Align Center.Click Align Middle.Select the graphic, and then click one of the arrows on the left border. In the Type your text here dialog box, enter text.Press and hold CTRL, and then select all of the text boxes above the pictures. On the Home tab, in the Font group, select Gill Sans MT from the Font list, and then select 26 pt. from the FontSize list. Click Font Color and select White, Background 1.Press and hold CTRL, and then select all of the text boxes above the pictures. Under SmartArt Tools, on the Format tab, in the Shapes group, click Change Shape, and then under Rectangles, click Round Diagonal Corner Rectangle.Also under SmartArt Tools, on the Format tab, in the Shape Styles group, click the Format Shape dialog box launcher. In the Format Shape dialog box, click Fill in the left pane, in the Fill pane, click Gradient fill, and then do the following:In the Type list, select Linear.In the Angle box, enter 0.3°.Under Gradient stops, click Add gradient stop or Remove gradient stop until three stops appear in the slider.Also under Gradient stops, customize the gradient stops as follows:Select the first stop in the slider, and then do the following: In the Position box, enter 0%.Click the button next to Color, click More Colors, and then in the Colors dialog box, on the Custom tab, enter values for Red: 77, Green: 28, and Blue: 27.Select the next stop in the slider, and then do the following: In the Position box, enter 50%.Click the button next to Color, click More Colors, and then in the Colors dialog box, on the Custom tab, enter values for Red: 136, Green: 50, and Blue: 48.Select the last stop in the slider, and then do the following: In the Position box, enter 100%.Click the button next to Color, click More Colors, and then in the Colors dialog box, on the Custom tab, enter values for Red: 77, Green: 28, and Blue: 27Also in the Format Shape dialog box, click Line Color in the left pane, in the Line Color pane, click No line.Also in the Format Shape dialog box, click Shadow in the left pane, in the Shadow pane, click the button next to Presets, and then under Outer, click Offset Diagonal Bottom Left (first row).Press and hold CTRL, and then select the three text boxes below the pictures. On the Home tab, in the Font group, select Gill Sans MT from the Font list,select 24 in the Font Size box, and then click Font Color and select White, Background 1.Also on the Home tab, in the Paragraph group, click Align Text Left. Press and hold CTRL, and then select the three vertical lines in the SmartArt graphic. Under SmartArt Tools, on the Format tab, in the Shape Styles group, click the Format Shape dialog box launcher. In the Format Shape dialog box, click Line Color in the left pane, in the Line Color pane, click Gradient line, and then do the following:In the Type list, click Linear.In the Angle box, enter 90°.Under Gradient stops, click Add gradient stop or Remove gradient stop until two stops appear in the slider.Also under Gradient stops, customize the gradient stops as follows:Select the first stop in the slider, and then do the following: In the Position box, enter 46%.Click the button next to Color, click More Colors, and then in the Colors dialog box, on the Custom tab, enter values for Red: 40, Green: 15, and Blue: 14.In the Transparency box, enter 0%. Select the last stop in the slider, and then do the following: In the Position box, enter 100%.Click the button next to Color, and then under Theme Colors click Black, Text 1 (first row).In the Transparency box, enter 100%. Press and hold CTRL, and then select all three pictures. Under SmartArt Tools, on the Format tab, in the Shapes group, click Change Shape, and then under Rectangles, click Round Single Corner Rectangle.Under Picture Tools, on the Format tab, in the Picture Styles group, click Picture Effects, point to Shadow, and then under Inner, click Inside Diagonal Top Right.Also under PictureTools, on the Format tab, in the Picture Styles group, click Picture Border, and then click No Outline.To reproduce the background effects on this slide, do the following:On the Design tab, in the Background group, click BackgroundStyles, and then click Format Background. In the FormatBackground dialog box, click Gradient fill, and then do the following:In the Type list, click Radial.In the Direction list, click From Center.Under Gradient stops, click Add gradient stop or Remove gradient stop until three stops appear in the slider.Also under Gradient stops, customize the gradient stops as follows:Select the first stop in the slider, and then do the following: In the Position box, enter 0%.Click the button next to Color, click More Colors, and then in the Colors dialog box, on the Custom tab, enter values for Red: 153, Green: 57, and Blue: 55.Select the next stop in the slider, and then do the following: In the Position box, enter 50%.Click the button next to Color, click More Colors, and then in the Colors dialog box, on the Custom tab, enter values for Red: 114, Green: 42, and Blue: 40.Select the last stop in the slider, and then do the following: In the Position box, enter 100%.Click the button next to Color, click More Colors, and then in the Colors dialog box, on the Custom tab, enter values for Red: 40, Green: 15, and Blue: 14.
- SmartArt graphic with pictures on red background(Intermediate)To reproduce the SmartArt graphic on this slide, do the following:On the Home tab, in the Slides group, click Layout, and then click Blank.On the Insert tab, in the Illustrations group, click SmartArt.In the Choose a SmartArt Graphic dialog box, in the left pane, click Picture. In the Picture pane, double-click Title Picture Lineup (fifth row) to insert the graphic into the slide. Click each of the four picture placeholders in the SmartArt graphic, select a picture, and then click Insert.Select the graphic. Under SmartArt Tools, on the Format tab, in the Size group, enter 5.92” in the Height box and 8.75” in the Width box.Also under SmartArt Tools, on the Format tab, in the Arrange group, click Align, and then do the following:Click Align to Slide.Click Align Center.Click Align Middle.Select the graphic, and then click one of the arrows on the left border. In the Type your text here dialog box, enter text.Press and hold CTRL, and then select all of the text boxes above the pictures. On the Home tab, in the Font group, select Gill Sans MT from the Font list, and then select 26 pt. from the FontSize list. Click Font Color and select White, Background 1.Press and hold CTRL, and then select all of the text boxes above the pictures. Under SmartArt Tools, on the Format tab, in the Shapes group, click Change Shape, and then under Rectangles, click Round Diagonal Corner Rectangle.Also under SmartArt Tools, on the Format tab, in the Shape Styles group, click the Format Shape dialog box launcher. In the Format Shape dialog box, click Fill in the left pane, in the Fill pane, click Gradient fill, and then do the following:In the Type list, select Linear.In the Angle box, enter 0.3°.Under Gradient stops, click Add gradient stop or Remove gradient stop until three stops appear in the slider.Also under Gradient stops, customize the gradient stops as follows:Select the first stop in the slider, and then do the following: In the Position box, enter 0%.Click the button next to Color, click More Colors, and then in the Colors dialog box, on the Custom tab, enter values for Red: 77, Green: 28, and Blue: 27.Select the next stop in the slider, and then do the following: In the Position box, enter 50%.Click the button next to Color, click More Colors, and then in the Colors dialog box, on the Custom tab, enter values for Red: 136, Green: 50, and Blue: 48.Select the last stop in the slider, and then do the following: In the Position box, enter 100%.Click the button next to Color, click More Colors, and then in the Colors dialog box, on the Custom tab, enter values for Red: 77, Green: 28, and Blue: 27Also in the Format Shape dialog box, click Line Color in the left pane, in the Line Color pane, click No line.Also in the Format Shape dialog box, click Shadow in the left pane, in the Shadow pane, click the button next to Presets, and then under Outer, click Offset Diagonal Bottom Left (first row).Press and hold CTRL, and then select the three text boxes below the pictures. On the Home tab, in the Font group, select Gill Sans MT from the Font list,select 24 in the Font Size box, and then click Font Color and select White, Background 1.Also on the Home tab, in the Paragraph group, click Align Text Left. Press and hold CTRL, and then select the three vertical lines in the SmartArt graphic. Under SmartArt Tools, on the Format tab, in the Shape Styles group, click the Format Shape dialog box launcher. In the Format Shape dialog box, click Line Color in the left pane, in the Line Color pane, click Gradient line, and then do the following:In the Type list, click Linear.In the Angle box, enter 90°.Under Gradient stops, click Add gradient stop or Remove gradient stop until two stops appear in the slider.Also under Gradient stops, customize the gradient stops as follows:Select the first stop in the slider, and then do the following: In the Position box, enter 46%.Click the button next to Color, click More Colors, and then in the Colors dialog box, on the Custom tab, enter values for Red: 40, Green: 15, and Blue: 14.In the Transparency box, enter 0%. Select the last stop in the slider, and then do the following: In the Position box, enter 100%.Click the button next to Color, and then under Theme Colors click Black, Text 1 (first row).In the Transparency box, enter 100%. Press and hold CTRL, and then select all three pictures. Under SmartArt Tools, on the Format tab, in the Shapes group, click Change Shape, and then under Rectangles, click Round Single Corner Rectangle.Under Picture Tools, on the Format tab, in the Picture Styles group, click Picture Effects, point to Shadow, and then under Inner, click Inside Diagonal Top Right.Also under PictureTools, on the Format tab, in the Picture Styles group, click Picture Border, and then click No Outline.To reproduce the background effects on this slide, do the following:On the Design tab, in the Background group, click BackgroundStyles, and then click Format Background. In the FormatBackground dialog box, click Gradient fill, and then do the following:In the Type list, click Radial.In the Direction list, click From Center.Under Gradient stops, click Add gradient stop or Remove gradient stop until three stops appear in the slider.Also under Gradient stops, customize the gradient stops as follows:Select the first stop in the slider, and then do the following: In the Position box, enter 0%.Click the button next to Color, click More Colors, and then in the Colors dialog box, on the Custom tab, enter values for Red: 153, Green: 57, and Blue: 55.Select the next stop in the slider, and then do the following: In the Position box, enter 50%.Click the button next to Color, click More Colors, and then in the Colors dialog box, on the Custom tab, enter values for Red: 114, Green: 42, and Blue: 40.Select the last stop in the slider, and then do the following: In the Position box, enter 100%.Click the button next to Color, click More Colors, and then in the Colors dialog box, on the Custom tab, enter values for Red: 40, Green: 15, and Blue: 14.
- SmartArt graphic with pictures on red background(Intermediate)To reproduce the SmartArt graphic on this slide, do the following:On the Home tab, in the Slides group, click Layout, and then click Blank.On the Insert tab, in the Illustrations group, click SmartArt.In the Choose a SmartArt Graphic dialog box, in the left pane, click Picture. In the Picture pane, double-click Title Picture Lineup (fifth row) to insert the graphic into the slide. Click each of the four picture placeholders in the SmartArt graphic, select a picture, and then click Insert.Select the graphic. Under SmartArt Tools, on the Format tab, in the Size group, enter 5.92” in the Height box and 8.75” in the Width box.Also under SmartArt Tools, on the Format tab, in the Arrange group, click Align, and then do the following:Click Align to Slide.Click Align Center.Click Align Middle.Select the graphic, and then click one of the arrows on the left border. In the Type your text here dialog box, enter text.Press and hold CTRL, and then select all of the text boxes above the pictures. On the Home tab, in the Font group, select Gill Sans MT from the Font list, and then select 26 pt. from the FontSize list. Click Font Color and select White, Background 1.Press and hold CTRL, and then select all of the text boxes above the pictures. Under SmartArt Tools, on the Format tab, in the Shapes group, click Change Shape, and then under Rectangles, click Round Diagonal Corner Rectangle.Also under SmartArt Tools, on the Format tab, in the Shape Styles group, click the Format Shape dialog box launcher. In the Format Shape dialog box, click Fill in the left pane, in the Fill pane, click Gradient fill, and then do the following:In the Type list, select Linear.In the Angle box, enter 0.3°.Under Gradient stops, click Add gradient stop or Remove gradient stop until three stops appear in the slider.Also under Gradient stops, customize the gradient stops as follows:Select the first stop in the slider, and then do the following: In the Position box, enter 0%.Click the button next to Color, click More Colors, and then in the Colors dialog box, on the Custom tab, enter values for Red: 77, Green: 28, and Blue: 27.Select the next stop in the slider, and then do the following: In the Position box, enter 50%.Click the button next to Color, click More Colors, and then in the Colors dialog box, on the Custom tab, enter values for Red: 136, Green: 50, and Blue: 48.Select the last stop in the slider, and then do the following: In the Position box, enter 100%.Click the button next to Color, click More Colors, and then in the Colors dialog box, on the Custom tab, enter values for Red: 77, Green: 28, and Blue: 27Also in the Format Shape dialog box, click Line Color in the left pane, in the Line Color pane, click No line.Also in the Format Shape dialog box, click Shadow in the left pane, in the Shadow pane, click the button next to Presets, and then under Outer, click Offset Diagonal Bottom Left (first row).Press and hold CTRL, and then select the three text boxes below the pictures. On the Home tab, in the Font group, select Gill Sans MT from the Font list,select 24 in the Font Size box, and then click Font Color and select White, Background 1.Also on the Home tab, in the Paragraph group, click Align Text Left. Press and hold CTRL, and then select the three vertical lines in the SmartArt graphic. Under SmartArt Tools, on the Format tab, in the Shape Styles group, click the Format Shape dialog box launcher. In the Format Shape dialog box, click Line Color in the left pane, in the Line Color pane, click Gradient line, and then do the following:In the Type list, click Linear.In the Angle box, enter 90°.Under Gradient stops, click Add gradient stop or Remove gradient stop until two stops appear in the slider.Also under Gradient stops, customize the gradient stops as follows:Select the first stop in the slider, and then do the following: In the Position box, enter 46%.Click the button next to Color, click More Colors, and then in the Colors dialog box, on the Custom tab, enter values for Red: 40, Green: 15, and Blue: 14.In the Transparency box, enter 0%. Select the last stop in the slider, and then do the following: In the Position box, enter 100%.Click the button next to Color, and then under Theme Colors click Black, Text 1 (first row).In the Transparency box, enter 100%. Press and hold CTRL, and then select all three pictures. Under SmartArt Tools, on the Format tab, in the Shapes group, click Change Shape, and then under Rectangles, click Round Single Corner Rectangle.Under Picture Tools, on the Format tab, in the Picture Styles group, click Picture Effects, point to Shadow, and then under Inner, click Inside Diagonal Top Right.Also under PictureTools, on the Format tab, in the Picture Styles group, click Picture Border, and then click No Outline.To reproduce the background effects on this slide, do the following:On the Design tab, in the Background group, click BackgroundStyles, and then click Format Background. In the FormatBackground dialog box, click Gradient fill, and then do the following:In the Type list, click Radial.In the Direction list, click From Center.Under Gradient stops, click Add gradient stop or Remove gradient stop until three stops appear in the slider.Also under Gradient stops, customize the gradient stops as follows:Select the first stop in the slider, and then do the following: In the Position box, enter 0%.Click the button next to Color, click More Colors, and then in the Colors dialog box, on the Custom tab, enter values for Red: 153, Green: 57, and Blue: 55.Select the next stop in the slider, and then do the following: In the Position box, enter 50%.Click the button next to Color, click More Colors, and then in the Colors dialog box, on the Custom tab, enter values for Red: 114, Green: 42, and Blue: 40.Select the last stop in the slider, and then do the following: In the Position box, enter 100%.Click the button next to Color, click More Colors, and then in the Colors dialog box, on the Custom tab, enter values for Red: 40, Green: 15, and Blue: 14.
- SmartArt graphic with pictures on red background(Intermediate)To reproduce the SmartArt graphic on this slide, do the following:On the Home tab, in the Slides group, click Layout, and then click Blank.On the Insert tab, in the Illustrations group, click SmartArt.In the Choose a SmartArt Graphic dialog box, in the left pane, click Picture. In the Picture pane, double-click Title Picture Lineup (fifth row) to insert the graphic into the slide. Click each of the four picture placeholders in the SmartArt graphic, select a picture, and then click Insert.Select the graphic. Under SmartArt Tools, on the Format tab, in the Size group, enter 5.92” in the Height box and 8.75” in the Width box.Also under SmartArt Tools, on the Format tab, in the Arrange group, click Align, and then do the following:Click Align to Slide.Click Align Center.Click Align Middle.Select the graphic, and then click one of the arrows on the left border. In the Type your text here dialog box, enter text.Press and hold CTRL, and then select all of the text boxes above the pictures. On the Home tab, in the Font group, select Gill Sans MT from the Font list, and then select 26 pt. from the FontSize list. Click Font Color and select White, Background 1.Press and hold CTRL, and then select all of the text boxes above the pictures. Under SmartArt Tools, on the Format tab, in the Shapes group, click Change Shape, and then under Rectangles, click Round Diagonal Corner Rectangle.Also under SmartArt Tools, on the Format tab, in the Shape Styles group, click the Format Shape dialog box launcher. In the Format Shape dialog box, click Fill in the left pane, in the Fill pane, click Gradient fill, and then do the following:In the Type list, select Linear.In the Angle box, enter 0.3°.Under Gradient stops, click Add gradient stop or Remove gradient stop until three stops appear in the slider.Also under Gradient stops, customize the gradient stops as follows:Select the first stop in the slider, and then do the following: In the Position box, enter 0%.Click the button next to Color, click More Colors, and then in the Colors dialog box, on the Custom tab, enter values for Red: 77, Green: 28, and Blue: 27.Select the next stop in the slider, and then do the following: In the Position box, enter 50%.Click the button next to Color, click More Colors, and then in the Colors dialog box, on the Custom tab, enter values for Red: 136, Green: 50, and Blue: 48.Select the last stop in the slider, and then do the following: In the Position box, enter 100%.Click the button next to Color, click More Colors, and then in the Colors dialog box, on the Custom tab, enter values for Red: 77, Green: 28, and Blue: 27Also in the Format Shape dialog box, click Line Color in the left pane, in the Line Color pane, click No line.Also in the Format Shape dialog box, click Shadow in the left pane, in the Shadow pane, click the button next to Presets, and then under Outer, click Offset Diagonal Bottom Left (first row).Press and hold CTRL, and then select the three text boxes below the pictures. On the Home tab, in the Font group, select Gill Sans MT from the Font list,select 24 in the Font Size box, and then click Font Color and select White, Background 1.Also on the Home tab, in the Paragraph group, click Align Text Left. Press and hold CTRL, and then select the three vertical lines in the SmartArt graphic. Under SmartArt Tools, on the Format tab, in the Shape Styles group, click the Format Shape dialog box launcher. In the Format Shape dialog box, click Line Color in the left pane, in the Line Color pane, click Gradient line, and then do the following:In the Type list, click Linear.In the Angle box, enter 90°.Under Gradient stops, click Add gradient stop or Remove gradient stop until two stops appear in the slider.Also under Gradient stops, customize the gradient stops as follows:Select the first stop in the slider, and then do the following: In the Position box, enter 46%.Click the button next to Color, click More Colors, and then in the Colors dialog box, on the Custom tab, enter values for Red: 40, Green: 15, and Blue: 14.In the Transparency box, enter 0%. Select the last stop in the slider, and then do the following: In the Position box, enter 100%.Click the button next to Color, and then under Theme Colors click Black, Text 1 (first row).In the Transparency box, enter 100%. Press and hold CTRL, and then select all three pictures. Under SmartArt Tools, on the Format tab, in the Shapes group, click Change Shape, and then under Rectangles, click Round Single Corner Rectangle.Under Picture Tools, on the Format tab, in the Picture Styles group, click Picture Effects, point to Shadow, and then under Inner, click Inside Diagonal Top Right.Also under PictureTools, on the Format tab, in the Picture Styles group, click Picture Border, and then click No Outline.To reproduce the background effects on this slide, do the following:On the Design tab, in the Background group, click BackgroundStyles, and then click Format Background. In the FormatBackground dialog box, click Gradient fill, and then do the following:In the Type list, click Radial.In the Direction list, click From Center.Under Gradient stops, click Add gradient stop or Remove gradient stop until three stops appear in the slider.Also under Gradient stops, customize the gradient stops as follows:Select the first stop in the slider, and then do the following: In the Position box, enter 0%.Click the button next to Color, click More Colors, and then in the Colors dialog box, on the Custom tab, enter values for Red: 153, Green: 57, and Blue: 55.Select the next stop in the slider, and then do the following: In the Position box, enter 50%.Click the button next to Color, click More Colors, and then in the Colors dialog box, on the Custom tab, enter values for Red: 114, Green: 42, and Blue: 40.Select the last stop in the slider, and then do the following: In the Position box, enter 100%.Click the button next to Color, click More Colors, and then in the Colors dialog box, on the Custom tab, enter values for Red: 40, Green: 15, and Blue: 14.
- SmartArt graphic with pictures on red background(Intermediate)To reproduce the SmartArt graphic on this slide, do the following:On the Home tab, in the Slides group, click Layout, and then click Blank.On the Insert tab, in the Illustrations group, click SmartArt.In the Choose a SmartArt Graphic dialog box, in the left pane, click Picture. In the Picture pane, double-click Title Picture Lineup (fifth row) to insert the graphic into the slide. Click each of the four picture placeholders in the SmartArt graphic, select a picture, and then click Insert.Select the graphic. Under SmartArt Tools, on the Format tab, in the Size group, enter 5.92” in the Height box and 8.75” in the Width box.Also under SmartArt Tools, on the Format tab, in the Arrange group, click Align, and then do the following:Click Align to Slide.Click Align Center.Click Align Middle.Select the graphic, and then click one of the arrows on the left border. In the Type your text here dialog box, enter text.Press and hold CTRL, and then select all of the text boxes above the pictures. On the Home tab, in the Font group, select Gill Sans MT from the Font list, and then select 26 pt. from the FontSize list. Click Font Color and select White, Background 1.Press and hold CTRL, and then select all of the text boxes above the pictures. Under SmartArt Tools, on the Format tab, in the Shapes group, click Change Shape, and then under Rectangles, click Round Diagonal Corner Rectangle.Also under SmartArt Tools, on the Format tab, in the Shape Styles group, click the Format Shape dialog box launcher. In the Format Shape dialog box, click Fill in the left pane, in the Fill pane, click Gradient fill, and then do the following:In the Type list, select Linear.In the Angle box, enter 0.3°.Under Gradient stops, click Add gradient stop or Remove gradient stop until three stops appear in the slider.Also under Gradient stops, customize the gradient stops as follows:Select the first stop in the slider, and then do the following: In the Position box, enter 0%.Click the button next to Color, click More Colors, and then in the Colors dialog box, on the Custom tab, enter values for Red: 77, Green: 28, and Blue: 27.Select the next stop in the slider, and then do the following: In the Position box, enter 50%.Click the button next to Color, click More Colors, and then in the Colors dialog box, on the Custom tab, enter values for Red: 136, Green: 50, and Blue: 48.Select the last stop in the slider, and then do the following: In the Position box, enter 100%.Click the button next to Color, click More Colors, and then in the Colors dialog box, on the Custom tab, enter values for Red: 77, Green: 28, and Blue: 27Also in the Format Shape dialog box, click Line Color in the left pane, in the Line Color pane, click No line.Also in the Format Shape dialog box, click Shadow in the left pane, in the Shadow pane, click the button next to Presets, and then under Outer, click Offset Diagonal Bottom Left (first row).Press and hold CTRL, and then select the three text boxes below the pictures. On the Home tab, in the Font group, select Gill Sans MT from the Font list,select 24 in the Font Size box, and then click Font Color and select White, Background 1.Also on the Home tab, in the Paragraph group, click Align Text Left. Press and hold CTRL, and then select the three vertical lines in the SmartArt graphic. Under SmartArt Tools, on the Format tab, in the Shape Styles group, click the Format Shape dialog box launcher. In the Format Shape dialog box, click Line Color in the left pane, in the Line Color pane, click Gradient line, and then do the following:In the Type list, click Linear.In the Angle box, enter 90°.Under Gradient stops, click Add gradient stop or Remove gradient stop until two stops appear in the slider.Also under Gradient stops, customize the gradient stops as follows:Select the first stop in the slider, and then do the following: In the Position box, enter 46%.Click the button next to Color, click More Colors, and then in the Colors dialog box, on the Custom tab, enter values for Red: 40, Green: 15, and Blue: 14.In the Transparency box, enter 0%. Select the last stop in the slider, and then do the following: In the Position box, enter 100%.Click the button next to Color, and then under Theme Colors click Black, Text 1 (first row).In the Transparency box, enter 100%. Press and hold CTRL, and then select all three pictures. Under SmartArt Tools, on the Format tab, in the Shapes group, click Change Shape, and then under Rectangles, click Round Single Corner Rectangle.Under Picture Tools, on the Format tab, in the Picture Styles group, click Picture Effects, point to Shadow, and then under Inner, click Inside Diagonal Top Right.Also under PictureTools, on the Format tab, in the Picture Styles group, click Picture Border, and then click No Outline.To reproduce the background effects on this slide, do the following:On the Design tab, in the Background group, click BackgroundStyles, and then click Format Background. In the FormatBackground dialog box, click Gradient fill, and then do the following:In the Type list, click Radial.In the Direction list, click From Center.Under Gradient stops, click Add gradient stop or Remove gradient stop until three stops appear in the slider.Also under Gradient stops, customize the gradient stops as follows:Select the first stop in the slider, and then do the following: In the Position box, enter 0%.Click the button next to Color, click More Colors, and then in the Colors dialog box, on the Custom tab, enter values for Red: 153, Green: 57, and Blue: 55.Select the next stop in the slider, and then do the following: In the Position box, enter 50%.Click the button next to Color, click More Colors, and then in the Colors dialog box, on the Custom tab, enter values for Red: 114, Green: 42, and Blue: 40.Select the last stop in the slider, and then do the following: In the Position box, enter 100%.Click the button next to Color, click More Colors, and then in the Colors dialog box, on the Custom tab, enter values for Red: 40, Green: 15, and Blue: 14.
- SmartArt graphic with pictures on red background(Intermediate)To reproduce the SmartArt graphic on this slide, do the following:On the Home tab, in the Slides group, click Layout, and then click Blank.On the Insert tab, in the Illustrations group, click SmartArt.In the Choose a SmartArt Graphic dialog box, in the left pane, click Picture. In the Picture pane, double-click Title Picture Lineup (fifth row) to insert the graphic into the slide. Click each of the four picture placeholders in the SmartArt graphic, select a picture, and then click Insert.Select the graphic. Under SmartArt Tools, on the Format tab, in the Size group, enter 5.92” in the Height box and 8.75” in the Width box.Also under SmartArt Tools, on the Format tab, in the Arrange group, click Align, and then do the following:Click Align to Slide.Click Align Center.Click Align Middle.Select the graphic, and then click one of the arrows on the left border. In the Type your text here dialog box, enter text.Press and hold CTRL, and then select all of the text boxes above the pictures. On the Home tab, in the Font group, select Gill Sans MT from the Font list, and then select 26 pt. from the FontSize list. Click Font Color and select White, Background 1.Press and hold CTRL, and then select all of the text boxes above the pictures. Under SmartArt Tools, on the Format tab, in the Shapes group, click Change Shape, and then under Rectangles, click Round Diagonal Corner Rectangle.Also under SmartArt Tools, on the Format tab, in the Shape Styles group, click the Format Shape dialog box launcher. In the Format Shape dialog box, click Fill in the left pane, in the Fill pane, click Gradient fill, and then do the following:In the Type list, select Linear.In the Angle box, enter 0.3°.Under Gradient stops, click Add gradient stop or Remove gradient stop until three stops appear in the slider.Also under Gradient stops, customize the gradient stops as follows:Select the first stop in the slider, and then do the following: In the Position box, enter 0%.Click the button next to Color, click More Colors, and then in the Colors dialog box, on the Custom tab, enter values for Red: 77, Green: 28, and Blue: 27.Select the next stop in the slider, and then do the following: In the Position box, enter 50%.Click the button next to Color, click More Colors, and then in the Colors dialog box, on the Custom tab, enter values for Red: 136, Green: 50, and Blue: 48.Select the last stop in the slider, and then do the following: In the Position box, enter 100%.Click the button next to Color, click More Colors, and then in the Colors dialog box, on the Custom tab, enter values for Red: 77, Green: 28, and Blue: 27Also in the Format Shape dialog box, click Line Color in the left pane, in the Line Color pane, click No line.Also in the Format Shape dialog box, click Shadow in the left pane, in the Shadow pane, click the button next to Presets, and then under Outer, click Offset Diagonal Bottom Left (first row).Press and hold CTRL, and then select the three text boxes below the pictures. On the Home tab, in the Font group, select Gill Sans MT from the Font list,select 24 in the Font Size box, and then click Font Color and select White, Background 1.Also on the Home tab, in the Paragraph group, click Align Text Left. Press and hold CTRL, and then select the three vertical lines in the SmartArt graphic. Under SmartArt Tools, on the Format tab, in the Shape Styles group, click the Format Shape dialog box launcher. In the Format Shape dialog box, click Line Color in the left pane, in the Line Color pane, click Gradient line, and then do the following:In the Type list, click Linear.In the Angle box, enter 90°.Under Gradient stops, click Add gradient stop or Remove gradient stop until two stops appear in the slider.Also under Gradient stops, customize the gradient stops as follows:Select the first stop in the slider, and then do the following: In the Position box, enter 46%.Click the button next to Color, click More Colors, and then in the Colors dialog box, on the Custom tab, enter values for Red: 40, Green: 15, and Blue: 14.In the Transparency box, enter 0%. Select the last stop in the slider, and then do the following: In the Position box, enter 100%.Click the button next to Color, and then under Theme Colors click Black, Text 1 (first row).In the Transparency box, enter 100%. Press and hold CTRL, and then select all three pictures. Under SmartArt Tools, on the Format tab, in the Shapes group, click Change Shape, and then under Rectangles, click Round Single Corner Rectangle.Under Picture Tools, on the Format tab, in the Picture Styles group, click Picture Effects, point to Shadow, and then under Inner, click Inside Diagonal Top Right.Also under PictureTools, on the Format tab, in the Picture Styles group, click Picture Border, and then click No Outline.To reproduce the background effects on this slide, do the following:On the Design tab, in the Background group, click BackgroundStyles, and then click Format Background. In the FormatBackground dialog box, click Gradient fill, and then do the following:In the Type list, click Radial.In the Direction list, click From Center.Under Gradient stops, click Add gradient stop or Remove gradient stop until three stops appear in the slider.Also under Gradient stops, customize the gradient stops as follows:Select the first stop in the slider, and then do the following: In the Position box, enter 0%.Click the button next to Color, click More Colors, and then in the Colors dialog box, on the Custom tab, enter values for Red: 153, Green: 57, and Blue: 55.Select the next stop in the slider, and then do the following: In the Position box, enter 50%.Click the button next to Color, click More Colors, and then in the Colors dialog box, on the Custom tab, enter values for Red: 114, Green: 42, and Blue: 40.Select the last stop in the slider, and then do the following: In the Position box, enter 100%.Click the button next to Color, click More Colors, and then in the Colors dialog box, on the Custom tab, enter values for Red: 40, Green: 15, and Blue: 14.
- SmartArt graphic with pictures on red background(Intermediate)To reproduce the SmartArt graphic on this slide, do the following:On the Home tab, in the Slides group, click Layout, and then click Blank.On the Insert tab, in the Illustrations group, click SmartArt.In the Choose a SmartArt Graphic dialog box, in the left pane, click Picture. In the Picture pane, double-click Title Picture Lineup (fifth row) to insert the graphic into the slide. Click each of the four picture placeholders in the SmartArt graphic, select a picture, and then click Insert.Select the graphic. Under SmartArt Tools, on the Format tab, in the Size group, enter 5.92” in the Height box and 8.75” in the Width box.Also under SmartArt Tools, on the Format tab, in the Arrange group, click Align, and then do the following:Click Align to Slide.Click Align Center.Click Align Middle.Select the graphic, and then click one of the arrows on the left border. In the Type your text here dialog box, enter text.Press and hold CTRL, and then select all of the text boxes above the pictures. On the Home tab, in the Font group, select Gill Sans MT from the Font list, and then select 26 pt. from the FontSize list. Click Font Color and select White, Background 1.Press and hold CTRL, and then select all of the text boxes above the pictures. Under SmartArt Tools, on the Format tab, in the Shapes group, click Change Shape, and then under Rectangles, click Round Diagonal Corner Rectangle.Also under SmartArt Tools, on the Format tab, in the Shape Styles group, click the Format Shape dialog box launcher. In the Format Shape dialog box, click Fill in the left pane, in the Fill pane, click Gradient fill, and then do the following:In the Type list, select Linear.In the Angle box, enter 0.3°.Under Gradient stops, click Add gradient stop or Remove gradient stop until three stops appear in the slider.Also under Gradient stops, customize the gradient stops as follows:Select the first stop in the slider, and then do the following: In the Position box, enter 0%.Click the button next to Color, click More Colors, and then in the Colors dialog box, on the Custom tab, enter values for Red: 77, Green: 28, and Blue: 27.Select the next stop in the slider, and then do the following: In the Position box, enter 50%.Click the button next to Color, click More Colors, and then in the Colors dialog box, on the Custom tab, enter values for Red: 136, Green: 50, and Blue: 48.Select the last stop in the slider, and then do the following: In the Position box, enter 100%.Click the button next to Color, click More Colors, and then in the Colors dialog box, on the Custom tab, enter values for Red: 77, Green: 28, and Blue: 27Also in the Format Shape dialog box, click Line Color in the left pane, in the Line Color pane, click No line.Also in the Format Shape dialog box, click Shadow in the left pane, in the Shadow pane, click the button next to Presets, and then under Outer, click Offset Diagonal Bottom Left (first row).Press and hold CTRL, and then select the three text boxes below the pictures. On the Home tab, in the Font group, select Gill Sans MT from the Font list,select 24 in the Font Size box, and then click Font Color and select White, Background 1.Also on the Home tab, in the Paragraph group, click Align Text Left. Press and hold CTRL, and then select the three vertical lines in the SmartArt graphic. Under SmartArt Tools, on the Format tab, in the Shape Styles group, click the Format Shape dialog box launcher. In the Format Shape dialog box, click Line Color in the left pane, in the Line Color pane, click Gradient line, and then do the following:In the Type list, click Linear.In the Angle box, enter 90°.Under Gradient stops, click Add gradient stop or Remove gradient stop until two stops appear in the slider.Also under Gradient stops, customize the gradient stops as follows:Select the first stop in the slider, and then do the following: In the Position box, enter 46%.Click the button next to Color, click More Colors, and then in the Colors dialog box, on the Custom tab, enter values for Red: 40, Green: 15, and Blue: 14.In the Transparency box, enter 0%. Select the last stop in the slider, and then do the following: In the Position box, enter 100%.Click the button next to Color, and then under Theme Colors click Black, Text 1 (first row).In the Transparency box, enter 100%. Press and hold CTRL, and then select all three pictures. Under SmartArt Tools, on the Format tab, in the Shapes group, click Change Shape, and then under Rectangles, click Round Single Corner Rectangle.Under Picture Tools, on the Format tab, in the Picture Styles group, click Picture Effects, point to Shadow, and then under Inner, click Inside Diagonal Top Right.Also under PictureTools, on the Format tab, in the Picture Styles group, click Picture Border, and then click No Outline.To reproduce the background effects on this slide, do the following:On the Design tab, in the Background group, click BackgroundStyles, and then click Format Background. In the FormatBackground dialog box, click Gradient fill, and then do the following:In the Type list, click Radial.In the Direction list, click From Center.Under Gradient stops, click Add gradient stop or Remove gradient stop until three stops appear in the slider.Also under Gradient stops, customize the gradient stops as follows:Select the first stop in the slider, and then do the following: In the Position box, enter 0%.Click the button next to Color, click More Colors, and then in the Colors dialog box, on the Custom tab, enter values for Red: 153, Green: 57, and Blue: 55.Select the next stop in the slider, and then do the following: In the Position box, enter 50%.Click the button next to Color, click More Colors, and then in the Colors dialog box, on the Custom tab, enter values for Red: 114, Green: 42, and Blue: 40.Select the last stop in the slider, and then do the following: In the Position box, enter 100%.Click the button next to Color, click More Colors, and then in the Colors dialog box, on the Custom tab, enter values for Red: 40, Green: 15, and Blue: 14.
- SmartArt graphic with pictures on red background(Intermediate)To reproduce the SmartArt graphic on this slide, do the following:On the Home tab, in the Slides group, click Layout, and then click Blank.On the Insert tab, in the Illustrations group, click SmartArt.In the Choose a SmartArt Graphic dialog box, in the left pane, click Picture. In the Picture pane, double-click Title Picture Lineup (fifth row) to insert the graphic into the slide. Click each of the four picture placeholders in the SmartArt graphic, select a picture, and then click Insert.Select the graphic. Under SmartArt Tools, on the Format tab, in the Size group, enter 5.92” in the Height box and 8.75” in the Width box.Also under SmartArt Tools, on the Format tab, in the Arrange group, click Align, and then do the following:Click Align to Slide.Click Align Center.Click Align Middle.Select the graphic, and then click one of the arrows on the left border. In the Type your text here dialog box, enter text.Press and hold CTRL, and then select all of the text boxes above the pictures. On the Home tab, in the Font group, select Gill Sans MT from the Font list, and then select 26 pt. from the FontSize list. Click Font Color and select White, Background 1.Press and hold CTRL, and then select all of the text boxes above the pictures. Under SmartArt Tools, on the Format tab, in the Shapes group, click Change Shape, and then under Rectangles, click Round Diagonal Corner Rectangle.Also under SmartArt Tools, on the Format tab, in the Shape Styles group, click the Format Shape dialog box launcher. In the Format Shape dialog box, click Fill in the left pane, in the Fill pane, click Gradient fill, and then do the following:In the Type list, select Linear.In the Angle box, enter 0.3°.Under Gradient stops, click Add gradient stop or Remove gradient stop until three stops appear in the slider.Also under Gradient stops, customize the gradient stops as follows:Select the first stop in the slider, and then do the following: In the Position box, enter 0%.Click the button next to Color, click More Colors, and then in the Colors dialog box, on the Custom tab, enter values for Red: 77, Green: 28, and Blue: 27.Select the next stop in the slider, and then do the following: In the Position box, enter 50%.Click the button next to Color, click More Colors, and then in the Colors dialog box, on the Custom tab, enter values for Red: 136, Green: 50, and Blue: 48.Select the last stop in the slider, and then do the following: In the Position box, enter 100%.Click the button next to Color, click More Colors, and then in the Colors dialog box, on the Custom tab, enter values for Red: 77, Green: 28, and Blue: 27Also in the Format Shape dialog box, click Line Color in the left pane, in the Line Color pane, click No line.Also in the Format Shape dialog box, click Shadow in the left pane, in the Shadow pane, click the button next to Presets, and then under Outer, click Offset Diagonal Bottom Left (first row).Press and hold CTRL, and then select the three text boxes below the pictures. On the Home tab, in the Font group, select Gill Sans MT from the Font list,select 24 in the Font Size box, and then click Font Color and select White, Background 1.Also on the Home tab, in the Paragraph group, click Align Text Left. Press and hold CTRL, and then select the three vertical lines in the SmartArt graphic. Under SmartArt Tools, on the Format tab, in the Shape Styles group, click the Format Shape dialog box launcher. In the Format Shape dialog box, click Line Color in the left pane, in the Line Color pane, click Gradient line, and then do the following:In the Type list, click Linear.In the Angle box, enter 90°.Under Gradient stops, click Add gradient stop or Remove gradient stop until two stops appear in the slider.Also under Gradient stops, customize the gradient stops as follows:Select the first stop in the slider, and then do the following: In the Position box, enter 46%.Click the button next to Color, click More Colors, and then in the Colors dialog box, on the Custom tab, enter values for Red: 40, Green: 15, and Blue: 14.In the Transparency box, enter 0%. Select the last stop in the slider, and then do the following: In the Position box, enter 100%.Click the button next to Color, and then under Theme Colors click Black, Text 1 (first row).In the Transparency box, enter 100%. Press and hold CTRL, and then select all three pictures. Under SmartArt Tools, on the Format tab, in the Shapes group, click Change Shape, and then under Rectangles, click Round Single Corner Rectangle.Under Picture Tools, on the Format tab, in the Picture Styles group, click Picture Effects, point to Shadow, and then under Inner, click Inside Diagonal Top Right.Also under PictureTools, on the Format tab, in the Picture Styles group, click Picture Border, and then click No Outline.To reproduce the background effects on this slide, do the following:On the Design tab, in the Background group, click BackgroundStyles, and then click Format Background. In the FormatBackground dialog box, click Gradient fill, and then do the following:In the Type list, click Radial.In the Direction list, click From Center.Under Gradient stops, click Add gradient stop or Remove gradient stop until three stops appear in the slider.Also under Gradient stops, customize the gradient stops as follows:Select the first stop in the slider, and then do the following: In the Position box, enter 0%.Click the button next to Color, click More Colors, and then in the Colors dialog box, on the Custom tab, enter values for Red: 153, Green: 57, and Blue: 55.Select the next stop in the slider, and then do the following: In the Position box, enter 50%.Click the button next to Color, click More Colors, and then in the Colors dialog box, on the Custom tab, enter values for Red: 114, Green: 42, and Blue: 40.Select the last stop in the slider, and then do the following: In the Position box, enter 100%.Click the button next to Color, click More Colors, and then in the Colors dialog box, on the Custom tab, enter values for Red: 40, Green: 15, and Blue: 14.
- SmartArt graphic with pictures on red background(Intermediate)To reproduce the SmartArt graphic on this slide, do the following:On the Home tab, in the Slides group, click Layout, and then click Blank.On the Insert tab, in the Illustrations group, click SmartArt.In the Choose a SmartArt Graphic dialog box, in the left pane, click Picture. In the Picture pane, double-click Title Picture Lineup (fifth row) to insert the graphic into the slide. Click each of the four picture placeholders in the SmartArt graphic, select a picture, and then click Insert.Select the graphic. Under SmartArt Tools, on the Format tab, in the Size group, enter 5.92” in the Height box and 8.75” in the Width box.Also under SmartArt Tools, on the Format tab, in the Arrange group, click Align, and then do the following:Click Align to Slide.Click Align Center.Click Align Middle.Select the graphic, and then click one of the arrows on the left border. In the Type your text here dialog box, enter text.Press and hold CTRL, and then select all of the text boxes above the pictures. On the Home tab, in the Font group, select Gill Sans MT from the Font list, and then select 26 pt. from the FontSize list. Click Font Color and select White, Background 1.Press and hold CTRL, and then select all of the text boxes above the pictures. Under SmartArt Tools, on the Format tab, in the Shapes group, click Change Shape, and then under Rectangles, click Round Diagonal Corner Rectangle.Also under SmartArt Tools, on the Format tab, in the Shape Styles group, click the Format Shape dialog box launcher. In the Format Shape dialog box, click Fill in the left pane, in the Fill pane, click Gradient fill, and then do the following:In the Type list, select Linear.In the Angle box, enter 0.3°.Under Gradient stops, click Add gradient stop or Remove gradient stop until three stops appear in the slider.Also under Gradient stops, customize the gradient stops as follows:Select the first stop in the slider, and then do the following: In the Position box, enter 0%.Click the button next to Color, click More Colors, and then in the Colors dialog box, on the Custom tab, enter values for Red: 77, Green: 28, and Blue: 27.Select the next stop in the slider, and then do the following: In the Position box, enter 50%.Click the button next to Color, click More Colors, and then in the Colors dialog box, on the Custom tab, enter values for Red: 136, Green: 50, and Blue: 48.Select the last stop in the slider, and then do the following: In the Position box, enter 100%.Click the button next to Color, click More Colors, and then in the Colors dialog box, on the Custom tab, enter values for Red: 77, Green: 28, and Blue: 27Also in the Format Shape dialog box, click Line Color in the left pane, in the Line Color pane, click No line.Also in the Format Shape dialog box, click Shadow in the left pane, in the Shadow pane, click the button next to Presets, and then under Outer, click Offset Diagonal Bottom Left (first row).Press and hold CTRL, and then select the three text boxes below the pictures. On the Home tab, in the Font group, select Gill Sans MT from the Font list,select 24 in the Font Size box, and then click Font Color and select White, Background 1.Also on the Home tab, in the Paragraph group, click Align Text Left. Press and hold CTRL, and then select the three vertical lines in the SmartArt graphic. Under SmartArt Tools, on the Format tab, in the Shape Styles group, click the Format Shape dialog box launcher. In the Format Shape dialog box, click Line Color in the left pane, in the Line Color pane, click Gradient line, and then do the following:In the Type list, click Linear.In the Angle box, enter 90°.Under Gradient stops, click Add gradient stop or Remove gradient stop until two stops appear in the slider.Also under Gradient stops, customize the gradient stops as follows:Select the first stop in the slider, and then do the following: In the Position box, enter 46%.Click the button next to Color, click More Colors, and then in the Colors dialog box, on the Custom tab, enter values for Red: 40, Green: 15, and Blue: 14.In the Transparency box, enter 0%. Select the last stop in the slider, and then do the following: In the Position box, enter 100%.Click the button next to Color, and then under Theme Colors click Black, Text 1 (first row).In the Transparency box, enter 100%. Press and hold CTRL, and then select all three pictures. Under SmartArt Tools, on the Format tab, in the Shapes group, click Change Shape, and then under Rectangles, click Round Single Corner Rectangle.Under Picture Tools, on the Format tab, in the Picture Styles group, click Picture Effects, point to Shadow, and then under Inner, click Inside Diagonal Top Right.Also under PictureTools, on the Format tab, in the Picture Styles group, click Picture Border, and then click No Outline.To reproduce the background effects on this slide, do the following:On the Design tab, in the Background group, click BackgroundStyles, and then click Format Background. In the FormatBackground dialog box, click Gradient fill, and then do the following:In the Type list, click Radial.In the Direction list, click From Center.Under Gradient stops, click Add gradient stop or Remove gradient stop until three stops appear in the slider.Also under Gradient stops, customize the gradient stops as follows:Select the first stop in the slider, and then do the following: In the Position box, enter 0%.Click the button next to Color, click More Colors, and then in the Colors dialog box, on the Custom tab, enter values for Red: 153, Green: 57, and Blue: 55.Select the next stop in the slider, and then do the following: In the Position box, enter 50%.Click the button next to Color, click More Colors, and then in the Colors dialog box, on the Custom tab, enter values for Red: 114, Green: 42, and Blue: 40.Select the last stop in the slider, and then do the following: In the Position box, enter 100%.Click the button next to Color, click More Colors, and then in the Colors dialog box, on the Custom tab, enter values for Red: 40, Green: 15, and Blue: 14.
- SmartArt graphic with pictures on red background(Intermediate)To reproduce the SmartArt graphic on this slide, do the following:On the Home tab, in the Slides group, click Layout, and then click Blank.On the Insert tab, in the Illustrations group, click SmartArt.In the Choose a SmartArt Graphic dialog box, in the left pane, click Picture. In the Picture pane, double-click Title Picture Lineup (fifth row) to insert the graphic into the slide. Click each of the four picture placeholders in the SmartArt graphic, select a picture, and then click Insert.Select the graphic. Under SmartArt Tools, on the Format tab, in the Size group, enter 5.92” in the Height box and 8.75” in the Width box.Also under SmartArt Tools, on the Format tab, in the Arrange group, click Align, and then do the following:Click Align to Slide.Click Align Center.Click Align Middle.Select the graphic, and then click one of the arrows on the left border. In the Type your text here dialog box, enter text.Press and hold CTRL, and then select all of the text boxes above the pictures. On the Home tab, in the Font group, select Gill Sans MT from the Font list, and then select 26 pt. from the FontSize list. Click Font Color and select White, Background 1.Press and hold CTRL, and then select all of the text boxes above the pictures. Under SmartArt Tools, on the Format tab, in the Shapes group, click Change Shape, and then under Rectangles, click Round Diagonal Corner Rectangle.Also under SmartArt Tools, on the Format tab, in the Shape Styles group, click the Format Shape dialog box launcher. In the Format Shape dialog box, click Fill in the left pane, in the Fill pane, click Gradient fill, and then do the following:In the Type list, select Linear.In the Angle box, enter 0.3°.Under Gradient stops, click Add gradient stop or Remove gradient stop until three stops appear in the slider.Also under Gradient stops, customize the gradient stops as follows:Select the first stop in the slider, and then do the following: In the Position box, enter 0%.Click the button next to Color, click More Colors, and then in the Colors dialog box, on the Custom tab, enter values for Red: 77, Green: 28, and Blue: 27.Select the next stop in the slider, and then do the following: In the Position box, enter 50%.Click the button next to Color, click More Colors, and then in the Colors dialog box, on the Custom tab, enter values for Red: 136, Green: 50, and Blue: 48.Select the last stop in the slider, and then do the following: In the Position box, enter 100%.Click the button next to Color, click More Colors, and then in the Colors dialog box, on the Custom tab, enter values for Red: 77, Green: 28, and Blue: 27Also in the Format Shape dialog box, click Line Color in the left pane, in the Line Color pane, click No line.Also in the Format Shape dialog box, click Shadow in the left pane, in the Shadow pane, click the button next to Presets, and then under Outer, click Offset Diagonal Bottom Left (first row).Press and hold CTRL, and then select the three text boxes below the pictures. On the Home tab, in the Font group, select Gill Sans MT from the Font list,select 24 in the Font Size box, and then click Font Color and select White, Background 1.Also on the Home tab, in the Paragraph group, click Align Text Left. Press and hold CTRL, and then select the three vertical lines in the SmartArt graphic. Under SmartArt Tools, on the Format tab, in the Shape Styles group, click the Format Shape dialog box launcher. In the Format Shape dialog box, click Line Color in the left pane, in the Line Color pane, click Gradient line, and then do the following:In the Type list, click Linear.In the Angle box, enter 90°.Under Gradient stops, click Add gradient stop or Remove gradient stop until two stops appear in the slider.Also under Gradient stops, customize the gradient stops as follows:Select the first stop in the slider, and then do the following: In the Position box, enter 46%.Click the button next to Color, click More Colors, and then in the Colors dialog box, on the Custom tab, enter values for Red: 40, Green: 15, and Blue: 14.In the Transparency box, enter 0%. Select the last stop in the slider, and then do the following: In the Position box, enter 100%.Click the button next to Color, and then under Theme Colors click Black, Text 1 (first row).In the Transparency box, enter 100%. Press and hold CTRL, and then select all three pictures. Under SmartArt Tools, on the Format tab, in the Shapes group, click Change Shape, and then under Rectangles, click Round Single Corner Rectangle.Under Picture Tools, on the Format tab, in the Picture Styles group, click Picture Effects, point to Shadow, and then under Inner, click Inside Diagonal Top Right.Also under PictureTools, on the Format tab, in the Picture Styles group, click Picture Border, and then click No Outline.To reproduce the background effects on this slide, do the following:On the Design tab, in the Background group, click BackgroundStyles, and then click Format Background. In the FormatBackground dialog box, click Gradient fill, and then do the following:In the Type list, click Radial.In the Direction list, click From Center.Under Gradient stops, click Add gradient stop or Remove gradient stop until three stops appear in the slider.Also under Gradient stops, customize the gradient stops as follows:Select the first stop in the slider, and then do the following: In the Position box, enter 0%.Click the button next to Color, click More Colors, and then in the Colors dialog box, on the Custom tab, enter values for Red: 153, Green: 57, and Blue: 55.Select the next stop in the slider, and then do the following: In the Position box, enter 50%.Click the button next to Color, click More Colors, and then in the Colors dialog box, on the Custom tab, enter values for Red: 114, Green: 42, and Blue: 40.Select the last stop in the slider, and then do the following: In the Position box, enter 100%.Click the button next to Color, click More Colors, and then in the Colors dialog box, on the Custom tab, enter values for Red: 40, Green: 15, and Blue: 14.
- SmartArt graphic with pictures on red background(Intermediate)To reproduce the SmartArt graphic on this slide, do the following:On the Home tab, in the Slides group, click Layout, and then click Blank.On the Insert tab, in the Illustrations group, click SmartArt.In the Choose a SmartArt Graphic dialog box, in the left pane, click Picture. In the Picture pane, double-click Title Picture Lineup (fifth row) to insert the graphic into the slide. Click each of the four picture placeholders in the SmartArt graphic, select a picture, and then click Insert.Select the graphic. Under SmartArt Tools, on the Format tab, in the Size group, enter 5.92” in the Height box and 8.75” in the Width box.Also under SmartArt Tools, on the Format tab, in the Arrange group, click Align, and then do the following:Click Align to Slide.Click Align Center.Click Align Middle.Select the graphic, and then click one of the arrows on the left border. In the Type your text here dialog box, enter text.Press and hold CTRL, and then select all of the text boxes above the pictures. On the Home tab, in the Font group, select Gill Sans MT from the Font list, and then select 26 pt. from the FontSize list. Click Font Color and select White, Background 1.Press and hold CTRL, and then select all of the text boxes above the pictures. Under SmartArt Tools, on the Format tab, in the Shapes group, click Change Shape, and then under Rectangles, click Round Diagonal Corner Rectangle.Also under SmartArt Tools, on the Format tab, in the Shape Styles group, click the Format Shape dialog box launcher. In the Format Shape dialog box, click Fill in the left pane, in the Fill pane, click Gradient fill, and then do the following:In the Type list, select Linear.In the Angle box, enter 0.3°.Under Gradient stops, click Add gradient stop or Remove gradient stop until three stops appear in the slider.Also under Gradient stops, customize the gradient stops as follows:Select the first stop in the slider, and then do the following: In the Position box, enter 0%.Click the button next to Color, click More Colors, and then in the Colors dialog box, on the Custom tab, enter values for Red: 77, Green: 28, and Blue: 27.Select the next stop in the slider, and then do the following: In the Position box, enter 50%.Click the button next to Color, click More Colors, and then in the Colors dialog box, on the Custom tab, enter values for Red: 136, Green: 50, and Blue: 48.Select the last stop in the slider, and then do the following: In the Position box, enter 100%.Click the button next to Color, click More Colors, and then in the Colors dialog box, on the Custom tab, enter values for Red: 77, Green: 28, and Blue: 27Also in the Format Shape dialog box, click Line Color in the left pane, in the Line Color pane, click No line.Also in the Format Shape dialog box, click Shadow in the left pane, in the Shadow pane, click the button next to Presets, and then under Outer, click Offset Diagonal Bottom Left (first row).Press and hold CTRL, and then select the three text boxes below the pictures. On the Home tab, in the Font group, select Gill Sans MT from the Font list,select 24 in the Font Size box, and then click Font Color and select White, Background 1.Also on the Home tab, in the Paragraph group, click Align Text Left. Press and hold CTRL, and then select the three vertical lines in the SmartArt graphic. Under SmartArt Tools, on the Format tab, in the Shape Styles group, click the Format Shape dialog box launcher. In the Format Shape dialog box, click Line Color in the left pane, in the Line Color pane, click Gradient line, and then do the following:In the Type list, click Linear.In the Angle box, enter 90°.Under Gradient stops, click Add gradient stop or Remove gradient stop until two stops appear in the slider.Also under Gradient stops, customize the gradient stops as follows:Select the first stop in the slider, and then do the following: In the Position box, enter 46%.Click the button next to Color, click More Colors, and then in the Colors dialog box, on the Custom tab, enter values for Red: 40, Green: 15, and Blue: 14.In the Transparency box, enter 0%. Select the last stop in the slider, and then do the following: In the Position box, enter 100%.Click the button next to Color, and then under Theme Colors click Black, Text 1 (first row).In the Transparency box, enter 100%. Press and hold CTRL, and then select all three pictures. Under SmartArt Tools, on the Format tab, in the Shapes group, click Change Shape, and then under Rectangles, click Round Single Corner Rectangle.Under Picture Tools, on the Format tab, in the Picture Styles group, click Picture Effects, point to Shadow, and then under Inner, click Inside Diagonal Top Right.Also under PictureTools, on the Format tab, in the Picture Styles group, click Picture Border, and then click No Outline.To reproduce the background effects on this slide, do the following:On the Design tab, in the Background group, click BackgroundStyles, and then click Format Background. In the FormatBackground dialog box, click Gradient fill, and then do the following:In the Type list, click Radial.In the Direction list, click From Center.Under Gradient stops, click Add gradient stop or Remove gradient stop until three stops appear in the slider.Also under Gradient stops, customize the gradient stops as follows:Select the first stop in the slider, and then do the following: In the Position box, enter 0%.Click the button next to Color, click More Colors, and then in the Colors dialog box, on the Custom tab, enter values for Red: 153, Green: 57, and Blue: 55.Select the next stop in the slider, and then do the following: In the Position box, enter 50%.Click the button next to Color, click More Colors, and then in the Colors dialog box, on the Custom tab, enter values for Red: 114, Green: 42, and Blue: 40.Select the last stop in the slider, and then do the following: In the Position box, enter 100%.Click the button next to Color, click More Colors, and then in the Colors dialog box, on the Custom tab, enter values for Red: 40, Green: 15, and Blue: 14.
- SmartArt graphic with pictures on red background(Intermediate)To reproduce the SmartArt graphic on this slide, do the following:On the Home tab, in the Slides group, click Layout, and then click Blank.On the Insert tab, in the Illustrations group, click SmartArt.In the Choose a SmartArt Graphic dialog box, in the left pane, click Picture. In the Picture pane, double-click Title Picture Lineup (fifth row) to insert the graphic into the slide. Click each of the four picture placeholders in the SmartArt graphic, select a picture, and then click Insert.Select the graphic. Under SmartArt Tools, on the Format tab, in the Size group, enter 5.92” in the Height box and 8.75” in the Width box.Also under SmartArt Tools, on the Format tab, in the Arrange group, click Align, and then do the following:Click Align to Slide.Click Align Center.Click Align Middle.Select the graphic, and then click one of the arrows on the left border. In the Type your text here dialog box, enter text.Press and hold CTRL, and then select all of the text boxes above the pictures. On the Home tab, in the Font group, select Gill Sans MT from the Font list, and then select 26 pt. from the FontSize list. Click Font Color and select White, Background 1.Press and hold CTRL, and then select all of the text boxes above the pictures. Under SmartArt Tools, on the Format tab, in the Shapes group, click Change Shape, and then under Rectangles, click Round Diagonal Corner Rectangle.Also under SmartArt Tools, on the Format tab, in the Shape Styles group, click the Format Shape dialog box launcher. In the Format Shape dialog box, click Fill in the left pane, in the Fill pane, click Gradient fill, and then do the following:In the Type list, select Linear.In the Angle box, enter 0.3°.Under Gradient stops, click Add gradient stop or Remove gradient stop until three stops appear in the slider.Also under Gradient stops, customize the gradient stops as follows:Select the first stop in the slider, and then do the following: In the Position box, enter 0%.Click the button next to Color, click More Colors, and then in the Colors dialog box, on the Custom tab, enter values for Red: 77, Green: 28, and Blue: 27.Select the next stop in the slider, and then do the following: In the Position box, enter 50%.Click the button next to Color, click More Colors, and then in the Colors dialog box, on the Custom tab, enter values for Red: 136, Green: 50, and Blue: 48.Select the last stop in the slider, and then do the following: In the Position box, enter 100%.Click the button next to Color, click More Colors, and then in the Colors dialog box, on the Custom tab, enter values for Red: 77, Green: 28, and Blue: 27Also in the Format Shape dialog box, click Line Color in the left pane, in the Line Color pane, click No line.Also in the Format Shape dialog box, click Shadow in the left pane, in the Shadow pane, click the button next to Presets, and then under Outer, click Offset Diagonal Bottom Left (first row).Press and hold CTRL, and then select the three text boxes below the pictures. On the Home tab, in the Font group, select Gill Sans MT from the Font list,select 24 in the Font Size box, and then click Font Color and select White, Background 1.Also on the Home tab, in the Paragraph group, click Align Text Left. Press and hold CTRL, and then select the three vertical lines in the SmartArt graphic. Under SmartArt Tools, on the Format tab, in the Shape Styles group, click the Format Shape dialog box launcher. In the Format Shape dialog box, click Line Color in the left pane, in the Line Color pane, click Gradient line, and then do the following:In the Type list, click Linear.In the Angle box, enter 90°.Under Gradient stops, click Add gradient stop or Remove gradient stop until two stops appear in the slider.Also under Gradient stops, customize the gradient stops as follows:Select the first stop in the slider, and then do the following: In the Position box, enter 46%.Click the button next to Color, click More Colors, and then in the Colors dialog box, on the Custom tab, enter values for Red: 40, Green: 15, and Blue: 14.In the Transparency box, enter 0%. Select the last stop in the slider, and then do the following: In the Position box, enter 100%.Click the button next to Color, and then under Theme Colors click Black, Text 1 (first row).In the Transparency box, enter 100%. Press and hold CTRL, and then select all three pictures. Under SmartArt Tools, on the Format tab, in the Shapes group, click Change Shape, and then under Rectangles, click Round Single Corner Rectangle.Under Picture Tools, on the Format tab, in the Picture Styles group, click Picture Effects, point to Shadow, and then under Inner, click Inside Diagonal Top Right.Also under PictureTools, on the Format tab, in the Picture Styles group, click Picture Border, and then click No Outline.To reproduce the background effects on this slide, do the following:On the Design tab, in the Background group, click BackgroundStyles, and then click Format Background. In the FormatBackground dialog box, click Gradient fill, and then do the following:In the Type list, click Radial.In the Direction list, click From Center.Under Gradient stops, click Add gradient stop or Remove gradient stop until three stops appear in the slider.Also under Gradient stops, customize the gradient stops as follows:Select the first stop in the slider, and then do the following: In the Position box, enter 0%.Click the button next to Color, click More Colors, and then in the Colors dialog box, on the Custom tab, enter values for Red: 153, Green: 57, and Blue: 55.Select the next stop in the slider, and then do the following: In the Position box, enter 50%.Click the button next to Color, click More Colors, and then in the Colors dialog box, on the Custom tab, enter values for Red: 114, Green: 42, and Blue: 40.Select the last stop in the slider, and then do the following: In the Position box, enter 100%.Click the button next to Color, click More Colors, and then in the Colors dialog box, on the Custom tab, enter values for Red: 40, Green: 15, and Blue: 14.
- SmartArt graphic with pictures on red background(Intermediate)To reproduce the SmartArt graphic on this slide, do the following:On the Home tab, in the Slides group, click Layout, and then click Blank.On the Insert tab, in the Illustrations group, click SmartArt.In the Choose a SmartArt Graphic dialog box, in the left pane, click Picture. In the Picture pane, double-click Title Picture Lineup (fifth row) to insert the graphic into the slide. Click each of the four picture placeholders in the SmartArt graphic, select a picture, and then click Insert.Select the graphic. Under SmartArt Tools, on the Format tab, in the Size group, enter 5.92” in the Height box and 8.75” in the Width box.Also under SmartArt Tools, on the Format tab, in the Arrange group, click Align, and then do the following:Click Align to Slide.Click Align Center.Click Align Middle.Select the graphic, and then click one of the arrows on the left border. In the Type your text here dialog box, enter text.Press and hold CTRL, and then select all of the text boxes above the pictures. On the Home tab, in the Font group, select Gill Sans MT from the Font list, and then select 26 pt. from the FontSize list. Click Font Color and select White, Background 1.Press and hold CTRL, and then select all of the text boxes above the pictures. Under SmartArt Tools, on the Format tab, in the Shapes group, click Change Shape, and then under Rectangles, click Round Diagonal Corner Rectangle.Also under SmartArt Tools, on the Format tab, in the Shape Styles group, click the Format Shape dialog box launcher. In the Format Shape dialog box, click Fill in the left pane, in the Fill pane, click Gradient fill, and then do the following:In the Type list, select Linear.In the Angle box, enter 0.3°.Under Gradient stops, click Add gradient stop or Remove gradient stop until three stops appear in the slider.Also under Gradient stops, customize the gradient stops as follows:Select the first stop in the slider, and then do the following: In the Position box, enter 0%.Click the button next to Color, click More Colors, and then in the Colors dialog box, on the Custom tab, enter values for Red: 77, Green: 28, and Blue: 27.Select the next stop in the slider, and then do the following: In the Position box, enter 50%.Click the button next to Color, click More Colors, and then in the Colors dialog box, on the Custom tab, enter values for Red: 136, Green: 50, and Blue: 48.Select the last stop in the slider, and then do the following: In the Position box, enter 100%.Click the button next to Color, click More Colors, and then in the Colors dialog box, on the Custom tab, enter values for Red: 77, Green: 28, and Blue: 27Also in the Format Shape dialog box, click Line Color in the left pane, in the Line Color pane, click No line.Also in the Format Shape dialog box, click Shadow in the left pane, in the Shadow pane, click the button next to Presets, and then under Outer, click Offset Diagonal Bottom Left (first row).Press and hold CTRL, and then select the three text boxes below the pictures. On the Home tab, in the Font group, select Gill Sans MT from the Font list,select 24 in the Font Size box, and then click Font Color and select White, Background 1.Also on the Home tab, in the Paragraph group, click Align Text Left. Press and hold CTRL, and then select the three vertical lines in the SmartArt graphic. Under SmartArt Tools, on the Format tab, in the Shape Styles group, click the Format Shape dialog box launcher. In the Format Shape dialog box, click Line Color in the left pane, in the Line Color pane, click Gradient line, and then do the following:In the Type list, click Linear.In the Angle box, enter 90°.Under Gradient stops, click Add gradient stop or Remove gradient stop until two stops appear in the slider.Also under Gradient stops, customize the gradient stops as follows:Select the first stop in the slider, and then do the following: In the Position box, enter 46%.Click the button next to Color, click More Colors, and then in the Colors dialog box, on the Custom tab, enter values for Red: 40, Green: 15, and Blue: 14.In the Transparency box, enter 0%. Select the last stop in the slider, and then do the following: In the Position box, enter 100%.Click the button next to Color, and then under Theme Colors click Black, Text 1 (first row).In the Transparency box, enter 100%. Press and hold CTRL, and then select all three pictures. Under SmartArt Tools, on the Format tab, in the Shapes group, click Change Shape, and then under Rectangles, click Round Single Corner Rectangle.Under Picture Tools, on the Format tab, in the Picture Styles group, click Picture Effects, point to Shadow, and then under Inner, click Inside Diagonal Top Right.Also under PictureTools, on the Format tab, in the Picture Styles group, click Picture Border, and then click No Outline.To reproduce the background effects on this slide, do the following:On the Design tab, in the Background group, click BackgroundStyles, and then click Format Background. In the FormatBackground dialog box, click Gradient fill, and then do the following:In the Type list, click Radial.In the Direction list, click From Center.Under Gradient stops, click Add gradient stop or Remove gradient stop until three stops appear in the slider.Also under Gradient stops, customize the gradient stops as follows:Select the first stop in the slider, and then do the following: In the Position box, enter 0%.Click the button next to Color, click More Colors, and then in the Colors dialog box, on the Custom tab, enter values for Red: 153, Green: 57, and Blue: 55.Select the next stop in the slider, and then do the following: In the Position box, enter 50%.Click the button next to Color, click More Colors, and then in the Colors dialog box, on the Custom tab, enter values for Red: 114, Green: 42, and Blue: 40.Select the last stop in the slider, and then do the following: In the Position box, enter 100%.Click the button next to Color, click More Colors, and then in the Colors dialog box, on the Custom tab, enter values for Red: 40, Green: 15, and Blue: 14.
- SmartArt graphic with pictures on red background(Intermediate)To reproduce the SmartArt graphic on this slide, do the following:On the Home tab, in the Slides group, click Layout, and then click Blank.On the Insert tab, in the Illustrations group, click SmartArt.In the Choose a SmartArt Graphic dialog box, in the left pane, click Picture. In the Picture pane, double-click Title Picture Lineup (fifth row) to insert the graphic into the slide. Click each of the four picture placeholders in the SmartArt graphic, select a picture, and then click Insert.Select the graphic. Under SmartArt Tools, on the Format tab, in the Size group, enter 5.92” in the Height box and 8.75” in the Width box.Also under SmartArt Tools, on the Format tab, in the Arrange group, click Align, and then do the following:Click Align to Slide.Click Align Center.Click Align Middle.Select the graphic, and then click one of the arrows on the left border. In the Type your text here dialog box, enter text.Press and hold CTRL, and then select all of the text boxes above the pictures. On the Home tab, in the Font group, select Gill Sans MT from the Font list, and then select 26 pt. from the FontSize list. Click Font Color and select White, Background 1.Press and hold CTRL, and then select all of the text boxes above the pictures. Under SmartArt Tools, on the Format tab, in the Shapes group, click Change Shape, and then under Rectangles, click Round Diagonal Corner Rectangle.Also under SmartArt Tools, on the Format tab, in the Shape Styles group, click the Format Shape dialog box launcher. In the Format Shape dialog box, click Fill in the left pane, in the Fill pane, click Gradient fill, and then do the following:In the Type list, select Linear.In the Angle box, enter 0.3°.Under Gradient stops, click Add gradient stop or Remove gradient stop until three stops appear in the slider.Also under Gradient stops, customize the gradient stops as follows:Select the first stop in the slider, and then do the following: In the Position box, enter 0%.Click the button next to Color, click More Colors, and then in the Colors dialog box, on the Custom tab, enter values for Red: 77, Green: 28, and Blue: 27.Select the next stop in the slider, and then do the following: In the Position box, enter 50%.Click the button next to Color, click More Colors, and then in the Colors dialog box, on the Custom tab, enter values for Red: 136, Green: 50, and Blue: 48.Select the last stop in the slider, and then do the following: In the Position box, enter 100%.Click the button next to Color, click More Colors, and then in the Colors dialog box, on the Custom tab, enter values for Red: 77, Green: 28, and Blue: 27Also in the Format Shape dialog box, click Line Color in the left pane, in the Line Color pane, click No line.Also in the Format Shape dialog box, click Shadow in the left pane, in the Shadow pane, click the button next to Presets, and then under Outer, click Offset Diagonal Bottom Left (first row).Press and hold CTRL, and then select the three text boxes below the pictures. On the Home tab, in the Font group, select Gill Sans MT from the Font list,select 24 in the Font Size box, and then click Font Color and select White, Background 1.Also on the Home tab, in the Paragraph group, click Align Text Left. Press and hold CTRL, and then select the three vertical lines in the SmartArt graphic. Under SmartArt Tools, on the Format tab, in the Shape Styles group, click the Format Shape dialog box launcher. In the Format Shape dialog box, click Line Color in the left pane, in the Line Color pane, click Gradient line, and then do the following:In the Type list, click Linear.In the Angle box, enter 90°.Under Gradient stops, click Add gradient stop or Remove gradient stop until two stops appear in the slider.Also under Gradient stops, customize the gradient stops as follows:Select the first stop in the slider, and then do the following: In the Position box, enter 46%.Click the button next to Color, click More Colors, and then in the Colors dialog box, on the Custom tab, enter values for Red: 40, Green: 15, and Blue: 14.In the Transparency box, enter 0%. Select the last stop in the slider, and then do the following: In the Position box, enter 100%.Click the button next to Color, and then under Theme Colors click Black, Text 1 (first row).In the Transparency box, enter 100%. Press and hold CTRL, and then select all three pictures. Under SmartArt Tools, on the Format tab, in the Shapes group, click Change Shape, and then under Rectangles, click Round Single Corner Rectangle.Under Picture Tools, on the Format tab, in the Picture Styles group, click Picture Effects, point to Shadow, and then under Inner, click Inside Diagonal Top Right.Also under PictureTools, on the Format tab, in the Picture Styles group, click Picture Border, and then click No Outline.To reproduce the background effects on this slide, do the following:On the Design tab, in the Background group, click BackgroundStyles, and then click Format Background. In the FormatBackground dialog box, click Gradient fill, and then do the following:In the Type list, click Radial.In the Direction list, click From Center.Under Gradient stops, click Add gradient stop or Remove gradient stop until three stops appear in the slider.Also under Gradient stops, customize the gradient stops as follows:Select the first stop in the slider, and then do the following: In the Position box, enter 0%.Click the button next to Color, click More Colors, and then in the Colors dialog box, on the Custom tab, enter values for Red: 153, Green: 57, and Blue: 55.Select the next stop in the slider, and then do the following: In the Position box, enter 50%.Click the button next to Color, click More Colors, and then in the Colors dialog box, on the Custom tab, enter values for Red: 114, Green: 42, and Blue: 40.Select the last stop in the slider, and then do the following: In the Position box, enter 100%.Click the button next to Color, click More Colors, and then in the Colors dialog box, on the Custom tab, enter values for Red: 40, Green: 15, and Blue: 14.
- SmartArt graphic with pictures on red background(Intermediate)To reproduce the SmartArt graphic on this slide, do the following:On the Home tab, in the Slides group, click Layout, and then click Blank.On the Insert tab, in the Illustrations group, click SmartArt.In the Choose a SmartArt Graphic dialog box, in the left pane, click Picture. In the Picture pane, double-click Title Picture Lineup (fifth row) to insert the graphic into the slide. Click each of the four picture placeholders in the SmartArt graphic, select a picture, and then click Insert.Select the graphic. Under SmartArt Tools, on the Format tab, in the Size group, enter 5.92” in the Height box and 8.75” in the Width box.Also under SmartArt Tools, on the Format tab, in the Arrange group, click Align, and then do the following:Click Align to Slide.Click Align Center.Click Align Middle.Select the graphic, and then click one of the arrows on the left border. In the Type your text here dialog box, enter text.Press and hold CTRL, and then select all of the text boxes above the pictures. On the Home tab, in the Font group, select Gill Sans MT from the Font list, and then select 26 pt. from the FontSize list. Click Font Color and select White, Background 1.Press and hold CTRL, and then select all of the text boxes above the pictures. Under SmartArt Tools, on the Format tab, in the Shapes group, click Change Shape, and then under Rectangles, click Round Diagonal Corner Rectangle.Also under SmartArt Tools, on the Format tab, in the Shape Styles group, click the Format Shape dialog box launcher. In the Format Shape dialog box, click Fill in the left pane, in the Fill pane, click Gradient fill, and then do the following:In the Type list, select Linear.In the Angle box, enter 0.3°.Under Gradient stops, click Add gradient stop or Remove gradient stop until three stops appear in the slider.Also under Gradient stops, customize the gradient stops as follows:Select the first stop in the slider, and then do the following: In the Position box, enter 0%.Click the button next to Color, click More Colors, and then in the Colors dialog box, on the Custom tab, enter values for Red: 77, Green: 28, and Blue: 27.Select the next stop in the slider, and then do the following: In the Position box, enter 50%.Click the button next to Color, click More Colors, and then in the Colors dialog box, on the Custom tab, enter values for Red: 136, Green: 50, and Blue: 48.Select the last stop in the slider, and then do the following: In the Position box, enter 100%.Click the button next to Color, click More Colors, and then in the Colors dialog box, on the Custom tab, enter values for Red: 77, Green: 28, and Blue: 27Also in the Format Shape dialog box, click Line Color in the left pane, in the Line Color pane, click No line.Also in the Format Shape dialog box, click Shadow in the left pane, in the Shadow pane, click the button next to Presets, and then under Outer, click Offset Diagonal Bottom Left (first row).Press and hold CTRL, and then select the three text boxes below the pictures. On the Home tab, in the Font group, select Gill Sans MT from the Font list,select 24 in the Font Size box, and then click Font Color and select White, Background 1.Also on the Home tab, in the Paragraph group, click Align Text Left. Press and hold CTRL, and then select the three vertical lines in the SmartArt graphic. Under SmartArt Tools, on the Format tab, in the Shape Styles group, click the Format Shape dialog box launcher. In the Format Shape dialog box, click Line Color in the left pane, in the Line Color pane, click Gradient line, and then do the following:In the Type list, click Linear.In the Angle box, enter 90°.Under Gradient stops, click Add gradient stop or Remove gradient stop until two stops appear in the slider.Also under Gradient stops, customize the gradient stops as follows:Select the first stop in the slider, and then do the following: In the Position box, enter 46%.Click the button next to Color, click More Colors, and then in the Colors dialog box, on the Custom tab, enter values for Red: 40, Green: 15, and Blue: 14.In the Transparency box, enter 0%. Select the last stop in the slider, and then do the following: In the Position box, enter 100%.Click the button next to Color, and then under Theme Colors click Black, Text 1 (first row).In the Transparency box, enter 100%. Press and hold CTRL, and then select all three pictures. Under SmartArt Tools, on the Format tab, in the Shapes group, click Change Shape, and then under Rectangles, click Round Single Corner Rectangle.Under Picture Tools, on the Format tab, in the Picture Styles group, click Picture Effects, point to Shadow, and then under Inner, click Inside Diagonal Top Right.Also under PictureTools, on the Format tab, in the Picture Styles group, click Picture Border, and then click No Outline.To reproduce the background effects on this slide, do the following:On the Design tab, in the Background group, click BackgroundStyles, and then click Format Background. In the FormatBackground dialog box, click Gradient fill, and then do the following:In the Type list, click Radial.In the Direction list, click From Center.Under Gradient stops, click Add gradient stop or Remove gradient stop until three stops appear in the slider.Also under Gradient stops, customize the gradient stops as follows:Select the first stop in the slider, and then do the following: In the Position box, enter 0%.Click the button next to Color, click More Colors, and then in the Colors dialog box, on the Custom tab, enter values for Red: 153, Green: 57, and Blue: 55.Select the next stop in the slider, and then do the following: In the Position box, enter 50%.Click the button next to Color, click More Colors, and then in the Colors dialog box, on the Custom tab, enter values for Red: 114, Green: 42, and Blue: 40.Select the last stop in the slider, and then do the following: In the Position box, enter 100%.Click the button next to Color, click More Colors, and then in the Colors dialog box, on the Custom tab, enter values for Red: 40, Green: 15, and Blue: 14.
- SmartArt graphic with pictures on red background(Intermediate)To reproduce the SmartArt graphic on this slide, do the following:On the Home tab, in the Slides group, click Layout, and then click Blank.On the Insert tab, in the Illustrations group, click SmartArt.In the Choose a SmartArt Graphic dialog box, in the left pane, click Picture. In the Picture pane, double-click Title Picture Lineup (fifth row) to insert the graphic into the slide. Click each of the four picture placeholders in the SmartArt graphic, select a picture, and then click Insert.Select the graphic. Under SmartArt Tools, on the Format tab, in the Size group, enter 5.92” in the Height box and 8.75” in the Width box.Also under SmartArt Tools, on the Format tab, in the Arrange group, click Align, and then do the following:Click Align to Slide.Click Align Center.Click Align Middle.Select the graphic, and then click one of the arrows on the left border. In the Type your text here dialog box, enter text.Press and hold CTRL, and then select all of the text boxes above the pictures. On the Home tab, in the Font group, select Gill Sans MT from the Font list, and then select 26 pt. from the FontSize list. Click Font Color and select White, Background 1.Press and hold CTRL, and then select all of the text boxes above the pictures. Under SmartArt Tools, on the Format tab, in the Shapes group, click Change Shape, and then under Rectangles, click Round Diagonal Corner Rectangle.Also under SmartArt Tools, on the Format tab, in the Shape Styles group, click the Format Shape dialog box launcher. In the Format Shape dialog box, click Fill in the left pane, in the Fill pane, click Gradient fill, and then do the following:In the Type list, select Linear.In the Angle box, enter 0.3°.Under Gradient stops, click Add gradient stop or Remove gradient stop until three stops appear in the slider.Also under Gradient stops, customize the gradient stops as follows:Select the first stop in the slider, and then do the following: In the Position box, enter 0%.Click the button next to Color, click More Colors, and then in the Colors dialog box, on the Custom tab, enter values for Red: 77, Green: 28, and Blue: 27.Select the next stop in the slider, and then do the following: In the Position box, enter 50%.Click the button next to Color, click More Colors, and then in the Colors dialog box, on the Custom tab, enter values for Red: 136, Green: 50, and Blue: 48.Select the last stop in the slider, and then do the following: In the Position box, enter 100%.Click the button next to Color, click More Colors, and then in the Colors dialog box, on the Custom tab, enter values for Red: 77, Green: 28, and Blue: 27Also in the Format Shape dialog box, click Line Color in the left pane, in the Line Color pane, click No line.Also in the Format Shape dialog box, click Shadow in the left pane, in the Shadow pane, click the button next to Presets, and then under Outer, click Offset Diagonal Bottom Left (first row).Press and hold CTRL, and then select the three text boxes below the pictures. On the Home tab, in the Font group, select Gill Sans MT from the Font list,select 24 in the Font Size box, and then click Font Color and select White, Background 1.Also on the Home tab, in the Paragraph group, click Align Text Left. Press and hold CTRL, and then select the three vertical lines in the SmartArt graphic. Under SmartArt Tools, on the Format tab, in the Shape Styles group, click the Format Shape dialog box launcher. In the Format Shape dialog box, click Line Color in the left pane, in the Line Color pane, click Gradient line, and then do the following:In the Type list, click Linear.In the Angle box, enter 90°.Under Gradient stops, click Add gradient stop or Remove gradient stop until two stops appear in the slider.Also under Gradient stops, customize the gradient stops as follows:Select the first stop in the slider, and then do the following: In the Position box, enter 46%.Click the button next to Color, click More Colors, and then in the Colors dialog box, on the Custom tab, enter values for Red: 40, Green: 15, and Blue: 14.In the Transparency box, enter 0%. Select the last stop in the slider, and then do the following: In the Position box, enter 100%.Click the button next to Color, and then under Theme Colors click Black, Text 1 (first row).In the Transparency box, enter 100%. Press and hold CTRL, and then select all three pictures. Under SmartArt Tools, on the Format tab, in the Shapes group, click Change Shape, and then under Rectangles, click Round Single Corner Rectangle.Under Picture Tools, on the Format tab, in the Picture Styles group, click Picture Effects, point to Shadow, and then under Inner, click Inside Diagonal Top Right.Also under PictureTools, on the Format tab, in the Picture Styles group, click Picture Border, and then click No Outline.To reproduce the background effects on this slide, do the following:On the Design tab, in the Background group, click BackgroundStyles, and then click Format Background. In the FormatBackground dialog box, click Gradient fill, and then do the following:In the Type list, click Radial.In the Direction list, click From Center.Under Gradient stops, click Add gradient stop or Remove gradient stop until three stops appear in the slider.Also under Gradient stops, customize the gradient stops as follows:Select the first stop in the slider, and then do the following: In the Position box, enter 0%.Click the button next to Color, click More Colors, and then in the Colors dialog box, on the Custom tab, enter values for Red: 153, Green: 57, and Blue: 55.Select the next stop in the slider, and then do the following: In the Position box, enter 50%.Click the button next to Color, click More Colors, and then in the Colors dialog box, on the Custom tab, enter values for Red: 114, Green: 42, and Blue: 40.Select the last stop in the slider, and then do the following: In the Position box, enter 100%.Click the button next to Color, click More Colors, and then in the Colors dialog box, on the Custom tab, enter values for Red: 40, Green: 15, and Blue: 14.
- SmartArt graphic with pictures on red background(Intermediate)To reproduce the SmartArt graphic on this slide, do the following:On the Home tab, in the Slides group, click Layout, and then click Blank.On the Insert tab, in the Illustrations group, click SmartArt.In the Choose a SmartArt Graphic dialog box, in the left pane, click Picture. In the Picture pane, double-click Title Picture Lineup (fifth row) to insert the graphic into the slide. Click each of the four picture placeholders in the SmartArt graphic, select a picture, and then click Insert.Select the graphic. Under SmartArt Tools, on the Format tab, in the Size group, enter 5.92” in the Height box and 8.75” in the Width box.Also under SmartArt Tools, on the Format tab, in the Arrange group, click Align, and then do the following:Click Align to Slide.Click Align Center.Click Align Middle.Select the graphic, and then click one of the arrows on the left border. In the Type your text here dialog box, enter text.Press and hold CTRL, and then select all of the text boxes above the pictures. On the Home tab, in the Font group, select Gill Sans MT from the Font list, and then select 26 pt. from the FontSize list. Click Font Color and select White, Background 1.Press and hold CTRL, and then select all of the text boxes above the pictures. Under SmartArt Tools, on the Format tab, in the Shapes group, click Change Shape, and then under Rectangles, click Round Diagonal Corner Rectangle.Also under SmartArt Tools, on the Format tab, in the Shape Styles group, click the Format Shape dialog box launcher. In the Format Shape dialog box, click Fill in the left pane, in the Fill pane, click Gradient fill, and then do the following:In the Type list, select Linear.In the Angle box, enter 0.3°.Under Gradient stops, click Add gradient stop or Remove gradient stop until three stops appear in the slider.Also under Gradient stops, customize the gradient stops as follows:Select the first stop in the slider, and then do the following: In the Position box, enter 0%.Click the button next to Color, click More Colors, and then in the Colors dialog box, on the Custom tab, enter values for Red: 77, Green: 28, and Blue: 27.Select the next stop in the slider, and then do the following: In the Position box, enter 50%.Click the button next to Color, click More Colors, and then in the Colors dialog box, on the Custom tab, enter values for Red: 136, Green: 50, and Blue: 48.Select the last stop in the slider, and then do the following: In the Position box, enter 100%.Click the button next to Color, click More Colors, and then in the Colors dialog box, on the Custom tab, enter values for Red: 77, Green: 28, and Blue: 27Also in the Format Shape dialog box, click Line Color in the left pane, in the Line Color pane, click No line.Also in the Format Shape dialog box, click Shadow in the left pane, in the Shadow pane, click the button next to Presets, and then under Outer, click Offset Diagonal Bottom Left (first row).Press and hold CTRL, and then select the three text boxes below the pictures. On the Home tab, in the Font group, select Gill Sans MT from the Font list,select 24 in the Font Size box, and then click Font Color and select White, Background 1.Also on the Home tab, in the Paragraph group, click Align Text Left. Press and hold CTRL, and then select the three vertical lines in the SmartArt graphic. Under SmartArt Tools, on the Format tab, in the Shape Styles group, click the Format Shape dialog box launcher. In the Format Shape dialog box, click Line Color in the left pane, in the Line Color pane, click Gradient line, and then do the following:In the Type list, click Linear.In the Angle box, enter 90°.Under Gradient stops, click Add gradient stop or Remove gradient stop until two stops appear in the slider.Also under Gradient stops, customize the gradient stops as follows:Select the first stop in the slider, and then do the following: In the Position box, enter 46%.Click the button next to Color, click More Colors, and then in the Colors dialog box, on the Custom tab, enter values for Red: 40, Green: 15, and Blue: 14.In the Transparency box, enter 0%. Select the last stop in the slider, and then do the following: In the Position box, enter 100%.Click the button next to Color, and then under Theme Colors click Black, Text 1 (first row).In the Transparency box, enter 100%. Press and hold CTRL, and then select all three pictures. Under SmartArt Tools, on the Format tab, in the Shapes group, click Change Shape, and then under Rectangles, click Round Single Corner Rectangle.Under Picture Tools, on the Format tab, in the Picture Styles group, click Picture Effects, point to Shadow, and then under Inner, click Inside Diagonal Top Right.Also under PictureTools, on the Format tab, in the Picture Styles group, click Picture Border, and then click No Outline.To reproduce the background effects on this slide, do the following:On the Design tab, in the Background group, click BackgroundStyles, and then click Format Background. In the FormatBackground dialog box, click Gradient fill, and then do the following:In the Type list, click Radial.In the Direction list, click From Center.Under Gradient stops, click Add gradient stop or Remove gradient stop until three stops appear in the slider.Also under Gradient stops, customize the gradient stops as follows:Select the first stop in the slider, and then do the following: In the Position box, enter 0%.Click the button next to Color, click More Colors, and then in the Colors dialog box, on the Custom tab, enter values for Red: 153, Green: 57, and Blue: 55.Select the next stop in the slider, and then do the following: In the Position box, enter 50%.Click the button next to Color, click More Colors, and then in the Colors dialog box, on the Custom tab, enter values for Red: 114, Green: 42, and Blue: 40.Select the last stop in the slider, and then do the following: In the Position box, enter 100%.Click the button next to Color, click More Colors, and then in the Colors dialog box, on the Custom tab, enter values for Red: 40, Green: 15, and Blue: 14.
- SmartArt graphic with pictures on red background(Intermediate)To reproduce the SmartArt graphic on this slide, do the following:On the Home tab, in the Slides group, click Layout, and then click Blank.On the Insert tab, in the Illustrations group, click SmartArt.In the Choose a SmartArt Graphic dialog box, in the left pane, click Picture. In the Picture pane, double-click Title Picture Lineup (fifth row) to insert the graphic into the slide. Click each of the four picture placeholders in the SmartArt graphic, select a picture, and then click Insert.Select the graphic. Under SmartArt Tools, on the Format tab, in the Size group, enter 5.92” in the Height box and 8.75” in the Width box.Also under SmartArt Tools, on the Format tab, in the Arrange group, click Align, and then do the following:Click Align to Slide.Click Align Center.Click Align Middle.Select the graphic, and then click one of the arrows on the left border. In the Type your text here dialog box, enter text.Press and hold CTRL, and then select all of the text boxes above the pictures. On the Home tab, in the Font group, select Gill Sans MT from the Font list, and then select 26 pt. from the FontSize list. Click Font Color and select White, Background 1.Press and hold CTRL, and then select all of the text boxes above the pictures. Under SmartArt Tools, on the Format tab, in the Shapes group, click Change Shape, and then under Rectangles, click Round Diagonal Corner Rectangle.Also under SmartArt Tools, on the Format tab, in the Shape Styles group, click the Format Shape dialog box launcher. In the Format Shape dialog box, click Fill in the left pane, in the Fill pane, click Gradient fill, and then do the following:In the Type list, select Linear.In the Angle box, enter 0.3°.Under Gradient stops, click Add gradient stop or Remove gradient stop until three stops appear in the slider.Also under Gradient stops, customize the gradient stops as follows:Select the first stop in the slider, and then do the following: In the Position box, enter 0%.Click the button next to Color, click More Colors, and then in the Colors dialog box, on the Custom tab, enter values for Red: 77, Green: 28, and Blue: 27.Select the next stop in the slider, and then do the following: In the Position box, enter 50%.Click the button next to Color, click More Colors, and then in the Colors dialog box, on the Custom tab, enter values for Red: 136, Green: 50, and Blue: 48.Select the last stop in the slider, and then do the following: In the Position box, enter 100%.Click the button next to Color, click More Colors, and then in the Colors dialog box, on the Custom tab, enter values for Red: 77, Green: 28, and Blue: 27Also in the Format Shape dialog box, click Line Color in the left pane, in the Line Color pane, click No line.Also in the Format Shape dialog box, click Shadow in the left pane, in the Shadow pane, click the button next to Presets, and then under Outer, click Offset Diagonal Bottom Left (first row).Press and hold CTRL, and then select the three text boxes below the pictures. On the Home tab, in the Font group, select Gill Sans MT from the Font list,select 24 in the Font Size box, and then click Font Color and select White, Background 1.Also on the Home tab, in the Paragraph group, click Align Text Left. Press and hold CTRL, and then select the three vertical lines in the SmartArt graphic. Under SmartArt Tools, on the Format tab, in the Shape Styles group, click the Format Shape dialog box launcher. In the Format Shape dialog box, click Line Color in the left pane, in the Line Color pane, click Gradient line, and then do the following:In the Type list, click Linear.In the Angle box, enter 90°.Under Gradient stops, click Add gradient stop or Remove gradient stop until two stops appear in the slider.Also under Gradient stops, customize the gradient stops as follows:Select the first stop in the slider, and then do the following: In the Position box, enter 46%.Click the button next to Color, click More Colors, and then in the Colors dialog box, on the Custom tab, enter values for Red: 40, Green: 15, and Blue: 14.In the Transparency box, enter 0%. Select the last stop in the slider, and then do the following: In the Position box, enter 100%.Click the button next to Color, and then under Theme Colors click Black, Text 1 (first row).In the Transparency box, enter 100%. Press and hold CTRL, and then select all three pictures. Under SmartArt Tools, on the Format tab, in the Shapes group, click Change Shape, and then under Rectangles, click Round Single Corner Rectangle.Under Picture Tools, on the Format tab, in the Picture Styles group, click Picture Effects, point to Shadow, and then under Inner, click Inside Diagonal Top Right.Also under PictureTools, on the Format tab, in the Picture Styles group, click Picture Border, and then click No Outline.To reproduce the background effects on this slide, do the following:On the Design tab, in the Background group, click BackgroundStyles, and then click Format Background. In the FormatBackground dialog box, click Gradient fill, and then do the following:In the Type list, click Radial.In the Direction list, click From Center.Under Gradient stops, click Add gradient stop or Remove gradient stop until three stops appear in the slider.Also under Gradient stops, customize the gradient stops as follows:Select the first stop in the slider, and then do the following: In the Position box, enter 0%.Click the button next to Color, click More Colors, and then in the Colors dialog box, on the Custom tab, enter values for Red: 153, Green: 57, and Blue: 55.Select the next stop in the slider, and then do the following: In the Position box, enter 50%.Click the button next to Color, click More Colors, and then in the Colors dialog box, on the Custom tab, enter values for Red: 114, Green: 42, and Blue: 40.Select the last stop in the slider, and then do the following: In the Position box, enter 100%.Click the button next to Color, click More Colors, and then in the Colors dialog box, on the Custom tab, enter values for Red: 40, Green: 15, and Blue: 14.
- SmartArt graphic with pictures on red background(Intermediate)To reproduce the SmartArt graphic on this slide, do the following:On the Home tab, in the Slides group, click Layout, and then click Blank.On the Insert tab, in the Illustrations group, click SmartArt.In the Choose a SmartArt Graphic dialog box, in the left pane, click Picture. In the Picture pane, double-click Title Picture Lineup (fifth row) to insert the graphic into the slide. Click each of the four picture placeholders in the SmartArt graphic, select a picture, and then click Insert.Select the graphic. Under SmartArt Tools, on the Format tab, in the Size group, enter 5.92” in the Height box and 8.75” in the Width box.Also under SmartArt Tools, on the Format tab, in the Arrange group, click Align, and then do the following:Click Align to Slide.Click Align Center.Click Align Middle.Select the graphic, and then click one of the arrows on the left border. In the Type your text here dialog box, enter text.Press and hold CTRL, and then select all of the text boxes above the pictures. On the Home tab, in the Font group, select Gill Sans MT from the Font list, and then select 26 pt. from the FontSize list. Click Font Color and select White, Background 1.Press and hold CTRL, and then select all of the text boxes above the pictures. Under SmartArt Tools, on the Format tab, in the Shapes group, click Change Shape, and then under Rectangles, click Round Diagonal Corner Rectangle.Also under SmartArt Tools, on the Format tab, in the Shape Styles group, click the Format Shape dialog box launcher. In the Format Shape dialog box, click Fill in the left pane, in the Fill pane, click Gradient fill, and then do the following:In the Type list, select Linear.In the Angle box, enter 0.3°.Under Gradient stops, click Add gradient stop or Remove gradient stop until three stops appear in the slider.Also under Gradient stops, customize the gradient stops as follows:Select the first stop in the slider, and then do the following: In the Position box, enter 0%.Click the button next to Color, click More Colors, and then in the Colors dialog box, on the Custom tab, enter values for Red: 77, Green: 28, and Blue: 27.Select the next stop in the slider, and then do the following: In the Position box, enter 50%.Click the button next to Color, click More Colors, and then in the Colors dialog box, on the Custom tab, enter values for Red: 136, Green: 50, and Blue: 48.Select the last stop in the slider, and then do the following: In the Position box, enter 100%.Click the button next to Color, click More Colors, and then in the Colors dialog box, on the Custom tab, enter values for Red: 77, Green: 28, and Blue: 27Also in the Format Shape dialog box, click Line Color in the left pane, in the Line Color pane, click No line.Also in the Format Shape dialog box, click Shadow in the left pane, in the Shadow pane, click the button next to Presets, and then under Outer, click Offset Diagonal Bottom Left (first row).Press and hold CTRL, and then select the three text boxes below the pictures. On the Home tab, in the Font group, select Gill Sans MT from the Font list,select 24 in the Font Size box, and then click Font Color and select White, Background 1.Also on the Home tab, in the Paragraph group, click Align Text Left. Press and hold CTRL, and then select the three vertical lines in the SmartArt graphic. Under SmartArt Tools, on the Format tab, in the Shape Styles group, click the Format Shape dialog box launcher. In the Format Shape dialog box, click Line Color in the left pane, in the Line Color pane, click Gradient line, and then do the following:In the Type list, click Linear.In the Angle box, enter 90°.Under Gradient stops, click Add gradient stop or Remove gradient stop until two stops appear in the slider.Also under Gradient stops, customize the gradient stops as follows:Select the first stop in the slider, and then do the following: In the Position box, enter 46%.Click the button next to Color, click More Colors, and then in the Colors dialog box, on the Custom tab, enter values for Red: 40, Green: 15, and Blue: 14.In the Transparency box, enter 0%. Select the last stop in the slider, and then do the following: In the Position box, enter 100%.Click the button next to Color, and then under Theme Colors click Black, Text 1 (first row).In the Transparency box, enter 100%. Press and hold CTRL, and then select all three pictures. Under SmartArt Tools, on the Format tab, in the Shapes group, click Change Shape, and then under Rectangles, click Round Single Corner Rectangle.Under Picture Tools, on the Format tab, in the Picture Styles group, click Picture Effects, point to Shadow, and then under Inner, click Inside Diagonal Top Right.Also under PictureTools, on the Format tab, in the Picture Styles group, click Picture Border, and then click No Outline.To reproduce the background effects on this slide, do the following:On the Design tab, in the Background group, click BackgroundStyles, and then click Format Background. In the FormatBackground dialog box, click Gradient fill, and then do the following:In the Type list, click Radial.In the Direction list, click From Center.Under Gradient stops, click Add gradient stop or Remove gradient stop until three stops appear in the slider.Also under Gradient stops, customize the gradient stops as follows:Select the first stop in the slider, and then do the following: In the Position box, enter 0%.Click the button next to Color, click More Colors, and then in the Colors dialog box, on the Custom tab, enter values for Red: 153, Green: 57, and Blue: 55.Select the next stop in the slider, and then do the following: In the Position box, enter 50%.Click the button next to Color, click More Colors, and then in the Colors dialog box, on the Custom tab, enter values for Red: 114, Green: 42, and Blue: 40.Select the last stop in the slider, and then do the following: In the Position box, enter 100%.Click the button next to Color, click More Colors, and then in the Colors dialog box, on the Custom tab, enter values for Red: 40, Green: 15, and Blue: 14.
- SmartArt graphic with pictures on red background(Intermediate)To reproduce the SmartArt graphic on this slide, do the following:On the Home tab, in the Slides group, click Layout, and then click Blank.On the Insert tab, in the Illustrations group, click SmartArt.In the Choose a SmartArt Graphic dialog box, in the left pane, click Picture. In the Picture pane, double-click Title Picture Lineup (fifth row) to insert the graphic into the slide. Click each of the four picture placeholders in the SmartArt graphic, select a picture, and then click Insert.Select the graphic. Under SmartArt Tools, on the Format tab, in the Size group, enter 5.92” in the Height box and 8.75” in the Width box.Also under SmartArt Tools, on the Format tab, in the Arrange group, click Align, and then do the following:Click Align to Slide.Click Align Center.Click Align Middle.Select the graphic, and then click one of the arrows on the left border. In the Type your text here dialog box, enter text.Press and hold CTRL, and then select all of the text boxes above the pictures. On the Home tab, in the Font group, select Gill Sans MT from the Font list, and then select 26 pt. from the FontSize list. Click Font Color and select White, Background 1.Press and hold CTRL, and then select all of the text boxes above the pictures. Under SmartArt Tools, on the Format tab, in the Shapes group, click Change Shape, and then under Rectangles, click Round Diagonal Corner Rectangle.Also under SmartArt Tools, on the Format tab, in the Shape Styles group, click the Format Shape dialog box launcher. In the Format Shape dialog box, click Fill in the left pane, in the Fill pane, click Gradient fill, and then do the following:In the Type list, select Linear.In the Angle box, enter 0.3°.Under Gradient stops, click Add gradient stop or Remove gradient stop until three stops appear in the slider.Also under Gradient stops, customize the gradient stops as follows:Select the first stop in the slider, and then do the following: In the Position box, enter 0%.Click the button next to Color, click More Colors, and then in the Colors dialog box, on the Custom tab, enter values for Red: 77, Green: 28, and Blue: 27.Select the next stop in the slider, and then do the following: In the Position box, enter 50%.Click the button next to Color, click More Colors, and then in the Colors dialog box, on the Custom tab, enter values for Red: 136, Green: 50, and Blue: 48.Select the last stop in the slider, and then do the following: In the Position box, enter 100%.Click the button next to Color, click More Colors, and then in the Colors dialog box, on the Custom tab, enter values for Red: 77, Green: 28, and Blue: 27Also in the Format Shape dialog box, click Line Color in the left pane, in the Line Color pane, click No line.Also in the Format Shape dialog box, click Shadow in the left pane, in the Shadow pane, click the button next to Presets, and then under Outer, click Offset Diagonal Bottom Left (first row).Press and hold CTRL, and then select the three text boxes below the pictures. On the Home tab, in the Font group, select Gill Sans MT from the Font list,select 24 in the Font Size box, and then click Font Color and select White, Background 1.Also on the Home tab, in the Paragraph group, click Align Text Left. Press and hold CTRL, and then select the three vertical lines in the SmartArt graphic. Under SmartArt Tools, on the Format tab, in the Shape Styles group, click the Format Shape dialog box launcher. In the Format Shape dialog box, click Line Color in the left pane, in the Line Color pane, click Gradient line, and then do the following:In the Type list, click Linear.In the Angle box, enter 90°.Under Gradient stops, click Add gradient stop or Remove gradient stop until two stops appear in the slider.Also under Gradient stops, customize the gradient stops as follows:Select the first stop in the slider, and then do the following: In the Position box, enter 46%.Click the button next to Color, click More Colors, and then in the Colors dialog box, on the Custom tab, enter values for Red: 40, Green: 15, and Blue: 14.In the Transparency box, enter 0%. Select the last stop in the slider, and then do the following: In the Position box, enter 100%.Click the button next to Color, and then under Theme Colors click Black, Text 1 (first row).In the Transparency box, enter 100%. Press and hold CTRL, and then select all three pictures. Under SmartArt Tools, on the Format tab, in the Shapes group, click Change Shape, and then under Rectangles, click Round Single Corner Rectangle.Under Picture Tools, on the Format tab, in the Picture Styles group, click Picture Effects, point to Shadow, and then under Inner, click Inside Diagonal Top Right.Also under PictureTools, on the Format tab, in the Picture Styles group, click Picture Border, and then click No Outline.To reproduce the background effects on this slide, do the following:On the Design tab, in the Background group, click BackgroundStyles, and then click Format Background. In the FormatBackground dialog box, click Gradient fill, and then do the following:In the Type list, click Radial.In the Direction list, click From Center.Under Gradient stops, click Add gradient stop or Remove gradient stop until three stops appear in the slider.Also under Gradient stops, customize the gradient stops as follows:Select the first stop in the slider, and then do the following: In the Position box, enter 0%.Click the button next to Color, click More Colors, and then in the Colors dialog box, on the Custom tab, enter values for Red: 153, Green: 57, and Blue: 55.Select the next stop in the slider, and then do the following: In the Position box, enter 50%.Click the button next to Color, click More Colors, and then in the Colors dialog box, on the Custom tab, enter values for Red: 114, Green: 42, and Blue: 40.Select the last stop in the slider, and then do the following: In the Position box, enter 100%.Click the button next to Color, click More Colors, and then in the Colors dialog box, on the Custom tab, enter values for Red: 40, Green: 15, and Blue: 14.