R38 Controller
•
0 likes•689 views

The R38 controller offers on/off or high accuracy PID control for heating or cooling applications.

Recommended
More Related Content
Viewers also liked
Viewers also liked (9)
Similar to R38 Controller
Similar to R38 Controller (20)
Recently uploaded
Recently uploaded (20)
R38 Controller
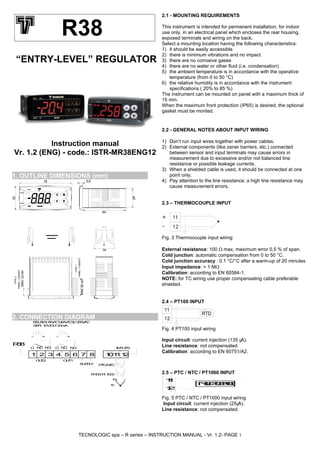
- 1. TECNOLOGIC spa – R series – INSTRUCTION MANUAL - Vr. 1.2- PAGE 1 “ENTRY-LEVEL” REGULATOR Instruction manual Vr. 1.2 (ENG) - code.: ISTR-MR38ENG12 1. OUTLINE DIMENSIONS (mm) TYPE1 PANEL+GASKET PANEL+GASKET TYPE2 34 MAX12mm MAX29mm 64 28 5,578 35 2. CONNECTION DIAGRAM SSR:10VDC/20mA NC SUPPLY + 1 32 4 C 11 INPUTS PTC-NTC 865 OUT1 NO 7 12 OUT2 R38 RELAYS:8A-AC1(6A-AC3)/250VAC Pt100/Pt1000 tc NC NOC 10 +- +- 2.1 - MOUNTING REQUIREMENTS This instrument is intended for permanent installation, for indoor use only, in an electrical panel which encloses the rear housing, exposed terminals and wiring on the back. Select a mounting location having the following characteristics: 1) it should be easily accessible 2) there is minimum vibrations and no impact 3) there are no corrosive gases 4) there are no water or other fluid (i.e. condensation) 5) the ambient temperature is in accordance with the operative temperature (from 0 to 50 °C) 6) the relative humidity is in accordance with the instrument specifications ( 20% to 85 %) The instrument can be mounted on panel with a maximum thick of 15 mm. When the maximum front protection (IP65) is desired, the optional gasket must be monted. 2.2 - GENERAL NOTES ABOUT INPUT WIRING 1) Don’t run input wires together with power cables. 2) External components (like zener barriers, etc.) connected between sensor and input terminals may cause errors in measurement due to excessive and/or not balanced line resistance or possible leakage currents. 3) When a shielded cable is used, it should be connected at one point only. 4) Pay attention to the line resistance; a high line resistance may cause measurement errors. 2.3 – THERMOCOUPLE INPUT 11 12 + - Fig. 3 Thermocouple input wiring External resistance: 100 max, maximum error 0,5 % of span. Cold junction: automatic compensation from 0 to 50 °C. Cold junction accuracy : 0.1 °C/°C after a warm-up of 20 minutes Input impedance: > 1 M Calibration: according to EN 60584-1. NOTE: for TC wiring use proper compensating cable preferable shielded. 2.4 – PT100 INPUT 11 12 RTD Fig. 4 PT100 input wiring Input circuit: current injection (135 μA). Line resistance: not compensated. Calibration: according to EN 60751/A2. 2.5 – PTC / NTC / PT1000 INPUT 11 12 NTC/PTC/Pt1000 Fig. 5 PTC / NTC / PT1000 input wiring Input circuit: current injection (25μA). Line resistance: not compensated. R38
- 2. TECNOLOGIC spa – R series – INSTRUCTION MANUAL - Vr. 1.2- PAGE 2 2.6 – OUTPUTS Safety notes: 1) To avoid electrical shock, connect supply cables last. 2) For supply connections use No 16 AWG or larger wires rated for at last 75 °C. 3) Use copper conductors only. 4) SSR outputs are not isolated. A double or reinforced isolation must be assured by the external solid state relays. a) Out 1 Relay Out 1 contact rating: 8 A /250 V cos =1 3 A /250 V cos =0,4 Operation: 1 x 10 5 SSR Logic level 0: Vout < 0.5 V DC. Logic level 1: 12 V ± 20% @ 1 mA 10 V ± 20% @ 20 mA. NOTE: This output is not isolated. A double or reinforced isolation between instrument output and power supply must be assured by the external solid state relay. b) Out 2 Relay Out 2 contact rating: 8 A /250 V cos =1 3 A /250 V cos =0.4 Operation: 1 x 10 5 SSR Logic level 0: Vout < 0.5 V DC Logic level 1: 12 V ± 20% @ 1 mA 10 V ± 20% @ 20 mA NOTE: This output is not isolated. A double or reinforced isolation between instrument output and power supply must be assured by the external solid state relay. 2.7- POWER SUPPLY Power consumption: 5VA max Supply voltage: From 100 V to 240 V AC/DC (+ 10%) 24 V AC/DC (-15% to +10%) 12 V AC/DC (-15% to +10%) NOTES: 1) Before connecting the instrument to the electrical supply, make sure that line voltage is equal to the voltage shown on the identification label. 2) To avoid electrical shock, connect supply cables at the end of the wiring procedure. 3) For supply connections use No 16 AWG or larger wires rated for at last 75 °C. 4) Use copper conductors only. 5) Do not place signal cables parallelly or next to power cables or to noise sources. 6) The power supply input is NOT fuse protected. Please, provide a T type 1A, 250 V fuse externally. 7) For DC power supply the polarity is a do not care condition. 3. TECHNICAL CHARACTERISTICS 3.1- TECHNICAL SPECIFICATIONS Case: Plastic, self-extinguishing degree: V-0 according to UL 94 Front protection: IP 65 (when the optional panel gasketis mounted) for indoor locations according to EN 60070-1 Rear terminals protection: IP 20 according to EN 60070-1 Installation: Panel mounting Terminal block:11screw terminals (screw M3, for cables from 0.25 to 2.5 mm2 or from AWG 22 to AWG 14 ) Dimensions: 75 x 33 mm, depth 75,5 mm Cutout: 71 (-0 a + 0,5mm) x 29 (-0 a +0,5 mm) Weight: 180 g approx. Insulation voltage: 2300 V rms according to EN 61010-1. Display: one 3 digits red display h 12 mm Display updating time: 1 s. Sampling time: 1 s. Resolution: 20000 counts. Total Accuracy: + 0.5% E.S.V. + 1 digit @ 25°C of room temperature. Electromagnetic compatibility and safety requirements: Compliance: directive EMC 2004/108/CE (EN 61326), directive LV 2006/95/CE (EN 61010-1) Installation category: II Pollution category: 2 Temperature drift: It is part of the global accuracy. Operating temperature: from 0 to 50°C (from 32 to 122°F). Storage temperature: -30 to +70°C (-22 to 158°F) Humidity: from 20 % to 85% RH, non condensing. 1 2 3 C NC NO 1 2 3 +- 4 5 6 C NC NO 4 5 6 +- 7 8 Supply
- 3. TECNOLOGIC spa – R series – INSTRUCTION MANUAL - Vr. 1.2- PAGE 3 3.2 – HOW TO ORDER Model R38 - = Regulator R38S = Regulator with S-touch (*) keyboard Power supply F = 12 V DC not isolated L = 24 V AC/DC H = 100…240 V AC/DC Input F = TC J or K A = PT100 T = PTC, NTC or PT1000 Out 1 R = Relay SPDT 8A-AC1 O = VDC for SSR Out 2 - = Not available R = Relay SPDT 8A-AC1 O = VDC for SSR (*) Capacitive keyboard. 4. CONFIGURATION PROCEDURE 4.1 Introduction When the instrument is powered, it initially works according to the parameter values loaded in its memory. The instruments behavior and its performance are governed by the value of the memorized parameters. At the first start up the instrument will use a “default” parameter set (factory parameter set); this set is a generic one (e.g. a TC J input is programmed). We recommend that you modify the parameters to suit your application (e.g. set the right input type, Control strategy and define an alarm, etc.) To change these parameters you will need to enter the “Configuration procedure”. 4.2 - INSTRUMENT BEHAVIOUR AT POWER UP At power up the instrument can start in one of the following modes depending on its configuration: Auto mode - The display will show the measured value. - The instrument is performing the standard loop control. Stand by mode (St.bY) - The display will show alternately the measured value and the message <<St.bY>> or <<od>>. - The instrument does not perform any control (the control outputs are OFF). - The instrument is working as an indicator. We define all the above described conditions as “Standard Display”. 4.3 – FRONT PANEL DESCRIPTION Out2 R38 3 5 1 2 4 Out1 Tun AL 1 - Key P Pressed for 5 sec., it allows access to the parameters programming mode. In the programming mode, it is used for the change of the parameters and for the confirmation of the values. Still in the programming mode, it can be used together with the UP key to modify the level of access (operator level or configuration level) of the selected parameter. During the normal functioning (not in programming phase), pressed together with the UP key for 5 sec., it allows to lock and unlock the keyboard. During the normal functioning (not in programming phase), pressed together with the U key for 5 sec., it allows the reset or the aknowledgement of the alarms. 2 - Key In the programming mode, it is used for to decrease the values to be programmed and for the selection of the parameters. During the normal functioning (not in programming phase), quickly pressed, it allows to visualize and to modify the value of the set point. 3 - Key In the programming mode, it is used to increase the values to be programmed and for the selection of the parameters. Kept pressed for 3 sec in the programming mode it can be used to exit from it and come back to the normal functioning. Still in the programming mode, it can be used together with the P key, to modify the level of access (operator level or configuration level) of the selected parameter. Pressed together with the P key for 5 sec., it unlocks the keyboard, when previously locked. During the normal functioning (not in programming phase), quickly pressed, it allows to visualize the output power. 4 - Key U If programmed through par. "ub.F", pressed for 1 sec. in the normal functioning mode, it allows the switch on/off (Stand-by) or to perform one of the possible functions (to start a cycle of Autotuning, etc.). During the normal functioning (not in programming phase), pressed together with the P key for 5 sec., it allows the reset or the aknowledgement of the alarms. 5 - Led SET
- 4. TECNOLOGIC spa – R series – INSTRUCTION MANUAL - Vr. 1.2- PAGE 4 In the programming mode, it is used for indicating the level of programming of parameters. If Ub.F = Sb.o, when the instrument is in Stand-by mode, it remains the only lit led. In the normal functioning mode, it flashes when a key is pressed to indicates the pressure has happend on the key. 6 - Led Out1 It indicates the Out 1 condition ( compressor or temperature control device) activated (on), deactivated (off) or inhibited (flashing) . 7 - Led Out2 It indicates the Out 2 condition. 8 - Led Tun It indicates the Autotuning is in progress. 4.4 – HOW TO ENTER INTO THE CONFIGURATION PARAMETERS Press P key and keep it pressed. Condition 1: the instrument will show “Ln” (lock ON). The keyboard is locked. Maintaining the pressure on the P key, also press the UP key. The LED SET begins to flash. Keep the pressure on the two keys until the display shows “LF” (loack OFF). Now release the keys. The keyboard is now unlocked. NOTE: if no button is pressed for a time longer than the time programmed with the Lo parameter, the key lock will be automatically enabled. Condition 2: The instrument do not display any message. In this situation we can have 2 different cases: Case 1: The parameters protection (password) is not active. Press P key and keep it pressed for around 5 seconds. The display will show the code of the first configuration parameter. With the UP and DOWN keys, select the parameter to be edited. Case 2: The parameters protection (password) is active. Press P key and keep it pressed for more than 5 seconds. The display will show the code that identifies the first parameter that has been moved into the Operator level. Press UP key. The display will visualize “r.P”. Press P key again. The display will show “0”. With the UP and DOWN keys, program the password and confirm it pushing P key again. NOTE: the factory default password is equal to 0 (no password). 2.A) If the password is correct, the instrument will show the code that identifies the first configuration parameter. 2.B) If the password is not correct, the instrument will show “r.P” again. a) Once entered into the configuration parameters, select the parameter to be modified using the UP and DOWN keys. b) Press P key. The instrument will alternatively visualize the parameter’s code and its value. c) Modify the value of the parameter through the UP and DOWN keys. d) Press P key to memorize the new value. The display will return to visualize only the code of the selected parameter. e) Working on UP and DOWN keys, it is therefore possible to select another parameter and to modify it as described on points a, b, c, d. Note: the instrument will only show the parameters applicable to its hardware options in accordance with the specific instrument configuration (i.e.setting AL1t [Alarm 1 type] equal to <<nonE>> [not used], all parameters related with the alarm 1 will be skipped). To go out from the programming mode do not work on any key for around 30 seconds, or press UP key for around 5 sec. NORMALMODE PASSWORDREQUEST INS.CORRECT PASSWORD PARAMETERS (PROGRAMMODE) Increase Value Decrease Value 4.5 – PARAMETERS PROTECTION THROUGH A PASSWORD The instrument has a function that protects the parameters through a password, programmable by means of par. "PP." If you wish to have this protection, you have to set parameter "PP" to the number you'd like to be your password and then exit from parameters programming. When the protection is active, to be able to have access to the parameters, press P key and keep it pressed for around 5 seconds. Afterwards, the display will visualize "r.P" , push the P key again and the display will visualize "0." Now, through the UP and DOWN keys, set the number of your password and press P key. If the password is correct the display will visualize the code that identifies the first parameter and it will be possible to program it with the same procedure as described on the previous paragraph. The protection through password is disabled setting par. "PP" = oF. Notes: If the password is forgotten, use password -18. This will allow you access to the protected parameters and it will be possible therefore to verify and also modify the parameter "PP." 4.6 – CUSTOMIZED PARAMETERS PROGRAMMING (LEVELS OF PARAMETERS PROGRAMMING) The factory programming makes hides all the parameters behind the password with exception of the set point 1. If you wish to modify some parameters, maintaining the protection on the others, after setting the Password through parameter "PP", it is necessary to follow this procedure: a) Enter the programming through the Password. b) Select the parameter to be programmable without password. c.1) The led Set is flashing. - the parameter is protected by the password. c.2) The led Set is lit but not flashing - The parameter is not protected by the password. To modify the level of access of the parameter (in other words : to have the parameter protected or not by the password) press the P key and keeping it pressed press the up key. The led Set will change its state, pointing out the new level of accessibility of the parameter (switched on = not protected; flashing = protected by password). If the Password is enabled and some parameters have been set as "not protected", when entering the programming the instrument will first display all the parameters set as "not protected" and then, "r.P" parameter. By entering the password here all other parameters can be viewed. 4.7 - FACTORY RESET - DEFAULT PARAMETERS LOADING PROCEDURE It is possible to restore the instruments factory configuration.
- 5. TECNOLOGIC spa – R series – INSTRUCTION MANUAL - Vr. 1.2- PAGE 5 To load the factory default parameter settings, proceed as follows: - Try to enter in configuration mode (see 4.4 paragraph). If no password is programmed, set PP different from OFF. - Exit from configuration procedure. - Press the P button for more than 7 seconds. The display will show “rP”. - Release the P button and push it again. The display will show “0”. -By means of keys and set the value -48. Once the password has been confirmed by pressing the P key, the display shows for approx. 2 sec. "--", the instruments then runs through the start up procedure resetting all the parameters to the factory defaults. Note: the complete list of the default parameter is available in Appendix A. 4.9 - ON / STAND-BY FUNCTION When supplied, the instrument can assume 2 different conditions: - ON: means that the regulator activates the programmed control functions. - STAND-BY: means that the regulator doesn't activate any control function and the control outputs are forced to zero (the display results switched on or off according to the programming done on parameter ub.F). The instrument starts in the same way it was before the switch off. The condition of ON/STAND-BY can be selected through the U key when pressed for 1 sec. The passage from the STAND-BY to the ON condition, doesn't activate the Soft-start (or od) or the Autotuning and it hides the alarms. When the instrument is in STAND-BY mode with the display on the display alternates between the measure value and "St.b." When the instrument is in STAND-BY with display off, the display is completely switched off except for the decimal point of the LSD (led Set (5)). When the instrument is in STAND-BY mode (both the visualizations) it is however possible to enter the parameters programming. 4.10 – ALL CONFIGURATION PARAMETERS In the following pages we will describe all the parameters of the instrument. However, the instrument will only show the parameters applicable to its hardware options in accordance with the specific instrument configuration (i.e.setting o2F [Alarm] equal to <<no>> [not used], all parameters related with the alarm will be skipped). [1] SPL : Minimum Set Point value Range : from -99.9 to SPH engineering units. [2] SPH : Maximum Set Point value Range: from SPL to 999 engineering units. [3] SP1 : Set Point Range: from SPL to SPH engineering units. [4] SP2 : Second Set Point Note: When 2 control outputs are programmed with ON/OFF action, the instrument uses SP1 to command OUT1 and SP2 (see following parameter) to command OUT2. Available: when Out 2 has been programmed as control output. Range: from SPL to SPH engineering units. [5] AL : Alarm threshold Available : when Out 2 has been programmed as alarm. Range: from –99.9 to 999 engineering units. [6] tun = Autotuning Available: when o1.F = PID ALL = the Autotuning is performed at every start up and parameters Pb, Ti and Td are hidden. OnE = the Autotuning is performed only at the next start up. ub = manual start up through U key (parameters Pb, Ti and Td are visible). NOTE: when the Autotuning and the soft start, or the delay at the start up, have been programmed, the instrument performs first the soft start (with the parameters it has in memory) and then performs the Autotuning. [7] Pb = Proportional band Available: when o1F=PID and tun = ub Range: from 1 to 200 engineering units. [8] ti = Integral time Available: when o1F=PID and tun = ub Range: from 1 to 999 seconds and OFF (excluded). [9] td = Derivative time Available: when o1F=PID and tun = ub Range: from 0 (= OFF) to 200 seconds. [10] SEn = Input type Model Selection Sensor Measuring range F J .C TC J - 40 a 999 °C Ca.C TC K - 40 a 999 °C J .F TC J - 40 a 999 °F Ca.F TC K - 40 a 999 °F A Pt.C PT 100 -50.0 a 850 °C auto-ranging Pt.F PT 100 - 58.0 a 999 °F auto-ranging T nC.C NTC -50.0 a 110 °C auto-ranging PC.C PTC -50.0 a 150 °C auto-ranging nC.F NTC - 58.0 a 228 °F auto-ranging PC.F PTC -58.0 a 302 °F auto-ranging P1.C Pt 1000 -50.0 a 850 °C auto-ranging P1.F Pt 1000 - 58.0 a 999 °F auto-ranging [11] dP = Decimal point Range: YES = Autoranging display nO = display without decimal point [12] CA = Offset on the displayed value Range: from -300 to 300 engineering units. [13] Ft = Filter on the displayed value Range: from 0 (OFF) to 20 seconds. [14] o1F = Out 1 function Range: H.rE = PID control with heating action (reverse) C.rE = PID control with cooling action (direct) on.H = ON/OFF control with heating action (reverse) on.C = ON /OFF control with cooling action (direct) [15] tr1 = Out 1 cycle time Range: from 1 to 250 seconds. [16] o2F = Out 2 function Range: When o1F is equal to H.rE or C.rE no = Not used HAL = Absolute high alarm
- 6. TECNOLOGIC spa – R series – INSTRUCTION MANUAL - Vr. 1.2- PAGE 6 LAL = Absolute low alarm b.AL = Band alarm (simmetric to the set point) dHA = Deviation high alarm dLA = Deviation low alarm When o1F = on.H or on.C no = Not used HAL = Absolute high alarm LAL = Absolute low alarm b.AL = Band alarm (simmetric to the set point) dHA = Deviation high alarm dLA = Deviation low alarm SP.C = SP2 - ON /OFF control with cooling action SP.H = SP2 – ON /OFF control with heating action nr = ON/OFF Neutral Zone (o2F will make the opposite action to the one programmed on o1F, while the hysteresis [par. d1] becomes the neutral zone) NOTE: The Neutral Zone functioning is used to control the plants with an element that causes a positive increase (ex. Heating, Humidifying etc.) and an element that causes a negative increase (ex. Cooling, Dehumidifying etc.). The control works on the programmed outputs depending on the measure, on the active Set point "SP", and on the programmed hysteresis "d1". The regulator works in the following way: it switches off the outputs when the process value reaches the Set and activates the heating output when the process value is lower than [SP-d1], or it switches on the cooling output when the process value is higher than [SP+d1]. Accordingly, the element that causes positive increase must be connected to the output programmed as heating, while the element of negative increase must be connected to output programmed as cooling. 0N O2F =nr (cooling) O1F = on. H (heating) SP PV off 0N off off off 0N time D1 D1 Table of the possible combinations O1F O2F Displayed parameters H.rE H.AL, L.AL, b.AL, dHA, dLA SP1, AL C.rE H.AL, L.AL, b.AL, dHA, dLA SP1, AL On.H H.AL, L.AL, b.AL, dHA, dLA SP1, AL SP.C, SP.H SP1, SP2 Nr Sp1 only On.C H.AL, L.AL, b.AL, dHA, dLA SP1, AL SP.C, SP.H SP1, SP2 Nr SP1 only [17] d1 = Out 1 hysteresis or neutral zone Available: when Out 1 is equal to H.rE or C.rE. Range: from 1 to 999 engineering units. [18] d2 = Out 2 hysteresis Available: when o2F is different from nr. Range: from 1 to 999 engineering units. [19] AL.F =Alarm function Available: when o2F is programmed as alarm output Range: AL = Automatic reset Alarm AL.n = Latched Alarm AL.A = Aknowledgeable Alarm AL = Automatic reset Alarm Time Measure MEAS Alx Alarm hystetesis Status Time ON OFF Automatic Reset Automatic Reset AL.n = Latched Alarm Latched Time Measure MEAS Alx Alarm hystetesis Status Time ON Manual Reset OFF Manual Reset AL.A = Acknowledgeable alarm Aknowledg. Time Measure Ambient Temp. Alx Alarm hystetesis Status Time ON OFF Automatic Reset ACK [20] AL.t = Inhibition time of the alarm at the start up or after a change of set point Range: from 0 = OFF (any hidding) to 9.59 HH.mms Notes: When the measure reaches the alarm threshold, the instrument disables the hidding of the alarm.
- 7. TECNOLOGIC spa – R series – INSTRUCTION MANUAL - Vr. 1.2- PAGE 7 [21] P.c.t = Compressor protection time The protection prevents the output cycling and therefore reduces relay wear by waiting for the time setting to elapse before allowing a subsequent switching of the output. In other words, it defines the minimum time that will pass between the switch off of a cooling output and its following reactivation. Available: if at least one output is programmed as cooling output. Range: from 0=OFF to 9.59 HH.mm Note: this parameter has effect to ALL the cooling outputs. [22] SSt = Soft start time Range: from 0=OFF to 9.59 HH.mm NOTE: When the control is ON/OFF type, the time of the soft start becomes an output time delay, the power is forced to 0 and the parameter SSP is hidden. [23] SSP = Power during Soft Start Available: when Sst is different from 0. Range: from 0 to 100 %. NOTE: if programmed = 0, also the alarms and/or the second control output remains = 0 and the instrument visualizes “od” for the programmed time. [24] Ub.F = U key function Range: no = No function Tun = It activates the manual tuning Sb = Stand-by mode Sb.o = Stand-By mode with display off [25] PP = Parameters protection Password Range: from 1 to 999. [26] Lo = Time for the Key lock automatic enable This parameter allows to set the time that the instrument will wait before to automatically enable the key lock. The time count will re- start after a key pressure. Range: from OFF (lock disabled) to 30 minutes. 5 – ERROR MESSAGES 5.1 OUT OF RANGE SIGNALS The display shows the OVER-RANGE and UNDERRANGE conditions with the following indications: Over-range Under-range The sensor break will be signaled as an out of range. NOTE: When an over-range or an under-range is detected, the alarms operate as in presence of the maximum or the minimum measurable value respectively. To check the out of span Error condition, proceed as follows: 1) Check the input signal source and the connecting line. 2) Make sure that the input signal is in accordance with the instrument configuration. Otherwise, modify the input configuration (see section 4). 3) If no error is detected, send the instrument to your supplier to be checked. 5.2 LIST OF POSSIBLE ERRORS AtE - Auto-tune not finished within 12 hours. EPr- Possible problem of the instrument memory. The messages disappears automatically. When the error continues, send the instrument to your supplier.