1. Landscape Photography Tips
Posted: 02 Apr 2012 05:13 PM PDT
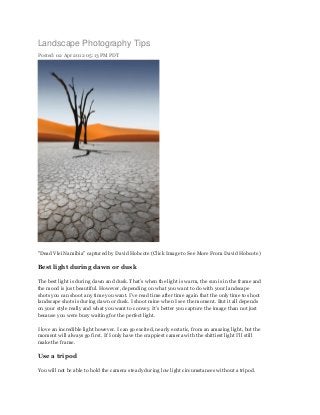
"Dead Vlei Namibia" captured by David Hobcote (Click Image to See More From David Hobcote)
Best light during dawn or dusk
The best light is during dawn and dusk. That’s when the light is warm, the sun is in the frame and
the mood is just beautiful. However, depending on what you want to do with your landscape
shots you can shoot any time you want. I’ve read time after time again that the only time to shoot
landscape shots is during dawn or dusk. I shoot mine when I see the moment. But it all depends
on your style really and what you want to convey. It’s better you capture the image than not just
because you were busy waiting for the perfect light.
I love an incredible light however. I can go excited, nearly ecstatic, from an amazing light, but the
moment will always go first. If I only have the crappiest camera with the shittiest light I’ll still
make the frame.
Use a tripod
You will not be able to hold the camera steady during low light circumstances without a tripod.
2. Invest in a stable one and use the timer shutter, or invest in a remote shutter control, to shoot the
image. This way it doesn’t get influenced by the motion of you pressing down on the shutter
button. I do have a remote shutter control but I still prefer the timer because it’s with me at all
times without using up space in my luggage. And with a Canon 5D Mark II I can set the timer to
merely two seconds which makes the it very convenient. Perfect for the shake to settle down and
it’s a short enough time to wait for the shutter to trigger. Ten seconds can be bothersome but two
is nothing. A stable tripod costs a lot though, but in many ways it will be worth it because just a
little wind can knock your tripod down and wreck anything it holds. This can cost you the image,
but it can also cost you the camera.
Divide the image for depth
Divide the image into foreground (for instance the ground or the beach), the middle ground (for
instance the water) and the background (for instance the sky). This creates a sense of depth and
will make a huge difference to your landscape photography.
Set the aperture value high
Around 22 should give you a nice sharp overall image. Many lenses are the sharpest around 8 but
that’s a whole other level of sharpness. Go with as high value as you can get and use a tripod.
Unless you are going for effects like freezing the flow of water. Since the shutter speed will be
quite slow while shooting landscapes you should set the ISO to around 50 or 100 which will cause
low amounts of noise in the picture.
"Waterfall at Sunset" captured by Ævar Guðmundsson (Click Image to See More From Ævar
Guðmundsson)
3. Focus in the middle
If you are looking for overall sharpness then always place the focus in the middle of the
landscape. If there’s a focal point you want to emphasize – place the focus straight onto that one.
Focal point
Is there any elements you can use in the picture as a focal point? For instance a road that swirls
into the image, three rocks in the water or maybe a tree? If you create a focal point in the
photograph it will be so much stronger than without one. Without it will simply just be flat.
Always look for light, lines, symmetry and elements that stand out. An easy way to do this is to
look at the landscape – what exactly captures your attention? Make that your focal point.
Get an interesting sky
A clear blue sky is awesome, but it’s also just a blue boring sky. If you want drama with your
picture, wait for the charismatic clouds to sweep in. As always it depends on what you are going
for but a busy sky always creates more of an emotional effect.
Never place the horizon in the middle
Okay, this is a little bit of a lie because sometimes placing the horizon in the absolute middle of
the photograph can be amazing, but most of the time look at what’s interesting – the ground or
the sky? Then compose the image so that the most interesting part uses up more space. If you
have a clear blue sky it will just fill you image with blue. If so composite the image so that the
most of it is filled with an interesting ground. If you have an incredible texture of clouds before
you and the ground is just boring rocks – shoot the sky. In short, choose what’s more interesting
– the ground or the sky – and let the most interesting element be the dominant part of the image.
4. Photo capture by Anthony Smith (Click Image to See More From Anthony Smith)
Think detail
Make sure the highlights don’t go to bright and cram in as much detail you can. This goes for
every photograph though – detail captivates but when it comes to landscape photography the
details are a massive part of the image. You can even use bracketing to create an HDR image with
incredible amounts of detail. HDR stands for High Dynamic Range and in short it’s a way to
blend several exposures into one with details in even the brightest and the darkest areas.
About the Author:
Examples of photography related to this article and a portfolio by the author is available
here: www.mikaelcedergren.com.