Data driven strategies and considerations for scalable purification of Plasmi...
Barcode Data Standards
1. Protocols for High-Volume
DNA Barcode Analysis
Draft Submission to:
DNA Working Group
Consortium for the Barcode of Life
Prepared By:
Natalia V. Ivanova (nivanova@uoguelph.ca), Jeremy R. deWaard (jdewaard@uoguelph.ca);
Mehrdad Hajibabaei (mhajibab@uoguelph.ca) and Paul D.N. Hebert (phebert@uoguelph.ca)
Biodiversity Institute of Ontario, University of Guelph, Guelph, Ontario, Canada, N1G 2W1
2. Introduction
This draft report describes protocols and equipment that will enable single laboratories to achieve
production rates of 50K sequences per year. However, most suggestions are also relevant to labs
with lower production goals as they seek simply to minimize the costs of analysis and speed its
execution.
Most steps of the analysis (specimen to PCR product) can be carried out in facilities with modest
infrastructure ($20K). However, the establishment of a sequencing facility capable of analyzing
50-100K samples per year is much more expensive (circa $1M). As a result, it may often be
appropriate to funnel PCR products from ‘satellite’ laboratories to a central sequencing facility.
Although commercial kits are available for varied stages of the analytical chain (e.g. DNA
extraction, PCR amplification, product detection), ‘home-made’ reagents can lower costs
dramatically. We describe both approaches in many cases.
1. Specimen Collection/Preservation
Whenever possible, specimens should be killed in a DNA-friendly fashion (freezing, cyanide,
immersion in ethanol), avoiding even brief exposure to killing/preservation agents such as ethyl
acetate or formalin that damage DNA. DNA in dried specimens ordinarily remains in good
condition for at least a year, but degradation becomes increasingly problematic as time passes.
DNA in frozen specimens (especially those held in cryogenic conditions) remains stable
indefinitely, but DNA in ethanol-preserved material often degrades due to acidification. As a
result, barcode analysis should follow collection as quickly as possible.
2. Tissue Sampling/Handling
All specimen samples should be handled on a clean working surface and all instruments should
be acid or flame sterilized between each sample. A Bunsen burner flame is convenient for
sterilization; small propane tanks are ideal for settings where ‘gas’ is not on-line.
In any laboratory that seeks high production rates, it is critical to carry out all stages of barcode
analysis in 96-well plates. Care must be taken when loading these plates with samples to avoid
cross-contamination between wells. This risk can be reduced by covering each plate with strip
caps and opening just one row at a time. Soaking dry insect legs in ethanol for a few minutes
before extraction is also helpful as it prevents specimen ‘flying’ due to static electricity.
3. Genomic DNA Isolation/Purification
3.1. FAST DNA EXTRACTION- LOW COST
CHELEX 100 (DRYRELEASE)
Fresh or frozen specimens are ordinarily an easy target for barcode analysis, allowing the use of
rapid Chelex resin protocols (Walsh et al. 1991) for DNA isolation. Chelex extraction (Jaulnac et
al. 1998) can be combined with proteinase K treatment to create a simple, cheap and efficient 96-
well protocol for DNA extraction. This protocol has been used successfully with arthropods, fish,
birds (including feathers) and mammals (including skin and hairs). It requires only a small amount
3
of tissue (1-3 mm ), making even a single insect leg sufficient for several DNA extractions.
2
3. Some Chelex protocols involve grinding tissue in liquid nitrogen (Gregory & Rinderer 2004), an
approach that is not readily compatible with 96-well format extractions. By combining Chelex
extraction with proteinase K treatment, the need for tissue disruption is eliminated. Tissue
samples usually dissolve completely after overnight incubation, while chitinous parts remain
intact, but DNA is released. Therefore, the Chelex/Proteinase K combination can be used for
non-destructive DNA extraction from small invertebrates (e.g. collembolans, rotifers). In this
case, the entire specimen is placed in the solution and removed at the end of the procedure.
Chelex-based extraction is not suitable for samples with high levels of PCR inhibitors (e.g.
haemoglobin) or for samples where DNA is degraded. A second disadvantage of this method lies
in the fact that the extracted DNA is relatively impure and is, hence, often unstable for more than
a few weeks.
Two commercial kits provide very fast options for DNA extraction (Sigma-Aldrich Extract-N-Amp*
PCR* Kit, Genereleaser), but are more costly and are not currently available in a 96-well format.
3.2 SILICA OR SILICA MEMBRANE DNA EXTRACTION
Various silica and silica-membrane based protocols produce relatively pure DNA. These
approaches are also more effective in extracting DNA, a factor that makes them particularly
useful for studies on specimens with degraded DNA. These approaches rely on DNA binding to
silica in the presence of a high concentration of chaotropic salt (Boom et al. 1990; Hoss and
Paabo 1993). This class of methods provides an alternate non-destructive approach for extracting
DNA that involves soaking samples in guanidinum-thiocyanate (GuSCN) with subsequent
sorption of DNA to silica (Rohland et al. 2004).
We have tested four commercially available systems that employ silica-binding.
a) Sigma-Aldrich GenEluteTM Mammalian Genomic DNA Miniprep Kit
b) QIAGEN DNeasy tissue kit (DNeasy 96 tissue kit)
c) Promega Wizard® SV 96 Genomic DNA Purification System
d) Macherey-Nagel Nucleospin® 96 tissue
The GenElute kit is sensitive, but it is not available in a 96-well format and is relatively slow to
use. The other three kits are available in 96-well formats. A multi-channel pipettor is required to
effectively perform 96-well DNA extractions with any of these kits. For those that are considering
very high volume production, most of these kits can be automated on robotic liquid handling
stations.
3.3 MAGNETIC BEAD-BASED DNA EXTRACTION
Dynal Biotech's Dynabeads® DNA DIRECTTM and Dynal MPC® -auto 96 Magnet Station
This system might be effectively applied in cases where a robotic liquid handling device is
available.
4. Genomic DNA Quantitation
It is not usually necessary to quantify genomic DNA extracts because even a few copies of the
target gene are sufficient for PCR amplification. However, the quantity of extracted DNA can be
determined with a plate reader.
3
4. 5. PCR Amplification of Barcode Region
5.1 PRIMERS
Primer design is critical and minor adjustments can have large impacts on barcode recovery. The
first phase of any study on a new group should involve a serious effort to identify optimal primers.
Whenever we have done this, we have gained very high success in barcode recovery. For
example, the 2 primer sets that we routinely employ for lepidopterans recover the barcode region
from more than 99% of species and our 2 primer sets for fishes have about 97% success.
DEGENERATE PRIMERS, MODIFIED BASES (E.G. INOSINE)
Single bp mismatches at the 3’-end of a primer usually prevent PCR amplification (Simsek &
Adnan 2000). This problem can often be solved by the use of degenerate or inosine containing
primers (Batzer et al. 1991; Shultz & Regier 2000; Candrian at al. 1991; Christopherson et al.
1997). Sorenson et al. (1999) suggest that primers with appropriate degenerate sites are also
less likely to preferentially amplify nuclear pseudogenes because they accommodate usual
differences between nuclear and mtDNA sequences (e.g. 3rd positions changes in the mtDNA
copy).
Primers with 2-4 degenerate positions will often rescue barcodes from ‘recalcitrant’ specimens.
Early results with primers containing inosine show that they are also effective in amplifying
difficult samples.
5.2 REACTION MINIMIZATION, REACTION MIXES AND PCR ENHANCERS
Although Chelex-based DNA extracts sometimes resist amplification because of the presence of
inhibitors, this can usually be overcome by incorporating amplification facilitators such as bovine
serum albumin (BSA), betaine or DMSO (Al-Soud & Rådström 2000) in the PCR mix. Betaine
exerts its effect by stabilizing AT base pairs while destabilizing GC base pairings, resulting in a
net specific destabilization of GC-rich regions (Rees et al. 1993, Henke et al. 1997). Most
commercial ‘PCR-enhancing’ buffers contain betaine (Frackman et al. 1998). The addition of
amplification enhancers also improves the specificity of PCR and allows the amplification of GC-
rich templates.
To reduce costs we have lowered reaction volumes; we regularly employ 10 µl (versus standard
25-50 µl). In order to accurately dispense such small volumes, it is useful to make up a larger
volume master mix. This can be dispensed into 96-well plates and stored frozen till use, but
freezing is not possible without a cryoprotectant. Such pre-mixing of PCR reagents speeds an
otherwise time-consuming step and aids quality assurance.
Trehalose is widely used as a cryoprotectant (Franks 1990; Spiess et al. 2004). It also acts as a
potent PCR enhancer by both lowering the DNA melting temperature and stabilizing Taq
polymerase (Spiess et al. 2004). Because of these properties, trehalose is ideal to stabilize frozen
PCR mixes and to overcome the effect of inhibitors that may be present in Chelex extracts,
o
resulting in improved PCR success. Aliquoted ‘ready to use’ PCR mixes can be stored at -20 C
for 3 months and do not degrade even after several freeze-thaw cycles. Thus, we regularly fill
large numbers of 96-well PCR plates with 10 µl of standardized mix and hold them frozen until
use.
5.3 THERMAL CYCLERS
The latest generation of thermal cyclers (e.g. Eppendorf MasterCycler) have faster thermal
ramping that allows PCR amplifications to be completed more quickly (2 vs 3 hours). There are
also capillary cyclers that enable the completion of amplification in 20 minutes, but they are not
96-well compatible.
4
5. 5.4 ALTERNATE POLYMERASES
There is a growing diversity of polymerases or polymerase cocktails that have varied effects.
Some enable PCR to be executed much more quickly; others aid the amplification of damaged
templates or permit high fidelity replication.
a) Fast Taqs: e.g. Z Taq (Takara). This enzyme allows PCR completion in 20 minutes using a
standard cycler.
b) DNA Repair: e.g. Restorase and Restorase II (Sigma). By repairing DNA damage, these
mixes aid the recovery of barcodes from specimens with degraded DNA.
c) High-fidelity/specificity: e.g. DeepVent Taq (NEB), Diamond Taq (Bioline). These enzymes
are of limited utility in barcode analysis as PCR artifacts are generally unimportant because a
large population of molecules is available for amplification.
5.5 FIELD –FRIENDLY PCR
Dried PCR reagents will undoubtedly be a convenient solution for barcode acquisition in ‘field’
settings because they are stable at room temperature. The resultant PCR products can be air or
vacuum dried before transportation to a DNA sequencing facility.
Dried reagents e.g. Amersham PuReTaq Ready-To-Go™ PCR Beads
6. PCR Product Check/Quantitation
For projects that are examining compliant specimens, it is possible to proceed directly from the
barcode PCR to a sequencing reaction. However, it is often critical to screen PCR reactions for
product when working with older specimens or with a new taxonomic group. This has traditionally
been a laborious task involving gel casting and the loading of individual reaction products into the
gel. We have explored two options to reduce this time – microfluidic technology and pre-cast
agarose gels.
6.1 MICROFLUIDIC TECHNOLOGY
This approach involves microfluidic devices that are able to sip a small volume of the PCR
product from each well in a plate and determine its size and concentration. Both existing devices
have several drawbacks- they are expensive, have high operating costs, and are relatively slow.
CALIPER LS 90
This instrument provides sizing and quantification of PCR products. However, it requires
considerable operator attention as the 96-well plate has to be changed every hour. Moreover, this
system is not compatible with PCR additives (e.g. trehalose) because the microfluidic channels
clog.
AGILENT 5100 AUTOMATED LAB-ON-A-CHIP PLATFORM (ALP)
This instrument requires less operator attention, allowing the unattended analysis of up to 10
plates (96 or 384 well format) (Pike et al. 2004). Our preliminary results show that this system is
less sensitive to debris and PCR additives than the Caliper LS 90. However, its capital and
operating costs are very high, while its sensitivity is lower than agarose gel screening methods.
5
6. 6.2 PRE-CAST AGAROSE GELS
Several manufacturers make pre-cast agarose gels that are designed to analyze 96-well plates.
We have considerable experience with the E-gels by Invitrogen, but similar products from Bio-
Rad or Amersham Bisciences are worth investigating, especially if they have a lower cost.
E-GEL 96® SYSTEM
The E-gel 96 system is user-friendly and has a low capital cost ($0.5K). It involves the use of pre-
cast agarose gels that are run in a bufferless electrophoresis system. Results are obtained in 6-
15 minutes. The system is sensitive and compatible with 8-, 12- or 96-tip robotic liquid handling
systems. E-gel software provides a simple way to incorporate results into spreadsheets that track
specimen analysis. The cost per sample is about $0.30, which is lower than microfluidic systems,
but about 10X the cost of ‘home-made’ agarose gels.
7. PCR Product Normalization & Hit Picking
At present, we sequence all wells on a plate if at least 80 of the samples have PCR amplified.
When success is lower, we use spreadsheets with incorporated E-gel images to aid hit picking
and normalization of successful PCR reactions. This is a difficult and time consuming task; this is
one point in the analytical chain where a robotic system could substantially aid production.
8. PCR Product Cleanup
PCR products are often ‘cleaned-up’ to remove un-incorporated nucleotides and residual primers.
If this step is omitted, it leads to degradation in the sequencing results for the first 50 or so bp.
Such degradation is of little concern when the PCR product is slated for bi-direction sequencing.
However, when the PCR product is sequenced in just a single direction, there are varied kits to
support cleanup as well as traditional ethanol precipitation.
a) Milllipore MultiScreen® Filter Technology
b) QIAGEN QIAquick Robo96 PCR Clean-up Kit
c) Promega's Wizard® MagneSilTM PCR Clean-Up System
9. Sequencing Setup
9.1 DECREASING CONCENTRATION OF BIGDYE AND LOWER REACTION
VOLUMES
To reduce costs, we use 10 µl sequencing reactions containing just 0.25 µl of BigDye (1/16
concentration). Because BigDye is so expensive, lowering its usage is a critical step in minimizing
costs.
We dispense our sequencing reaction cocktail into either 96-well plates or into larger volume
tubes (to provide the opportunity to use different sequencing primers) and then freeze it for up to
3 months. Trehalose is added to ensure stability of the enzyme during freeze-thaw cycles.
We find that 10 pmoles of the sequencing primer is optimal for analyzing PCR products without
clean up. Primers can be reduced to 3 pmoles if the PCR product has been cleaned up.
6
7. 9.2 SEQUENCING CHEMISTRY
TM
We employ ABI BigDye v. 3.1. Cycle Sequencing Kit because it provides a robust
sequencing chemistry. It generally produces long reads (circa 750 bp), even on GC-rich
templates.
Amersham Biosciences DYEnamic™ ET Terminator Cycle Sequencing Kits are fully
compatible with ABI instruments (mobility files can be downloaded from the Amersham web site)
and appear to perform well. This chemistry option deserves more serious study as it is lower in
cost.
TM
The CounterTrace II system from Nucleics is also compatible with ABI sequencers and
TM
BigDye v1.1 and 3.1 chemistries. CounterTrace II typically leads to an increase in read length
(15-20% in high throughput laboratories) and allows greater dilution of Big Dye.
10. Sequencing Reaction Cleanup
SEPHADEX
There are many protocols available to cleanup sequencing reactions. Many high-volume
genomics facilities use either ethanol precipitation or magnetic bead protocols. At present, we use
a Sephadex column based approach which is available in a 96-well format. However, other
options like SPRI (Solid Phase Reversible Immobilisation)-based dye terminator removal
system e.g. AgenCourt Cleanseq or ethanol precipitation might be employed.
11. Sequence Analysis
Capillary sequencers have now largely displaced slab gel instruments, but ABI PRISM® 377 and
373 sequencers provide a low-cost sequencing solution for labs that seek to analyze no more
than 50 templates a day. However, for higher production goals and greater automation, a multi-
capillary instrument is critical. Applied Biosystems has long dominated the sequencer
marketplace and they produce several highly reliable instruments with varied production
capacities.
LOW-THROUGHPUT LABS
ABI PRISM® 3100 Avant Genetic Analyzer – 4 capillaries, syringe system of polymer delivery
(upgradeable to 3130 with automated system of polymer delivery).
MID-THROUGHPUT LABS
ABI PRISM® 3100 Genetic Analyzer – 16 capillaries, syringe system of polymer delivery
(upgradeable to 3130xl with automated system of polymer delivery).
HIGH-THROUGHPUT LABS
Applied Biosystems 3730 or 3730XL DNA Analyzer – 48-96 capillaries, automated polymer
delivery.
OTHER OPTIONS
Amersham Biosciences MegaBACE™ 500 and MegaBACE™ 1000. Both systems accept a
variable number of capillary arrays with up to 48 capillaries in the MegaBACE™ 500 and twice
that many in the MegaBACE™ 1000.
Amersham Biosciences MegaBACE 4000 – This system has 384 capillaries, the highest
capacity of any sequencer.
Beckman-Coulter CEQ 8000/8800 – This instrument has not proven effective for barcode
analysis.
7
8. 12. Sequence Editing
Whenever possible, barcode products should be sequenced bidirectionally if they are destined for
inclusion in the barcode reference library. Bidirectional sequencing aids the generation of full
length barcode sequences by avoiding problems in signal deterioration that often occur near the
end of a read. It has also allowed the creation of specialized software that generates a consensus
sequence from the 2 reads and determines a quality score (e.g. PHRED) for each position.
However, there remains a need for manual sequence editing to fully extract information from
sequence records.
Two widely used DNA analysis software packages are effective for the analysis of barcode
sequences.
TM
1) Sequencher (Gene Codes Corporation). Sequencher was first introduced in 1991 and
remains very popular. It is easy to learn and can be served over TCP/IP, AppleTalk, or IPX, a
feature that makes it popular in large research centers and universities.
2) SeqScape® (Applied Biosystems) is another powerful tool for sequence analysis. As indels
are rare in COI, sequences are easily assembled against a reference sequence. This program
includes internal base callers (including KB basecaller), automatic alignment and trimming
against a reference sequence. It also allows the easy import of sequences into a project, and can
create different layers for varied regions of interest. It requires a powerful computer for normal
operation.
DNA Star (Lasergene®) provides another option and it couples software for sequence analysis
with the capacity for primer design, DNA map drawing, etc. The latest release of this package is
Sequencher compatible.
13. Sequence Alignment
We employ the Barcode of Life database to organize sequence records and keep them in
alignment. This software also allows results from different projects to be merged into a ‘virtual
project’ enabling sequence comparisons and tree generation for specimens from different
projects.
As COI sequences rarely have indels or deletions, they can be easily aligned in any DNA
alignment or editing software. We usually align against a reference sequence at the editing stage.
When the generated sequence is shorter, all missing bases are replaced with ‘N’s to stabilize the
length of submitted sequences.
14. Acknowledgements
Support from the Gordon and Betty Moore Foundation, from NSERC and from the Canada
Foundation for Innovation aided the assembly of this report.
15. Appendix
An Appendix that provides detailed protocols, sources for key reagents, and more detailed
time/cost estimates for various analytical steps will be available for distribution at the joint meeting
th
of the DNA and Database Working Groups on February 9 .
8
9. 16. References
Al-Soud WA, Rådström P(2000) Effects of amplification facilitators on diagnostic PCR in the
presence of blood, feces, and meat. J. Clin. Microbiol. 38: 4463-4470
Batzer MA, Carlton JE, Deininger PL (1991) Enhanced evolutionary PCR using oligonucleotides
with inosine at the 3'-terminus. Nucleic Acids Res. 19(18):5081.
Boom R, Sol CJ, Salimans MM, Jansen CL, Wertheim-van Dillen PM, van der Noordaa J (1990)
Rapid and simple method for purification of nucleic acids. J. Clin. Microbiol. 28:495-503.
Candrian U, Furrer B, Hofelein C, Luthy J (1991) Use of inosine-containing oligonucleotide
primers for enzymatic amplification of different alleles of the gene coding for heat-stable toxin
type I of enterotoxigenic Escherichia coli. Appl Environ Microbiol. 57(4):955-961.
Christopherson C, Sninsky J, Kwok S (1997) The effects of internal primer-template mismatches
on RT-PCR: HIV-1 model studies. Nucleic Acids Res. 25:654-658.
Frankman S, Kobs G, Simpson D, Storts D (1998) Betaine and DMSO: enhancing agents for
PCR. Promega Notes 65:27.
Franks F (1990) Freeze drying: from empiricism to predictability. Cryoletters 11:93-110.
Gregory PG, Rinderer TE (2004) Non-destructive DNA sampling in honey bee queens, Apis
mellifera. Ent. Exp. App. 111:173-177.
Henke W, Herdel K, Jung K, Schnorr D, Loening SA (1997) Betaine improves the PCR
amplification of GC-rich DNA sequences. Nucleic Acids Res. 25:3957-8.
Hoss M, Paabo S (1993) DNA extraction from Pleistocene bones by a silica-based purification
method. Nucleic Acids Res. 21:3913-3914.
Jaulhac B, Reyrolle M, Sodahlon YK, Jarraud S, Kubina M, Monteil H, Piemont Y, Etienne J
(1998) Comparison of sample preparation methods for detection of Legionella pneumophila in
culture-positive bronchoalveolar lavage fluids by PCR. J. Clin. Microbiol. 36: 2120-2122.
Pike KM, Piona TM, Stewart C, Kim C, Munroe DJ, Salovsky R (2004) Integrating High-
Throughput, On-Chip Electrophoresis Analysis into PCR Diagnostics Projects. Application
Note. Agilent Technologies. November 12, 2004.
Rees WA, Yager TD, Korte J, von Hippel PH (1993) Betaine can eliminate the base pair
composition dependence of DNA melting. Biochemistry 32:137-144
Rohland N, Siedel H, Hofreiter M (2004) Nondestructive DNA extraction method for mitochondrial
DNA analyses of museum specimens. BioTechniques 36:814-821
Shultz JW, Regier JC (2000) Phylogenetic analysis of arthropods using two nuclear protein-
encoding genes supports a crustacean + hexapod clade. Proc. R. Soc. Lond. B. 267:1011-
1019.
Simsek M, Adnan H (2000) Effect of single mismatches at 3′–end of primers on polymerase chain
reaction. Medical Sciences 2, 11-14.
Sorenson MD, Ast JC, Dimcheff DE, Yuri T, Mindell DP (1999) Primers for a PCR-based
approach to mitochondrial genome sequencing in birds and other vertebrates. Mol.
Phylogenet. Evol. 12:105-114.
Spiess AN, Mueller N, Ivell R (2004) Trehalose is a potent PCR enhancer: Lowering of DNA
melting temperature and thermal stabilization of Taq polymerase by the disaccharide
trehalose. Clinical Chemistry 50:1256-1259
Walsh SP, Metzger D A, Higuchi R (1991) Chelex 100 as a medium for simple extraction of DNA
for PCR-based typing from forensic material. BioTechniques 10: 506-513.
9
10. TABLE 1: Costs in obtaining a bi-directional barcode sequence from fresh or archival specimens.
The cost estimate for archival specimens is based on PCR amplification and contig assembly
of two 350 bp amplicons.
Fresh/Frozen Archival
DNA Extraction $0.34 $2.00
PCR Amplification $0.24 $0.48
PCR Product Check $0.35 $0.70
Cycle Sequencing $1.04 $2.08
Sequencing Clean up $0.32 $0.64
Sequence $0.40 $0.80
Subtotal: $2.69 $6.70
Staff time $2.00 $5.00
Service contracts $0.50 $1.00
Total: $5.19 $12.70
Note: If barcode analysis is only being used for species identification, the PCR products can be sequenced
in a single direction, reducing the cost to approximately $3.60 for fresh samples and to $8.80 for archival specimens.
Bi-directional analysis is critical for sequences that will be used as 'barcode references'.
Robotic instruments will produce cost savings through reduced staff time, but will increase capital costs
and service contracts.
10
12. –
BARCODES OF LIFE
DNA BARCODING ANIMAL LIFE USING COI
DETAILED LABORATORY PROTOCOLS:
DNA EXTRACTION (RECENT) 1.1
DNA EXTRACTION (RECENT AND ARCHIVAL) 1.2
COI AMPLIFICATION 2.1-2.3
PCR PRODUCT CHECK 3.1-3.3
PCR PRODUCT CLEAN-UP 4.1
SEQUENCING REACTION 5.1
SEQUENCING REACTION CLEAN-UP 6.1
12
13. DNA EXTRACTION (RECENT) 1.1
GENERAL PRACTICES 7) thermocycler at 95ºC 20 min to denature
the Proteinase K enzyme.
Clean the bench top with alcohol before
and after setting up extractions. 8) Store extractions at –20ºC.
Always use clean, acid or flame sterilized 9) Before PCR set up, centrifuge the plate
forceps between specimens. at 1000 rpm for 5 minutes.
For acid sterilization directly before use, 10) Use 1-2 µl of DNA sample for PCR.
briefly soak forceps and pestles in 5N Make sure that Chelex granules do not
HCl for 30 sec. go into the PCR reaction.
Rinse forceps and pestles in two CHELEX REAGENTS (DRYRELEASE)
separate ddH2O washes to remove
excessive HCl. Extraction Buffer (100 ml)
Chelex-100 BIO-RAD 5-6 g
For flame sterilization soak forceps in 95-
100% ethanol and ignite on propane 1% Sodium Azide 10 ml
burner for 1-2 seconds. Repeat if 1 Tris-HCl pH 8.3 1 ml
necessary. ultrapure H2O to 100 mls
Store at +4ºC in 10 ml aliquots
Use small amounts of tissue from single
animals (eg. single legs for Lepidoptera, Note: Sodium Azide is toxic (see MSD!)
whole animals for daphniids).
Proteinase K (20 mg/ml)
Proteinase K 100 mg
FOR RECENT SPECIMENS
ultrapure H2O 5 ml
1) Use a simple Chelex/Proteinase K Store in 0.1-1 ml aliquots at –20ºC
extraction (DryRelease). Do not freeze-thaw more than 1 time.
o
Store unused aliquot for 1-3 days at +4 C.
2) Aliquot 100 µl of Working Solution in
each well of a 96-well plate.
Working Chelex Solution
3) Put a tiny amount of tissue (e.g. 1-2 mm Add 10 µl of Proteinase K to 100 µl of Chelex
3
of insect leg or 1-2 mm of ethanol solution. To set up a plate – add 1 ml of
preserved tissue) into each well of a 96- Proteinase K to 10 ml of Chelex solution.
well Eppendorf plate containing 100 µl of
premixed DryRelease. To prevent cross
contamination work with one row at a Different final extraction volume 40-110 µl
time. Close lids. Don’t shake to make could be used for different samples.
sure that the tissue fragment remains in
the solution. Aliquot Working Chelex Solution using
multichannel or regular pipette (use wide-
4) Incubate for 12-24 hours at 55ºC. bored tips), mix solution while aliquoting to
make sure that the resin is equally dispersed
5) FOR ANIMAL TISSUE only – tape over between wells (tubes).
the lids and shake on Vortex.
6) Centrifuge the plate at 1000 rpm for 5
minutes. Incubate samples in a
13
14. DNA EXTRACTION (RECENT AND 1.2
ARCHIVAL)
FOR RECENT AND ARCHIVAL SPECIMENS 8) Remove Cap Strips and transfer lysate
(about 600 µl) from the wells of the MN
Currently we use the Genomic DNA Round-well Block into the wells of the
NucleoSpin® 96 Tissue Kit (Machery- NucleoSpin® Tissue Binding Plate
Nagel) with modifications as follows: placed on top of an MN Square-well
Block. Seal plate with Self-adhering
1) Note: Use filter-plugged tips to avoid PE foil supplied with kit.
contamination of samples and 9) Centrifuge at 5600 - 6000 g for 10
reagents. Dilute Proteinase K with minutes to bind DNA to silica
Proteinase Buffer and Buffer B5 with membrane.
95% ethanol prior to first use, as 10) First wash step: Add 500 µl of Buffer
described in the instruction manual. BW to each well of the NucleoSpin®
Although elution Buffer BE is provided Tissue Binding Plate. Use a new Self-
with the kit for Step #15 (the final adhering PE foil to seal the plate and
elution of DNA from surface of centrifuge at 5600 - 6000 for 2
columns), we use ddH20 instead. minutes.
2) Add a tiny amount of tissue (e.g. 2-4 11) To accommodate the volume of
3 flowthrough, replace the current MN
mm of insect leg or 1-3 mm of ethanol
preserved tissue) to each well of a Square-well Block with a new, sterile
Round-well Block supplied with the kit. MN Square-well Block underneath the
3) Prepare a working solution of NucleoSpin® Tissue Binding Plate.
Proteinase K by combining 180 µl of 12) Second wash step: Add 700 µl of
Buffer T1 with 25 µl of Proteinase K for Buffer B5 to each well of the
each sample. Transfer 200 µl of the NucleoSpin® Tissue Binding Plate.
working solution into each well of the Use a new Self-adhering PE foil to
Round-well Block. seal the plate then centrifuge at 5600 -
4) Seal wells with Cap Strips provided 6000 for 4 minutes.
and shake vigorously for 10 - 15 13) Remove the Self-adhering PE foil and
seconds to mix. Centrifuge at 1500 g place the NucleoSpin® Tissue Binding
for 15 seconds to collect samples at Plate on an open rack with MN Tube
the bottom of the wells. Strips. Incubate at 56° for 30
C
5) Incubate at 56ºC (dry-bath) for a minutes to evaporate residual ethanol.
minimum of 6 hours or overnight to 14) Dispense 30 - 50 µl ddH20 directly
allow digestion. Tape down Cap onto the membrane in each well of the
Strips to prevent them from NucleoSpin® Tissue Binding Plate and
occasionally popping off. incubate at room temperature for 1
6) After digestion, centrifuge at 1500 g for minute.
15 seconds to remove any condensate 15) To elute highly pure DNA, centrifuge
from the Cap Strips. 5600 - 6000 g for 2 minutes and again
7) Premix ethanol and Buffer BQ1: For at 5600 - 6000 g for 2 minutes after
each sample, add 200 µl of 95% rotating NucleoSpin® Tissue Binding
ethanol and 200 µl of binding Buffer Plate and MN Tube Strips 180°.
BQ1 to adjust DNA binding conditions. Remove NucleoSpin® Tissue Binding
Shake vigorously for 10 - 15 seconds Plate and transfer eluted DNA to a 96
and centrifuge at 1500 g for 10 PCR plate and seal. Keep DNA at 4ºC
seconds to remove any sample form for temporary storage or at -20ºC for
Cap Strips. long-term storage.
16) Use 1-2 µl of the DNA sample for
PCR.
14
15. COI AMPLIFICATION 2.1
GENERAL PRACTICES PCR REACTION MIX
The basic recipe for a Polymerase Chain Volumes for One Reaction
Reaction (PCR) is given in the table at 25 µl 12.5 µl
the right. The amount of DNA extract
10% trehalose 12.5 6.25
used will depend on the concentration of
the sample. It is best to keep the volume H2O+DNA 8 4
of DNA template as low as possible to 10X PCR Buffer 2.5 1.25
avoid adding enzyme inhibitors that may 50 mM MgCl2 (2.5 mM) 1.25 0.625
be present, and to avoid illegitimate
10 mM dNTP 0.125 0.0625
amplification of excess DNA.
10 µM Primer 1 0.25 0.125
Addition of trehalose facilitates PCR 10 µM Primer 2 0.25 0.125
and makes possible freezing of Taq polymerase 0.125 0.0625
aliquoted master-mixes. Aliquots in
o
tubes can be stored at -20 C for 1-3
months (1-3 freeze-thaw cycles don’t MULTIPLE SAMPLES
affect performance).The content of a tube
should be mixed by pipetting before use. When doing multiple reactions with the same
Another option – aliquot mixes directly primer set, make a master mix that contains
into 96-well plates, cover plates with PCR everything except DNA template. It is OK to
o
film, store at -20 C for 1 month. round up volumes of dNTPs, primers and Taq
to the nearest 0.5 µl.
The use of plugged tips is recommended If you plan to fill several 96-well plates include
for all PCR reagents to avoid extra volume to allow for pipetting mistakes
contamination. Clean the bench top with and dead volume in the digital multichannel
alcohol before setting up reactions. pipettor (e.g. for making 10 plates with 12.5 µl
Always use a sterile tip when removing reactions each, include about 40 extra
Taq polymerase and the other reagents reactions)
from their tubes.
Keep DNA templates (i.e. other PCR Volumes for 96-well plate
products) away from the PCR reagents 25 µl(x100) 12.5 µl(x104)
while you are setting up the reaction
mixes. Add DNA after all of the reagents DNA (e.g. 2 µl) - -
have been returned to the freezer. 10% trehalose 1250 650
H2O 600 208
Always include a sample without template 10X PCR Buffer 250 130
as a negative control to check for
contamination of the reagents. Include a 50 mM MgCl2 125 65
positive control (a DNA sample that has 10 mM dNTP 12.5 6.5
amplified in the past) as well to test the 10 µM Primer 1 25 13
effectiveness of the PCR reagents. 10 µM Primer 2 25 13
The concentration of MgCl2 will depend Taq polymerase 12.5 6.5
on the primers. Use the lowest
concentration of MgCl2 possible to give Aliquot 1/8 of total mix volume in 8-tube PCR
the cleanest product. The minimum strip (if making more than one plate – to
concentration is 1.5 mM. disposable container) and dispense desired
volume (23 µl for 25 µl reactions or 10.5 µl for
Recipes for individual reagents are given 12.5 µl reactions) in 96-well plate and then
on the following page. add 2 µl of DNA extract.
15
16. COI AMPLIFICATION 2.2
PCR REAGENTS PRIMERS
Ultrapure H2O 100 µM Stock
Store ultrapure H2O frozen in 1 ml aliquots. Dissolve desiccated primer in: number of
Use a new, sterile filter-plugged tip to aliquot nmol x 10 µl ultrapure H2O
the water. Aliquot the entire bottle of water
when it is first opened. eg. dissolve 50 nmol primer in 500 µl H2O
10X PCR Buffer 10 µM Working Stock
2 M Tris-HCl pH 8.3 5 ml Dilute 100 µM primer stocks to 10 µM with
KCl 3.73 g ultrapure H2O and store frozen in 100 µl
aliquots
ultrapure H2O to 100 mls
store frozen in 1 ml aliquots e.g. Add 10 µl of 100 µM primer stock to 90
µl ddH2O
10 mM dNTP Mix
100 mM dGTP 10 µl TIPS FOR PRIMER DESIGN
100 mM dATP 10 µl
Primers should be between 20-30 nt in
100 mM dTTP 10 µl length
100 mM dCTP 10 µl
ultrapure H2O 60 µl Avoid complementarity within and
between primers
store frozen in 100 µl aliquots
The GC content should be approximately
1 M MgCl2 50%
anhydrous MgCl2 9.52
Avoid mono- or dinucleotide repetition
ultrapure H2O to 100 ml
within primers
use entire contents of a fresh bottle of MgCl2,
store frozen in 10-50 ml aliquots The primer should end on a G or a C
Primers should end on the second (or
50 mM MgCl2
first if necessary) position of a codon
1 M MgCl2 2 ml
ultrapure H2O 39 ml The melting temperatures of primer pairs
o
store frozen in 1 ml aliquots should be within 5 C of one another
To design COI primers for a particular
10% trehalose taxonomic group, try aligning as many
D-(+)-Trehalose dihydrate 5g COI genes from closely related taxa as
ultrapure H2O to 50 mls possible (try surfing GenBank) for the
desired species group. Design primers
store frozen in 1-2 ml aliquots
that are situated in regions that are
conserved across all taxa
16
17. COI AMPLIFICATION 2.3
PCR THERMOCYCLE PROGRAM Eppendorf PCR Program for COI
Step Action Time
A typical PCR program on the o
1 94 C 1 min
Eppendorf mastercycler epgradient o
thermocycler is shown at the right. 2 94 C 40 sec
o
3 45 C 40 sec
Step 1 is an initial 94ºC soak to 4
o
72 C 1 min
completely denature the original DNA
5 GOTO step 2 5 more times
template.
6 94ºC 40 sec
Step 2 is the denaturing step. 7 51ºC 40 sec
8 72ºC 1 min
Step 3 is the annealing step whose
9 GO TO step 6 35 more times
temperature will depend on the o
sequence of the primers. For COI, it is 10 72 C 5 min
o
ideal to begin annealing at a low 11 4C 0:0:0
temperature (45ºC) for a few initial
cycles to allow the primers to bind to
the template and then raise the
temperature (51ºC) to avoid excessive
non-specific binding of primers.
Step 4 is the extension step whose time
depends on the length of the product.
Generally, extension steps should be at
least 1 min/1000 bp.
Step 5 repeats steps 2, 3, and 4 five
more times.
Steps 6, 7, 8, and 9 denature, anneal at
51ºC, and extend for 36 cycles.
Step 10 is a soak at 72ºC that will allow
the Taq polymerase to complete any
unfinished products.
Step 11 is a 4ºC soak that holds the
samples until they are removed.
17
18. PCR PRODUCT CHECK 3.1
AGAROSE GEL ELECTROPHORESIS 7) Pipette the samples into the wells, being
careful not to puncture or tear their
CAUTION: The gel will contain the mutagen edges. Include the blue dye
Ethidium bromide. Gloves and a lab coat Bromophenol in at least one lane so that
should be worn when handling and loading the you can monitor the progress of the gel
gel. Take care not to contaminate countertops run. If necessary, include a size
and sinks when handling the gel. standard (for example, lambda DNA
digested with the Hind III enzyme) mixed
1) 1. Determine the total volume and with the blue dye Bromophenol in at
concentration of gel required. For COI least one lane.
(~700 bp), use a 1% gel.
8) Place the gel into the electrophoresis
Recommended gel composition for chamber and carefully submerse it in 1X
resolution of linear DNA TBE running buffer. Do not pour the
buffer directly onto the sample wells.
% Gel Optimum resolution in bp There should be a 2-4 mm layer of buffer
0.7 800-12000 over the gel.
1.0 500-10000
9) Connect the electrical leads to the
1.2 400-7000
electrophoresis chamber. Remember to
run to red. That is, connect the black
2) Add the appropriate amount of agarose lead to the end of the gel containing the
and 1X TBE buffer to a pyrex flask and sample wells. The DNA samples, which
swirl. are negatively charged, should migrate
towards the red (positive) lead.
Example: 100 ml of 1.0% agarose
1X TBE 100 ml 10) Turn on the power supply and adjust the
Agarose 1.0 gm voltage level as follows:
3) Heat the agarose mixture in the Gel Size Maximum voltage
microwave. Allow about 2 min for a 50-
100 ml gel and 3-4 min for larger gels. 50 ml 100
Swirl the mixture and check to make 100 ml 100
sure that ALL of the agarose has melted.
There should be no lumps or particles. > 200 ml 125
CAUTION: When you first remove the flask
11) Allow the bromophenol blue marker dye
from the microwave, steam may escape
in the standard lane to migrate within 2-4
explosively from the liquid, which may cause
cm from the end of the gel.
burns.
12) TURN OFF THE POWER SUPPLY and
4) Allow the agarose to cool for several
disconnect the leads.
minutes and add 1 drop (2 ul) of
Ethidium bromide (4 mg/ml) to it. Mix
13) The gel is now ready to be
well.
photographed. Wear goggles to protect
eyes from UV exposure.
5) Pour the agarose solution into a sealed
gel tray and insert a comb at one end of
the tray to form the sample wells.
6) After the gel has completely hardened,
carefully remove the comb.
18
19. PCR PRODUCT CHECK 3.2
SOLUTIONS FOR RUNNING AGAROSE GELS
1 2 3 4 5 6
10 X TBE
Tris Base 108 gm
Boric acid 55 gm
Na2EDTA 9.3 gm
H2O to 1 L
Adjust to pH 8.3
Ethidium bromide
4 mg/ml
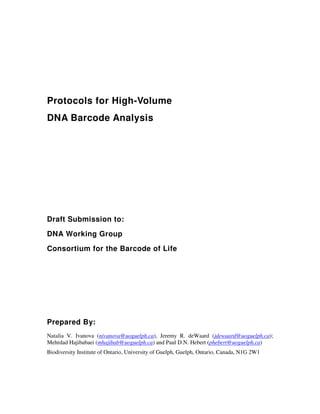
Agarose Gel Dye (Bromophenol Blue) Photo conditions: 1.0 exposure, 0 black, 90 white, 150
gamma.
0.5 M EDTA pH 8 200 µl
Bromophenol blue 2 mg Figure: A gel image of COI PCR products. All
H2O to 5 mls lanes contain 10 µl of a 50 µl PCR reaction.
All of these COI PCR products can be
Size Standard: Lambda DNA digested sequenced directly. For weak bands (lanes 1,
with HindIII (or buy pre-made commercial) 6), use 4-5 µl of COI PCR product in the
sequencing reactions. For medium bands
Lambda DNA (0.5 µl) 180 µl (lane 2), use 2-3 µl and for strong bands
10 X HindIII buffer 20 µl (lanes 3-5), use 1.5 µl.
HindIII 2-5 µl
o
Digest for 3 hours in a 37 C water bath.
Ethanol precipitate and resuspend in 250 µl For samples showing clean, discrete
H2O. Add 50 µl of digest to 1 ml PCR products (all lanes in above
Bromophenol blue dye. Final [DNA] is 18 figure), proceed directly to sequencing
µg/ml. Load 10-20 µl of size standard per (page 3.4).
well.
However, for samples with multiple bands
or excessive smearing, excise the
CLEANING OF COI PCR PRODUCT desired fragment from a gel under long
wave (nm) ultraviolet light and purify
Following PCR amplification, prepare a using a kit (see page 3.3).
1% TBE agarose gel.
Load 10 µl of PCR products into wells
and run the gel.
NOTE: DO NOT add the blue dye
bromophenol to PCR samples, as it will
inhibit direct sequencing. Load the dye in
a separate lane.
19
20. PCR PRODUCT CHECK 3.3
INVITROGEN E-GEL® 96 SYSTEM AND TYPICAL E-GEL IMAGES (NEGATIVE) OF COI
SOFTWARE AMPLIFICATION – DNA EXTRACTED WITH
CHELEX
We now employ pre-cast agarose gels from
Invitrogen. This system is bufferless, so The dark band indicate product; the clear
exposure to Ethidium Bromide is minimized. slots are the loading wells.
However, gloves should be worn when
handling and loading the gel. Regular PCR master mix without trehalose
(A12, B12 – negative controls; M – size
Loading and Running E-gel® 96 Gels: marker)
The recommended program for E-gel® 96 gel
is EG and the run time is 6-12 min.
Plug the Mother E-Base into an electrical
outlet. Press and release the pwg/prg
(power/program) button on the base to select
program EG.
Remove gel from the package and
remove plastic comb from the gel.
Slide gel into the two electrode
connections on the Mother or
TM
Daughter E-Base .
Load 15 µl of ddH20 or diluted Gel
Dye into wells with 8- or 12-
multichannel pipettor.
Load appropriate DNA markers in the
marker wells PCR master mix with 5% trehalose (A12,
Load 4-5 µl of sample. B12 – negative controls, M – size marker)
To begin electrophoresis, press and
release the pwd/prg button on the E-
TM
Base . The red light changes to
green.
At the end of run (signaled with a
flashing red light and rapid beeping),
press and release the pwr/prg button
to stop the beeping.
Remove gel cassette from the base
and capture a digital image of a gel on
UV transilluminator equipped with
digital camera.
Analyze the image and align or
arrange lanes in the image using the
TM
E-Editor 2.0 software available at
www.invitrogen.com/egels.
Incorporate E-gel image into lab
spreadsheet for estimation of
concentration and hit picking.
20
21. PCR PRODUCT CLEAN-UP 4.1
CLEANING OF COI PCR PRODUCT (CONT.) 14) Add 7 µl of ddH20 to pellets, resuspend
and incubate at 55ºC for an additional 10
minutes.
We use the QIAEX II Agarose Gel
Extraction Kit (Qiagen) to gel-purify PCR
samples with modifications as follows: 15) Spin samples at 13000 rpm for 1 minute.
Pipet 6 µl of supernatant into the final
1) Electrophorese the remaining PCR microfuge tubes.
product (~40µl) on a subsequent gel.
16) Electrophorese 3 µl of Qiaex cleaned
2) Excise the desired band and place into a products on a 1% TBE agarose gel to
1.5 ml microfuge tube. estimate its concentration.
3) Add 500 µl of Buffer QX1.
17) Use 1-5 µl (dependent on COI band
intensity) of purified PCR product in the
4) Vortex glassmilk suspension WELL (30 sequencing reaction (next section).
seconds) and add 7 µl to samples.
5) Incubate samples at 55ºC for 1 hour to
melt agarose.
6) Spin samples at 13000 rpm for 1 minute.
7) Pour off supernatant. Add 500 µl of
Buffer PE and resuspend the pellets by
vortexing.
8) Spin samples at 13000 rpm for 1 minute.
9) Pour off supernatant. Add 500 µl of
Buffer PE and resuspend the pellets
again by vortexing.
10) Spin samples at 13000 rpm for 1 minute.
11) Pour off supernatant. Invert tubes and
air-dry pellets for 15-20 minutes.
12) Add 8 µl of ddH20, resuspend pellets and
incubate at 55ºC for 10 minutes.
13) Spin samples at 13000 rpm for 1 minute.
Pipet 7 µl of supernatant into clean
microfuge tubes. Place aside.
21
22. SEQUENCING REACTION 5.1
DYE TERMINATOR SEQUENCING OF COI FOR
THE 3730 DNA ANALYZER
DNA must be very clean for good results.
Set up a sequencing reaction according
to the table below. Use 8 ng/100 bases
of DNA for Qiaex cleaned or 1-2 µl
(depending on intensity of the band) for
directly sequenced PCR products.
Reagent COI (~700 bp)
Dye terminator mix v3.1 0.25 µl
5 X Sequencing Buffer 1.875 µl
10% trehalose 5 µl
10 µM Primer 1 µl
H2O 0.875 µl
DNA 1[up to 2] µl
Final Volume 10 µl
Note: 5X Sequencing buffer is: 400 mM Tris-
HCl pH 9 + 10 mM MgCl2 or 5X ABI
sequencing buffer.
Run the sequencing reactions in a
thermocycler under the conditions shown
below. The annealing temperature can be
varied according to the primer specificity
but 55ºC works well for most COI
sequencing reactions.
PCR Program for COI Sequencing
Step Action Time
o
1 96 C 2 min
o
2 96 C 30 sec
o
3 55 C 15 sec
o
4 60 C 4 min
5 GOTO step 2 29 more times
o
6 4C 00:00:00
22
23. SEQUENCING REACTION CLEAN-UP 6.1
SEPHADEX CLEAN-UP
Measure Dry Sephadex with the Black
column loader into the Sephadex
Plate.
Hydrate the wells with 300 µl of
Autoclaved Distilled Water.
Let the Sephadex swell overnight in
the fridge OR for 3 to 4 hours at room
temperature before use.
Put Sephadex plate together with
Centrifuge Alignment frame and
"balance" plate – hold together with at
least 2 rubber bands.
Make sure the two sets weigh the
same (adjust weigh by using different
rubber bands.
Centrifuge at 750 rcf for 3 minutes –
this is to drain the water from the
wells.
Add the entire DNA from the
Sequencing Reaction to the center of
Sephadex columns.
Add 10 µl of Formamide to each well
of the autoclaved 3730 96 well plate.
To elute DNA attach 3730 96 well
plate to the bottom of the Sephadex
plate – secure them with tape and with
rubber bands.
Make sure the sets weigh the same
(adjust weight by using different
rubber bands).
Centrifuge at 750 rcf for 3 minutes.
Cover the top of plate with Septa.
Place 3730 96 well plate into the black
plate bases and attach the white plate
retainer.
Stack assembled plate in the 3730 –
don't forget your barcode and plate
record.
23