This document provides an introduction to Visual Basic for Applications (VBA) in Excel. It explains how to add the Developer toolbar to access VBA features in Excel. It then describes the Excel VBA development environment and how to write simple macros to automate tasks like formatting cells. Examples are provided of recording macros to demonstrate how VBA code is generated. The document emphasizes that recorded macros contain more code than is needed and that writing your own VBA code results in more efficient macros.
1. Excel VBA
VBA stands for Visual Basic for Applications.
It's a programming language that enables
you to control just about everything in Excel.
How to Add the Developer Toolbar to
Excel
Before you can make a start, you need to
add the Developer ribbon to the top of Excel.
In Excel 2010 and 2013 click the File menu
then select Options. From the dialogue box,
click on Customize Ribbon on the left side.
From the right hand side you'll then see an
area called "Customize the Ribbon". Under
"Main Tabs" check the box for Developer:
When you have the developer toolbar, you'll
see the following tab in the Ribbon (this is
from Excel 2013, so you may not have all
the items below):
In order to run macros without any annoying
security warnings, click on Macro Security,
on the Code panel. Select the option
for Enable all macros. Then make sure that
"Trust access to the VBA object model" is
checked:
NOTE: If you're worried about macro
security then you can always bring this box
up again and disable the macros before you
exit Excel.
The Excel Visual Basic for Applications
Development Environment
There are a few ways to open up the VBA
Editor in Excel. From the Developer tab, on
the Code panel, you can click the Visual
Basic button. On the Controls panel of the
Developer tab, you can click View Code. A
keyboard shortcut is to hold down the left
ALT key on your keyboard. Keep it held
down and press the F11 key.
Whichever method you choose you should
see a screen like this one:
It's a little daunting at first glance. But the
more your work with the editor the less
daunting it will become.
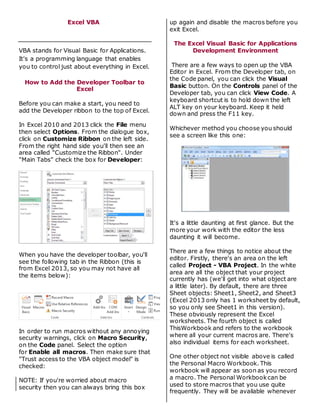
There are a few things to notice about the
editor. Firstly, there's an area on the left
called Project - VBA Project. In the white
area are all the object that your project
currently has (we'll get into what object are
a little later). By default, there are three
Sheet objects: Sheet1, Sheet2, and Sheet3
(Excel 2013 only has 1 worksheet by default,
so you only see Sheet1 in this version).
These obviously represent the Excel
worksheets. The fourth object is called
ThisWorkbook and refers to the workbook
where all your current macros are. There's
also individual items for each worksheet.
One other object not visible above is called
the Personal Macro Workbook. This
workbook will appear as soon as you record
a macro. The Personal Workbookcan be
used to store macros that you use quite
frequently. They will be available whenever
2. you close down Excel and open up a new workbook. The other sheet objects are specific
to a particular workbook.
The big grey area is where you'll write your
code. The reason it's grey above is because
no coding window has been opened yet. To
open up a coding screen double click an
object on your left. Double click the Sheet1
object and you'll see this:
All the macros you'll write need to be typed
here, on this white screen. Because we
double-clicked Sheet1 the code written here
will only affect the worksheet called Sheet1.
Likewise, if you add code to Sheet2 it will be
run in the worksheet called Sheet2.
To give you a quick idea of what VBA code
looks like, add the following in the white
area for Sheet1:
Sub HelloWorld()
MsgBox "Hello VBA
World!"
End Sub
Your coding window will then look like this:
The Sub at the start of our code is short for
Subroutine. A Subroutine is just a chunk of
code that does a particular job. It has a
corresponding End Sub to show where the
code chunk ends. (What you should have
noticed, though, is that as soon as you typed
the first line and hit the Enter key VBA adds
the End Sub for itself.)
A Sub needs a name followed by a pair of
round brackets. There is a space between
Sub and the name. In between Sub and End
Sub is where you add the code for your
macro. You can have practically anything
you like as a name for your Subroutines. But
try to keep them related to what the code
will be doing. If we'd give our Sub the name
Colin, for example, it would be a bit odd, to
say the least. The Name HelloWorld
describes what the code will do, however.
Subroutines can't contain spaces, though.
But you can type an underscore. So this is
OK:
Sub Hello_World()
But this is not:
Sub Hello World()
Take note of the following when coming up
with a name for your Subroutines:
They can't start with a number, only
alphabetical characters (you can have
numbers elsewhere in your names,
though)
3. You can't have full stops/periods in
them
You can't use any of the following
characters anywhere in your names:
#, $, %, &, !
Once you've added the code, it's time to run
it. To run your code, have a look at the
toolbar at the top of the editor. Locate and
click the green triangle:
Another way to run your code is to click
the Run menu. From the Run menu,
select Run Sub/User Form.
A shortcut to run your code is to press the
F5 key on your keyboard.
What you should see when the code is run is
this:
:
The MsgBox stands for Message Box. In
between double quotes, we type what we
wanted the message box to display.
Watch as Excel records a Macro
You can watch as Excel records a macro.
That way you'll get a feel for how things
work. However, Excel tends to overdo it
when it adds code, so don't think this is the
type of code you'll have to write. Your own
code will be much shorter!
First, make sure you have Excel and the
coding window open side by side. Like this:
If you have Windows 7 or greater you can
easily have two programmes open side by
side by doing the following:
Click on Excel to activate it
Hold down the Windows key on your
keyboard (the Windows key is
between the left CTRL and left ALT
key)
Keep it held down and press the left
arrow key
Click on the coding window to activate
it
Hold down the Windows key on your
keyboard
Keep it held down and press the right
arrow key
Both Excel and the Editor should now
be side by side, as above
If the above doesn't work for you, then just
position the two windows as best you can.
But we can now record a macro and watch
as Excel does its thing.
We'll record a simple macro that right aligns
text in a cell. So enter the letters A to F in
the A column of Excel:
4. On the Developer tab, locate the Code panel
and click Record Macro:
The Record Macro dialogue box should
appear:
For the Macro Name, type TestMacro. Click
the dropdown box for Store macro in and
select Personal Macro Workbook:
Click OK.
To record the Macro, select the cells A1 to
A6. Click on the Home tab on the Excel
ribbon. Locate the Alignment panel and
click the right-align option:
Switch back to the Developer tab. On
the Coding panel, click Stop Recording:
Now have a look at the coding window. If
you haven't yet recorded a macro you should
see a new item appear in the object window,
just below your sheet objects:
The new object is called Personal.XLSB.
Click the plus symbol to expand the entry
5. and you'll see some yellow folders. Expand
these as well:
Double click Module1 and you'll see the
code for the Macro you've just recorded:
(Don't worry if your coding window doesn't
have the Option Explicit at the top. We'll
explain about this in the variables chapter,
later.)
Excel has created a Sub of its own. You don't
need to understand all the code at this early
stage. But you can probably pick out a few
things that make sense. The cells A1 to A6
appear on the first line (the green lines are
comments and will be ignored). This
happened when you selected them. With the
selection, Excel has added some formatting.
The one that makes sense is xlRight for the
horizontal alignment.
All those other lines highlight the fact that
Excel tends to add lots of code
unnecessarily. When you get some
experience writing VBA code you'll spot lots
of ways you can reduce the code Excel
writes. For example, the whole of the macro
above could have been replaced with just
one line. This
Range("A1:A6").HorizontalAlignment =
xlRight
We'll explore Ranges in the next section. But
this single line of code is more readable - it
reduces Excel's code to just the bare
minimum.
Now that you've recorded a macro, click
the File menu in the VB Editor. From the File
menu, select Save Personal.XLSB.
Let's try another macro. With this one, we'll
just select the text and make it bold. Keep
Excel and the Coding Editor open side by
side.
Return to Excel. Click on the Developer tab
again, and click Record Macro on
the Code panel. You should see the Record
Macro dialogue box appear. Change the
name from Macro2 to MakeBold.
Leave Store macro in on Personal Macro
Workbook. Click OK.
Highlight cells A1 to A6 again. Click on
the Home tab in the Ribbon. From
the Font panel, click the Bold icon.
Keep an eye on the coding window when you
do all this. You should see Excel
automatically adding the code for you Sub.
Something like this:
Range("A1:A6").Select
Selection.Font.Bold = True
Stop the recording by clicking on the
Developer tab, then the Code panel.
Exercise
Record a new macro to make the text in cells
A1 to A6 a different font, a different font
size, and a different colour.
When you complete the exercise above, you
should find that Excel adds quite a lot of
code for what seems like simple job.
6. However, you should bear in mind that most
of what Excel adds is not needed - your own
VBA code will be a lot shorter!
Before we move on, it's best to delete all
these macros. To do that, click on the
Developer tab. From the Code panel, click
on Macros:
You should see the following Macros dialogue
box appear:
If you get an error message about Excel not
being able to delete macros while the
Personal work book is hidden,
click Cancel on the dialogue box. From
Excel, click on the View ribbon. Locate
the Window panel and click Unhide:
From the Macro dialogue box, though, select
a macro on the left and the click
the Delete button. Do the same for all the
macros on the list. Save your Personal
workbox in the editor again (File > Save).