The Ring programming language version 1.9 book - Part 71 of 210
•
0 j'aime•14 vues

The Ring programming language version 1.9 book - Part 71 of 210

Recommandé
Recommandé
Contenu connexe
Tendances
Tendances (20)
Similaire à The Ring programming language version 1.9 book - Part 71 of 210
Similaire à The Ring programming language version 1.9 book - Part 71 of 210 (20)
Plus de Mahmoud Samir Fayed
Plus de Mahmoud Samir Fayed (20)
Dernier
Dernier (20)
The Ring programming language version 1.9 book - Part 71 of 210
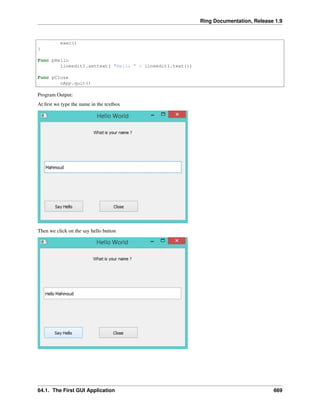
- 1. Ring Documentation, Release 1.9 exec() } Func pHello lineedit1.settext( "Hello " + lineedit1.text()) Func pClose oApp.quit() Program Output: At first we type the name in the textbox Then we click on the say hello button 64.1. The First GUI Application 669
- 2. Ring Documentation, Release 1.9 64.2 The Events Loop Qt uses Event-Driven and the events loop get the control when we call the exec() method from the qApp class. Once we call exec(), The events loop starts, and the Widgets starts responding to the different events (Mouse, Key- board, Timers, etc). You get the control back again when an event is fired and your callback function is called. Once the execution of your callback function is done, the control go back again to the events loop. Useful things to remember 1. We can do most of the work using normal events (Events provided directly by each widget). 2. We can add more events to any widget using the Events Filter. 3. Using Timers we can easily get the control back and check for more things to do. Also when our callback function is busy with doing time consuming operations, we can call the ProcessEvents() method from the qApp class to avoid stoping the GUI. oApp.processevents() We can avoid calling the exec() method, and create our main loop It’s not recommended to do that, It’s just an option. # Instead of calling the exec() method while true oApp.processevents() # Respond to GUI Events # More Thing to do, We have the control! # ..... end 64.3 Using Layout The next example is just an upgrade to the previous application to use the vertical layout. Load "guilib.ring" MyApp = New qApp { win1 = new qWidget() { setwindowtitle("Hello World") setGeometry(100,100,400,130) label1 = new qLabel(win1) { settext("What is your name ?") setGeometry(10,20,350,30) setalignment(Qt_AlignHCenter) } btn1 = new qpushbutton(win1) { setGeometry(10,200,100,30) settext("Say Hello") setclickevent("pHello()") } btn2 = new qpushbutton(win1) { setGeometry(150,200,100,30) 64.2. The Events Loop 670
- 3. Ring Documentation, Release 1.9 settext("Close") setclickevent("pClose()") } lineedit1 = new qlineedit(win1) { setGeometry(10,100,350,30) } layout1 = new qVBoxLayout() { addwidget(label1) addwidget(lineedit1) addwidget(btn1) addwidget(btn2) } win1.setlayout(layout1) show() } exec() } Func pHello lineedit1.settext( "Hello " + lineedit1.text()) Func pClose MyApp.quit() The application during the runtime! 64.4 Using the QTextEdit Class In this example we will use the QTextEdit Class Load "guilib.ring" New qApp { win1 = new qWidget() { setwindowtitle("QTextEdit Class") setGeometry(100,100,500,500) new qtextedit(win1) { setGeometry(10,10,480,480) 64.4. Using the QTextEdit Class 671
- 4. Ring Documentation, Release 1.9 } show() } exec() } During the runtime we can paste rich text in the qtextedit widget 64.5 Using the QListWidget Class In this example we will use the QListWidget Class Load "guilib.ring" New qApp { win1 = new qWidget() { 64.5. Using the QListWidget Class 672
- 5. Ring Documentation, Release 1.9 setGeometry(100,100,400,400) list1 = new qlistwidget(win1) { setGeometry(150,100,200,200) alist = ["one","two","three","four","five"] for x in alist additem(x) next setcurrentrow(3,2) win1.setwindowtitle("Items Count : " + count() ) } btn1 = new qpushbutton(win1) { setGeometry(10,200,100,30) settext("selected item") setclickevent("pWork()") } btn2 = new qpushbutton(win1) { setGeometry(10,240,100,30) settext("Delete item") setclickevent("pWork2()") } show() } exec() } func pWork btn1.settext(string(list1.currentrow())) func pWork2 list1 { takeitem(currentrow()) } The application during the runtime 64.5. Using the QListWidget Class 673
- 6. Ring Documentation, Release 1.9 Another Example: Load "guilib.ring" New qApp { win1 = new qWidget() { setGeometry(100,100,500,400) list1 = new qlistwidget(win1) { setGeometry(150,100,200,200) alist = ["one","two","three","four","five"] for x in alist additem(x) next setcurrentrow(3,2) win1.setwindowtitle("Items Count : " + count() ) } btn1 = new qpushbutton(win1) { setGeometry(10,200,100,30) settext("selected item") setclickevent("pWork()") } btn2 = new qpushbutton(win1) { setGeometry(10,240,100,30) settext("Delete item") 64.5. Using the QListWidget Class 674
- 7. Ring Documentation, Release 1.9 setclickevent("pWork2()") } show() } exec() } func pWork nbrOfItems = list1.count() curItemNbr = list1.currentrow() curValue = list1.item(list1.currentrow()).text() win1.setwindowtitle( "After Select - NbrOfItems: " + nbrOfItems + " CurItemNbr: " + curItemNbr + " CurValue: " + curValue ) btn1.settext( string(list1.currentrow() ) + " --- " + list1.item(list1.currentrow()).text() ) func pWork2 list1 { takeitem(currentrow()) nbrOfItems = count() curItemNbr = currentrow() curValue = item(currentrow()).text() win1.setwindowtitle("After Delete - NbrOfItems: " + nbrOfItems + " CurItemNbr: " + curItemNbr +" CurValue: " + curValue ) } 64.6 Using QTreeView and QFileSystemModel In this example we will learn how to use the QTreeView widget to represent the File System Load "guilib.ring" New qApp { win1 = New qWidget() { setwindowtitle("Using QTreeView and QFileSystemModel") setGeometry(100,100,500,400) New qtreeview(win1) { setGeometry(00,00,500,400) oDir = new QDir() ofile = new QFileSystemModel() ofile.setrootpath(oDir.currentpath()) setmodel(ofile) } 64.6. Using QTreeView and QFileSystemModel 675
- 8. Ring Documentation, Release 1.9 show() } exec() } The application during the runtime 64.7 Using QTreeWidget and QTreeWidgetItem In this example we will learn about using the QTreeWidget and QTreeWidgetItem classes Load "guilib.ring" New qApp { win1 = new qWidget() { setwindowtitle("TreeWidget") setGeometry(100,100,400,400) layout1 = new qvboxlayout() tree1 = new qtreewidget(win1) { setGeometry(00,00,400,400) 64.7. Using QTreeWidget and QTreeWidgetItem 676
- 9. Ring Documentation, Release 1.9 setcolumncount(1) myitem = new qtreewidgetitem() myitem.settext(0,"The First Step") addtoplevelitem(myitem) for x = 1 to 10 myitem2 = new qtreewidgetitem() myitem2.settext(0,"hello"+x) myitem.addchild(myitem2) for y = 1 to 10 myitem3 = new qtreewidgetitem() myitem3.settext(0,"hello"+x) myitem2.addchild(myitem3) next next setheaderlabel("Steps Tree") } layout1.addwidget(tree1) setlayout(layout1) show() } exec() } The application during the runtime 64.7. Using QTreeWidget and QTreeWidgetItem 677
- 10. Ring Documentation, Release 1.9 64.8 Using QComboBox Class In this example we will learn about using the QComboBox class Load "guilib.ring" New qApp { win1 = new qWidget() { setwindowtitle("Using QComboBox") setGeometry(100,100,400,400) New QComboBox(win1) { setGeometry(150,100,200,30) alist = ["one","two","three","four","five"] for x in aList additem(x,0) next } show() } exec() } The application during the runtime 64.8. Using QComboBox Class 678