SlideShare une entreprise Scribd logo
1  sur  5
Télécharger pour lire hors ligne
www.onyxstamps.com                    by Katy Bayard                            Twitter: @onyxstamps


  How to Make a Sunflower


    This work is licensed under a Creative Commons Attribution-Share Alike 3.0 United States License.
Sunflower Tutorial
   www.onyxstamps.com                                                               Twitter: @onyxstamps
                                            by Katy Bayard


                       What You Need
         Supplies                                              Stampin’ Up! Supplies I Used
         q Yellow patterned paper                              Crushed Curry Patterns DSP
         q Brown patterned paper                               Soft Suede Patterns DSP
         q Green patterned paper                               Old Olive Patterns DSP
         q Adhesive                                            Tombow Multi, Sticky Pages
         q Sticky Paper                                        Sticky Pages
         q Light Brown Ink                                     Creamy Caramel Classic Ink
         q Dark Brown Ink                                      Chocolate Chip Classic Ink
         q Dark Green Ink                                      Always Artichoke Classic Ink


         Tools
         q Paper cutter                  q Scissors                         q Sponges


                                        Note on Assembly
Because of the large number of petals that are needed for this project, assembly goes
faster if you make all the petals first, then adhere them to the flower base. This tutorial
is set up in this way.

However, adhering the petals to the base as you make them works as well. I made my
first flower this way and it worked great. So just choose the method that fits your
crafting style!


        This work is licensed under a Creative Commons Attribution-Share Alike 3.0 United States License.
Sunflower Tutorial
  www.onyxstamps.com                                                                Twitter: @onyxstamps
                                            by Katy Bayard


                               Prepare Petals
Cut paper into strips as follows:
  Yellow Patterned Paper:                 Brown Patterned Paper                    Green Patterned Paper
  · 3” x 3/4” - 46 pieces                 · 2 1/2” x 1/2” - 54 pieces              · 2 1/2” x 1/2” - 9 pieces
  · 2 1/2” x 5/8” - 46 pieces                                                      · 2” x 3/8” - 12 pieces
                                                                                   · 1 1/2” x 1/4” - 4 pieces

  Note: These quantities are for a flower built on a 7” base. You may need slightly more or less
  depending on how closely you space the petals.


Glue strips into petal shapes
  ·   Put a bit of adhesive on one end of the strip
      of paper.
  ·   Hold the paper so that the pattern that will
      be inside the petal is facing down.
  ·   Using both hands, bend the ends of the
      paper so that they meet with the bottom
      side facing up.
  ·   Press ends to secure the adhesive
                                                                Applying Glue                 Finished Petal


                   Prepare Flower Bases
Cut flower base
  ·   Print circle template and trace onto Sticky Sheet
  ·   Cut out circle
  ·   Remove red transparent layer and place on work surface
      sticky side up


Cut flower insert
                                                                                    Flower base and insert
  ·   Cut out a circle about 1 1/2” in diameter. You may need to
      trim this down later to fit inside the flower.
        This work is licensed under a Creative Commons Attribution-Share Alike 3.0 United States License.
Sunflower Tutorial
    www.onyxstamps.com                                                                  Twitter: @onyxstamps
                                              by Katy Bayard


                      Step 3: Adhere Petals
Place Yellow Petals
·   First row: Starting one of the largest yellow
    petals, press end onto sticky sheet so that the
    petal is half hanging off the sheet.
    Þ Repeat this around the edge of the circle so
       that the first row of petals is complete.

·   Second row: Using one of the yellow largest
    petals, press the end onto the sticky sheet so that             Placing 1st petal          1st row completed
    the petal overlaps with the first row and that tip
    of the petal is positioned between the petals of
    the first row.
    Þ Repeat until the second row of petals is
        complete

·   Third & Fourth rows: Repeat with the 2nd
    largest yellow petals, until you have 2 more rows
    of yellow petals.
                                                                    Placing 2nd row         Yellow petals completed


Place Brown Petals
· Place 3 rows of brown petals the same way you
  placed the yellow petals
· Note: things are going to start getting tight, with
  it getting harder to stagger the petals pre cicely.
  This is no problem...just place them in a position
  that looks good!
                                                                   Placing brown row        Brown petals completed


Place Green Petals
·   Place 1 row of the largest green petals
·   Using the small sticky circle, place two rows of
    the middle sized green petals.
·   Place green circle inside the flower. It may help
    to use a pen to help push the circle in.
·   Place a couple of the smallest petals in the
    middle to fill the flower.                                   Inserting green petals      Completed Sunflower!

          This work is licensed under a Creative Commons Attribution-Share Alike 3.0 United States License.
Sunflower Tutorial
    www.onyxstamps.com                                                                Twitter: @onyxstamps
                                              by Katy Bayard


          Step 4: Add More Color
·   At this point you can go ahead and use the
    flower, or you can apply some extra color to
    the petals to add some depth and texture.
·   Ink up a sponge with dark green ink.
    Starting in the middle, brush the sponge on
    the green petals to apply the ink.
·   Repeat on the brown petals using dark
    brown ink.
·   Repeat on the yellow petals using light
    brown ink.


Congratulations, you're done! You can now add it to your project. In the photo on the front page, I ad-
 hered it to a white frame that I decorated with a Stampin' Up vinyl frame and hand cut green leaves.


                                                                                                    Yikes! I used
                                                                                                 dark brown ink on
                                                                                                  the green petals.
                                                                                                 Dark green looks
                                                                                                    much better.


          This work is licensed under a Creative Commons Attribution-Share Alike 3.0 United States License.

Contenu connexe

Similaire à Sunflower tutorial

How to make easy diy giant paper flowers
How to make easy diy giant paper flowersHow to make easy diy giant paper flowers
How to make easy diy giant paper flowersPico Bags
 
Printing vegetable and block
Printing vegetable and blockPrinting vegetable and block
Printing vegetable and block13023901-016
 
Spring craft - thecraftideas.com
Spring craft - thecraftideas.comSpring craft - thecraftideas.com
Spring craft - thecraftideas.comtheCraftIdeas
 
How to make miss la sen craft foam bag
How to make miss la sen craft foam bagHow to make miss la sen craft foam bag
How to make miss la sen craft foam bagMiss La Sen house
 
Embroidery design from embroidery magazine
Embroidery design from embroidery magazineEmbroidery design from embroidery magazine
Embroidery design from embroidery magazineRivanEleraki
 
Making paper flowers
Making paper flowersMaking paper flowers
Making paper flowersjinjin0219
 
Summer fun finalrevisions
Summer fun finalrevisionsSummer fun finalrevisions
Summer fun finalrevisionsApril Decheine
 
Kids craft thecrafideas.com
Kids craft thecrafideas.comKids craft thecrafideas.com
Kids craft thecrafideas.comtheCraftIdeas
 
Paper Bag Makeover
Paper Bag MakeoverPaper Bag Makeover
Paper Bag MakeoverNancy Poh
 
MAKING CALADO EMBROIDERY
MAKING CALADO EMBROIDERYMAKING CALADO EMBROIDERY
MAKING CALADO EMBROIDERYAllanna Unias
 
Heart Shape Plastic Canvas
Heart Shape Plastic CanvasHeart Shape Plastic Canvas
Heart Shape Plastic CanvasMaylene2012
 
Tv #4 how to create a collage landscape
Tv #4 how to create a collage landscapeTv #4 how to create a collage landscape
Tv #4 how to create a collage landscapeLori Krein Studios
 
How to make a miss la sen holiday pop up card
How to make a miss la sen holiday pop up cardHow to make a miss la sen holiday pop up card
How to make a miss la sen holiday pop up cardMiss La Sen house
 
Presentation4
Presentation4Presentation4
Presentation4batch5cb
 

Similaire à Sunflower tutorial (20)

Remshel granados power point
Remshel granados power pointRemshel granados power point
Remshel granados power point
 
Quilling_Patterns_Part1
Quilling_Patterns_Part1Quilling_Patterns_Part1
Quilling_Patterns_Part1
 
How to make easy diy giant paper flowers
How to make easy diy giant paper flowersHow to make easy diy giant paper flowers
How to make easy diy giant paper flowers
 
Printing vegetable and block
Printing vegetable and blockPrinting vegetable and block
Printing vegetable and block
 
Spring craft - thecraftideas.com
Spring craft - thecraftideas.comSpring craft - thecraftideas.com
Spring craft - thecraftideas.com
 
How to make miss la sen craft foam bag
How to make miss la sen craft foam bagHow to make miss la sen craft foam bag
How to make miss la sen craft foam bag
 
Bucket Flower Pot Craft
Bucket Flower Pot CraftBucket Flower Pot Craft
Bucket Flower Pot Craft
 
Embroidery design from embroidery magazine
Embroidery design from embroidery magazineEmbroidery design from embroidery magazine
Embroidery design from embroidery magazine
 
Manipulating fabric - The Art of Manipulating Fabric
Manipulating fabric - The Art of Manipulating FabricManipulating fabric - The Art of Manipulating Fabric
Manipulating fabric - The Art of Manipulating Fabric
 
Making paper flowers
Making paper flowersMaking paper flowers
Making paper flowers
 
Dandelions with bleeding tissue paper
Dandelions with bleeding tissue paperDandelions with bleeding tissue paper
Dandelions with bleeding tissue paper
 
Summer fun finalrevisions
Summer fun finalrevisionsSummer fun finalrevisions
Summer fun finalrevisions
 
Kids craft thecrafideas.com
Kids craft thecrafideas.comKids craft thecrafideas.com
Kids craft thecrafideas.com
 
Paper Bag Makeover
Paper Bag MakeoverPaper Bag Makeover
Paper Bag Makeover
 
MAKING CALADO EMBROIDERY
MAKING CALADO EMBROIDERYMAKING CALADO EMBROIDERY
MAKING CALADO EMBROIDERY
 
Heart Shape Plastic Canvas
Heart Shape Plastic CanvasHeart Shape Plastic Canvas
Heart Shape Plastic Canvas
 
Tv #4 how to create a collage landscape
Tv #4 how to create a collage landscapeTv #4 how to create a collage landscape
Tv #4 how to create a collage landscape
 
061
061061
061
 
How to make a miss la sen holiday pop up card
How to make a miss la sen holiday pop up cardHow to make a miss la sen holiday pop up card
How to make a miss la sen holiday pop up card
 
Presentation4
Presentation4Presentation4
Presentation4
 

Dernier

西伦敦大学毕业证学位证成绩单-怎么样做
西伦敦大学毕业证学位证成绩单-怎么样做西伦敦大学毕业证学位证成绩单-怎么样做
西伦敦大学毕业证学位证成绩单-怎么样做j5bzwet6
 
E J Waggoner against Kellogg's Pantheism 8.pptx
E J Waggoner against Kellogg's Pantheism 8.pptxE J Waggoner against Kellogg's Pantheism 8.pptx
E J Waggoner against Kellogg's Pantheism 8.pptxJackieSparrow3
 
Authentic No 1 Amil Baba In Pakistan Amil Baba In Faisalabad Amil Baba In Kar...
Authentic No 1 Amil Baba In Pakistan Amil Baba In Faisalabad Amil Baba In Kar...Authentic No 1 Amil Baba In Pakistan Amil Baba In Faisalabad Amil Baba In Kar...
Authentic No 1 Amil Baba In Pakistan Amil Baba In Faisalabad Amil Baba In Kar...Authentic No 1 Amil Baba In Pakistan
 
(No.1)↠Young Call Girls in Sikanderpur (Gurgaon) ꧁❤ 9711911712 ❤꧂ Escorts
(No.1)↠Young Call Girls in Sikanderpur (Gurgaon) ꧁❤ 9711911712 ❤꧂ Escorts(No.1)↠Young Call Girls in Sikanderpur (Gurgaon) ꧁❤ 9711911712 ❤꧂ Escorts
(No.1)↠Young Call Girls in Sikanderpur (Gurgaon) ꧁❤ 9711911712 ❤꧂ EscortsDelhi Escorts Service
 
(南达科他州立大学毕业证学位证成绩单-永久存档)
(南达科他州立大学毕业证学位证成绩单-永久存档)(南达科他州立大学毕业证学位证成绩单-永久存档)
(南达科他州立大学毕业证学位证成绩单-永久存档)oannq
 
Inspiring Through Words Power of Inspiration.pptx
Inspiring Through Words Power of Inspiration.pptxInspiring Through Words Power of Inspiration.pptx
Inspiring Through Words Power of Inspiration.pptxShubham Rawat
 
Call Girls In Karkardooma 83770 87607 Just-Dial Escorts Service 24X7 Avilable
Call Girls In Karkardooma 83770 87607 Just-Dial Escorts Service 24X7 AvilableCall Girls In Karkardooma 83770 87607 Just-Dial Escorts Service 24X7 Avilable
Call Girls In Karkardooma 83770 87607 Just-Dial Escorts Service 24X7 Avilabledollysharma2066
 
南新罕布什尔大学毕业证学位证成绩单-学历认证
南新罕布什尔大学毕业证学位证成绩单-学历认证南新罕布什尔大学毕业证学位证成绩单-学历认证
南新罕布什尔大学毕业证学位证成绩单-学历认证kbdhl05e
 

Dernier (9)

Model Call Girl in Lado Sarai Delhi reach out to us at 🔝9953056974🔝
Model Call Girl in Lado Sarai Delhi reach out to us at 🔝9953056974🔝Model Call Girl in Lado Sarai Delhi reach out to us at 🔝9953056974🔝
Model Call Girl in Lado Sarai Delhi reach out to us at 🔝9953056974🔝
 
西伦敦大学毕业证学位证成绩单-怎么样做
西伦敦大学毕业证学位证成绩单-怎么样做西伦敦大学毕业证学位证成绩单-怎么样做
西伦敦大学毕业证学位证成绩单-怎么样做
 
E J Waggoner against Kellogg's Pantheism 8.pptx
E J Waggoner against Kellogg's Pantheism 8.pptxE J Waggoner against Kellogg's Pantheism 8.pptx
E J Waggoner against Kellogg's Pantheism 8.pptx
 
Authentic No 1 Amil Baba In Pakistan Amil Baba In Faisalabad Amil Baba In Kar...
Authentic No 1 Amil Baba In Pakistan Amil Baba In Faisalabad Amil Baba In Kar...Authentic No 1 Amil Baba In Pakistan Amil Baba In Faisalabad Amil Baba In Kar...
Authentic No 1 Amil Baba In Pakistan Amil Baba In Faisalabad Amil Baba In Kar...
 
(No.1)↠Young Call Girls in Sikanderpur (Gurgaon) ꧁❤ 9711911712 ❤꧂ Escorts
(No.1)↠Young Call Girls in Sikanderpur (Gurgaon) ꧁❤ 9711911712 ❤꧂ Escorts(No.1)↠Young Call Girls in Sikanderpur (Gurgaon) ꧁❤ 9711911712 ❤꧂ Escorts
(No.1)↠Young Call Girls in Sikanderpur (Gurgaon) ꧁❤ 9711911712 ❤꧂ Escorts
 
(南达科他州立大学毕业证学位证成绩单-永久存档)
(南达科他州立大学毕业证学位证成绩单-永久存档)(南达科他州立大学毕业证学位证成绩单-永久存档)
(南达科他州立大学毕业证学位证成绩单-永久存档)
 
Inspiring Through Words Power of Inspiration.pptx
Inspiring Through Words Power of Inspiration.pptxInspiring Through Words Power of Inspiration.pptx
Inspiring Through Words Power of Inspiration.pptx
 
Call Girls In Karkardooma 83770 87607 Just-Dial Escorts Service 24X7 Avilable
Call Girls In Karkardooma 83770 87607 Just-Dial Escorts Service 24X7 AvilableCall Girls In Karkardooma 83770 87607 Just-Dial Escorts Service 24X7 Avilable
Call Girls In Karkardooma 83770 87607 Just-Dial Escorts Service 24X7 Avilable
 
南新罕布什尔大学毕业证学位证成绩单-学历认证
南新罕布什尔大学毕业证学位证成绩单-学历认证南新罕布什尔大学毕业证学位证成绩单-学历认证
南新罕布什尔大学毕业证学位证成绩单-学历认证
 

Sunflower tutorial

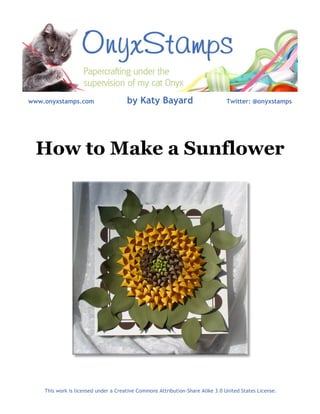
  • 1. www.onyxstamps.com by Katy Bayard Twitter: @onyxstamps How to Make a Sunflower This work is licensed under a Creative Commons Attribution-Share Alike 3.0 United States License.
  • 2. Sunflower Tutorial www.onyxstamps.com Twitter: @onyxstamps by Katy Bayard What You Need Supplies Stampin’ Up! Supplies I Used q Yellow patterned paper Crushed Curry Patterns DSP q Brown patterned paper Soft Suede Patterns DSP q Green patterned paper Old Olive Patterns DSP q Adhesive Tombow Multi, Sticky Pages q Sticky Paper Sticky Pages q Light Brown Ink Creamy Caramel Classic Ink q Dark Brown Ink Chocolate Chip Classic Ink q Dark Green Ink Always Artichoke Classic Ink Tools q Paper cutter q Scissors q Sponges Note on Assembly Because of the large number of petals that are needed for this project, assembly goes faster if you make all the petals first, then adhere them to the flower base. This tutorial is set up in this way. However, adhering the petals to the base as you make them works as well. I made my first flower this way and it worked great. So just choose the method that fits your crafting style! This work is licensed under a Creative Commons Attribution-Share Alike 3.0 United States License.
  • 3. Sunflower Tutorial www.onyxstamps.com Twitter: @onyxstamps by Katy Bayard Prepare Petals Cut paper into strips as follows: Yellow Patterned Paper: Brown Patterned Paper Green Patterned Paper · 3” x 3/4” - 46 pieces · 2 1/2” x 1/2” - 54 pieces · 2 1/2” x 1/2” - 9 pieces · 2 1/2” x 5/8” - 46 pieces · 2” x 3/8” - 12 pieces · 1 1/2” x 1/4” - 4 pieces Note: These quantities are for a flower built on a 7” base. You may need slightly more or less depending on how closely you space the petals. Glue strips into petal shapes · Put a bit of adhesive on one end of the strip of paper. · Hold the paper so that the pattern that will be inside the petal is facing down. · Using both hands, bend the ends of the paper so that they meet with the bottom side facing up. · Press ends to secure the adhesive Applying Glue Finished Petal Prepare Flower Bases Cut flower base · Print circle template and trace onto Sticky Sheet · Cut out circle · Remove red transparent layer and place on work surface sticky side up Cut flower insert Flower base and insert · Cut out a circle about 1 1/2” in diameter. You may need to trim this down later to fit inside the flower. This work is licensed under a Creative Commons Attribution-Share Alike 3.0 United States License.
  • 4. Sunflower Tutorial www.onyxstamps.com Twitter: @onyxstamps by Katy Bayard Step 3: Adhere Petals Place Yellow Petals · First row: Starting one of the largest yellow petals, press end onto sticky sheet so that the petal is half hanging off the sheet. Þ Repeat this around the edge of the circle so that the first row of petals is complete. · Second row: Using one of the yellow largest petals, press the end onto the sticky sheet so that Placing 1st petal 1st row completed the petal overlaps with the first row and that tip of the petal is positioned between the petals of the first row. Þ Repeat until the second row of petals is complete · Third & Fourth rows: Repeat with the 2nd largest yellow petals, until you have 2 more rows of yellow petals. Placing 2nd row Yellow petals completed Place Brown Petals · Place 3 rows of brown petals the same way you placed the yellow petals · Note: things are going to start getting tight, with it getting harder to stagger the petals pre cicely. This is no problem...just place them in a position that looks good! Placing brown row Brown petals completed Place Green Petals · Place 1 row of the largest green petals · Using the small sticky circle, place two rows of the middle sized green petals. · Place green circle inside the flower. It may help to use a pen to help push the circle in. · Place a couple of the smallest petals in the middle to fill the flower. Inserting green petals Completed Sunflower! This work is licensed under a Creative Commons Attribution-Share Alike 3.0 United States License.
  • 5. Sunflower Tutorial www.onyxstamps.com Twitter: @onyxstamps by Katy Bayard Step 4: Add More Color · At this point you can go ahead and use the flower, or you can apply some extra color to the petals to add some depth and texture. · Ink up a sponge with dark green ink. Starting in the middle, brush the sponge on the green petals to apply the ink. · Repeat on the brown petals using dark brown ink. · Repeat on the yellow petals using light brown ink. Congratulations, you're done! You can now add it to your project. In the photo on the front page, I ad- hered it to a white frame that I decorated with a Stampin' Up vinyl frame and hand cut green leaves. Yikes! I used dark brown ink on the green petals. Dark green looks much better. This work is licensed under a Creative Commons Attribution-Share Alike 3.0 United States License.