Apidays New York 2024 - Scaling API-first by Ian Reasor and Radu Cotescu, Adobe
Movie maker notes
1. Windows Media Player setting up
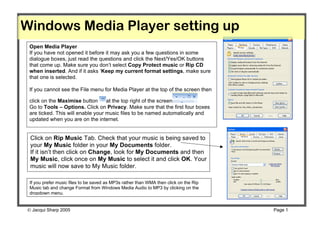
Open Media Player
If you have not opened it before it may ask you a few questions in some
dialogue boxes, just read the questions and click the Next/Yes/OK buttons
that come up. Make sure you don’t select Copy Protect music or Rip CD
when inserted. And if it asks ‘Keep my current format settings, make sure
that one is selected.
If you cannot see the File menu for Media Player at the top of the screen then
click on the Maximise button at the top right of the screen
Go to Tools – Options. Click on Privacy. Make sure that the first four boxes
are ticked. This will enable your music files to be named automatically and
updated when you are on the internet.
Click on Rip Music Tab. Check that your music is being saved to
your My Music folder in your My Documents folder.
If it isn’t then click on Change, look for My Documents and then
My Music, click once on My Music to select it and click OK. Your
music will now save to My Music folder.
If you prefer music files to be saved as MP3s rather than WMA then click on the Rip
Music tab and change Format from Windows Media Audio to MP3 by clicking on the
dropdown menu.
Jacqui Sharp 2005 Page 1
2. Windows Media Player
To Burn music from a CD
• Insert a music CD
• Click on Rip music from CD
• Click OK
• Media Player will open and immediately start ripping the music (if
you are online at the same time then the tracks will be named as
well
• Select Play Audio CD using Windows Media Player
• Your music should start playing immediately
• If you are online at the same time it will also name your tracks for
you
If you would like to hear the music before it is ripped, select Play Audio CD after
you insert the CD (if you already have Media Player opened it will play
automatically)
1. Click on the Rip Tab
2. Click in the boxes of the songs you don’t want to rip
3. Click Rip music when you are ready
Jacqui Sharp 2005 Page 2
3. Windows Media Player
If you are not connected to the Internet you can still rename your
songs
• Click once on the Track and then click again, type in the name of
the song
• Name the Composer and Artist in the same way
• Clicking twice on a track will start the track playing
To play the songs
• Click on the Library tab
• Click on the + next to All Music
• Click on the + next to Album
• Choose an album from the list
• Click the Play button it will play all the songs in the album
• Click the Stop button to stop songs
• Click the previous or next buttons to move between the
songs
• Mute the songs by clicking
• Alter the volume by clicking and dragging the slider
• Clicking on any of the other choices such as Genre will have the
different types of music sorted for you so if you have several
Jazz albums they will be sorted in that Genre
Jacqui Sharp 2005 Page 3
4. Windows Media Player
To burn music to a CD
• Insert CD
• Select Album from list,
Burn Panel
• Click and drag that album over to the Burn Panel
• If you want individual songs rather than a whole album
then click and drag individual songs over
• Click on Start Burn
• All the songs will be converted ready to burn and then
will start to be burned
• Once it has finished the CD will eject out automatically
Jacqui Sharp 2005 Page 4
5. Windows Media Player
• You need to be in Library
• Make your own compilation Playlist of your favourite songs
• Click on the + next to My Playlists
• Right click on it and select New
• Drag the songs you want to go into this playlist by clicking on Album, choose an
Album, choose a song and then drag into the Playlist panel on the right hand side
• Click on the New Playlist drop down menu and choose from the items listed
Playlist panel
• Click on Shuffle List to change the order
• Click on Sort to sort the list
• Click on Save Playlist As once you have made all your changes,
type in a name for it and click Save
• Click on Burn List to burn to CD
Jacqui Sharp 2005 Page 5
6. Windows Media Player
While you are playing your music you can set it to skin mode Full Mode
by clicking on the Skin button
To click back to whole screen click the Return to Full mode
button
Skin Mode
You can change the look of your skin by going to View –
Skin Chooser
Click on the name of a skin in the left hand panel to view the
skins
Click on Apply Skin to change the skin
Clicking More Skins takes you to the Microsoft Website
where you can download more skins
Change your Visualisations by going to View –
Visualisations or download some more from the Internet by
going to View – Visualisations – Download Visualisations
Once your songs are downloaded you can access them
through MovieMaker and PowerPoint. Your music will be
filed in the My Music Folder in My Documents.
Jacqui Sharp 2005 Page 6
7. Importing Photos
Hint: If this window
Plug one end into the camera and the USB end into the USB port in doesn’t come up, go
your computer to Start – Programs
– Accessories –
• Switch your camera on this may appear, select Microsoft Scanner and
Scanner and Camera Wizard or it might say Copy pictures to a Camera Wizard
folder on my computer
• Click Next on the next dialogue box
•
• If you need to rotate any pictures, click on the Picture and
then click on one of the rotate buttons
• If there are any photos you do not want to import then click in
the box with the to de-select the tick or click Clear All
and go and click in the tick boxes to select the photos you
want to download
• Click Next
Jacqui Sharp 2005 Page 7
8. Importing Photos
• Type in a name for this
group of photos
• Click on the Browse button to find the folder to save the photos
to
• Click on a folder in the My Pictures folder or
• Make a new folder by clicking on the My Pictures folder first
and then click on Make New Folder
• Type in the name for the new folder and click OK
• Click Next
• Click Next and Finish
• Your new folder of photos will open
Jacqui Sharp 2005 Page 8
9. Edit Photos
Microsoft Office Picture
Manager
• Go to Start – All Programs –
Microsoft Office – Microsoft Office
tools – Microsoft Office Picture
Manager
• Your screen should look something
like this
• If you haven’t got all the toolbars or side WARNING: before resizing or
menus then go to View and make sure all compressing your photos Save
of these are selected another copy of that photo, Click
o Thumbnails on a photo, press Ctrl C on the
o Task Pane keyboard and then press Ctrl V.
o Shortcuts (this will mean that you have 2
o Show File Names copies of the same photo.) Do this
o Show Pictures only because when you have compressed
• If your Task Pane at the left is or resized your photo you will be
not visible then click on the asked to save at some stage and all
changes will be saved, which means
Shortcuts button
the original quality of your photo will
be lost.
Jacqui Sharp 2005 Page 9
10. Edit Photos
• This is your ‘My Pictures Folder’, to see all of it click on the Plus sign
• Click on a Folder and all of the pictures inside of it will appear
• Rename a picture by clicking once on it and once again then type in a new name
• Double clicking a picture will bring it into full screen and you can use the Zoom button
to zoom in and out
• Clicking on the AutoCorrect button will automatically correct colour, brightness and
contrast of your photo
• Click on the Edit Pictures button to make changes to the photos
To change Brightness
Click on Brightness and Contrast
Select Auto brightness or move the controllers to adjust it
manually. To go back to other options click on
the arrow
Jacqui Sharp 2005 Page 10
11. Edit Photos
To change Colour click on Color
Select Enhance Color or move the controllers to adjust it manually. To go back
to other options click on the arrow
• To crop the photos
• Click on Crop .
• Click on the Black handles in the middle or corners and drag
to the centre of the photo.
• Click OK.
• If you have made a mistake click on the Undo
arrow in the Toolbar.
• To go back to other options click on the arrow
To Rotate a picture
Click on Rotate.
Choose the option you want.
To go back to other options click on
the arrow
Jacqui Sharp 2005 Page 11
12. Edit Photos
To fix redeye
• Click on The Redeye removal button.
• Place your mouse over the eye and click, continue to click
on all the red eyes in the photo.
• Click OK when you have finished.
• To go back to other options click on the arrow.
To resize the photo
• Click on Resize.
To compress the photo
• Click in the Click on Compress
Predefined width x Pictures.
height. Choose what you want to
• Select from those compress for (the email
choices or click on option is very tiny).
Percentage of original See the difference in size
width…, type in a under heading
percentage like 50, Estimated total size,
click OK. Click OK. To go back to
other options click on
• To go back to other the arrow.
options click on
the arrow.
Jacqui Sharp 2005 Page 12
13. More on Photos
• Go back to the beginning options by clicking on
the Home button .
• Rename pictures in this option by clicking on
Rename pictures .
• Click on the picture to be renamed and type in the
name of the picture and press OK.
• To go back to other options click on the
arrow .
Email pictures Find out the size
• In this option click on Email pictures. of your photo by
clicking on it and
• Click on Attached to the message, or looking down at
Displayed as previews. the bottom left of
• Choose a preview size and click on Create the information
Message. Outlook will open and you can type in bar
email address and message and press OK
Jacqui Sharp 2005 Page 13
14. More on Photos
Quick Photo presentation
• Send a whole group of photos to PowerPoint or Word.
• Click on one photo or hold down the Ctrl key and click on multiple photos,
click on Send Pictures to Microsoft office
• Select PowerPoint and Send and they will all appear in a PowerPoint
presentation.
View Pictures
in different ways by
clicking on the three
Send photos to another choices available to
location on your hardrive, you
Select photos, click on Thumbnail
Filmstrip
Browse and select folder Thumbnail view
you would like to send them Filmstrip view
to, change name and file Single picture.
type if you wish and finally
decided what size you want
to export them. Click OK.
Single Picture
Jacqui Sharp 2005 Page 14
15. MovieMaker
Collections – this is where all your movie clips, music
and photos will be stored
Tasks –
Click on
the tasks Watch your
and they movie in this
will guide screen
you
through
the
different
processes
Story Board –
drag all your
photos, movies,
music, transitions
etc down to here.
Click on the
Timeline button to
see all the sound
Jacqui Sharp 2005 Page 15
16. Creativity FunPack
You can download a Creativity fun pack from
http://www.microsoft.com/windowsxp/downloads/powertoys/mmcreate.mspx
This has free sounds, music, titles and video end credits
You will then need to import it into MovieMaker
1. Open Windows Movie Maker 2.
2. Go to File - Import . find where the Creativity funpack is. The default location is in your My
Videos folder
3. Before importing the Video Title Slides, uncheck the Create clips for video files box. You
need the video files to remain in one piece.
4. Select the clips by pressing Ctrl A on the keyboard and click Open
5. You will need to open each folder and select all of the contents, you cannot import the
folders
Jacqui Sharp 2005 Page 16
17. Capture the movie
Note: most DV cameras USB leads will not work on your laptops or computers if you are
running Windows XP SP2. All new laptops and computers linked to a network will be in this
category as they will be updated automatically via the internet. You will need to purchase a
Firewire cable for your camera. All laptops will have a firewire port but not all computers.
Firewire cable
Firewire port
• Open MovieMaker by going to Start – All Programs, it may be in
your programme menu or you might need to look in Accessories
• Turn on your Video Camera and set it to Play or VTR (depending
what model you have)
• The Video capture wizard will start automatically
• Type in a name for your video.
• Select where you want your video to be saved
• Click Next
Jacqui Sharp 2005 Page 17
18. Capture the movie
Select Best quality for playback on any
computer if you are just going to be using on
your computer.
If you want to create a good quality DVD you
will need to select Digital Device format or
choose from other settings.
If you select Other Settings, you can choose
other ways to save your movie file. It can be
saved to a Pocket PC or you can publish to a
website and choose how big you would like
the file. If you choose the DV-AVI (PAL)
option that will give you a very large file of
very good quality that can be burned to DVD,
for slightly lesser quality but a significantly
smaller file you could choose High Quality
video.
Click Next.
Jacqui Sharp 2005 Page 18
19. Capture the movie
• Click Capture parts of the tape manually
• Click Next
• Make sure that the Create clips when wizard
finishes check box is ticked
• Find the place on the Video tape where you want to
start downloading by clicking the play button on the
Controller
• Click Start Capture.
• Click Stop Capture when you have finished
• Click Finish
Use these controls to play and stop your movie
Use the Green controller
to move quickly through your movie. Or press
the Spacebar on your computer to start and stop
a clip playing.
Don’t forget to
save as you go
by going to File –
Use these controls to zoom in and out your timeline Save Project
so that you can see more or less of all your clips.
Jacqui Sharp 2005 Page 19
20. Storyboard
• You’ll see your clips in the Collections view.
• Double click a clip to see how it looks in the preview window. Press
Play
• Click and drag each clip in order to the Storyboard
Storyboard
Split a long clip
• If one of your clips in the Collections View is very long
you can split it
• Click on the clip in the Collections View
• Click Play and when you see the place you want to split,
click the Play button again to Pause it
• Click on the Split button
• Your clip will split into two separate clips in the Collection
Pane
Jacqui Sharp 2005 Page 20
21. Combine your clips
• You can also combine many small clips to make
one clip, you can do this in the Collection
Window or on the Storyboard or Timeline view
• Click on the first clip to be combined, hold down
your Control key and click on all of the other
clips to be combined (they should all be
highlighted)
• Go to Clip – Combine in the menu bar
Edit your clips
• Click on Show Timeline , click on the clip you’d like to trim.
• Drag the scroll bar and watch the movie in the Preview window.
• Stop where you want to trim the clip.
• Go to Clip - Set Start Trim Point. (this will delete everything before)
• Now continue to drag the scroll bar until you reach the end of your clip.
• Go to Clip - Set End Trim Point. (this will delete everything after just on that clip)
• You will now have your trimmed clip.
Jacqui Sharp 2005 Page 21
22. Import photos
• In the movie task pane click on Import
Pictures
• Navigate through your My Picture’s Folder
until you see the pictures you want
• Click on one and Ctrl Click the other ones
you want
• Click on Import
• Click and drag the photos down on to the
Clip Pane just as you did with the movie clips
Add Transitions
• Click View video transitions.
• Double-click the transitions to see how they
look
• Drag a transition down to the Storyboard
and place them in the squares between
your video clips.
Jacqui Sharp 2005 Page 22
23. Add Titles
• Click Make titles or credits.
• Add a title before your movie by clicking
• Type in the words you
want to appear on your
screen
• Click Change the title
animation, and then select a
different animation from the
list. A preview will show in the
Preview window
• Click Change the text and font colour, and you can
make changes to the font, font size and position and
the colour of the text and background.
• Click Done, Add Title to Movie and your title will be
added to your storyboard before your first clip.
Jacqui Sharp 2005 Page 23
24. Add text to a clip
• Click Make Titles and Credits
• Click on a clip that you want to add text on top of
• Click on
• Type in text
• Click on Change the Title Animation and make changes to
how it appears on the screen
• If necessary make changes to font size and colour
• Click Done, add title to movie
Add credits to end of clip
• Click Make Titles and Credits
• Click on
• Type in text
• Click on Change the Title Animation and make changes to
how it appears on the screen
• If necessary make changes to font size and colour
• Click Done, add title to movie
Jacqui Sharp 2005 Page 24
25. Add Video Effects
• Click View video effects .
• Double-click on an effect and it will show an
example in the preview window.
• You will need to be in Story board View
• Drag the effect of your choice down to the
Storyboard and place it on top of the star in the
lower left hand corner of the clip.
• You can add more than one effect to a clip
Three effects
Jacqui Sharp 2005 Page 25
26. Add Music
• Click on Import audio or music
• Click on My Documents and then doubleclick My Music
folder
• Double click on any of your music folders
• Double Click on the music track you’d like to use
• Click on Import.
• The music track will appear in your Collection view.
• Click on Show Timeline button in the
Storyboard part of your screen.
• Drag your music track to the Audio/Music part of the
Timeline.
• You can change the place of the music track by clicking
and dragging and moving it
Jacqui Sharp 2005 Page 26
27. Adjust audio levels
• Go to Tools - Audio Levels.
• Increase audio level of Music track by dragging the slider bar towards
Audio/Music.
• To increase the audio level of audio from the Video drag the slider bar towards
Audio from video.
• Click Close
• Click on the Music clip and alter the volume sound by going to Clip –Audio
• Fade in and out the music by selecting Fade in and Fade out on the dropdown
menu
• Adjust the volume level of the clip by clicking on Volume on the drop down menu
•
Mute audio
Sometimes you can get noises on a video clip that you don’t want to hear like somebody
talking or wind noises. You can remove these without affecting other clips or background
music you have inserted
• Click on the clip that needs to be muted
• Go to Clip –Audio-Mute
Jacqui Sharp 2005 Page 27
28. Add a Narration
• Click on Narrate Timeline button
• Click Show more options
• Drag the Playback indicator on the
timeline to where you want to start the
narration (you can’t add it to a music
clip so you may need to move the
music clip)
• Click in the Limit narration to
available free space
and that will stop you from moving the
music track along as you speak
• Plug in your microphone and click
Start Narration
• Click Stop Narration when you have
finished and Click Save when the
dialogue box appears
Jacqui Sharp 2005 Page 28
29. Save a Movie
• Go to Save Movie File
• Choose where to save it
o My Computer (Full quality, it will play back in Media Player)
o Recordable CD (it will be compressed to fit a CD)
o Email ( heavily compressed to be sent in an email)
o The Web (heavily compressed to be viewed on a web page
o DV camera (full quality which can then be recorded on video
tape)
• Click Next
• Type in a • Choose best
name for quality for
your movie playback or
and choose make a
where you choice from
want to save the other
it settings
• Click Next
Jacqui Sharp 2005 Page 29
30. Save a Movie
If you select Other Settings, you can choose
other ways to save your movie file. It can be
saved to a Pocket PC or you can publish to a
website and choose how big you would like the
file. If you choose the DV-AVI (PAL) option that
will give you a very large file of very good quality
that can be burned to DVD, for slightly lesser
quality but a significantly smaller file you could
choose High Quality video.
1. Click Next
2. The Movie file will
now start to be
saved
3. When it is finished,
click on the Finish
button to view
movie
Jacqui Sharp 2005 Page 30