Full mouth rehabilitation with implant supported restorations
1. implantology section
FULL MOUTH REHABILITATION
WITH IMPLANT SUPPORTED
RESTORATIONS
The following is a visual essay of a full mouth implant supported restoration
for a 62- year- old healthy non smoker male patient
UDATTA KHER
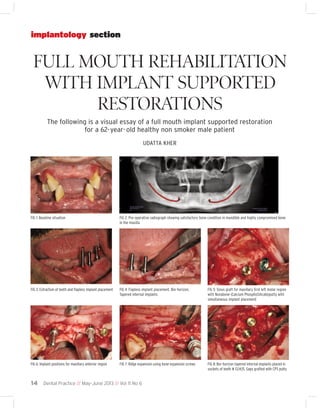
FIG 1: Baseline situation
FIG 2: Pre-operative radiograph showing satisfactory bone condition in mandible and highly compromised bone
in the maxilla
FIG 3: Extraction of teeth and flapless implant placement
FIG 4: Flapless implant placement. Bio-horizon,
Tapered internal implants
FIG 5: Sinus graft for maxillary first left molar region
with Novabone (Calcium PhosphoSilicate)putty with
simultaneous implant placement
FIG 6: Implant positions for maxillary anterior region
FIG 7: Ridge expansion using bone expansion screws
FIG 8: Bio-horizon tapered internal implants placed in
sockets of teeth # 13,14,15. Gaps grafted with CPS putty
14 Dental Practice // May-June 2013 // Vol 11 No 6
2. FIG 9: Guided bone regeneration around implants done
with CPS putty and PGA-PLA membrane
FIG 10: Watertight closure using 4-0 Vicryl sutures
FIG 11: Mandibular implants after complete healing
FIG 12: Open tray impression using Coriplant tray for
mandibular implants
FIG 13: Framework trial in milled polymethylmethacrylate for verification of fit and contours
FIG 14: Definitive PFM screw-retained prosthesis with
pink ceramic
FIG 15: Mandibular screw-retained prosthesis (Porcelain
fused to milled Cobalt Chromium)
FIG 16: Maxillary implants after complete healing
FIG 17: Custom tray with impression copings connected
with pattern resin
FIG 18: Open tray impression in custom tray using polyether impression material
FIG 19: Implant supported bite registration plate for better stability
Dental Practice // May-June 2013 // Vol 11 No 6
15
3. endodontic section
FIG 20: Jaw relation
FIG 21: Verification jig in resin for fit of the framework
FIG 22: Maxillary hybrid prosthesis against mandibular PFM prosthesis in occlusion.
Labwork: Katara Dental
FIG 23: Post operative radiograph
About the AUTHOR
Dr. Udatta Kher graduated from Government Dental College and Hospital, Mumbai in 1990
and followed that up with masters in Oral Surgery from the same institute. He maintains
two practices at Pali Hill and Lokhandwala complex, Mumbai. His main focus in practice is
towards implantology, laser dentistry and restorative dentistry. He is a visiting Professor
in the ‘Implantology Department’ at SDM Dental College, Dharwad. He is a Founder member of the ‘Indian Academy of Laser Dentistry’. Dr. Kher also holds a ‘Diploma in Laser
Dentistry’ from Aachen University, Germany. He is a Key Opinion Leader for Biohorizons,
3M Espe and Novabone. He devotes a considerable amount of time lecturing on various
podiums, mentoring young dentists, and publishing articles for dental journals in the field
of his speciality. He is the ‘Study Club Director’ for the Mumbai Seacoast Study Club of the
‘International Team for Implantology’. He can be reached at udattakher@gmail.com
FIG 24: Post-operative smile
16
Dental Practice // May-June 2013 // Vol 11 No 6
4. Q&A
Full mouth rehabilitation
with implant supported
restorations
On reviewing this case report, editorial board member, Dr. Ali Tunkiwala had a few queries for
the author. Here are Dr. Udatta Kher’s responses:
Why was a flapless approach chosen for
implants in the mandible?
The CBCT showed good volume of
bone in the mandible at the sites where
implants were planned. The flapless
implant placement is minimally invasive and the postoperative recovery after
the procedure is very rapid. The
patient’s existing denture served as a
stent and the 2 extraction sockets of
teeth # 33 and 43 provided a guideline
for accurate implant locations.
What were the challenges faced in the
surgery for maxillary implant placement?
The bone volume in the maxilla in the
sites of previous extraction was very
deficient. Hence bone manipulation
and augmentation procedures were
used simultaneously to place implants
in the maxilla. The left maxillary sinus
was grafted to increase vertical height of
bone. The anterior maxilla had reduced
width of bone. Hence, bone expansion
and GBR procedure using Calcium
phosphosilicate putty and collagen
membrane was performed at the location of teeth #12 and 22. Since the
extraction sockets of teeth # 13, 14, 15
and 23 were found suitable, implants
were placed in those sockets and the
gaps were grafted with CPS putty.
What prosthesis was the patient wearing
during the healing phase?
An immediate denture relined with a
soft denture reliner was used as an
interim prosthesis.
Why were the mandibular and maxil-
lary prosthesis made at different times?
The mandibular implants were placed
in good non grafted sites. Hence, they
were ready for loading after 2 months.
Since the maxillary sites were compromised and needed extensive grafting,
the maxillary implants were loaded after
6 months.
Why were different impression procedures chosen for the two arches?
The mandibular implants were almost
parallel to each other. A closed or an
open tray technique is suitable in such
cases. In this case we chose an open tray
impression in a stock tray without
splinting the impression posts. Due to
the configuration of the maxillary bone,
the implant angulations have a few
degrees of divergence. Hence an open
tray impression procedure with a
custom tray and splinted impression
posts was used to minimize errors in
transfer of the implant prosthetic
platform.
How was the jaw relation recorded?
A screw-retained base with a wax rim
was made to record the jaw relation.
The firm base rested on the implants
and not the soft tissue. This helped in
reducing errors while recording the
relation of the maxilla against the
mandibular fixed prosthesis.
Why were screw retained restorations
chosen?
The screw-retained restorations are easier to maintain since they can be
retrieved. That is a big advantage while
making multi implant prosthesis.
Why were different materials chosen for
the mandibular and maxillary
prosthesis?
Porcelain fused to metal screw-retained
bridge without any flanges was chosen in
the mandible for better maintenance. A
hybrid denture was chosen the maxilla to
compensate for the loss of the hand and
soft tissue. The labial contour needed to
be optimum for adequate lip support. A
screw retained hybrid denture with
acrylic teeth served this purpose. Also,
since the maxillary bone was of poorer
quality and had grafted sites, a softer
material like acrylic was chosen to reduce
occlusal stresses transmitted to the bone.
Why was the mandibular prosthesis
made in 2 pieces?
The terminal implants in the mandible
were placed bilaterally in the region of
the first molar. Flexure of the mandible
while opening and closing would have
created stress in the prosthesis which
would eventually lead to bone loss
around the implants. The prosthesis was
split between right canine and first premolar region to minimize this effect.
How will the patient maintain the prosthesis?
The patient has been advised to use an
oral irrigation device for cleaning the
prosthesis and interdental brushes to
clean the underside of the bridge. The
mandibular prosthesis being a flangeless
PFM prosthesis will be easier to maintain compared to the one in the maxilla.
During a 6 monthly recall, both the
prosthesis will be removed for cleaning
and better maintenance.
Dental Practice // May-June 2013 // Vol 11 No 6
17