1. นาย สิทธิพล มหาภิรมย์ 55030119
Electrolux User Manual
Important Information
· Elexrtrolux Company Limited recommends you to read and understand the manual of
Electrolux dishwasher Model ESF 631.
· Please keep this manual as a reference in the case of owner change.
· For user safety, please read the instruction and guidelines before using the machine.
· Electrolux will respond to the damages only in the case of household use. Electrolux
will reserve our responsibility in any other damages as a result of non-household use.
· After unpacking the product, please check and ensure no scratch on the machine
which may be caused by transportation. If any scratch found, do not install it and
immediately contact Electrolux.
· Please ensure that you receive all accessories. i.e. a pipe hanger and a salt-refilling
cone. (in picture).
· In the case of installing the machine with the kitchenware, prepare a plastic bag to
cover the pipe in order to prevent water condensation.
Installing the Dishwasher
· Installing the electrical power and water system for the machine should be done by a
professional technician.
· In the case that you install it by yourself, we suggest you strictly follow all
instructions and requirements.
· Any wrong installation may cause damages and dangerous accidents that will not
covered in Electrolux warranty.
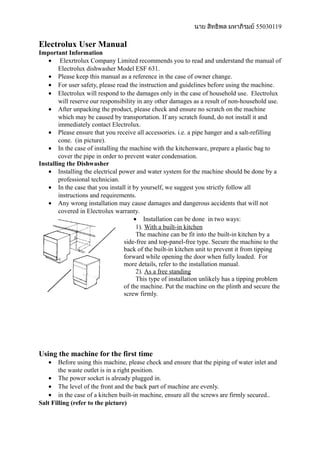
· Installation can be done in two ways:
1). With a built-in kitchen
The machine can be fit into the built-in kitchen by a
side-free and top-panel-free type. Secure the machine to the
back of the built-in kitchen unit to prevent it from tipping
forward while opening the door when fully loaded. For
more details, refer to the installation manual.
2). As a free standing
This type of installation unlikely has a tipping problem
of the machine. Put the machine on the plinth and secure the
screw firmly.
Using the machine for the first time
· Before using this machine, please check and ensure that the piping of water inlet and
the waste outlet is in a right position.
· The power socket is already plugged in.
· The level of the front and the back part of machine are evenly.
· in the case of a kitchen built-in machine, ensure all the screws are firmly secured..
Salt Filling (refer to the picture)
2. นาย สิทธิพล มหาภิรมย์ 55030119
This machine has a special filter of water softening to
reduce the hardness of water by using salt. The softening
process can prevent a limestone residue left in the machine
and on your dishes. Before using the machine, fill into the
filter slot at the bottom part of the machine with some
coarse salt . Do not use table salt. An 1.5 kg of coarse salt is
sufficient for washing up to15 - 30 times.
How to fill in the salt
· Open salt container cover (inside the machine at the
right bottom)
· Use the cone to fill in the coarse salt. (as shown on
the picture)
Warning: Never use the machine without filling some salt. This may caused a serious
damage to the water softening system. A slight damage can be fixed by refilling it with some
coarse salt and run the washing program for 4-5 times. The light signal of salt refilling will be
up when it is empty.
Important : Always refill it with some salt flakes before using the machine. Refill a
1.5 KG or more of salt each time depending on the adjustment of water softening button.
If the water hardness is low (lower than 20°dH), adjust the button to position 1 (as the
picture), however, if the hardness is high (20°dH or higher), adjust the button to position 2.
If you do not know how much of the water hardness, you should start with position 1.
If limestone residue is still found, adjust the button to position 2.
How to load dishes
The upper rack
This rack is for cups, small dishes and long object that cannot put in the spoon basket.
For the highest efficiency of washing, you need to face down all of cups and dishes. If you
put the long item in the spoon basket, the machine will not wash it efficiently as it covers the
water splashing while the machine is working.
The lower rack
This rack is for heavy items, for example, large bowls, plates, a pot and a pan. If there
is some space left, you may put cups or glasses on it. In the case of putting in a very large
object, you may remove the upper rack and use the bottom shelf instead.
The spoon basket
For the highest efficiency of washing spoons and knifes, spreading them out and keep
their handles down to the basket. Never put the edge of very sharp knifes up, keep it down to
the basket. To use the space more efficiently, the knife basket should be placed at the
appropriate area. Ensure that it will not obstruct the spray arm.
Filling the detergent dispenser
The detergent dispenser is located behind
the door of machine. Inside, there is a indicator
mark of detergent powder MAX and MIN
level. Use detergent powder designed for
dishwasher machine only. Do not use ordinary
washing liquid due to its too much foaming
and a risk of damaging to the machine. Follow
product instructions of the washing powder.
While the machine is running, the detergent
dispenser will open automatically.
3. นาย สิทธิพล มหาภิรมย์ 55030119
In the case of pre-washing program, no need to fill in detergent powder. If the utensils
are very dirty, add a small amount of detergent powder into the hole located on the detergent
dispenser cover.
· Keep the dishwasher detergent out of the reach of.
· Do not leave dishwasher door open while containing the
washing powder.
· If someone has swallowed dishwasher detergent, do not
make them vomit. Instead, make him or her drink lots of
water or milk and bring them to a hospital as soon as
possible.
Rinse-Aid
The benefit of the rinse-aid is to make the utensils cleaner and dry faster since the
water runs off quickly. Apply an appropriate of dosage.
Filling the rinse-aid
The shiny-aid liquid slot is located next to dishwasher slot. This can contain shiny
liquid for 110 cc. which is enough for washing up to 16-40 times, however, this also depends
on the hardness of water. The amount of liquid can be adjusted to suit the condition of water.
If there is a light of symbol on the panel, it means that you need to refill the shiny-aid
liquid. Fill the liquid into the slot until it is full. (The light will not disappear until the
volume reaches 60 cc. or half of the slot). After filling the shiny-aid liquid, wipe out any
liquid spill around the slot before closing that gap to prevent an overfoaming problem.
4. นาย สิทธิพล มหาภิรมย์ 55030119
The Panel
1. On / Off switch
2. Temperature selection
3. Heat drying program
4. Symbol light of coarse salt and rince-aidliquid.
Program selection guide
RINSE AND HOLD use for washing a small amount of dishes. The rinse and hold
program is an economical modeas it requires less energy and water.
LONG use for the casserole dishes, saucepans and large and heavy items which is
very dirty. Washing at temperature 65˚C with a Pre-Wash program at 55˚C is recommended.
NORMAL use as general washing program
ECONOMY use for light dirty and no pre-wash.
QUICK use for a small quantity of dishes and not very dirty. The process of program
is shorter than others.
PLATE WARMING not a washing program. Use for warming plates for the hot
food.
5. นาย สิทธิพล มหาภิรมย์ 55030119
Care and Maintenance
Cleaning outside of the machine
Never rinse up the machine. Use damp cloth to wipe around the outside. The washer
will clean itself inside every time you finish washing, however, some parts of it may need a
special cleaning for the best washing result.
Cleaning the spray arms
The spray arms are rarely required a special cleaning as it can clean itself. If you need
to clean it by yourself, remove the arm by following the picture.
6. นาย สิทธิพล มหาภิรมย์ 55030119
Cleaning the coarse filter and fine filter
It is best to check the coarse filter in the middle of fine filter after each wash. If you
find any dirtin it, remove it out by turning it anticlockwise and lift it out. Then rinse the dirt
out by warm water and replace it back.
7. นาย สิทธิพล มหาภิรมย์ 55030119
Cleaning the coarse filter and fine filter
It is best to check the coarse filter in the middle of fine filter after each wash. If you
find any dirtin it, remove it out by turning it anticlockwise and lift it out. Then rinse the dirt
out by warm water and replace it back.