How to create 3d sphere pattern in Adobe illustrator
•
2 likes•807 views

How to draw 3d sphere pattern in Adobe illustrator by RFclipart. Learn more How to Draw Anything in Adobe Illustrator with Vector Guru!!!

Recommended
Recommended
More Related Content
Recently uploaded
Recently uploaded (20)
Featured
Featured (20)
How to create 3d sphere pattern in Adobe illustrator
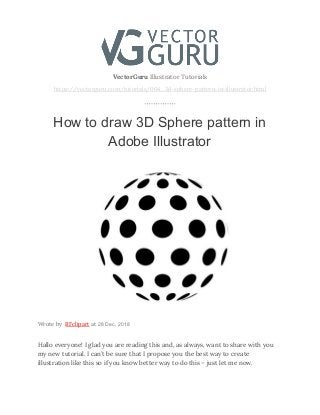
- 1. VectorGuru Illustrator Tutorials https://vectorguru.com/tutorials/004_3d-sphere-pattern-in-illustrator.html How to draw 3D Sphere pattern in Adobe Illustrator Wrote by RFclipartat 28 Dec, 2018 Hallo everyone! I glad you are reading this and, as always, want to share with you my new tutorial. I can’t be sure that I propose you the best way to create illustration like this so if you know better way to do this – just let me now.
- 2. Today’s tutorial is about creating geometrical patterns and pouring that look like 3D styled. We will create 3D sphere in illustrator filled with circle pattern. First of all let’s create a half of circle. We will use it later. Then let’s create pattern you like. Something like this. Drug and drop it to "Symbols" panel. Window "Symbol options" will appear. Just press "Ok".
- 3. Our pattern is ready! Everything prepared, so let’s start creating stylish 3D fill. Select your half of circle and go to "Effects – 3D - Revolve". Dialog window will appear. We will revolve our object along right side, so let’s choose "Right Edge"
- 4. Voila! Now we have almost 3D sphere, but is isn’t our goal! Now we must apply pattern that we created in the beginning. Press "Map Art" button. New dialog window will appear. Select your pattern from the list. This step allows you to move and scale your pattern as you wish. Press "Ok" button two times. We almost here! Now we must separate sphere and our pattern. Go to "Object - Expand Appearance".
- 5. Right click on the object and choose "Ungroup" several times (Until this option is being accessible). Right click on the object and choose "Release clipping mask".
- 6. Now you can select your pattern and use it as you wish!
- 7. You can get other results using different forms and patterns. Thank you for reading this. I hope you enjoyed and got some useful experience. Good luck! Read this illustrator tutorial on our website Read more Illustrator Tutorials