SlideShare une entreprise Scribd logo
1  sur  19
Télécharger pour lire hors ligne
1: Setting up Xen (<10minutes)
1.1: Install and configure Virtual Box (<2 minutes)
If you have not followed the instructions in xenbits.xen.org/people/larsk/xenexercise-
ossna18-prep.pdf and downloaded the ZIP file to $XenExercise (note: this is a shortcut for
the location where you zipped your downloaded files into) and pre-installed Virtual Box, you
can get images from a USB drive with a number of common virtual box install images. Copy
the files into your hard drive (again we will call the target location $XenExercise).
You should see:
If you have downloaded the files, but not installed them, $XenExercise will contain:
Then:
• Install Virtualbox (going through the install process)
• Double click on the Extension pack to install it
Before you start, go to File  Host Network Manager. If it does not show vboxnet0, press
create, after which you should see:
1.2: Import Virtual Box Image
Start VirtualBox and install the XenExercise.ova VirtualBox image by going to File 
Import Appliance in the menu bar.
Click the Open Appliance menu to select our OVA file. Once you have selected the file, click
Next.
The next window will show you the configuration of virtual appliance we use for the
exercise. You can scroll through the configuration list and double click on any item (or
check/uncheck the box) to make changes to it, but we set up everything for the demo.
Lastly, click Import.
Virtualbox will proceed to import the virtual machine into your library. The import should
take 1-2 minutes. Once the process is completed, you should be able to see the new VM in
your list.
1.2.1: Number of CPUs
Now we change the number of CPUs that Virtual Box will expose to the VM we just created:
we need 2 for the demo. Go to Settings  System  Processor and you will see
Put the slider to 2 CPUs (as long as it is in the green area) and press OK.
Background Note: The image has been set up to use two network configurations. You can
see these by going to Settings and the Network tab: and check and see whether
• Adaptor 1 is set to NAT.
• Adaptor 2 is attached to Host-only Adapter: under Advanced, Promiscuous Mode
should be set to Allow All. If this isn't set you won't be able to ssh into Xen Guests.
The VirtualBox network set-up is relatively unusual: normally we would set up a single
bridged network to allow for the ability of guests to connect to the internet while also
being able to ssh into guests from your laptop. However, for wifi networks bridging does
not work reliably. To work around this, we set up NAT – which allows internet access but
no ssh access, while Host-only allows ssh access. By setting up two adaptors, we can get
both.
Press Start on the newly created VM, which will start the exercise VM in Virtual Box, your
system will look like this:
At this point, we have a virtual environment that is equivalent to a dedicated machine with
CentOS 7 installed, on which you can then install the Xen Hypervisor.
You can now log into the host via root and xenroot from within the XenExercise window.
1.2.2: Keyboard Settings
Make sure you have your preferred keyboard set up: the default should be us: you can use
Dom0# localectl set-keymap <map>
to change this permanently.
1.2.3: Get your hosts IP address and open Terminal
Within the XenExercise window execute
Dom0# ip addr | grep 192.168
and write down the IP address. The one you can `ssh` to from a terminal will start with
`192.168`.
Open your favourite terminal and ssh in:
Dom0# ssh root@192.168.56.101
and write down the IP address. At this point you can hide the VirtualBox and XenExercise
window, as we will not need it anymore.
Note: Instead of writing down the IP addresses you can also edit the /etc/hosts file on
Linux and mac using. You can use the same approach with other guests that we create
$ sudo vi /etc/hosts
Adding, and then saving
## XenExercise
192.168.56.101 dom0
On windows the file is in c:WindowsSystem32Driversetchosts and can be edited with
Notepad run as administrator.
1.2.4: Demo Directory
The image contains a few pre-downloaded files in
Dom0# ls -a /demo
• scripts: contains CentOS 7 networking scripts and other utility scripts
• images: this will be the location where we store demo related files
• master-images: pre-downloaded files for different types of guests
• mersienne-prime.py: a little compute intensive python workload
1.3: Installing Xen
Now install the packages that enable Xen. These are developed and maintained by the
CentOS Virt SIG:
Dom0# yum install -y centos-release-xen-48
Update to a Dom0 capable Linux Kernel:
Dom0# yum update -y kernel
Now install Xen
Dom0# yum install -y xen
Configure the Network – aka we enable Configure the Network – aka we enable host bridge
mode:
Dom0# /demo/scripts/bridge-setup.sh
and verify that it worked
Dom0# nmcli con
NAME UUID TYPE DEVICE
eth0 e21723e8-8149-4b15-aa48-cf0072a30621 ethernet eth0
eth1 6646618b-2e6c-4b58-aecd-f4213f83a067 ethernet eth1
xenbr0 6c0345ae-a1c8-4016-adcc-dbd18759d0d7 bridge xenbr0
xenbr1 e9091911-fc8d-4ff3-9c8a-2ac47da0f348 bridge xenbr1
In the example, xenbr0 is connected to eth0 and xenbr1 to eth1. In a standard set-up, you
would only have one bridge.
Then reboot: you may want to unhide the XenExercise window, such that you can see what
is happening to the system:
Dom0# reboot
When the VM boots, you should see the following bootloader menu:
Reconnect your console via ssh (see 1.2.3) after the reboot.
Note: We created an OVA image of the VM, called XenExercises-from2.ova, in case the
internet connection is poor. You should have downloaded this, or get it from the USB
drive that we have handed out. The file is in the OVA/Sections directory. Follow the
relevant steps in section 1.2 of this document.
2: Verifying the Xen Install & Start a Guest (<10minutes)
2.1: Exploring the Install Locations and Services
First, we are going to explore some file system locations post the Xen install
Dom0# ls /etc/xen
Contains example configuration file examples for VMs:
• xl.conf: global Xen configuration file
• xlexample.hvm, xlexample.pvlinux: examples for HVM and PV guests
• auto: autostart VMs after restart when the xendomains service is enabled, e.g.
ln -s /etc/xen/MY_DOMU_GUEST_1.cfg /etc/xen/auto/
• scripts: example scripts for networking, storage, …
Note that configuration files for Xen guests do not need to be stored in this directory, but
usually are.
Dom0# ls /usr/lib64/xen
• bin: contains binaries for System Services such as the Device Model (QEMU), that
run in Dom0. Note that this is not the only location for such services (you will also
find some in /proc/xen and other locations)
• boot: contains binaries related to booting guests
Note that on CentOS you can check which services are running via
Dom0# systemctl list-units --all | grep xen
While services are stopped or started via systemctl start|stop [service_name]
2.2: Exploring the System
The following command shows you Xen system information
Dom0# xl info
The following command shows the Virtual Machines that you are running
Dom0# xl list
2.3: Create a Guest from a prepared image
Note: We created CentOS 7 QCOW2 image which contains an installed guest OS, such
that we do not have to go through the full OS install process during the exercise. You can
find the image in /demo/master-images
A number of services (free and paid for) are available to download pre-prepared Xen
guest images for various operating systems.
To create a guest from it, copy the master image
Dom0# cd /demo
Dom0# cp master-images/centos7/c7-master.qcow2 images/c7-01.qcow2
Then make a copy of PV example
Dom0# cp master-images/centos7/c7-master.cfg images/c7-01.cfg
Generate a unique mac addresses for each outward connection of your VM
Dom0# /demo/scripts/make-mac.sh c7-01
5a:27:56:fa:05:0b
Dom0# /demo/scripts/make-mac.sh c7-01 xenbr1
5a:27:7f:22:1e:0b
Now cd into /demo/images and edit the config file (lines that need to change are
highlighted in bold)
name="c7-01"
type="pv"
bootloader="pygrub"
memory=512
maxmem = 1024
vcpus = 1
vif = ['mac=5a:27:56:fa:05:0b', 'bridge=xenbr1,mac=5a:27:7f:22:1e:0b']
disk = ['vdev=xvda,format=qcow2,target=/demo/images/c7-01.qcow2']
Then start the guest
Dom0# xl create c7-01.cfg -c
The -c option will attach a console to the guest after start. You will then see the bootloader
menu, in this case pygrub. Wait or select the default and do nothing:
The guest will boot and after a few seconds ask for the login prompt.
2.3.1: Connect to the guest, get the guest IP address, copy example workload
In the previous exercise we attached the console when we started the guest. Now we exit
the console by pressing Ctrl+] and reset the screen using clear.
Then connect to the guest using xl console
Dom0# xl console c7-01
and log in via root and xenroot. Note that this has the same effect as the -c option when we
created the guest. As in step 1.2.3, get the IP address and connect to the guest via ssh in a
second shell window. You may also want to exit the first console via Ctrl+].
Now we are going to copy an example workload from Dom0 to the guest
c7-01# scp root@192.168.56.101:/demo/mersienne-prime.py .
and log in via root and xenroot. As in step 1.2.3, get the IP address and connect to the guest
via ssh in a second shell window. You may also want to exit the first console via Ctrl+].
2.3.2: xl top
Within the c7-01 terminal, execute the just downloaded workload
c7-01# python mersienne-prime.py
and in the Dom0 terminal, execute
c7-01# xl top
Note: For this section to work you need to have set up VirtualBox with 2 CPUs. If you have
not done so earlier, please shut down your Xen VM, then the VirtualBox host and follow
the steps in section 1.2.1. Then restart the host. Note that when you shut down the host
(aka VirtualBox) your system will only start with Dom0.
Your terminal windows will lose the ssh connection: keep the Dom0 terminal window
open. Then ssh in again.
3: VCPUs, Memory, … (<15minutes)
As we have previously created a number of VM’s we will shut these down
Dom0# xl shutdown -a
Then perform
Dom0# xl list
Name ID Mem VCPUs State Time(s)
Domain-0 0 1024 4 r----- 27.8
We are now going to create a clone of the c7-01 VM (which already has our test app
mersienne-prime.py installed in it) by making copies of the qcow and cfg files in the
demo/images directory
Dom0# cp c7-01.cfg c7-02.cfg
Dom0# cp c7-01.qcow2 c7-02.qcow2
Generate a unique mac addresses for each outward connection of your VM
Dom0# /demo/scripts/make-mac.sh c7-02
5a:27:56:fa:05:ab
Dom0# /demo/scripts/make-mac.sh c7-02 xenbr1
5a:27:7f:22:1e:ab
Now edit the highlighted entries in c7-02.cfg
name="c7-02"
vcpu=2
vif = [ 'mac=5a:27:56:fa:05:ab', 'bridge=xenbr1,mac=5a:27:7f:22:1e:ab']
disk= [ 'vdev=xvda,format=qcow2,target=/demo/images/c7-02.qcow2']
Now start both VMs
Dom0# xl create c7-01.cfg
Now create the second guest, get the IP address and exit.
Dom0# xl create c7-02.cfg -c
3.1: VCPUs
To show the effect of VCPUs on performance, we have created the second guest with 2
VCPUs:
Dom0# xl list
Name ID Mem VCPUs State Time(s)
Domain-0 0 1024 2 r----- 69.9
c7-01 3 512 1 -b---- 11.1
c7-02 5 512 2 -b---- 16.0
We then create two more terminal windows, arrange them as in the picture below, using
ssh two log into the two VMs as per the picture.
Then we execute xl top in Dom0 and python mersienne-prime.py in terminal 1 & 2.
Note: Because the python script is a single process, the larger number of VCPUs does not
make a difference in performance.
Setup 1: Let’s see what happens when we do the following: exit the scripts in all VMs. Then
execute python mersienne-prime.py in terminal 1 & 2 & 4.
We execute python mersienne-prime.py in each terminal window: essentially, we are
doubling the compute load in c7-02.
Xentop shows the following:
To get the performance of each Mersienne Prime process look for
M<M-number>(<timestamp>): <number>) in the output!
Looking at xl top and the time stamps
• shows c7-01 getting 50% of the CPU time of c7-02
• each run of mersienne-prime.py takes a similar complete time
Setup 2: Now let’s try the same in terminal 1 & 2 & 3.
Looking at xl top and the time stamps
• shows c7-01 and c7-02 getting near 100% of CPU time
• each run of mersienne-prime.py on c7-01 is 50% of that of c7-02
3.1.1: CPU Pinning
Setup 3: Now we use pinning to pin the single VCPU of c7-01 and the two VCPUs of c7-02 to
CPU 1.
To do this we first list VCPU information
Dom0# xl vcpu-list
Name ID VCPU CPU State Time(s) Affinity (Hard / Soft)
Domain-0 0 0 0 -b- 41.4 all / all
Domain-0 0 1 1 r-- 39.3 all / all
c7-01 1 0 0 -b- 173.0 all / all
c7-02 2 0 0 -b- 165.1 all / all
c7-02 2 1 0 -b- 152.0 all / all
We then pin the CPUs: note that the command requires using the Domain ID (not the
domain name), which in the example above is 1 for c7-01 and 2 for c7-02
Dom0# xl vcpu-pin 1 0 1; xl vcpu-pin 2 0 1; xl vcpu-pin 2 1 1
We then make sure that Dom0 runs only on other VCPUs but 1
Dom0# xl vcpu-pin 0 0 0; xl vcpu-pin 0 1 0
We then make sure that Dom0 runs only on other VCPUs but 1, do another xl vcpu-list and
check if everything is fine run xl top in Dom0.
Dom0# xl vcpu-list
Name ID VCPU CPU State Time(s) Affinity (Hard / Soft)
Domain-0 0 0 0 -b- 41.4 0 / all
Domain-0 0 1 0 r-- 39.3 0 / all
c7-01 1 0 1 -b- 173.0 0 / all
c7-02 2 0 1 -b- 165.1 1 / all
c7-02 2 1 1 -b- 152.0 1 / all
We now execute python mersienne-prime.py in terminal 1 & 2 & 4.
Looking at xl top and the time stamps of each Mersienne Prime process in different
windows (timestamps are at M<M-number>(<timestamp>): <number>), you will see that:
• shows c7-01 getting 33% of CPU while c7-02 is getting 66%
• each run of mersienne-prime.py takes a similar complete time
This is what we would expect in this case.
Final Note: Using pinning and scheduling can be used to optimise system performance –
in particular when you have heavy workloads. In particular when you have very different
workloads running in an identical VM.
It is also useful when using NUMA architectures. For more information see
• https://wiki.xenproject.org/wiki/Tuning_Xen_for_Performance
• https://wiki.xenproject.org/wiki/Category:NUMA
In addition, you can also change schedulers, as well as control the behaviour of individual
schedulers.
• See https://wiki.xenproject.org/wiki/Category:Scheduler
Cleanup: Now close terminals 2 – 4
3.2: Memory
Now we look at a number of commands and config options to manipulate the memory
available to a host: for c7-01 we the maximum amount of memory available is 1G.
Dom0# xl list
Name ID Mem VCPUs State Time(s)
Domain-0 0 1024 2 r----- 209.8
c7-01 1 512 1 -b---- 469.3
c7-02 2 512 1 -b---- 324.4
Perform free
c7-01# free
total used free shared buff/cache available
Mem: 488484 90420 273072 4344 124992 359864
Swap: 419836 0 419836
Now we change the domains memory by executing
Dom0# xl mem-set c7-01 1024m
And check the memory again
c7-01# free
total used free shared buff/cache available
Mem: 1012772 90528 797248 4344 124996 884060
Swap: 419836 0 419836
4: Save and Restore (<5minutes)
In this exercise we will use the save and restore functionality, which are building blocks of
live migration. We will simulate what happens during live migration on a single host. We will
do this with c7-01. To save some space on our very small exercise disk, we will shut-down
c7-01 and delete its disk (but keep the config file)
Dom0# xl shutdown c7-02
Dom0# rm -f c7-02.qcow2
Now we type in (without pressing return such that we get a heavy workload with interesting
output saved)
Dom0# xl save c7-01 c7-01.cpt <DO NOT YET PRESS ENTER>
and start the Mersienne script in c7-01. Note that this time we will
c7-01# python mersienne-prime.py 2> mersienne.log
Then very quickly press return in the Dom0 terminal
Dom0# xl save c7-01 c7-01.cpt
xc: info: Saving domain 3, type x86 PV
xc: Frames: 262144/262144 100%
xc: End of stream: 0/0 0%
The c7-01 terminal managed to compute numbers up to in my test run. You should see
something similar:
M15(0.3505): 10407932194664399081925240327364085538615262247266704805319112
350403608059673360298012239441732324184842421613954281007791383566248323464
908139906605677320762924129509389220345773183349661583550472959420547689811
211693677147548478866962501384438260291732348885311160828538416585028255604
666224831890918801847068222203140521026698435488732958028878050869736186900
714720710555703168729087
The c7-01 VM has been destroyed which you can check via xl list.
Now we restore c7-01 from the just created c7-01.cpt file, which contains the VMs memory
and CPU state.
Dom0# xl restore c7-01.cpt
Loading new save file c7-01.cpt (new xl fmt info 0x3/0x0/1123)
Savefile contains xl domain config in JSON format
Parsing config from <saved>
xc: info: Found x86 PV domain from Xen 4.8
xc: info: Restoring domain
xc: info: Restore successful
xc: info: XenStore: mfn 0xc000f, dom 0, evt 1
xc: info: Console: mfn 0xc000e, dom 0, evt 2
Note that configuration file was embedded into the configuration file. Also note that the ssh
terminal connection to c7-01 should not yet have been lost and output should continue to
be directed to it from now. Of course, in a real-life scenario we would have migrated the
VM to another host, where this does not apply.
However, if you lost your terminal connection, first execute xl top: you should see that c7-
01 is running at 100%. Reconnect to c7-01 via ssh and perform a ps -aux |grep mersienne
and look at mersienne.log, which should have entries newer than M15(0.3505).
Final Note: when migrating a guest from one host to another in essence the following
steps are performed:
• Host 1: Save
• Host 2: Restore
• Both hosts see the same filesystem and thus have access to disk images,
checkpoint files as well as config files (if needed)
The xl migrate command ensures coordinates the execution of save and restore on both
hosts. Also, some commercial solutions based on Xen, implement additional functionality
that do not require a shared host filesystem.
Cleanup: Delete the just created c7-01.cpt file, such that we have enough disk space for the
next exercise.
5: Creating Guests from Scratch (<10 minutes)
Note: This exercise will require a fast and reliable internet connection as the Debian
install will want to fetch packages from the internet. With reasonable bandwidth the
install will take 10-20 minutes. To be able to focus on the key steps, we will
• follow the exercise up to the installer
• then we will get and use the file $XenExercise/IMG/d8-01.img
This ensures that we can focus on the key steps, rather than the install.
First ,we create an empty disk via
# dd if=/dev/zero of=/demo/images/d8-01.img bs=1M count=1500
As before we create unique mac addresses:
# /demo/scripts/make-mac.sh d8-01
5a:27:48:e0:4e:fb
# /demo/scripts/make-mac.sh d8-01 xenbr1
5a:27:74:08:46:fb
Now we copy and edit the config file and change the portions marked in red: in many cases,
you simply have to uncomment the relevant portions of the file
# cp /demo/master-images/debian8/debian.cfg d8-01.cfg
# vi d8-01.cfg
kernel = "/demo/master-images/debian8/vmlinuz"
ramdisk = "/demo/master-images/debian8/initrd.gz"
…
extra = "debian-installer/exit/always_halt=true -- quiet console=hvc0"
…
memory = 512
…
name = "d8-01"
…
vcpus = 1
…
vif = [ 'mac=5a:27:48:e0:4e:fb','bridge=xenbr1,mac=5a:27:74:08:46:fb' ]
…
disk= [ 'vdev=xvda,format=raw,target=/demo/images/d8-01.img' ]
We then create the guest, attaching the console
# xl create d8-01.cfg -c
At this point you will see:
Instead of going through the install, we abort it and shut down the VM in a Dom0 terminal
by executing
Dom0# xl shutdown d8-01
In the Laptop terminal shell go to the $XenExercise/IMG directory:
$ cd ~/Desktop/XenExercise/IMG
$ scp ./d8-01.img root@192.168.56.101:/demo/images
This provides the Debian image immediately after the install
Note: the install was performed with default settings, with the exception of
Primary internet adaptor: eth0
Hostname: d8-01
Password: xenroot
User: yourname
Password: yourpw
Also note that – although the default – we want to
Install Grub as bootloader: yes, /dev/xvda
In the Dom0 terminal we have to change the guest’s config file and change the portions
marked in red: in many cases, you simply have to comment out the relevant portions of the
file. The reason for this is that we want to boot from the disk (now as the disk image has a
Debian install in it), and not from the network
Dom0# vi d8-01.cfg
…
#kernel = "/demo/master-images/debian8/vmlinuz"
#ramdisk = "/demo/master-images/debian8/initrd.gz"
…
#extra = "debian-installer/exit/always_halt=true – quiet
…
#========================================================================
# TO BOOT INSTALLED SYSTEM
#
# Comment all of the above installation options and uncomment the
# below instead
#========================================================================
bootloader="pygrub"
Now start the guest in the Dom0 terminal:
Dom0# xl create d8-01.cfg -c
and log in as root.
The Debian installer has not set up eth1, nor does it allow ssh’ing into the guest without
the use of ssh keys. To fix this we need to edit /etc/network/interfaces and add the
portions marked in red:
Dom0# vi /etc/network/interfaces
# This file describes the network interfaces available on your system
# and how to activate them. For more information, see interfaces(5).
source /etc/network/interfaces.d/*
# The loopback network interface
auto lo
iface lo inet loopback
# The primary network interface
allow-hotplug eth0
iface eth0 inet dhcp
# The secondary network interface
allow-hotplug eth1
iface eth1 inet dhcp
and perform:
Dom0# /etc/init.d/networking restart
Now we need to edit /etc/ssh/sshd_config and modify the portions marked in red:
Dom0# vi /etc/ssh/sshd_config
…
# Authentication:
LoginGraceTime 120
PermitRootLogin yes
StrictModes yes
…
and perform:
Dom0# /etc/init.d/ssh restart
Now we get the IP address in the usual way and write it down, leave the terminal via Ctrl+]
and re-attach from a new terminal window via ssh.

Contenu connexe

Tendances

Scale14x: Are today's foss security practices robust enough in the cloud era ...
Scale14x: Are today's foss security practices robust enough in the cloud era ...Scale14x: Are today's foss security practices robust enough in the cloud era ...
Scale14x: Are today's foss security practices robust enough in the cloud era ...The Linux Foundation
 
Xen Project 15 Years down the Line
Xen Project 15 Years down the LineXen Project 15 Years down the Line
Xen Project 15 Years down the LineThe Linux Foundation
 
ELC2019: Static Partitioning Made Simple
ELC2019: Static Partitioning Made SimpleELC2019: Static Partitioning Made Simple
ELC2019: Static Partitioning Made SimpleThe Linux Foundation
 
Securing your cloud with Xen's advanced security features
Securing your cloud with Xen's advanced security featuresSecuring your cloud with Xen's advanced security features
Securing your cloud with Xen's advanced security featuresThe Linux Foundation
 
OSSJP/ALS19: The Road to Safety Certification: Overcoming Community Challeng...
OSSJP/ALS19:  The Road to Safety Certification: Overcoming Community Challeng...OSSJP/ALS19:  The Road to Safety Certification: Overcoming Community Challeng...
OSSJP/ALS19: The Road to Safety Certification: Overcoming Community Challeng...The Linux Foundation
 
System Device Tree update: Bus Firewalls and Lopper
System Device Tree update: Bus Firewalls and LopperSystem Device Tree update: Bus Firewalls and Lopper
System Device Tree update: Bus Firewalls and LopperStefano Stabellini
 
XPDS14: Xen and the Art of Certification - Nathan Studer & Robert VonVossen, ...
XPDS14: Xen and the Art of Certification - Nathan Studer & Robert VonVossen, ...XPDS14: Xen and the Art of Certification - Nathan Studer & Robert VonVossen, ...
XPDS14: Xen and the Art of Certification - Nathan Studer & Robert VonVossen, ...The Linux Foundation
 
Cloud Computing Hypervisors and Comparison Xen KVM
Cloud Computing Hypervisors and Comparison Xen KVM Cloud Computing Hypervisors and Comparison Xen KVM
Cloud Computing Hypervisors and Comparison Xen KVM cloudresearcher
 
Securing Your Cloud with Xen (CloudOpen NA 2013)
Securing Your Cloud with Xen (CloudOpen NA 2013)Securing Your Cloud with Xen (CloudOpen NA 2013)
Securing Your Cloud with Xen (CloudOpen NA 2013)Russell Pavlicek
 
Dom0less - Xen Developer Summit 2019
Dom0less  - Xen Developer Summit 2019Dom0less  - Xen Developer Summit 2019
Dom0less - Xen Developer Summit 2019Stefano Stabellini
 
Rootlinux17: An introduction to Xen Project Virtualisation
Rootlinux17:  An introduction to Xen Project VirtualisationRootlinux17:  An introduction to Xen Project Virtualisation
Rootlinux17: An introduction to Xen Project VirtualisationThe Linux Foundation
 
OSSEU18: From Handcraft to Unikraft: Simpler Unikernelization of Your Applica...
OSSEU18: From Handcraft to Unikraft: Simpler Unikernelization of Your Applica...OSSEU18: From Handcraft to Unikraft: Simpler Unikernelization of Your Applica...
OSSEU18: From Handcraft to Unikraft: Simpler Unikernelization of Your Applica...The Linux Foundation
 
Linuxcon EU : Virtualization in the Cloud featuring Xen and XCP
Linuxcon EU : Virtualization in the Cloud featuring Xen and XCPLinuxcon EU : Virtualization in the Cloud featuring Xen and XCP
Linuxcon EU : Virtualization in the Cloud featuring Xen and XCPThe Linux Foundation
 
S4 xen hypervisor_20080622
S4 xen hypervisor_20080622S4 xen hypervisor_20080622
S4 xen hypervisor_20080622Todd Deshane
 
LCA13: Xen on ARM
LCA13: Xen on ARMLCA13: Xen on ARM
LCA13: Xen on ARMLinaro
 
XPDDS19: The Xen-Blanket for 2019 - Christopher Clark and Kelli Little, Star ...
XPDDS19: The Xen-Blanket for 2019 - Christopher Clark and Kelli Little, Star ...XPDDS19: The Xen-Blanket for 2019 - Christopher Clark and Kelli Little, Star ...
XPDDS19: The Xen-Blanket for 2019 - Christopher Clark and Kelli Little, Star ...The Linux Foundation
 

Tendances (20)

Scale14x: Are today's foss security practices robust enough in the cloud era ...
Scale14x: Are today's foss security practices robust enough in the cloud era ...Scale14x: Are today's foss security practices robust enough in the cloud era ...
Scale14x: Are today's foss security practices robust enough in the cloud era ...
 
Xen Project 15 Years down the Line
Xen Project 15 Years down the LineXen Project 15 Years down the Line
Xen Project 15 Years down the Line
 
Xen Community Update 2011
Xen Community Update 2011Xen Community Update 2011
Xen Community Update 2011
 
ELC2019: Static Partitioning Made Simple
ELC2019: Static Partitioning Made SimpleELC2019: Static Partitioning Made Simple
ELC2019: Static Partitioning Made Simple
 
Securing your cloud with Xen's advanced security features
Securing your cloud with Xen's advanced security featuresSecuring your cloud with Xen's advanced security features
Securing your cloud with Xen's advanced security features
 
OSSJP/ALS19: The Road to Safety Certification: Overcoming Community Challeng...
OSSJP/ALS19:  The Road to Safety Certification: Overcoming Community Challeng...OSSJP/ALS19:  The Road to Safety Certification: Overcoming Community Challeng...
OSSJP/ALS19: The Road to Safety Certification: Overcoming Community Challeng...
 
Xen in Linux (aka PVOPS update)
Xen in Linux (aka PVOPS update)Xen in Linux (aka PVOPS update)
Xen in Linux (aka PVOPS update)
 
Xen io
Xen ioXen io
Xen io
 
System Device Tree update: Bus Firewalls and Lopper
System Device Tree update: Bus Firewalls and LopperSystem Device Tree update: Bus Firewalls and Lopper
System Device Tree update: Bus Firewalls and Lopper
 
XPDS14: Xen and the Art of Certification - Nathan Studer & Robert VonVossen, ...
XPDS14: Xen and the Art of Certification - Nathan Studer & Robert VonVossen, ...XPDS14: Xen and the Art of Certification - Nathan Studer & Robert VonVossen, ...
XPDS14: Xen and the Art of Certification - Nathan Studer & Robert VonVossen, ...
 
Cloud Computing Hypervisors and Comparison Xen KVM
Cloud Computing Hypervisors and Comparison Xen KVM Cloud Computing Hypervisors and Comparison Xen KVM
Cloud Computing Hypervisors and Comparison Xen KVM
 
Xen Hypervisor
Xen HypervisorXen Hypervisor
Xen Hypervisor
 
Securing Your Cloud with Xen (CloudOpen NA 2013)
Securing Your Cloud with Xen (CloudOpen NA 2013)Securing Your Cloud with Xen (CloudOpen NA 2013)
Securing Your Cloud with Xen (CloudOpen NA 2013)
 
Dom0less - Xen Developer Summit 2019
Dom0less  - Xen Developer Summit 2019Dom0less  - Xen Developer Summit 2019
Dom0less - Xen Developer Summit 2019
 
Rootlinux17: An introduction to Xen Project Virtualisation
Rootlinux17:  An introduction to Xen Project VirtualisationRootlinux17:  An introduction to Xen Project Virtualisation
Rootlinux17: An introduction to Xen Project Virtualisation
 
OSSEU18: From Handcraft to Unikraft: Simpler Unikernelization of Your Applica...
OSSEU18: From Handcraft to Unikraft: Simpler Unikernelization of Your Applica...OSSEU18: From Handcraft to Unikraft: Simpler Unikernelization of Your Applica...
OSSEU18: From Handcraft to Unikraft: Simpler Unikernelization of Your Applica...
 
Linuxcon EU : Virtualization in the Cloud featuring Xen and XCP
Linuxcon EU : Virtualization in the Cloud featuring Xen and XCPLinuxcon EU : Virtualization in the Cloud featuring Xen and XCP
Linuxcon EU : Virtualization in the Cloud featuring Xen and XCP
 
S4 xen hypervisor_20080622
S4 xen hypervisor_20080622S4 xen hypervisor_20080622
S4 xen hypervisor_20080622
 
LCA13: Xen on ARM
LCA13: Xen on ARMLCA13: Xen on ARM
LCA13: Xen on ARM
 
XPDDS19: The Xen-Blanket for 2019 - Christopher Clark and Kelli Little, Star ...
XPDDS19: The Xen-Blanket for 2019 - Christopher Clark and Kelli Little, Star ...XPDDS19: The Xen-Blanket for 2019 - Christopher Clark and Kelli Little, Star ...
XPDDS19: The Xen-Blanket for 2019 - Christopher Clark and Kelli Little, Star ...
 

Similaire à OSSNA18: Xen Beginners Training (exercise script)

Fedora Atomic Workshop handout for Fudcon Pune 2015
Fedora Atomic Workshop handout for Fudcon Pune  2015Fedora Atomic Workshop handout for Fudcon Pune  2015
Fedora Atomic Workshop handout for Fudcon Pune 2015rranjithrajaram
 
Running virtual box from the linux command line
Running virtual box from the linux command lineRunning virtual box from the linux command line
Running virtual box from the linux command lineEric Javier Espino Man
 
install CentOS 6.3 minimal on Hyper-V
install CentOS 6.3 minimal on Hyper-Vinstall CentOS 6.3 minimal on Hyper-V
install CentOS 6.3 minimal on Hyper-VTũi Wichets
 
Adding System Call to Kernel
Adding System Call to KernelAdding System Call to Kernel
Adding System Call to KernelMuhammad Bilal
 
Large Scale Deployment of Linux
Large Scale Deployment of LinuxLarge Scale Deployment of Linux
Large Scale Deployment of LinuxKshitij Agarwal
 
Dockerfish-Tutorial
Dockerfish-TutorialDockerfish-Tutorial
Dockerfish-TutorialBrian Hood
 
the NML project
the NML projectthe NML project
the NML projectLei Yang
 
Setup Kubernetes with flannel on ubuntu platform
Setup Kubernetes with flannel on ubuntu platformSetup Kubernetes with flannel on ubuntu platform
Setup Kubernetes with flannel on ubuntu platformAjeet Singh
 
2 how to-build_document_management_system
2 how to-build_document_management_system2 how to-build_document_management_system
2 how to-build_document_management_systemKichiemon Adachi
 
Eucalyptus on Xen - Build Enterprise Private Cloud | Torry Harris Whitepaper
Eucalyptus on Xen - Build Enterprise Private Cloud | Torry Harris WhitepaperEucalyptus on Xen - Build Enterprise Private Cloud | Torry Harris Whitepaper
Eucalyptus on Xen - Build Enterprise Private Cloud | Torry Harris WhitepaperTorry Harris Business Solutions
 
Tutorial CentOS 5 untuk Webhosting
Tutorial CentOS 5 untuk WebhostingTutorial CentOS 5 untuk Webhosting
Tutorial CentOS 5 untuk WebhostingBeni Krisbiantoro
 
Docker introduction for the beginners
Docker introduction for the beginnersDocker introduction for the beginners
Docker introduction for the beginnersJuneyoung Oh
 
Manual 70-410 _Yves
Manual 70-410 _YvesManual 70-410 _Yves
Manual 70-410 _YvesYves Mukusa
 

Similaire à OSSNA18: Xen Beginners Training (exercise script) (20)

Howto Pxeboot
Howto PxebootHowto Pxeboot
Howto Pxeboot
 
Virtualization.pdf
Virtualization.pdfVirtualization.pdf
Virtualization.pdf
 
Fedora Atomic Workshop handout for Fudcon Pune 2015
Fedora Atomic Workshop handout for Fudcon Pune  2015Fedora Atomic Workshop handout for Fudcon Pune  2015
Fedora Atomic Workshop handout for Fudcon Pune 2015
 
Running virtual box from the linux command line
Running virtual box from the linux command lineRunning virtual box from the linux command line
Running virtual box from the linux command line
 
install CentOS 6.3 minimal on Hyper-V
install CentOS 6.3 minimal on Hyper-Vinstall CentOS 6.3 minimal on Hyper-V
install CentOS 6.3 minimal on Hyper-V
 
Adding System Call to Kernel
Adding System Call to KernelAdding System Call to Kernel
Adding System Call to Kernel
 
Dhcp
DhcpDhcp
Dhcp
 
Knowledge article
Knowledge articleKnowledge article
Knowledge article
 
Linux
Linux Linux
Linux
 
Large Scale Deployment of Linux
Large Scale Deployment of LinuxLarge Scale Deployment of Linux
Large Scale Deployment of Linux
 
Dockerfish-Tutorial
Dockerfish-TutorialDockerfish-Tutorial
Dockerfish-Tutorial
 
the NML project
the NML projectthe NML project
the NML project
 
Setup Kubernetes with flannel on ubuntu platform
Setup Kubernetes with flannel on ubuntu platformSetup Kubernetes with flannel on ubuntu platform
Setup Kubernetes with flannel on ubuntu platform
 
2 how to-build_document_management_system
2 how to-build_document_management_system2 how to-build_document_management_system
2 how to-build_document_management_system
 
Eucalyptus on Xen - Build Enterprise Private Cloud | Torry Harris Whitepaper
Eucalyptus on Xen - Build Enterprise Private Cloud | Torry Harris WhitepaperEucalyptus on Xen - Build Enterprise Private Cloud | Torry Harris Whitepaper
Eucalyptus on Xen - Build Enterprise Private Cloud | Torry Harris Whitepaper
 
Tutorial CentOS 5 untuk Webhosting
Tutorial CentOS 5 untuk WebhostingTutorial CentOS 5 untuk Webhosting
Tutorial CentOS 5 untuk Webhosting
 
Docker introduction for the beginners
Docker introduction for the beginnersDocker introduction for the beginners
Docker introduction for the beginners
 
Kickstart
KickstartKickstart
Kickstart
 
Linux
LinuxLinux
Linux
 
Manual 70-410 _Yves
Manual 70-410 _YvesManual 70-410 _Yves
Manual 70-410 _Yves
 

Plus de The Linux Foundation

XPDDS19: How TrenchBoot is Enabling Measured Launch for Open-Source Platform ...
XPDDS19: How TrenchBoot is Enabling Measured Launch for Open-Source Platform ...XPDDS19: How TrenchBoot is Enabling Measured Launch for Open-Source Platform ...
XPDDS19: How TrenchBoot is Enabling Measured Launch for Open-Source Platform ...The Linux Foundation
 
XPDDS19 Keynote: Xen in Automotive - Artem Mygaiev, Director, Technology Solu...
XPDDS19 Keynote: Xen in Automotive - Artem Mygaiev, Director, Technology Solu...XPDDS19 Keynote: Xen in Automotive - Artem Mygaiev, Director, Technology Solu...
XPDDS19 Keynote: Xen in Automotive - Artem Mygaiev, Director, Technology Solu...The Linux Foundation
 
XPDDS19 Keynote: Xen Project Weather Report 2019 - Lars Kurth, Director of Op...
XPDDS19 Keynote: Xen Project Weather Report 2019 - Lars Kurth, Director of Op...XPDDS19 Keynote: Xen Project Weather Report 2019 - Lars Kurth, Director of Op...
XPDDS19 Keynote: Xen Project Weather Report 2019 - Lars Kurth, Director of Op...The Linux Foundation
 
XPDDS19 Keynote: Unikraft Weather Report
XPDDS19 Keynote:  Unikraft Weather ReportXPDDS19 Keynote:  Unikraft Weather Report
XPDDS19 Keynote: Unikraft Weather ReportThe Linux Foundation
 
XPDDS19 Keynote: Secret-free Hypervisor: Now and Future - Wei Liu, Software E...
XPDDS19 Keynote: Secret-free Hypervisor: Now and Future - Wei Liu, Software E...XPDDS19 Keynote: Secret-free Hypervisor: Now and Future - Wei Liu, Software E...
XPDDS19 Keynote: Secret-free Hypervisor: Now and Future - Wei Liu, Software E...The Linux Foundation
 
XPDDS19 Keynote: Xen Dom0-less - Stefano Stabellini, Principal Engineer, Xilinx
XPDDS19 Keynote: Xen Dom0-less - Stefano Stabellini, Principal Engineer, XilinxXPDDS19 Keynote: Xen Dom0-less - Stefano Stabellini, Principal Engineer, Xilinx
XPDDS19 Keynote: Xen Dom0-less - Stefano Stabellini, Principal Engineer, XilinxThe Linux Foundation
 
XPDDS19 Keynote: Patch Review for Non-maintainers - George Dunlap, Citrix Sys...
XPDDS19 Keynote: Patch Review for Non-maintainers - George Dunlap, Citrix Sys...XPDDS19 Keynote: Patch Review for Non-maintainers - George Dunlap, Citrix Sys...
XPDDS19 Keynote: Patch Review for Non-maintainers - George Dunlap, Citrix Sys...The Linux Foundation
 
XPDDS19: Memories of a VM Funk - Mihai Donțu, Bitdefender
XPDDS19: Memories of a VM Funk - Mihai Donțu, BitdefenderXPDDS19: Memories of a VM Funk - Mihai Donțu, Bitdefender
XPDDS19: Memories of a VM Funk - Mihai Donțu, BitdefenderThe Linux Foundation
 
OSSJP/ALS19: The Road to Safety Certification: How the Xen Project is Making...
 OSSJP/ALS19: The Road to Safety Certification: How the Xen Project is Making... OSSJP/ALS19: The Road to Safety Certification: How the Xen Project is Making...
OSSJP/ALS19: The Road to Safety Certification: How the Xen Project is Making...The Linux Foundation
 
XPDDS19: Speculative Sidechannels and Mitigations - Andrew Cooper, Citrix
XPDDS19: Speculative Sidechannels and Mitigations - Andrew Cooper, CitrixXPDDS19: Speculative Sidechannels and Mitigations - Andrew Cooper, Citrix
XPDDS19: Speculative Sidechannels and Mitigations - Andrew Cooper, CitrixThe Linux Foundation
 
XPDDS19: Keeping Coherency on Arm: Reborn - Julien Grall, Arm ltd
XPDDS19: Keeping Coherency on Arm: Reborn - Julien Grall, Arm ltdXPDDS19: Keeping Coherency on Arm: Reborn - Julien Grall, Arm ltd
XPDDS19: Keeping Coherency on Arm: Reborn - Julien Grall, Arm ltdThe Linux Foundation
 
XPDDS19: QEMU PV Backend 'qdevification'... What Does it Mean? - Paul Durrant...
XPDDS19: QEMU PV Backend 'qdevification'... What Does it Mean? - Paul Durrant...XPDDS19: QEMU PV Backend 'qdevification'... What Does it Mean? - Paul Durrant...
XPDDS19: QEMU PV Backend 'qdevification'... What Does it Mean? - Paul Durrant...The Linux Foundation
 
XPDDS19: Status of PCI Emulation in Xen - Roger Pau Monné, Citrix Systems R&D
XPDDS19: Status of PCI Emulation in Xen - Roger Pau Monné, Citrix Systems R&DXPDDS19: Status of PCI Emulation in Xen - Roger Pau Monné, Citrix Systems R&D
XPDDS19: Status of PCI Emulation in Xen - Roger Pau Monné, Citrix Systems R&DThe Linux Foundation
 
XPDDS19: [ARM] OP-TEE Mediator in Xen - Volodymyr Babchuk, EPAM Systems
XPDDS19: [ARM] OP-TEE Mediator in Xen - Volodymyr Babchuk, EPAM SystemsXPDDS19: [ARM] OP-TEE Mediator in Xen - Volodymyr Babchuk, EPAM Systems
XPDDS19: [ARM] OP-TEE Mediator in Xen - Volodymyr Babchuk, EPAM SystemsThe Linux Foundation
 
XPDDS19: Bringing Xen to the Masses: The Story of Building a Community-driven...
XPDDS19: Bringing Xen to the Masses: The Story of Building a Community-driven...XPDDS19: Bringing Xen to the Masses: The Story of Building a Community-driven...
XPDDS19: Bringing Xen to the Masses: The Story of Building a Community-driven...The Linux Foundation
 
XPDDS19: Will Robots Automate Your Job Away? Streamlining Xen Project Contrib...
XPDDS19: Will Robots Automate Your Job Away? Streamlining Xen Project Contrib...XPDDS19: Will Robots Automate Your Job Away? Streamlining Xen Project Contrib...
XPDDS19: Will Robots Automate Your Job Away? Streamlining Xen Project Contrib...The Linux Foundation
 
XPDDS19: Client Virtualization Toolstack in Go - Nick Rosbrook & Brendan Kerr...
XPDDS19: Client Virtualization Toolstack in Go - Nick Rosbrook & Brendan Kerr...XPDDS19: Client Virtualization Toolstack in Go - Nick Rosbrook & Brendan Kerr...
XPDDS19: Client Virtualization Toolstack in Go - Nick Rosbrook & Brendan Kerr...The Linux Foundation
 
XPDDS19: Core Scheduling in Xen - Jürgen Groß, SUSE
XPDDS19: Core Scheduling in Xen - Jürgen Groß, SUSEXPDDS19: Core Scheduling in Xen - Jürgen Groß, SUSE
XPDDS19: Core Scheduling in Xen - Jürgen Groß, SUSEThe Linux Foundation
 
XPDDS19: Implementing AMD MxGPU - Jonathan Farrell, Assured Information Security
XPDDS19: Implementing AMD MxGPU - Jonathan Farrell, Assured Information SecurityXPDDS19: Implementing AMD MxGPU - Jonathan Farrell, Assured Information Security
XPDDS19: Implementing AMD MxGPU - Jonathan Farrell, Assured Information SecurityThe Linux Foundation
 
XPDDS19: Support of PV Devices in Nested Xen - Jürgen Groß, SUSE
XPDDS19: Support of PV Devices in Nested Xen - Jürgen Groß, SUSEXPDDS19: Support of PV Devices in Nested Xen - Jürgen Groß, SUSE
XPDDS19: Support of PV Devices in Nested Xen - Jürgen Groß, SUSEThe Linux Foundation
 

Plus de The Linux Foundation (20)

XPDDS19: How TrenchBoot is Enabling Measured Launch for Open-Source Platform ...
XPDDS19: How TrenchBoot is Enabling Measured Launch for Open-Source Platform ...XPDDS19: How TrenchBoot is Enabling Measured Launch for Open-Source Platform ...
XPDDS19: How TrenchBoot is Enabling Measured Launch for Open-Source Platform ...
 
XPDDS19 Keynote: Xen in Automotive - Artem Mygaiev, Director, Technology Solu...
XPDDS19 Keynote: Xen in Automotive - Artem Mygaiev, Director, Technology Solu...XPDDS19 Keynote: Xen in Automotive - Artem Mygaiev, Director, Technology Solu...
XPDDS19 Keynote: Xen in Automotive - Artem Mygaiev, Director, Technology Solu...
 
XPDDS19 Keynote: Xen Project Weather Report 2019 - Lars Kurth, Director of Op...
XPDDS19 Keynote: Xen Project Weather Report 2019 - Lars Kurth, Director of Op...XPDDS19 Keynote: Xen Project Weather Report 2019 - Lars Kurth, Director of Op...
XPDDS19 Keynote: Xen Project Weather Report 2019 - Lars Kurth, Director of Op...
 
XPDDS19 Keynote: Unikraft Weather Report
XPDDS19 Keynote:  Unikraft Weather ReportXPDDS19 Keynote:  Unikraft Weather Report
XPDDS19 Keynote: Unikraft Weather Report
 
XPDDS19 Keynote: Secret-free Hypervisor: Now and Future - Wei Liu, Software E...
XPDDS19 Keynote: Secret-free Hypervisor: Now and Future - Wei Liu, Software E...XPDDS19 Keynote: Secret-free Hypervisor: Now and Future - Wei Liu, Software E...
XPDDS19 Keynote: Secret-free Hypervisor: Now and Future - Wei Liu, Software E...
 
XPDDS19 Keynote: Xen Dom0-less - Stefano Stabellini, Principal Engineer, Xilinx
XPDDS19 Keynote: Xen Dom0-less - Stefano Stabellini, Principal Engineer, XilinxXPDDS19 Keynote: Xen Dom0-less - Stefano Stabellini, Principal Engineer, Xilinx
XPDDS19 Keynote: Xen Dom0-less - Stefano Stabellini, Principal Engineer, Xilinx
 
XPDDS19 Keynote: Patch Review for Non-maintainers - George Dunlap, Citrix Sys...
XPDDS19 Keynote: Patch Review for Non-maintainers - George Dunlap, Citrix Sys...XPDDS19 Keynote: Patch Review for Non-maintainers - George Dunlap, Citrix Sys...
XPDDS19 Keynote: Patch Review for Non-maintainers - George Dunlap, Citrix Sys...
 
XPDDS19: Memories of a VM Funk - Mihai Donțu, Bitdefender
XPDDS19: Memories of a VM Funk - Mihai Donțu, BitdefenderXPDDS19: Memories of a VM Funk - Mihai Donțu, Bitdefender
XPDDS19: Memories of a VM Funk - Mihai Donțu, Bitdefender
 
OSSJP/ALS19: The Road to Safety Certification: How the Xen Project is Making...
 OSSJP/ALS19: The Road to Safety Certification: How the Xen Project is Making... OSSJP/ALS19: The Road to Safety Certification: How the Xen Project is Making...
OSSJP/ALS19: The Road to Safety Certification: How the Xen Project is Making...
 
XPDDS19: Speculative Sidechannels and Mitigations - Andrew Cooper, Citrix
XPDDS19: Speculative Sidechannels and Mitigations - Andrew Cooper, CitrixXPDDS19: Speculative Sidechannels and Mitigations - Andrew Cooper, Citrix
XPDDS19: Speculative Sidechannels and Mitigations - Andrew Cooper, Citrix
 
XPDDS19: Keeping Coherency on Arm: Reborn - Julien Grall, Arm ltd
XPDDS19: Keeping Coherency on Arm: Reborn - Julien Grall, Arm ltdXPDDS19: Keeping Coherency on Arm: Reborn - Julien Grall, Arm ltd
XPDDS19: Keeping Coherency on Arm: Reborn - Julien Grall, Arm ltd
 
XPDDS19: QEMU PV Backend 'qdevification'... What Does it Mean? - Paul Durrant...
XPDDS19: QEMU PV Backend 'qdevification'... What Does it Mean? - Paul Durrant...XPDDS19: QEMU PV Backend 'qdevification'... What Does it Mean? - Paul Durrant...
XPDDS19: QEMU PV Backend 'qdevification'... What Does it Mean? - Paul Durrant...
 
XPDDS19: Status of PCI Emulation in Xen - Roger Pau Monné, Citrix Systems R&D
XPDDS19: Status of PCI Emulation in Xen - Roger Pau Monné, Citrix Systems R&DXPDDS19: Status of PCI Emulation in Xen - Roger Pau Monné, Citrix Systems R&D
XPDDS19: Status of PCI Emulation in Xen - Roger Pau Monné, Citrix Systems R&D
 
XPDDS19: [ARM] OP-TEE Mediator in Xen - Volodymyr Babchuk, EPAM Systems
XPDDS19: [ARM] OP-TEE Mediator in Xen - Volodymyr Babchuk, EPAM SystemsXPDDS19: [ARM] OP-TEE Mediator in Xen - Volodymyr Babchuk, EPAM Systems
XPDDS19: [ARM] OP-TEE Mediator in Xen - Volodymyr Babchuk, EPAM Systems
 
XPDDS19: Bringing Xen to the Masses: The Story of Building a Community-driven...
XPDDS19: Bringing Xen to the Masses: The Story of Building a Community-driven...XPDDS19: Bringing Xen to the Masses: The Story of Building a Community-driven...
XPDDS19: Bringing Xen to the Masses: The Story of Building a Community-driven...
 
XPDDS19: Will Robots Automate Your Job Away? Streamlining Xen Project Contrib...
XPDDS19: Will Robots Automate Your Job Away? Streamlining Xen Project Contrib...XPDDS19: Will Robots Automate Your Job Away? Streamlining Xen Project Contrib...
XPDDS19: Will Robots Automate Your Job Away? Streamlining Xen Project Contrib...
 
XPDDS19: Client Virtualization Toolstack in Go - Nick Rosbrook & Brendan Kerr...
XPDDS19: Client Virtualization Toolstack in Go - Nick Rosbrook & Brendan Kerr...XPDDS19: Client Virtualization Toolstack in Go - Nick Rosbrook & Brendan Kerr...
XPDDS19: Client Virtualization Toolstack in Go - Nick Rosbrook & Brendan Kerr...
 
XPDDS19: Core Scheduling in Xen - Jürgen Groß, SUSE
XPDDS19: Core Scheduling in Xen - Jürgen Groß, SUSEXPDDS19: Core Scheduling in Xen - Jürgen Groß, SUSE
XPDDS19: Core Scheduling in Xen - Jürgen Groß, SUSE
 
XPDDS19: Implementing AMD MxGPU - Jonathan Farrell, Assured Information Security
XPDDS19: Implementing AMD MxGPU - Jonathan Farrell, Assured Information SecurityXPDDS19: Implementing AMD MxGPU - Jonathan Farrell, Assured Information Security
XPDDS19: Implementing AMD MxGPU - Jonathan Farrell, Assured Information Security
 
XPDDS19: Support of PV Devices in Nested Xen - Jürgen Groß, SUSE
XPDDS19: Support of PV Devices in Nested Xen - Jürgen Groß, SUSEXPDDS19: Support of PV Devices in Nested Xen - Jürgen Groß, SUSE
XPDDS19: Support of PV Devices in Nested Xen - Jürgen Groß, SUSE
 

Dernier

SensoDat: Simulation-based Sensor Dataset of Self-driving Cars
SensoDat: Simulation-based Sensor Dataset of Self-driving CarsSensoDat: Simulation-based Sensor Dataset of Self-driving Cars
SensoDat: Simulation-based Sensor Dataset of Self-driving CarsChristian Birchler
 
Odoo 14 - eLearning Module In Odoo 14 Enterprise
Odoo 14 - eLearning Module In Odoo 14 EnterpriseOdoo 14 - eLearning Module In Odoo 14 Enterprise
Odoo 14 - eLearning Module In Odoo 14 Enterprisepreethippts
 
Intelligent Home Wi-Fi Solutions | ThinkPalm
Intelligent Home Wi-Fi Solutions | ThinkPalmIntelligent Home Wi-Fi Solutions | ThinkPalm
Intelligent Home Wi-Fi Solutions | ThinkPalmSujith Sukumaran
 
Introduction Computer Science - Software Design.pdf
Introduction Computer Science - Software Design.pdfIntroduction Computer Science - Software Design.pdf
Introduction Computer Science - Software Design.pdfFerryKemperman
 
MYjobs Presentation Django-based project
MYjobs Presentation Django-based projectMYjobs Presentation Django-based project
MYjobs Presentation Django-based projectAnoyGreter
 
20240415 [Container Plumbing Days] Usernetes Gen2 - Kubernetes in Rootless Do...
20240415 [Container Plumbing Days] Usernetes Gen2 - Kubernetes in Rootless Do...20240415 [Container Plumbing Days] Usernetes Gen2 - Kubernetes in Rootless Do...
20240415 [Container Plumbing Days] Usernetes Gen2 - Kubernetes in Rootless Do...Akihiro Suda
 
Automate your Kamailio Test Calls - Kamailio World 2024
Automate your Kamailio Test Calls - Kamailio World 2024Automate your Kamailio Test Calls - Kamailio World 2024
Automate your Kamailio Test Calls - Kamailio World 2024Andreas Granig
 
How to submit a standout Adobe Champion Application
How to submit a standout Adobe Champion ApplicationHow to submit a standout Adobe Champion Application
How to submit a standout Adobe Champion ApplicationBradBedford3
 
Cloud Data Center Network Construction - IEEE
Cloud Data Center Network Construction - IEEECloud Data Center Network Construction - IEEE
Cloud Data Center Network Construction - IEEEVICTOR MAESTRE RAMIREZ
 
Alfresco TTL#157 - Troubleshooting Made Easy: Deciphering Alfresco mTLS Confi...
Alfresco TTL#157 - Troubleshooting Made Easy: Deciphering Alfresco mTLS Confi...Alfresco TTL#157 - Troubleshooting Made Easy: Deciphering Alfresco mTLS Confi...
Alfresco TTL#157 - Troubleshooting Made Easy: Deciphering Alfresco mTLS Confi...Angel Borroy López
 
CRM Contender Series: HubSpot vs. Salesforce
CRM Contender Series: HubSpot vs. SalesforceCRM Contender Series: HubSpot vs. Salesforce
CRM Contender Series: HubSpot vs. SalesforceBrainSell Technologies
 
React Server Component in Next.js by Hanief Utama
React Server Component in Next.js by Hanief UtamaReact Server Component in Next.js by Hanief Utama
React Server Component in Next.js by Hanief UtamaHanief Utama
 
SpotFlow: Tracking Method Calls and States at Runtime
SpotFlow: Tracking Method Calls and States at RuntimeSpotFlow: Tracking Method Calls and States at Runtime
SpotFlow: Tracking Method Calls and States at Runtimeandrehoraa
 
Post Quantum Cryptography – The Impact on Identity
Post Quantum Cryptography – The Impact on IdentityPost Quantum Cryptography – The Impact on Identity
Post Quantum Cryptography – The Impact on Identityteam-WIBU
 
Recruitment Management Software Benefits (Infographic)
Recruitment Management Software Benefits (Infographic)Recruitment Management Software Benefits (Infographic)
Recruitment Management Software Benefits (Infographic)Hr365.us smith
 
A healthy diet for your Java application Devoxx France.pdf
A healthy diet for your Java application Devoxx France.pdfA healthy diet for your Java application Devoxx France.pdf
A healthy diet for your Java application Devoxx France.pdfMarharyta Nedzelska
 
Unveiling the Future: Sylius 2.0 New Features
Unveiling the Future: Sylius 2.0 New FeaturesUnveiling the Future: Sylius 2.0 New Features
Unveiling the Future: Sylius 2.0 New FeaturesŁukasz Chruściel
 
英国UN学位证,北安普顿大学毕业证书1:1制作
英国UN学位证,北安普顿大学毕业证书1:1制作英国UN学位证,北安普顿大学毕业证书1:1制作
英国UN学位证,北安普顿大学毕业证书1:1制作qr0udbr0
 
Open Source Summit NA 2024: Open Source Cloud Costs - OpenCost's Impact on En...
Open Source Summit NA 2024: Open Source Cloud Costs - OpenCost's Impact on En...Open Source Summit NA 2024: Open Source Cloud Costs - OpenCost's Impact on En...
Open Source Summit NA 2024: Open Source Cloud Costs - OpenCost's Impact on En...Matt Ray
 

Dernier (20)

SensoDat: Simulation-based Sensor Dataset of Self-driving Cars
SensoDat: Simulation-based Sensor Dataset of Self-driving CarsSensoDat: Simulation-based Sensor Dataset of Self-driving Cars
SensoDat: Simulation-based Sensor Dataset of Self-driving Cars
 
Odoo 14 - eLearning Module In Odoo 14 Enterprise
Odoo 14 - eLearning Module In Odoo 14 EnterpriseOdoo 14 - eLearning Module In Odoo 14 Enterprise
Odoo 14 - eLearning Module In Odoo 14 Enterprise
 
Intelligent Home Wi-Fi Solutions | ThinkPalm
Intelligent Home Wi-Fi Solutions | ThinkPalmIntelligent Home Wi-Fi Solutions | ThinkPalm
Intelligent Home Wi-Fi Solutions | ThinkPalm
 
Introduction Computer Science - Software Design.pdf
Introduction Computer Science - Software Design.pdfIntroduction Computer Science - Software Design.pdf
Introduction Computer Science - Software Design.pdf
 
MYjobs Presentation Django-based project
MYjobs Presentation Django-based projectMYjobs Presentation Django-based project
MYjobs Presentation Django-based project
 
20240415 [Container Plumbing Days] Usernetes Gen2 - Kubernetes in Rootless Do...
20240415 [Container Plumbing Days] Usernetes Gen2 - Kubernetes in Rootless Do...20240415 [Container Plumbing Days] Usernetes Gen2 - Kubernetes in Rootless Do...
20240415 [Container Plumbing Days] Usernetes Gen2 - Kubernetes in Rootless Do...
 
Automate your Kamailio Test Calls - Kamailio World 2024
Automate your Kamailio Test Calls - Kamailio World 2024Automate your Kamailio Test Calls - Kamailio World 2024
Automate your Kamailio Test Calls - Kamailio World 2024
 
How to submit a standout Adobe Champion Application
How to submit a standout Adobe Champion ApplicationHow to submit a standout Adobe Champion Application
How to submit a standout Adobe Champion Application
 
Cloud Data Center Network Construction - IEEE
Cloud Data Center Network Construction - IEEECloud Data Center Network Construction - IEEE
Cloud Data Center Network Construction - IEEE
 
Alfresco TTL#157 - Troubleshooting Made Easy: Deciphering Alfresco mTLS Confi...
Alfresco TTL#157 - Troubleshooting Made Easy: Deciphering Alfresco mTLS Confi...Alfresco TTL#157 - Troubleshooting Made Easy: Deciphering Alfresco mTLS Confi...
Alfresco TTL#157 - Troubleshooting Made Easy: Deciphering Alfresco mTLS Confi...
 
CRM Contender Series: HubSpot vs. Salesforce
CRM Contender Series: HubSpot vs. SalesforceCRM Contender Series: HubSpot vs. Salesforce
CRM Contender Series: HubSpot vs. Salesforce
 
React Server Component in Next.js by Hanief Utama
React Server Component in Next.js by Hanief UtamaReact Server Component in Next.js by Hanief Utama
React Server Component in Next.js by Hanief Utama
 
Hot Sexy call girls in Patel Nagar🔝 9953056974 🔝 escort Service
Hot Sexy call girls in Patel Nagar🔝 9953056974 🔝 escort ServiceHot Sexy call girls in Patel Nagar🔝 9953056974 🔝 escort Service
Hot Sexy call girls in Patel Nagar🔝 9953056974 🔝 escort Service
 
SpotFlow: Tracking Method Calls and States at Runtime
SpotFlow: Tracking Method Calls and States at RuntimeSpotFlow: Tracking Method Calls and States at Runtime
SpotFlow: Tracking Method Calls and States at Runtime
 
Post Quantum Cryptography – The Impact on Identity
Post Quantum Cryptography – The Impact on IdentityPost Quantum Cryptography – The Impact on Identity
Post Quantum Cryptography – The Impact on Identity
 
Recruitment Management Software Benefits (Infographic)
Recruitment Management Software Benefits (Infographic)Recruitment Management Software Benefits (Infographic)
Recruitment Management Software Benefits (Infographic)
 
A healthy diet for your Java application Devoxx France.pdf
A healthy diet for your Java application Devoxx France.pdfA healthy diet for your Java application Devoxx France.pdf
A healthy diet for your Java application Devoxx France.pdf
 
Unveiling the Future: Sylius 2.0 New Features
Unveiling the Future: Sylius 2.0 New FeaturesUnveiling the Future: Sylius 2.0 New Features
Unveiling the Future: Sylius 2.0 New Features
 
英国UN学位证,北安普顿大学毕业证书1:1制作
英国UN学位证,北安普顿大学毕业证书1:1制作英国UN学位证,北安普顿大学毕业证书1:1制作
英国UN学位证,北安普顿大学毕业证书1:1制作
 
Open Source Summit NA 2024: Open Source Cloud Costs - OpenCost's Impact on En...
Open Source Summit NA 2024: Open Source Cloud Costs - OpenCost's Impact on En...Open Source Summit NA 2024: Open Source Cloud Costs - OpenCost's Impact on En...
Open Source Summit NA 2024: Open Source Cloud Costs - OpenCost's Impact on En...
 

OSSNA18: Xen Beginners Training (exercise script)

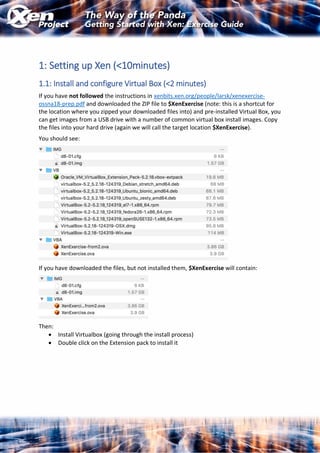
  • 1. 1: Setting up Xen (<10minutes) 1.1: Install and configure Virtual Box (<2 minutes) If you have not followed the instructions in xenbits.xen.org/people/larsk/xenexercise- ossna18-prep.pdf and downloaded the ZIP file to $XenExercise (note: this is a shortcut for the location where you zipped your downloaded files into) and pre-installed Virtual Box, you can get images from a USB drive with a number of common virtual box install images. Copy the files into your hard drive (again we will call the target location $XenExercise). You should see: If you have downloaded the files, but not installed them, $XenExercise will contain: Then: • Install Virtualbox (going through the install process) • Double click on the Extension pack to install it
  • 2. Before you start, go to File  Host Network Manager. If it does not show vboxnet0, press create, after which you should see: 1.2: Import Virtual Box Image Start VirtualBox and install the XenExercise.ova VirtualBox image by going to File  Import Appliance in the menu bar. Click the Open Appliance menu to select our OVA file. Once you have selected the file, click Next. The next window will show you the configuration of virtual appliance we use for the exercise. You can scroll through the configuration list and double click on any item (or check/uncheck the box) to make changes to it, but we set up everything for the demo. Lastly, click Import. Virtualbox will proceed to import the virtual machine into your library. The import should take 1-2 minutes. Once the process is completed, you should be able to see the new VM in your list.
  • 3. 1.2.1: Number of CPUs Now we change the number of CPUs that Virtual Box will expose to the VM we just created: we need 2 for the demo. Go to Settings  System  Processor and you will see Put the slider to 2 CPUs (as long as it is in the green area) and press OK. Background Note: The image has been set up to use two network configurations. You can see these by going to Settings and the Network tab: and check and see whether • Adaptor 1 is set to NAT. • Adaptor 2 is attached to Host-only Adapter: under Advanced, Promiscuous Mode should be set to Allow All. If this isn't set you won't be able to ssh into Xen Guests. The VirtualBox network set-up is relatively unusual: normally we would set up a single bridged network to allow for the ability of guests to connect to the internet while also being able to ssh into guests from your laptop. However, for wifi networks bridging does not work reliably. To work around this, we set up NAT – which allows internet access but no ssh access, while Host-only allows ssh access. By setting up two adaptors, we can get both.
  • 4. Press Start on the newly created VM, which will start the exercise VM in Virtual Box, your system will look like this: At this point, we have a virtual environment that is equivalent to a dedicated machine with CentOS 7 installed, on which you can then install the Xen Hypervisor. You can now log into the host via root and xenroot from within the XenExercise window. 1.2.2: Keyboard Settings Make sure you have your preferred keyboard set up: the default should be us: you can use Dom0# localectl set-keymap <map> to change this permanently. 1.2.3: Get your hosts IP address and open Terminal Within the XenExercise window execute Dom0# ip addr | grep 192.168 and write down the IP address. The one you can `ssh` to from a terminal will start with `192.168`. Open your favourite terminal and ssh in: Dom0# ssh root@192.168.56.101 and write down the IP address. At this point you can hide the VirtualBox and XenExercise window, as we will not need it anymore.
  • 5. Note: Instead of writing down the IP addresses you can also edit the /etc/hosts file on Linux and mac using. You can use the same approach with other guests that we create $ sudo vi /etc/hosts Adding, and then saving ## XenExercise 192.168.56.101 dom0 On windows the file is in c:WindowsSystem32Driversetchosts and can be edited with Notepad run as administrator. 1.2.4: Demo Directory The image contains a few pre-downloaded files in Dom0# ls -a /demo • scripts: contains CentOS 7 networking scripts and other utility scripts • images: this will be the location where we store demo related files • master-images: pre-downloaded files for different types of guests • mersienne-prime.py: a little compute intensive python workload
  • 6. 1.3: Installing Xen Now install the packages that enable Xen. These are developed and maintained by the CentOS Virt SIG: Dom0# yum install -y centos-release-xen-48 Update to a Dom0 capable Linux Kernel: Dom0# yum update -y kernel Now install Xen Dom0# yum install -y xen Configure the Network – aka we enable Configure the Network – aka we enable host bridge mode: Dom0# /demo/scripts/bridge-setup.sh and verify that it worked Dom0# nmcli con NAME UUID TYPE DEVICE eth0 e21723e8-8149-4b15-aa48-cf0072a30621 ethernet eth0 eth1 6646618b-2e6c-4b58-aecd-f4213f83a067 ethernet eth1 xenbr0 6c0345ae-a1c8-4016-adcc-dbd18759d0d7 bridge xenbr0 xenbr1 e9091911-fc8d-4ff3-9c8a-2ac47da0f348 bridge xenbr1 In the example, xenbr0 is connected to eth0 and xenbr1 to eth1. In a standard set-up, you would only have one bridge. Then reboot: you may want to unhide the XenExercise window, such that you can see what is happening to the system: Dom0# reboot When the VM boots, you should see the following bootloader menu: Reconnect your console via ssh (see 1.2.3) after the reboot.
  • 7. Note: We created an OVA image of the VM, called XenExercises-from2.ova, in case the internet connection is poor. You should have downloaded this, or get it from the USB drive that we have handed out. The file is in the OVA/Sections directory. Follow the relevant steps in section 1.2 of this document. 2: Verifying the Xen Install & Start a Guest (<10minutes) 2.1: Exploring the Install Locations and Services First, we are going to explore some file system locations post the Xen install Dom0# ls /etc/xen Contains example configuration file examples for VMs: • xl.conf: global Xen configuration file • xlexample.hvm, xlexample.pvlinux: examples for HVM and PV guests • auto: autostart VMs after restart when the xendomains service is enabled, e.g. ln -s /etc/xen/MY_DOMU_GUEST_1.cfg /etc/xen/auto/ • scripts: example scripts for networking, storage, … Note that configuration files for Xen guests do not need to be stored in this directory, but usually are. Dom0# ls /usr/lib64/xen • bin: contains binaries for System Services such as the Device Model (QEMU), that run in Dom0. Note that this is not the only location for such services (you will also find some in /proc/xen and other locations) • boot: contains binaries related to booting guests Note that on CentOS you can check which services are running via Dom0# systemctl list-units --all | grep xen While services are stopped or started via systemctl start|stop [service_name] 2.2: Exploring the System The following command shows you Xen system information Dom0# xl info The following command shows the Virtual Machines that you are running Dom0# xl list
  • 8. 2.3: Create a Guest from a prepared image Note: We created CentOS 7 QCOW2 image which contains an installed guest OS, such that we do not have to go through the full OS install process during the exercise. You can find the image in /demo/master-images A number of services (free and paid for) are available to download pre-prepared Xen guest images for various operating systems. To create a guest from it, copy the master image Dom0# cd /demo Dom0# cp master-images/centos7/c7-master.qcow2 images/c7-01.qcow2 Then make a copy of PV example Dom0# cp master-images/centos7/c7-master.cfg images/c7-01.cfg Generate a unique mac addresses for each outward connection of your VM Dom0# /demo/scripts/make-mac.sh c7-01 5a:27:56:fa:05:0b Dom0# /demo/scripts/make-mac.sh c7-01 xenbr1 5a:27:7f:22:1e:0b Now cd into /demo/images and edit the config file (lines that need to change are highlighted in bold) name="c7-01" type="pv" bootloader="pygrub" memory=512 maxmem = 1024 vcpus = 1 vif = ['mac=5a:27:56:fa:05:0b', 'bridge=xenbr1,mac=5a:27:7f:22:1e:0b'] disk = ['vdev=xvda,format=qcow2,target=/demo/images/c7-01.qcow2'] Then start the guest Dom0# xl create c7-01.cfg -c The -c option will attach a console to the guest after start. You will then see the bootloader menu, in this case pygrub. Wait or select the default and do nothing: The guest will boot and after a few seconds ask for the login prompt.
  • 9. 2.3.1: Connect to the guest, get the guest IP address, copy example workload In the previous exercise we attached the console when we started the guest. Now we exit the console by pressing Ctrl+] and reset the screen using clear. Then connect to the guest using xl console Dom0# xl console c7-01 and log in via root and xenroot. Note that this has the same effect as the -c option when we created the guest. As in step 1.2.3, get the IP address and connect to the guest via ssh in a second shell window. You may also want to exit the first console via Ctrl+]. Now we are going to copy an example workload from Dom0 to the guest c7-01# scp root@192.168.56.101:/demo/mersienne-prime.py . and log in via root and xenroot. As in step 1.2.3, get the IP address and connect to the guest via ssh in a second shell window. You may also want to exit the first console via Ctrl+]. 2.3.2: xl top Within the c7-01 terminal, execute the just downloaded workload c7-01# python mersienne-prime.py and in the Dom0 terminal, execute c7-01# xl top
  • 10. Note: For this section to work you need to have set up VirtualBox with 2 CPUs. If you have not done so earlier, please shut down your Xen VM, then the VirtualBox host and follow the steps in section 1.2.1. Then restart the host. Note that when you shut down the host (aka VirtualBox) your system will only start with Dom0. Your terminal windows will lose the ssh connection: keep the Dom0 terminal window open. Then ssh in again. 3: VCPUs, Memory, … (<15minutes) As we have previously created a number of VM’s we will shut these down Dom0# xl shutdown -a Then perform Dom0# xl list Name ID Mem VCPUs State Time(s) Domain-0 0 1024 4 r----- 27.8 We are now going to create a clone of the c7-01 VM (which already has our test app mersienne-prime.py installed in it) by making copies of the qcow and cfg files in the demo/images directory Dom0# cp c7-01.cfg c7-02.cfg Dom0# cp c7-01.qcow2 c7-02.qcow2 Generate a unique mac addresses for each outward connection of your VM Dom0# /demo/scripts/make-mac.sh c7-02 5a:27:56:fa:05:ab Dom0# /demo/scripts/make-mac.sh c7-02 xenbr1 5a:27:7f:22:1e:ab Now edit the highlighted entries in c7-02.cfg name="c7-02" vcpu=2 vif = [ 'mac=5a:27:56:fa:05:ab', 'bridge=xenbr1,mac=5a:27:7f:22:1e:ab'] disk= [ 'vdev=xvda,format=qcow2,target=/demo/images/c7-02.qcow2'] Now start both VMs Dom0# xl create c7-01.cfg Now create the second guest, get the IP address and exit. Dom0# xl create c7-02.cfg -c
  • 11. 3.1: VCPUs To show the effect of VCPUs on performance, we have created the second guest with 2 VCPUs: Dom0# xl list Name ID Mem VCPUs State Time(s) Domain-0 0 1024 2 r----- 69.9 c7-01 3 512 1 -b---- 11.1 c7-02 5 512 2 -b---- 16.0 We then create two more terminal windows, arrange them as in the picture below, using ssh two log into the two VMs as per the picture. Then we execute xl top in Dom0 and python mersienne-prime.py in terminal 1 & 2. Note: Because the python script is a single process, the larger number of VCPUs does not make a difference in performance. Setup 1: Let’s see what happens when we do the following: exit the scripts in all VMs. Then execute python mersienne-prime.py in terminal 1 & 2 & 4. We execute python mersienne-prime.py in each terminal window: essentially, we are doubling the compute load in c7-02. Xentop shows the following:
  • 12. To get the performance of each Mersienne Prime process look for M<M-number>(<timestamp>): <number>) in the output! Looking at xl top and the time stamps • shows c7-01 getting 50% of the CPU time of c7-02 • each run of mersienne-prime.py takes a similar complete time Setup 2: Now let’s try the same in terminal 1 & 2 & 3. Looking at xl top and the time stamps • shows c7-01 and c7-02 getting near 100% of CPU time • each run of mersienne-prime.py on c7-01 is 50% of that of c7-02 3.1.1: CPU Pinning Setup 3: Now we use pinning to pin the single VCPU of c7-01 and the two VCPUs of c7-02 to CPU 1. To do this we first list VCPU information Dom0# xl vcpu-list Name ID VCPU CPU State Time(s) Affinity (Hard / Soft) Domain-0 0 0 0 -b- 41.4 all / all Domain-0 0 1 1 r-- 39.3 all / all c7-01 1 0 0 -b- 173.0 all / all c7-02 2 0 0 -b- 165.1 all / all c7-02 2 1 0 -b- 152.0 all / all We then pin the CPUs: note that the command requires using the Domain ID (not the domain name), which in the example above is 1 for c7-01 and 2 for c7-02 Dom0# xl vcpu-pin 1 0 1; xl vcpu-pin 2 0 1; xl vcpu-pin 2 1 1 We then make sure that Dom0 runs only on other VCPUs but 1 Dom0# xl vcpu-pin 0 0 0; xl vcpu-pin 0 1 0 We then make sure that Dom0 runs only on other VCPUs but 1, do another xl vcpu-list and check if everything is fine run xl top in Dom0. Dom0# xl vcpu-list Name ID VCPU CPU State Time(s) Affinity (Hard / Soft) Domain-0 0 0 0 -b- 41.4 0 / all Domain-0 0 1 0 r-- 39.3 0 / all c7-01 1 0 1 -b- 173.0 0 / all c7-02 2 0 1 -b- 165.1 1 / all c7-02 2 1 1 -b- 152.0 1 / all We now execute python mersienne-prime.py in terminal 1 & 2 & 4.
  • 13. Looking at xl top and the time stamps of each Mersienne Prime process in different windows (timestamps are at M<M-number>(<timestamp>): <number>), you will see that: • shows c7-01 getting 33% of CPU while c7-02 is getting 66% • each run of mersienne-prime.py takes a similar complete time This is what we would expect in this case. Final Note: Using pinning and scheduling can be used to optimise system performance – in particular when you have heavy workloads. In particular when you have very different workloads running in an identical VM. It is also useful when using NUMA architectures. For more information see • https://wiki.xenproject.org/wiki/Tuning_Xen_for_Performance • https://wiki.xenproject.org/wiki/Category:NUMA In addition, you can also change schedulers, as well as control the behaviour of individual schedulers. • See https://wiki.xenproject.org/wiki/Category:Scheduler Cleanup: Now close terminals 2 – 4 3.2: Memory Now we look at a number of commands and config options to manipulate the memory available to a host: for c7-01 we the maximum amount of memory available is 1G. Dom0# xl list Name ID Mem VCPUs State Time(s) Domain-0 0 1024 2 r----- 209.8 c7-01 1 512 1 -b---- 469.3 c7-02 2 512 1 -b---- 324.4 Perform free c7-01# free total used free shared buff/cache available Mem: 488484 90420 273072 4344 124992 359864 Swap: 419836 0 419836 Now we change the domains memory by executing Dom0# xl mem-set c7-01 1024m And check the memory again c7-01# free total used free shared buff/cache available Mem: 1012772 90528 797248 4344 124996 884060 Swap: 419836 0 419836
  • 14. 4: Save and Restore (<5minutes) In this exercise we will use the save and restore functionality, which are building blocks of live migration. We will simulate what happens during live migration on a single host. We will do this with c7-01. To save some space on our very small exercise disk, we will shut-down c7-01 and delete its disk (but keep the config file) Dom0# xl shutdown c7-02 Dom0# rm -f c7-02.qcow2 Now we type in (without pressing return such that we get a heavy workload with interesting output saved) Dom0# xl save c7-01 c7-01.cpt <DO NOT YET PRESS ENTER> and start the Mersienne script in c7-01. Note that this time we will c7-01# python mersienne-prime.py 2> mersienne.log Then very quickly press return in the Dom0 terminal Dom0# xl save c7-01 c7-01.cpt xc: info: Saving domain 3, type x86 PV xc: Frames: 262144/262144 100% xc: End of stream: 0/0 0% The c7-01 terminal managed to compute numbers up to in my test run. You should see something similar: M15(0.3505): 10407932194664399081925240327364085538615262247266704805319112 350403608059673360298012239441732324184842421613954281007791383566248323464 908139906605677320762924129509389220345773183349661583550472959420547689811 211693677147548478866962501384438260291732348885311160828538416585028255604 666224831890918801847068222203140521026698435488732958028878050869736186900 714720710555703168729087 The c7-01 VM has been destroyed which you can check via xl list. Now we restore c7-01 from the just created c7-01.cpt file, which contains the VMs memory and CPU state. Dom0# xl restore c7-01.cpt Loading new save file c7-01.cpt (new xl fmt info 0x3/0x0/1123) Savefile contains xl domain config in JSON format Parsing config from <saved> xc: info: Found x86 PV domain from Xen 4.8 xc: info: Restoring domain xc: info: Restore successful xc: info: XenStore: mfn 0xc000f, dom 0, evt 1 xc: info: Console: mfn 0xc000e, dom 0, evt 2 Note that configuration file was embedded into the configuration file. Also note that the ssh terminal connection to c7-01 should not yet have been lost and output should continue to
  • 15. be directed to it from now. Of course, in a real-life scenario we would have migrated the VM to another host, where this does not apply. However, if you lost your terminal connection, first execute xl top: you should see that c7- 01 is running at 100%. Reconnect to c7-01 via ssh and perform a ps -aux |grep mersienne and look at mersienne.log, which should have entries newer than M15(0.3505). Final Note: when migrating a guest from one host to another in essence the following steps are performed: • Host 1: Save • Host 2: Restore • Both hosts see the same filesystem and thus have access to disk images, checkpoint files as well as config files (if needed) The xl migrate command ensures coordinates the execution of save and restore on both hosts. Also, some commercial solutions based on Xen, implement additional functionality that do not require a shared host filesystem. Cleanup: Delete the just created c7-01.cpt file, such that we have enough disk space for the next exercise.
  • 16. 5: Creating Guests from Scratch (<10 minutes) Note: This exercise will require a fast and reliable internet connection as the Debian install will want to fetch packages from the internet. With reasonable bandwidth the install will take 10-20 minutes. To be able to focus on the key steps, we will • follow the exercise up to the installer • then we will get and use the file $XenExercise/IMG/d8-01.img This ensures that we can focus on the key steps, rather than the install. First ,we create an empty disk via # dd if=/dev/zero of=/demo/images/d8-01.img bs=1M count=1500 As before we create unique mac addresses: # /demo/scripts/make-mac.sh d8-01 5a:27:48:e0:4e:fb # /demo/scripts/make-mac.sh d8-01 xenbr1 5a:27:74:08:46:fb Now we copy and edit the config file and change the portions marked in red: in many cases, you simply have to uncomment the relevant portions of the file # cp /demo/master-images/debian8/debian.cfg d8-01.cfg # vi d8-01.cfg kernel = "/demo/master-images/debian8/vmlinuz" ramdisk = "/demo/master-images/debian8/initrd.gz" … extra = "debian-installer/exit/always_halt=true -- quiet console=hvc0" … memory = 512 … name = "d8-01" … vcpus = 1 … vif = [ 'mac=5a:27:48:e0:4e:fb','bridge=xenbr1,mac=5a:27:74:08:46:fb' ] … disk= [ 'vdev=xvda,format=raw,target=/demo/images/d8-01.img' ] We then create the guest, attaching the console # xl create d8-01.cfg -c
  • 17. At this point you will see: Instead of going through the install, we abort it and shut down the VM in a Dom0 terminal by executing Dom0# xl shutdown d8-01 In the Laptop terminal shell go to the $XenExercise/IMG directory: $ cd ~/Desktop/XenExercise/IMG $ scp ./d8-01.img root@192.168.56.101:/demo/images This provides the Debian image immediately after the install Note: the install was performed with default settings, with the exception of Primary internet adaptor: eth0 Hostname: d8-01 Password: xenroot User: yourname Password: yourpw Also note that – although the default – we want to Install Grub as bootloader: yes, /dev/xvda In the Dom0 terminal we have to change the guest’s config file and change the portions marked in red: in many cases, you simply have to comment out the relevant portions of the file. The reason for this is that we want to boot from the disk (now as the disk image has a Debian install in it), and not from the network Dom0# vi d8-01.cfg … #kernel = "/demo/master-images/debian8/vmlinuz" #ramdisk = "/demo/master-images/debian8/initrd.gz" … #extra = "debian-installer/exit/always_halt=true – quiet …
  • 18. #======================================================================== # TO BOOT INSTALLED SYSTEM # # Comment all of the above installation options and uncomment the # below instead #======================================================================== bootloader="pygrub" Now start the guest in the Dom0 terminal: Dom0# xl create d8-01.cfg -c and log in as root. The Debian installer has not set up eth1, nor does it allow ssh’ing into the guest without the use of ssh keys. To fix this we need to edit /etc/network/interfaces and add the portions marked in red: Dom0# vi /etc/network/interfaces # This file describes the network interfaces available on your system # and how to activate them. For more information, see interfaces(5). source /etc/network/interfaces.d/* # The loopback network interface auto lo iface lo inet loopback # The primary network interface allow-hotplug eth0 iface eth0 inet dhcp # The secondary network interface allow-hotplug eth1 iface eth1 inet dhcp and perform: Dom0# /etc/init.d/networking restart Now we need to edit /etc/ssh/sshd_config and modify the portions marked in red: Dom0# vi /etc/ssh/sshd_config … # Authentication: LoginGraceTime 120 PermitRootLogin yes StrictModes yes … and perform: Dom0# /etc/init.d/ssh restart
  • 19. Now we get the IP address in the usual way and write it down, leave the terminal via Ctrl+] and re-attach from a new terminal window via ssh.