SlideShare une entreprise Scribd logo
1  sur  32
Télécharger pour lire hors ligne
MINOX NVD mini
1
2 3 4 5 6 7 89
Mnx_Man_NVDmini_RZ_neu.indd 1 08.02.11 11:28
2
Inhaltsverzeichnis
Einleitung  .  .  .  .  .  .  .  .  .  .  .  .  .  .  .  .  .  .  .  .  .  .  .  .  .  .  .  .  .  .  .  .  .  .  . Seite 3
Lernen Sie Ihr Nachtsichtgerät kennen .  .  .  .  .  .  .  .  .  .  .  .  .  .  .  .  .  .  .  .  . Seite 4
Inbetriebnahme und Anwendung . . . . . . . . . . . . . . . . . . . . . . . . Seite 5
Fokussierung (Scharfeinstellung) . . . . . . . . . . . . . . . . . . . . . . . . Seite 5
Aufladen des Akkus  .  .  .  .  .  .  .  .  .  .  .  .  .  .  .  .  .  .  .  .  .  .  .  .  .  .  .  .  .  . Seite 6
Anzeichen niedriger Batterieladezustand  .  .  .  .  .  .  .  .  .  .  .  .  .  .  .  .  .  .  . Seite 7
Wichtige Informationen  .  .  .  .  .  .  .  .  .  .  .  .  .  .  .  .  .  .  .  .  .  .  .  .  .  .  .  . Seite 8
Pflegetipps .  .  .  .  .  .  .  .  .  .  .  .  .  .  .  .  .  .  .  .  .  .  .  .  .  .  .  .  .  .  .  .  .  .  . Seite 8
Technische Daten . . . . . . . . . . . . . . . . . . . . . . . . . . . . . . . . Seite 9
Gewährleistungsbestimmungen  .  .  .  .  .  .  .  .  .  .  .  .  .  .  .  .  .  .  .  .  .  .  .  . Seite 10
Kundendienst  .  .  .  .  .  .  .  .  .  .  .  .  .  .  .  .  .  .  .  .  .  .  .  .  .  .  .  .  .  .  .  .  .  . Seite 11
Mnx_Man_NVDmini_RZ_neu.indd 2 08.02.11 11:28
3
Einleitung
Sehr geehrter MINOX Kunde,
herzlichen Glückwunsch zum Kauf dieses
MINOX Nachtsichtgerätes. Mit diesem Gerät
haben Sie sich für ein Produkt von höchster
optischer und feinmechanischer Qualität
entschieden.
Diese Anleitung soll Ihnen ein Berater sein, um
das Leistungsspektrum Ihres MINOX
Nachtsichtgerätes optimal zu nutzen.
Wir wünschen Ihnen mit Ihrem MINOX
Nachtsichtgerät viel Freude und mit Sicherheit
den perfekten Durchblick!
Mnx_Man_NVDmini_RZ_neu.indd 3 08.02.11 11:28
4
Lernen Sie Ihr
Nachtsichtgerät kennen
Bedienelemente
1.	 AN/AUS Hauptschalter (Power)
2.	 Objektiv
3.	 Infrarot-LED Lampen
4.	 Objektiv Fokussier-Ring
5.	 Ladeanschluss (DC 5V, 500 mA) für Akku
6.	Grüne LED zur Anzeige des Ladezustands
während des Ladevorgangs
7.	 Schutzabdeckung für Ladeanschluss
8.	 Trage-Clip
9.	 Okular, fokussierbar
Bei dem NVD mini handelt es sich um ein
hochwertiges, technisch anspruchsvolles
opto-elektronisches Gerät, dessen spezieller
Anwendungsbereich in der Beobachtung und
Orientierung bei Nacht und in der Dämmerung
liegt. Die Betriebstemperatur liegt zwischen
-30° und +50°. Dank seiner äußerst
kompakten Abmessungen ist es bequem zu
bedienen und immer und überall ein
zuverlässiger Begleiter. Bei richtigem
Gebrauch werden Sie viele Jahre Freude mit
Ihrem neuen MINOX Nachtsichtgerät haben.
Mnx_Man_NVDmini_RZ_neu.indd 4 08.02.11 11:28
5
Inbetriebnahme und Anwendung
Ihr MINOX NVD mini lässt sich über den AN/
AUS Hauptschalter (Power) (1) auf der oberen
Seite des Gehäuses ein- und ausschalten.
Drücken Sie einfach den AN/AUS
Hauptschalter (Power) (1) und halten Sie
diesen gedrückt. Das Gerät schaltet sich ein
und bleibt eingeschaltet so lange Sie diesen
Schalter gedrückt halten. Beim Durchschauen
durch Ihr Nachtsichtgerät sehen Sie das
anvisierte Motiv auf dem grünen Monitor. Die
Infrarot-Beleuchtung hat sich eingeschaltet.
Beim Loslassen des AN/AUS Hauptschalter
(Power) (1) schaltet sich Ihr Nachtsichtgerät
wieder aus.
Fokussierung (Scharfeinstellung)
Visieren Sie ein Objekt in einer Entfernung
von etwa 20 und 60 Metern an. Drehen Sie
nun den Objektiv Fokussier-Ring (4) so lange,
bis das Objekt scharf eingestellt ist. Um den
Monitor an Ihre persönliche Sehstärke
anzupassen, fokussieren Sie den Okularring
(9) bis Sie die Pixel des Monitors scharf
erkennen können.
Mnx_Man_NVDmini_RZ_neu.indd 5 08.02.11 11:28
Aufladen des Akkus
In Ihrem Nachtsichtgerät befindet sich ein
integrierter wieder aufladbarer Akku. Um den
Akku (wieder)aufzuladen, öffnen Sie bitte die
Schutzabdeckung für den Batterieladeanschluss
(7) an der Unterseite des Gerätes.
Der Akku Ihres Nachtsichtgerätes kann über
das mitgelieferte USB-Kabel über einen USB-
Anschluss geladen werden. Verbinden Sie Ihr
Nachtsichtgerät mit dem USB-Kabel. Das
andere Ende des USB-Kabels verbinden Sie nun
bitte mit dem USB-Anschluss eines
eingeschalteten Computers. Der Akku Ihres
Nachtsichtgerätes beginnt nun zu laden. Eine
kleine grüne LED (6), die sich unterhalb am
Ende des Trage-Clips (8), neben der
Ladeanschlussbuchse (5) befindet, beginnt zu
leuchten. Sobald der Akku voll geladen ist,
erlischt die LED-Anzeige. Entfernen Sie nach
vollständiger Ladevorgang das Kabel und
schließen die Schutzabdeckung.
Das MINOX NVD mini wird in zwei
verschiedenen Verpackungseinheiten
ausgeliefert. Aus Platzgründen befindet sich in
der „Air Line“ Verpackungseinheit kein
Netzadapter, da in den verschiedenen Regionen
der Welt unterschiedliche Netzadapter
Verwendung finden.
Das Laden des MINOX NVD mini ist aber immer
6
Mnx_Man_NVDmini_RZ_neu.indd 6 08.02.11 11:28
7
über das USB Kabel und dem entsprechenden
PC gewährleistet. Gerne senden wir Ihnen
kostenlos den für Ihre Region passenden
Netzadapter zu.
Bitte nehmen Sie hierzu mit uns unter
service@minox.com oder
Tel. +49 6441 917-0 Kontakt auf.
In der für den Fachhandel bestimmten
Verpackungseinheit befindet sich der für die
Region passende Netzadapter, der mit dem
USB Kabel verbunden werden kann. Das
MINOX NVD mini kann damit an jeder
herkömmlichen Steckdose geladen werden.
Anzeichen niedriger
Batterieladezustand
Sobald die Akkuleistung unterhalb von 10%
(zwischen 3 und 10%) fällt, ändert sich die
Farbe des Monitors von grün in ein schwarz-
weißes Bild. Sinkt die Akkuleistung unterhalb
einer Grenze von 3%, blinkt der Monitor 10
Mal auf bevor sich das Gerät automatisch
abschaltet. Bitte laden Sie den Akku wieder
vollständig auf, um eine maximale Leistung zu
erhalten.
Mnx_Man_NVDmini_RZ_neu.indd 7 08.02.11 11:28
Wichtige Informationen
Um irreparable Schäden an Ihrem
Nachtsichtgerät zu vermeiden, beachten Sie
bitte folgende Hinweise:
- 	Bewahren Sie das Gerät nicht unter extrem
niedrigen oder hohen Temperaturen auf.
- 	Bewahren Sie das Gerät nicht in feuchter,
staubiger oder schmutziger Umgebung auf.
- 	Setzen Sie das Gerät keinerlei
Fremdeinwirkungen aus.
- 	Setzen Sie das Gerät keinerlei Schlägen
oder Stößen aus.
- 	Nicht in helle Lichtquellen oder direkt in die
Sonne schauen.
Pflegetipps
- 	Schützen Sie das Nachtsichtgerät vor
Stürzen, Feuchtigkeit, Schmutz und
extremen Temperaturen.
- 	Schützen Sie alle optischen Oberflächen vor
Feuchtigkeit und Schleifmitteln. Diese
beschädigen die Anti-Reflexions-
Beschichtung.
- 	Entfernen Sie Staub und Schmutz von der
Linse nur mit einem weichen, trockenen
Tuch.
8
Mnx_Man_NVDmini_RZ_neu.indd 8 08.02.11 11:28
9
*	Bestellnummern USB-Netzteil
	 606350000120 EU Version
	 606350000220 UK Version
	 606350000320 US Version
Technische Daten
Vergrößerung	 2x
Sensor	 CMOS Nachtsichtsensor
Infrarotstrahler	 ca. 40 m
Beobachtungsdistanz	 ca. 60 m
Auflösung	 480 x 240
Sehfeld	 18,5 °
Betriebsspannung	 7,4 V
max. Betriebsdauer	 3 Stunden
Batterie	 Lithium Polymer
Videoausgang	 Nein
Abmessungen	 14,2 cm x 4,9cm (Durchmesser)
Gewicht	 221 g
Zubehör	 Tasche; Ladekabel
Optional erhältlich 	 Netzteil USB 500mAh*
Ladezeit	ca. 6 Stunden, basierend auf 500 mA Ausgangsleistung
	 Der maximale zulässige Ladestrom beträgt 600 mA!
Mnx_Man_NVDmini_RZ_neu.indd 9 08.02.11 11:28
10
Gewährleistungsbestimmungen
Mit dem Kauf dieses MINOX
Nachtsichtgerätes haben Sie ein Produkt
erworben, das nach besonders strengen
Qualitätsrichtlinien hergestellt und geprüft
wurde. Die für dieses Produkt geltende
gesetzliche Gewährleistung von 2 Jahren wird
von uns ab dem Tag des Verkaufs durch einen
autorisierten Händler unter folgenden
Bedingungen übernommen:
1)	In der Gewährleistungszeit werden
B e a n s t a n d u n g e n , d i e a u f
Fabrikationsfehlern beruhen, kostenlos
und nach eigenem Ermessen durch
Instandsetzung, Aus­tausch defekter Teile
oder Umtausch in ein gleichartiges
einwandfreies Erzeugnis behoben.
Weitergehende Ansprüche, gleich welcher
Art und gleich aus welchem Rechtsgrund
im Zusammenhang mit dieser Gewähr­
leistung, sind ausgeschlossen.
2)	Gewährleistungsansprüche entfallen,
wenn der betreffende Mangel auf
unsachgemäße Behandlung – wozu auch
die Verwendung von Fremdzubehör zählen
kann – zurückzuführen ist, ein Eingriff von
nicht autorisierten Personen und
Werkstätten durchgeführt oder die
Fabrikationsnummer unkenntlich gemacht
wurde.
Mnx_Man_NVDmini_RZ_neu.indd 10 08.02.11 11:28
11
3)	Gewährleistungsansprüche können nur bei
Vorlage eines maschinengeschriebenen
Kaufbelegs eines autorisierten Händlers
geltend gemacht werden.
4)	Bei Inanspruchnahme der Gewährleistung
leiten Sie bitte die MINOX Kamera
zusammen mit dem Original des
maschinengeschriebenen Kaufbelegs und
einer Schilderung der Beanstandung dem
Kundendienst der MINOX GmbH oder
einer Landesvertretung zu.
5)	Touristen steht im Bedarfsfalle unter
Vorlage des maschinengeschriebenen
Kaufbelegs die Vertretung des jeweiligen
Reiselandes gemäß den Regelungen zur
Gewährleistung der MINOX GmbH zur
Verfügung.
Kundendienst
Unser Kundendienst steht Ihnen unter
folgender  Adresse zur Verfügung:
MINOX GmbH
Walter-Zapp-Str. 4
D-35578 Wetzlar / Germany
Tel.: +49 (0) 6441 / 917-0
Fax: +49 (0) 6441 / 917-612
info@minox.com
www.minox.com
Mnx_Man_NVDmini_RZ_neu.indd 11 08.02.11 11:28
12
Contents
Introduction  .  .  .  .  .  .  .  .  .  .  .  .  .  .  .  .  .  .  .  .  .  .  .  .  .  .  .  .  .  .  .  .  .  . Page 13
Get familiar with your night vision ‘scope .  .  .  .  .  .  .  .  .  .  .  .  .  .  .  .  .  .  . Page 14
Operating the night vision scope  .  .  .  .  .  .  .  .  .  .  .  .  .  .  .  .  .  .  .  .  .  .  . Page 15
Adjustment  .  .  .  .  .  .  .  .  .  .  .  .  .  .  .  .  .  .  .  .  .  .  .  .  .  .  .  .  .  .  .  .  .  . Page 15
Charging the battery  .  .  .  .  .  .  .  .  .  .  .  .  .  .  .  .  .  .  .  .  .  .  .  .  .  .  .  .  . Page 16
Low Battery Indicator  .  .  .  .  .  .  .  .  .  .  .  .  .  .  .  .  .  .  .  .  .  .  .  .  .  .  .  .  . Page 17
Important information  .  .  .  .  .  .  .  .  .  .  .  .  .  .  .  .  .  .  .  .  .  .  .  .  .  .  .  . Page 17
Advice on care  .  .  .  .  .  .  .  .  .  .  .  .  .  .  .  .  .  .  .  .  .  .  .  .  .  .  .  .  .  .  .  .  . Page 18
Technical Data  .  .  .  .  .  .  .  .  .  .  .  .  .  .  .  .  .  .  .  .  .  .  .  .  .  .  .  .  .  .  .  .  . Page 19
Conditions of warranty  .  .  .  .  .  .  .  .  .  .  .  .  .  .  .  .  .  .  .  .  .  .  .  .  .  .  .  . Page 20
Customer Service  .  .  .  .  .  .  .  .  .  .  .  .  .  .  .  .  .  .  .  .  .  .  .  .  .  .  .  .  .  .  . Page 21
Mnx_Man_NVDmini_RZ_neu.indd 12 08.02.11 11:28
13
Introduction
Dear MINOX Customer,
Congratulations on your purchase of this night
vision ‘scope. You have chosen a product that
boasts highest optical quality and precision
mechanics.
This User’s Manual will advise you on how to
obtain the best performance results from your
MINOX night vision ‘scope.
We hope this night vision ’scope scope will give
you a great deal of pleasure and always keep
you perfectly in the picture!
Mnx_Man_NVDmini_RZ_neu.indd 13 08.02.11 11:28
14
Get familiar with your
night vision ‘scope
Control elements
1.	 POWER button
2.	 Lens
3.	 IR LEDs
4.	 Front focusing ring
5.	 DC Jack (Input DC 5V, 500mA)  
6.	 Green LED
7.	 Cover for charging connection
8.	 Clip
9.	 Eyepiece
The NVD mini is a high quality, sophisticated
optoelectronic device specially designed for
observation and orientation purposes at night
and in twilight conditions.
The temperature range is from -30° to +50° C /
-22° to +122° F. With its compact dimensions
it is easy to handle and ready for use at any
time. When used and cared for correctly this
night vision ‘scope guarantees satisfactory
operation for many years.
Mnx_Man_NVDmini_RZ_neu.indd 14 08.02.11 11:28
15
Operating the night vision scope
The night vision scope is activated by pressing
and holding the POWER button (1).
When the scope is turned on, the infrared
illumination in the front ring is also activated.
When looking through your night vision
scope, you will see the image displayed on a
green monitor.
Turn the scope off by releasing the POWER
button (1).
Adjustment
Aim at an object that is about 20 to 60 m (22
to 66 yards) away. Turn the lens focussing ring
(4) until the image is sharp. To adjust the
scope to your personal eyesight, focus the
ocular ring (9) until the pixels on the monitor
are sharp.
Mnx_Man_NVDmini_RZ_neu.indd 15 08.02.11 11:28
Charging the battery
To charge the built-in battery, open the cover for
charging connection (7), which is located on the
bottom of the unit, and connect the DC jack (5)
of the scope to an USB port of a switched-on
computer using the cable provided.
Charging begins when the green LED (6) lights
up. This green LED is located underneath the
clip directly next to charging connection.
When the charging is completed, the green
LED turns off.
After charging, remove the socket from the DC
jack and close the cover.
The MINOX NVD mini is available in two
different packaging units. Due to lack of
space, the “Air Line“ unit is not available with
an AC adapter. This is due to the fact that
different adapters are used in the various
regions of the world. However charging the
MINOX NVD mini is always possible using the
USB cable and a respective PC or laptop.
We would gladly send the appropriate AC
adapter for your region free of charge.
Please contact us under service@minox.com
or +49 6441 917-0.
The packaging units determined for retailers
are supplied with the appropriate AC adapter
16
Mnx_Man_NVDmini_RZ_neu.indd 16 08.02.11 11:28
17
for that region of the world and can be used
in combination with the USB cable. The
MINOX NVD mini can then be charged with
any wall socket from that region.
Low Battery Indicator
As soon as the rechargeable battery falls
below a level of 10% (between 3 and 10%),
the colour of the monitor changes from green
to black and white.
When the battery level is less than 3 % the
monitor flashes 10 times and then the scope
turns off automatically.
Please fully recharge the battery before use.
Important information
To avoid irreparable damage to your MINOX
night vision ‘scope, please always observe the
following instructions:
- 	Do not keep the device under extremely
low or high temperatures.
- 	Do not keep the device in damp, dusty or
dirty areas.
- 	Keep the device safe from any external
influence.
- 	Never subject the device to knocks or
impact.
Mnx_Man_NVDmini_RZ_neu.indd 17 08.02.11 11:28
Advice on care
- 	Do not look directly into bright light
sources or to the sun with your scope.
- 	Protect the Night-Vision scope against
falling, damp, dirt and extreme
temperatures. Protect all optical surfaces
against damp and abrasive agents. These
may otherwise damage the anti-reflection
coating.
-	Only remove dust and dirt from the lens
using a soft, dry cloth.
18
Mnx_Man_NVDmini_RZ_neu.indd 18 08.02.11 11:28
19
Technical Data
Optical magnification	 2x
Sensor	 CMOS Night Vision sensor
IR LED  range	 approx. 131,2 ft
Maximum visible range 	 approx. 196,8 ft
Display resolution	 480 x 240
View angle	 18.5°
Working voltage	 7.4V
Working time	 3 hours
Battery type	 Lithium Polymer
Video out 	 Not Available
Dimensions	 5.59 inch x dia 1.93 inch
Weight	 7.8 oz
Accessory	 Pouch, USB charging cable
Optionally available	 USB Adapter* 500mAh
Charging time	 6 hours based on a 500 mA supply
	 The max. charging current rating is 600 mA !
*	Order numbers USB Adapter
	 606350000120 EU Version
	 606350000220 UK Version
	 606350000320 US Version
Mnx_Man_NVDmini_RZ_neu.indd 19 08.02.11 11:28
20
Conditions of warranty
With the purchase of this MINOX product you
have acquired a product which has been
manufactured and checked to special quality
standards. For this product the MINOX GmbH
provides warranty of 2 years. The period
commences on the date of purchase from an
authorized dealer and the warranty is subject to
the following conditions:
1)	During the warranty period we shall deal with
complaints based on faulty manufacture (free
of charge) by repair, replacement of defective
parts or replacement by an identical flawless
product at our own discretion. Consequential
claims, no matter what kind of what legal
argument in connection with this warranty,
cannot be accepted.
2)	Claims under warranty are null and void, if
the defect has been caused by improper
handling – which also can include the use of
non-MINOX accessories – if the MINOX
product is serviced by unauthorized persons
or workshops, or if the serial number has been
obliterated.
3)	Warranty claims can only be made by
submission of the typewritten sales slip of an
authorized dealer.
Mnx_Man_NVDmini_RZ_neu.indd 20 08.02.11 11:28
21
4)	When submitting claims under warranty
please return the MINOX product together
with the typewritten sales slip and a
description of the claim to the MINOX GmbH
or MINOX agency.
5)	Tourists may, if required, make use of the
Agency of the country in which they are
travelling (within the terms of the Warranty
of the MINOX GmbH) by presenting the
typewritten sales slip.
Customer Service
You can reach our Customer Service under the
following address, where they will be pleased
to help you:
MINOX GmbH
Walter-Zapp-Str. 4
D-35578 Wetzlar / Germany
Tel.: +49 (0) 6441 / 917-0
Fax: +49 (0) 6441 / 917-612
info@minox.com
www.minox.com
Mnx_Man_NVDmini_RZ_neu.indd 21 08.02.11 11:28
22
Contenu
Introduction  .  .  .  .  .  .  .  .  .  .  .  .  .  .  .  .  .  .  .  .  .  .  .  .  .  .  .  .  .  .  .  .  .  . Page 23
Familiarisez-vous avec votre lunette pour vision nocturne  .  .  .  .  .  .  .  .  .  . Page 24
Mise en service et utilisation  .  .  .  .  .  .  .  .  .  .  .  .  .  .  .  .  .  .  .  .  .  .  .  .  . Page 25
Focalisation (Mise au point)  .  .  .  .  .  .  .  .  .  .  .  .  .  .  .  .  .  .  .  .  .  .  .  .  .  . Page 25
Chargement de l’accu  .  .  .  .  .  .  .  .  .  .  .  .  .  .  .  .  .  .  .  .  .  .  .  .  .  .  .  .  . Page 26
Indication du chargement insuffisant de l’accu  .  .  .  .  .  .  .  .  .  .  .  .  .  .  .  . Page 27
Informations importantes  .  .  .  .  .  .  .  .  .  .  .  .  .  .  .  .  .  .  .  .  .  .  .  .  .  .  . Page 28
Conseils d’entretien  .  .  .  .  .  .  .  .  .  .  .  .  .  .  .  .  .  .  .  .  .  .  .  .  .  .  .  .  .  . Page 28
Données techniques  .  .  .  .  .  .  .  .  .  .  .  .  .  .  .  .  .  .  .  .  .  .  .  .  .  .  .  .  .  . Page 29
Clauses de la garantie .  .  .  .  .  .  .  .  .  .  .  .  .  .  .  .  .  .  .  .  .  .  .  .  .  .  .  .  . Page 30
Service après-vente  .  .  .  .  .  .  .  .  .  .  .  .  .  .  .  .  .  .  .  .  .  .  .  .  .  .  .  .  .  . Page 31
Mnx_Man_NVDmini_RZ_neu.indd 22 08.02.11 11:28
23
Introduction
Cher client,
Nous vous félicitons d’avoir acheté cette lunette
pour vision nocturne MINOX, un instrument
d’une grande qualité optique, doté en outre
d’une mécanique  de haute précision.
Ce manuel d’utilisation vous aidera à tirer
pleinement parti de ses multiples possibilités.
Nous vous souhaitons de passer avec cette
lunette de vision nocturne de très agréables
moments d’observation, des moments qui
vaudront assurément le coup d’œil !  
Mnx_Man_NVDmini_RZ_neu.indd 23 08.02.11 11:28
24
Familiarisez-vous avec votre
lunette pour vision nocturne
Eléments d’utilisation
1.	 Interrupteur
2.	 Lentille
3.	 Diode DEL infrarouge  
4.	 Bague avant de mise au point
5.	 Connecteur DC (Entrée DC 5V, 500mA)
6.	 Diode DEL verte
7.	 Couvercle
8.	 Agrafe
9.	 Oculaire
Le NVD mini est un instrument
optoélectronique hautement. Il peut s’utiliser
en situation d’observation ou d’orientation
(combiné avec un émetteur de rayons
infrarouges) quel que soit le degré d’obscurité
(crépuscule, clair de lune, nuit étoilée ou nuit
noire) dans une plage de températures de
-30° bis +50° C. Grâce à ses dimensions
compactes, l’appareil est simple à manipuler
et utilisable à tout moment. En l’utilisant et
en l’entretenant correctement, il fonctionnera
de façon irréprochable pendant de
nombreuses années.
Mnx_Man_NVDmini_RZ_neu.indd 24 08.02.11 11:28
25
Mise en service et utilisation
Votre lunette de vision nocturne MINOX NVD
mini se connecte/déconnecte à l’aide de
l’interrupteur (POWER) (1) situé au-dessus du
boîtier. Pour l’activer, il suffit de presser en
continu sur cet interrupteur. Votre lunette
restera alors opérationnelle, aussi longtemps
que vous maintiendrez la pression   sur ce
bouton. Si vous regardez dans la lunette de
vision nocturne, vous pourrez y voir le motif
visé sur le moniteur vert. L’illumination
infrarouge s’est activée. Si vous   arrêtez
d’appuyer sur l’interrupteur (POWER) (1), la
lunette nocturne sera désactivée.
Focalisation (Mise au point)
Visez un objet situé à une distance de 20 à 60
mètres. Puis, tournez la bague de focalisation
de l’objectif   (4) jusqu’à obtention d’une
image nette de l’objet visé. Ensuite, afin
d’adapter le moniteur à votre vue, mettez au
point de nouveau avec la bague de l’oculaire
(9).
Mnx_Man_NVDmini_RZ_neu.indd 25 08.02.11 11:28
Chargement de l’accu
Votre lunette nocturne est équipée d’un accu
rechargeable incorporé. Pour le (re)charger,  
ouvrez le couvercle de protection de la
connexion USB (7) (prévue   pour son (re)
chargement (5), située sous la lunette. Cet
accu peut être (re)chargé avec le câble USB
livré de série. Pour cela, connectez ce câble au
port USB de votre lunette. Puis, l’autre
extrémité au port USB d’un ordinateur en
marche. Le processus de rechargement
commencera alors, signalé par une diode
verte (6) située au bout du clip de fixation, à
côté de la prise de chargement. Cette diode
s’éteindra automatiquement lorsque le
chargement sera accompli. Déconnectez alors
le câble USB et refermez le couvercle de
protection.
La livraison de la lunette MINOX NVD consiste
en deux paquets. Par manque de place,
l’adaptateur au secteur électrique ne se
trouve pas dans le paquet « Air Line ». Ceci
est aussi dû au fait que différents types
d’adaptateurs sont requis en fonction du pays
de leur utilisation. Cependant, il est toujours
possible de procéder au (re)chargement de la
lunette nocturne MINOX NVD mini à l’aide du
câble USB livré de série, connecté à un
ordinateur.
26
Mnx_Man_NVDmini_RZ_neu.indd 26 08.02.11 11:28
27
Bien sûr, nous vous enverrons volontiers – et
gratuitement - l’adaptateur au secteur
adéquat pour la région où vous habitez. Dans
ce but, veuillez nous contacter via internet  
sous  service@minox.com  ou par téléphone
sous le numéro +49 6441 917-0
Aux livraisons adressées à nos revendeurs
locaux, nous joignons les adaptateurs
adéquats pour leurs pays, connectables au
câble USB. La lunette de vision nocturne
MINOX NVD mini peut ainsi être (re)chargée
via une prise électrique locale.
Indication du chargement
insuffisant de l’accu
Lorsque le chargement de l’accu tombe sous
10% (entre 3 et 10%), l’image du moniteur
passe du vert au noir et blanc. Et si cette
insuffisance passe à moins de 3%, le moniteur
clignote une dizaine de fois avant l’arrêt
complet de l’appareil. Dans ce cas, il faut
recharger l’accu à fond pour retrouver un
fonctionnement pleinement performant.  
Mnx_Man_NVDmini_RZ_neu.indd 27 08.02.11 11:28
Informations importantes
Pour éviter un risque éventuel de dommage
irréparable à votre lunette de vision nocturne,
veuillez suivre les conseils suivants:  
- 	Évitez de la soumettre à des températures
extrêmes, hautes ou basses.
- 	Évitez de laisser cette lunette dans une
atmosphère humide, poussiéreuse ou
malpropre.
- 	Évitez tout contact environnemental qui
pourrait lui être nocif.
- 	Évitez de soumettre cette lunette à chocs,
coups ou chutes.
- 	Avec elle, évitez de viser vers une source
lumineuse vive ou en direction du soleil
28
Conseils d’entretien
- 	Évitez à cette lunette de vision nocturne les
chutes, l’humidité et les températures
extrêmes.
- 	Évitez aux surfaces optiques tout contact
avec l‘humidité et les produits
- 	Abrasifs car ceux-ci risquent d’endommager
leur traitement antireflet.
- 	Pour éloignez la poussière et les impuretés
des lentilles utilisez un chiffon doux et sec.
Mnx_Man_NVDmini_RZ_neu.indd 28 08.02.11 11:28
29
Données techniques
Grossissement	 2x
Capteur	 Capteur pour vision nocturne CMOS
Portée de la diode DEL (en m.)	 env. 40 m
Portée max. de visibilité (en m.) 	 env. 60 m
Résolution de l’affichage 	 480 x 240
Angle de vision 	 18,5 deg
Voltage de travail 	 7,4V
Durée de travail 	 3 heures
Type d’accu 	 Lithium polymère
Sortie vidéo 	 Non inclue  
Dimensions	 14.2 cm x Dia 4.9 cm
Poids 	 220 g
Accessoires 	 Sac; Câble de chargement
En option  	 Alimentation électrique USB* 500mAh
Durée de chargement 	 6 heures à base de 500 mA puissance de sortie
	 La tension électrique maximum: 600 mA !
*	Numéro de commande
	 Alimentation électrique USB
	 606350000120 EU Version
	 606350000220 UK Version
	 606350000320 US Version
Mnx_Man_NVDmini_RZ_neu.indd 29 08.02.11 11:28
30
Clauses de la garantie
En achetant cette caméra MINOX, vous avez
acquis un produit qui a été fabriqué et éprouvé
suivant des normes de qualité particulièrement
sévères.
La garantie légale de 2 ans, en vigueur pour ce
produit, est prise en charge par nos soins à
compter du jour de la vente par un négociant
agréé dans les conditions suivantes:
1)	Il sera remédié, au cours de la période de
garantie, aux réclamations qui se fondent
sur des défauts de fabrication, gratuitement
et, suivant notre propre appréciation, par le
biais d'une remise en état, d'un changement
des pièces défectueuses ou d'un échange
contre un produit en parfait état et de même
type. Les demandes qui dé­passeraient ce
cadre, quelle que soit leur nature et quel que
soit leur motif juridique en rapport avec la
présente prestation de garantie, sont
exclues.
2)	­Les droits à la garantie sont supprimés si le
défaut en question est imputable à une
manipulation incorrecte – l'utilisation
d'accessoires étrangers pouvant aussi en
faire partie – si une interven-tion a été
effectuée par des personnes et des ateliers
non autorisés ou si le numéro de fabri­cation
a été rendu méconnaissable.
Mnx_Man_NVDmini_RZ_neu.indd 30 08.02.11 11:28
31
3)	Les droits à la garantie ne peuvent être
invoqués que sur présentation d'un
justificatif d'achat imprimé émanant d'un
négociant autorisé.
4) En cas de recours à la garantie, veuillez faire
parvenir la caméra MINOX, accompagnée de
l'original du justifi­catif d'achat imprimé et
d'un exposé de la réclamation, au service
clients de la MINOX GmbH ou à une
succursale régionale.
5)	­En cas de besoin, la succursale du pays de
destination correspondant se tient à la
disposition des touristes, conformément aux
règles qui régissent la prestation de garantie
de la MINOX GmbH, sur présentation du
justifi­catif d'achat imprimé.
Service après-vente
Notre service après-vente se tient à votre
disposition à l’adresse suivante:
MINOX GmbH
Walter-Zapp-Str. 4
D-35578 Wetzlar / Germany
Tel.: +49 (0) 6441 / 917-0
Fax: +49 (0) 6441 / 917-612
info@minox.com
www.minox.com
Mnx_Man_NVDmini_RZ_neu.indd 31 08.02.11 11:28
MINOX NVD mini
Anleitung
Instruction
Mode d’emploi
Minox NVD mini
• Deutsch
• English
• Français
Änderungen in Konstruktion und Ausführung vorbehalten.
Die Marke MINOX ist eine eingetragene Marke der MINOX GmbH, Wetzlar.
Design subject to alterations without notice.
MINOX is a registered trademark of MINOX GmbH, Wetzlar.
Sous réserve de modifications.
MINOX est une marque déposée par MINOX GmbH, Wetzlar.
MINOX GmbH
Walter-Zapp-Str. 4
D-35578 Wetzlar, Germany
Tel.: +49 (0) 6441 / 917-0
Fax: +49 (0) 6441 / 917-612
e-mail: info@minox.com
www.minox.com 99478 01/11
Minox NVD mini
Mnx_Man_NVDmini_RZ.indd 32-34 14.01.11 07:43

Contenu connexe

En vedette

PUBKON 2103: Barrierefrei publizieren – Schnell und einfach
PUBKON 2103: Barrierefrei publizieren – Schnell und einfachPUBKON 2103: Barrierefrei publizieren – Schnell und einfach
PUBKON 2103: Barrierefrei publizieren – Schnell und einfachKlaas Posselt
 
Erst kaufen, dann denken
Erst kaufen, dann denkenErst kaufen, dann denken
Erst kaufen, dann denkenkiwide
 
INTI 13 - A propos des récentes innondations de La Plata: mobilisation d’un p...
INTI 13 - A propos des récentes innondations de La Plata: mobilisation d’un p...INTI 13 - A propos des récentes innondations de La Plata: mobilisation d’un p...
INTI 13 - A propos des récentes innondations de La Plata: mobilisation d’un p...Territorial Intelligence
 
CGT-Gruppe: Gesellschafterversammlung im schriftlichen Umlaufverfahren
CGT-Gruppe: Gesellschafterversammlung im schriftlichen UmlaufverfahrenCGT-Gruppe: Gesellschafterversammlung im schriftlichen Umlaufverfahren
CGT-Gruppe: Gesellschafterversammlung im schriftlichen Umlaufverfahrenolik88
 
Propostes noupedreguer
Propostes noupedreguerPropostes noupedreguer
Propostes noupedreguerSergi Ferrús
 
Canvis socials i educació intercultural
Canvis socials i educació interculturalCanvis socials i educació intercultural
Canvis socials i educació interculturalGuida Allès Pons
 
Plan empleo (programa capriles radosnky)
Plan empleo (programa capriles radosnky)Plan empleo (programa capriles radosnky)
Plan empleo (programa capriles radosnky)Nelson Hernandez
 
Ganzheitlichkeit und die 5 Koshas - das umfassende System des Yoga für ganzhe...
Ganzheitlichkeit und die 5 Koshas - das umfassende System des Yoga für ganzhe...Ganzheitlichkeit und die 5 Koshas - das umfassende System des Yoga für ganzhe...
Ganzheitlichkeit und die 5 Koshas - das umfassende System des Yoga für ganzhe...Mahashakti Uta Engeln
 
Input oata rk_bs
Input oata rk_bsInput oata rk_bs
Input oata rk_bsrosenkranz
 
Fernando peñalver 2011 2012
Fernando peñalver 2011 2012Fernando peñalver 2011 2012
Fernando peñalver 2011 2012lisbe
 
In den kopf schauen
In den kopf schauenIn den kopf schauen
In den kopf schauenkiwide
 
Effektive Produktentwicklung mit Lernenden Teams (#wmie12)
Effektive Produktentwicklung mit Lernenden Teams (#wmie12)Effektive Produktentwicklung mit Lernenden Teams (#wmie12)
Effektive Produktentwicklung mit Lernenden Teams (#wmie12)WMiE
 
Medienbildung in der schule - Recherche
Medienbildung in der schule - RechercheMedienbildung in der schule - Recherche
Medienbildung in der schule - Recherchesimoross
 
Kulturdenkmal: Mühlen- und Müllereiwesen in Deutschland
Kulturdenkmal: Mühlen- und Müllereiwesen in DeutschlandKulturdenkmal: Mühlen- und Müllereiwesen in Deutschland
Kulturdenkmal: Mühlen- und Müllereiwesen in Deutschlandolik88
 
Das eigene Test Lab, für jeden! (CeBIT-Edition mit Demo-Videos)
Das eigene Test Lab, für jeden! (CeBIT-Edition mit Demo-Videos)Das eigene Test Lab, für jeden! (CeBIT-Edition mit Demo-Videos)
Das eigene Test Lab, für jeden! (CeBIT-Edition mit Demo-Videos)Peter Kirchner
 

En vedette (19)

PUBKON 2103: Barrierefrei publizieren – Schnell und einfach
PUBKON 2103: Barrierefrei publizieren – Schnell und einfachPUBKON 2103: Barrierefrei publizieren – Schnell und einfach
PUBKON 2103: Barrierefrei publizieren – Schnell und einfach
 
Erst kaufen, dann denken
Erst kaufen, dann denkenErst kaufen, dann denken
Erst kaufen, dann denken
 
INTI 13 - A propos des récentes innondations de La Plata: mobilisation d’un p...
INTI 13 - A propos des récentes innondations de La Plata: mobilisation d’un p...INTI 13 - A propos des récentes innondations de La Plata: mobilisation d’un p...
INTI 13 - A propos des récentes innondations de La Plata: mobilisation d’un p...
 
CGT-Gruppe: Gesellschafterversammlung im schriftlichen Umlaufverfahren
CGT-Gruppe: Gesellschafterversammlung im schriftlichen UmlaufverfahrenCGT-Gruppe: Gesellschafterversammlung im schriftlichen Umlaufverfahren
CGT-Gruppe: Gesellschafterversammlung im schriftlichen Umlaufverfahren
 
Propostes noupedreguer
Propostes noupedreguerPropostes noupedreguer
Propostes noupedreguer
 
SymbioCity
SymbioCitySymbioCity
SymbioCity
 
Canvis socials i educació intercultural
Canvis socials i educació interculturalCanvis socials i educació intercultural
Canvis socials i educació intercultural
 
Plan empleo (programa capriles radosnky)
Plan empleo (programa capriles radosnky)Plan empleo (programa capriles radosnky)
Plan empleo (programa capriles radosnky)
 
Lahm
Lahm Lahm
Lahm
 
Ganzheitlichkeit und die 5 Koshas - das umfassende System des Yoga für ganzhe...
Ganzheitlichkeit und die 5 Koshas - das umfassende System des Yoga für ganzhe...Ganzheitlichkeit und die 5 Koshas - das umfassende System des Yoga für ganzhe...
Ganzheitlichkeit und die 5 Koshas - das umfassende System des Yoga für ganzhe...
 
Input oata rk_bs
Input oata rk_bsInput oata rk_bs
Input oata rk_bs
 
Fernando peñalver 2011 2012
Fernando peñalver 2011 2012Fernando peñalver 2011 2012
Fernando peñalver 2011 2012
 
Pflanzen
PflanzenPflanzen
Pflanzen
 
In den kopf schauen
In den kopf schauenIn den kopf schauen
In den kopf schauen
 
Effektive Produktentwicklung mit Lernenden Teams (#wmie12)
Effektive Produktentwicklung mit Lernenden Teams (#wmie12)Effektive Produktentwicklung mit Lernenden Teams (#wmie12)
Effektive Produktentwicklung mit Lernenden Teams (#wmie12)
 
Medienbildung in der schule - Recherche
Medienbildung in der schule - RechercheMedienbildung in der schule - Recherche
Medienbildung in der schule - Recherche
 
Kulturdenkmal: Mühlen- und Müllereiwesen in Deutschland
Kulturdenkmal: Mühlen- und Müllereiwesen in DeutschlandKulturdenkmal: Mühlen- und Müllereiwesen in Deutschland
Kulturdenkmal: Mühlen- und Müllereiwesen in Deutschland
 
botones de power point
botones de power pointbotones de power point
botones de power point
 
Das eigene Test Lab, für jeden! (CeBIT-Edition mit Demo-Videos)
Das eigene Test Lab, für jeden! (CeBIT-Edition mit Demo-Videos)Das eigene Test Lab, für jeden! (CeBIT-Edition mit Demo-Videos)
Das eigene Test Lab, für jeden! (CeBIT-Edition mit Demo-Videos)
 

Similaire à Instructions MINOX NVD mini | Optics Trade

Instructions MINOX MD 62 Series | Optics Trade
Instructions MINOX MD 62 Series | Optics TradeInstructions MINOX MD 62 Series | Optics Trade
Instructions MINOX MD 62 Series | Optics TradeOptics-Trade
 
Instructions MINOX MD 62 Series | Optics Trade
Instructions MINOX MD 62 Series | Optics TradeInstructions MINOX MD 62 Series | Optics Trade
Instructions MINOX MD 62 Series | Optics TradeOptics-Trade
 
Anleitung Miele Trockner t 494 c
Anleitung Miele Trockner t 494 cAnleitung Miele Trockner t 494 c
Anleitung Miele Trockner t 494 cOmaheim
 
Instructions MINOX MD 7x42 C | Optics Trade
Instructions MINOX MD 7x42 C | Optics TradeInstructions MINOX MD 7x42 C | Optics Trade
Instructions MINOX MD 7x42 C | Optics TradeOptics-Trade
 
Instructions MINOX 7x42C - Optics Trade
Instructions MINOX 7x42C - Optics TradeInstructions MINOX 7x42C - Optics Trade
Instructions MINOX 7x42C - Optics TradeOptics-Trade
 
Instruction manual | Minox X-HD | Optics Trade
Instruction manual | Minox X-HD | Optics TradeInstruction manual | Minox X-HD | Optics Trade
Instruction manual | Minox X-HD | Optics TradeOptics-Trade
 
Medion handbook bda_40052218
Medion handbook bda_40052218Medion handbook bda_40052218
Medion handbook bda_40052218bpgroup
 
Emf2179 ib _devicenet aif module__v4-1__de_en_fr
Emf2179 ib _devicenet aif module__v4-1__de_en_frEmf2179 ib _devicenet aif module__v4-1__de_en_fr
Emf2179 ib _devicenet aif module__v4-1__de_en_frCharles Santos
 
Instruction manual | Minox MD 60-80 ZR | Spotting Scopes | Optics Trade
Instruction manual | Minox MD 60-80 ZR | Spotting Scopes | Optics TradeInstruction manual | Minox MD 60-80 ZR | Spotting Scopes | Optics Trade
Instruction manual | Minox MD 60-80 ZR | Spotting Scopes | Optics TradeOptics-Trade
 
Instructions MINOX Wildfire DTC 650 | Optics Trade
Instructions MINOX Wildfire DTC 650 | Optics TradeInstructions MINOX Wildfire DTC 650 | Optics Trade
Instructions MINOX Wildfire DTC 650 | Optics TradeOptics-Trade
 
Anleitung Speedport W701v
Anleitung Speedport W701vAnleitung Speedport W701v
Anleitung Speedport W701vguest37a405
 
Bedanl Speedport W303v A V 05.2008
Bedanl Speedport W303v A V 05.2008Bedanl Speedport W303v A V 05.2008
Bedanl Speedport W303v A V 05.2008guest7015743
 
Bedanl sinus a302_09.2009
Bedanl sinus a302_09.2009Bedanl sinus a302_09.2009
Bedanl sinus a302_09.2009thanurabw
 
Instruction Manual | Nitehog Viper 50 Next | Optics Trade
Instruction Manual | Nitehog Viper 50 Next | Optics TradeInstruction Manual | Nitehog Viper 50 Next | Optics Trade
Instruction Manual | Nitehog Viper 50 Next | Optics TradeOptics-Trade
 
Instructions SCHMIDT & BENDER PM II Dual Use | Optics Trade
Instructions SCHMIDT & BENDER PM II Dual Use | Optics TradeInstructions SCHMIDT & BENDER PM II Dual Use | Optics Trade
Instructions SCHMIDT & BENDER PM II Dual Use | Optics TradeOptics-Trade
 
skymaster instructions
skymaster instructionsskymaster instructions
skymaster instructionsPete Mould
 
Dell U3415W Handbuch (Deutsch)
Dell U3415W Handbuch (Deutsch)Dell U3415W Handbuch (Deutsch)
Dell U3415W Handbuch (Deutsch)DellU3415W
 

Similaire à Instructions MINOX NVD mini | Optics Trade (20)

Instructions MINOX MD 62 Series | Optics Trade
Instructions MINOX MD 62 Series | Optics TradeInstructions MINOX MD 62 Series | Optics Trade
Instructions MINOX MD 62 Series | Optics Trade
 
Instructions MINOX MD 62 Series | Optics Trade
Instructions MINOX MD 62 Series | Optics TradeInstructions MINOX MD 62 Series | Optics Trade
Instructions MINOX MD 62 Series | Optics Trade
 
Anleitung Miele Trockner t 494 c
Anleitung Miele Trockner t 494 cAnleitung Miele Trockner t 494 c
Anleitung Miele Trockner t 494 c
 
Instructions MINOX MD 7x42 C | Optics Trade
Instructions MINOX MD 7x42 C | Optics TradeInstructions MINOX MD 7x42 C | Optics Trade
Instructions MINOX MD 7x42 C | Optics Trade
 
Instructions MINOX 7x42C - Optics Trade
Instructions MINOX 7x42C - Optics TradeInstructions MINOX 7x42C - Optics Trade
Instructions MINOX 7x42C - Optics Trade
 
Instruction manual | Minox X-HD | Optics Trade
Instruction manual | Minox X-HD | Optics TradeInstruction manual | Minox X-HD | Optics Trade
Instruction manual | Minox X-HD | Optics Trade
 
Bomber 2001
Bomber 2001Bomber 2001
Bomber 2001
 
Wam 6214
Wam 6214Wam 6214
Wam 6214
 
Medion handbook bda_40052218
Medion handbook bda_40052218Medion handbook bda_40052218
Medion handbook bda_40052218
 
Emf2179 ib _devicenet aif module__v4-1__de_en_fr
Emf2179 ib _devicenet aif module__v4-1__de_en_frEmf2179 ib _devicenet aif module__v4-1__de_en_fr
Emf2179 ib _devicenet aif module__v4-1__de_en_fr
 
Instruction manual | Minox MD 60-80 ZR | Spotting Scopes | Optics Trade
Instruction manual | Minox MD 60-80 ZR | Spotting Scopes | Optics TradeInstruction manual | Minox MD 60-80 ZR | Spotting Scopes | Optics Trade
Instruction manual | Minox MD 60-80 ZR | Spotting Scopes | Optics Trade
 
Instructions MINOX Wildfire DTC 650 | Optics Trade
Instructions MINOX Wildfire DTC 650 | Optics TradeInstructions MINOX Wildfire DTC 650 | Optics Trade
Instructions MINOX Wildfire DTC 650 | Optics Trade
 
Szaritogep de
Szaritogep deSzaritogep de
Szaritogep de
 
Anleitung Speedport W701v
Anleitung Speedport W701vAnleitung Speedport W701v
Anleitung Speedport W701v
 
Bedanl Speedport W303v A V 05.2008
Bedanl Speedport W303v A V 05.2008Bedanl Speedport W303v A V 05.2008
Bedanl Speedport W303v A V 05.2008
 
Bedanl sinus a302_09.2009
Bedanl sinus a302_09.2009Bedanl sinus a302_09.2009
Bedanl sinus a302_09.2009
 
Instruction Manual | Nitehog Viper 50 Next | Optics Trade
Instruction Manual | Nitehog Viper 50 Next | Optics TradeInstruction Manual | Nitehog Viper 50 Next | Optics Trade
Instruction Manual | Nitehog Viper 50 Next | Optics Trade
 
Instructions SCHMIDT & BENDER PM II Dual Use | Optics Trade
Instructions SCHMIDT & BENDER PM II Dual Use | Optics TradeInstructions SCHMIDT & BENDER PM II Dual Use | Optics Trade
Instructions SCHMIDT & BENDER PM II Dual Use | Optics Trade
 
skymaster instructions
skymaster instructionsskymaster instructions
skymaster instructions
 
Dell U3415W Handbuch (Deutsch)
Dell U3415W Handbuch (Deutsch)Dell U3415W Handbuch (Deutsch)
Dell U3415W Handbuch (Deutsch)
 

Plus de Optics-Trade

Technical Data | ThermTec Wild 650L | Optics Trade
Technical Data | ThermTec Wild 650L | Optics TradeTechnical Data | ThermTec Wild 650L | Optics Trade
Technical Data | ThermTec Wild 650L | Optics TradeOptics-Trade
 
Technical Data | ThermTec Wild 635L | Optics Trade
Technical Data | ThermTec Wild 635L | Optics TradeTechnical Data | ThermTec Wild 635L | Optics Trade
Technical Data | ThermTec Wild 635L | Optics TradeOptics-Trade
 
Technical Data | ThermTec Wild 650 | Optics Trade
Technical Data | ThermTec Wild 650 | Optics TradeTechnical Data | ThermTec Wild 650 | Optics Trade
Technical Data | ThermTec Wild 650 | Optics TradeOptics-Trade
 
Technical Data | ThermTec Wild 635 | Optics Trade
Technical Data | ThermTec Wild 635 | Optics TradeTechnical Data | ThermTec Wild 635 | Optics Trade
Technical Data | ThermTec Wild 635 | Optics TradeOptics-Trade
 
Technical Data | ThermTec Wild 335 | Optics Trade
Technical Data | ThermTec Wild 335 | Optics TradeTechnical Data | ThermTec Wild 335 | Optics Trade
Technical Data | ThermTec Wild 335 | Optics TradeOptics-Trade
 
Technical Data | ThermTec Wild 325 | Optics Trade
Technical Data | ThermTec Wild 325 | Optics TradeTechnical Data | ThermTec Wild 325 | Optics Trade
Technical Data | ThermTec Wild 325 | Optics TradeOptics-Trade
 
Instruction Manual | ThermTec Wild Thermal Monoculars | Optics Trade
Instruction Manual | ThermTec Wild Thermal Monoculars | Optics TradeInstruction Manual | ThermTec Wild Thermal Monoculars | Optics Trade
Instruction Manual | ThermTec Wild Thermal Monoculars | Optics TradeOptics-Trade
 
Technical Data | ThermTec Hunt 335 | Optics Trade
Technical Data | ThermTec Hunt 335 | Optics TradeTechnical Data | ThermTec Hunt 335 | Optics Trade
Technical Data | ThermTec Hunt 335 | Optics TradeOptics-Trade
 
Instruction Manual | ThermTec Hunt Thermal Clip-On Series | Optics Trade
Instruction Manual | ThermTec Hunt Thermal Clip-On Series | Optics TradeInstruction Manual | ThermTec Hunt Thermal Clip-On Series | Optics Trade
Instruction Manual | ThermTec Hunt Thermal Clip-On Series | Optics TradeOptics-Trade
 
Instruction Manual | Steiner eRanger LRF 10x42 | Optics Trade
Instruction Manual | Steiner eRanger LRF 10x42 | Optics TradeInstruction Manual | Steiner eRanger LRF 10x42 | Optics Trade
Instruction Manual | Steiner eRanger LRF 10x42 | Optics TradeOptics-Trade
 
Flyer | Guide DN Series Handheld Digital Binoculars | Optics Trade
Flyer | Guide DN Series Handheld Digital Binoculars | Optics TradeFlyer | Guide DN Series Handheld Digital Binoculars | Optics Trade
Flyer | Guide DN Series Handheld Digital Binoculars | Optics TradeOptics-Trade
 
Quick Start Guide | Guide TB Series | Optics Trade
Quick Start Guide | Guide TB Series | Optics TradeQuick Start Guide | Guide TB Series | Optics Trade
Quick Start Guide | Guide TB Series | Optics TradeOptics-Trade
 
Instruction Manual | Pard FD1 Digital NV Front Attachment | Optics Trade
Instruction Manual | Pard FD1 Digital NV Front Attachment | Optics TradeInstruction Manual | Pard FD1 Digital NV Front Attachment | Optics Trade
Instruction Manual | Pard FD1 Digital NV Front Attachment | Optics TradeOptics-Trade
 
Instruction Manual | EOTech Vudu X 2-12x40 | Optics Trade
Instruction Manual | EOTech Vudu X 2-12x40 | Optics TradeInstruction Manual | EOTech Vudu X 2-12x40 | Optics Trade
Instruction Manual | EOTech Vudu X 2-12x40 | Optics TradeOptics-Trade
 
Instruction Manual | EOTech Vudu X 1-6x24 | Optics Trade
Instruction Manual | EOTech Vudu X 1-6x24 | Optics TradeInstruction Manual | EOTech Vudu X 1-6x24 | Optics Trade
Instruction Manual | EOTech Vudu X 1-6x24 | Optics TradeOptics-Trade
 
Instruction Manual | Nightforce CFS 6-36x50 F1 | Optics Trade
Instruction Manual | Nightforce CFS 6-36x50 F1 | Optics TradeInstruction Manual | Nightforce CFS 6-36x50 F1 | Optics Trade
Instruction Manual | Nightforce CFS 6-36x50 F1 | Optics TradeOptics-Trade
 
Instruction Manual | Athlon Cronus Tactical G2 ED 7-42x60 | Optics Trade
Instruction Manual | Athlon Cronus Tactical G2 ED 7-42x60 | Optics TradeInstruction Manual | Athlon Cronus Tactical G2 ED 7-42x60 | Optics Trade
Instruction Manual | Athlon Cronus Tactical G2 ED 7-42x60 | Optics TradeOptics-Trade
 
Insrtuction Manual | Swarovski CL Companion Habicht | Optics Trade
Insrtuction Manual | Swarovski CL Companion Habicht | Optics TradeInsrtuction Manual | Swarovski CL Companion Habicht | Optics Trade
Insrtuction Manual | Swarovski CL Companion Habicht | Optics TradeOptics-Trade
 
Technical Data | Swarovski CL Companion Habicht | Optics Trade
Technical Data | Swarovski CL Companion Habicht | Optics TradeTechnical Data | Swarovski CL Companion Habicht | Optics Trade
Technical Data | Swarovski CL Companion Habicht | Optics TradeOptics-Trade
 
Instruction Manual | Athlon Midas G2 UHD PRO | Optics Trade
Instruction Manual | Athlon Midas G2 UHD PRO | Optics TradeInstruction Manual | Athlon Midas G2 UHD PRO | Optics Trade
Instruction Manual | Athlon Midas G2 UHD PRO | Optics TradeOptics-Trade
 

Plus de Optics-Trade (20)

Technical Data | ThermTec Wild 650L | Optics Trade
Technical Data | ThermTec Wild 650L | Optics TradeTechnical Data | ThermTec Wild 650L | Optics Trade
Technical Data | ThermTec Wild 650L | Optics Trade
 
Technical Data | ThermTec Wild 635L | Optics Trade
Technical Data | ThermTec Wild 635L | Optics TradeTechnical Data | ThermTec Wild 635L | Optics Trade
Technical Data | ThermTec Wild 635L | Optics Trade
 
Technical Data | ThermTec Wild 650 | Optics Trade
Technical Data | ThermTec Wild 650 | Optics TradeTechnical Data | ThermTec Wild 650 | Optics Trade
Technical Data | ThermTec Wild 650 | Optics Trade
 
Technical Data | ThermTec Wild 635 | Optics Trade
Technical Data | ThermTec Wild 635 | Optics TradeTechnical Data | ThermTec Wild 635 | Optics Trade
Technical Data | ThermTec Wild 635 | Optics Trade
 
Technical Data | ThermTec Wild 335 | Optics Trade
Technical Data | ThermTec Wild 335 | Optics TradeTechnical Data | ThermTec Wild 335 | Optics Trade
Technical Data | ThermTec Wild 335 | Optics Trade
 
Technical Data | ThermTec Wild 325 | Optics Trade
Technical Data | ThermTec Wild 325 | Optics TradeTechnical Data | ThermTec Wild 325 | Optics Trade
Technical Data | ThermTec Wild 325 | Optics Trade
 
Instruction Manual | ThermTec Wild Thermal Monoculars | Optics Trade
Instruction Manual | ThermTec Wild Thermal Monoculars | Optics TradeInstruction Manual | ThermTec Wild Thermal Monoculars | Optics Trade
Instruction Manual | ThermTec Wild Thermal Monoculars | Optics Trade
 
Technical Data | ThermTec Hunt 335 | Optics Trade
Technical Data | ThermTec Hunt 335 | Optics TradeTechnical Data | ThermTec Hunt 335 | Optics Trade
Technical Data | ThermTec Hunt 335 | Optics Trade
 
Instruction Manual | ThermTec Hunt Thermal Clip-On Series | Optics Trade
Instruction Manual | ThermTec Hunt Thermal Clip-On Series | Optics TradeInstruction Manual | ThermTec Hunt Thermal Clip-On Series | Optics Trade
Instruction Manual | ThermTec Hunt Thermal Clip-On Series | Optics Trade
 
Instruction Manual | Steiner eRanger LRF 10x42 | Optics Trade
Instruction Manual | Steiner eRanger LRF 10x42 | Optics TradeInstruction Manual | Steiner eRanger LRF 10x42 | Optics Trade
Instruction Manual | Steiner eRanger LRF 10x42 | Optics Trade
 
Flyer | Guide DN Series Handheld Digital Binoculars | Optics Trade
Flyer | Guide DN Series Handheld Digital Binoculars | Optics TradeFlyer | Guide DN Series Handheld Digital Binoculars | Optics Trade
Flyer | Guide DN Series Handheld Digital Binoculars | Optics Trade
 
Quick Start Guide | Guide TB Series | Optics Trade
Quick Start Guide | Guide TB Series | Optics TradeQuick Start Guide | Guide TB Series | Optics Trade
Quick Start Guide | Guide TB Series | Optics Trade
 
Instruction Manual | Pard FD1 Digital NV Front Attachment | Optics Trade
Instruction Manual | Pard FD1 Digital NV Front Attachment | Optics TradeInstruction Manual | Pard FD1 Digital NV Front Attachment | Optics Trade
Instruction Manual | Pard FD1 Digital NV Front Attachment | Optics Trade
 
Instruction Manual | EOTech Vudu X 2-12x40 | Optics Trade
Instruction Manual | EOTech Vudu X 2-12x40 | Optics TradeInstruction Manual | EOTech Vudu X 2-12x40 | Optics Trade
Instruction Manual | EOTech Vudu X 2-12x40 | Optics Trade
 
Instruction Manual | EOTech Vudu X 1-6x24 | Optics Trade
Instruction Manual | EOTech Vudu X 1-6x24 | Optics TradeInstruction Manual | EOTech Vudu X 1-6x24 | Optics Trade
Instruction Manual | EOTech Vudu X 1-6x24 | Optics Trade
 
Instruction Manual | Nightforce CFS 6-36x50 F1 | Optics Trade
Instruction Manual | Nightforce CFS 6-36x50 F1 | Optics TradeInstruction Manual | Nightforce CFS 6-36x50 F1 | Optics Trade
Instruction Manual | Nightforce CFS 6-36x50 F1 | Optics Trade
 
Instruction Manual | Athlon Cronus Tactical G2 ED 7-42x60 | Optics Trade
Instruction Manual | Athlon Cronus Tactical G2 ED 7-42x60 | Optics TradeInstruction Manual | Athlon Cronus Tactical G2 ED 7-42x60 | Optics Trade
Instruction Manual | Athlon Cronus Tactical G2 ED 7-42x60 | Optics Trade
 
Insrtuction Manual | Swarovski CL Companion Habicht | Optics Trade
Insrtuction Manual | Swarovski CL Companion Habicht | Optics TradeInsrtuction Manual | Swarovski CL Companion Habicht | Optics Trade
Insrtuction Manual | Swarovski CL Companion Habicht | Optics Trade
 
Technical Data | Swarovski CL Companion Habicht | Optics Trade
Technical Data | Swarovski CL Companion Habicht | Optics TradeTechnical Data | Swarovski CL Companion Habicht | Optics Trade
Technical Data | Swarovski CL Companion Habicht | Optics Trade
 
Instruction Manual | Athlon Midas G2 UHD PRO | Optics Trade
Instruction Manual | Athlon Midas G2 UHD PRO | Optics TradeInstruction Manual | Athlon Midas G2 UHD PRO | Optics Trade
Instruction Manual | Athlon Midas G2 UHD PRO | Optics Trade
 

Instructions MINOX NVD mini | Optics Trade

  • 1. MINOX NVD mini 1 2 3 4 5 6 7 89 Mnx_Man_NVDmini_RZ_neu.indd 1 08.02.11 11:28
  • 2. 2 Inhaltsverzeichnis Einleitung . . . . . . . . . . . . . . . . . . . . . . . . . . . . . . . . . . . Seite 3 Lernen Sie Ihr Nachtsichtgerät kennen . . . . . . . . . . . . . . . . . . . . . Seite 4 Inbetriebnahme und Anwendung . . . . . . . . . . . . . . . . . . . . . . . . Seite 5 Fokussierung (Scharfeinstellung) . . . . . . . . . . . . . . . . . . . . . . . . Seite 5 Aufladen des Akkus . . . . . . . . . . . . . . . . . . . . . . . . . . . . . . Seite 6 Anzeichen niedriger Batterieladezustand . . . . . . . . . . . . . . . . . . . Seite 7 Wichtige Informationen . . . . . . . . . . . . . . . . . . . . . . . . . . . . Seite 8 Pflegetipps . . . . . . . . . . . . . . . . . . . . . . . . . . . . . . . . . . . Seite 8 Technische Daten . . . . . . . . . . . . . . . . . . . . . . . . . . . . . . . . Seite 9 Gewährleistungsbestimmungen . . . . . . . . . . . . . . . . . . . . . . . . Seite 10 Kundendienst . . . . . . . . . . . . . . . . . . . . . . . . . . . . . . . . . . Seite 11 Mnx_Man_NVDmini_RZ_neu.indd 2 08.02.11 11:28
  • 3. 3 Einleitung Sehr geehrter MINOX Kunde, herzlichen Glückwunsch zum Kauf dieses MINOX Nachtsichtgerätes. Mit diesem Gerät haben Sie sich für ein Produkt von höchster optischer und feinmechanischer Qualität entschieden. Diese Anleitung soll Ihnen ein Berater sein, um das Leistungsspektrum Ihres MINOX Nachtsichtgerätes optimal zu nutzen. Wir wünschen Ihnen mit Ihrem MINOX Nachtsichtgerät viel Freude und mit Sicherheit den perfekten Durchblick! Mnx_Man_NVDmini_RZ_neu.indd 3 08.02.11 11:28
  • 4. 4 Lernen Sie Ihr Nachtsichtgerät kennen Bedienelemente 1. AN/AUS Hauptschalter (Power) 2. Objektiv 3. Infrarot-LED Lampen 4. Objektiv Fokussier-Ring 5. Ladeanschluss (DC 5V, 500 mA) für Akku 6. Grüne LED zur Anzeige des Ladezustands während des Ladevorgangs 7. Schutzabdeckung für Ladeanschluss 8. Trage-Clip 9. Okular, fokussierbar Bei dem NVD mini handelt es sich um ein hochwertiges, technisch anspruchsvolles opto-elektronisches Gerät, dessen spezieller Anwendungsbereich in der Beobachtung und Orientierung bei Nacht und in der Dämmerung liegt. Die Betriebstemperatur liegt zwischen -30° und +50°. Dank seiner äußerst kompakten Abmessungen ist es bequem zu bedienen und immer und überall ein zuverlässiger Begleiter. Bei richtigem Gebrauch werden Sie viele Jahre Freude mit Ihrem neuen MINOX Nachtsichtgerät haben. Mnx_Man_NVDmini_RZ_neu.indd 4 08.02.11 11:28
  • 5. 5 Inbetriebnahme und Anwendung Ihr MINOX NVD mini lässt sich über den AN/ AUS Hauptschalter (Power) (1) auf der oberen Seite des Gehäuses ein- und ausschalten. Drücken Sie einfach den AN/AUS Hauptschalter (Power) (1) und halten Sie diesen gedrückt. Das Gerät schaltet sich ein und bleibt eingeschaltet so lange Sie diesen Schalter gedrückt halten. Beim Durchschauen durch Ihr Nachtsichtgerät sehen Sie das anvisierte Motiv auf dem grünen Monitor. Die Infrarot-Beleuchtung hat sich eingeschaltet. Beim Loslassen des AN/AUS Hauptschalter (Power) (1) schaltet sich Ihr Nachtsichtgerät wieder aus. Fokussierung (Scharfeinstellung) Visieren Sie ein Objekt in einer Entfernung von etwa 20 und 60 Metern an. Drehen Sie nun den Objektiv Fokussier-Ring (4) so lange, bis das Objekt scharf eingestellt ist. Um den Monitor an Ihre persönliche Sehstärke anzupassen, fokussieren Sie den Okularring (9) bis Sie die Pixel des Monitors scharf erkennen können. Mnx_Man_NVDmini_RZ_neu.indd 5 08.02.11 11:28
  • 6. Aufladen des Akkus In Ihrem Nachtsichtgerät befindet sich ein integrierter wieder aufladbarer Akku. Um den Akku (wieder)aufzuladen, öffnen Sie bitte die Schutzabdeckung für den Batterieladeanschluss (7) an der Unterseite des Gerätes. Der Akku Ihres Nachtsichtgerätes kann über das mitgelieferte USB-Kabel über einen USB- Anschluss geladen werden. Verbinden Sie Ihr Nachtsichtgerät mit dem USB-Kabel. Das andere Ende des USB-Kabels verbinden Sie nun bitte mit dem USB-Anschluss eines eingeschalteten Computers. Der Akku Ihres Nachtsichtgerätes beginnt nun zu laden. Eine kleine grüne LED (6), die sich unterhalb am Ende des Trage-Clips (8), neben der Ladeanschlussbuchse (5) befindet, beginnt zu leuchten. Sobald der Akku voll geladen ist, erlischt die LED-Anzeige. Entfernen Sie nach vollständiger Ladevorgang das Kabel und schließen die Schutzabdeckung. Das MINOX NVD mini wird in zwei verschiedenen Verpackungseinheiten ausgeliefert. Aus Platzgründen befindet sich in der „Air Line“ Verpackungseinheit kein Netzadapter, da in den verschiedenen Regionen der Welt unterschiedliche Netzadapter Verwendung finden. Das Laden des MINOX NVD mini ist aber immer 6 Mnx_Man_NVDmini_RZ_neu.indd 6 08.02.11 11:28
  • 7. 7 über das USB Kabel und dem entsprechenden PC gewährleistet. Gerne senden wir Ihnen kostenlos den für Ihre Region passenden Netzadapter zu. Bitte nehmen Sie hierzu mit uns unter service@minox.com oder Tel. +49 6441 917-0 Kontakt auf. In der für den Fachhandel bestimmten Verpackungseinheit befindet sich der für die Region passende Netzadapter, der mit dem USB Kabel verbunden werden kann. Das MINOX NVD mini kann damit an jeder herkömmlichen Steckdose geladen werden. Anzeichen niedriger Batterieladezustand Sobald die Akkuleistung unterhalb von 10% (zwischen 3 und 10%) fällt, ändert sich die Farbe des Monitors von grün in ein schwarz- weißes Bild. Sinkt die Akkuleistung unterhalb einer Grenze von 3%, blinkt der Monitor 10 Mal auf bevor sich das Gerät automatisch abschaltet. Bitte laden Sie den Akku wieder vollständig auf, um eine maximale Leistung zu erhalten. Mnx_Man_NVDmini_RZ_neu.indd 7 08.02.11 11:28
  • 8. Wichtige Informationen Um irreparable Schäden an Ihrem Nachtsichtgerät zu vermeiden, beachten Sie bitte folgende Hinweise: - Bewahren Sie das Gerät nicht unter extrem niedrigen oder hohen Temperaturen auf. - Bewahren Sie das Gerät nicht in feuchter, staubiger oder schmutziger Umgebung auf. - Setzen Sie das Gerät keinerlei Fremdeinwirkungen aus. - Setzen Sie das Gerät keinerlei Schlägen oder Stößen aus. - Nicht in helle Lichtquellen oder direkt in die Sonne schauen. Pflegetipps - Schützen Sie das Nachtsichtgerät vor Stürzen, Feuchtigkeit, Schmutz und extremen Temperaturen. - Schützen Sie alle optischen Oberflächen vor Feuchtigkeit und Schleifmitteln. Diese beschädigen die Anti-Reflexions- Beschichtung. - Entfernen Sie Staub und Schmutz von der Linse nur mit einem weichen, trockenen Tuch. 8 Mnx_Man_NVDmini_RZ_neu.indd 8 08.02.11 11:28
  • 9. 9 * Bestellnummern USB-Netzteil 606350000120 EU Version 606350000220 UK Version 606350000320 US Version Technische Daten Vergrößerung 2x Sensor CMOS Nachtsichtsensor Infrarotstrahler ca. 40 m Beobachtungsdistanz ca. 60 m Auflösung 480 x 240 Sehfeld 18,5 ° Betriebsspannung 7,4 V max. Betriebsdauer 3 Stunden Batterie Lithium Polymer Videoausgang Nein Abmessungen 14,2 cm x 4,9cm (Durchmesser) Gewicht 221 g Zubehör Tasche; Ladekabel Optional erhältlich Netzteil USB 500mAh* Ladezeit ca. 6 Stunden, basierend auf 500 mA Ausgangsleistung Der maximale zulässige Ladestrom beträgt 600 mA! Mnx_Man_NVDmini_RZ_neu.indd 9 08.02.11 11:28
  • 10. 10 Gewährleistungsbestimmungen Mit dem Kauf dieses MINOX Nachtsichtgerätes haben Sie ein Produkt erworben, das nach besonders strengen Qualitätsrichtlinien hergestellt und geprüft wurde. Die für dieses Produkt geltende gesetzliche Gewährleistung von 2 Jahren wird von uns ab dem Tag des Verkaufs durch einen autorisierten Händler unter folgenden Bedingungen übernommen: 1) In der Gewährleistungszeit werden B e a n s t a n d u n g e n , d i e a u f Fabrikationsfehlern beruhen, kostenlos und nach eigenem Ermessen durch Instandsetzung, Aus­tausch defekter Teile oder Umtausch in ein gleichartiges einwandfreies Erzeugnis behoben. Weitergehende Ansprüche, gleich welcher Art und gleich aus welchem Rechtsgrund im Zusammenhang mit dieser Gewähr­ leistung, sind ausgeschlossen. 2) Gewährleistungsansprüche entfallen, wenn der betreffende Mangel auf unsachgemäße Behandlung – wozu auch die Verwendung von Fremdzubehör zählen kann – zurückzuführen ist, ein Eingriff von nicht autorisierten Personen und Werkstätten durchgeführt oder die Fabrikationsnummer unkenntlich gemacht wurde. Mnx_Man_NVDmini_RZ_neu.indd 10 08.02.11 11:28
  • 11. 11 3) Gewährleistungsansprüche können nur bei Vorlage eines maschinengeschriebenen Kaufbelegs eines autorisierten Händlers geltend gemacht werden. 4) Bei Inanspruchnahme der Gewährleistung leiten Sie bitte die MINOX Kamera zusammen mit dem Original des maschinengeschriebenen Kaufbelegs und einer Schilderung der Beanstandung dem Kundendienst der MINOX GmbH oder einer Landesvertretung zu. 5) Touristen steht im Bedarfsfalle unter Vorlage des maschinengeschriebenen Kaufbelegs die Vertretung des jeweiligen Reiselandes gemäß den Regelungen zur Gewährleistung der MINOX GmbH zur Verfügung. Kundendienst Unser Kundendienst steht Ihnen unter folgender Adresse zur Verfügung: MINOX GmbH Walter-Zapp-Str. 4 D-35578 Wetzlar / Germany Tel.: +49 (0) 6441 / 917-0 Fax: +49 (0) 6441 / 917-612 info@minox.com www.minox.com Mnx_Man_NVDmini_RZ_neu.indd 11 08.02.11 11:28
  • 12. 12 Contents Introduction . . . . . . . . . . . . . . . . . . . . . . . . . . . . . . . . . . Page 13 Get familiar with your night vision ‘scope . . . . . . . . . . . . . . . . . . . Page 14 Operating the night vision scope . . . . . . . . . . . . . . . . . . . . . . . Page 15 Adjustment . . . . . . . . . . . . . . . . . . . . . . . . . . . . . . . . . . Page 15 Charging the battery . . . . . . . . . . . . . . . . . . . . . . . . . . . . . Page 16 Low Battery Indicator . . . . . . . . . . . . . . . . . . . . . . . . . . . . . Page 17 Important information . . . . . . . . . . . . . . . . . . . . . . . . . . . . Page 17 Advice on care . . . . . . . . . . . . . . . . . . . . . . . . . . . . . . . . . Page 18 Technical Data . . . . . . . . . . . . . . . . . . . . . . . . . . . . . . . . . Page 19 Conditions of warranty . . . . . . . . . . . . . . . . . . . . . . . . . . . . Page 20 Customer Service . . . . . . . . . . . . . . . . . . . . . . . . . . . . . . . Page 21 Mnx_Man_NVDmini_RZ_neu.indd 12 08.02.11 11:28
  • 13. 13 Introduction Dear MINOX Customer, Congratulations on your purchase of this night vision ‘scope. You have chosen a product that boasts highest optical quality and precision mechanics. This User’s Manual will advise you on how to obtain the best performance results from your MINOX night vision ‘scope. We hope this night vision ’scope scope will give you a great deal of pleasure and always keep you perfectly in the picture! Mnx_Man_NVDmini_RZ_neu.indd 13 08.02.11 11:28
  • 14. 14 Get familiar with your night vision ‘scope Control elements 1. POWER button 2. Lens 3. IR LEDs 4. Front focusing ring 5. DC Jack (Input DC 5V, 500mA) 6. Green LED 7. Cover for charging connection 8. Clip 9. Eyepiece The NVD mini is a high quality, sophisticated optoelectronic device specially designed for observation and orientation purposes at night and in twilight conditions. The temperature range is from -30° to +50° C / -22° to +122° F. With its compact dimensions it is easy to handle and ready for use at any time. When used and cared for correctly this night vision ‘scope guarantees satisfactory operation for many years. Mnx_Man_NVDmini_RZ_neu.indd 14 08.02.11 11:28
  • 15. 15 Operating the night vision scope The night vision scope is activated by pressing and holding the POWER button (1). When the scope is turned on, the infrared illumination in the front ring is also activated. When looking through your night vision scope, you will see the image displayed on a green monitor. Turn the scope off by releasing the POWER button (1). Adjustment Aim at an object that is about 20 to 60 m (22 to 66 yards) away. Turn the lens focussing ring (4) until the image is sharp. To adjust the scope to your personal eyesight, focus the ocular ring (9) until the pixels on the monitor are sharp. Mnx_Man_NVDmini_RZ_neu.indd 15 08.02.11 11:28
  • 16. Charging the battery To charge the built-in battery, open the cover for charging connection (7), which is located on the bottom of the unit, and connect the DC jack (5) of the scope to an USB port of a switched-on computer using the cable provided. Charging begins when the green LED (6) lights up. This green LED is located underneath the clip directly next to charging connection. When the charging is completed, the green LED turns off. After charging, remove the socket from the DC jack and close the cover. The MINOX NVD mini is available in two different packaging units. Due to lack of space, the “Air Line“ unit is not available with an AC adapter. This is due to the fact that different adapters are used in the various regions of the world. However charging the MINOX NVD mini is always possible using the USB cable and a respective PC or laptop. We would gladly send the appropriate AC adapter for your region free of charge. Please contact us under service@minox.com or +49 6441 917-0. The packaging units determined for retailers are supplied with the appropriate AC adapter 16 Mnx_Man_NVDmini_RZ_neu.indd 16 08.02.11 11:28
  • 17. 17 for that region of the world and can be used in combination with the USB cable. The MINOX NVD mini can then be charged with any wall socket from that region. Low Battery Indicator As soon as the rechargeable battery falls below a level of 10% (between 3 and 10%), the colour of the monitor changes from green to black and white. When the battery level is less than 3 % the monitor flashes 10 times and then the scope turns off automatically. Please fully recharge the battery before use. Important information To avoid irreparable damage to your MINOX night vision ‘scope, please always observe the following instructions: - Do not keep the device under extremely low or high temperatures. - Do not keep the device in damp, dusty or dirty areas. - Keep the device safe from any external influence. - Never subject the device to knocks or impact. Mnx_Man_NVDmini_RZ_neu.indd 17 08.02.11 11:28
  • 18. Advice on care - Do not look directly into bright light sources or to the sun with your scope. - Protect the Night-Vision scope against falling, damp, dirt and extreme temperatures. Protect all optical surfaces against damp and abrasive agents. These may otherwise damage the anti-reflection coating. - Only remove dust and dirt from the lens using a soft, dry cloth. 18 Mnx_Man_NVDmini_RZ_neu.indd 18 08.02.11 11:28
  • 19. 19 Technical Data Optical magnification 2x Sensor CMOS Night Vision sensor IR LED range approx. 131,2 ft Maximum visible range approx. 196,8 ft Display resolution 480 x 240 View angle 18.5° Working voltage 7.4V Working time 3 hours Battery type Lithium Polymer Video out Not Available Dimensions 5.59 inch x dia 1.93 inch Weight 7.8 oz Accessory Pouch, USB charging cable Optionally available USB Adapter* 500mAh Charging time 6 hours based on a 500 mA supply The max. charging current rating is 600 mA ! * Order numbers USB Adapter 606350000120 EU Version 606350000220 UK Version 606350000320 US Version Mnx_Man_NVDmini_RZ_neu.indd 19 08.02.11 11:28
  • 20. 20 Conditions of warranty With the purchase of this MINOX product you have acquired a product which has been manufactured and checked to special quality standards. For this product the MINOX GmbH provides warranty of 2 years. The period commences on the date of purchase from an authorized dealer and the warranty is subject to the following conditions: 1) During the warranty period we shall deal with complaints based on faulty manufacture (free of charge) by repair, replacement of defective parts or replacement by an identical flawless product at our own discretion. Consequential claims, no matter what kind of what legal argument in connection with this warranty, cannot be accepted. 2) Claims under warranty are null and void, if the defect has been caused by improper handling – which also can include the use of non-MINOX accessories – if the MINOX product is serviced by unauthorized persons or workshops, or if the serial number has been obliterated. 3) Warranty claims can only be made by submission of the typewritten sales slip of an authorized dealer. Mnx_Man_NVDmini_RZ_neu.indd 20 08.02.11 11:28
  • 21. 21 4) When submitting claims under warranty please return the MINOX product together with the typewritten sales slip and a description of the claim to the MINOX GmbH or MINOX agency. 5) Tourists may, if required, make use of the Agency of the country in which they are travelling (within the terms of the Warranty of the MINOX GmbH) by presenting the typewritten sales slip. Customer Service You can reach our Customer Service under the following address, where they will be pleased to help you: MINOX GmbH Walter-Zapp-Str. 4 D-35578 Wetzlar / Germany Tel.: +49 (0) 6441 / 917-0 Fax: +49 (0) 6441 / 917-612 info@minox.com www.minox.com Mnx_Man_NVDmini_RZ_neu.indd 21 08.02.11 11:28
  • 22. 22 Contenu Introduction . . . . . . . . . . . . . . . . . . . . . . . . . . . . . . . . . . Page 23 Familiarisez-vous avec votre lunette pour vision nocturne . . . . . . . . . . Page 24 Mise en service et utilisation . . . . . . . . . . . . . . . . . . . . . . . . . Page 25 Focalisation (Mise au point) . . . . . . . . . . . . . . . . . . . . . . . . . . Page 25 Chargement de l’accu . . . . . . . . . . . . . . . . . . . . . . . . . . . . . Page 26 Indication du chargement insuffisant de l’accu . . . . . . . . . . . . . . . . Page 27 Informations importantes . . . . . . . . . . . . . . . . . . . . . . . . . . . Page 28 Conseils d’entretien . . . . . . . . . . . . . . . . . . . . . . . . . . . . . . Page 28 Données techniques . . . . . . . . . . . . . . . . . . . . . . . . . . . . . . Page 29 Clauses de la garantie . . . . . . . . . . . . . . . . . . . . . . . . . . . . . Page 30 Service après-vente . . . . . . . . . . . . . . . . . . . . . . . . . . . . . . Page 31 Mnx_Man_NVDmini_RZ_neu.indd 22 08.02.11 11:28
  • 23. 23 Introduction Cher client, Nous vous félicitons d’avoir acheté cette lunette pour vision nocturne MINOX, un instrument d’une grande qualité optique, doté en outre d’une mécanique de haute précision. Ce manuel d’utilisation vous aidera à tirer pleinement parti de ses multiples possibilités. Nous vous souhaitons de passer avec cette lunette de vision nocturne de très agréables moments d’observation, des moments qui vaudront assurément le coup d’œil ! Mnx_Man_NVDmini_RZ_neu.indd 23 08.02.11 11:28
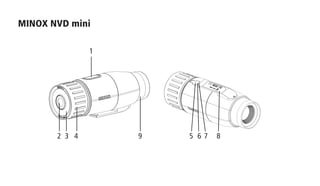
  • 24. 24 Familiarisez-vous avec votre lunette pour vision nocturne Eléments d’utilisation 1. Interrupteur 2. Lentille 3. Diode DEL infrarouge 4. Bague avant de mise au point 5. Connecteur DC (Entrée DC 5V, 500mA) 6. Diode DEL verte 7. Couvercle 8. Agrafe 9. Oculaire Le NVD mini est un instrument optoélectronique hautement. Il peut s’utiliser en situation d’observation ou d’orientation (combiné avec un émetteur de rayons infrarouges) quel que soit le degré d’obscurité (crépuscule, clair de lune, nuit étoilée ou nuit noire) dans une plage de températures de -30° bis +50° C. Grâce à ses dimensions compactes, l’appareil est simple à manipuler et utilisable à tout moment. En l’utilisant et en l’entretenant correctement, il fonctionnera de façon irréprochable pendant de nombreuses années. Mnx_Man_NVDmini_RZ_neu.indd 24 08.02.11 11:28
  • 25. 25 Mise en service et utilisation Votre lunette de vision nocturne MINOX NVD mini se connecte/déconnecte à l’aide de l’interrupteur (POWER) (1) situé au-dessus du boîtier. Pour l’activer, il suffit de presser en continu sur cet interrupteur. Votre lunette restera alors opérationnelle, aussi longtemps que vous maintiendrez la pression sur ce bouton. Si vous regardez dans la lunette de vision nocturne, vous pourrez y voir le motif visé sur le moniteur vert. L’illumination infrarouge s’est activée. Si vous arrêtez d’appuyer sur l’interrupteur (POWER) (1), la lunette nocturne sera désactivée. Focalisation (Mise au point) Visez un objet situé à une distance de 20 à 60 mètres. Puis, tournez la bague de focalisation de l’objectif (4) jusqu’à obtention d’une image nette de l’objet visé. Ensuite, afin d’adapter le moniteur à votre vue, mettez au point de nouveau avec la bague de l’oculaire (9). Mnx_Man_NVDmini_RZ_neu.indd 25 08.02.11 11:28
  • 26. Chargement de l’accu Votre lunette nocturne est équipée d’un accu rechargeable incorporé. Pour le (re)charger, ouvrez le couvercle de protection de la connexion USB (7) (prévue pour son (re) chargement (5), située sous la lunette. Cet accu peut être (re)chargé avec le câble USB livré de série. Pour cela, connectez ce câble au port USB de votre lunette. Puis, l’autre extrémité au port USB d’un ordinateur en marche. Le processus de rechargement commencera alors, signalé par une diode verte (6) située au bout du clip de fixation, à côté de la prise de chargement. Cette diode s’éteindra automatiquement lorsque le chargement sera accompli. Déconnectez alors le câble USB et refermez le couvercle de protection. La livraison de la lunette MINOX NVD consiste en deux paquets. Par manque de place, l’adaptateur au secteur électrique ne se trouve pas dans le paquet « Air Line ». Ceci est aussi dû au fait que différents types d’adaptateurs sont requis en fonction du pays de leur utilisation. Cependant, il est toujours possible de procéder au (re)chargement de la lunette nocturne MINOX NVD mini à l’aide du câble USB livré de série, connecté à un ordinateur. 26 Mnx_Man_NVDmini_RZ_neu.indd 26 08.02.11 11:28
  • 27. 27 Bien sûr, nous vous enverrons volontiers – et gratuitement - l’adaptateur au secteur adéquat pour la région où vous habitez. Dans ce but, veuillez nous contacter via internet sous service@minox.com ou par téléphone sous le numéro +49 6441 917-0 Aux livraisons adressées à nos revendeurs locaux, nous joignons les adaptateurs adéquats pour leurs pays, connectables au câble USB. La lunette de vision nocturne MINOX NVD mini peut ainsi être (re)chargée via une prise électrique locale. Indication du chargement insuffisant de l’accu Lorsque le chargement de l’accu tombe sous 10% (entre 3 et 10%), l’image du moniteur passe du vert au noir et blanc. Et si cette insuffisance passe à moins de 3%, le moniteur clignote une dizaine de fois avant l’arrêt complet de l’appareil. Dans ce cas, il faut recharger l’accu à fond pour retrouver un fonctionnement pleinement performant. Mnx_Man_NVDmini_RZ_neu.indd 27 08.02.11 11:28
  • 28. Informations importantes Pour éviter un risque éventuel de dommage irréparable à votre lunette de vision nocturne, veuillez suivre les conseils suivants: - Évitez de la soumettre à des températures extrêmes, hautes ou basses. - Évitez de laisser cette lunette dans une atmosphère humide, poussiéreuse ou malpropre. - Évitez tout contact environnemental qui pourrait lui être nocif. - Évitez de soumettre cette lunette à chocs, coups ou chutes. - Avec elle, évitez de viser vers une source lumineuse vive ou en direction du soleil 28 Conseils d’entretien - Évitez à cette lunette de vision nocturne les chutes, l’humidité et les températures extrêmes. - Évitez aux surfaces optiques tout contact avec l‘humidité et les produits - Abrasifs car ceux-ci risquent d’endommager leur traitement antireflet. - Pour éloignez la poussière et les impuretés des lentilles utilisez un chiffon doux et sec. Mnx_Man_NVDmini_RZ_neu.indd 28 08.02.11 11:28
  • 29. 29 Données techniques Grossissement 2x Capteur Capteur pour vision nocturne CMOS Portée de la diode DEL (en m.) env. 40 m Portée max. de visibilité (en m.) env. 60 m Résolution de l’affichage 480 x 240 Angle de vision 18,5 deg Voltage de travail 7,4V Durée de travail 3 heures Type d’accu Lithium polymère Sortie vidéo Non inclue   Dimensions 14.2 cm x Dia 4.9 cm Poids 220 g Accessoires Sac; Câble de chargement En option   Alimentation électrique USB* 500mAh Durée de chargement 6 heures à base de 500 mA puissance de sortie La tension électrique maximum: 600 mA ! * Numéro de commande Alimentation électrique USB 606350000120 EU Version 606350000220 UK Version 606350000320 US Version Mnx_Man_NVDmini_RZ_neu.indd 29 08.02.11 11:28
  • 30. 30 Clauses de la garantie En achetant cette caméra MINOX, vous avez acquis un produit qui a été fabriqué et éprouvé suivant des normes de qualité particulièrement sévères. La garantie légale de 2 ans, en vigueur pour ce produit, est prise en charge par nos soins à compter du jour de la vente par un négociant agréé dans les conditions suivantes: 1) Il sera remédié, au cours de la période de garantie, aux réclamations qui se fondent sur des défauts de fabrication, gratuitement et, suivant notre propre appréciation, par le biais d'une remise en état, d'un changement des pièces défectueuses ou d'un échange contre un produit en parfait état et de même type. Les demandes qui dé­passeraient ce cadre, quelle que soit leur nature et quel que soit leur motif juridique en rapport avec la présente prestation de garantie, sont exclues. 2) ­Les droits à la garantie sont supprimés si le défaut en question est imputable à une manipulation incorrecte – l'utilisation d'accessoires étrangers pouvant aussi en faire partie – si une interven-tion a été effectuée par des personnes et des ateliers non autorisés ou si le numéro de fabri­cation a été rendu méconnaissable. Mnx_Man_NVDmini_RZ_neu.indd 30 08.02.11 11:28
  • 31. 31 3) Les droits à la garantie ne peuvent être invoqués que sur présentation d'un justificatif d'achat imprimé émanant d'un négociant autorisé. 4) En cas de recours à la garantie, veuillez faire parvenir la caméra MINOX, accompagnée de l'original du justifi­catif d'achat imprimé et d'un exposé de la réclamation, au service clients de la MINOX GmbH ou à une succursale régionale. 5) ­En cas de besoin, la succursale du pays de destination correspondant se tient à la disposition des touristes, conformément aux règles qui régissent la prestation de garantie de la MINOX GmbH, sur présentation du justifi­catif d'achat imprimé. Service après-vente Notre service après-vente se tient à votre disposition à l’adresse suivante: MINOX GmbH Walter-Zapp-Str. 4 D-35578 Wetzlar / Germany Tel.: +49 (0) 6441 / 917-0 Fax: +49 (0) 6441 / 917-612 info@minox.com www.minox.com Mnx_Man_NVDmini_RZ_neu.indd 31 08.02.11 11:28
  • 32. MINOX NVD mini Anleitung Instruction Mode d’emploi Minox NVD mini • Deutsch • English • Français Änderungen in Konstruktion und Ausführung vorbehalten. Die Marke MINOX ist eine eingetragene Marke der MINOX GmbH, Wetzlar. Design subject to alterations without notice. MINOX is a registered trademark of MINOX GmbH, Wetzlar. Sous réserve de modifications. MINOX est une marque déposée par MINOX GmbH, Wetzlar. MINOX GmbH Walter-Zapp-Str. 4 D-35578 Wetzlar, Germany Tel.: +49 (0) 6441 / 917-0 Fax: +49 (0) 6441 / 917-612 e-mail: info@minox.com www.minox.com 99478 01/11 Minox NVD mini Mnx_Man_NVDmini_RZ.indd 32-34 14.01.11 07:43